


Riva ASR Plugin Samples#
The NVIGI Riva ASR Plugin pack includes two sample applications that demonstrate how to integrate Automatic Speech Recognition (ASR) into your applications: a 3D-rendered GUI-based sample and a command-line ASR sample. The following sections describe how to configure, build, and run these samples.
1. Overview#
Both samples demonstrate the use of the NVIGI Riva ASR plugins with ONNX Runtime backends. The samples are provided in source form within the package, allowing you to build and customize them for your needs.
2. The 3D Sample#
The 3D sample, nvigi.3d, combines NVIGI and Donut (https://github.com/NVIDIAGameWorks/donut) to create a sample app demonstrating NVIGI ASR integration in a 3D application. Using NVIGI, it’s possible to support multiple backends within a single application. The sample shows one such use case using CPU, TensorRT-RTX GPU, and DirectML (DML) backends. Support for multiple backends ensures application developers can create a wide variety of inference pipelines. In the sample, based on user selection, a particular type of backend is instantiated and used for speech recognition.
The Donut-based NVIDIA NVIGI (In-Game Inference) 3D Sample is an interactive 3D application designed to show how one might integrate speech recognition (ASR) features into a UI-based workflow. The focus in the sample is showing how to present the options to the user and run ASR workflows without blocking the 3D interaction or rendering. The sample defaults to rendering with Direct3D 12, but via a command-line option can switch to rendering via Vulkan.
IMPORTANT: For important changes and bug fixes included in the current release, please see the release notes for the pack BEFORE use.
2.1 Requirements#
Hardware:
CPU: x64 processor with SSE4.2 support or higher
GPU: NVIDIA GPU with Compute Capability 7.0+ recommended for GPU acceleration (optional, CPU as well as DML backend available - So it can run on non-NVIDIA GPUs as well)
Memory: 8GB RAM minimum, 16GB recommended
VRAM: 1-2 GB minimum for GPU backend
Software:
Windows 10/11 (64-bit)
Visual Studio 2022 with C++ development tools
CMake 3.20 or higher (for building the 3D sample with local Donut)
2.2 Setting up and Launching the Sample#
The sample requires the Riva ASR model to be available in the models directory. The models are included in the data/nvigi.models directory.
Launching the Pre-Built Sample#
For those using the prebuilt binaries in the package, the sample executable is available immediately and can be run:
Navigate to
<PACK_ROOT>/bin/x64/Run
.\nvigi.3d.exe, either by double-clicking the executable in Windows Explorer or by running it from a command prompt
The sample requires and looks for AI models and rendering media relative to the executable path. Specifically, it looks for:
The models directory:
<PACK_ROOT>/data/nvigi.modelsThe media directory:
<PACK_ROOT>/data/nvigi.test/nvigi.3d
The code will check upward from the executable directory several times to find these directories. This is done so that the pre-built binary layout is trivially supported with no user effort.
If required, the models directory may be specified explicitly via the command line argument -pathToModels <path>. This is recommended if you have a non-standard layout.
2.3 Using the Sample#
Main UI#
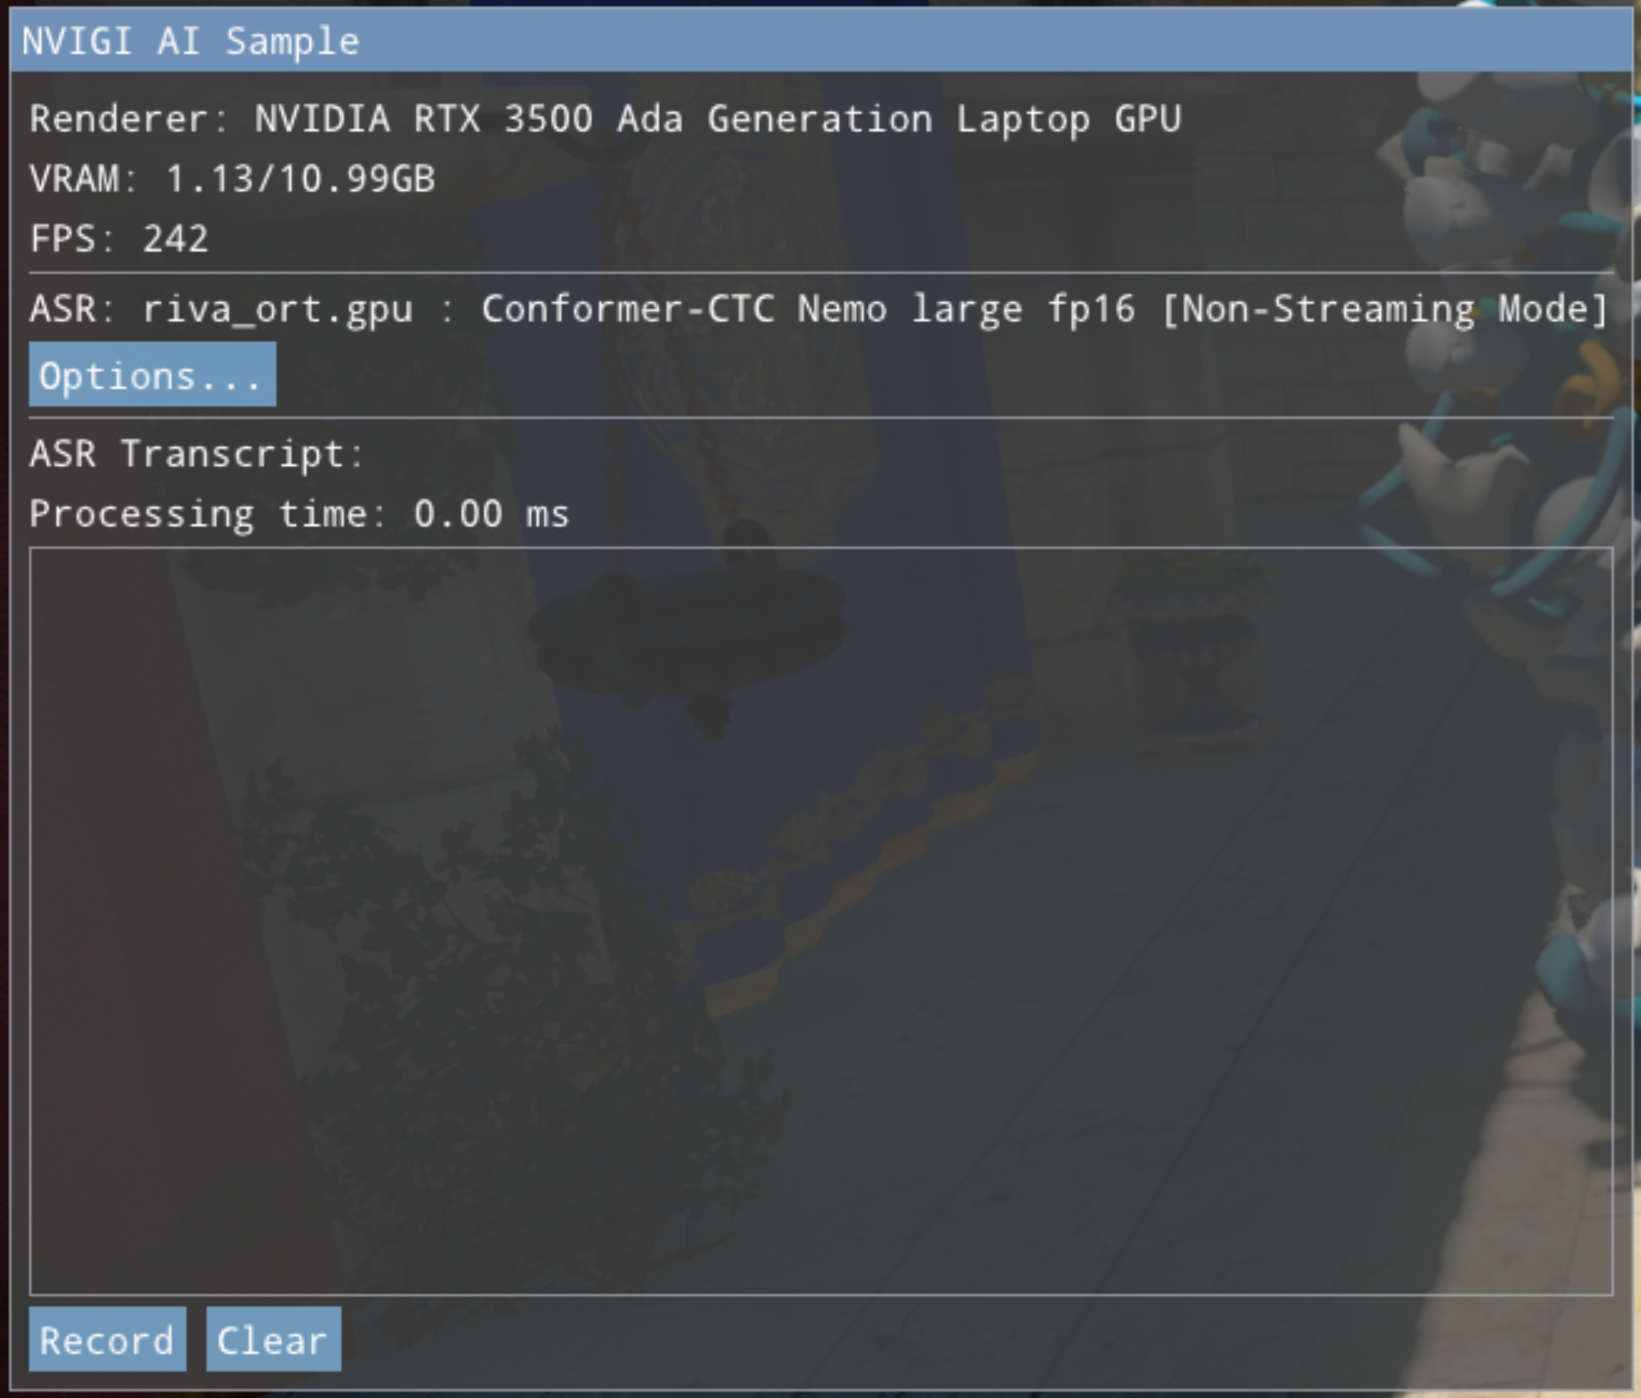
On launch, the sample will show a UI box on the left side of the window as shown above, and will show a 3D rendered scene at the same time. This is the main UI:
At the top are GPU, system and performance info
Directly below is a listing of the current ASR model/backend in use
Below this is the “App Settings” collapsable for setting priority modes and limiting the frame rate (Details below)
Next is the “Model Settings…” collapsable that allows switching ASR models and backends (Details below)
Finally, we have the interaction area:
The transcription text window, which shows the results of ASR speech recognition
Below this are the interaction controls for ASR recording
At the bottom is the performance metric: End-to-end audio-to-text inference time for ASR
The main UI’s interaction area includes controls that allow the user to record spoken audio that will be converted to text by ASR. In addition, the “Reset” button clears the transcription window and resets the ASR’s streaming context.
The 3D sample supports two ASR modes, which can be toggled in the Model Settings panel:
Non-Streaming Mode (Default)#
When “Enable Streaming Mode” is unchecked (shown as “[Non-Streaming Mode]” in the UI):
Click the “Record” button to start capturing audio (button changes to “Stop”)
Speak your audio
Click “Stop” when finished
After stopping, the ASR plugin processes the complete audio and displays the full transcription in one pass
This mode is best for:
Recording complete utterances or sentences
When you want to review the entire transcription at once
Lower latency per-word accuracy when the full context is available
Streaming Mode#
When “Enable Streaming Mode” is checked (shown as “[Streaming Mode]” in the UI):
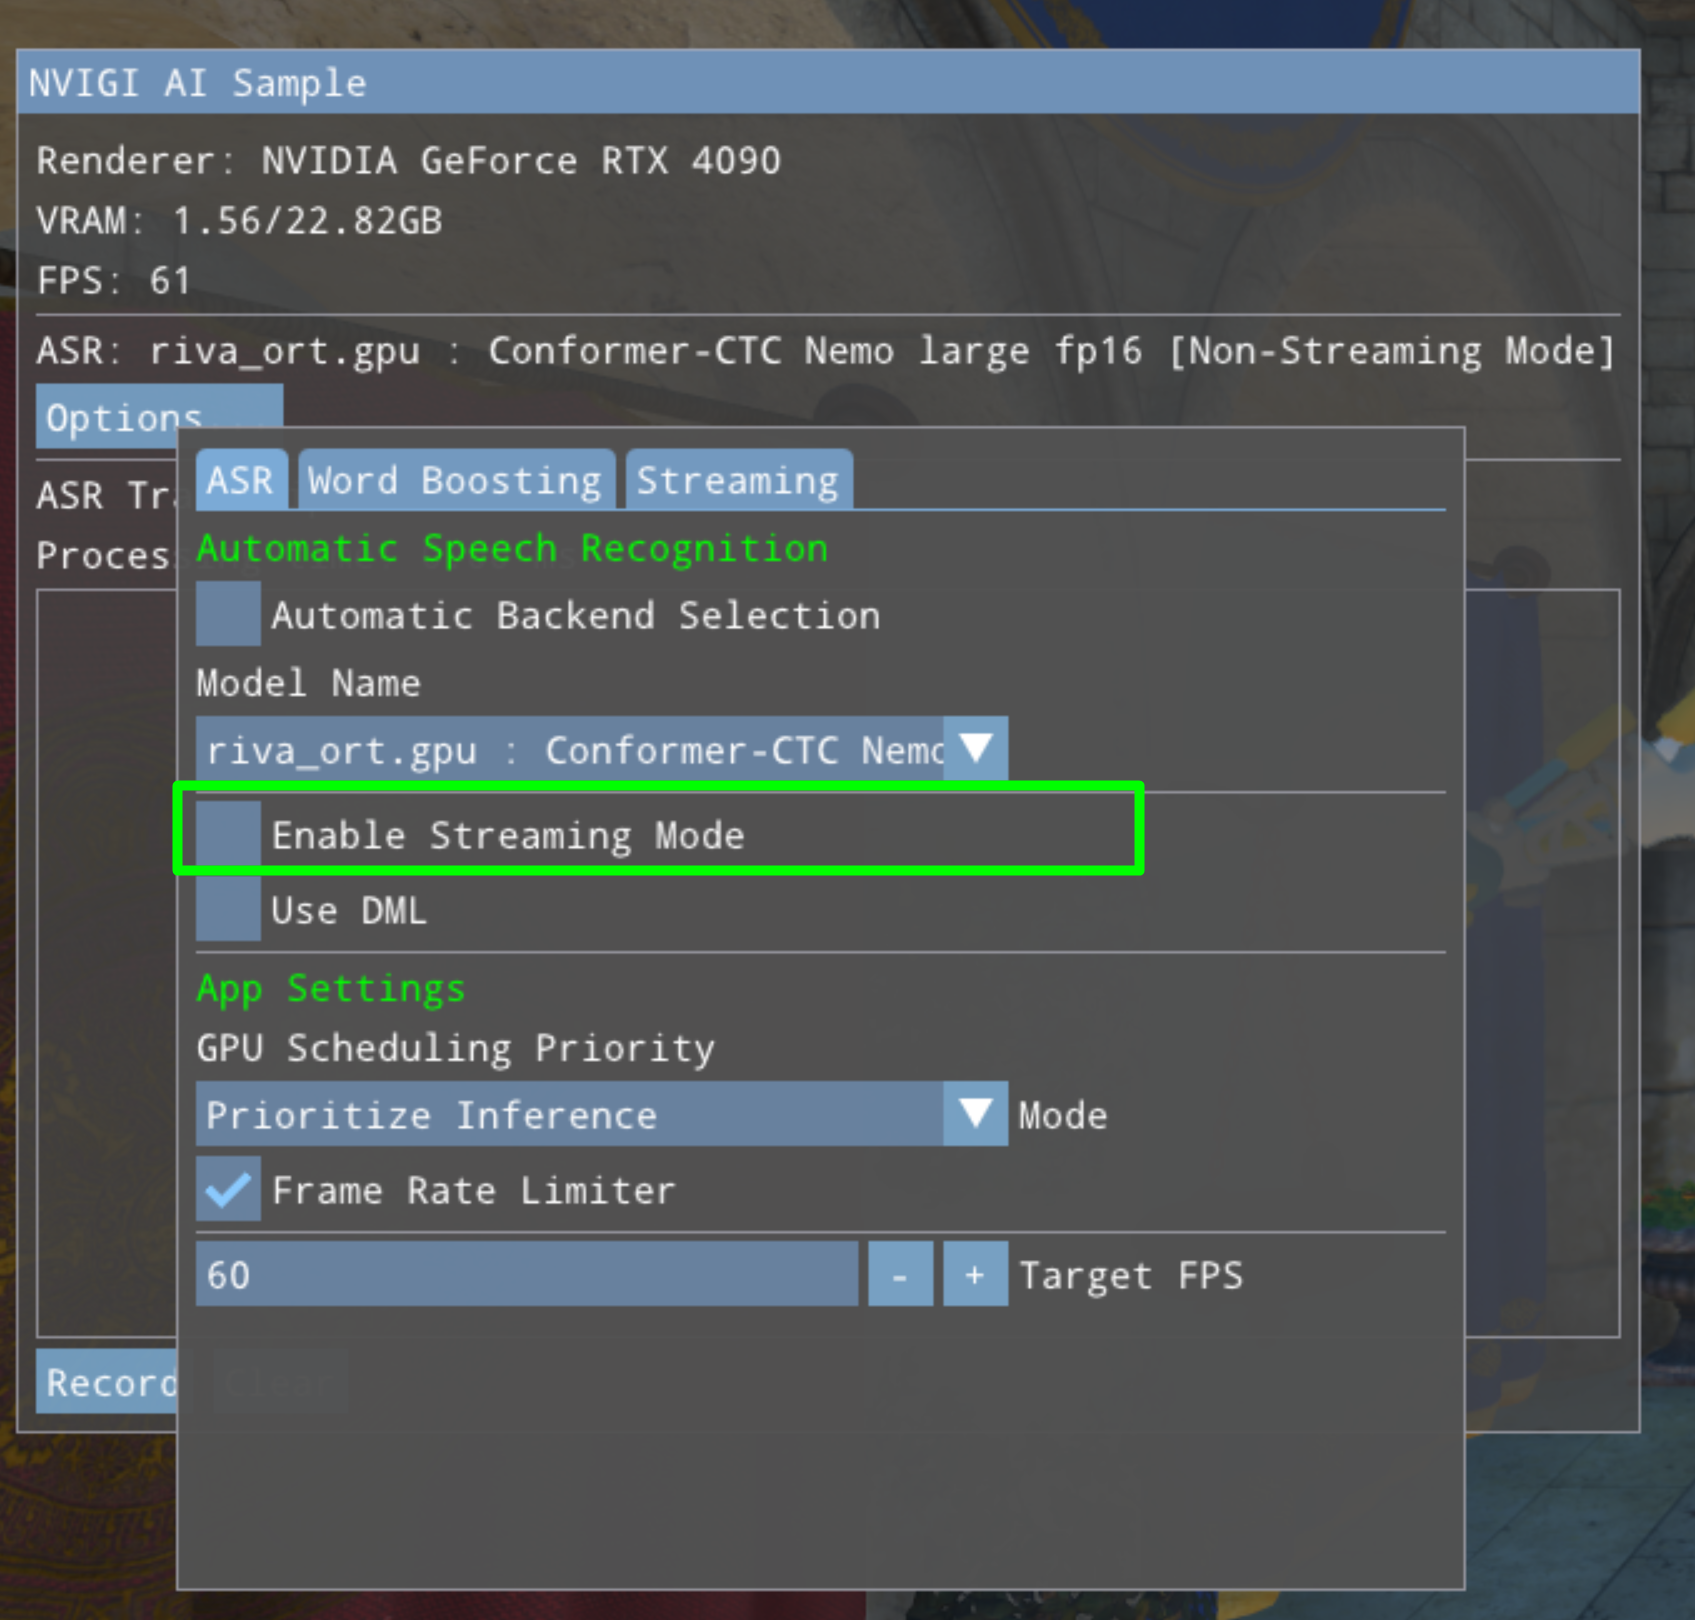
Click the “Record” button to start capturing audio
Speak your audio - transcription appears in real-time as you speak
Partial results update continuously during speech
Click “Stop” to finalize and get the complete transcription
This mode is best for:
Real-time feedback during speech
Long recordings where you want to see progress
Interactive applications requiring immediate response
Live captioning or dictation scenarios
Note: This release includes Conformer-CTC ASR models for 8 languages: English (en-US), French (fr-FR), German (de-DE), Italian (it-IT), Spanish (es-ES), Korean (ko-KR), Japanese (ja-JP), and Mandarin Chinese (zh-CN). An English Parakeet-0.6B model is also included. Select the desired model in the Model Settings panel.
Troubleshooting Audio#
If the streaming transcription shows “
Check your Windows microphone settings
Ensure the correct microphone is selected and not muted
Verify audio levels in Windows Sound settings
Test different microphones from Windows settings (the sample uses the system default microphone)
App Settings UI Panel#
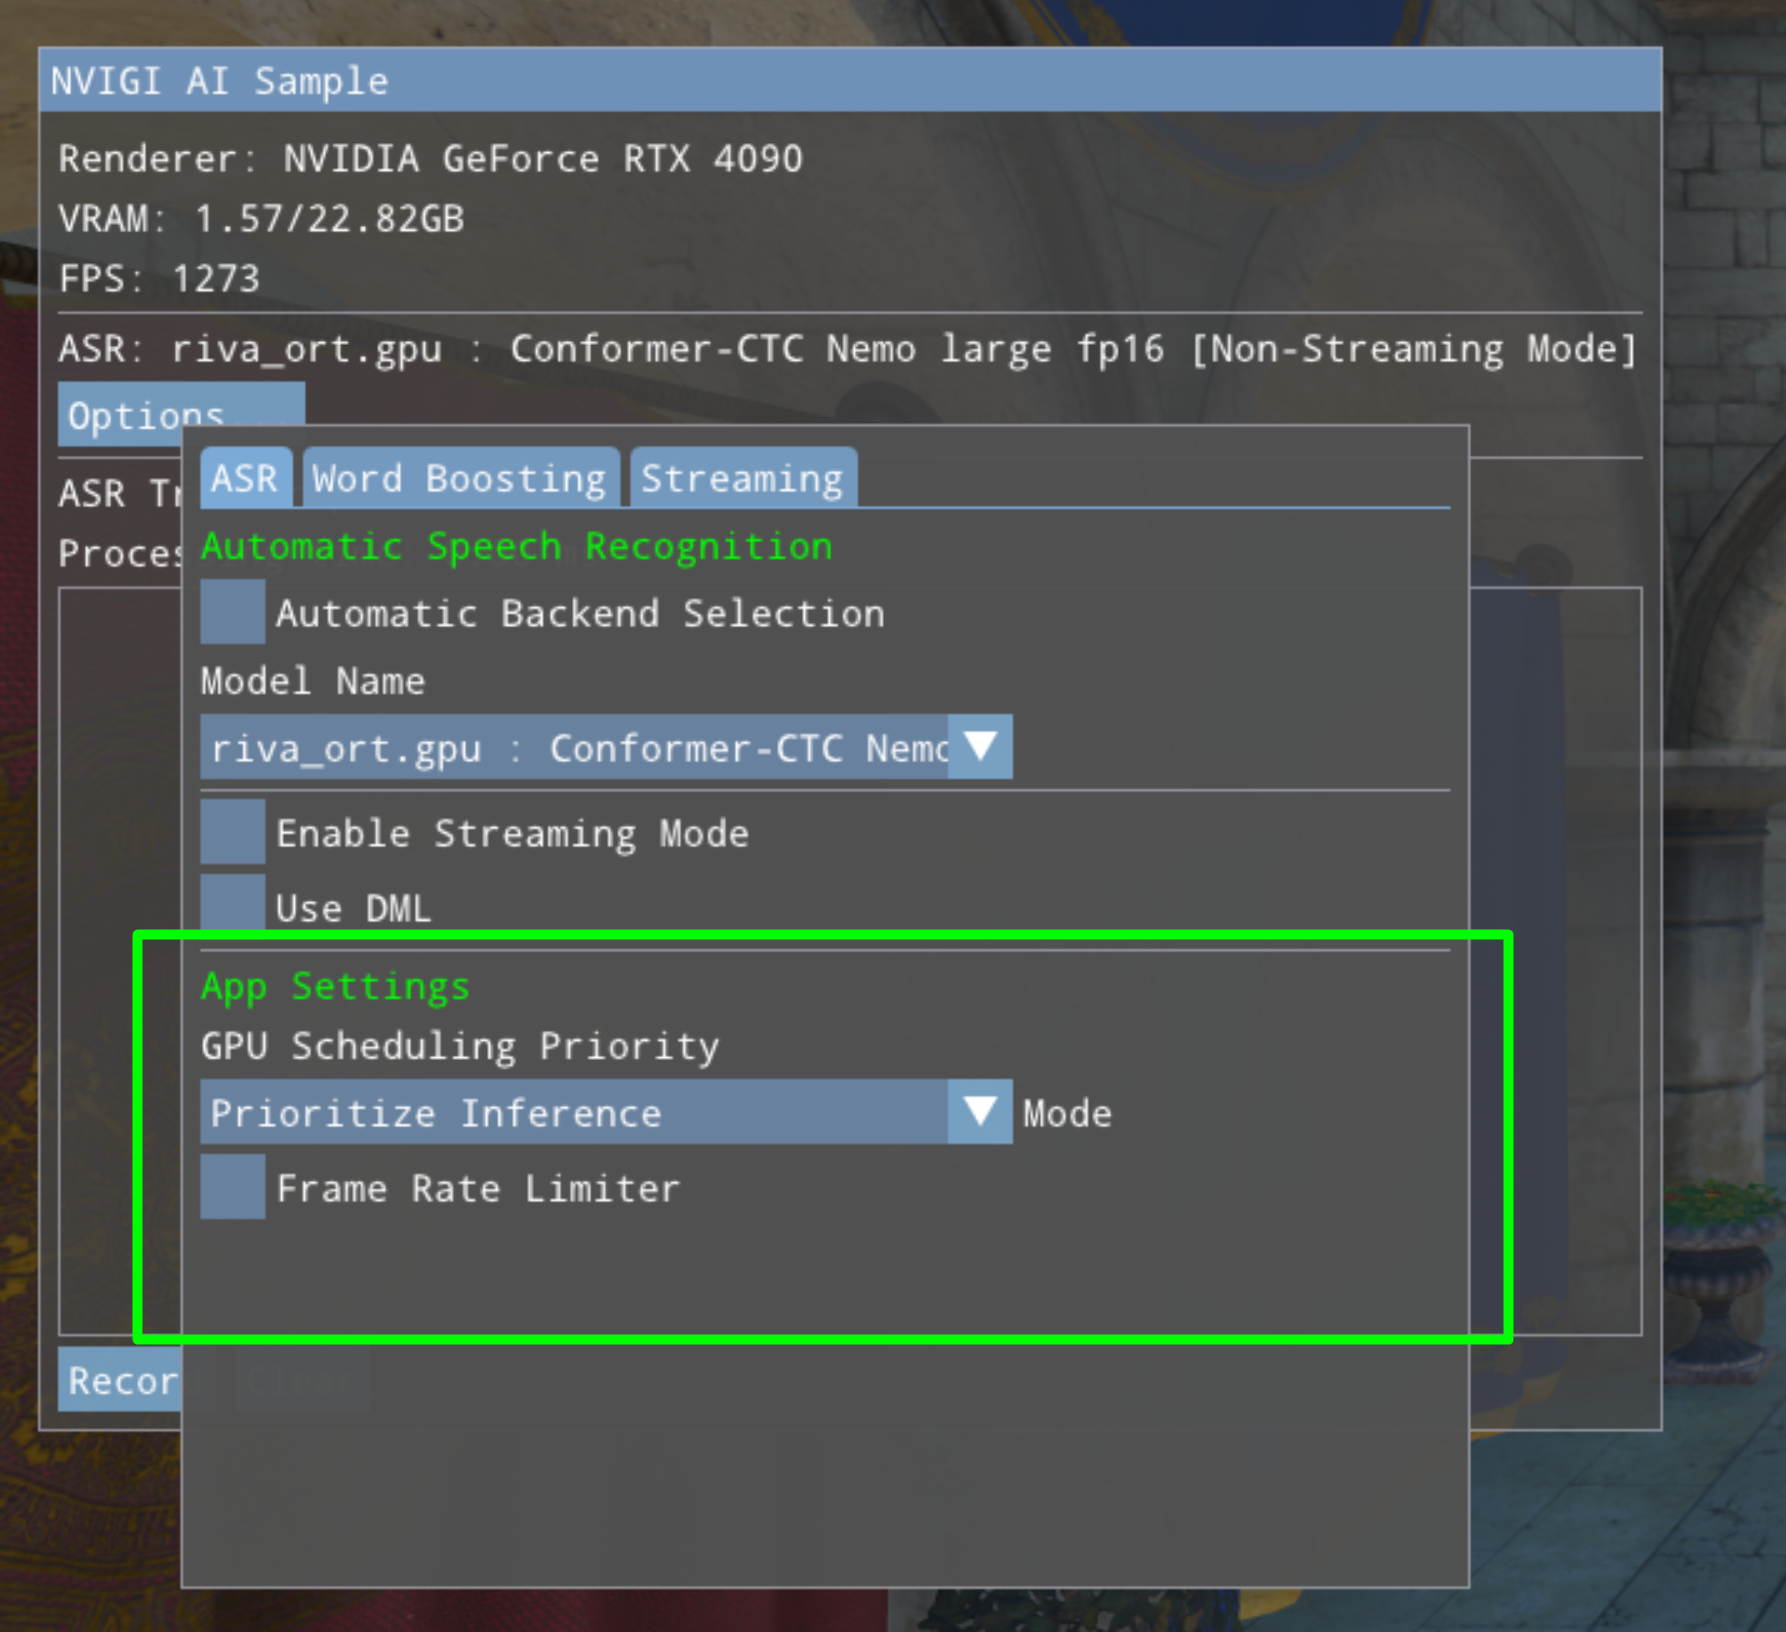
By expanding the “App Settings” caret, the user can access two sets of application-related settings:
A drop-down to set the 3D-vs-compute/inference prioritization to one of the following:
Prioritize Graphics: Give more GPU priority to 3D rendering, at the expense of inference latency. Use when frame rate is critical and you can tolerate higher ASR latency.
Prioritize Inference: Give more GPU priority to compute, improving inference latency at the potential expense of rendering time. Use when low ASR latency is critical (e.g., real-time voice commands) and you can tolerate some frame drops.
Balanced: Balanced split between graphics and compute. Good default for most applications; provides reasonable frame rates and ASR latency without tuning.
Note: For games with low graphics intensity, the difference between scheduling modes will be minimal since the GPU has enough headroom to handle both workloads without contention.
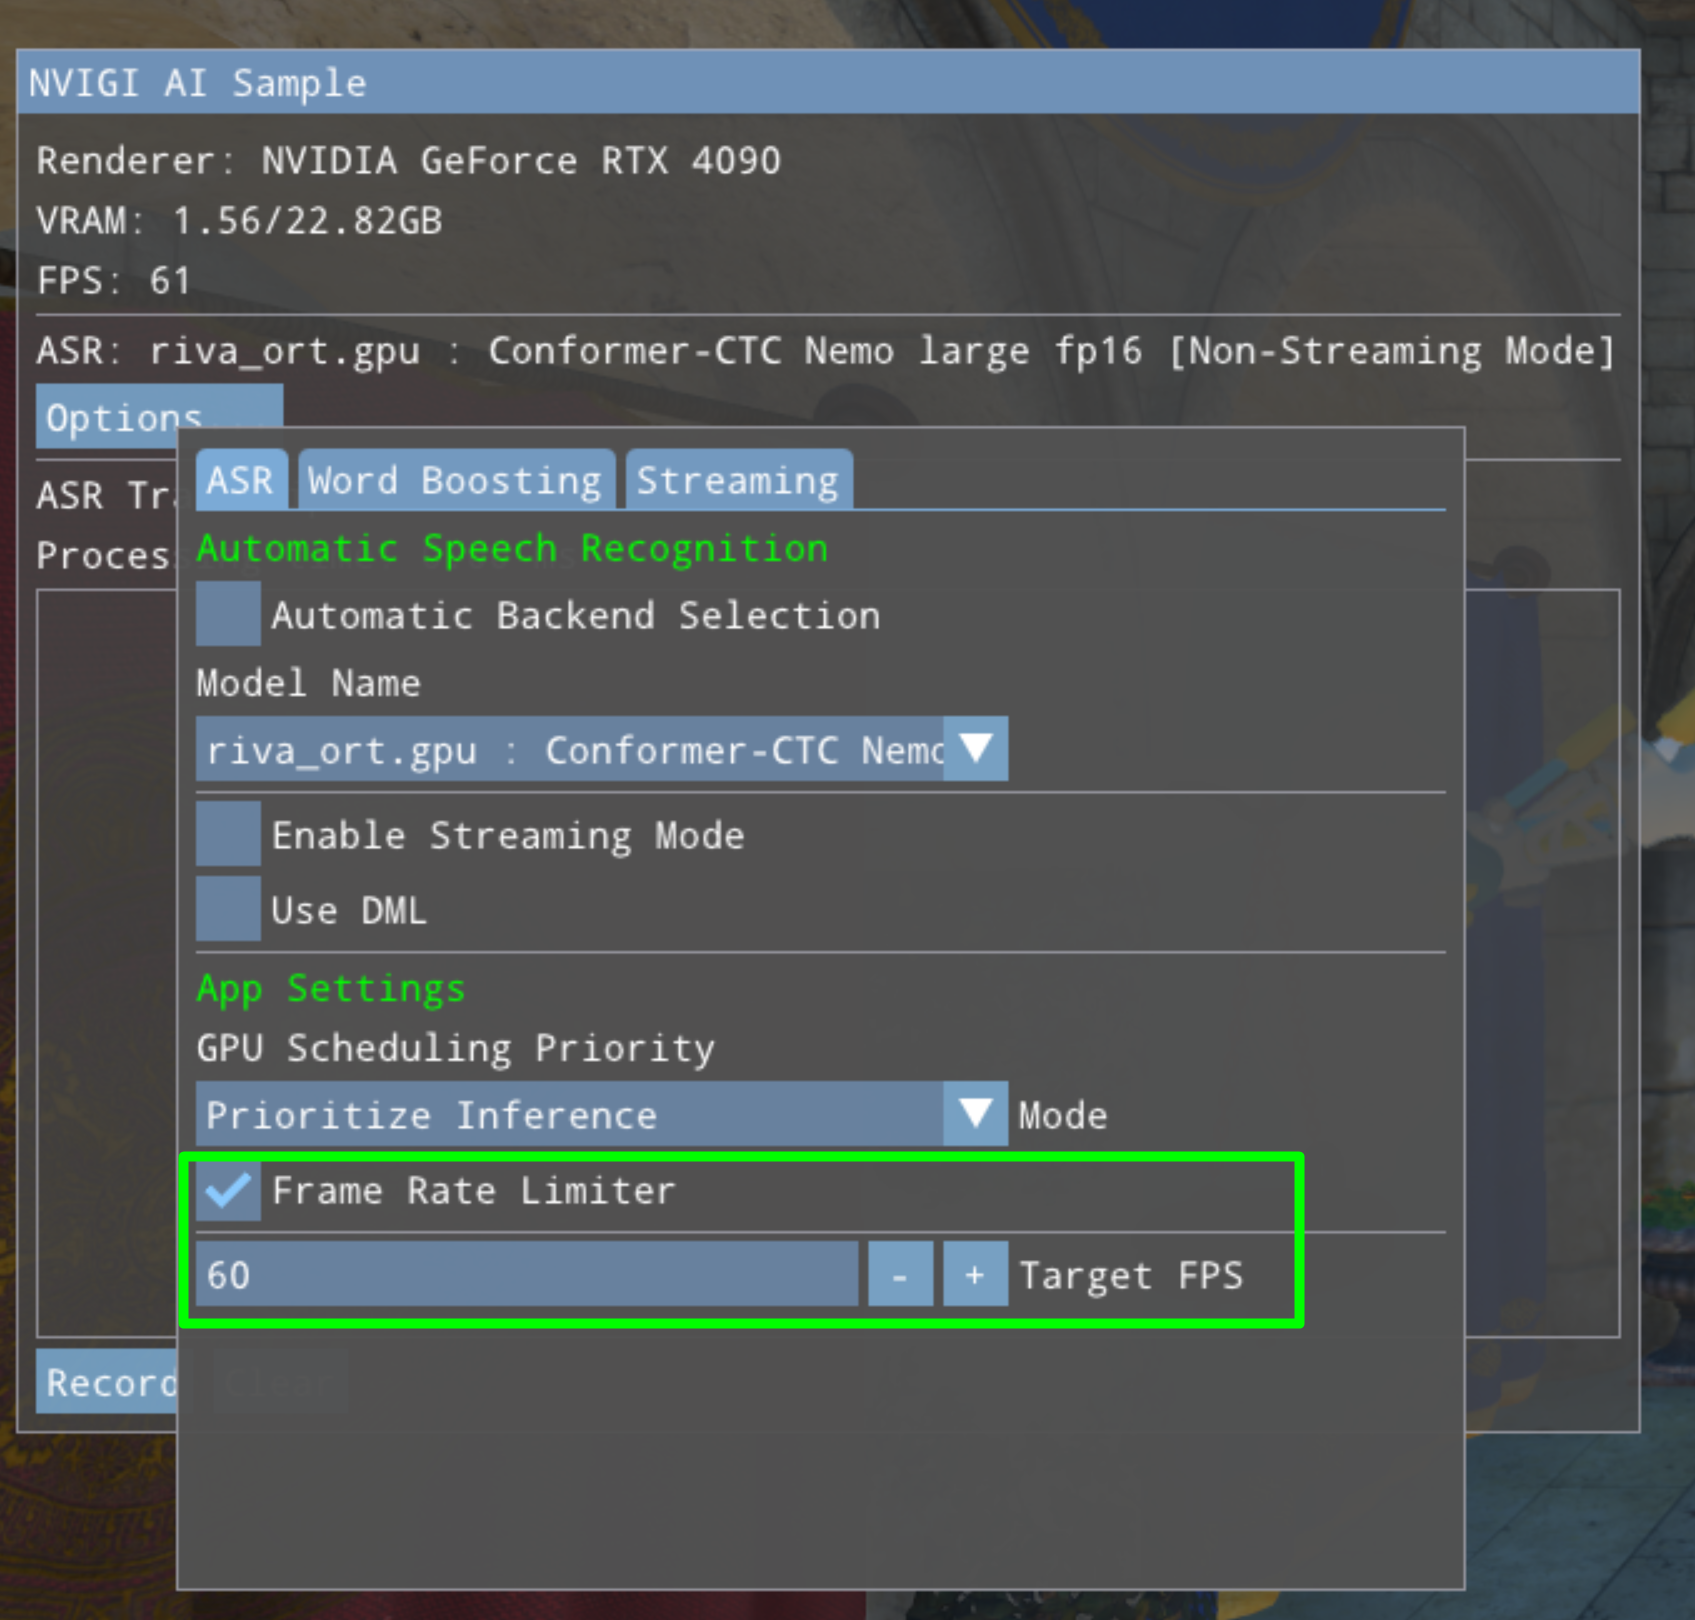
An optional frame-rate limiter. If the “Frame Rate Limiter” box is checked, a type-in allows the user to specify the max frame rate for rendering.
Why use the frame rate limiter? The 3D sample has minimal graphics load, so without limiting, it may run at hundreds of FPS. This doesn’t reflect real-world game scenarios where the GPU is under heavier load. By limiting the frame rate (e.g., to 60 or 120 FPS), you can simulate more realistic conditions and better evaluate how ASR performance and GPU scheduling modes will behave in an actual game with demanding graphics.
Model Settings UI Panels#
To expand the Settings panel, click the “Model Settings…” triangle on the Main UI. This will show the currently-enabled settings panel. Note that when ASR is actively running (e.g., during recording and transcription), the settings will be grayed out and disabled for interaction.
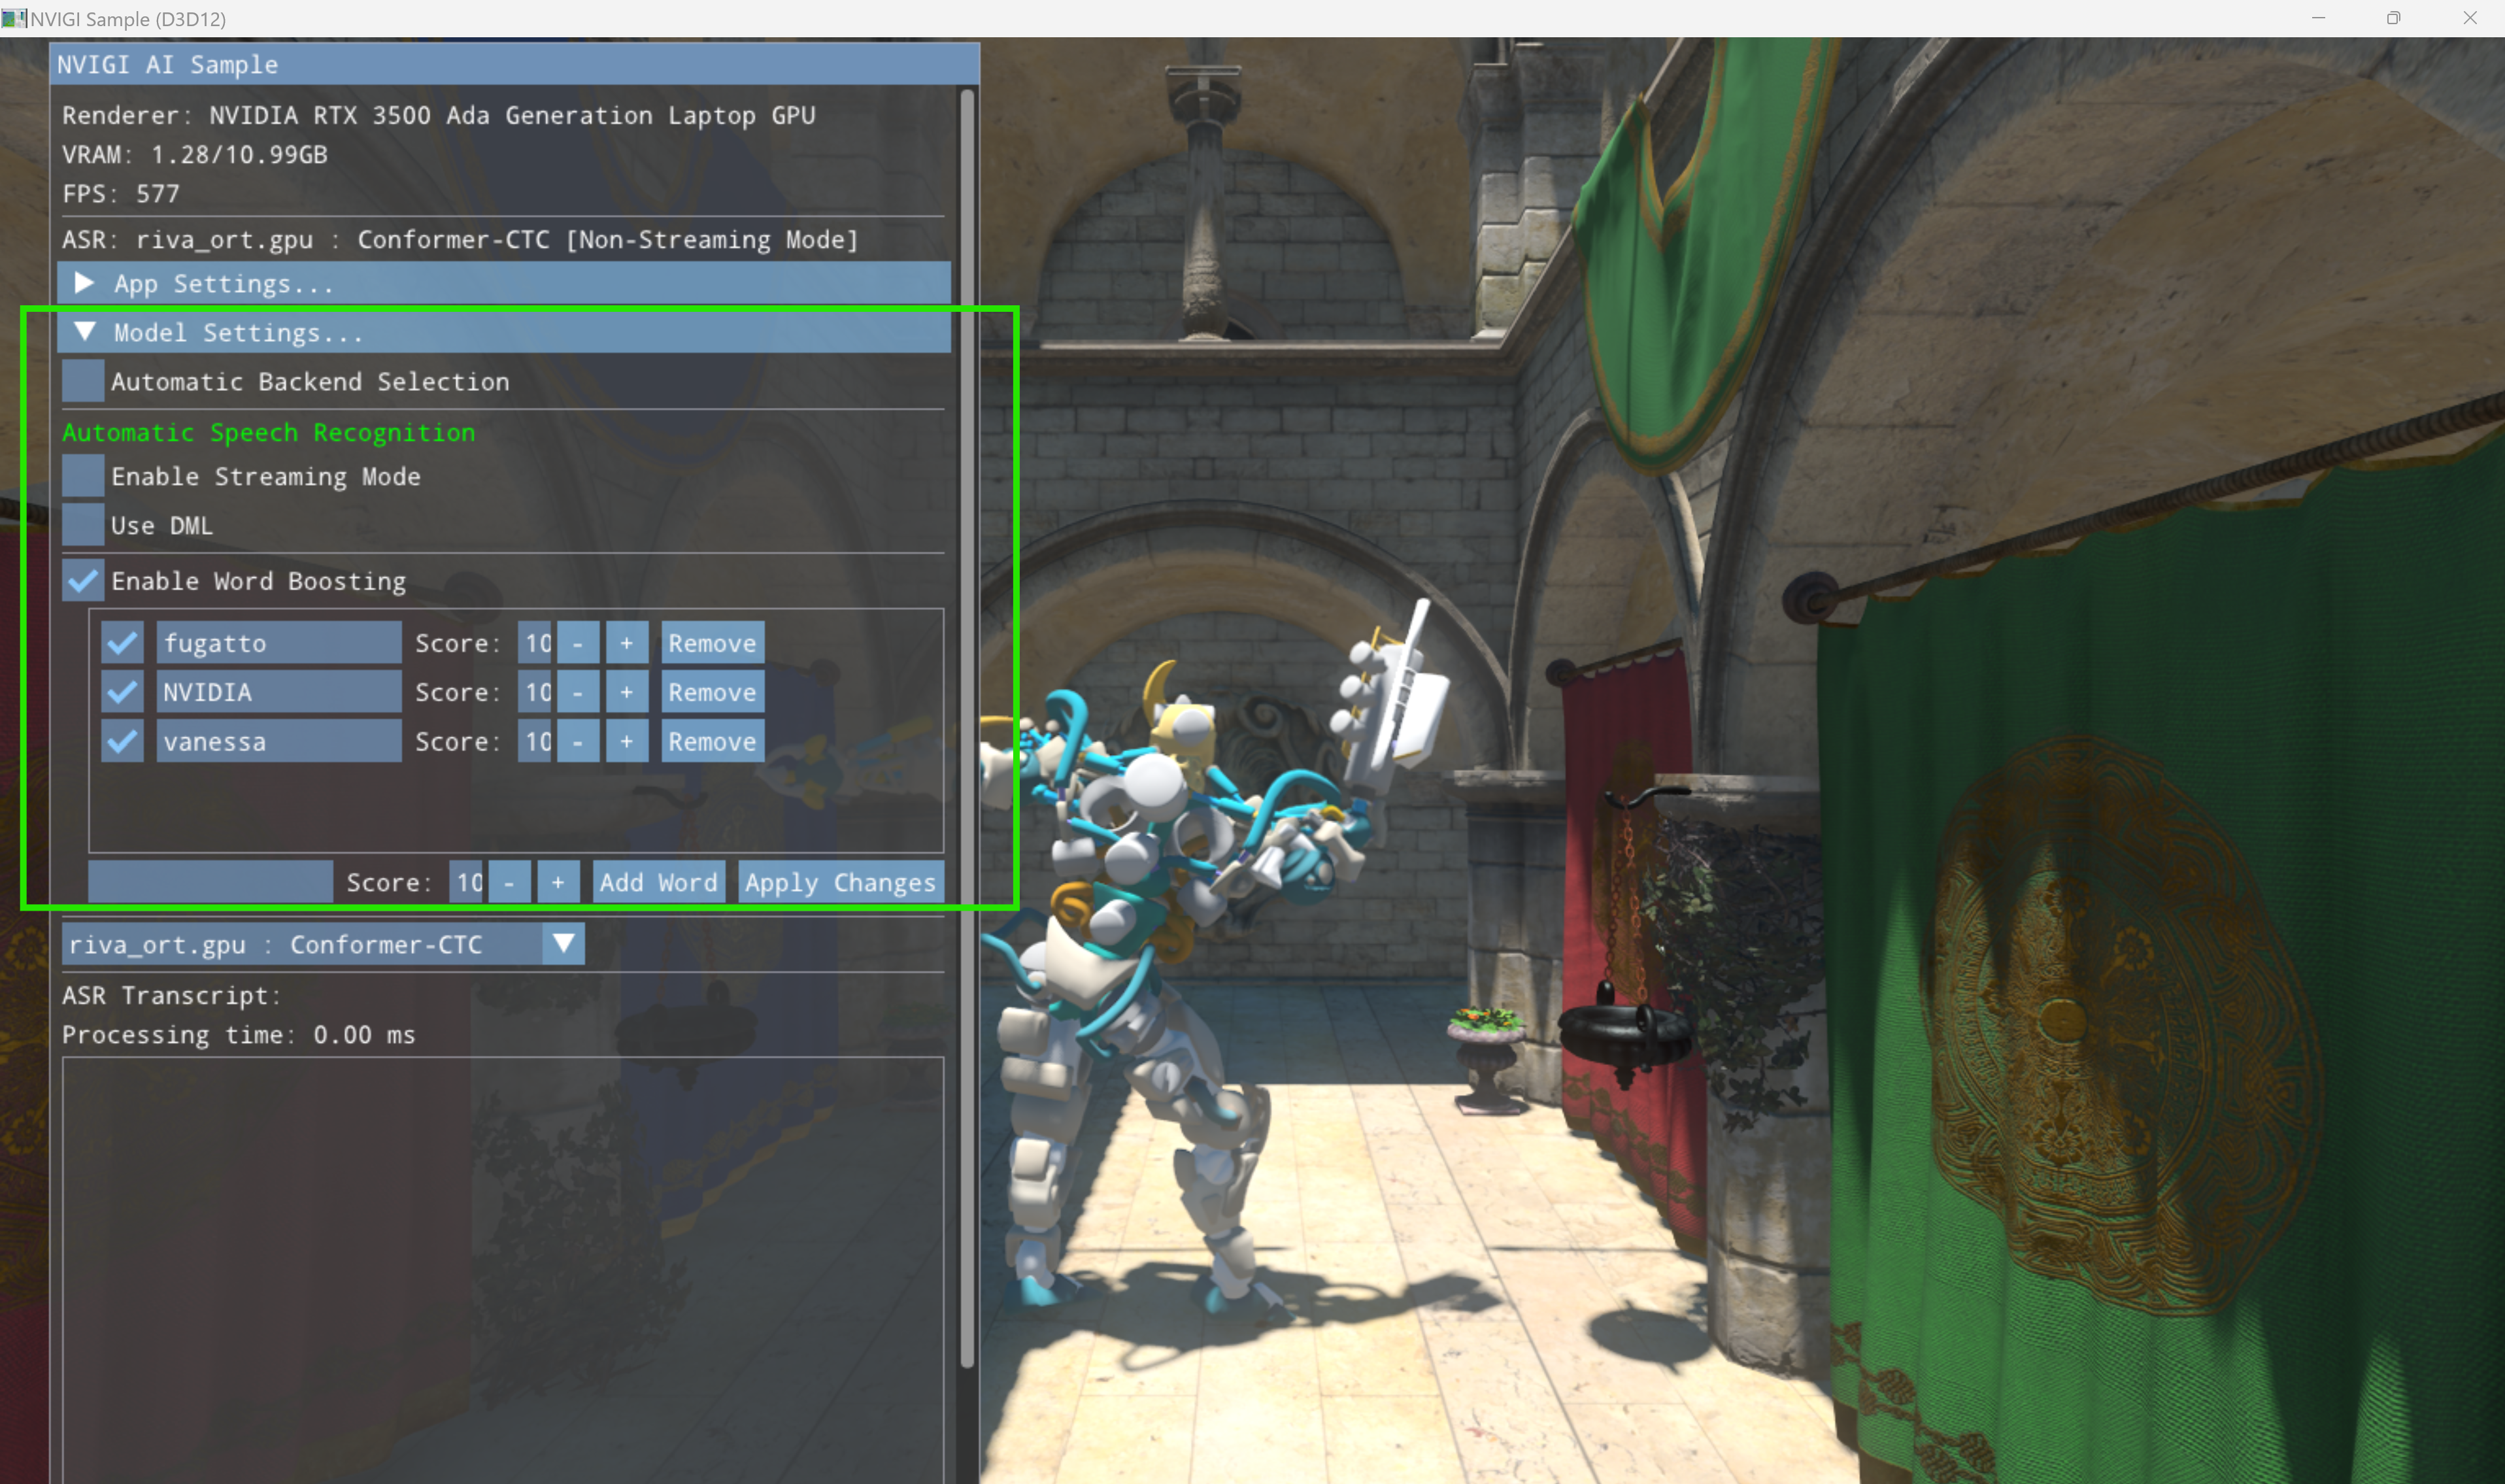
Note that multiple available backends (CPU, GPU) may be shown for the ASR model.
Selecting a backend will immediately load the model from disk with the selected backend. This will disable ASR until the new model is loaded, as the sample shuts down the previous model before loading the new one.
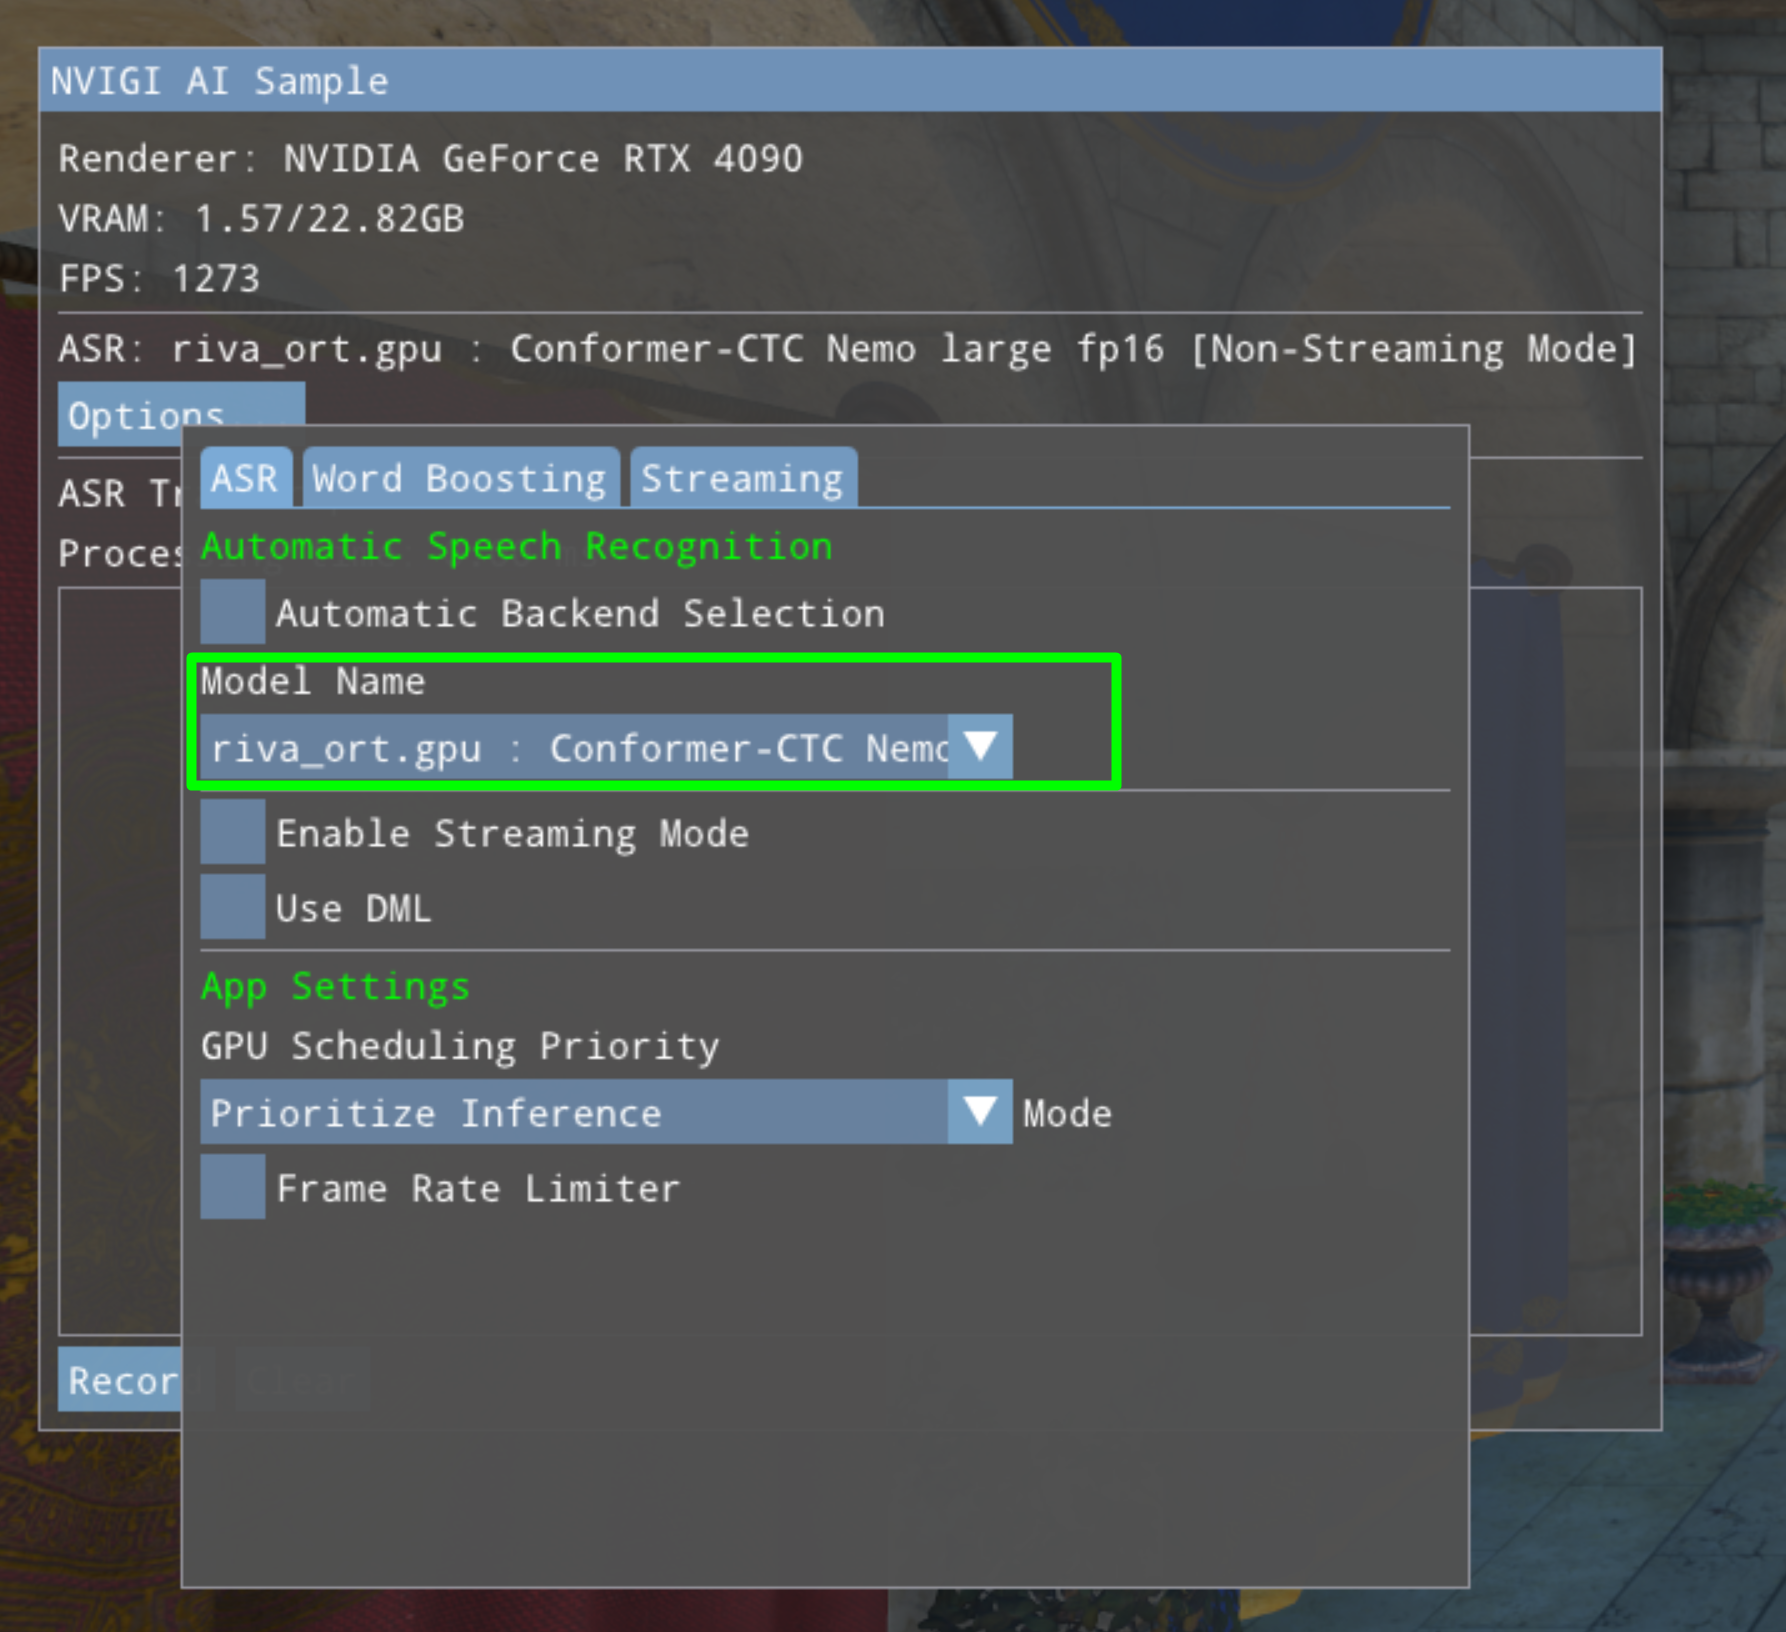
The backend is selected automatically by code in the sample. Currently, that code selects in the following order:
If an TRT-RTX compatible NVIDIA GPU is present, and a TensorRT-RTX-based backend that is within the VRAM budget exists, select it,
If a GPU is present and a DirectML-based backend that is within the VRAM budget exists, select it
Select a CPU backend if available
Adjusting the VRAM budget can cause a new backend to be selected as the user is interacting.
This selection metric can be changed by changing the behavior of the function SelectAutoPlugin in NVIGIContext.cpp.
2.4 Word Boosting#
Word boosting allows you to influence the ASR model to favor specific words or phrases during recognition. This is particularly useful for:
Domain-specific terminology (e.g., technical terms, product names)
Proper nouns (e.g., “NVIDIA”, “Fugatto”, personal names)
Words that the model frequently misrecognizes
Application-specific vocabulary
To access word boosting settings in the 3D sample, expand the “Model Settings” panel and enable the “Enable Word Boosting” checkbox.
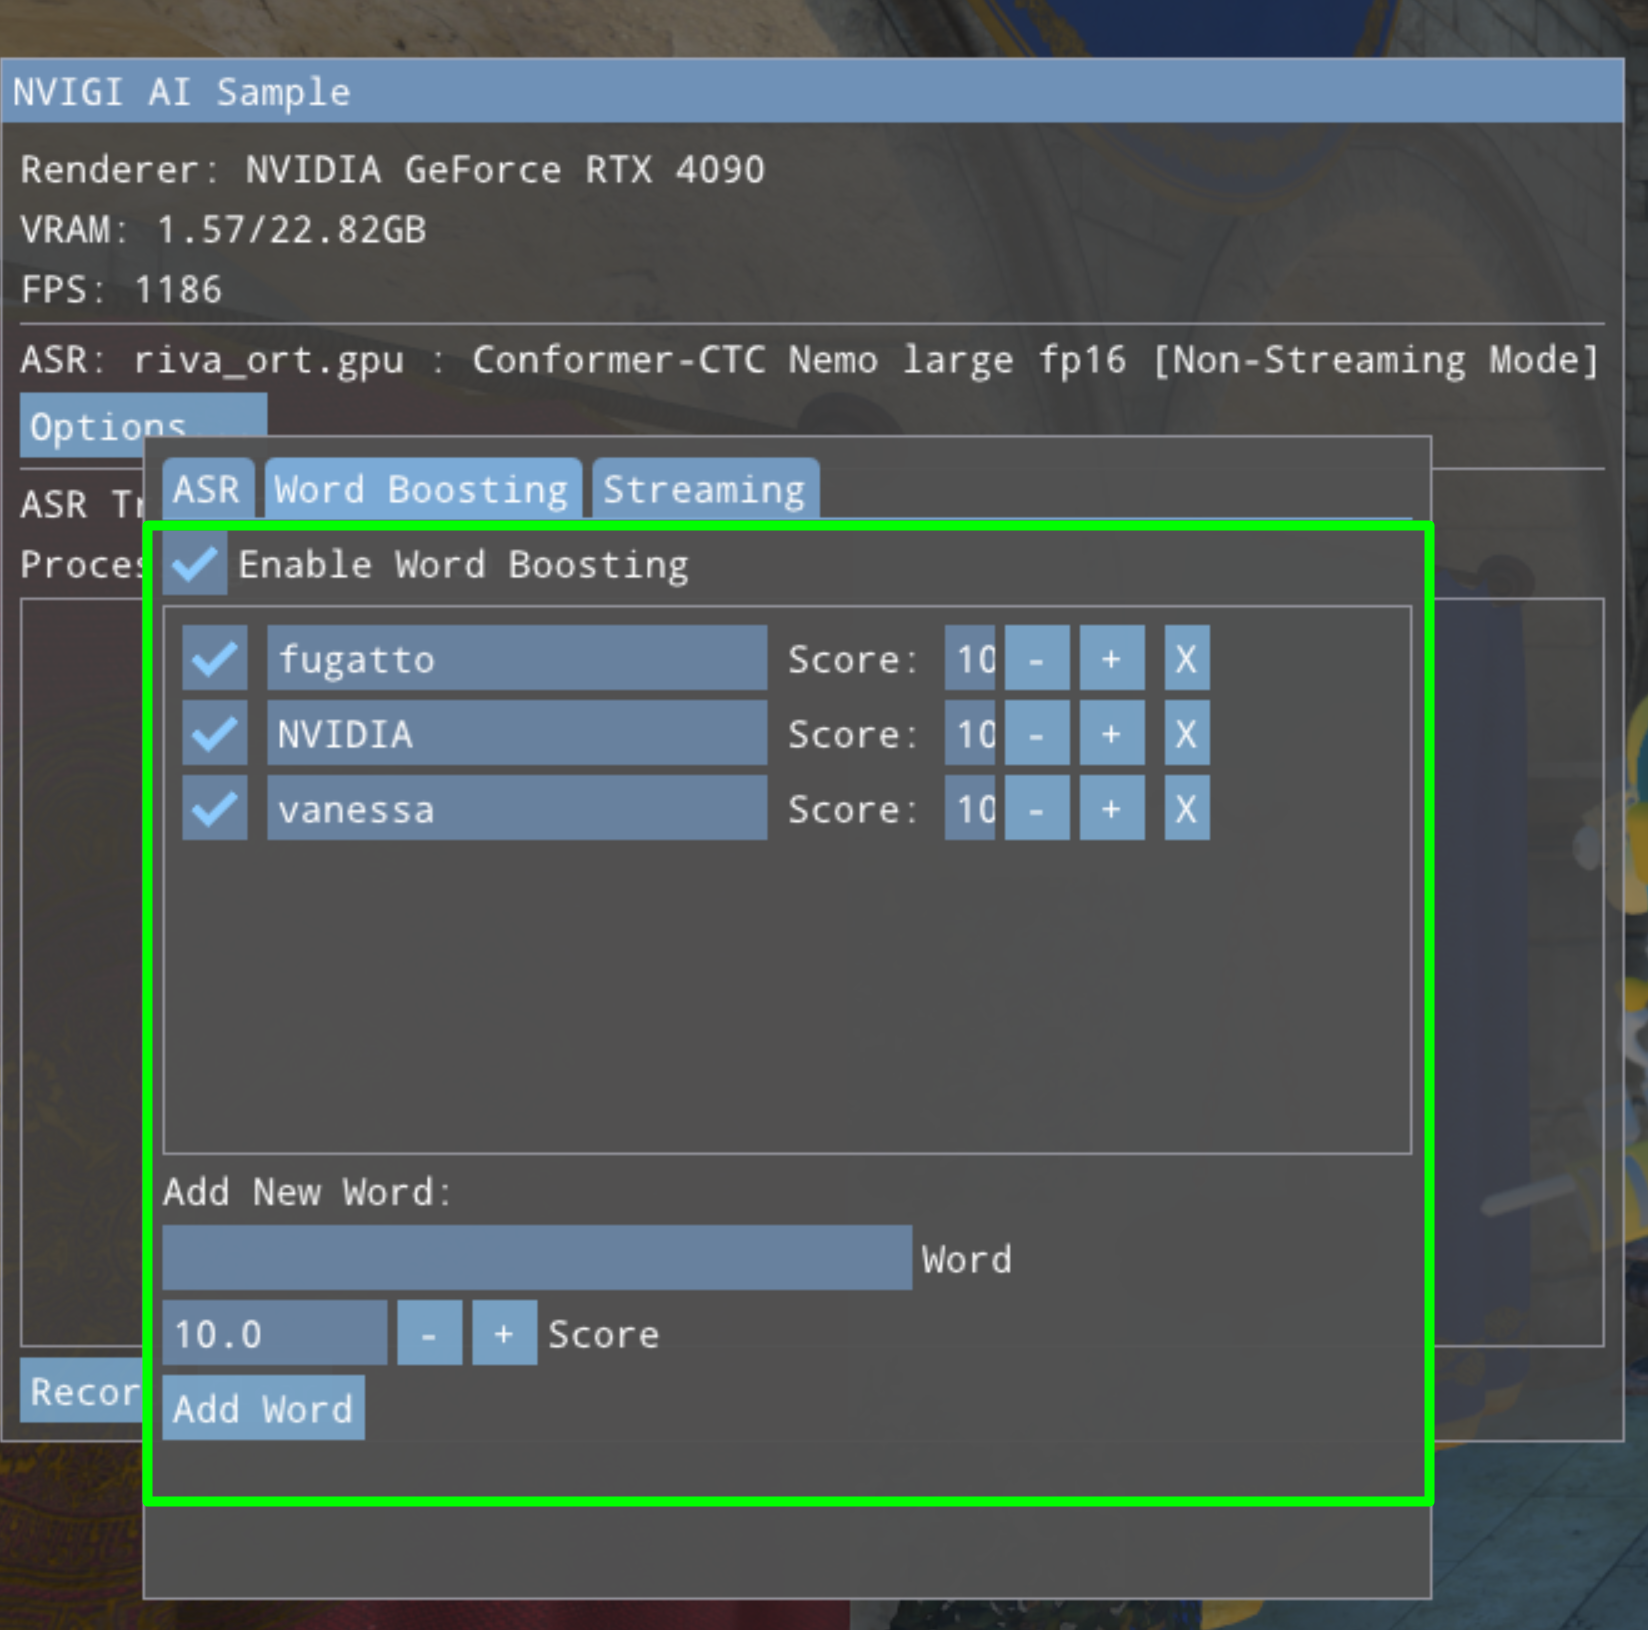
Using Word Boosting#
The word boosting interface allows you to:
Add New Words:
Enter a word in the text field at the bottom
Adjust the score using the
-and+buttons (default: 10)Click “Add Word” to add it to the boost list (changes are applied immediately)
Manage Existing Words:
Enable/Disable: Check or uncheck the checkbox next to each word
Adjust Score: Use the
-and+buttons to increase or decrease the boost scoreRemove: Click the “Remove” button to delete a word from the list
Score Guidelines#
It is recommended to keep boost scores between -50 and +50.
Positive scores (e.g., +10, +20): Increase the likelihood that the ASR model will recognize this word
Use for words you want to emphasize
Higher scores = stronger emphasis
Typical range: 5-20 for most cases
Negative scores (e.g., -10, -20): Decrease the likelihood that the ASR model will recognize this word
Use to suppress words that are frequently misrecognized
Useful for filtering out unwanted terms
Score of 0: No effect (same as not boosting the word)
Best Practices#
Start with moderate scores (±10) and adjust based on results
Keep scores within the -50 to +50 range
Test your boosted vocabulary with sample audio to verify effectiveness
Don’t over-boost (scores >50) as it may reduce overall accuracy
Technical Details#
Word boosting modifies the ASR decoder’s scoring function to favor or penalize specific tokens. The boost scores are applied during beam search decoding and affect the final transcription selection. For more technical information on how word boosting works, see the Programming Guide.
2.5 Logging from the Sample#
By default, the pre-built sample will launch a log window that shows the NVIGI log messages during init, creation, runtime and shutdown. In addition, logging to file may be enabled by specifying a path (directory-only) to where logs should be written:
.\nvigi.3d.exe -logToFile ..\logs <...>
With this option example, a log file would be written to ..\logs\nvigi-log.txt
Logs can be useful when debugging issues or sending support questions.
2.6 Building the Sample from Source#
While the pre-built sample is ready to run out of the box, building from source offers several advantages:
Debugging: Step through the code in Visual Studio to understand the ASR integration flow, inspect variables, and diagnose issues
Customization: Modify the sample to experiment with different ASR parameters, UI layouts, or integration patterns for your own application
Learning: Study and modify the code to better understand NVIGI plugin loading, streaming ASR callbacks, and real-time transcription handling
Testing: Validate fixes or test new features before integrating them into your own project
The source code for the 3D Sample is provided in <PACK_ROOT>/source/samples/nvigi.3d. To build the sample:
Prerequisites#
Ensure Visual Studio 2022 is installed with C++ development tools
Ensure the pack has been set up by running
.\setup.batfrom<PACK_ROOT>in a command prompt
Build Steps#
Open a command prompt or VS2022 Developer Command Prompt
Navigate to
<PACK_ROOT>Run
.\setup.bat(if not already done) to generate the Visual Studio solutionRun
.\build.batto build all projects in Release configuration, or:Open
<PACK_ROOT>/_project/vs2022/nvigi.rivaASR.slnin Visual Studio 2022Select your desired configuration (Debug, Release, Production)
Build the
nvigi.3dproject
After building, run
.\copy_sdk_binaries.bat -release(or appropriate config) to copy the built executables and DLLs to<PACK_ROOT>/bin/x64
The built sample executable will be available at <PACK_ROOT>/bin/x64/nvigi.3d.exe.
Building with Local Donut#
The default build uses a pre-built version of the Donut rendering framework. It is also possible to rebuild the Sample against a locally-built version of Donut, which is useful for debugging or testing changes to the Sample itself. To do this, you will need CMake installed on the development system and in the PATH. Then, follow these steps:
Open a VS2022 Developer Command Prompt and navigate to
<PACK_ROOT>/source/samples/nvigi.3d/opt-local-donutDownload the Donut source code by running the script
.\01_pull.bat. By default, this will checkout the commit that was used to generate the pre-built version of Donut used in the sampleIf desired, checkout a newer commit of Donut from within the new
<PACK_ROOT>/source/samples/nvigi.3d/opt-local-donut/Donutdirectory, or edit the Donut code as desiredRun the script
.\02_setup.batto run CMake to create the build filesRun the script
.\03_build.batto build all three configurations of Donut. This will create a prebuilt pack of Donut in the<PACK_ROOT>/source/samples/nvigi.3d/opt-local-donut/_packagedirectoryEdit the Premake file for the sample
<PACK_ROOT>/source/samples/nvigi.3d/premake.luato:Comment out
donut_dir = externaldir.."donut"Uncomment
donut_dir = ROOT.."source/samples/nvigi.3d/opt-local-donut/_package/donut"
Re-run
<PACK_ROOT>\setup.batfrom<PACK_ROOT>Rebuild the solution
Rerun
.\copy_sdk_binaries.bat -<cfg>from<PACK_ROOT>to copy the binaries
This will build the sample against the locally-built Donut code, which can then be debugged or tested as needed.
2.7 Running the Built Sample in Debugger#
To run the rebuilt sample from within the Visual Studio debugger:
One-time setup in the project file (needs to be redone if
_projectis deleted):In the Visual Studio IDE, edit the project config settings for
nvigi.3dNavigate to the “Debugging” settings
Set “Command” to
$(SolutionDir)..\..\bin\x64\nvigi.3d.exeSet “Command Arguments” as needed (see command-line options below)
Set “Working Directory” to
$(SolutionDir)..\..\bin\x64
Build the desired configuration (Release is recommended - it is optimized but contains symbols)
After each (re-)build, re-run
.\copy_sdk_binaries.bat -<cfg>from<PACK_ROOT>to copy the updated binariesSet
nvigi.3das the startup project in Visual StudioLaunch with debugging (F5)
2.8 Command-line Options#
A subset including the most interesting options to the most common users:
Arguments |
Effect |
|---|---|
|
Required for non-standard layouts - should point to the models tree. Defaults to searching upward from executable directory for |
|
Sets the destination directory for logging. The log will be written to |
More Useful Command Line Arguments#
Arguments |
Effect |
|---|---|
|
Use Vulkan for rendering and show only Vulkan-compatible NVIGI plugins |
|
Sets width |
|
Sets height |
|
Allows verbose info level logging |
|
Enables NVRHI and Graphics API validation Layer |
|
Does not do NVIGI dll signature check |
|
Enables Vsync |
|
Loads a custom scene |
|
Sets number of frames to render before the app shuts down |
|
Disable the use of CUDA in Graphics optimization (for debugging/testing purposes) |
2.9 Notes#
The Vulkan rendering mode and its associated inference are experimental at this time
The sample is designed for use with local systems - use of the sample on remote desktop is not recommended.
3. The Command-Line ASR Sample#
The ASR sample, nvigi.asr.sample, shows how to use the NVIGI Riva ASR plugins for speech recognition. It supports both streaming mode for real-time transcription and offline mode for batch processing of audio files.
3.1 Overview#
This sample demonstrates:
Initializing the NVIGI framework and loading ASR plugins
Configuring ASR for streaming or offline mode
Streaming audio data in chunks to the ASR plugin (streaming mode)
Processing complete audio files at once (offline mode)
Receiving both partial and accumulated transcription results via callbacks
Proper cleanup of resources
The sample can process WAV files in either streaming or offline mode, or capture live microphone input in streaming mode.
3.2 Choosing Between Streaming and Offline Mode#
Offline mode (--mode offline) should be preferred in most cases:
More accurate: Processes the entire audio at once, giving the model full context for better transcription quality
Faster: Lower latency per word and better throughput
Best for: Pre-recorded audio files, batch transcription, and interactive applications where the user speaks for a few seconds before expecting a response (e.g., voice commands, push-to-talk interfaces)
Streaming mode (--mode streaming, default) should only be used when real-time transcription during recording is required:
Real-time feedback: Provides partial results as audio is being processed
Best for: Live captioning, real-time dictation, scenarios where users need to see transcription while still speaking
Recommendation: Use offline mode for better accuracy and performance. Even for interactive applications with microphone input, offline mode is preferred if the transcription can wait until after the user finishes speaking.
3.3 Building the Sample#
The source code for the ASR sample is provided in <PACK_ROOT>/source/samples/nvigi.asr.sample.
Build Steps#
Open a command prompt or VS2022 Developer Command Prompt
Navigate to
<PACK_ROOT>Run
.\setup.bat(if not already done) to generate the Visual Studio solutionRun
.\build.bat -releaseto build all projects in Release configuration, or:Open
<PACK_ROOT>/_project/vs2022/nvigi.rivaASR.slnin Visual Studio 2022Select your desired configuration (Debug, Release, Production)
Build the
nvigi.asr.sampleproject
After building, run
.\copy_sdk_binaries.bat Release(or appropriate config) to copy the built executables and DLLs to<PACK_ROOT>/bin/x64
The built sample executable will be available at <PACK_ROOT>/bin/x64/nvigi.asr.sample.exe.
3.4 Running the Sample#
Run at Command Line#
To run nvigi.asr.sample from the command line:
Open a command prompt and navigate to
<PACK_ROOT>\bin\x64Run the command:
.\nvigi.asr.sample.exe -m ..\..\data\nvigi.models
The sample will capture audio from your default microphone in streaming mode and display:
Partial transcription results as audio is processed in real-time
The accumulated transcription with high accuracy context
The final complete transcription when you stop speaking
Performance metrics including inference time
Note: The -m (or --model-dir) option is required and specifies the directory containing the RIVA ASR models.
Command Line Arguments#
The sample supports various command-line options to customize its behavior:
Usage: nvigi.asr.sample [options]

Options:
  --help                          Show this help message
  -b, --backend <cpu|gpu|dml>     Backend to use: cpu, gpu, or dml (default: cpu)
  -k, --chunk-size <ms>           Streaming chunk size in milliseconds (default: 380 for Conformer, 900 for Parakeet)
  -c, --context-padding <ms>      Context padding (left and right) in milliseconds (default: 2500)
  -m, --model-dir <path>          Path to directory containing RIVA ASR models (required)
  --model <name>                  Model name (conformer, parakeet) or GUID (default: conformer)
  --mode <streaming|offline>      Processing mode: streaming or offline (default: streaming, offline requires wav-file)
  -p, --partial <true|false>      Enable partial decoding during streaming (default: true)
  -s, --sdk <path>                SDK location (if none provided, uses exe location)
  -w, --wav-file <path>           Path to WAV file to process (if not provided, uses microphone)
Example Usage#
All examples assume you are in <PACK_ROOT>\bin\x64 directory.
Process a specific audio file with GPU backend:
.\nvigi.asr.sample.exe -w my_audio.wav -b gpu -m ..\..\data\nvigi.models
Use CPU backend with custom chunk size:
.\nvigi.asr.sample.exe -b cpu -k 400 -m ..\..\data\nvigi.models
Disable partial results during streaming:
.\nvigi.asr.sample.exe -p false -m ..\..\data\nvigi.models
Use microphone input (default when no wav file specified):
.\nvigi.asr.sample.exe -m ..\..\data\nvigi.models
Process a test WAV file (streaming mode):
.\nvigi.asr.sample.exe -w ..\..\data\nvigi.test\nvigi.asr\jfk.wav -m ..\..\data\nvigi.models
Process a WAV file in offline mode (batch processing):
.\nvigi.asr.sample.exe -w ..\..\data\nvigi.test\nvigi.asr\jfk.wav --mode offline -m ..\..\data\nvigi.models
Use a multilingual model by specifying its GUID (see Models and Test Data for the full list):
.\nvigi.asr.sample.exe --model "{GUID}" -b gpu -w my_audio.wav -m ..\..\data\nvigi.models
3.5 Running in Debugger#
To run nvigi.asr.sample in the Visual Studio debugger:
One-time setup in the project file (needs to be redone if
_projectis deleted):In the Visual Studio IDE, edit the project config settings for
nvigi.asr.sampleNavigate to the “Debugging” settings
Set “Command” to
$(SolutionDir)..\..\bin\x64\nvigi.asr.sample.exeSet “Command Arguments” as needed (see command line options above)
Set “Working Directory” to
$(SolutionDir)..\..\bin\x64
Build the desired configuration (Release is recommended - it is optimized but contains symbols)
After each (re-)build, re-run
.\copy_sdk_binaries.bat <cfg>from<PACK_ROOT>to copy the updated binariesSet
nvigi.asr.sampleas the startup project in Visual StudioLaunch with debugging (F5)
3.6 Understanding the Sample Code#
The sample code (source/samples/nvigi.asr.sample/sample_asr.cpp) demonstrates key concepts:
NVIGI Initialization: How to load the NVIGI core library and initialize the framework
Plugin Loading: How to select and load the appropriate ASR plugin (CPU or GPU backend)
Instance Creation: How to configure ASR parameters for streaming mode including:
Backend selection (CPU, TensorRT-RTX, DirectML)
Streaming configuration (chunk size, beam size)
Optional features (auto punctuation, silence detection)
Streaming Workflow: The three-phase streaming process:
START signal: Initialize streaming with empty audio
DATA signals: Send audio chunks as they become available
STOP signal: Finalize streaming and get final results
Callback Handling: How to implement callbacks to receive:
Partial results: Real-time transcription updates (less accurate, no context)
Accumulated results: High-quality transcription with context
Final results: Complete transcription when done
Audio Format Handling: How to load and prepare audio data (16kHz, 16-bit, mono PCM)
Cleanup: Proper resource cleanup and shutdown
3.7 Sample Output#
When running the sample in streaming mode, you’ll see output similar to:
=== NVIGI ASR Sample ===
Model directory: ..\..\data\nvigi.models
SDK path: C:\Users\bkrishnamurt\Riva_Project\riva_asr\_riva_asr_pack_gin\bin\x64\
Backend: gpu
Input source: WAV file: ..\..\data\nvigi.test\nvigi.asr\jfk.wav
Partial decoding: enabled
Streaming chunk size: 380 ms
Context padding (left/right): 2500 ms

NVIGI SDK initialized successfully
Loaded RIVA-ort ASR plugin (gpu backend)
ASR instance created with streaming mode enabled

Processing WAV file: ..\..\data\nvigi.test\nvigi.asr\jfk.wav
WAV file loaded: ..\..\data\nvigi.test\nvigi.asr\jfk.wav
  Sample rate: 16000 Hz
  Channels: 1
  Duration: 11 seconds

Starting streaming transcription...
Transcription:
Processing audio in 380ms chunks...
Transcription: and so my fellow americans ask not what your country [can do for you <Silence>]
Transcription: and so my fellow americans ask not what your country can [can do for you <Silence>]
Transcription: and so my fellow americans ask not what your country can [do for you ask for <Silence>]
Transcription: and so my fellow americans ask not what your country can do [do for you ask fo]
Transcription: and so my fellow americans ask not what your country can do [you ask what you]
...
...
Final transcription: and so my fellow americans ask not what your country can do for you ask what you can do for your country
The sample shows:
How partial results provide immediate feedback as audio is processed
How accumulated results build up the high-quality transcription with proper context
The final complete transcription with the best accuracy
Performance metrics for the transcription
4. Additional Resources#
For detailed information on using the Riva ASR plugins in your own applications, refer to:
Programming Guide: Automatic Speech Recognition with Riva ASR using ONNX Runtime - Comprehensive guide covering:
Plugin initialization and configuration
Offline (non-streaming) and streaming modes
Audio format requirements
Advanced features (word boosting, silence detection, auto punctuation)
Backend selection (CPU, TensorRT-RTX, DirectML)
Graphics API integration (D3D12/Vulkan)
Performance optimization
Complete API reference
Getting Started Guide - Initial setup and configuration
5. Models and Test Data#
The _riva_asr_pack includes:
ASR Models: Located in
data/nvigi.models/nvigi.plugin.asr.riva-ort, one directory per model GUIDAll models are compatible with CPU, TensorRT-RTX, and DirectML backends
Optimized for real-time speech recognition
Model
Language
GUID
Conformer-CTC
English (en-US)
{B5D4F28E-3DB9-4FDA-A78B-A569AA22FCD0}Parakeet-0.6B
English (en-US)
{53211BAC-8B34-4AE5-83C3-9B4CA0B2AE6D}Conformer-CTC-French
French (fr-FR)
{7B9ED4D0-D15C-450F-BCC8-8FA7B460BFC0}Conformer-CTC-German
German (de-DE)
{632AA9FC-5C76-460D-B915-791E41F40028}Conformer-CTC-Italian
Italian (it-IT)
{33A53EA0-AD25-4CF1-B4FB-9B1513FDA24F}Conformer-CTC-Spanish
Spanish (es-ES)
{20AD4848-5CB4-49CA-B48F-AF1AA61B4EB2}Conformer-CTC-Korean
Korean (ko-KR)
{14BA55B2-0357-4B7B-B021-B9F1D8DFB77A}Conformer-CTC-Japanese
Japanese (ja-JP)
{29A8FAFA-A9BB-485C-AEEF-BFF4512DFE91}Conformer-CTC-Mandarin
Mandarin (zh-CN)
{0DDAD855-F9C3-42B4-AEED-18C9D0440923}
6. Troubleshooting#
6.1 Sample Won’t Launch#
Problem: Sample executable doesn’t start or crashes immediately
Solution:
Ensure all DLLs are present in
bin/x64directoryCheck that models are present in
data/nvigi.modelsReview log files for error messages
6.2 Build Errors#
Problem: Build fails with compilation errors
Solution:
Ensure Visual Studio 2022 is installed with C++ development tools
Run
.\setup.batfrom<PACK_ROOT>to regenerate project filesClean the solution and rebuild
Verify that packman dependencies downloaded correctly during setup
6.3 Poor ASR Accuracy#
Problem: Transcriptions are incorrect
Solution:
Ensure audio is in the correct format (16kHz, 16-bit, mono PCM)
Check microphone settings in Windows (for 3D sample)
Verify audio is clear and noise-free
Try the GPU backend (TensorRT-RTX) for better performance
Enable auto punctuation for better readability
Refer to the Programming Guide for word boosting to improve domain-specific vocabulary
6.4 GPU Backend Issues#
Problem: GPU backend fails to load or crashes
Solution:
Ensure NVIDIA GPU drivers are up to date (driver version 575+ for TensorRT-RTX)
Check VRAM budget is sufficient (2048 MB minimum recommended)
Try increasing VRAM budget in settings
Use DirectML backend as fallback (
-b dmlflag)Use CPU backend for debugging or if GPU is unavailable
6.5 Performance Issues#
Problem: ASR is slow or frame rate drops in 3D sample
Solution:
Use GPU backend instead of CPU for better performance
Adjust GPU scheduling mode in App Settings (Prioritize Inference vs Graphics)
Enable frame rate limiter to cap maximum FPS
Check that TensorRT-RTX engines have been compiled and cached (first run takes ~30 seconds)
Ensure no other applications are using excessive GPU resources
7. Support#
For issues, questions, or feedback, please contact NVIDIA Developer Support or refer to the NVIGI Developer Pack documentation.