
Nemotron ASR Plugin Samples#
The pack ships two sample applications. They demonstrate the two most common forms of NVIGI ASR integration: ASR running alongside a real-time renderer, and a minimal command-line application. Both samples support the four shipped models and the CUDA, D3D12, Vulkan, and CPU ASR backends.
For the underlying API, see the Programming Guide. For the model and backend inventory, see the Developer Pack.
1. Samples Overview#
Sample |
What it demonstrates |
Source |
|---|---|---|
|
ASR in a real-time D3D12 or Vulkan application, graphics interop, model and backend selection, and streaming transcription |
|
|
A focused end-to-end integration for WAV files or microphone input |
|
The models use two execution styles:
Model |
Execution in the samples |
|---|---|
Parakeet v2 |
Offline: transcribes the complete recording or WAV |
Parakeet v3 |
Offline: transcribes the complete recording or WAV |
Nemotron Streaming EN |
Streaming: updates the transcript while audio is being supplied |
Nemotron Streaming 3.5 |
Streaming: updates the transcript while audio is being supplied and accepts a language prompt |
2. The 3D Sample#
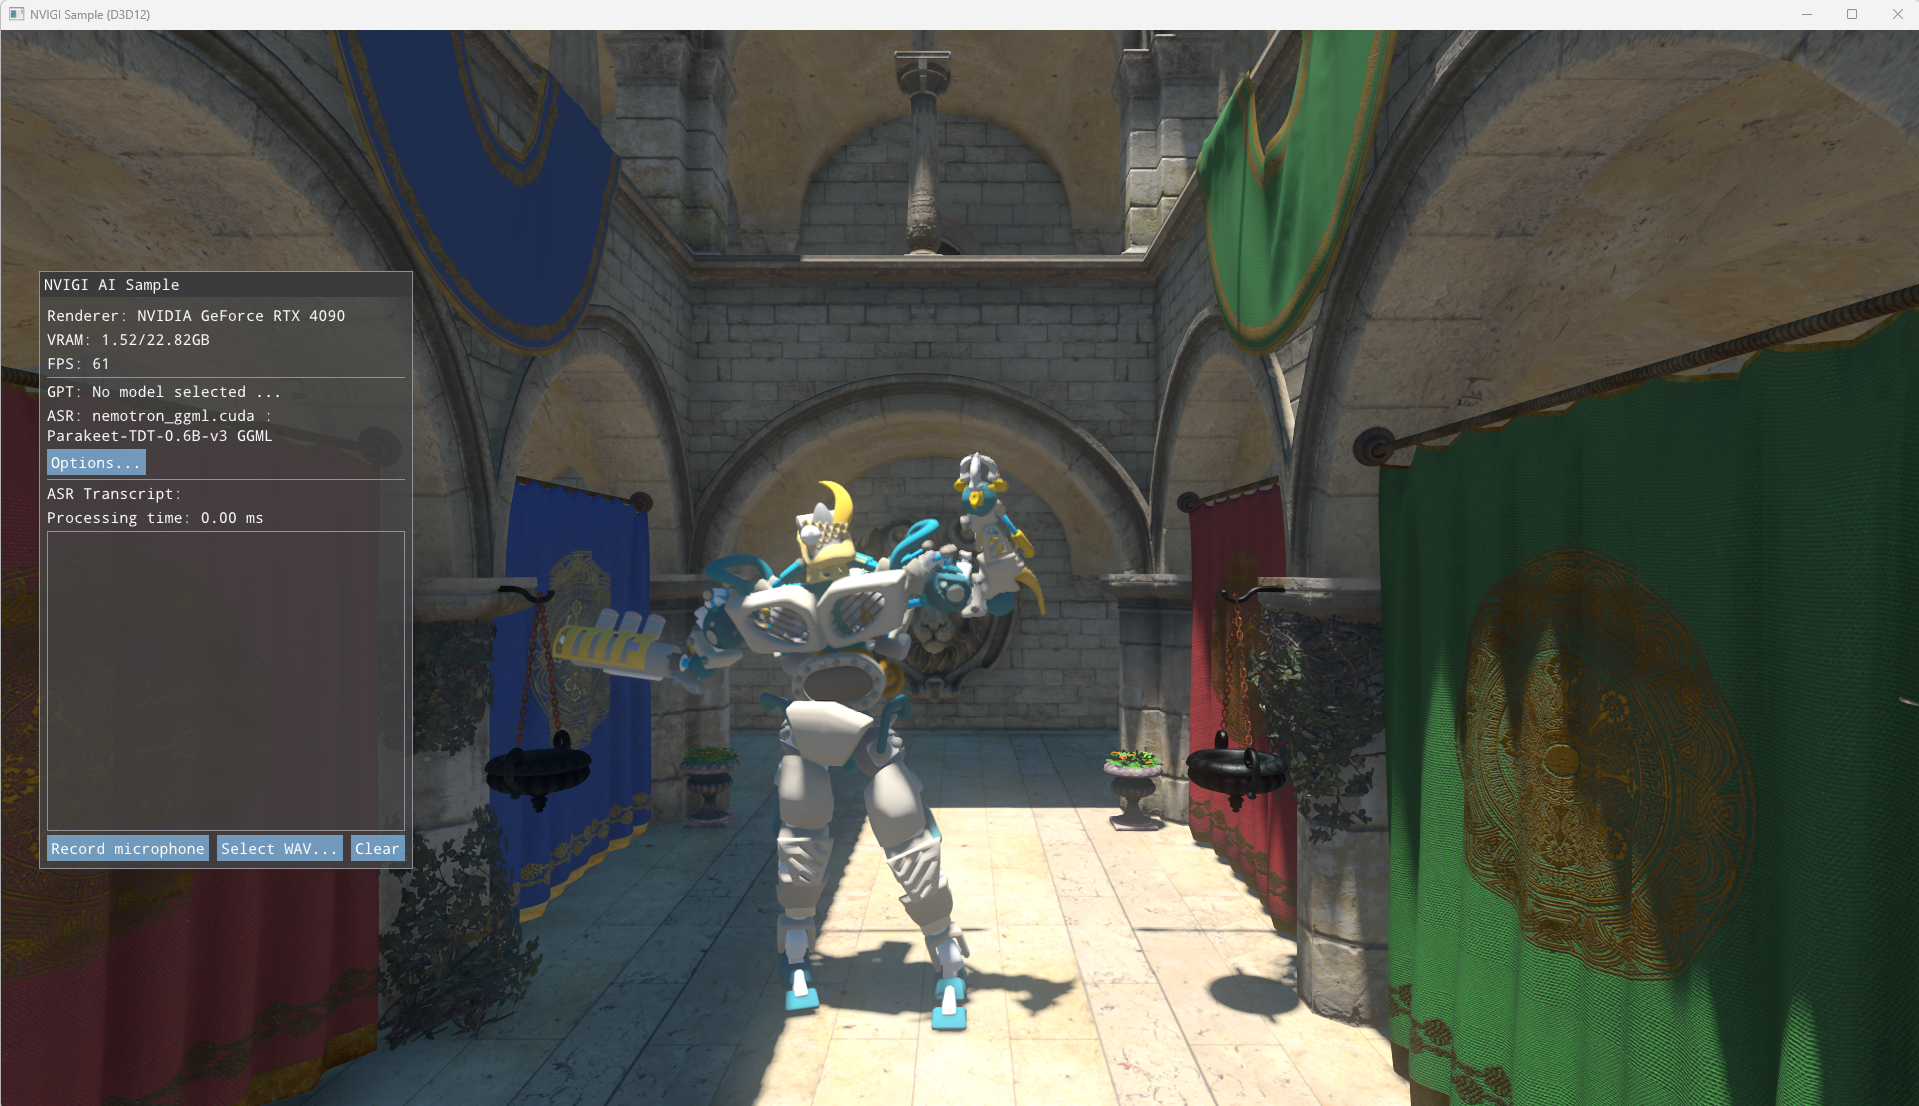
nvigi.3d.exe demonstrates ASR running alongside a real-time renderer. It is the most
useful sample for an application that already owns a D3D12 or Vulkan device because it
shows device and queue sharing, CUDA-in-Graphics, and GPU scheduling in context.
The primary integration code is in
source/samples/nvigi.3d/src/nvigi/NVIGIContext.{h,cpp}.
2.1 Launch the Sample#
The prebuilt executable is under <PACK_ROOT>/bin/x64. Run it from that directory:
Command |
Renderer |
ASR backends offered by the sample |
|---|---|---|
|
D3D12 |
CUDA, D3D12, CPU |
|
Vulkan |
CUDA, Vulkan, CPU |
The renderer-compatible native backend is shown in each mode. CUDA can be used with
either renderer through CUDA-in-Graphics. The shipped directory layout is discovered
automatically; use -pathToModels <path> only when the models are stored elsewhere.
2.2 Select a Model and Transcribe Audio#
Open Options, select the ASR tab, and choose the model and backend from Model Name. The dropdown discovers the models installed in the pack rather than relying on a hard-coded list.
The normal interaction depends on the selected model:
With Parakeet v2 or v3, click Record microphone, speak, and click Stop. The complete recording is transcribed after Stop.
With either streaming model, click Record microphone and speak. Committed and partial text can appear while recording; Stop finalizes the stream.
To use a WAV, click Select WAV…, choose a 16 kHz, 16-bit, mono PCM file, and then click Transcribe WAV. Streaming models feed the WAV through the same streaming lifecycle used for microphone input.
Click Clear to reset the displayed transcript and timing.
The transcript area displays committed text normally and unstable partial text in square brackets. For streaming models, the sample also reports time to first transcription.
2.3 Use the Two Streaming Models#
Both streaming models appear in the same Model Name dropdown as the two Parakeet models. Selecting either one exposes Streaming Settings in the ASR options panel.
Model |
When to use it |
Right-context choices |
Language setting |
|---|---|---|---|
Nemotron Streaming EN |
English streaming ASR |
Model default, 0, 1, 6, 13 |
English |
Nemotron Streaming 3.5 |
Multilingual streaming ASR |
Model default, 0, 3, 6, 13 |
|
Right context trades latency for future acoustic context. Start with Model default and change it only when evaluating that tradeoff for the application.
The streaming options also expose Word Boosts as comma-separated
phrase[:boost] entries and a Default Word Boost. The sample enables Silero
speech-state reporting when the selected streaming model advertises that capability.
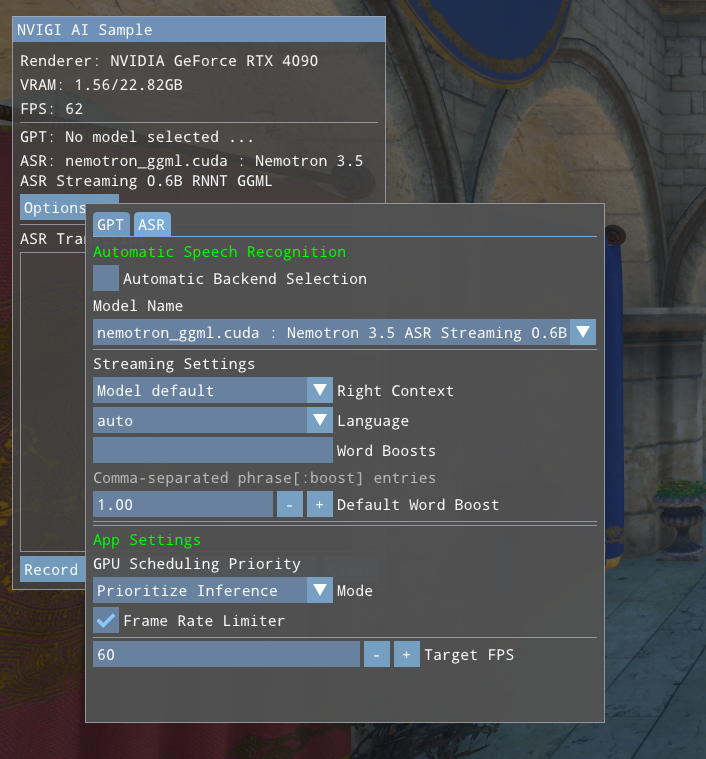
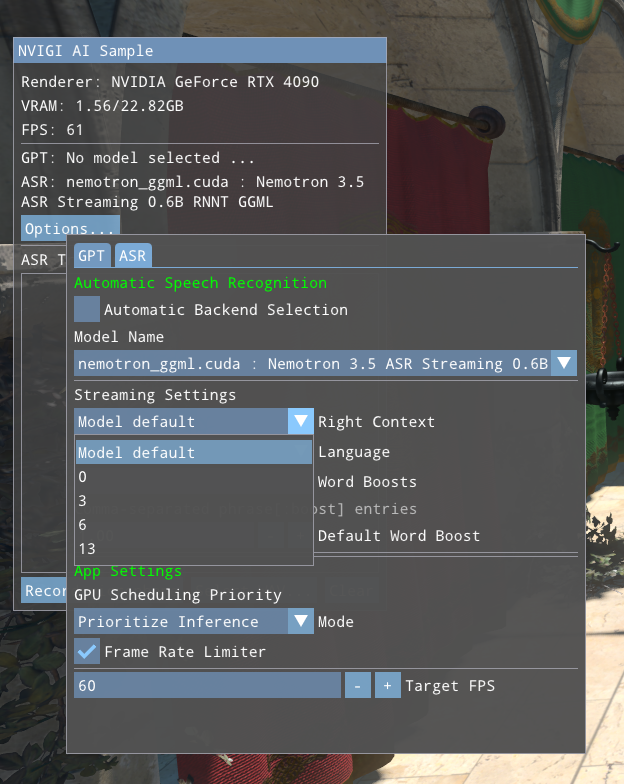
Changing right context reloads the ASR instance. Language and word boosts are captured when a stream starts, so configure them before pressing Record microphone or Transcribe WAV.
2.4 Graphics and Scheduling Options#
The ASR options panel also contains the graphics controls demonstrated by the sample:
Automatic Backend Selection lets the sample choose a compatible backend. Disable it to select a specific backend from the model dropdown.
GPU Scheduling Priority selects Prioritize Graphics, Balanced, or Prioritize Inference. It applies to the CUDA-in-Graphics path.
Frame Rate Limiter creates a repeatable rendering workload while comparing scheduling modes.
See the Programming Guide for the corresponding graphics-interoperability and GPU-scheduling APIs.
2.5 Logging and Useful Launch Options#
Write the 3D sample log to an existing directory with:
.\nvigi.3d.exe -logToFile ..\logs
The most useful launch options are:
Option |
Purpose |
|---|---|
|
Render with Vulkan instead of D3D12 |
|
Override the |
|
Write the sample log to the specified existing directory |
|
Disable CUDA-in-Graphics for comparison or diagnosis |
|
Set the initial window size |
|
Enable graphics API and NVRHI validation |
|
Enable verbose sample logging |
|
Enable vertical synchronization |
|
Run the UI without rendering the 3D scene |
3. The Command-Line ASR Sample#
nvigi.asr.sample.exe is the focused reference for loading one backend, creating an ASR
instance, transcribing a WAV or microphone recording, and shutting down. Read
sample_asr.cpp end to end when starting a new integration.
3.1 Run the Sample#
From <PACK_ROOT>/bin/x64, run the shipped English WAV with the default CUDA backend and
Parakeet v2:
.\nvigi.asr.sample.exe -m ..\..\data\nvigi.models `
  -w ..\..\data\nvigi.test\nvigi.asr\jfk.wav
When -w is omitted, the sample records from the default Windows microphone. The model
directory is required and must point to the directory containing
nvigi.plugin.asr.nemotron-ggml/{GUID}/.
3.2 Select Offline or Streaming ASR#
Select a model with --model. The two streaming aliases automatically select the
Start/Data/Stop streaming path; --streaming is not required for them.
Alias |
Model |
Execution |
|---|---|---|
|
Parakeet v2 |
Offline |
|
Parakeet v3 |
Offline |
|
Nemotron Streaming EN |
Streaming |
|
Nemotron Streaming 3.5 |
Streaming |
A brace-wrapped model GUID can be supplied instead of an alias.
Run the two streaming models as follows:
# English streaming model
.\nvigi.asr.sample.exe -m ..\..\data\nvigi.models `
  --model streaming-en `
  -w ..\..\data\nvigi.test\nvigi.asr\jfk.wav

# Nemotron Streaming 3.5 with an explicit language prompt
.\nvigi.asr.sample.exe -m ..\..\data\nvigi.models `
  --model streaming-3.5 --language en-US `
  -w ..\..\data\nvigi.test\nvigi.asr\jfk.wav
Use --right-context to select a supported streaming profile. Streaming EN accepts 0,
1, 6, and 13; Streaming 3.5 accepts 0, 3, 6, and 13. Omitting the option uses the model
default.
3.3 Command-Line Options#
Option |
Purpose |
|---|---|
|
SDK |
|
Required path to |
|
Select an installed ASR model; default |
|
Select |
|
Transcribe a WAV; repeatable; microphone input when omitted |
|
Directory for NVIGI log files |
|
Streaming language prompt; repeatable for multiple WAVs |
|
Streaming right context; |
|
Add a streaming word or phrase boost; repeatable |
|
Boost used when an entry omits its value |
|
Enable Silero speech-state reporting for a streaming model |
|
Print the complete command-line help |
Do not pass --streaming to Parakeet v2 or v3. Language, word boosting, right context,
and VAD are streaming-model controls.
3.4 Additional Examples#
All examples assume <PACK_ROOT>/bin/x64 is the current directory.
# Parakeet v3 on D3D12
.\nvigi.asr.sample.exe -m ..\..\data\nvigi.models `
  --model parakeet-v3 -b d3d12 `
  -w ..\..\data\nvigi.test\nvigi.asr\jfk.wav

# Streaming English with word boosting and VAD
.\nvigi.asr.sample.exe -m ..\..\data\nvigi.models `
  --model streaming-en -b cuda `
  --word-boost "NVIDIA:2" --default-word-boost 1.0 --vad `
  -w ..\..\data\nvigi.test\nvigi.asr\jfk.wav

# Nemotron Streaming 3.5 with one language per WAV
.\nvigi.asr.sample.exe -m ..\..\data\nvigi.models `
  --model streaming-3.5 `
  -w first.wav -w second.wav `
  --language en-US --language fr-FR
Input WAV files must contain 16 kHz, 16-bit, mono PCM audio.
3.5 Output and Source Walkthrough#
Offline models print one final transcription after the complete buffer is processed.
Streaming models update committed and partial text as audio arrives, then print the final
transcription after Stop. With --vad, speech-state changes are reported separately from
the transcript.
The source demonstrates this sequence:
Load
nvigi.core.framework.dllfrom the SDK directory and initialize NVIGI.Map the requested backend to the matching Nemotron ASR plugin ID.
Resolve the model alias or brace-wrapped GUID and verify that it is installed.
Chain common, backend, streaming, and optional VAD parameters.
For Parakeet, submit the complete buffer with
evaluate().For a streaming model, submit
Start, zero or moreDatachunks, andStopwithevaluateAsync().Copy committed text, partial text, and optional speech state in the callback.
Destroy the instance, unload the interface, shut down NVIGI, and release the core library.
4. Build the Samples#
The sample executables are already provided under bin/x64. Building from source
requires Visual Studio or Build Tools with the Desktop development with C++ workload.
Project generation also needs access to the Packman repositories configured by the pack.
From <PACK_ROOT>, generate the solution:
.\setup.bat vs2022
Use vs2019 for Visual Studio 2019. Open
_project/<version>/nvigi.nemotronASR.sln, or build from the command line:
.\build.bat -Debug
.\build.bat -Release
.\build.bat -Production
After a successful build, stage the selected configuration into the pack layout:
.\copy_sdk_binaries.bat Release
The staging helper accepts Debug, Release, or Production and updates bin/x64.
Run it again after rebuilding a sample. It stages build output; it does not compile the
samples.
4.1 Build with Visual Studio 2026#
Visual Studio 2026 can build the samples from the generated Visual Studio 2022 solution.
The vs2022 directory identifies the solution format produced by the bundled Premake;
it does not prevent a newer Visual Studio installation from opening and building it.
The supplied setup.bat accepts vs2019 and vs2022, so generate the solution with:
.\setup.bat vs2022
Then open _project/vs2022/nvigi.nemotronASR.sln in Visual Studio 2026 and build the
required configuration. Alternatively, from a Visual Studio 2026 Developer Command
Prompt, build it directly:
msbuild .\_project\vs2022\nvigi.nemotronASR.sln /m /t:Build /property:Configuration=Release
.\copy_sdk_binaries.bat Release
build.bat currently asks vswhere specifically for a Visual Studio 2022 installation.
On a system with only Visual Studio 2026, use the IDE or Developer Command Prompt above,
or make its discovery version-independent by locating the newest installation containing
the C++ tools:
for /f "usebackq tokens=1* delims=: " %%i in (`
    .\tools\vswhere.exe -latest -products * -requires Microsoft.VisualStudio.Component.VC.Tools.x86.x64
`) do (
    if /i "%%i"=="installationPath" set VS_PATH=%%j
)
After changing the build wrapper or using a different configuration, rebuild both
samples and rerun copy_sdk_binaries.bat with the matching configuration.
4.2 Run a Sample in the Debugger#
The samples must run from bin/x64 so they can find the staged plugin DLLs and runtime
dependencies. Configure each sample project once in Properties > Debugging:
Setting |
|
|
|---|---|---|
Command |
|
|
Working Directory |
|
|
Example Arguments |
|
|
Build the desired configuration, rerun copy_sdk_binaries.bat <configuration>, set the
sample as the startup project, and start debugging. These settings are stored in the
project’s .vcxproj.user file.
4.3 Build the 3D Sample with a Local Donut#
The default 3D-sample build uses the prebuilt Donut dependency supplied through Packman.
The customer package also contains a local-Donut workflow under
source/samples/nvigi.3d/opt-local-donut. Use it when debugging Donut or testing a Donut
change.
From a Visual Studio Developer Command Prompt:
cd <PACK_ROOT>\source\samples\nvigi.3d\opt-local-donut
.\01_pull.bat
.\02_setup.bat
.\03_build.bat
01_pull.bat checks out the Donut revision selected by the package. 02_setup.bat
generates the Donut build and uses the Vulkan SDK pulled by the pack-root setup.bat.
03_build.bat builds and installs the Release, Production, and Debug configurations
under opt-local-donut/_package/donut. CMake 3.20 or newer must be available.
Next, edit source/samples/nvigi.3d/premake.lua to select the local package:
donut_dir = ROOT.."source/samples/nvigi.3d/opt-local-donut/_package/donut"
-- donut_dir = externaldir.."donut"
Finally, regenerate the solution, rebuild, and stage the result:
cd <PACK_ROOT>
.\setup.bat vs2022
.\build.bat -Release
.\copy_sdk_binaries.bat Release
When using Visual Studio 2026 without a Visual Studio 2022 installation, perform the build through Visual Studio 2026 or its Developer Command Prompt as described in section 4.1.