Azure CSP Automated Setup Guide
Overview
In this guide, we will go through the steps needed to:
Understand the architecture of the infrastructure we will be setting up to host the Tokkio Application on the Azure CSP.
Perform the necessary steps to procure the pre-requisite access and information to use the automated deployment scripts.
Create one or more deployments of the Tokkio Application using the automated deployment scripts.
Verify the deployment.
Tear down the created infrastructure when no longer required.
Infrastructure Layout
Tokkio Application setup on Azure requires several Azure resources to be created such as Virtual Machines, Security Groups, Application Gateways, FrontDoor CDN for hosting UI content ..etc. While there are several patterns that can be followed to bring up infrastructure needed for Tokkio, here is one way we will be working to achieve.
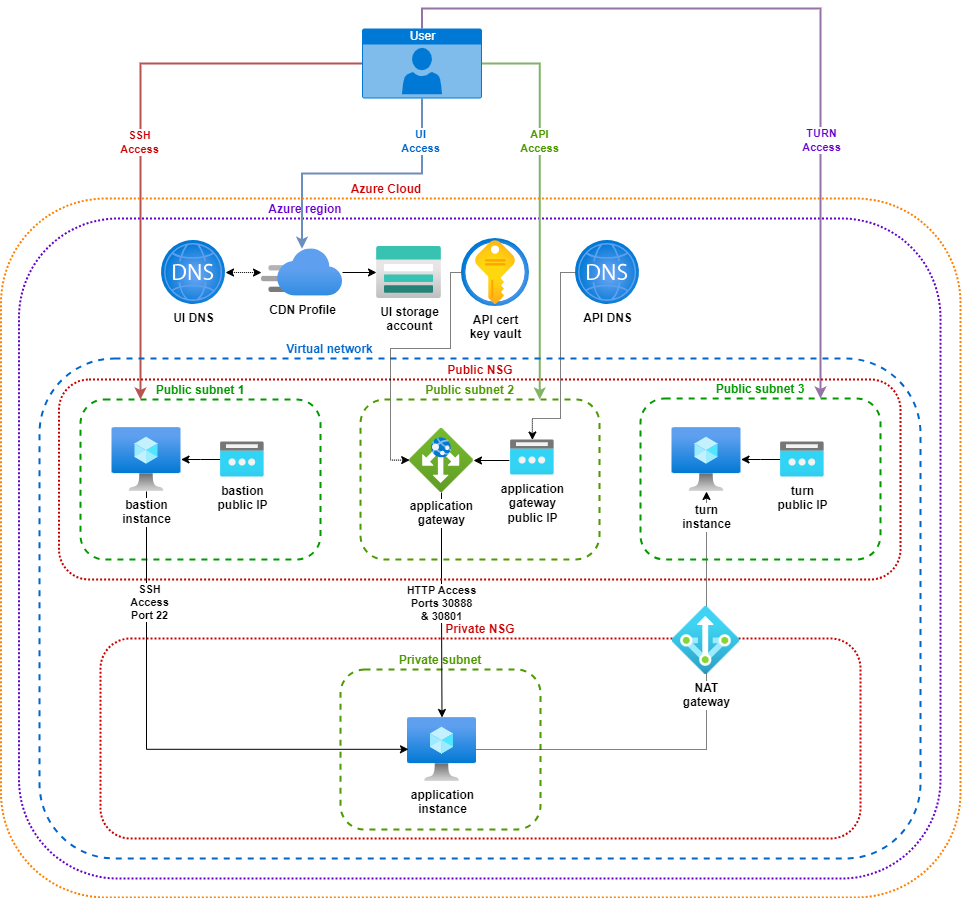
In addition to bringing up Azure resources, we also will have to work on downloading Tokkio application and its dependency artifacts, configure them and install.
These automation scripts will help you simplify that by abstracting out the complexity and allowing user to work with majorly 2 files viz., deploy-template.yml and secrets.sh
deploy-template.yml is an abstraction of infra specification we need for bringing up Tokkio Application. At a high level, we define the base infrastructure specifications (e.g. VirtualNetwork); then add TURN infrastructure (e.g. Virtual Machine) and Application infrastructure specifications (e.g. GPU Virtual Machine).
TURN infrastructure and Application infrastructure will be established on base infrastructure specified on this deploy-template.yml.
secrets.sh will be used as mechanism for user to provide secrets of two categories.
Secrets such as ‘Azure resource manager client secret’ so that automation program can interact with Azure tenant.
Note
We will skip some optional features such as Auto Scaling in this reference setup.
Important
Many of the resources in this setup may not fall in Free tier, you can check Azure Cost Management pages for understanding cost implications.
Prerequisites
This setup guide assumes you have the following conditions met:
Access to the Azure portal via a user with Admin access to at least one Subscription.
Ubuntu 20.04 or 22.04 based machine, on a user with sudo privileges to run the automated deployment scripts.
An Azure service principal to enable the automated deployment scripts to authenticate themselves with.
An Azure storage account and container to host the state of the automated deployment scripts, so that the created infrastructure may be modified or torn down at a later date or time.
Registration of a domain on which the Tokkio Application can be hosted.
An Azure app certificate to enable SSL support for the deployed application.
Setup Nvidia GPU Cloud (NGC) API Key by following instructions here.
SSH key pair to access the instances we are going to setup.
You may use existing SSH Key pair for this access or create a new pair.
Reference documentation to create a public private ssh key pair is available here.
Note
The same pre-requisites provisioned here can be used for multiple projects, and can be considered as a one time setup for most scenarios unless the parameters are not acceptable for any deployment.
Login to the Azure portal
Log into azure portal as user with admin access.
Click on More Services to get to the page listing all services.
For all subsequent steps, navigate back to this page to find and create a new resource.
Service Principal Setup
App Registration Service Principal
From the All Services page:
Select the Identity from the category (on the left).
Select the Azure Active Directory service.
Select App registrations in the service configuration panel (on the left).
Click on the +New registration button to create a new registration.
In the wizard:
Name: Provide an appropriate name. (eg: <my-org>-tokkio-automation)
Supported account types: Select Accounts in this organizational directory only.
Ignore all other fields.
Click Register.
You will be automatically taken to the created App registration. If not:
From All Services, navigate to Azure Active Directory under Identity category
Select App registrations from the service configuration panel
Select the created App Registration.
Select Certificated & secrets from the resource configuration panel (on the left).
Click on the +New client secret button to create a new client secret.
In the wizard:
Description: Provide an appropriate description.
Expires: Provide the period for which this secret will be valid.
Click Add.
Copy the Value of the created client secret. Note: Once you exit this screen, the value will no longer be visible.
Subscription Access grant to App Registration
From the All Services page:
Select the General from the category (on the left).
Select the Subscriptions service.
Select the name of the subscription under which the Tokkio Application will be deployed.
Select Access control (IAM) from the resource configuration panel (on the left).
Select the Role Assignments tab.
Click on the +Add and then the Add role assignment option to add a new role assignment.
In the wizard:
Role: Select Owner.
Members:
Assign access to: Select User, group, or service principal.
Members: Click +Select members and select the name of the App Registration.
Click on the +Add and then the Add role assignment option to add a new role assignment.
In the wizard:
Role: Select Contributor.
Members:
Assign access to: Select User, group, or service principal.
Members: Click +Select members and select the name of the App Registration.
Resource Group
From the All Services page:
Select the General from the category (on the left).
Select the Resource groups service.
Click on the +Create button to create a new resource group.
In the wizard:
Subscription: Choose the subscription under which resources will be created.
Resource group: Provide an appropriate name (eg: <<my-org>-tokkio-automation-pre-requisites>)
Region: Choose a region (preferably closest to the users of the application) in which to create the Resource Group.
Navigate Next to optionally configure tags (we will be skipping this through the remainder of this setup).
Click Review + create > Create.
Deployment State Storage
From the All Services page:
Select the Storage from the category (on the left).
Select the Storage accounts service.
Click on the +Create button to create a new storage account.
In the wizard:
In the Basics section:
Subscription: Subscription of the Resource Group created earlier.
Resource Group: The Resource Group created earlier.
Storage account name: Provide an appropriate name (eg: <myorg>tokkiodeploymentstate)
Region: Region chosen for the Resource Group created earlier.
Performance: Choose Standard.
Redundancy: Choose Locally-redundant storage (LRS).
Leave the remaining fields as is.
Leave all other sections as is.
Optionally add tags under the Tags section.
Click Review + create > Create.
Navigate to the created storage account by clicking on Go to resource or:
From All Services, navigate to Storage accounts under Storage category
Select the created Storage account.
Select Containers from the resource configuration panel (on the left).
Click on the +Container to create a new container.
In the wizard:
Name: Provide an appropriate name (eg: deployment-state)
Public access level: Select Private.
Click Create.
Base Domain
From the All Services page:
Select the Web from the category (on the left).
Select the App Service Domains service..
Click on the +Create button to create a new domain.
In the wizard:
In the Basics section:
Subscription: Subscription of the Resource Group created earlier.
Resource Group: The Resource Group created earlier.
Domain: Base domain which will be used for subsequent app deployments.
In the Contact information section - Provide the relevant Contact information. Not the email needs to be a valid email ID.
Leave the Advanced section as is.
Optionally add tags under the Tags section.
Click Review + create > Create.
Certificates
Key Vault
From the All Services page:
Select the Security from the category (on the left).
Select the Key Vaults service.
Click on the +Create button to create a new key vault.
In the wizard:
In the Basics section:
Subscription: Subscription of the Resource Group created earlier.
Resource Group: The Resource Group created earlier.
Key vault name: Provide an appropriate name (eg: <my-org>-certificates-vault).
Region: Region chosen for the Resource Group created earlier.
Leave remaining fields as is.
In the Access policy section:
Add an additional Access Policy.
Key Permissions: Select Select All.
Secret Permissions: Select Select All.
Certificate Permissions: Select Select All.
Rotation Policy Operations: Select Select All.
Add the App Registration Service Principal created earlier as Principal.
Let all other configurations remain as is.
Click Review + create > Create.
Leave the Networking section as is.
Optionally add tags under the Tags section.
Click Review + create > Create.
Wildcard Certificate
From the All Services page:
Select the Web from the category (on the left).
Select the App Service Certificates service..
Click on the +Create button to create a new certificate.
In the wizard:
In the Basics section:
Subscription: Subscription of the Resource Group created earlier.
Resource Group: The Resource Group created earlier.
SKU: Wildcard.
Naked domain hostname: Enter *.<base-domain> where <base-domain> is the name of the Base Domain created earlier.
Certificate name: Provide an appropriate name (eg: <my-base-domain>-wildcard-certificate).
Enable auto renewal: Optionally select Disable.
Optionally add tags under the Tags section.
Click Review + create > Create.
Navigate to the created certificate by clicking on Go to resource or:
From All Services, navigate to App Service Certificates under Web category
Select the created Certificate.
Select Certificate Configuration from the resource configuration panel (on the left).
Select Store and then the Select from Key Vault link.
In the wizard:
Subscription: Subscription of the Resource Group created earlier.
Key vault: Name of the Key Vault created earlier.
Navigate back to the created certificate by:
From All Services, navigate to App Service Certificates under Web category
Select the created Certificate.
Select Certificate Configuration from the resource configuration panel (on the left).
Select Verify and then click on Verify.
Wait for Domain Verification to complete.
Increase quota for GPU VM type
From the All Services page:
Select the Other from the category (on the left).
Select Quotas service.
Click on Compute.
Validate sufficient quota is present to create the application virtual machine by doing the following:
Update the Region filter to match the region where the virtual machines will be created.
In the search box, enter NCASv3_T4.
Check if available usage is at least 64 times the number of instance you wish to run under this setup, if not edit to request for additional quota.
Wait for confirmation that the quota has increased before proceeding.
Prepare deployment config
Download & Extract Deployment Artifact
Download One-click Setup Scripts
Using below commands, clone the repository and navigate to one-click script for Azure:
#clone repository https://github.com/NVIDIA/ACE.git
git clone https://github.com/NVIDIA/ACE.git

#navigate to aws folder
cd ACE/workflows/tokkio/scripts/one-click/azure
Prepare secrets
- The file secrets.sh can be setup as below so as not have to commit and push sensitive data as part of deploy-template.yml
secrets.sh
#!/bin/bash

# SPDX-FileCopyrightText: Copyright (c) 2024 NVIDIA CORPORATION & AFFILIATES. All rights reserved.
# SPDX-License-Identifier: LicenseRef-NvidiaProprietary
#
# NVIDIA CORPORATION, its affiliates and licensors retain all intellectual
# property and proprietary rights in and to this material, related
# documentation and any modifications thereto. Any use, reproduction,
# disclosure or distribution of this material and related documentation
# without an express license agreement from NVIDIA CORPORATION or
# its affiliates is strictly prohibited.

# _azure_app_reg_client_secret -> client secret value of the azure app registration with access to the resources
export _azure_app_reg_client_secret='<replace_content_between_quotes_with_your_value>'
# _ssh_public_key -> Your public ssh key's content
export _ssh_public_key='<replace_content_between_quotes_with_your_value>'
# _ngc_api_key -> Your ngc api key value
export _ngc_api_key='<replace_content_between_quotes_with_your_value>'
# _coturn_password -> Password for coturn server
export _coturn_password='<replace_content_between_quotes_with_your_value>'
# Set the open ai API key
export _openai_api_key='<replace_content_between_quotes_with_your_value>'
Important
You may want to be careful on whether or not to commit this file to your version control system as it contains secrets.
Prepare deploy template
- Deploy Template Schema & Configuration
Deploy template
deploy-template.ymlis used to compile the infrastructure needed to setup your project/environment(s). It has seperate sections to capture details for different needs such as provider config, TURN-infra etc. As shown in below layout diagram, you can choose to create one or more environments and infrastructure(s) under single project name.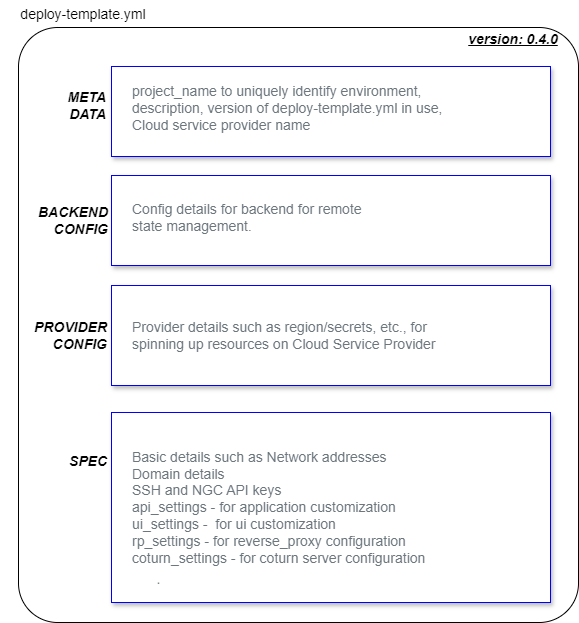
Override the content of
deploy-template.ymlfile with your environment/application specific values. This will drive the configuration of Infrastructure and application being installed.deploy-template.yml
# SPDX-FileCopyrightText: Copyright (c) 2024 NVIDIA CORPORATION & AFFILIATES. All rights reserved.
# SPDX-License-Identifier: LicenseRef-NvidiaProprietary
#
# NVIDIA CORPORATION, its affiliates and licensors retain all intellectual
# property and proprietary rights in and to this material, related
# documentation and any modifications thereto. Any use, reproduction,
# disclosure or distribution of this material and related documentation
# without an express license agreement from NVIDIA CORPORATION or
# its affiliates is strictly prohibited.

# NOTE: Refer to examples for various configuration options

project_name: "<replace-with-unique-name-to-identify-your-project>"
description: "<add-a-brief-description-about-this-project>"
template_version: "0.4.0"
csp: "azure"
backend:
  tenant_id: "<replace-with-your-azure-tenant-id>"
  subscription_id: "<replace-with-your-azure-subscription-id>"
  client_id: "<replace-with-your-azure-app-registration-client-id>"
  client_secret: "${_azure_app_reg_client_secret}"
  resource_group_name: "<replace-with-your-state-storage-account-resource-group-name>"
  storage_account_name: "<replace-with-your-state-storage-account-name>"
  container_name: "<replace-with-your-state-storage-container-name>"
provider:
  tenant_id: "<replace-with-your-azure-tenant-id>"
  subscription_id: "<replace-with-your-azure-subscription-id>"
  client_id: "<replace-with-your-azure-app-registration-client-id>"
  client_secret: "${_azure_app_reg_client_secret}"
spec:
  region: "<replace-with-azure-region-to-create-resources-in>"
  virtual_network_address_space: "<replace-with-an-available-cidr-range>"
  ssh_public_key: "${_ssh_public_key}" # NOTE: value of _ssh_public_key assumed to be provided in secrets.sh
  dev_source_address_prefixes:
    - "<replace-with-list-of-dev-ip-cidrs>"
  user_source_address_prefixes:
    - "<replace-with-list-of-user-ip-cidrs>"
  dns_and_certs_configs:
    resource_group: "<replace-with-your-resource-group-name-containing-the-domain-and-certs>"
    dns_zone: "<replace-with-the-dns-zone-under-which-apps-will-be-registered>"
    wildcard_cert: "<replace-with-the-name-of-the-wildcard-certificate-of-the-above-base-domain>"
  api_sub_domain: "<replace-with-the-subdomain-to-be-used-for-the-api>"
  ui_sub_domain: "<replace-with-the-subdomain-to-be-used-for-the-ui>"
  # elastic_sub_domain: 'replace-with-subdomain-for-elastic>'
  # kibana_sub_domain: '<replace-with-subdomain-for-kibana>'
  # grafana_sub_domain: '<replace-with-subdomain-for-grafana>'
  include_ui_custom_domain: <true|false>
  ngc_api_key: "${_ngc_api_key}" # NOTE: value of _ngc_api_key assumed to be provided in secrets.sh
  # vm_image_version : <replace-with-vm-image-version-of-Ubuntu22.04-defaults-to-latest>
  # api_vm_size: '<replace-with-desired-vm-size-defaults-to-Standard_NC64as_T4_v3>'
  # api_vm_data_disk_size_gb: <replace-with-desired-vm-disk-size-defaults-to-1024>
  # rp_vm_size: "<override-value-for-rp-vm-defaults-to-Standard_B2s_v2>"
  # rp_vm_data_disk_size_gb: <override-value-for-rp-vm-defaults-to-1024>
  # turn_server_provider: "<one-of-allowed-implementation-rp|coturn>"
  api_settings:
    # chart_org: "nvidia"
    # chart_team: "ucs-ms"
    # chart_name: "ucs-tokkio-audio-video-app"
    # chart_version: "4.1.0"
    # chart_namespace:
    #   api_ns: '<replace-with-k8s-namespace-for-application-chart/objects-defaults-to-default>'
    #   foundational_ns: '<replace-with-k8s-namespace-for-foundational-chart-defaults-to-foundational>'
    # openai_api_key: '${_openai_api_key}' # NOTE: value of _openai_api_key assumed to be provided in secrets.sh
    # cns_settings:
    #   cns_version: '<replace-with-required-cns-version-defaults-to-11.0>'
    #   cns_commit: '<replace-with-required-cns-git-hash-defaults-to-1abe8a8e17c7a15adb8b2585481a3f69a53e51e2>'
    # gpu_driver_settings:
    #   gpu_driver_runfile_install: '<replace-with-true-or-false-defaults-to-true>'
    #   gpu_driver_version: '<replace-with-gpu_driver_version-defaults-to-gpu_driver_version-coming-from-cns_values_${cns_version}.yaml-file'

  # NOTE: Uncomment and update below section in case turn_server_provider = rp
  # --- RP SETUP CONFIGURATION START ---
  # rp_settings:
  #   chart_org: 'nvidia'
  #   chart_team: 'ucs-ms'
  #   chart_name: 'rproxy'
  #   chart_version: '0.0.5'
  #   cns_settings:
  #     cns_version: '<replace-with-required-cns-version-defaults-to-11.0>'
  #     cns_commit: '<replace-with-required-cns-git-hash-defaults-to-1abe8a8e17c7a15adb8b2585481a3f69a53e51e2>'
  # --- RP SETUP CONFIGURATION END ---

  # NOTE: Uncomment and update below section in case turn_server_provider = coturn
  # --- COTURN CONFIGURATION START ---
  # coturn_settings:
  #   realm: '<replace-with-a-realm-to-use-for-the-turnserver>'
  #   username: '<replace-with-a-username-to-use-for-the-turnserver>'
  #   password: '${_coturn_password}' # NOTE: value of _coturn_password assumed to be provided in secrets.sh
  # --- COTURN CONFIGURATION END ---

  # NOTE: Uncomment any of the below lines based on the need to override
  # ui_settings:
  #   resource_org: "nvidia"
  #   resource_team: "ucs-ms"
  #   resource_name: "tokkio_ui"
  #   resource_version: "4.0.4"
  #   resource_file: "ui.tar.gz"
  #   countdown_value: "90"
  #   enable_countdown: false/true
  #   enable_camera: false/true
  #   app_title: "<your-custom-title>"
  #   application_type: "<choice-of-app-type-eg-qsr>"
  #   overlay_visible: <ui-settings-true|false>
  #   ui_window_visible: <ui-settings-true|false>
Note
To use Tokkio LLM reference app you need to update at least these properties
spec > api_settings > chart_name: "ucs-tokkio-audio-video-llm-app"andspec > ui_settings > application_type: "custom". For QSR app, you need to have at least``spec > api_settings > openai_api_key`` properties.Explanation of each and every entry of this yml file are explained in below table.
Deploy Template Parameter name
Type
Optional
Description
project_name
string
A unique name to identify the project. This is important to tear down resources later.
description
string
A brief description of the project.
template_version
string
0.4.0
csp
string
azure
backend
map
Backend configuration.
backend > tenant_id
string
Azure tenant id of the state storage account.
backend > subscription_id
string
Azure subscription id of the state storage account.
backend > client_id
string
Azure client id of the app registration with access to subscription.
backend > client_secret
string
Azure client secret for the above client id.
backend > resource_group_name
string
Azure resource group name of the state storage account.
backend > storage_account_name
string
Azure storage account name of the state storage account.
backend > container_name
string
Azure storage account container name of the container for state storage in the state storage account.
provider
map
Provider configuration.
provider > tenant_id
string
Azure tenant id where application will be deployed.
provider > subscription_id
string
Azure subscription id where application will be deployed.
provider > client_id
string
Azure client id of the app registration with access to subscription.
provider > client_secret
string
Azure client secret for the above client id.
spec
map
Application configuration.
spec > region
string
Azure region in which resources will be created.
spec > virtual_network_address_space
string
Private CIDR range in which base, turn and app resources will be created.
spec > ssh_public_key
string
Content of the public key of the ssh key-pair used for instance access. Prefer to provide via variable in secrets.sh.
spec > dev_source_address_prefixes
array
CIDR ranges from where SSH access should be allowed.
spec > user_source_address_prefixes
array
CIDR ranges from where application UI and API will be allowed access.
spec > dns_and_certs_configs
map
DNS and certificate configuration.
spec > dns_and_certs_configs > resource_group
string
Resource group of the DNS zone and key vault containing the certificate.
spec > dns_and_certs_configs > dns_zone
string
DNS zone name to be used as the base domain for the API and optionally the UI.
spec > dns_and_certs_configs > wildcard_cert
string
Name of the wildcard certificate that can be used against the various deployments.
spec > api_sub_domain
string
Sub-domain of the app API endpoint.
spec > ui_sub_domain
string
Sub-domain of the app UI endpoint.
spec > elastic_sub_domain
string
yes
Sub-domain of the elasticsearch UI endpoint.
spec > kibana_sub_domain
string
yes
Sub-domain of the kibana UI endpoint.
spec > grafana_sub_domain
string
yes
Sub-domain of the grafana UI endpoint.
spec > include_ui_custom_domain
bool
True if UI needs custom base domain. False if azure managed base domain acceptable.
spec > ngc_api_key
string
NGC API key with access to deployment artifacts. Prefer to provide via variable in secrets.sh.
spec > vm_image_version
string
yes
vm image version of Ubuntu 22.04 to be used. Defaults to latest.
spec > api_vm_size
string
yes
The Azure Virtual Machine size on which the API would run. Defaults to Standard_NC64as_T4_v3.
spec > api_vm_data_disk_size_gb
number
yes
The data disk size in GB on which the API would run. Defaults to 1024.
spec > rp_vm_size
string
yes
The Azure Virtual Machine size on which the API would run. Defaults to Standard_B2s_v2.
spec > rp_vm_data_disk_size_gb
number
yes
The data disk size in GB on which the RP instance would run. Defaults to 1024.
spec > turn_server_provider
string
yes
Either rp or coturn. Defaults to rp.
spec > rp_settings
map
yes
Configuration to configure RP as turn server. Must provide these values when spec > turn_server_provider is set to rp or left to empty (defaults to rp).
spec > rp_settings > chart_org
string
NGC Org of the RP chart to be used.
spec > rp_settings > chart_team
string
NGC Team of the RP chart to be used.
spec > rp_settings > chart_name
string
NGC Resource Name of the RP chart to be used.
spec > rp_settings > chart_version
string
NGC Resource Version of the RP chart to be used.
spec > rp_settings > cns_settings
map
yes
Nvidia Cloud Native Stack configuration.
spec > rp_settings > cns_settings > cns_version
string
yes
Nvidia cloud native stack version to be used. Defaults to 11.0
spec > rp_settings > cns_settings > cns_commit
string
yes
Nvidia cloud native stack commit id to be used. Defaults to 1abe8a8e17c7a15adb8b2585481a3f69a53e51e2.
spec > coturn_settings
map
yes
Configuration to configure COTURN as turn server. Must provide these values when spec > turn_server_provider is set to coturn.
spec > coturn_settings > realm
string
Realm name to be used during COTURN setup.
spec > coturn_settings > username
string
Username to be used connect to COTURN server.
spec > coturn_settings > password
string
Password to be used connect to COTURN server. Prefer to provide via variable in secrets.sh.
spec > api_settings
map
Configuration to change the default API chart used.
spec > api_settings > chart_org
string
yes
NGC Org of the API chart to be used.
spec > api_settings > chart_team
string
yes
NGC Team of the API chart to be used.
spec > api_settings > chart_name
string
yes
NGC Resource Name of the API chart to be used. Defaults to ucs-tokkio-audio-video-app (QSR).
spec > api_settings > chart_version
string
yes
NGC Resource Version of the API chart to be used.
spec > api_settings > chart_namespace
map
yes
Kubernetes namespace configuration.
spec > api_settings > chart_namespace > api_ns
string
yes
Kubernetes namespace to deploy API chart.
spec > api_settings > chart_namespace > foundational_ns
string
yes
Kubernetes namespace to deploy foundational chart.
spec > api_settings > openai_api_key
string
yes
Open AI API key for the QSR app (https://openai.com/blog/openai-api). Prefer to provide via variable in secrets.sh.
spec > api_settings > cns_settings
map
yes
Nvidia Cloud Native Stack configuration.
spec > api_settings > cns_settings > cns_version
string
yes
Nvidia cloud native stack version to be used. Defaults to 11.0
spec > api_settings > cns_settings > cns_commit
string
yes
Nvidia cloud native stack commit id to be used. Defaults to 1abe8a8e17c7a15adb8b2585481a3f69a53e51e2.
spec > api_settings > gpu_driver_settings
map
yes
GPU driver configuration.
spec > api_settings > gpu_driver_settings > gpu_driver_runfile_install
string
yes
Enable GPU driver installation using runfile. Defaults to true.
spec > api_settings > gpu_driver_settings > gpu_driver_version
string
yes
Configuration to change gpu driver version to be used. Defaults to version coming in cloud native stack.
spec > ui_settings
map
yes
Configuration to change the default UI resource used.
spec > ui_settings > resource_org
string
yes
NGC Org of the UI resource to be used.
spec > ui_settings > resource_team
string
yes
NGC Team of the UI resource to be used.
spec > ui_settings > resource_name
string
yes
NGC Resource Name of the UI resource to be used.
spec > ui_settings > resource_version
string
yes
NGC Resource Version of the UI resource to be used.
spec > ui_settings > resource_file
string
yes
NGC Resource File Name of the UI resource to be used.
spec > ui_settings > countdown_value
number
yes
Count down value in seconds. Defaults to 90.
spec > ui_settings > enable_countdown
bool
yes
Either true or false. used for Enabling Countdown parameter for UI. Defaults to false.
spec > ui_settings > enable_camera
bool
yes
Eeither true or false. used for Enabling Camera parameter for UI. Defaults to true.
spec > ui_settings > app_title
string
yes
Custom App Title for UI.
spec > ui_settings > application_type
string
yes
Custom Application Type for UI.
spec > ui_settings > overlay_visible
bool
yes
Either true or false. used to make Overlay visible in the UI. Defaults to true.
spec > ui_settings > ui_window_visible
bool
yes
Either true or false. used to make UI window visible. Defaults to false.
Setup logs backup
Audit logs for any changes made via the script will be captured in a directory named logs at the same level as the deploy-template.yml
Take necessary measures to ensure these are backed up in the event they are needed for debugging.
Note
Any values defined in secrets.sh will be masked in the logs
Deploy infrastructure and application
Use the below commands to Install / Update / Uninstall Tokkio application along with its infrastructure as per specs provided in deploy-template.
# To view available options
bash tokkio-deploy

# To preview changes based on deploy-template.yml without actually applying the changes
bash tokkio-deploy preview

# To install changes showed in preview option based on deploy-template.yml
bash tokkio-deploy install

# To show results/information about the project installed
bash tokkio-deploy show-results

# To uninstall the deployed infra and application
bash tokkio-deploy uninstall
Important
Both install and uninstall Options needs to be run with care. We recommend preview option to see the changes before install.
If you are looking for an option to print the details of your past installation, use show-results option.
Warning
Any attempts to suspend Ctrl + Z the running deployment will result in an inability to make changes to the project via the scripts as well as the need to manually cleanup resources created via the web console. Prefer terminating the process using Ctrl + C in case it has to absolutely be exited.
Known Issues
Occasionally the install step might fail with an error reading something similar to one of the below:
Error: updating Azure Storage Account `static_website` "####": accounts.Client#SetServiceProperties: Failure responding to request: StatusCode=404Error: failed creating container: failed creating container: containers.Client#Create: Failure responding to request: StatusCode=404
When this occurs, running
installagain one or more times usually resolves the issue.
Verify Deployment
On successful deployment of Infra, you will be displayed output in a format as shown below.
Apply complete! Resources: <nn> added, <nn> changed, <nn> destroyed.

Outputs:

app_infra = {
  "api_endpoint" = "https://<api_sub_domain>.<base_domain>"
  "elasticsearch_endpoint" = "https://<elastic_sub_domain>.<base_domain>"
  "grafana_endpoint" = "https://<grafana_sub_domain>.<base_domain>"
  "kibana_endpoint" = ""https://<kibana_sub_domain>.<base_domain>"

  "private_ips" = [
    "<private_ip_of_app_instace>",
  ]
  "ui_endpoint" = "https://<ui_sub_domain>.<base_domain>"
}
bastion_infra = {
  "private_ip" = "<bastion_instance_private_ip>"
  "public_ip" = "<bastion_instance_public_ip>"
}
rp_infra = {
  "private_ip" = "<rp_instance_private_ip>"
  "public_ip" = "<rp_instance_public_ip>"
}
Use ssh command in below format to log into Application virtual machine.
#Replace content between '<' and '>' with its appropriate values.
#pem file refered here must the key associated to the public key used in initial steps of setup.
ssh -i <path-to-pem-file> -o StrictHostKeyChecking=no -o ProxyCommand="ssh -i <path-to-pem-file> -W %h:%p -o StrictHostKeyChecking=no ubuntu@<bastion-vm-public-ip>" ubuntu@<app-vm-private-ip>
Once logged into the terminal, run below command to see the Kubernetes Pods’ statuses. All the pods should turn into Running state eventually.
ubuntu@qsr-app-api-1:~$  kubectl get pods
NAME                                                        READY   STATUS    RESTARTS   AGE
a2f-a2f-deployment-6d9f4d6ddd-vfmmf                         1/1     Running   0          45m
ace-agent-chat-controller-deployment-0                      1/1     Running   0          45m
ace-agent-chat-engine-deployment-687b4868c-x9m5l            1/1     Running   0          45m
ace-agent-plugin-server-deployment-7f7b7f848f-b862s         1/1     Running   0          45m
anim-graph-sdr-envoy-sdr-deployment-5c9c8d58c6-242h9        3/3     Running   0          45m
chat-controller-sdr-envoy-sdr-deployment-77975fc6bf-45vcm   3/3     Running   0          45m
ds-sdr-envoy-sdr-deployment-79676f5775-qwp9b                3/3     Running   0          45m
ds-visionai-ds-visionai-deployment-0                        2/2     Running   0          45m
ia-animation-graph-microservice-deployment-0                1/1     Running   0          45m
ia-omniverse-renderer-microservice-deployment-0             1/1     Running   0          45m
ia-omniverse-renderer-microservice-deployment-1             1/1     Running   0          45m
ia-omniverse-renderer-microservice-deployment-2             1/1     Running   0          45m
mongodb-mongodb-bc489b954-rc5nf                             1/1     Running   0          45m
occupancy-alerts-api-app-cfb94cb7b-s8vrh                    1/1     Running   0          45m
occupancy-alerts-app-5b97f578d8-q2nlz                       1/1     Running   0          45m
redis-redis-5cb5cb8596-r2grd                                1/1     Running   0          45m
redis-timeseries-redis-timeseries-55d476db56-bzh8w          1/1     Running   0          45m
renderer-sdr-envoy-sdr-deployment-5d4d99c778-4kgbn          3/3     Running   0          45m
riva-speech-57dbbc9dbf-f9p8w                                1/1     Running   0          45m
tokkio-cart-manager-deployment-55476f746b-5mjfc             1/1     Running   0          45m
tokkio-ingress-mgr-deployment-7cc446758f-wnz2d              3/3     Running   0          45m
tokkio-menu-api-deployment-748c8c6574-c9hhk                 1/1     Running   0          45m
tokkio-ui-server-deployment-55fcbdd9f4-z7xh9                1/1     Running   0          45m
tokkio-umim-action-server-deployment-74977db6d6-5pxz8       1/1     Running   0          45m
triton0-766cdf66b8-w5xnk                                    1/1     Running   0          45m
vms-vms-bc7455786-gjhc9                                     1/1     Running   0          45m
Note
Based on several conditions, Pods may take upto 50-60 mins to turn into Running state.
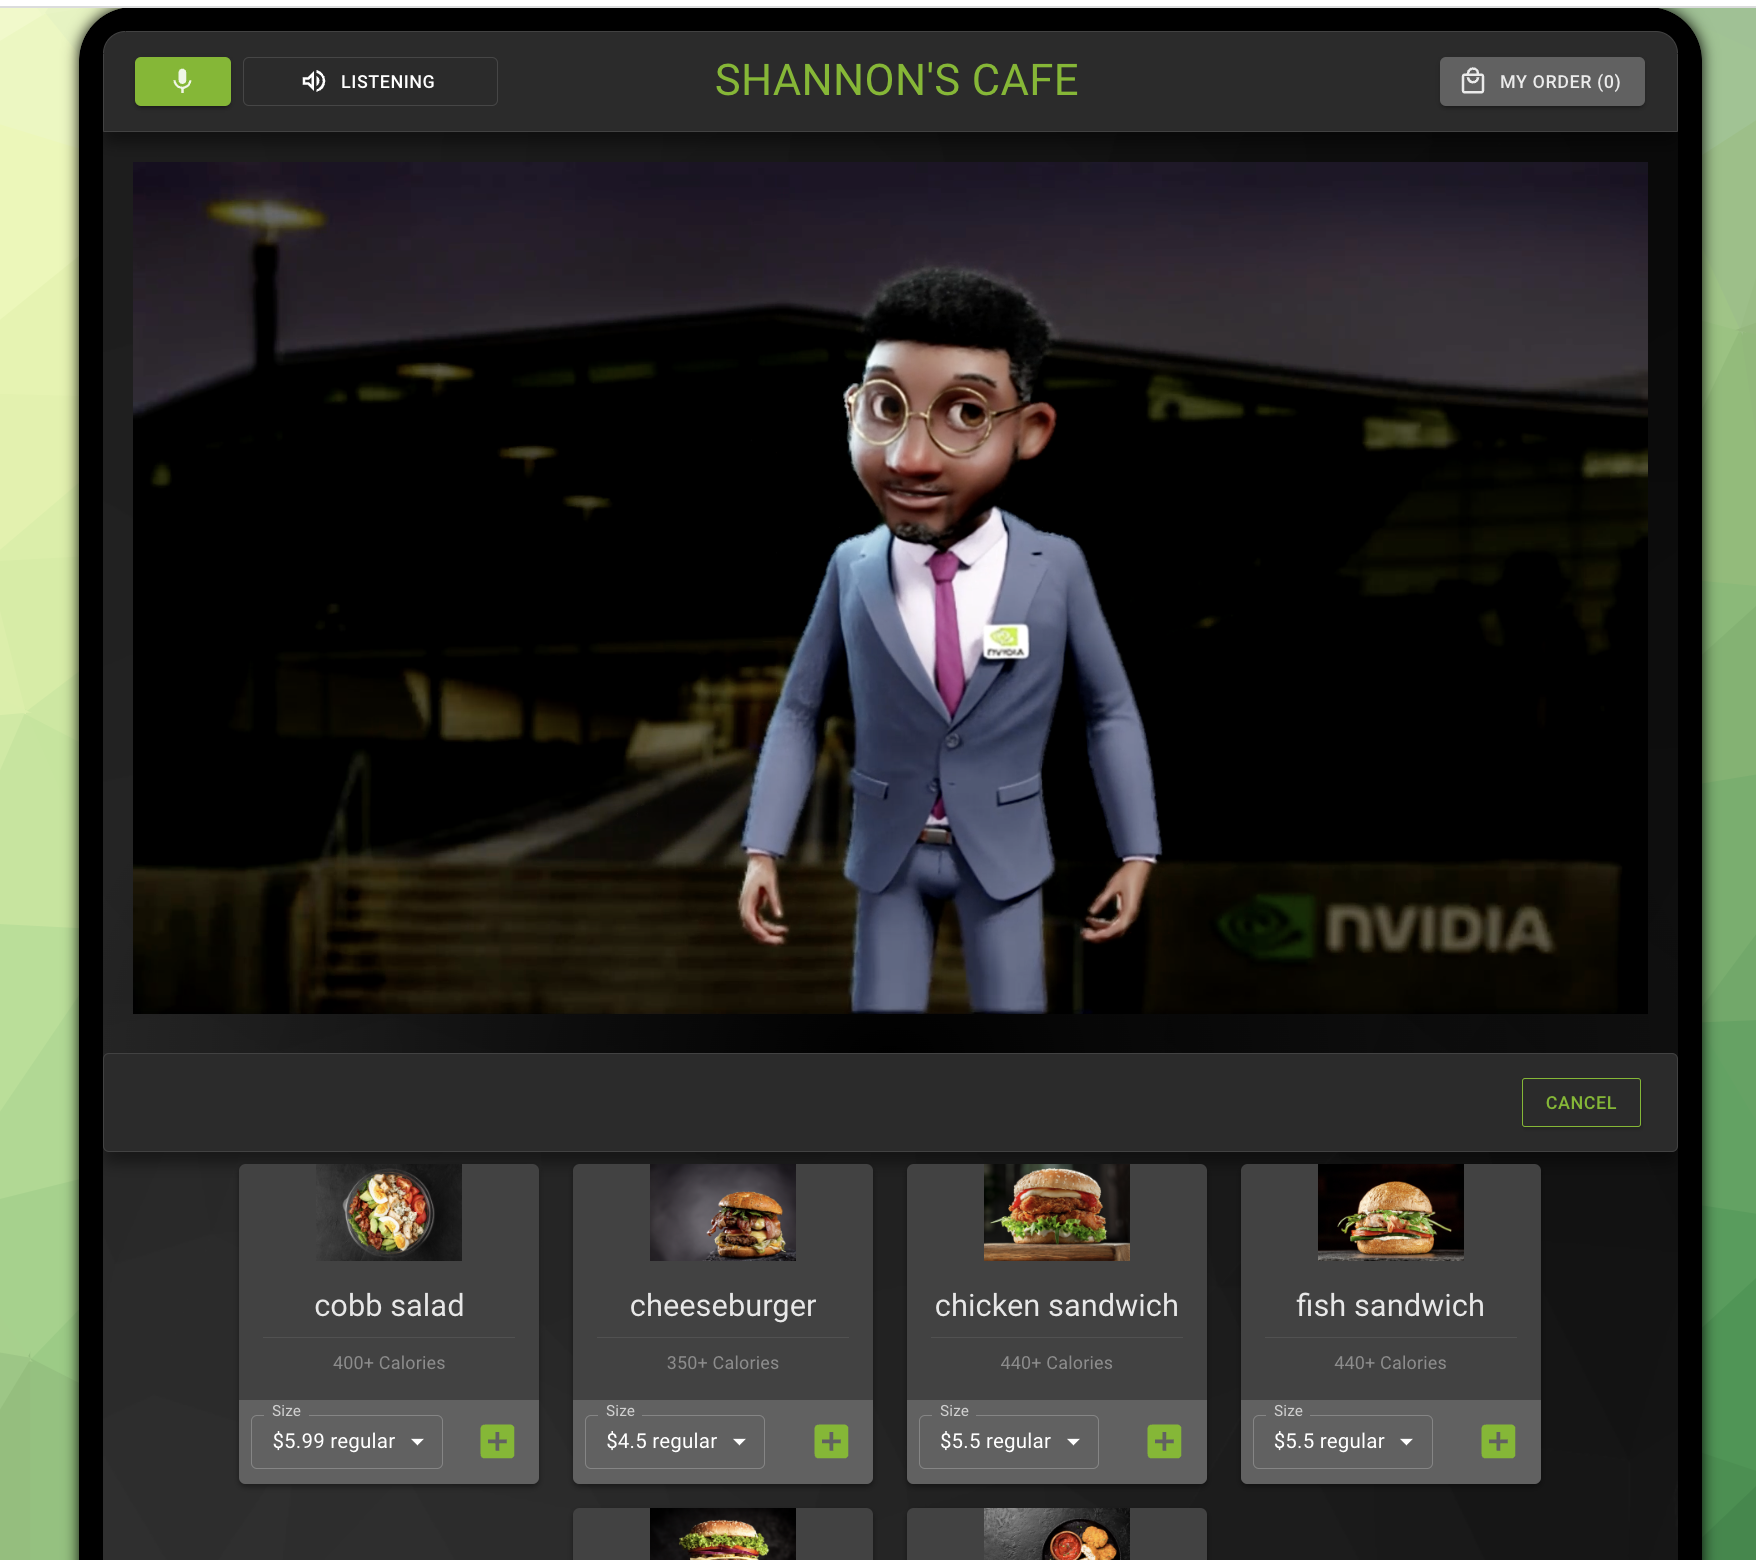
Once all the pods are in Running state, try accessing the UI with the help of URL printed in output attribute ui_endpoint. Example ui_endpoint https://toc-one-ui.azureedge.net.
When you try your URL on browser, you should be able to see Tokkio application coming up at this point.
Teardown infrastructure and application
To teardown all the infrastructure along with application that we created thru above scripts, run bash tokkio-deploy uninstall command.
Important
Both install and uninstall Options needs to be run with care. We recommend preview option to see the changes before install.
If you are looking for an option to print the details of your past installation, use show-results option.