Profiling and Performance Monitoring of NVIDIA Agent Intelligence Toolkit Workflows#
The AIQ toolkit Profiler Module provides profiling and forecasting capabilities for AIQ toolkit workflows. The profiler instruments the workflow execution by:
Collecting usage statistics in real time (via callbacks).
Recording the usage statistics on a per-invocation basis (e.g., tokens used, time between calls, LLM calls).
Storing the data for offline analysis.
Forecasting usage metrics using time-series style models (linear, random forest, etc.).
Computing workflow specific metrics for performance analysis (e.g., latency, throughput, etc.).
Analyzing workflow performance measures such as bottlenecks, latency, and concurrency spikes.
These functionalities will allow AIQ toolkit developers to dynamically stress test their workflows in pre-production phases to receive workflow-specific sizing guidance based on observed latency and throughput of their specific workflows At any or every stage in a workflow execution, the AIQ toolkit profiler generates predictions/forecasts about future token and tool usage. Client side forecasting allows for workflow-specific predictions which can be difficult, if not impossible, to achieve server side in order to facilitate inference planning. Will allow for features such as offline-replay or simulation of workflow runs without the need for deployed infrastructure such as tooling/vector DBs, etc. Will also allow for AIQ toolkit native observability and workflow fingerprinting.
Prerequisites#
The AIQ toolkit profiler requires additional dependencies not installed by default.
Install these dependencies by running the following command:
uv pip install -e .[profiling]
Current Profiler Architecture#
The AIQ toolkit Profiler can be broken into the following components:
Profiler Decorators and Callbacks#
profiler/decorators.py defines decorators that can wrap each workflow or LLM framework context manager to inject usage-collection callbacks.
profiler/callbacks directory implements callback handlers. These handlers track usage statistics (tokens, time, inputs/outputs) and push them to the AIQ toolkit usage stats queue. We currently support callback handlers for LangChain, LLama Index, CrewAI, and Semantic Kernel.
Profiler Runner#
profiler/profile_runner.py is the main orchestration class. It collects workflow run statistics from the AIQ toolkit Eval module, computed workflow-specific metrics, and optionally forecasts usage metrics using the AIQ toolkit Profiler module.
Under profiler/forecasting, the code trains scikit-learn style models on the usage data. model_trainer.py can train a LinearModel or a RandomForestModel on the aggregated usage data (the raw statistics collected). base_model.py, linear_model.py, and random_forest_regressor.py define the abstract base and specific scikit-learn wrappers.
Under profiler/inference_optimization we have several metrics that can be computed out evaluation traces of your workflow including workflow latency, commonly used prompt prefixes for caching, identifying workflow bottlenecks, and concurrency analysis.
CLI Integrations#
Native integrations with aiq eval to allow for running of the profiler through a unified evaluation interface. Configurability is exposed through a workflow YAML configuration file consistent with evaluation configurations.
Using the Profiler#
Step 1: Enabling Instrumentation on a Workflow [Optional]#
NOTE: If you don’t set it, AIQ toolkit will inspect your code to infer frameworks used. We recommend you set it explicitly.
To enable profiling on a workflow, you need to wrap the workflow with the profiler decorators. The decorators can be applied to any workflow using the framework_wrappers argument of the register_function decorator.
Simply specify which AIQ toolkit supported frameworks you will be using anywhere in your workflow (including tools) upon registration and AIQ toolkit will automatically apply the appropriate profiling decorators at build time.
For example:
@register_function(config_type=WebQueryToolConfig, framework_wrappers=[LLMFrameworkEnum.LANGCHAIN])
async def webquery_tool(config: WebQueryToolConfig, builder: Builder):
Once workflows are instrumented, the profiler will collect usage statistics in real time and store them for offline analysis for any LLM invocations or tool calls your workflow makes during execution. Runtime telemetry
is stored in a intermediate_steps_stream context variable during runtime. AIQ toolkit has a subscriber that will read intermediate steps through eval.
Even if a function isn’t one of the built-in AIQ toolkit “Functions”, you can still profile it with our simple decorator. The @track_function decorator helps you capture details such as when a function starts and ends, its input arguments, and its output—even if the function is asynchronous, a generator, or a class method.
How It Works#
The decorator automatically logs key events in three stages:
SPAN_START: Logged when the function begins executing. It records the serialized inputs.SPAN_CHUNK: For generator functions, each yielded value is captured as it’s produced.SPAN_END: Logged when the function finishes executing. It records the serialized output.
It supports all kinds of functions:
Synchronous functions & methods
Asynchronous functions
Generators (both
syncandasync)
Key Benefits#
Broad Compatibility: Use this decorator on any Python function, regardless of its type.
Simple Metadata: Optionally pass a dictionary of metadata to add extra context about the function call.
Automatic Data Serialization: The decorator converts input arguments and outputs into a
JSON-friendly format (with special handling for Pydantic models), making the data easier to analyze.Reactive Event Streaming: All profiling events are pushed to the
AIQ toolkitintermediate step stream, so you can subscribe and monitor events in real time.
How to Use#
Just decorate your custom function with @track_function and provide any optional metadata if needed:
from aiq.profiler.decorators.function_tracking import track_function

@track_function(metadata={"action": "compute", "source": "custom_function"})
def my_custom_function(a, b):
    # Your function logic here
    return a + b
Step 2: Configuring the Profiler with Eval#
The profiler can be run through the aiq eval command. The profiler can be configured through the profiler section of the workflow configuration file. The following is an example eval configuration section from the simple workflow which shows how to enable the profiler:
eval:
  general:
    output_dir: ./.tmp/aiq/examples/simple/
    dataset:
      _type: json
      file_path: examples/simple/data/langsmith.json
    profiler:
      # Compute inter query token uniqueness
      token_uniqueness_forecast: true
      # Compute expected workflow runtime
      workflow_runtime_forecast: true
      # Compute inference optimization metrics
      compute_llm_metrics: true
      # Avoid dumping large text into the output CSV (helpful to not break structure)
      csv_exclude_io_text: true
      # Idenitfy common prompt prefixes
      prompt_caching_prefixes:
        enable: true
        min_frequency: 0.1
      bottleneck_analysis:
        # Can also be simple_stack
        enable_nested_stack: true
      concurrency_spike_analysis:
        enable: true
        spike_threshold: 7

  evaluators:
    rag_accuracy:
      _type: ragas
      metric: AnswerAccuracy
      llm_name: nim_rag_eval_llm
    rag_groundedness:
      _type: ragas
      metric: ResponseGroundedness
      llm_name: nim_rag_eval_llm
    rag_relevance:
      _type: ragas
      metric: ContextRelevance
      llm_name: nim_rag_eval_llm
    trajectory_accuracy:
      _type: trajectory
      llm_name: nim_trajectory_eval_llm
Please also note the output_dir parameter which specifies the directory where the profiler output will be stored. Let us explore the profiler configuration options:
token_uniqueness_forecast: Compute the inter-query token uniqueness forecast. This computes the expected number of unique tokens in the next query based on the tokens used in the previous queries.workflow_runtime_forecast: Compute the expected workflow runtime forecast. This computes the expected runtime of the workflow based on the runtime of the previous queries.compute_llm_metrics: Compute inference optimization metrics. This computes workflow-specific metrics for performance analysis (e.g., latency, throughput, etc.).csv_exclude_io_text: Avoid dumping large text into the output CSV. This is helpful to not break the structure of the CSV output.prompt_caching_prefixes: Identify common prompt prefixes. This is helpful for identifying if you have commonly repeated prompts that can be pre-populated in KV cachesbottleneck_analysis: Analyze workflow performance measures such as bottlenecks, latency, and concurrency spikes. This can be set tosimple_stackfor a simpler analysis. Nested stack will provide a more detailed analysis identifying nested bottlenecks like tool calls inside other tools calls.concurrency_spike_analysis: Analyze concurrency spikes. This will identify if there are any spikes in the number of concurrent tool calls. At aspike_thresholdof 7, the profiler will identify any spikes where the number of concurrent running functions is greater than or equal to 7. Those are surfaced to the user in a dedicated section of the workflow profiling report.
Step 3: Running the Profiler#
To run the profiler, simply run the aiq eval command with the workflow configuration file. The profiler will collect usage statistics and store them in the output directory specified in the configuration file.
aiq eval --config_file examples/simple/configs/eval_config.yml
This will, based on the above configuration, produce the following files in the output_dir specified in the configuration file:
all_requests_profiler_traces.json: This file contains the raw usage statistics collected by the profiler. Includes raw traces of LLM and tool input, runtimes, and other metadata.inference_optimization.json: This file contains the computed workflow-specific metrics. This includes 90%, 95%, and 99% confidence intervals for latency, throughput, and workflow runtime.standardized_data_all.csv: This file contains the standardized usage data including prompt tokens, completion tokens, LLM input, framework, and other metadata.You’ll also find a JSON file and text report of any advanced or experimental techniques you ran including concurrency analysis, bottleneck analysis, or PrefixSpan.
Walkthrough of Profiling a Workflow#
In this guide, we will walk you through an end-to-end example of how to profile an AIQ toolkit workflow using the AIQ toolkit profiler, which is part of the library’s evaluation harness. We will begin by creating a workflow to profile, explore some of the configuration options of the profiler, and then perform an in-depth analysis of the profiling results.
Defining a Workflow#
For this guide, we will use a simple, but useful, workflow that analyzes the body of a given email to determine if it is a Phishing email. We will define a single tool that takes an email body as input and returns a response on
whether the email is a Phishing email or not. We will then add that tool as the only tool available to the tool_calling agent pre-built in the AIQ toolkit library. Below is the implementation of the phishing tool. The source code for this example can be found at examples/email_phishing_analyzer/.
Configuring the Workflow#
The configuration file for the workflow is as follows. Here, pay close attention to how the profiler and eval sections are configured.
## CONFIGURATION OPTIONS OMITTED HERE FOR BREVITY

functions:
  email_phishing_analyzer:
    _type: email_phishing_analyzer
    llm: nim_llm
    prompt: |
      Examine the following email content and determine if it exhibits signs of malicious intent. Look for any
        suspicious signals that may indicate phishing, such as requests for personal information or suspicious tone.

      Email content:
      {body}

      Return your findings as a JSON object with these fields:

      - is_likely_phishing: (boolean) true if phishing is suspected
      - explanation: (string) detailed explanation of your reasoning


## OTHER CONFIGURATION OPTIONS OMITTED FOR BREVITY

eval:
  general:
    output_dir: ./.tmp/eval/examples/email_phishing_analyzer/test_models/llama-3.1-8b-instruct
    verbose: true
    dataset:
        _type: csv
        file_path: examples/email_phishing_analyzer/data/smaller_test.csv
        id_key: "subject"
        structure:
          question_key: body
          answer_key: label

    profiler:
        token_uniqueness_forecast: true
        workflow_runtime_forecast: true
        compute_llm_metrics: true
        csv_exclude_io_text: true
        prompt_caching_prefixes:
          enable: true
          min_frequency: 0.1
        bottleneck_analysis:
          # Can also be simple_stack
          enable_nested_stack: true
        concurrency_spike_analysis:
          enable: true
          spike_threshold: 7
Diving deeper into the eval section, we see that the profiler section is configured with the following options:
token_uniqueness_forecast: Compute inter query token uniquenessworkflow_runtime_forecast: Compute expected workflow runtimecompute_llm_metrics: Compute inference optimization metricscsv_exclude_io_text: Avoid dumping large text into the output CSV (helpful to not break structure)prompt_caching_prefixes: Identify common prompt prefixesbottleneck_analysis: Enable bottleneck analysisconcurrency_spike_analysis: Enable concurrency spike analysis. Set thespike_thresholdto 7, meaning that any concurrency spike above 7 will be raised to the user specifically.
We also we see the evaluators section, which includes the following metrics:
rag_accuracy: Evaluates the accuracy of the answer generated by the workflow against the expected answer or ground truth.rag_groundedness: Evaluates thegroundednessof the response generated by the workflow based on the context retrieved by the workflow.rag_relevance: Evaluates the relevance of the context retrieved by the workflow against the question.
Running the Profiler#
To run the profiler, simply run the aiq eval command with the workflow configuration file. The profiler will collect usage statistics and store them in the output directory specified in the configuration file.
aiq eval --config_file examples/email_phishing_analyzer/configs/<config_file>.yml
Among other files, this will produce a standardized_results_all.csv file in the output_dir specified in the configuration file. This file will contain the profiling results of the workflow that we will use for the rest of the analysis.
Analyzing the Profiling Results#
The remainder of this guide will demonstrate how to perform a simple analysis of the profiling results using the standardized_results_all.csv file to compare the performance of various LLMs and evaluate the workflow’s efficiency.
Ultimately, we will use the collected telemetry data to identify which LLM we think is the best fit for our workflow.
Particularly, we evaluate the following models:
meta-llama-3.1-8b-instructmeta-llama-3.1-70b-instructmixtral-8x22b-instructphi-3-medium-4k-instructphi-3-mini-4k-instruct
We run evaluation of the workflow on a small dataset of emails and compare the performance of the LLMs based on the metrics provided by the profiler. Once we run aiq eval, we can analyze the standardized_results_all.csv file to compare the performance of the LLMs.
Henceforth, we assume that you have run the aiq eval command and have the standardized_results_all.csv file in the output_dir specified in the configuration file. Please also take a moment to create a CSV file containing the concatenated results of the LLMs you wish to compare.
Plotting Prompt vs Completion Tokens for LLMs#
One of the first things we can do is to plot the prompt vs completion tokens for each LLM. This will give us an idea of how the LLMs are performing in terms of token usage. We can use the standardized_results_all.csv file to plot this data.
import matplotlib.pyplot as plt
import pandas as pd
import seaborn as sns

df = pd.read_csv("standardized_results_all.csv")
# Filter LLM_END events
df_llm_end = df[df["event_type"] == "LLM_END"]

# Plot scatter plot
plt.figure(figsize=(10, 6))
sns.scatterplot(
    data=df_llm_end,
    x="prompt_tokens",
    y="completion_tokens",
    hue="llm_name",
    style="function_name",
    s=100  # Marker size
)

# Customize the plot
plt.xlabel("Prompt Tokens", fontsize=12)
plt.ylabel("Completion Tokens", fontsize=12)
plt.title("Prompt Tokens vs Completion Tokens by LLM and Function", fontsize=14)
plt.legend(title="LLM / Function", bbox_to_anchor=(1.05, 1), loc="upper left")
plt.grid(True)
plt.show()
The plot will show the prompt tokens on the x-axis and the completion tokens on the y-axis. Each point represents a completion event by an LLM for a given prompt. The color of the point represents the LLM used, and the style represents the function used. Below is an example of what the plot might look like:
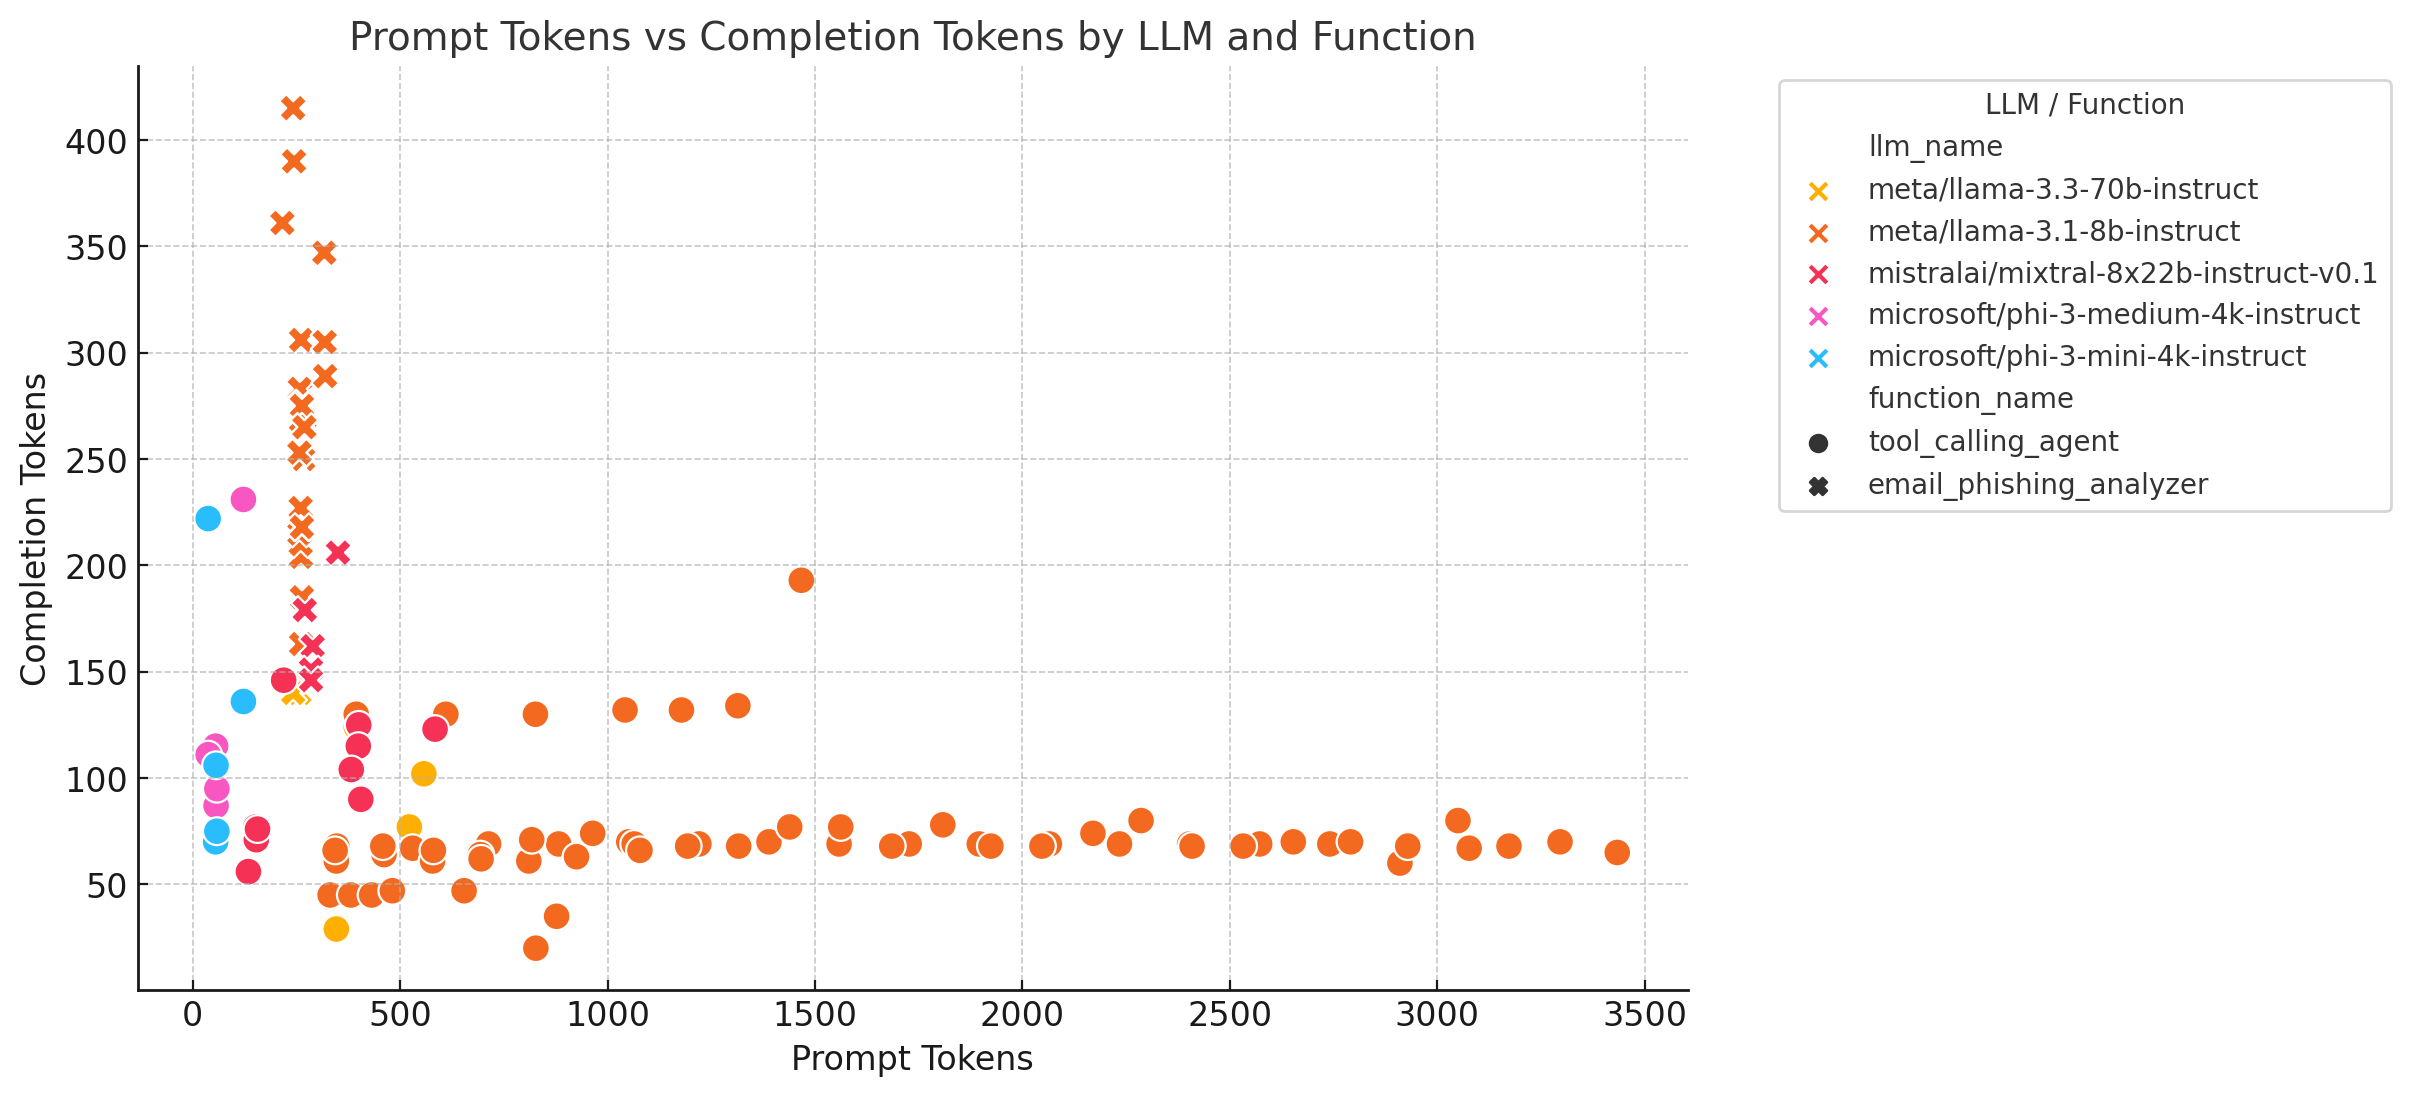
We see from the image above that the meta-llama-3.1-8b-instruct LLM has the highest prompt token usage and takes many more turns than any other model, perhaps indicating that it fails at tool calling. We also note that none of the phi-3-* models succeed at any tool calling, as they have no completion tokens in the
email_phishing_analyzer function. This could be due to the fact that the phi-3-* models are not well-suited for the task at hand.
Analyzing Workflow Runtimes#
Another important metric to analyze is the workflow runtime. We can use the standardized_results_all.csv file to plot the workflow runtime for each LLM. This will give us an idea of how long each LLM takes to complete the workflow and compare if some LLMs are more efficient than others.
df["event_timestamp"] = pd.to_numeric(df["event_timestamp"])

# Filter only LLM_START and LLM_END events
df_llm = df[df["event_type"].isin(["LLM_START", "LLM_END"])]

# Group by example_number and llm_name to get first LLM_START and last LLM_END timestamps
df_runtime = df_llm.groupby(["example_number", "llm_name"]).agg(
    start_time=("event_timestamp", "min"),
    end_time=("event_timestamp", "max")
).reset_index()

# Compute runtime
df_runtime["runtime_seconds"] = df_runtime["end_time"] - df_runtime["start_time"]

plt.figure(figsize=(10, 6))
sns.boxplot(
    data=df_runtime,
    x="llm_name",
    y="runtime_seconds"
)

# Set log scale for y-axis
plt.yscale("log")

# Customize the plot
plt.xlabel("LLM Model", fontsize=12)
plt.ylabel("Runtime (log10 scale, seconds)", fontsize=12)
plt.title("Example Runtime per LLM Model (Log Scale)", fontsize=14)
plt.xticks(rotation=45)
plt.grid(True, which="both", linestyle="--", linewidth=0.5)
plt.show()
We use the log scale for the y-axis to better visualize the runtime differences between the LLMs. The box plot will show the runtime of each LLM model for each example in the dataset. Below is an example of what the plot might look like:
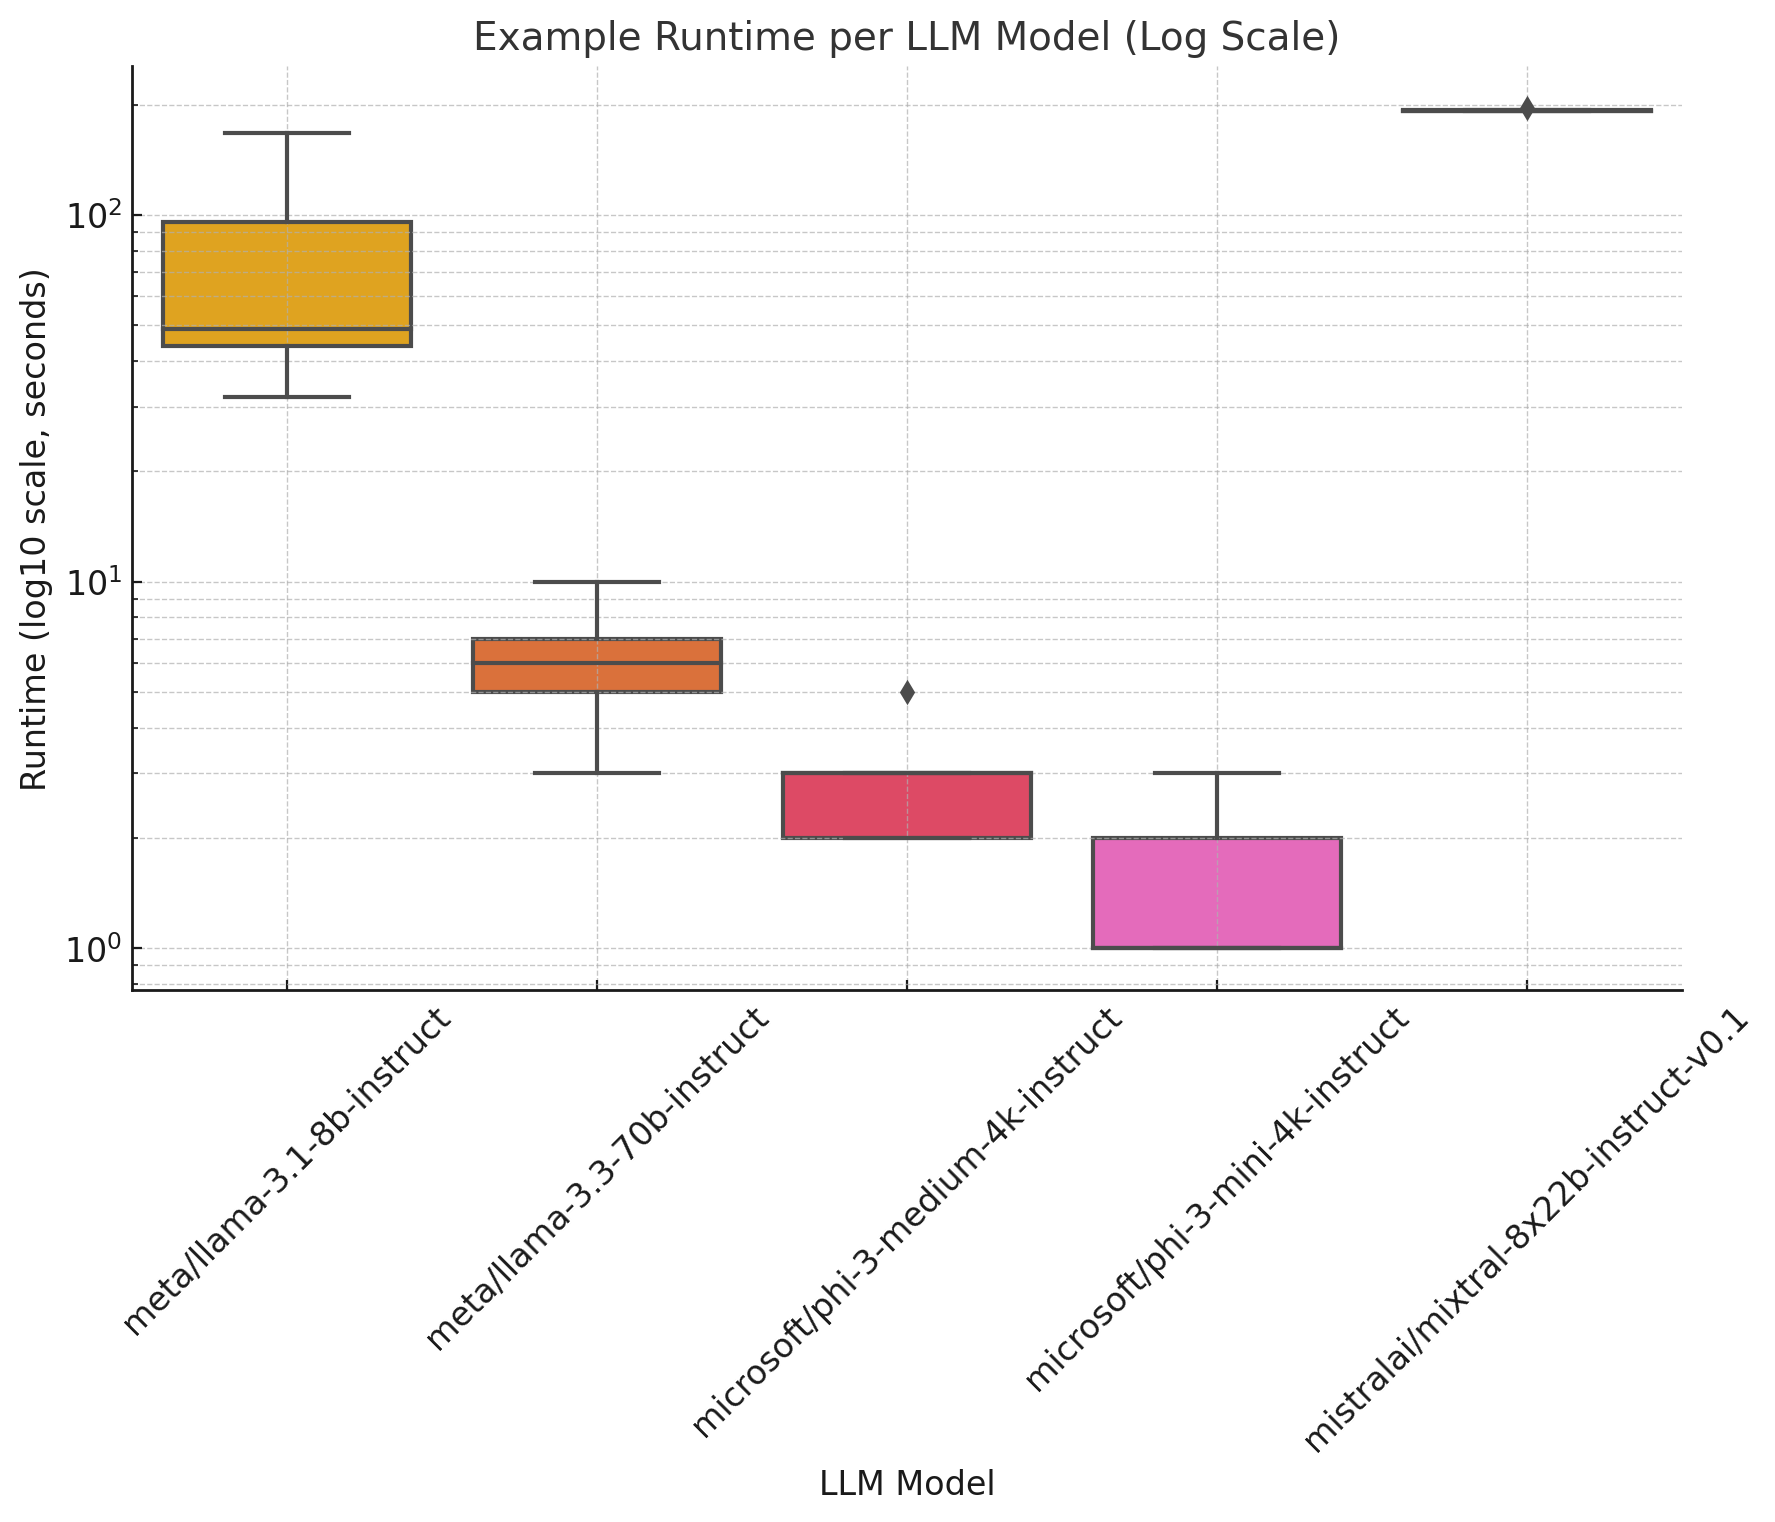
From the image above, we see that the mixtral-8x22b-instruct LLM has the highest runtime, indicating that it takes the longest to complete the workflow. The phi-3-mini-4k-instruct LLM has the lowest runtime, ostensibly due to the fact that it does not call tools at all and is the smallest model.
At the log scale, the mixtral-8x22b-instruct model take more than 10x longer than most other models.
Analyzing Token Efficiency#
Let us collect one more piece of information from the standardized_results_all.csv file to compare the performance of the LLMs. We will look at the total prompt and completion tokens generated by each LLM to determine which LLM is the most efficient in terms of token usage.
import numpy as np

# Aggregate total prompt and completion tokens per example and LLM
df_tokens = df_llm_end.groupby(["example_number", "llm_name"]).agg(
    total_prompt_tokens=("prompt_tokens", "sum"),
    total_completion_tokens=("completion_tokens", "sum")
).reset_index()

# Reshape data for plotting
df_tokens_melted = df_tokens.melt(
    id_vars=["example_number", "llm_name"],
    value_vars=["total_prompt_tokens", "total_completion_tokens"],
    var_name="Token Type",
    value_name="Token Count"
)

plt.figure(figsize=(12, 6))
sns.barplot(
    data=df_tokens_melted,
    x="llm_name",
    y="Token Count",
    hue="Token Type",
    ci=None
)

# Set log scale for y-axis
plt.yscale("log")

# Customize the plot
plt.xlabel("LLM Model", fontsize=12)
plt.ylabel("Total Token Count per Example (log10 scale)", fontsize=12)
plt.title("Total Prompt and Completion Tokens per Example by LLM Model (Log Scale)", fontsize=14)
plt.xticks(rotation=45)
plt.legend(title="Token Type")
plt.grid(axis="y", linestyle="--", linewidth=0.5, which="both")
plt.show()
The bar plot will show the total prompt and completion tokens generated by each LLM for each example in the dataset. Below is an example of what the plot might look like:
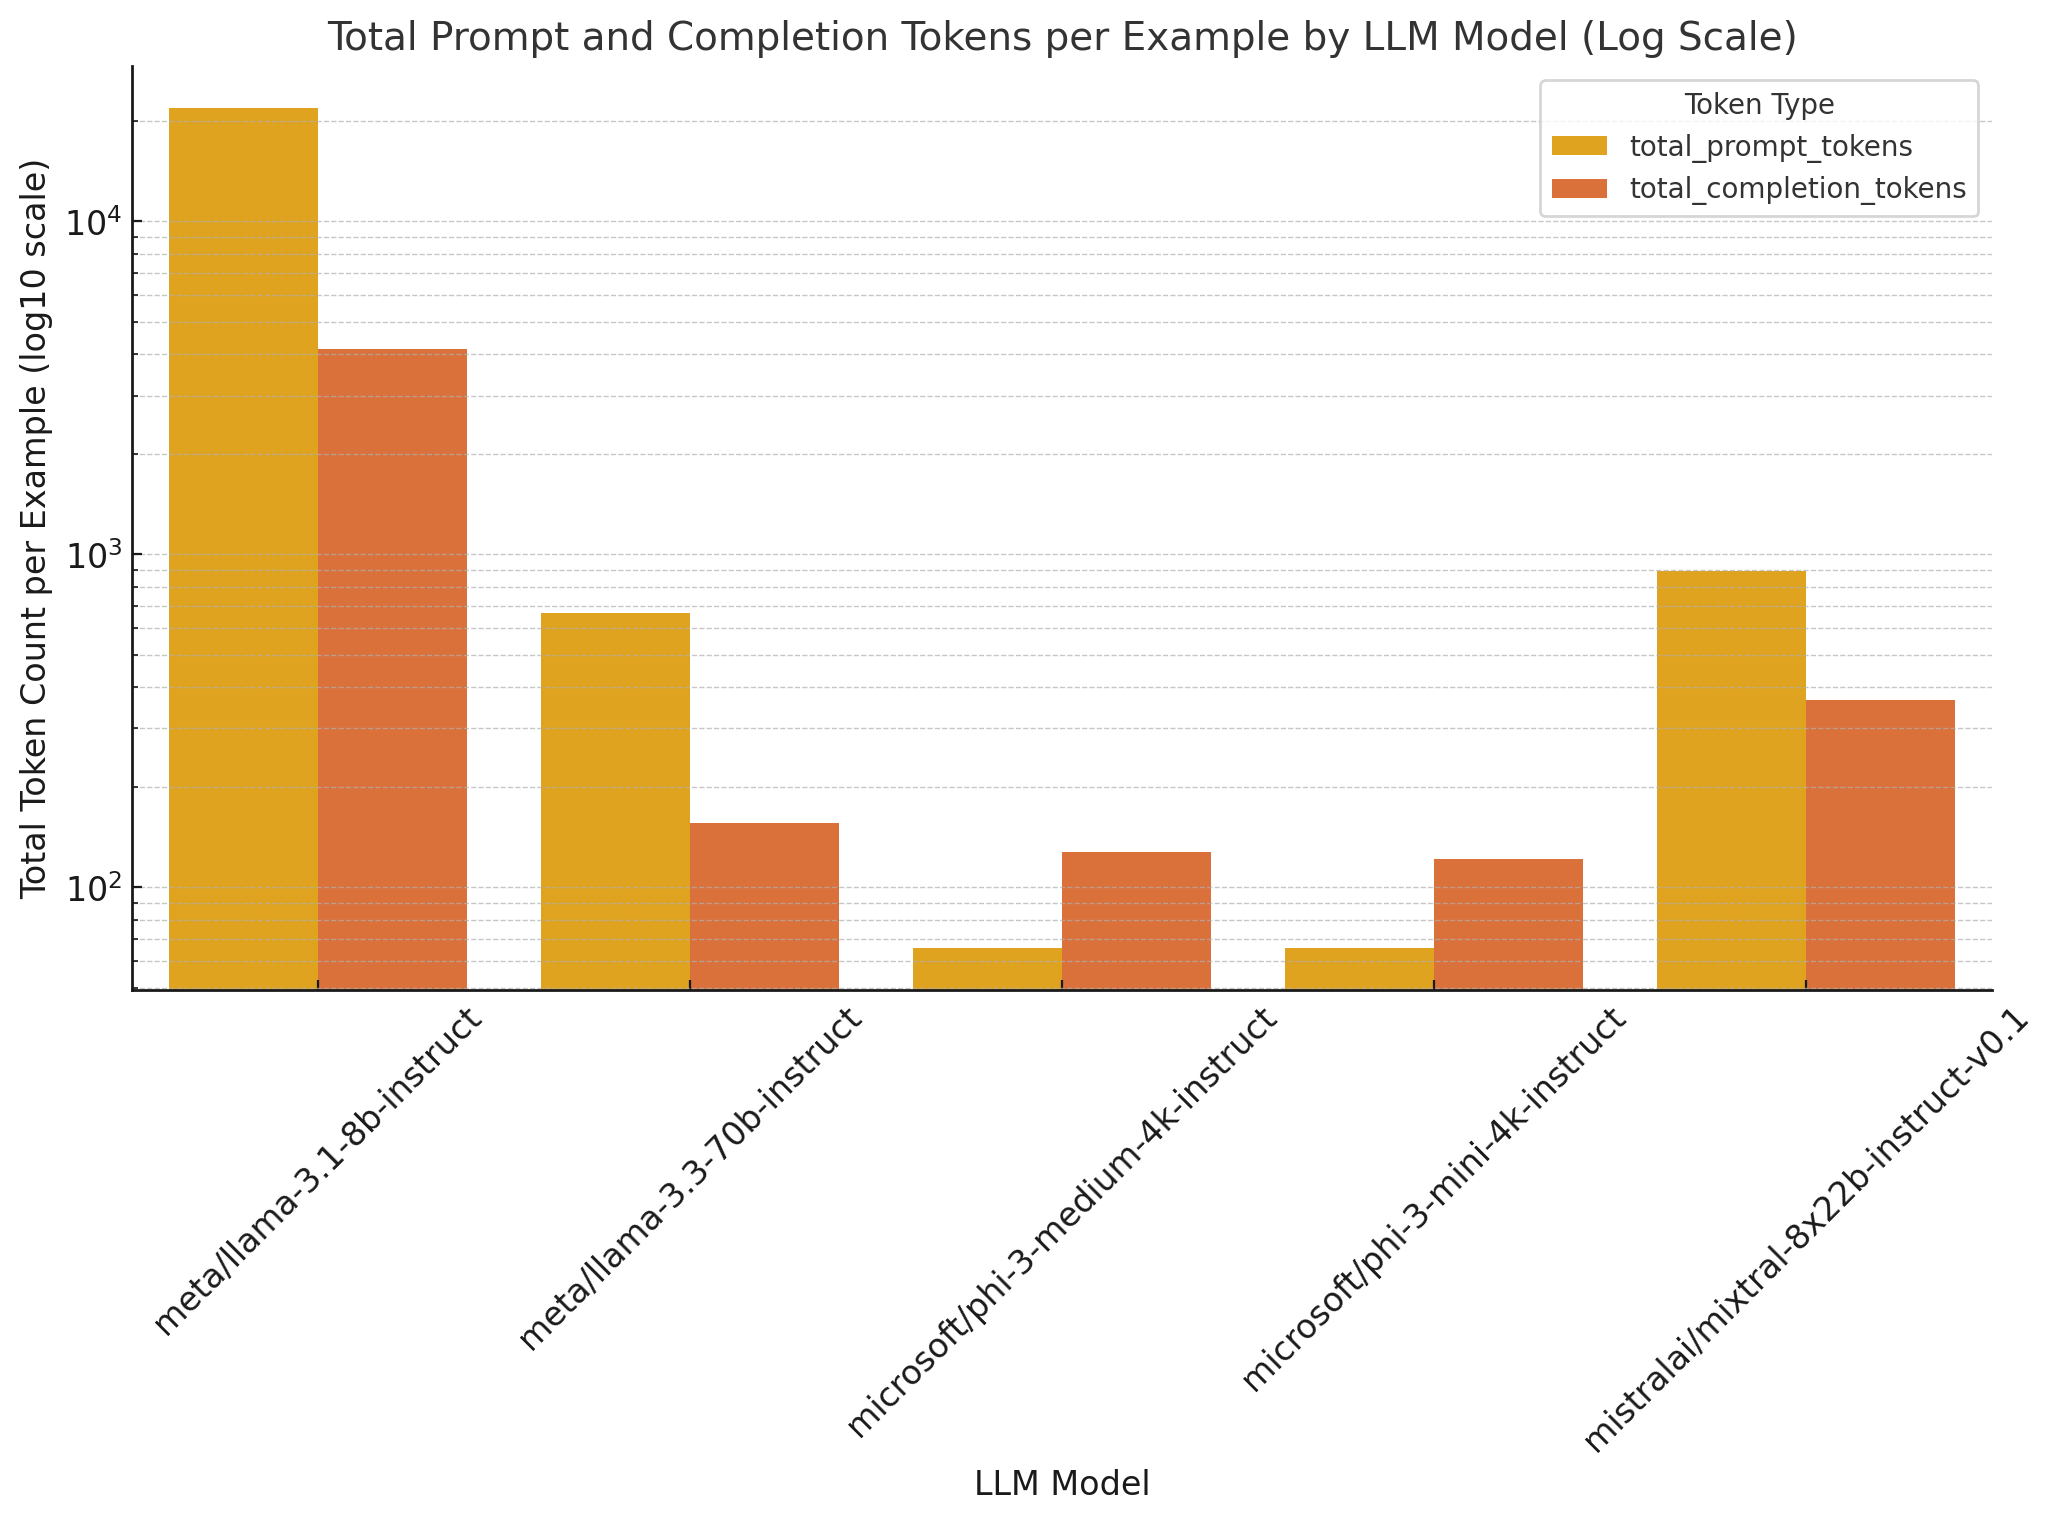
We see that the llama-3.1-8b-instruct LLM generates the most tokens, both prompt and completion, indicating that it is the most verbose model. The phi-3-mini-4k-instruct LLM generates the fewest tokens, indicating that it is the most efficient model in terms of token usage. llama-3.1-70b-instruct and mixtral-8x22b-instruct are in the middle in terms of token usage, indicating that they may be reasonable choices.
Understanding Where the Models Spend Time#
We can also analyze the bottleneck analysis provided by the profiler to understand where the LLMs spend most of their time. This can help us identify potential bottlenecks in the workflow and optimize the LLMs accordingly.
For example, we can explore why the mixtral-8x22b-instruct model has such a long runtime!. To do so, we can directly visualize the Gantt charts produced by the nested stack analysis in the bottleneck_analysis section of the profiler configuration for each model.
Let’s look at one below:
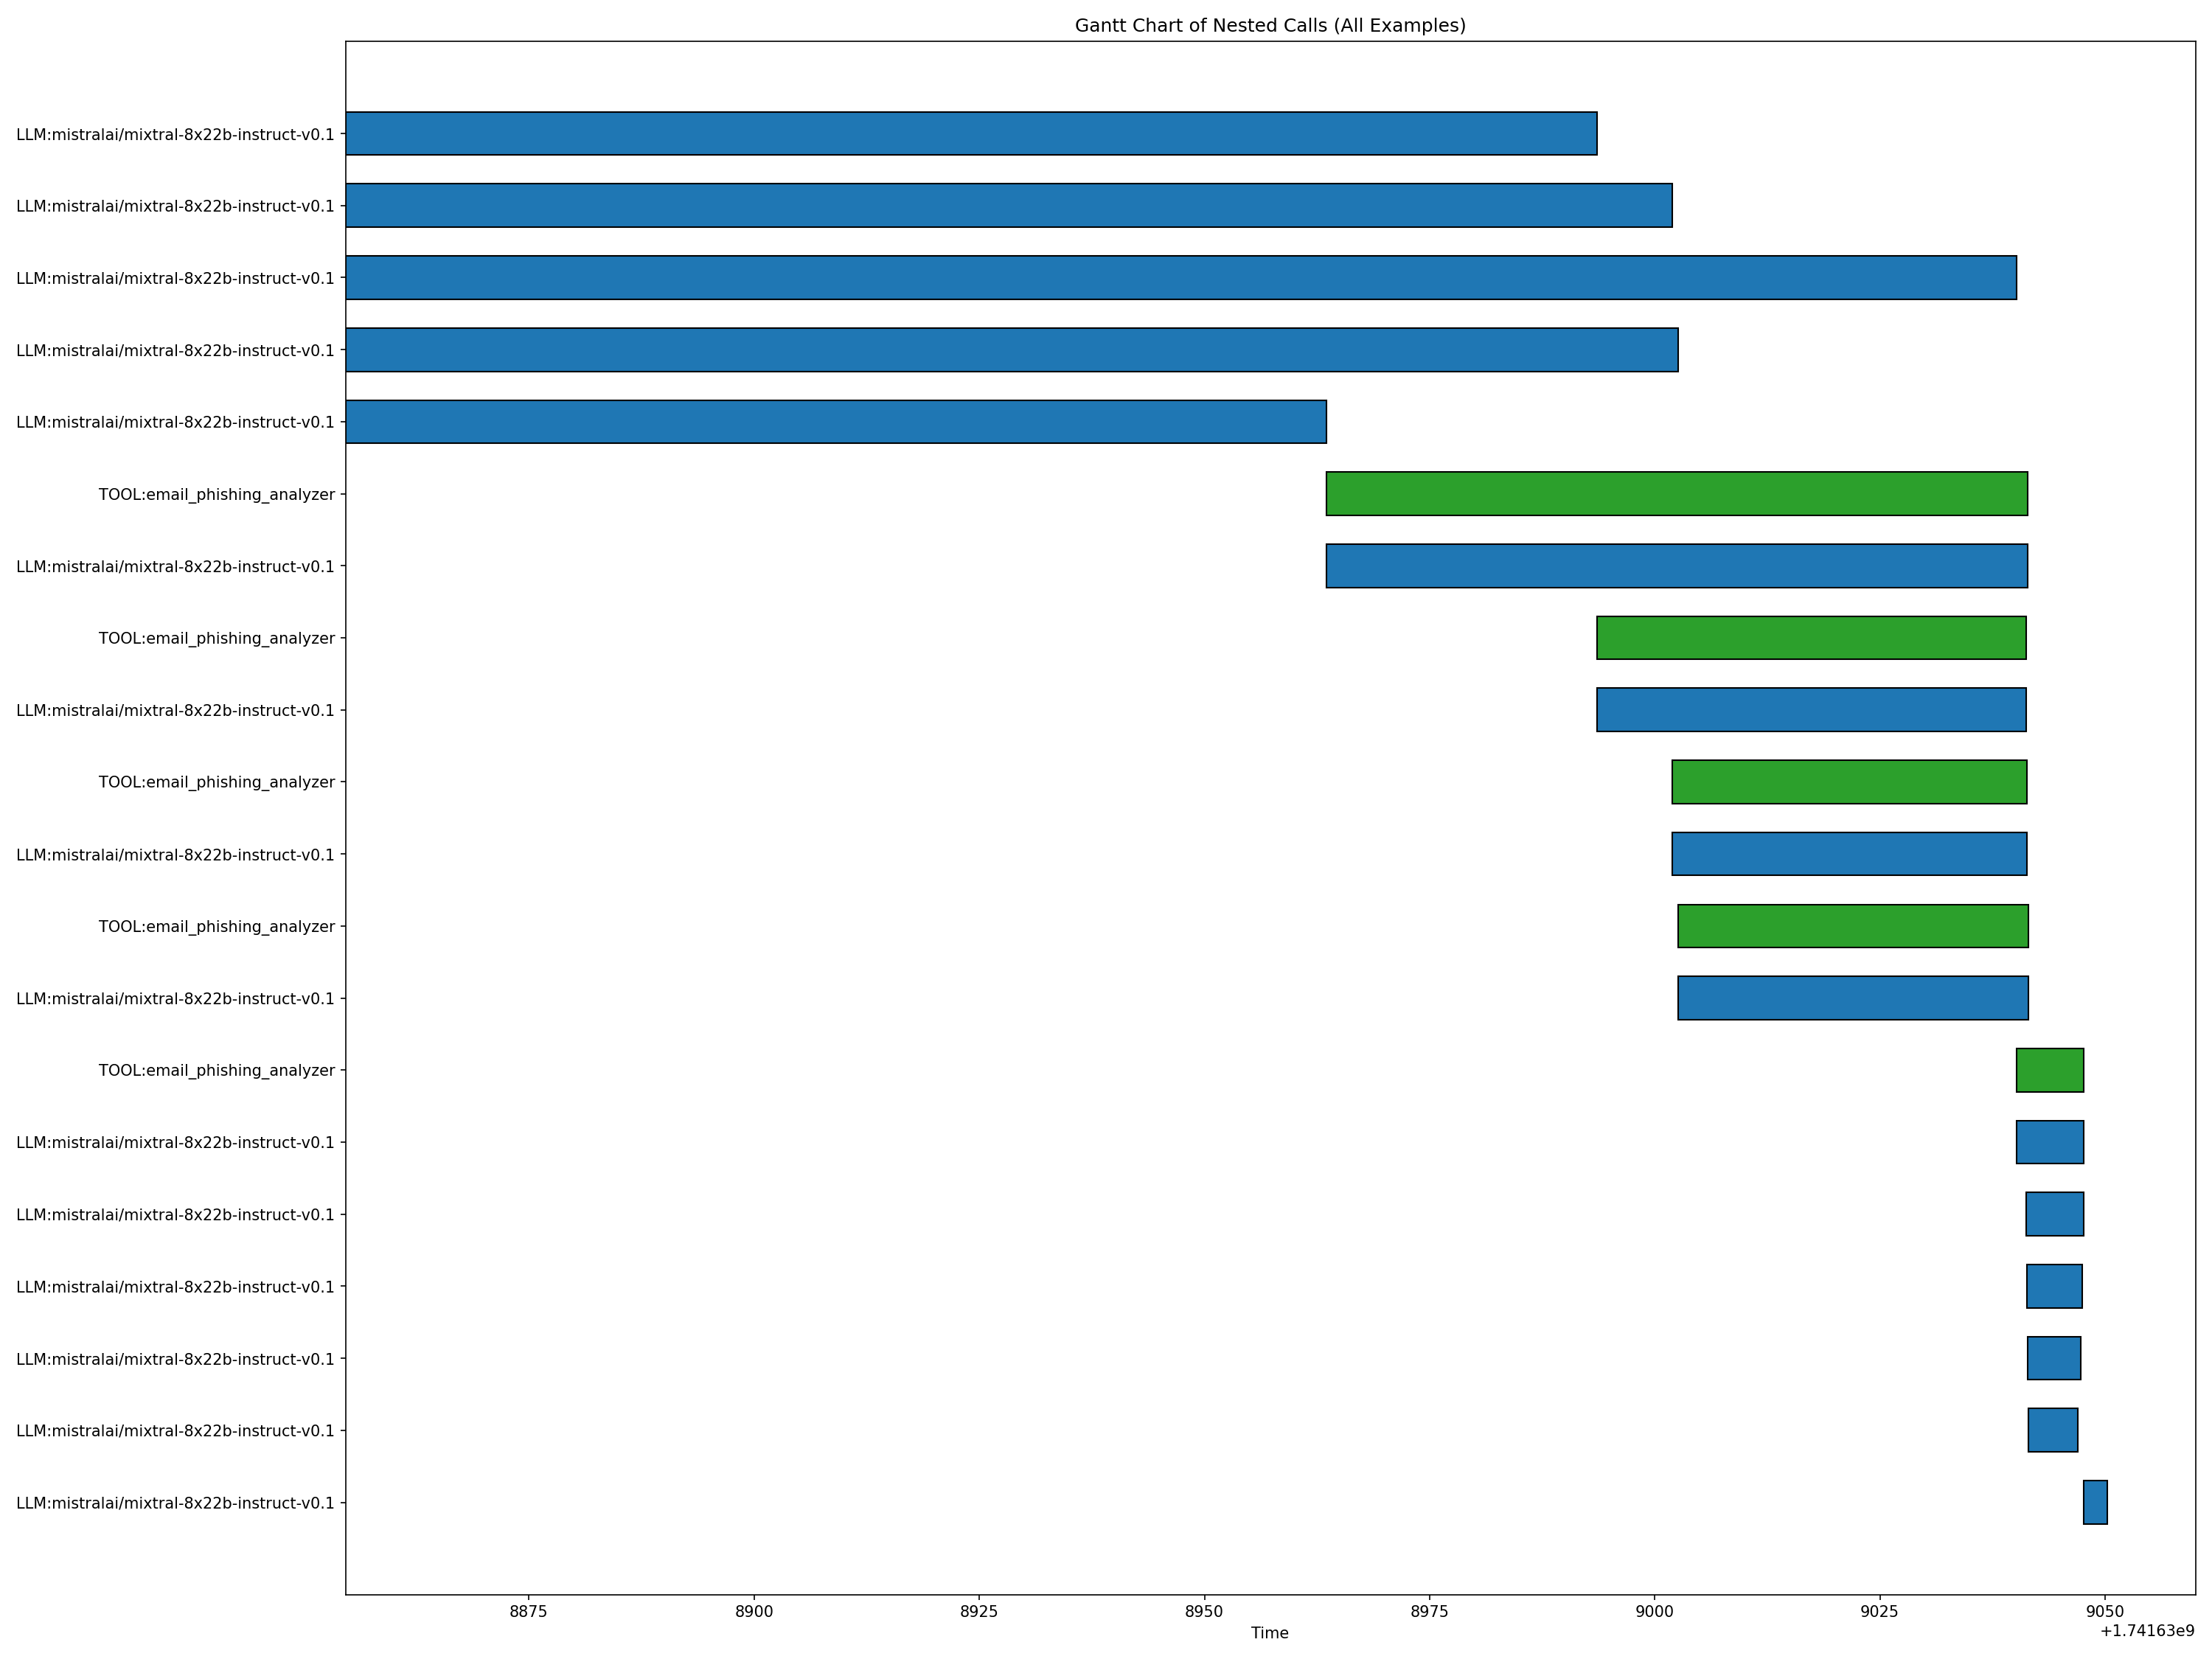
It is interesting here that most of the latency comes from the initial invocation of the agent, wherein it reasons and decides on whether to call a tool. Subsequent steps take much less time in seconds, which is the axis of the Gantt chart.
On the other hand, the llama-3.3-70b-instruct model has a much more balanced distribution of time across the workflow, indicating that it is more efficient in terms of time usage for a model of roughly equivalent size.
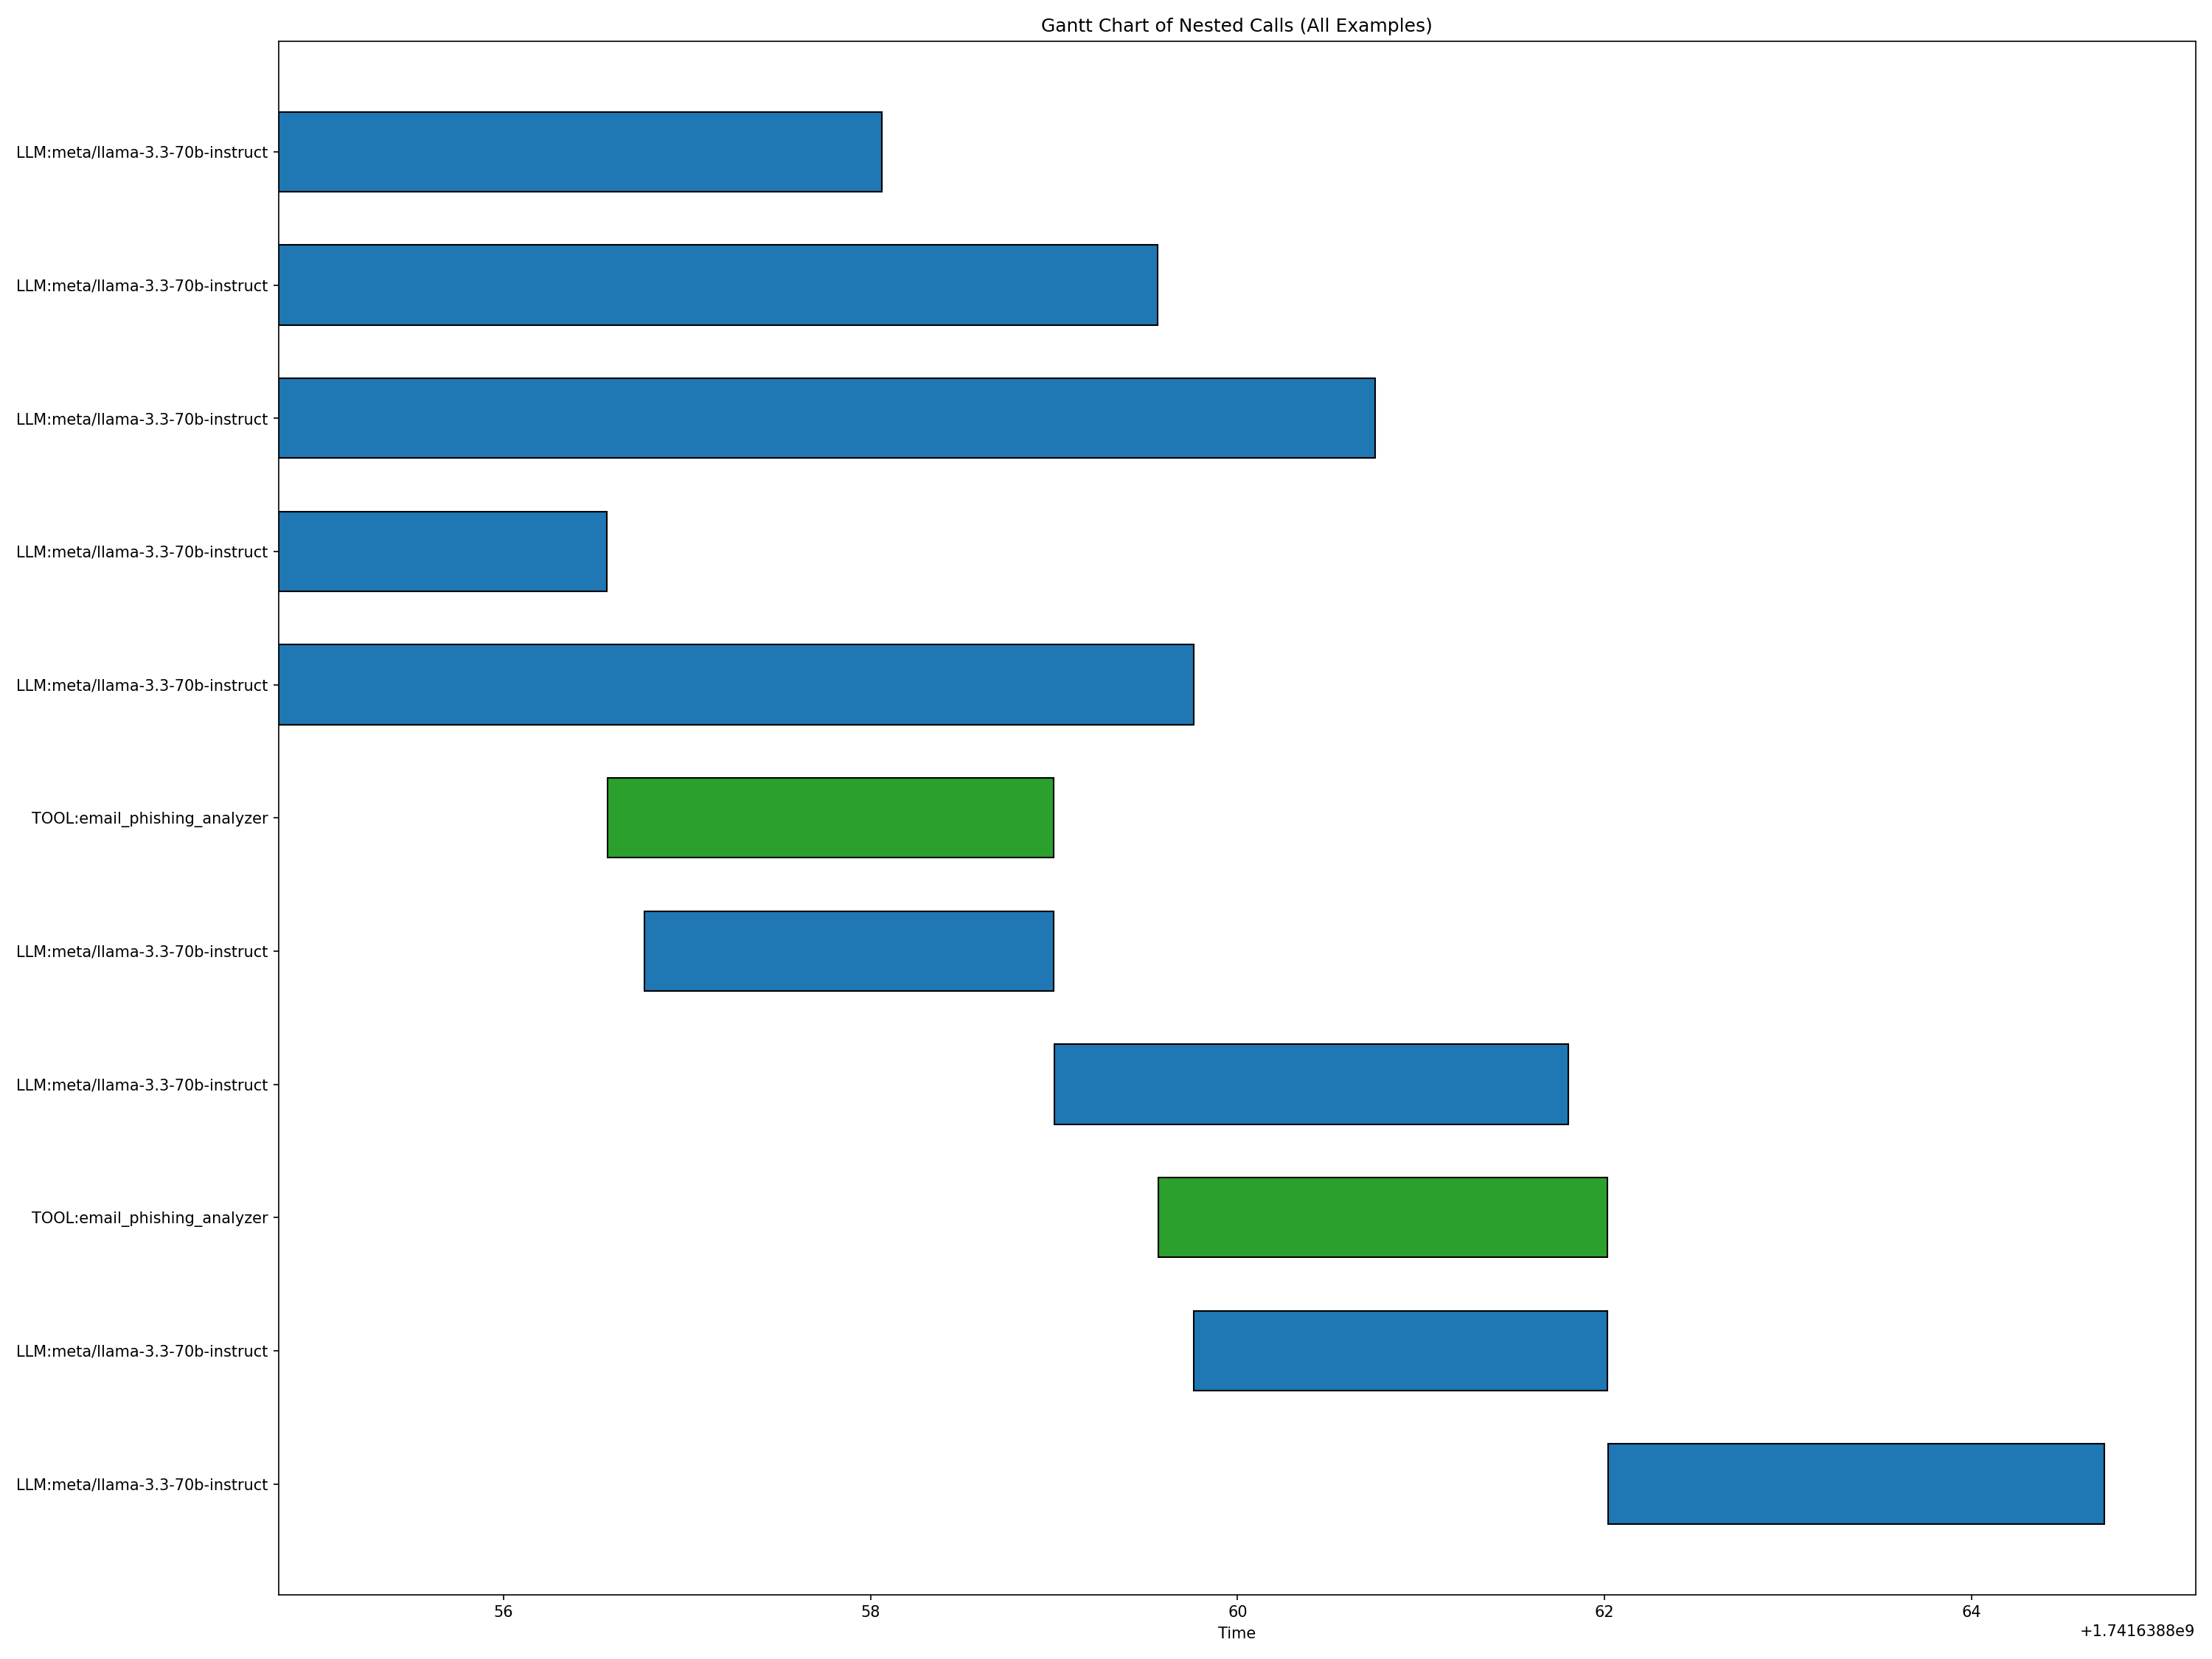
However, the llama-3.3-70b-instruct model fails to call the appropriate tool in the email_phishing_analyzer function, which may cause its responses to be less relevant our grounded. Let us explore those metrics below.
Analyzing RAGAS Metrics#
Finally, we can analyze the RAGAS metrics provided by the profiler to evaluate the performance of the LLMs. We can use the output of the eval harness to compare the accuracy, groundedness, and relevance of the responses generated by each LLM.
Below is plot visualizing the accuracy, groundedness, and relevance of the responses generated by each LLM:
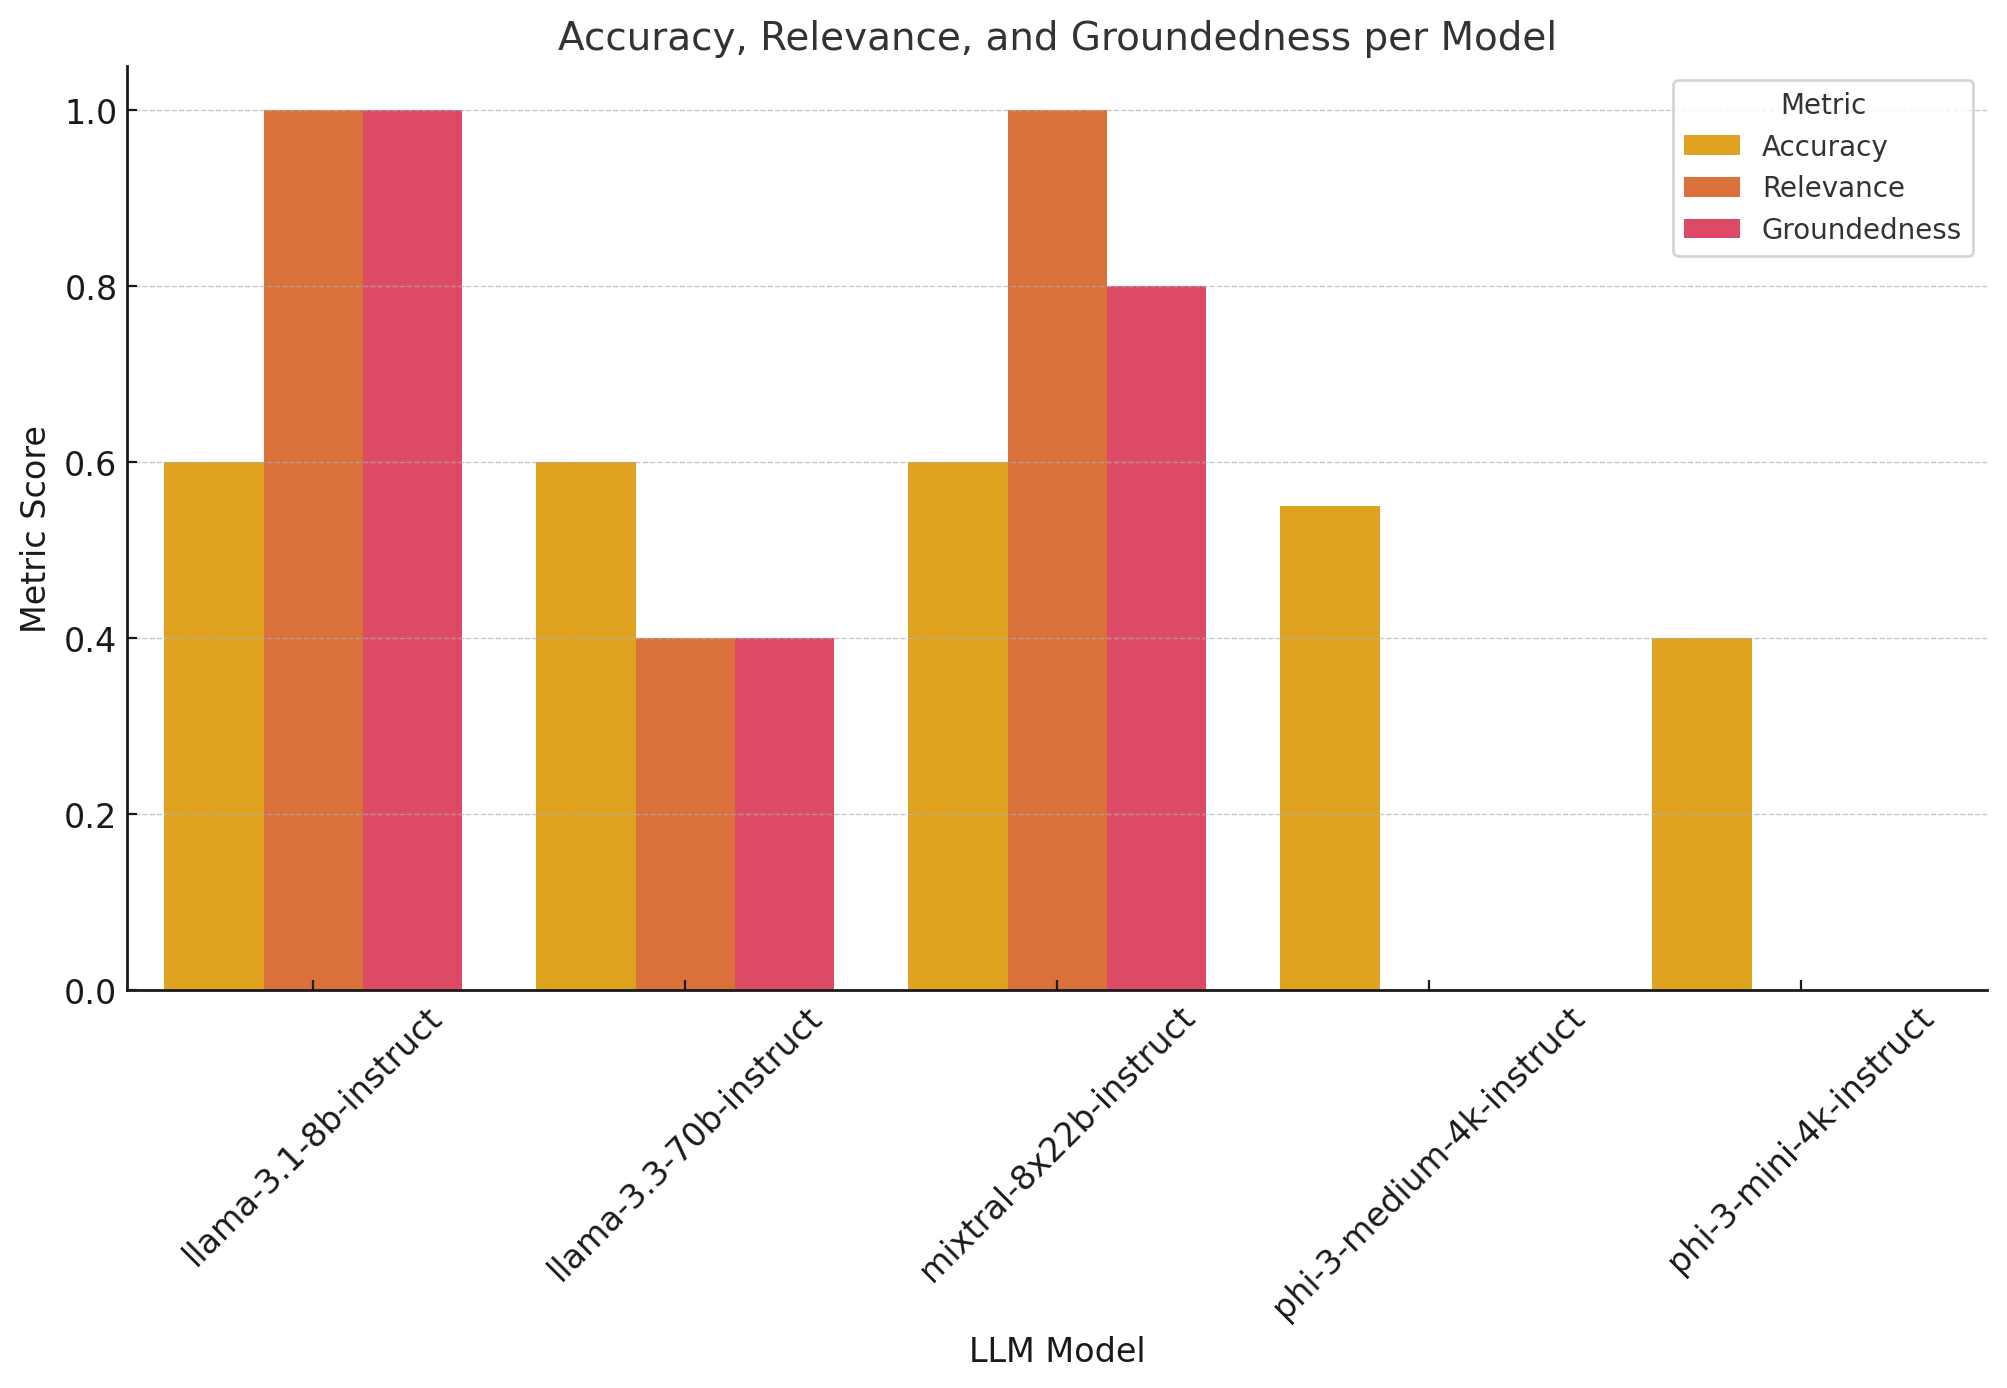
Clearly, the phi-3-* models are not good fits given their groundedness and relevance are both 0, so we will not use them for this workflow. The llama-3.3-70b-instruct model has the highest accuracy also did not have high groundedness and relevance, so we will not use it either.
The mixtral-8x22b-instruct model has a much higher runtime than the llama-3.1-8b-instruct model, so we will not use it either. The llama-3.1-8b-instruct model has the highest groundedness and relevance, so we will use it for our workflow.
Conclusion#
In this guide, we walked through an end-to-end example of how to profile an AIQ toolkit workflow using the AIQ toolkit profiler. We defined a simple workflow, configured the profiler, ran the profiler, and analyzed the profiling results to compare the performance of various LLMs and evaluate the workflow’s efficiency. We used the collected telemetry data to identify which LLM we think is the best fit for our workflow. We hope this guide has given you a good understanding of how to profile an AIQ toolkit workflow and analyze the results to make informed decisions about your workflow configuration.
If you’d like to optimize further, we recommend exploring the workflow_profiling_report.txt file that was also created by the profiler. That has detailed information about workflow bottlenecks, and latency at various concurrencies, which can be helpful metrics when identifying performance issues in your workflow.
Providing Feedback#
We welcome feedback on the AIQ toolkit Profiler module. Please provide feedback by creating an issue on the AIQ toolkit Git repository.
If you’re filing a bug report, please also include a reproducer workflow and the profiler output files.