Accelerating workloads with NVIDIA GPUs on Red Hat Device Edge#
Introduction#
Red Hat Device Edge delivers an enterprise-ready distribution of the Red Hat-led open source community project MicroShift with Red Hat Enterprise Linux (RHEL) and Red Hat Ansible Automation Platform.
MicroShift is a Kubernetes implementation derived from OpenShift, focusing on a minimal footprint for single-node deployments in resource-constrained locations. MicroShift became generally available (GA) with release 4.14, and at the time of this writing, the current release is 4.21. This platform enables you to deploy bare metal, virtual, containerized, or Kubernetes workloads to edge environments, with support for streamlined over-the-air updates for managed RHEL devices in hard-to-service locations.
This guide provides procedures to enable workloads to use NVIDIA GPUs on an x86 system running Red Hat Device Edge. The procedures documented here are validated for production use and are supported through NVIDIA Enterprise Support agreement and Red Hat Production Support Terms of Service.
Note
This documentation supports NVIDIA GPU enablement on Red Hat Device Edge deployments using RPM-based installations: Standard RHEL installations using RPM packages.
Document overview
This guide is organized into the following sections:
Prerequisites - Prerequisites, including repository access and version locking
Installation procedures - Installation procedures for RPM-based installations:
Installing via RPM packages - Sequential installation on running systems
Supportability and Compatibility - Support policies, compatibility matrices, and additional resources
Use the table of contents above to navigate directly to specific sections.
Architecture Overview#
The NVIDIA GPU integration with Red Hat Device Edge consists of multiple layers working together to expose GPU resources to containerized workloads running in MicroShift.
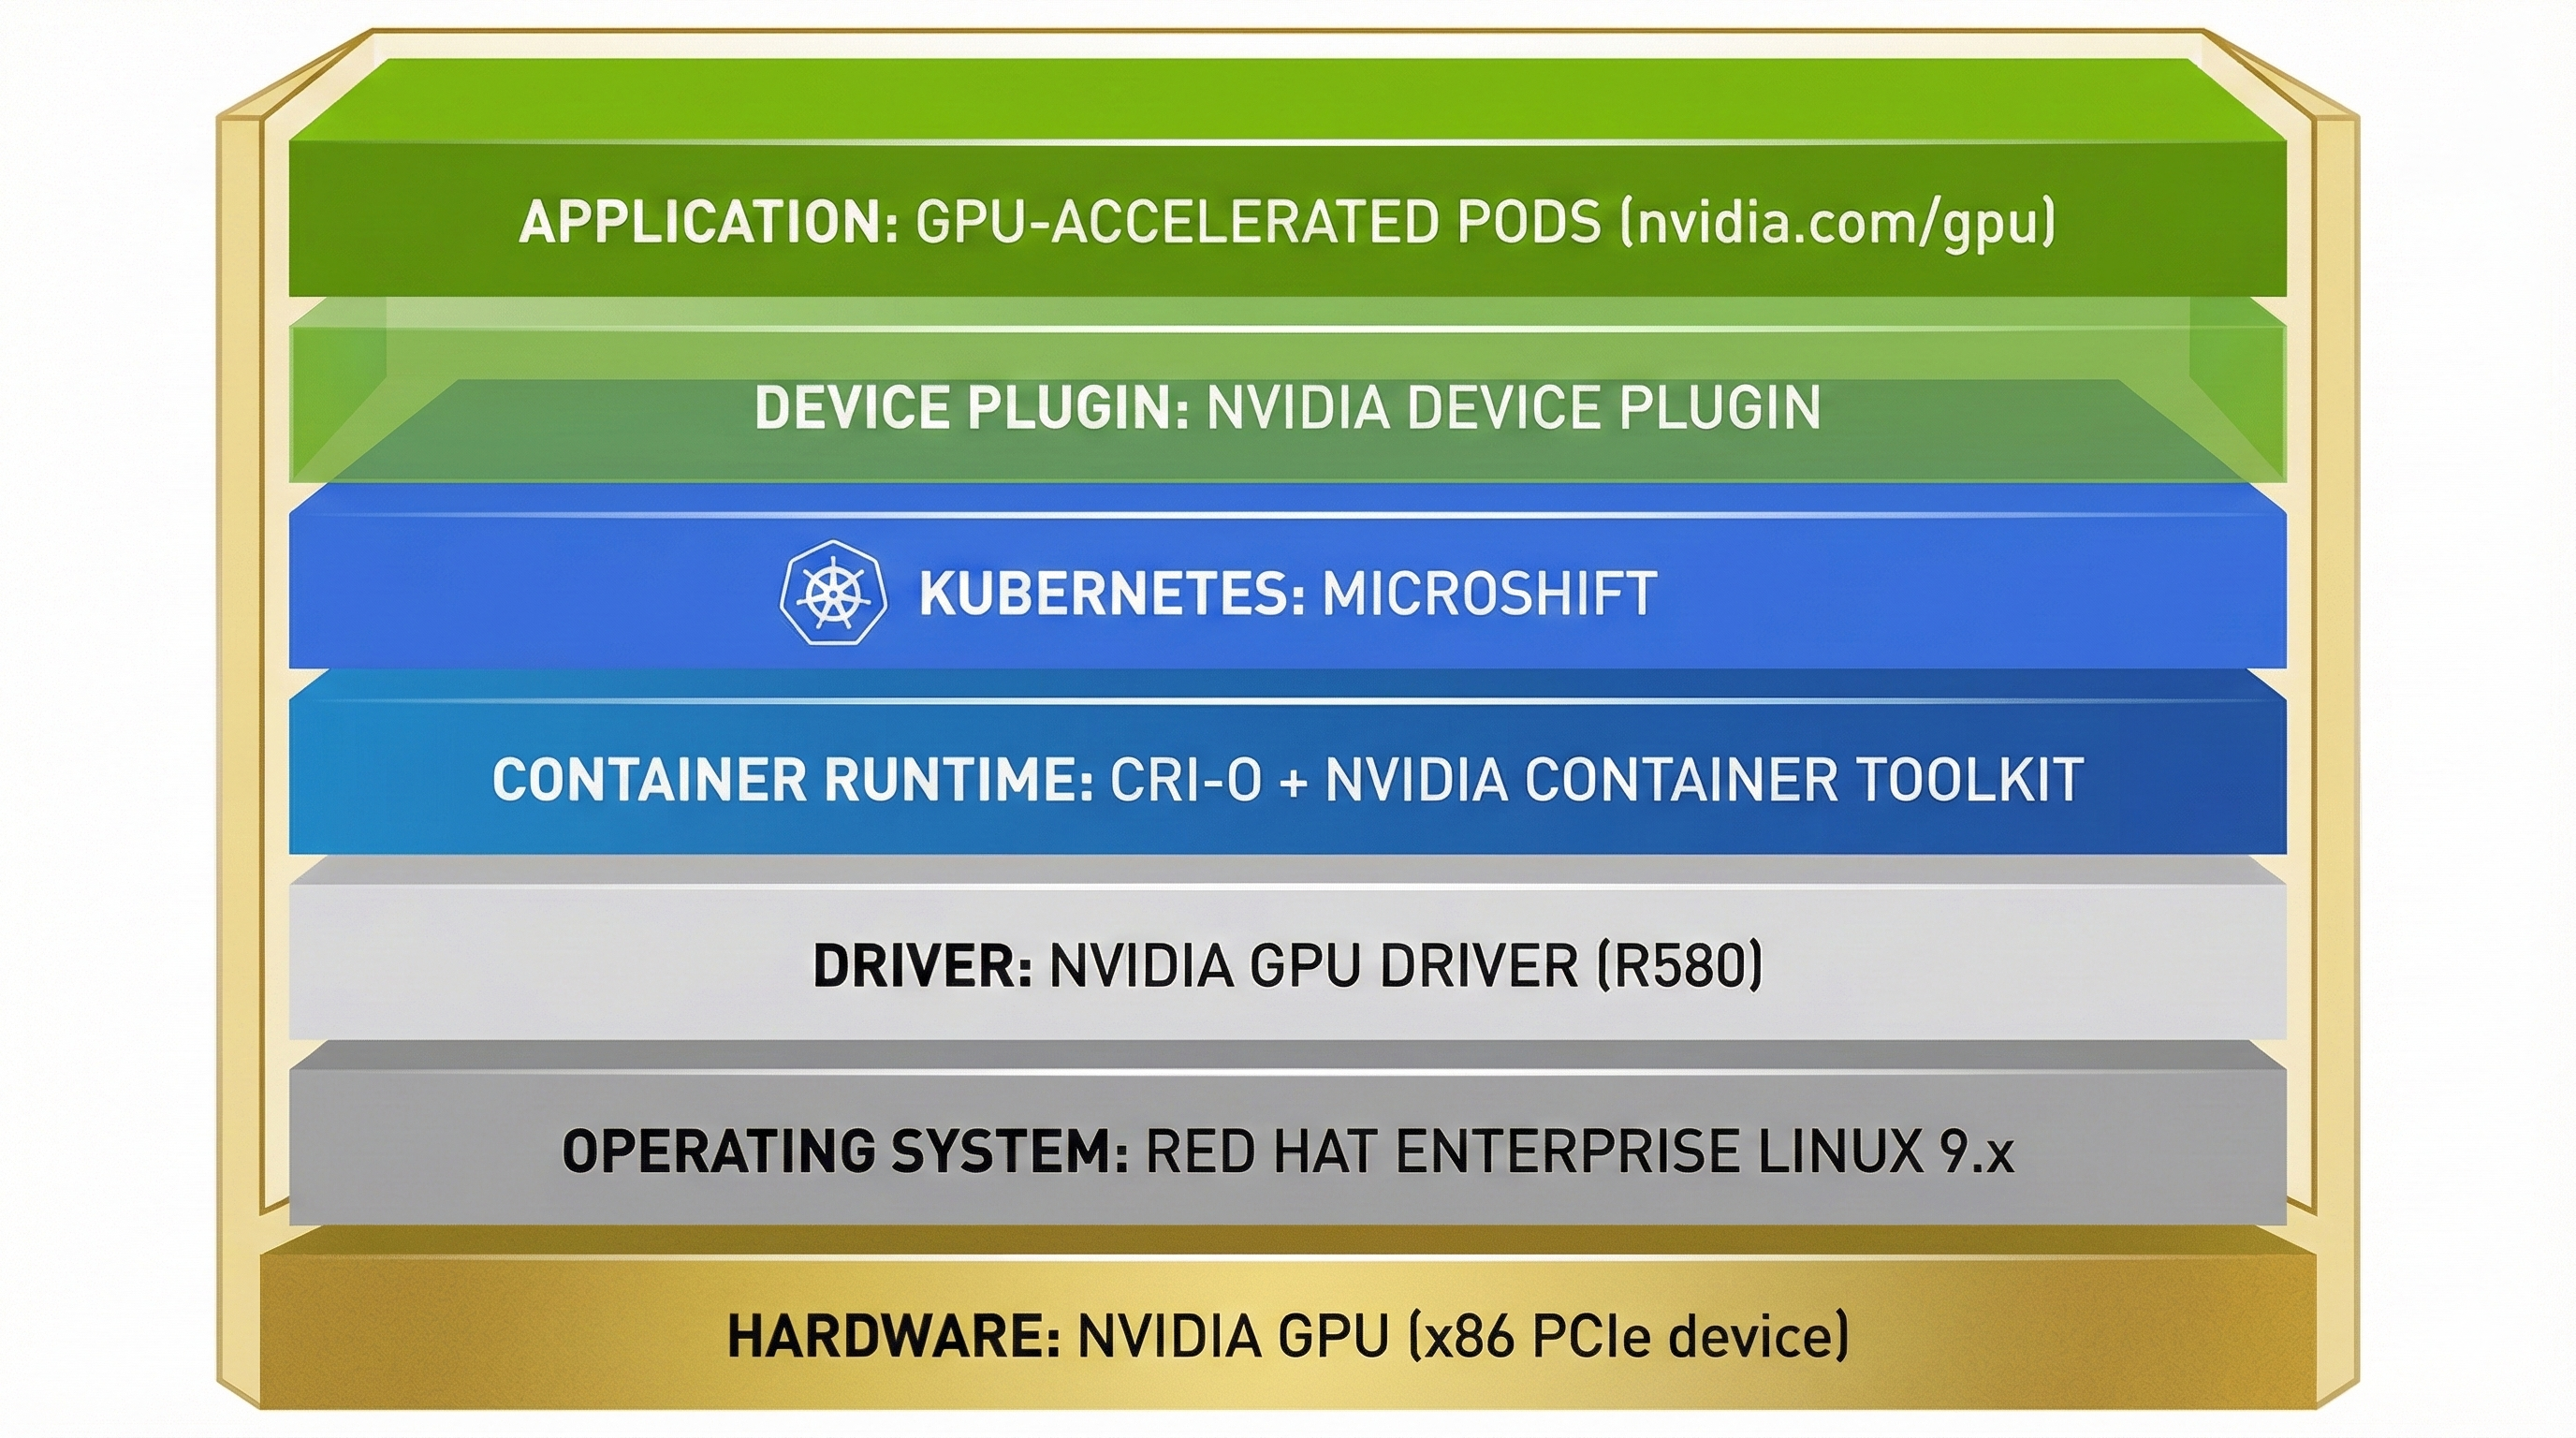
Architecture Stack: Hardware → OS → Drivers → Container Runtime → Kubernetes → Device Plugin → Applications#
The component stack flows from hardware to application:
Hardware Layer: NVIDIA GPU (x86 PCIe device)
Operating System Layer: Red Hat Enterprise Linux 9.x
Driver Layer: NVIDIA GPU Driver (R580 Production Branch) - kernel modules, libraries, and management tools
Container Runtime Layer: CRI-O + NVIDIA Container Toolkit - configures containers for GPU access
Kubernetes Layer: MicroShift - orchestrates container workloads
Device Plugin Layer: NVIDIA Device Plugin - exposes GPU resources to Kubernetes
Application Layer: GPU-accelerated Kubernetes pods requesting
nvidia.com/gpuresources
Note
Why Device Plugin instead of GPU Operator? The NVIDIA Device Plugin is preferred for Device Edge/MicroShift because it provides minimal resource overhead. The GPU Operator, used in OpenShift, is optimized for multi-node clusters with dynamic operator-based management, which adds unnecessary complexity for edge deployments.
Bill of Materials#
This section provides the validated software version combinations for this guide.
Supported RHEL and MicroShift combinations
Note
Check Latest Supportability Status: Before deployment, customers and partners should verify the latest supportability status and version compatibility by consulting:
The version combinations listed in this section reflect the validated configurations at the time of publication and may not represent all currently supported combinations.
RHEL Version |
MicroShift Versions |
|---|---|
RHEL 9.6 |
4.21, 4.20, 4.19 |
RHEL 9.4 |
4.18, 4.17, 4.16 |
RHEL 9.2 |
4.15 (EOL), 4.14 (EUS 2 only) |
NVIDIA component versions
Note
Check Latest NVIDIA Component Supportability Status: Before deployment, customers and partners should verify the latest supportability status and version compatibility by consulting:
The version combinations listed in this section reflect the validated combinations at the time of publication and may not represent all currently supported combinations. For detailed version compatibility information, see the Version compatibility section.
Component |
Recommended Version |
Notes |
|---|---|---|
R580 (Production Branch) |
Current stable Production Branch. R575, R565, R560, R550, R525 are EOL |
|
v1.17.9+ |
Required: >= 1.7.0 (>= 1.11.0 for Tegra systems). Version 1.17.9+ is validated for production use with Device Plugin 0.18.0+ |
|
0.18.0+ (Helm, recommended) or Latest (static manifests) |
Helm charts are NVIDIA’s recommended method for production deployments. Static manifests are available as an alternative |
Prerequisites#
In this section: This section covers prerequisites for RPM-based installations, including version compatibility requirements, repository access, GPU verification, and RHEL release setting.
Version compatibility requirements
Important
Red Hat Device Edge requires specific RHEL and MicroShift version combinations that align with RHEL Extended Update Support (EUS) releases. Not all RHEL 9.x versions are compatible with all MicroShift versions. Always verify the latest support policy and compatibility matrix before deployment to ensure your RHEL and MicroShift versions are supported together and within their lifecycle phases. For the current compatible and supported versions of MicroShift, including related lifecycle dates, refer to:
Common prerequisites
RPM-based installations require the following prerequisites:
MicroShift Installation: Install MicroShift on your Red Hat Enterprise Linux 9.x machine:
Repository Access: Access to the following Red Hat repositories on the target system:
rhel-9-for-x86_64-baseos-rpmsrhel-9-for-x86_64-appstream-rpmsMicroShift repositories (as documented in the MicroShift installation guide)
GPU Verification: Verify an NVIDIA GPU is installed on the target device:
$ lspci -nnv | grep -i nvidia
Example Output
17:00.0 3D controller [0302]: NVIDIA Corporation GA100GL [A30 PCIe] [10de:20b7] (rev a1)
        Subsystem: NVIDIA Corporation Device [10de:1532]
Setting the RHEL Release Version: Setting the Red Hat Enterprise Linux (RHEL) release version is critical to prevent unintended upgrades into an unsupported configuration. Compatibility is essential, as RPM dependency errors result if a MicroShift update is incompatible with the version of RHEL. Set the target system to a specific RHEL minor release before installing packages to prevent unintended upgrades:
$ sudo subscription-manager release --set=9.6
Note
It is recommended to set the release before installing packages to avoid dependency issues. For MicroShift 4.20 or 4.19, use
--set=9.6. For MicroShift 4.18, 4.17, or 4.16, use--set=9.4. For MicroShift 4.14 (EUS 2 only), use--set=9.2.
Installation procedures#
In this section: This section provides complete installation steps for the NVIDIA GPU driver, Container Toolkit, and Device Plugin on RPM-based RHEL installations. Components are installed sequentially on a running system.
This guide provides installation procedures for enabling NVIDIA GPU support on Red Hat Device Edge using RPM-based installations.
Installing via RPM packages#
In this section: This section provides sequential installation steps for the NVIDIA GPU driver (Step 1), Container Toolkit (Step 2), and Device Plugin (Step 3) on a running RPM-based RHEL system. Each step includes verification procedures.
About NVIDIA drivers
NVIDIA provides precompiled drivers in RPM repositories that implement the modularity mechanism. This approach is recommended for production deployments as it avoids the need for compiler toolchains and Extra Packages for Enterprise Linux (EPEL) dependencies.
Note
EPEL and DKMS are not supported for production use. While EPEL can provide compiler toolchains and DKMS (Dynamic Kernel Module Support) needed to build NVIDIA drivers from source, both are community-supported and not part of Red Hat Enterprise Linux. DKMS automatically rebuilds kernel modules when new kernels are installed, but, as documented by this KB 1132653, DKMS is not supplied or supported by Red Hat. The precompiled driver approach documented here avoids these risks by using packages from NVIDIA’s official RPM repositories. For more information about EPEL support policies, see How to use Extra Packages for Enterprise Linux (EPEL).
For more information about modularity streams and driver deployment, see Streamlining NVIDIA Driver Deployment on RHEL 8 with Modularity Streams.
Important
Use a supported Production Branch driver version. For current Production Branch information and EOL driver branches, see the Bill of Materials section. For the latest supported driver versions, refer to NVIDIA Datacenter Drivers documentation.
Step 1: Installing the NVIDIA GPU driver
This procedure applies to standard RHEL installations using RPM packages on a new system with an NVIDIA GPU.
Add the NVIDIA CUDA repository:
$ sudo dnf config-manager --add-repo=https://developer.download.nvidia.com/compute/cuda/repos/rhel9/x86_64/cuda-rhel9.repo
View available driver modules:
$ dnf module list nvidia-driverInstall the driver. For production deployments, use the standard NVIDIA-signed driver:
$ sudo dnf module install nvidia-driver:580Or for the latest version:
$ sudo dnf module install nvidia-driver:latestNote
You can list available driver versions using:
$ dnf module list nvidia-driverNote
Open GPU drivers (tech preview): Starting with RHEL 9.5, Red Hat signed open GPU drivers are available for testing on systems with Secure Boot enabled. These require the NVIDIA CUDA preview repository and
codeready-builder-for-rhel-9-x86_64-rpms. Open GPU drivers should only be used for testing, not production. See NVIDIA Open GPU Datacenter Drivers for RHEL9 signed by Red Hat for details.(Optional) If you require fabric manager and NSCQ support, install the additional packages:
$ sudo dnf install nvidia-fabric-manager libnvidia-nscq-580Note
Replace
580with your installed driver version if different.After installing the driver, disable the
nouveaudriver because it conflicts with the NVIDIA driver:$ echo 'blacklist nouveau' | sudo tee /etc/modprobe.d/nouveau-blacklist.conf
Update initramfs:
$ sudo dracut --forceEnable the
nvidia-persistencedservice to reduce driver initialization time:$ sudo systemctl enable nvidia-persistenced.service
If you installed fabric manager, also enable it:
$ sudo systemctl enable nvidia-fabricmanager.service
Reboot the machine:
$ sudo systemctl rebootAfter the machine boots, verify that the NVIDIA drivers are installed properly:
$ nvidia-smiExample Output
Thu Jun 22 14:29:53 2023
+-----------------------------------------------------------------------------+
| NVIDIA-SMI 580.xx.xx   Driver Version: 580.xx.xx   CUDA Version: 12.x     |
|-------------------------------+----------------------+----------------------+
| GPU  Name        Persistence-M| Bus-Id        Disp.A | Volatile Uncorr. ECC |
| Fan  Temp  Perf  Pwr:Usage/Cap|         Memory-Usage | GPU-Util  Compute M. |
|                               |                      |               MIG M. |
|===============================+======================+======================|
|   0  NVIDIA A30          Off  | 00000000:17:00.0 Off |                    0 |
| N/A   29C    P0    35W / 165W |      0MiB / 24576MiB |     25%      Default |
|                               |                      |             Disabled |
+-------------------------------+----------------------+----------------------+

+-----------------------------------------------------------------------------+
| Processes:                                                                  |
|  GPU   GI   CI        PID   Type   Process name                  GPU Memory |
|        ID   ID                                                   Usage      |
|=============================================================================|
|  No running processes found                                                 |
+-----------------------------------------------------------------------------+
Step 2: Installing the NVIDIA Container Toolkit
The NVIDIA Container Toolkit enables users to build and run GPU accelerated containers. The toolkit includes a container runtime library and utilities to automatically configure containers to leverage NVIDIA GPUs. You must install it to enable the container runtime to transparently configure the NVIDIA GPUs for the pods deployed in MicroShift.
The NVIDIA container toolkit supports the distributions listed in the NVIDIA Container Toolkit repository.
Important
The NVIDIA Device Plugin requires NVIDIA Container Toolkit >= 1.7.0 (>= 1.11.0 for Tegra-based systems). The recommended version 1.17.9+ exceeds this minimum requirement. For complete compatibility requirements, see the Version compatibility section.
Add the NVIDIA Container Toolkit repository:
$ curl -s -L https://nvidia.github.io/libnvidia-container/stable/rpm/nvidia-container-toolkit.repo | \
    sudo tee /etc/yum.repos.d/nvidia-container-toolkit.repo
Note
This uses the stable repository, which is recommended for production deployments.
Install the NVIDIA Container Toolkit:
$ sudo dnf install nvidia-container-toolkit -ySet the SELinux boolean to allow containers to use devices:
$ sudo setsebool -P container_use_devices onNote
With Container Toolkit v1.17.9+ and RHEL 9.x, the
container_use_devicesSELinux boolean is sufficient for GPU workloads. Custom SELinux modules are no longer required for standard deployments. If you encounter SELinux permission errors in specific environments, please raise a support case to NVIDIA.Configure CRI-O to use the NVIDIA runtime. This creates a drop-in configuration file that ensures the NVIDIA runtime is used:
$ sudo nvidia-ctk runtime configure --runtime=crio --set-as-default \
    --drop-in-config=/etc/crio/crio.conf.d/99-nvidia.conf
Important
In MicroShift 4.20+, the MicroShift configuration file is already named
10-microshift.conf, ensuring it loads before99-nvidia.conf. For MicroShift 4.14 and 4.15, the configuration files may not use numerical prefixes. If you encounter issues, rename the MicroShift configuration files to ensure proper load order:$ if [ -f /etc/crio/crio.conf.d/microshift.conf ]; then sudo mv /etc/crio/crio.conf.d/microshift.conf /etc/crio/crio.conf.d/10-microshift.conf fi $ if [ -f /etc/crio/crio.conf.d/microshift-ovn.conf ]; then sudo mv /etc/crio/crio.conf.d/microshift-ovn.conf /etc/crio/crio.conf.d/11-microshift-ovn.conf fi
Update the runtime order in the NVIDIA Container Runtime configuration to prioritize
crun:$ sudo sed -i 's/^runtimes =.*$/runtimes = ["crun", "docker-runc", "runc"]/g' \ /etc/nvidia-container-runtime/config.toml
Note
This ensures
crunis used as the primary runtime, which is the default for MicroShift and provides better performance.Restart the CRI-O service to apply the configuration:
$ sudo systemctl restart crioVerify the Container Toolkit installation:
$ nvidia-ctk --version$ systemctl status crio
Step 3: Installing the NVIDIA Device Plugin
To enable MicroShift to allocate GPU resources to pods, deploy the NVIDIA Device Plugin. The plugin runs as a daemon set that provides the following features:
Exposes the number of GPUs on each node of your cluster.
Keeps track of the health of your GPUs.
Runs GPU-enabled containers in your Kubernetes cluster.
You can install the NVIDIA Device Plugin using either Helm charts (recommended for production) or static YAML manifests. Both methods are supported, with Helm charts being NVIDIA’s preferred method for production deployments due to better configuration flexibility, especially for features like time-slicing.
Method 1: Installing with Helm Charts (Recommended for Production)
The Helm chart installation method is NVIDIA’s recommended approach for production deployments. It provides better configuration flexibility, easier updates, and support for advanced features like time-slicing. This method requires additional configuration for Pod Security Standards on MicroShift.
Note
The Helm chart installation on MicroShift requires manual Security Context Constraint (SCC) configuration. A pull request is currently under discussion to improve the Helm chart integration with MicroShift 4.15+ by adding better Pod Security Standards support. Monitor this PR for future improvements.
Install Helm on your system:
$ curl https://raw.githubusercontent.com/helm/helm/main/scripts/get-helm-3 | bash
Or download a specific version manually:
$ HELM_VERSION="v3.15.0"
$ curl -LO "https://get.helm.sh/helm-${HELM_VERSION}-linux-amd64.tar.gz"
$ tar -zxvf "helm-${HELM_VERSION}-linux-amd64.tar.gz"
$ sudo mv linux-amd64/helm /usr/local/bin/helm
$ rm -rf linux-amd64 "helm-${HELM_VERSION}-linux-amd64.tar.gz"
Verify the installation:
$ helm versionAdd the NVIDIA Device Plugin Helm repository:
$ helm repo add nvdp https://nvidia.github.io/k8s-device-plugin
$ helm repo update
Create a namespace for the device plugin:
$ oc create namespace nvidia-device-pluginConfigure Pod Security Standards for the namespace. The device plugin requires privileged access:
$ oc label namespace nvidia-device-plugin \
    pod-security.kubernetes.io/enforce=privileged \
    pod-security.kubernetes.io/enforce-version=latest \
    pod-security.kubernetes.io/warn=privileged \
    pod-security.kubernetes.io/warn-version=latest \
    pod-security.kubernetes.io/audit=privileged \
    pod-security.kubernetes.io/audit-version=latest --overwrite
Create a ConfigMap for the device plugin configuration. For basic GPU allocation, create a minimal configuration:
$ cat << EOF > nvdp-configmap.yaml
version: v1
flags:
  migStrategy: "none"
  failOnInitError: true
  nvidiaDriverRoot: "/"
  plugin:
    passDeviceSpecs: false
    deviceListStrategy: envvar
    deviceIDStrategy: uuid
EOF
For time-slicing configuration (allowing multiple pods to share a GPU), use:
$ cat << EOF > nvdp-configmap.yaml
version: v1
flags:
  migStrategy: "none"
  failOnInitError: true
  nvidiaDriverRoot: "/"
  plugin:
    passDeviceSpecs: false
    deviceListStrategy: envvar
    deviceIDStrategy: uuid
sharing:
  timeSlicing:
    resources:
    - name: nvidia.com/gpu
      replicas: 4
EOF
Create a values file for Helm with security context configurations:
$ cat << EOF > nvdp-values.yaml
podSecurityContext:
  runAsNonRoot: false
  seccompProfile:
    type: RuntimeDefault

securityContext:
  allowPrivilegeEscalation: true
  runAsNonRoot: false
  privileged: true
  seccompProfile:
    type: RuntimeDefault

gfd:
  enabled: true
  securityContext:
    privileged: true
    runAsNonRoot: false
    runAsUser: 0

nfd:
  enableNodeFeatureApi: true
  worker:
    securityContext:
      privileged: true
      runAsNonRoot: false
      runAsUser: 0
      allowPrivilegeEscalation: true
      readOnlyRootFilesystem: true
      capabilities:
        drop: ["ALL"]
EOF
Grant Security Context Constraint (SCC) permissions to the service accounts:
$ oc adm policy add-scc-to-user privileged -z nvdp-node-feature-discovery-worker -n nvidia-device-plugin
$ oc adm policy add-scc-to-user privileged -z nvdp-nvidia-device-plugin-service-account -n nvidia-device-plugin
Install the device plugin using Helm:
$ helm upgrade -i nvdp nvdp/nvidia-device-plugin -n nvidia-device-plugin --version 0.18.0 \
    --set-file=config.map.config=nvdp-configmap.yaml \
    -f nvdp-values.yaml
Verify the installation:
$ oc get pod -n nvidia-device-pluginExample Output
NAME                                                    READY   STATUS    RESTARTS   AGE
nvdp-node-feature-discovery-gc-6476cc6bf4-nmtf8         1/1     Running   0          41s
nvdp-node-feature-discovery-master-58788687cc-4rfsk     1/1     Running   0          41s
nvdp-node-feature-discovery-worker-8rvk6                1/1     Running   0          41s
nvdp-nvidia-device-plugin-gpu-feature-discovery-qsnv7   2/2     Running   0          39s
nvdp-nvidia-device-plugin-ll495                         2/2     Running   0          39s
Verify that the node exposes the
nvidia.com/gpuresources:$ oc get node -o json | jq -r '.items[0].status.capacity'
Note
The Helm chart method is particularly useful when you need to:
Configure time-slicing for GPU sharing
Easily update or uninstall the device plugin
Use dynamic configuration without modifying static YAML files
This is NVIDIA’s recommended method for production deployments.
Method 2: Installing with Static Manifests (Alternative)
The static manifest method deploys the device plugin using YAML files placed in MicroShift’s manifests directory. This method is available as an alternative to Helm charts for simpler deployments that don’t require advanced configuration features.
Create the
manifestsfolder:$ sudo mkdir -p /etc/microshift/manifests.d/nvidia-device-pluginThe device plugin runs in privileged mode, so you need to isolate it from other workloads by running it in its own namespace,
nvidia-device-plugin. To add the plugin to the manifests deployed by MicroShift at start time, download the configuration file and save it at/etc/microshift/manifests.d/nvidia-device-plugin/nvidia-device-plugin.yml:$ curl -s -L https://gitlab.com/nvidia/kubernetes/device-plugin/-/raw/main/deployments/static/nvidia-device-plugin-privileged-with-service-account.yml | \ sudo tee /etc/microshift/manifests.d/nvidia-device-plugin/nvidia-device-plugin.yml
Note
The device plugin repository has moved from GitHub to GitLab. The URL above reflects the current location.
The resources are not created automatically even though the files exist. You need to add them to the
kustomizeconfiguration. Do this by adding a singlekustomization.yamlfile in themanifests.d/nvidia-device-pluginfolder that references all the resources you want to create:$ cat <<EOF | sudo tee /etc/microshift/manifests.d/nvidia-device-plugin/kustomization.yaml --- apiVersion: kustomize.config.k8s.io/v1beta1 kind: Kustomization resources: - nvidia-device-plugin.yml EOF
Restart the MicroShift service so that it creates the resources:
$ sudo systemctl restart microshiftAfter MicroShift restarts, verify that the pod is running in the
nvidia-device-pluginnamespace:$ oc get pod -n nvidia-device-pluginExample Output
NAME                                                    READY   STATUS    RESTARTS   AGE
nvidia-device-plugin-daemonset-jx8s8                    1/1     Running   0          1m
Verify in the log that it has registered itself as a device plugin for the
nvidia.com/gpuresources:$ oc logs -n nvidia-device-plugin nvidia-device-plugin-daemonset-jx8s8Example Output
[...]
2023/06/22 14:25:38 Retreiving plugins.
2023/06/22 14:25:38 Detected NVML platform: found NVML library
2023/06/22 14:25:38 Detected non-Tegra platform: /sys/devices/soc0/family file not found
2023/06/22 14:25:38 Starting GRPC server for 'nvidia.com/gpu'
2023/06/22 14:25:38 Starting to serve 'nvidia.com/gpu' on /var/lib/kubelet/device-plugins/nvidia-gpu.sock
2023/06/22 14:25:38 Registered device plugin for 'nvidia.com/gpu' with Kubelet
You can also verify that the node exposes the
nvidia.com/gpuresources in its capacity:$ oc get node -o json | jq -r '.items[0].status.capacity'
Example Output
{
  "cpu": "48",
  "ephemeral-storage": "142063152Ki",
  "hugepages-1Gi": "0",
  "hugepages-2Mi": "0",
  "memory": "196686216Ki",
  "nvidia.com/gpu": "1",
  "pods": "250"
}
Note
See also: For support information, see Supportability and Compatibility.
Verifying GPU workloads#
You can run a test workload to verify that the configuration is correct. A simple workload is the CUDA vectorAdd program that NVIDIA provides in a container image.
Create a
testnamespace:$ oc create namespace test
Create a file, such as
pod-cuda-vector-add.yaml, with a pod specification. Note thespec.containers[0].resources.limitsfield where thenvidia.com/gpuresource specifies a value of1.$ cat << EOF > pod-cuda-vector-add.yaml --- apiVersion: v1 kind: Pod metadata: name: test-cuda-vector-add namespace: test spec: restartPolicy: OnFailure containers: - name: cuda-vector-add image: "nvcr.io/nvidia/k8s/cuda-sample:vectoradd-cuda11.7.1-ubi8" resources: limits: nvidia.com/gpu: 1 securityContext: allowPrivilegeEscalation: false capabilities: drop: ["ALL"] runAsNonRoot: true seccompProfile: type: "RuntimeDefault" EOF
Create the pod:
$ oc apply -f pod-cuda-vector-add.yamlVerify the pod log has found a CUDA device:
$ oc logs -n test test-cuda-vector-add
Example Output
[Vector addition of 50000 elements]
Copy input data from the host memory to the CUDA device
CUDA kernel launch with 196 blocks of 256 threads
Copy output data from the CUDA device to the host memory
Test PASSED
Done
Undeploy the pods in the
pod-cuda-vector-add.yamlfile:$ oc delete -f pod-cuda-vector-add.yamlDelete the
testnamespace:$ oc delete ns test
Supportability and Compatibility#
In this section: This section covers support policies from NVIDIA and Red Hat, version compatibility requirements, driver lifecycle information, and additional resources for troubleshooting and further information.
NVIDIA support
The NVIDIA Device Plugin (see NGC catalog), Container Toolkit, and GPU drivers are supported by NVIDIA through their Enterprise Support program. For production deployments, ensure you have an active NVIDIA Enterprise Support agreement.
Red Hat support
Red Hat supports the integration of NVIDIA components with Red Hat Device Edge and MicroShift within the scope of Red Hat’s third-party software support policies. For issues related to NVIDIA components (drivers, container toolkit, device plugin), contact NVIDIA Enterprise Support. For Red Hat components (MicroShift, RHEL, CRI-O), contact Red Hat Support. For integration issues, Red Hat and NVIDIA can collaborate through TSANet when both support agreements are active.
Driver lifecycle
Always use supported Production Branch driver versions. End-of-Life (EOL) driver branches should not be used in production. For current Production Branch information, see the Bill of Materials section. Refer to NVIDIA’s driver support matrix for current supported versions.
Version compatibility
The NVIDIA Device Plugin has the following prerequisites, as documented in the NVIDIA k8s-device-plugin repository:
NVIDIA driver version: NVIDIA drivers ~= 384.81 or newer. For production deployments, use a supported Production Branch driver (R580 recommended). See NVIDIA’s driver support matrix for current supported versions and EOL information.
NVIDIA Container Toolkit version: NVIDIA Container Toolkit >= 1.7.0 is required (>= 1.11.0 for integrated GPUs on Tegra-based systems). Version 1.17.9+ is recommended for production use. The Container Toolkit must be installed and configured with nvidia-container-runtime as the default low-level runtime.
NVIDIA Device Plugin version: Version 0.18.0+ is recommended for Helm deployments. The Device Plugin is compatible with Kubernetes >= 1.10. See the Device Plugin NGC catalog for available versions and release notes.
MicroShift version: Use MicroShift 4.20 or 4.19 with RHEL 9.6 (recommended for new deployments). MicroShift is based on Kubernetes and meets the Device Plugin’s Kubernetes version requirement. See the MicroShift system requirements for supported RHEL/MicroShift combinations.
RHEL version: Must align with MicroShift version requirements. RHEL 9.6 is recommended for MicroShift 4.20. See the Bill of Materials section for supported combinations.
Compatibility verification checklist:
Before deployment, verify:
Your RHEL minor release matches your MicroShift version (see Bill of Materials section)
Your NVIDIA driver version is >= 384.81 and a supported Production Branch (not EOL)
Your Container Toolkit version is >= 1.7.0 (>= 1.11.0 for Tegra systems) and nvidia-container-runtime is configured as the default low-level runtime
Your Device Plugin version is compatible with Kubernetes >= 1.10 (MicroShift meets this requirement)
All components are within their support lifecycle
Additional resources
Red Hat documentation
Red Hat support and knowledge base
NVIDIA documentation and resources
NVIDIA Open GPU Datacenter Drivers for RHEL9 signed by Red Hat
Streamlining NVIDIA Driver Deployment on RHEL 8 with Modularity Streams
Support collaboration