Quick Start Guide#
Prerequisites#
Ensure you have access to TensorRT-Cloud.
Ensure you have TensorRT-Cloud CLI installed.
Launching a Sweep for an Optimized TensorRT-LLM Engine#
This section walks you through running a configuration sweep and building an engine for TensorRT-LLM.
Set up the configuration sweep by specifying:
Hugging Face model of interest
Hardware
Typical Input Sequence Length (ISL) for your traffic
Typical Output Sequence Length (OSL) for your traffic
Let’s try this for a popular model; the 8B Llama distillation of DeepSeek, operating on an H100.
$ trt-cloud sweep \
--src-hf-repo deepseek-ai/DeepSeek-R1-Distill-Llama-8B \
--gpu H100 \
--input-sequence-length 1000 \
--output-sequence-length 1000
By default, this will test 32 builds and 4 concurrency scenarios sweeping across multiple common optimizations like
gemm_plugin,quantization,user_buffer, and others, with an objective of maximizing throughput. The concurrency per replica tested by default is 5, 25, 50, and 100.Note
You can customize the sweep. With the above command, add the flags
--save-config [NAME].jsonand--save-config-only. This will produce a sweep JSON you can edit to customize your sweep:{ "sweep_config": { "build_inputs": [ { "source": { "id": "meta-llama/Llama-3.2-1B-Instruct", "revision": "main", "source_type": "huggingface_repo", "token": "foo" }, "type": "huggingface_checkpoint" } ], "trtllm_build": { "dtype": "bfloat16", "max_batch_size": [ 8, 16, 32 ], "max_num_tokens": [ 1024, 8192 ], ... }
Refer to the Sweep Search Space section for the arguments that are adjustable.
To start your customized sweeps, run:
$ trt-cloud sweep -c file_path.json
After the sweep has started, you’ll be given a sweep ID.
View the sweep progress using the
sweep_ID.$ trt-cloud sweep status SWEEP_ID
Assuming
trt-cloudisn’t under excessive load, a 32-trial sweep for an 8B parameter model should conclude in ~30 minutes. After the sweep status shows the trial as complete, we’re ready for the next step.View the sweep results by supplying your sweep ID.
$ trt-cloud sweep results SWEEP_ID
This command produces a pre-signed link that you can use to download your sweep results. Open the
summary.htmlfile to view the key metrics from your sweep.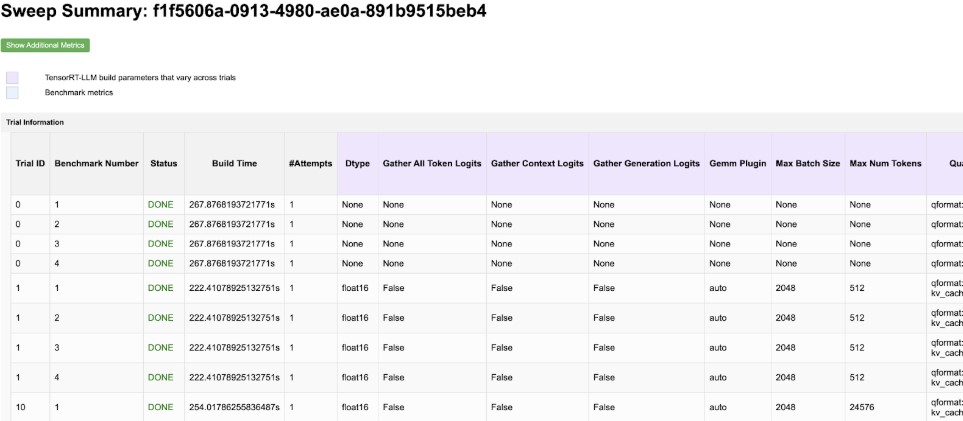
You can sort by throughput, latency, and other key metrics to find your ideal build.
Download an optimized and compiled TensorRT engine. After you find your preferred build, start that exact engine build by copying the code supplied in the Build Command column of your
summary.htmlfile.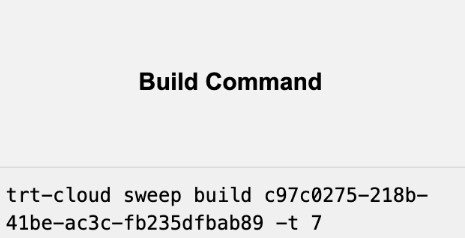
$ trt-cloud sweep build <sweep_uuid> -t <trial_id>
This returns a
build_uuidwhich you can use to check the build status. For example:$ trt-cloud build status <build_uuid>
After the build is complete, retrieve the download link for your desired model by issuing the
build resultscommand.$ trt-cloud build results <build_uuid>
Download the results to your GPUs and proceed to deployment. For more information about how to deploy and use a TensorRT-LLM engine, refer to the Running a TensorRT-LLM Engine section.
Building a TensorRT-LLM Engine#
Pick a Hugging Face repository to build. For example, deepseek-ai/DeepSeek-R1-Distill-Llama-8B (huggingface.co.
Start the engine build.
$ trt-cloud build llm --src-hf-repo=deepseek-ai/DeepSeek-R1-Distill-Llama-8B --gpu=H100 --os=linux --return-type=engine_and_metrics
[I] Build session with build_id: <build_id> started.
[I] To check the status of the build, run:
[I] trt-cloud build status <build_id>
Track the status of the build.
$ trt-cloud build status <build_id> --watch
Download the results after the build completes.
$ trt-cloud build results <build_id>
The generated TensorRT engine is saved in the engines subfolder.
View the engine performance metrics in the
metrics.jsonfile. For example:{ ... "num_samples": 3.0, "num_error_samples": 0.0, "total_latency(ms)": 20674.4, "seq_throughput(seq/sec)": 0.145107, "token_throughput(token/sec)": 74.2949, "avg_sequence_latency(ms)": 6891.29, "max_sequence_latency(ms)": 6912.19, "min_sequence_latency(ms)": 6880.72, "p99_sequence_latency(ms)": 6912.19, "p90_sequence_latency(ms)": 6912.19, "p50_sequence_latency(ms)": 6880.96, ... }
Running a TensorRT-LLM Engine#
Now that you’ve built a TensorRT-LLM engine in the previous section, it’s time to deploy the engine on your target inference hardware.
Note
These instructions are specific to Linux and TensorRT-LLM version 0.15.0 or newer.
Download or copy the build results onto your inference hardware. The easiest way to do this is to install
trt-cloudand run:$ trt-cloud build results <build id> -o ./build-result
This command allows you to download the engine to your inference hardware.
Install the required dependencies.
sudo apt-get -y install libopenmpi-dev jq
pip install --upgrade pip setuptools openai
Install the same version of TensorRT-LLM that was used to build the engine. The command below auto-detects the correct version. Refer to the Installing on Linux section of the TensorRT-LLM documentation for more information.
pip install tensorrt_llm~=$(jq -r ".version" ./build-result/engines/config.json) --extra-index-url https://pypi.nvidia.com
Use
trtllm-serveto start an OpenAI compatible server running the optimized engine. For more information, refer totrtllm-serveat GitHub: TensorRT-LLM and the TensorRT-LLM documentation.trtllm-serve ./build-result/engines --tokenizer ./build-result/tokenizer
While the above is running, use the following script to chat with the model (modify the script, if needed).
from openai import OpenAI

MAX_COMPLETION_TOKENS = 2048

client = OpenAI(base_url="http://127.0.0.1:8000/v1", api_key="foo")
history = []

while True:
    user_message = input("> ")
    history.append({"role": "user", "content": user_message})

    completion = client.chat.completions.create(
        model="",  # this will be ignored by trtllm-serve
        messages=history,
        max_tokens=MAX_COMPLETION_TOKENS,
    )

    assistant_message = completion.choices[0].message.content
    history.append({"role": "assistant", "content": assistant_message})
    print(assistant_message)
Building a TensorRT Engine for an ONNX Model#
This section shows an example of how to build a TensorRT engine from an ONNX model using the TensorRT-Cloud CLI.
Download an ONNX model. For example, MobileNetV2.
$ wget https://github.com/onnx/models/raw/main/Computer_Vision/mobilenetv2_050_Opset18_timm/mobilenetv2_050_Opset18.onnx
Start the engine build.
$ trt-cloud build onnx --src-path mobilenetv2_050_Opset18.onnx --gpu RTX4090 --os linux --trtexec-args="--fp16"
[I] Build session with build_id: <build_id> started.
[I] To check the status of the build, run:
[I] trt-cloud build status <build_id>
Track the status of the build.
$ trt-cloud build status <build_id> --watch
Download the results after the build completes.
$ trt-cloud build results <build_id>
[I] Built engine was uploaded to NGC Private Registry: <link>
[I] Total size of built engine: 5.540 MB
Would you like to download the build result? [y/N]: y
[I] Downloading engine to './trt-cloud-build-result-<build_id>'...
[I] Download complete.
The generated TensorRT engine,
Engine.trt, is saved in thedownloadedfolder. The entire is ready to deploy for inference of MobileNetV2 on a RTX 4090 GPU and Windows system.View the engine performance metrics in the
metrics.jsonfile. For example:{ "throughput_qps": 782.646, "inference_gpu_memory_MiB": 5.0, "latency_ms": { "min": 0.911316, "max": 5.17419, "mean": 1.00846, "median": 0.97345, …