


Example Deployment Using ONNX#
ONNX is a framework-agnostic model format that can be exported from most major frameworks, including TensorFlow and PyTorch. TensorRT provides a library for directly converting ONNX into a TensorRT engine through the ONNX-TRT parser.
This section walks through converting a pre-trained ResNet-50 model from the ONNX model zoo into a TensorRT engine using the ONNX-TRT parser and trtexec. If you integrate TensorRT through ONNX Runtime’s TensorRT Execution Provider instead, use ONNX Runtime 1.27 or later with TensorRT 11.x. Earlier ONNX Runtime releases reference APIs removed in TensorRT 11.0. Refer to the TensorRT 11.0.0 release notes (Known Issues), TensorRT 11.1.0 release notes (Fixed Issues), and the C++ API migration reference.
Visually, the ONNX-TensorRT workflow is:
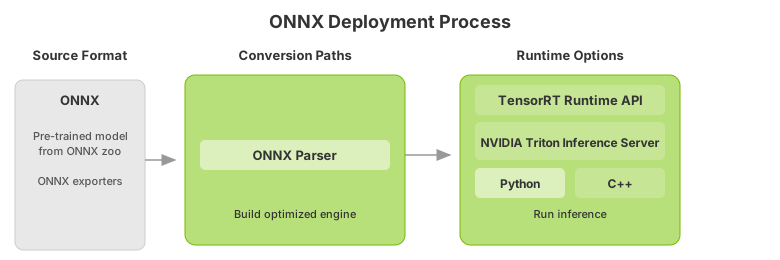
After you understand the basic steps of the TensorRT workflow, you can dive into the more in-depth Jupyter notebooks (refer to the following topics) for using TensorRT using Torch-TensorRT or ONNX. Using the PyTorch framework, you can follow along in the introductory Jupyter Notebook Running this Guide, which covers these workflow steps in more detail.
Export the Model#
The main automatic path for TensorRT conversion requires different model formats to convert a model successfully: The ONNX path requires that models be saved in ONNX.
This example uses ONNX, so it requires an ONNX model. The example uses ResNet-50, a basic backbone vision model that can be used for various purposes, to perform classification using a pre-trained ResNet-50 ONNX model from the ONNX model zoo on Hugging Face.
Download the pre-trained ResNet-50 model and place it in the expected path.
mkdir -p resnet50
wget -O resnet50/model.onnx https://huggingface.co/onnxmodelzoo/resnet50-v1-12/resolve/main/resnet50-v1-12.onnx
This downloads a pre-trained ResNet-50 .onnx file to the path resnet50/model.onnx.
In Exporting To ONNX From PyTorch, you can learn how to export ONNX models that work with this same deployment workflow.
Select a Precision#
Inference typically requires less numeric precision than training. With some care, lower precision can give you faster computation and lower memory consumption without sacrificing any meaningful accuracy. TensorRT supports FP32, FP16, FP8, BF16, and INT8 precisions, along with limited support for INT4 weights.
FP32 is most frameworks’ default training precision, so we will start by using it for inference here.
import numpy as np
PRECISION = np.float32
We set the precision that our TensorRT engine should use at runtime, which we will do in the next section.
Convert the Model#
The ONNX conversion path is one of the most universal and performant paths for automatic TensorRT conversion. It works for TensorFlow, PyTorch, and many other frameworks.
Several tools help you convert models from ONNX to a TensorRT engine. One common approach is to use trtexec, a command-line tool included with TensorRT that can, among other things, convert ONNX models to TensorRT engines and profile them.
We can run this conversion as follows:
trtexec --onnx=resnet50/model.onnx --saveEngine=resnet_engine_intro.engine
This converts resnet50/model.onnx to a TensorRT engine named
resnet_engine_intro.engine. Strong typing is the default in TensorRT 11.x,
so no separate flag is required.
Note
To tell
trtexecwhere to find our ONNX model, use the following option:--onnx=resnet50/model.onnx
To tell
trtexecwhere to save our optimized TensorRT engine, use the following option:--saveEngine=resnet_engine_intro.engine
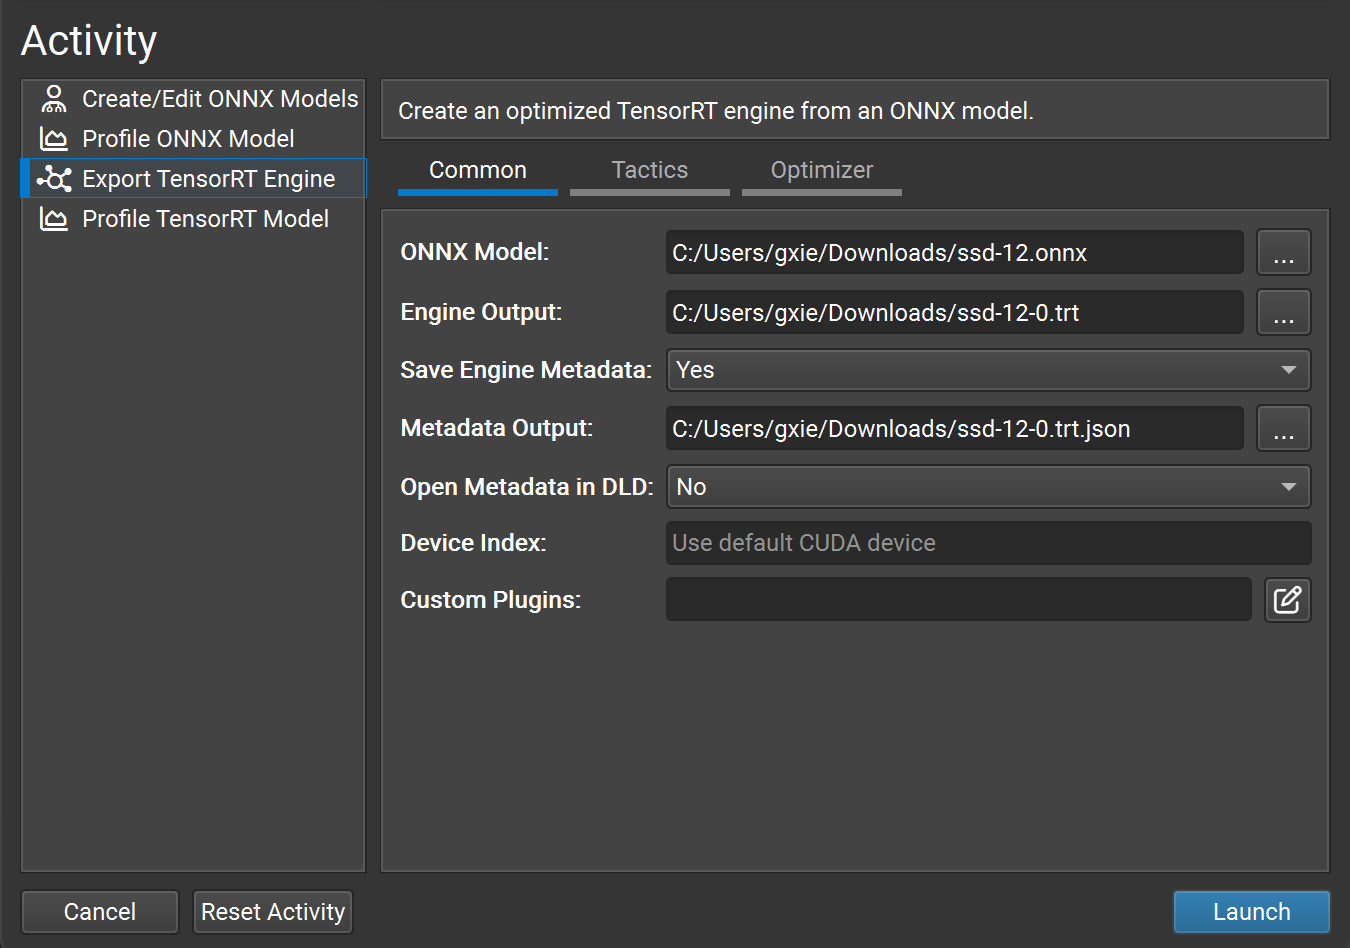
For a GUI-based workflow, use Nsight Deep Learning Designer to convert an ONNX model
into a TensorRT engine file. Most trtexec command-line parameters are also
available in its GUI.
Deploy the Model#
After successfully creating our TensorRT engine, we must decide how to run it with TensorRT.
There are two types of TensorRT runtimes: a standalone runtime with C++ and Python bindings and a native integration into PyTorch. This section will use a simplified wrapper (ONNXClassifierWrapper) that calls the standalone runtime. We will generate a batch of randomized “dummy” data and use our ONNXClassifierWrapper to run inference on that batch. For more information on TensorRT runtimes, refer to the Understanding TensorRT Runtimes Jupyter Notebook.
Download the helper that provides
ONNXClassifierWrapperinto the same directory asresnet_engine_intro.engine:wget -O onnx_helper.py https://raw.githubusercontent.com/NVIDIA/TensorRT/main/quickstart/IntroNotebooks/onnx_helper.py
If
wgetis not available, usecurl -L -o onnx_helper.py <url>or download the file from GitHub: onnx_helper.py.Install the Python packages used by the deployment steps:
python3 -m pip install numpy cuda-python
Warning
Current
cuda-pythonbindings return a status tuple from APIs such ascudaMemcpyAsyncandcudaStreamSynchronize. The downloaded helper currently treats those returns as scalar error codes. Run this patch before continuing. The replacements are no-ops after the upstream helper is corrected:python3 - <<'PY' from pathlib import Path helper = Path("onnx_helper.py") source = helper.read_text() source = source.replace( "err = cudart.cudaMemcpyAsync(", "err, = cudart.cudaMemcpyAsync(", ) source = source.replace( "err = cudart.cudaStreamSynchronize(self.stream)", "err, = cudart.cudaStreamSynchronize(self.stream)", ) helper.write_text(source) PY
Set up the
ONNXClassifierWrapper(using the precision we determined in Select a Precision).Note
The next three Python blocks are one continuous script. Paste them together (or keep the same interpreter session). They reuse
PRECISIONfrom Select a Precision and requirenumpyplus the patchedonnx_helper.pyfrom the previous step.import numpy as np from onnx_helper import ONNXClassifierWrapper # Reuse PRECISION from "Select a Precision" (default: np.float32) PRECISION = np.float32 trt_model = ONNXClassifierWrapper( "resnet_engine_intro.engine", target_dtype=PRECISION )
Generate a dummy batch.
input_shape = (1, 3, 224, 224)
dummy_input_batch = np.zeros(input_shape, dtype=PRECISION)
Feed a batch of data into our engine and get our predictions.
predictions = trt_model.predict(dummy_input_batch)
print(predictions.shape)
print(np.argmax(predictions, axis=1))
The expected shape for a batch of one ResNet-50 input is
(1, 1000). The printed class index is not meaningful because the input contains only zeros; this step verifies that inference returns a correctly shaped output.
Note that the wrapper loads and initializes the engine when running the first batch, so this batch generally has higher latency. For more information about batching, refer to the Batching section.
For more information about TensorRT APIs, refer to the NVIDIA TensorRT API Documentation.
ONNX Conversion and Deployment#
The ONNX interchange format provides a way to export models from many frameworks, including PyTorch, TensorFlow, and TensorFlow 2, for use with the TensorRT runtime. Importing models using ONNX requires the operators in your model to be supported by ONNX and for you to supply plugin implementations of any operators TensorRT does not support. (A library of plugins for TensorRT can be found on GitHub: plugin).
Exporting to ONNX from PyTorch#
ONNX models can be generated from PyTorch models using PyTorch torch.onnx.export. This subsection walks through the export steps. After you have an ONNX file, follow the steps in Example Deployment Using ONNX to convert and deploy it with TensorRT.
For additional detail, refer to the Using PyTorch with TensorRT through ONNX notebook.
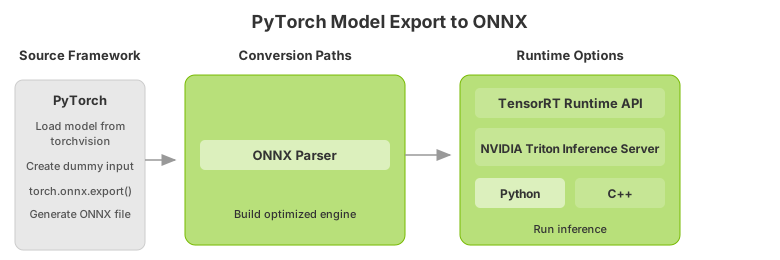
Import a ResNet-50 model from
torchvision. This will load a copy of ResNet-50 with pre-trained weights.import torchvision.models as models resnet50 = models.resnet50(weights=models.ResNet50_Weights.DEFAULT).eval()
Create a dummy input batch.
Note
We need a batch of data to save our ONNX file from PyTorch. We will use a dummy batch.
import torch

BATCH_SIZE = 32
dummy_input=torch.randn(BATCH_SIZE, 3, 224, 224)
Save the ONNX file.
import torch.onnx
torch.onnx.export(resnet50, dummy_input, "resnet50_pytorch.onnx", verbose=False)
Converting and Deploying the ONNX Model#
After exporting the ONNX file, you can convert it to a TensorRT engine and deploy it using the same workflow described in Example Deployment Using ONNX. That section covers precision selection, engine conversion with trtexec, and deployment using the TensorRT runtime.
For a deeper look at the TensorRT C++ and Python runtime APIs, refer to Using the TensorRT Runtime API.