(Deprecated) NeMo Framework End-to-End Workflow Example
A self-contained example on how to train a Large Language Model from scratch using NeMo Framework
NeMo 2.0 has been deprecated. This example is kept for legacy purposes but is no longer supported or maintained.
This workflow provides a full end-to-end example of preparing a dataset and training a hybrid SSM foundation model based on Nemotron-H using the redesigned NeMo 2.0 for NeMo Framework. This guide is split into sub-sections to describe each part in detail.
NeMo 2.0 now uses a Pythonic API that allows it to be integrated with IDEs such as Visual Studio Code (VS Code) and supports type checking.
While this guide demonstrates pre-training a Nemotron-H 8B model from scratch, you can modify it to train any supported model with NeMo 2.0. For more information about NeMo 2.0, including the latest list of supported models, see the NVIDIA NeMo Framework User Guide.
Nemotron-H is a hybrid SSM that leverages the Mamba architecture for faster training and inference speeds. Recent studies have proven this hybrid to be very robust, with models yielding slightly higher accuracy and much quicker training times and faster inference throughput compared to pure transformer-based equivalents, as found by Blakeman et al. (2025). With the rise of reasoning models, there is an increasing shift toward inference performance to meet the large output token demand. The hybrid SSM architecture of Nemotron-H is an excellent candidate for reasoning models given the high inference throughput.
Requirements
The following is a list of requirements to follow this complete workflow:
- An NVIDIA DGX Cloud Lepton cluster with at least 2x A100 or newer GPU nodes with eight GPUs each.
- VS Code installed on a local machine. Download instructions are available here.
- Python 3.10 or newer with PIP installed on a local machine.
- A shared filesystem with read/write access that is mountable in jobs.
- A Hugging Face account with an API token (setup steps are provided in the following section).
- A Weights & Biases account with an API token (setup steps are provided in the following section).
Initial Setup
This guide uses two external services to simplify the LLM development process: Hugging Face and Weights & Biases.
Hugging Face contains resources for many of the most popular language models and datasets in the community. You can leverage these resources while training the model to minimize deployment steps and maintain consistency with community model assumptions.
This workflow walks through training a Nemotron-H 8B model from scratch. The dataset you use needs to be tokenized using a custom tokenizer. NVIDIA, who produced the Nemotron-H models, published the tokenizer for the Nemotron-H models on Hugging Face. To use the tokenizer, you need to create a Hugging Face account and get an API token. The following steps guide you through that process.
Create a Hugging Face Account
If you don't have a Hugging Face account already, create one by going to https://huggingface.co/join and signing up with your corporate email account.
Once your account is set up, go to https://huggingface.co/settings/tokens while logged in to create a personal access token. Create a new token with Read access and give it a memorable name. Save the generated token in a safe place, as it won't be viewable again for security reasons.
(Optional) Accept the Model-Specific Licenses
If you're using gated models that require users to accept their license, such as the official Llama-3.1-8B model, navigate to their specific model card on Hugging Face, read the privacy policy, and click the Agree and access repository button while logged in to Hugging Face. Now you can download resources from the gated repository using your personal access token.
Since the Nemotron-H model isn't gated, this step is not necessary for following this guide.
Create a Weights & Biases Account
Weights & Biases is a tool that allows developers to easily track experiments for AI applications. NeMo Framework natively supports logging many values such as training loss, learning rate, and gradient norm as well as resource utilization with Weights & Biases. Weights & Biases is highly recommended for tracking NeMo Framework jobs.
To get started with Weights & Biases, navigate to https://wandb.ai in a web browser and click the Sign Up button in the top right to create a free account. Once logged in, go to https://wandb.ai/settings and go to the bottom to create a new API key. This API key will be used while launching workflows to automatically log to Weights & Biases.
Set Up VS Code Locally
With VS Code installed on your local machine, run the application and open a new directory to save the scripts you'll use for launching jobs on the DGX Cloud cluster.
In VS Code, open a terminal window by clicking the Terminal > New Terminal button in the menu. Next, create a Python virtual environment and install the dependencies required for running NeMo 2.0 and Lepton using the following commands in the new terminal:
Once dependencies are installed, you can define the data preparation and training scripts using VS Code.
The source env/bin/activate command above activates a Python virtual environment with the dependencies installed. If you need to leave the virtual environment, you can run deactivate. To activate it again, navigate back to the directory where the virtual environment named env was saved and run source env/bin/activate again. If you run into ModuleNotFound errors, it is likely the environment needs to be re-activated.
Authenticate with DGX Cloud Lepton
NeMo Framework on DGX Cloud Lepton leverages the Lepton Python SDK to upload data to the cluster and schedule jobs. To use the Python SDK, you need to authenticate with the cluster using the Lepton CLI tool installed in the previous step. In your active virtual environment, run:
This prompts you to authenticate with your DGX Cloud Lepton workspace. If you're in a GUI-supported environment such as a desktop, a browser will open to the credentials page in your workspace. Otherwise, a URL will be displayed. Open this URL in a browser.
On the credentials page, create an authentication token by following the prompts. The page will display a secret token which is used for authentication. Copy the workspace ID and token shown in the second field and paste it back in your terminal. The format should look like xxxxxx:**************************. You should now be authenticated with DGX Cloud Lepton. You only need to authenticate once locally as long as your credentials remain valid.
Prepare the Data
NeMo Framework supports processing custom text-based datasets for pre-training new models. The data preprocessor requires datasets to be cleansed, excluding any sensitive or improperly formatted data that is unsuitable for use during pre-training. Each file in the dataset must be in .json or, ideally, .jsonl format. Datasets can be downloaded from external sources or uploaded directly to the remote filesystem.
The following example walks through downloading, extracting, concatenating, and preprocessing the Nemotron-CC dataset, which includes a large corpus of curated text from several domains and has been deduplicated and cleaned to make it an excellent candidate for pre-training LLMs. While the remainder of the document will be based on the Nemotron-CC dataset, this general process can be followed for most custom datasets and will provide guidance on how to adapt as needed.
Set Up the Scripts
You will use four different scripts to prepare the Nemotron-CC dataset for pre-training a Nemotron-H-based SSM. These scripts will be automatically copied to the remote filesystem once launched. First, create a new sub-directory locally to save all of the files using this command:
The four scripts that need to be created are as follows:
Download
The first script downloads the medium, medium-high, and high quality subsets of the Nemotron-CC training dataset from Common Crawl to the remote filesystem. By default, Nemotron-CC includes data subsets ranging from low quality to high quality, but you only want to filter out the lower quality data as studies have shown this degrades model performance (Blakeman et al., 2025).
The script retrieves the list of pages to download from Common Crawl, then removes all of the low and low-medium quality pages before downloading the remaining links using the cc-downloader tool. This can run on a single node for more efficient resource utilization. Using the local VS Code session created previously, save the following file in the local directory at data_prep/download.sh.
Extract
The individual dataset shards are compressed in the Zstandard or .zstd format and must be decompressed. The following script distributes the downloaded files across all ranks, decompresses the shards, and then removes the compressed downloads to keep the filesystem clean. Using the local VS Code session, save the script in the local directory as data_prep/extract.py.
Concatenate
Given that the Nemotron-CC dataset contains several thousands of files, it is helpful to concatenate them into fewer, larger files. Processing a smaller number of large files is much faster than handling a large number of small files, which eliminates potential data bottlenecks during the pre-training stage.
The following script takes 50 individual shards at a time and combines them into one large file, repeating for the entire dataset. Each rank concatenates a unique subsection of the dataset and deletes the individual shards in the end. Using the local VS Code session, save the script in the local directory as data_prep/concat.sh.
The script combines 50 individual shards by default into a single file. For the complete dataset, this will yield 465 larger combined files representing the data, each being approximately 42 GB in size. To change how many shards are used in each file, increase or decrease the shards_per_file variable below. A larger number will result in fewer files that are larger in size. A smaller number will result in more files that are smaller in size.
Preprocess
Once all of the files have been concatenated, it is time to preprocess the dataset. The preprocessing phase tokenizes each dataset file using the Nemotron-H 8B Base tokenizer, which is downloaded from Hugging Face, and creates .bin and .idx files for each concatenated file. As with the other scripts, this one divides the work amongst all available workers to speed up preprocessing. Using the local VS Code session, save the following script in the local directory as data_prep/preprocess.py.
As mentioned, this script uses the Nemotron-H tokenizer because the intent is to use this data for pre-training a Nemotron-H model. However, you can swap out the tokenizer for a different one available on Hugging Face if pre-training a different model is desired.
For example, you can use the Llama-3.1-8B tokenizer instead. To do this, replace the reference to nvidia/Nemotron-H-8B-Base-8K in the script with the repo ID of the Llama-3.1-8B model, meta-llama/Meta-Llama-3.1-8B.
Be sure to accept any applicable licenses on the model repository page if you haven't already done so.
Data Prep
A final script needs to be written to launch all of the data preparation jobs on the cluster. This uses NeMo-Run to authenticate with the DGX Cloud Lepton cluster and run distributed PyTorch jobs directly on the cluster. The jobs will be launched sequentially in the order they are called. Using the local VS Code session, save the following script locally as data-prep.py.
Several lines in the script below will need to be modified to reflect your cluster. The lines are as follows:
resource_shape="gpu.h100-80gb": Replacegpu.h100-80gbwith the desired resource shape. This is the GPU type and configuration to use for the job, such asgpu.8xh100-80gbmight refer to a pod with 8x H100 GPUs available in it.node_group="xxxxx": Replacexxxxxwith the node group to run in. The list of available node groups can be found in the Nodes tab in the UI."HF_TOKEN": "xxxxxxxxxxxxxxxxxx": Add your Hugging Face authentication token between the quotation marks.executor = lepton_executor(nodes=8, devices=1): The example runs on eight pods with one process per node. If more nodes/processes are required, specify the amount here."from": "local:nfs": If using remote shared storage, enter the name of the storage to mount in all jobs. This can be found in the UI while creating a job and selecting a storage option.
Launch Data Preparation
Once all the scripts are saved in the specified location, it is time to launch the preprocessing job. NeMo-Run will launch the job automatically on the cluster, so starting data preparation is as simple as running a Python command. Launch data preparation with the following command in the terminal of your local VS Code session:
After creating the data preparation job, a pod for each worker and primary will be scheduled and started once resources become available on the cluster. You can monitor the process by viewing the logs in the DGX Cloud Lepton UI. The /nemo-workspace/data directory will evolve throughout the process with the following changes at the end of each stage:
- After downloading, there will be 23,240 compressed data shards named
CC-MAIN-*.zstdwhere the*identifies the individual files. These files are nested within directories to indicate the shard's quality, type, whether it is human or synthetic, etc. Each file is approximately 150 MB in size. - After extraction, there will be 23,240 unzipped data shards named
CC-MAIN-*.jsonland all of the compressed.zstdfiles will be removed. Each file is approximately 350 MB in size. - After concatenation, there will be 465 large, combined files named
nemotron-cc_N.jsonlwhereNindicates the subset of the data. Each file will be approximately 46 GB in size. All of the individualCC-MAIN*.jsonlfiles will be removed. - After preprocessing, there will be 465
.binfiles and 400.idxfiles namednemotron-cc-N_text_document, whereNcorresponds to the combined data file number. Each.binfile should be approximately 40 GB in size and.idxfiles should be around 350 MB (sizes will vary).
Once all files have been preprocessed, it is time to begin pre-training the model.
Pre-Train the Model
NeMo Framework contains many predefined configurations for various models, including the Nemotron-H models. This section will demonstrate how to initiate training a Nemotron-H 8B model on DGX Cloud Lepton using the preprocessed Nemotron-CC dataset.
Pre-training is the most compute-intensive phase of the LLM training process as the model is typically trained for hundreds of billions to several trillions of tokens while it learns the vocabulary and word pairings of the underlying dataset. Depending on the size of the dataset and model, as well as the amount of compute resources available to train the model, this process can take anywhere from several days to a few months to finish. Therefore, it is strongly recommended to leverage as much of your available compute power as possible for pre-training the model.
Set Up the Environment
Now the training job can be defined. The following script is used to launch pre-training of a Nemotron-H 8B model for one trillion tokens using the Nemotron-CC dataset that was prepared. Save the script to nemotronh-pretrain.py locally using your VS Code session. Note that, as with data preparation earlier, several lines will need to be modified to reflect your cluster. These lines are as follows:
resource_shape="gpu.8xh100-80gb": Replacegpu.8xh100-80gbwith the desired resource shape. This is the GPU type and configuration to use for the job, such asgpu.8xh100-80gbmight refer to a pod with 8x H100 GPUs available in it.node_group="xxxxx": Replacexxxxxwith the node group to run in. The list of available node groups can be found in the Nodes tab in the UI."HF_TOKEN": "xxxxxxxxxxxxxxxxxx": Add your Hugging Face authentication token between the quotation marks."WANDB_API_KEY": "xxxxxxxxxxxxxxxxxx": Add your Weights & Biases authentication token between the quotation marks."from": "local:nfs": If using remote shared storage, enter the name of the storage to mount in all jobs. This can be found in the UI while creating a job and selecting a storage option.
Depending on how many resources you have available, you can also change the number of nodes used for pre-training by modifying this line:
Update the nodes=8 line to the desired number of nodes to train with. Keep gpus_per_node at eight as this allows optimal multi-node communication over NCCL.
Additionally, a Python script needs to be created that converts the model to Hugging Face format once training finishes. Create a new directory named scripts using:
Copy and save the following Python script to scripts/convert.py:
This script will run after the model completes pre-training and find the final checkpoint in the training directory and convert it to Hugging Face format where it can be used for downstream tasks.
Launch the Pre-Training Job
After modifying and saving the nemotronh-pretrain.py script locally and saving the conversion script, launch the pre-training job from the terminal in your local VS Code session using the following command:
Make sure your Python virtual environment is activated before running this command.
The job will be scheduled with DGX Cloud Lepton and will launch once resources become available. After submission, the job will appear in the DGX Cloud Lepton Batch Jobs page.
NeMo Framework is fully integrated with Weights & Biases and logs multiple metrics that can be viewable on their website. If the W&B key was provided in the command, a new W&B project will automatically be created and metrics will be uploaded there. Viewing logs on W&B is recommended as the best path to monitor training progress.
View the Project Dashboard on Weights & Biases
To view your charts, navigate to https://wandb.ai. You should see a link to the newly created project on your home page. Clicking the link will take you to your project dashboard, which should look similar to the following. Note that the figure below includes training results for two different runs where the second run is a continuation of the first.
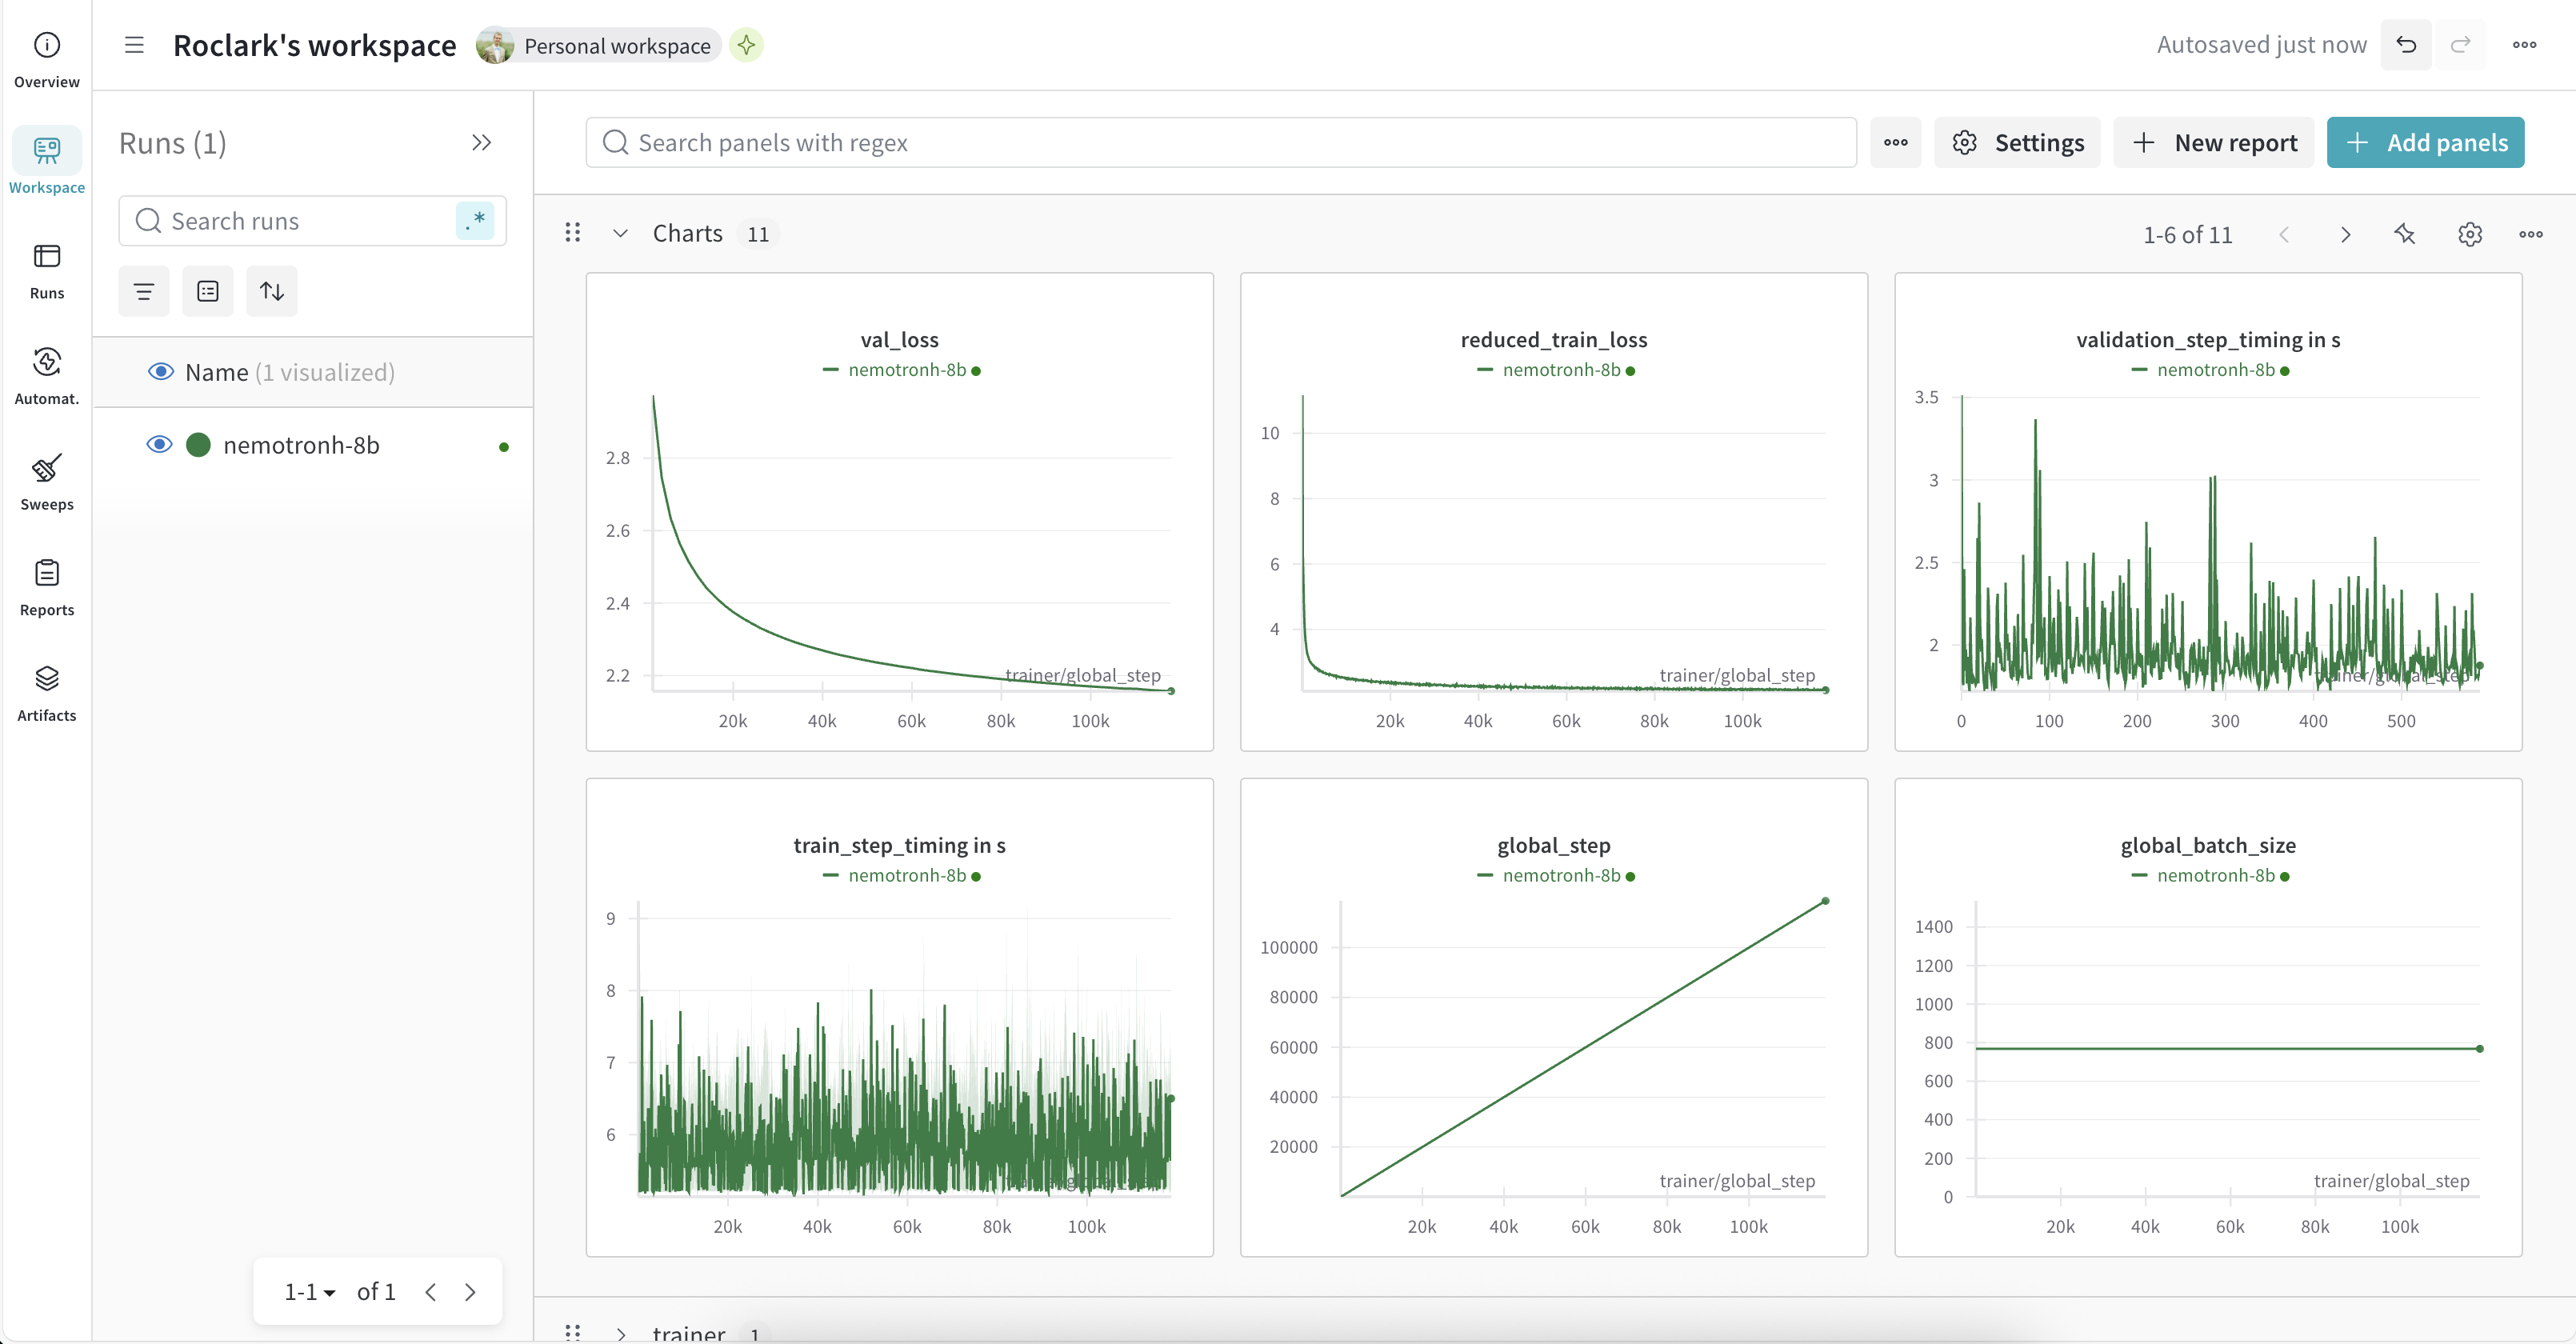
Two of the most important charts to monitor during pre-training are the reduced_train_loss and val_loss charts, which show how the model is learning over time. In general, these charts should have an exponential decay shape.
The job will take around three weeks to complete on eight nodes. Since NeMo Framework pre-training scales linearly, doubling the number of nodes should halve the amount of time required to pre-train the model.
While the model trains, a checkpoint will be periodically saved in the background automatically. Per the command above, the checkpoints will be saved in the /nemo-workspace/nemotronh_8b/nemotronh_8b/<date>/checkpoints directory where <date> is a timestamp of when the job was launched. Only the 10 checkpoints with the best val_loss values as well as the latest checkpoint will be saved. These checkpoints will be used for future fine-tuning runs. If the pre-training process gets interrupted for any reason, it can be re-launched by either cloning the job in the UI or running the python3 nemotronh-pretrain.py command again. Training will automatically resume from the latest checkpoint.
After pre-training finishes, another task will begin to convert the final pre-trained model checkpoint to the Hugging Face format. This spins up another pod with a single GPU, which is required for conversion. The final Hugging Face model will be saved at /nemo-workspace/nemotronh_8b/huggingface. The converted Hugging Face model can be deployed with vLLM for inference.
Deploy the Model for Inference
Now that you have finished pre-training a base model and converted it to the Hugging Face format, you can deploy it for inference as a NIM and send requests to the deployed model to do quick human evaluations.
This section is NOT intended for production inference deployments. The purpose of this section is to provide a quick way for engineers, QA teams, and other internal stakeholders to evaluate the model with user-generated prompts and inform decisions on the model's readiness. A production deployment would include user tracking, performance optimizations, and more.
To deploy the model for inference, navigate to the Endpoints page, click the Create Endpoint button, and select the Create LLM Endpoint box.
Follow these steps in the new form that opens:
- Enter a name for the endpoint, such as
nemotronh-8b-base. - Select Load from storage for the model and select the Volume where the checkpoint was saved and enter
/nemo-workspace/nemotronh_8b/huggingfaceas the Model file path. This will load the Hugging Face model directly from the shared storage. - Select the node group to run the deployment in.
- Select the GPU resource shape to deploy the model in. The 8B model can fit in a single GPU with at least 24 GB of GPU memory.
- In the Run Command section, add
--trust-remote-codeto the end of the command. By default, Hugging Face throws an error when models that aren't hosted on its servers are run so the user is aware that the model could be malicious. Since you built this model and trust it, you can authorize its usage for vLLM. The command will end up looking likevllm serve /nemo-workspace/nemotronh_8b/huggingface --port 8080 --trust-remote-code. - (Optional) Set the Autoscaling option to increase the number of replicas and/or disable autoscaling to keep the instance persistent.
- (Optional) Set the Access tokens to Enable public access to disable authentication for requests. This will make the endpoint available for anyone that has the URL without authentication. This should only be for temporary testing purposes.
- In the Storage section, verify the correct volume and mount path is selected.
- Click Create to deploy the model.
Back in the Endpoints page you will see the newly created inference endpoint. It will take some time for the model to be loaded from storage before it transitions to the Ready state. Once the deployment is ready, it can handle inference requests.
Send Requests to the Deployed Model using the Playground
The easiest way to send a request to the deployed model is via the Playground in the UI. Open the endpoint that was created for the model and select the Playground tab. This opens a chat interface for the model using the exposed API. Note that this is an easy way to test the model, but shouldn't be considered a full chat interface and can't handle very large input and output token sizes.
Using the sliders on the right of the page, set the Temperature to 0.7, Max Tokens to 512, and Top P to 0.6.
Next, enter a prompt, such as Write me a short story about a baby dragon that learns to fly and hit the Send button to initiate the request. The request will be sent to the deployed model and will stream the response once ready. The form will stream the generated response from the model.
Send Requests to the Deployed Model using the API
The endpoint also exposes a REST API that follows the OpenAI API standard for interacting with requests. This can be used to integrate with downstream applications like chat UIs, AI agents, or other backend services. The general format for sending a request from the terminal is as follows:
The endpoint URL can be found in the UI by selecting the nemotronh-8b-base deployment in the Endpoints menu and copying the Endpoint URL at the top of the page under the model name. This URL typically has the format https://<workspace ID>-<endpoint name>.xenon.lepton.run. For example, if a workspace has an ID of abcdefg, the URL would be https://abcdefg-nemotronh-8b-base.xenon.lepton.run.
To send a request from the terminal, replace X.X.X.X with the endpoint URL in the curl command above. Additionally, replace Write me a short story about a baby dragon that learns to fly with your prompt of choice. This command will generate 2048 tokens but this can be changed as needed depending on the prompt.
After submitting the command, it will be passed to the deployed model, which will generate a response to the prompt. Streaming is disabled for this particular request to make the results easier to read in the terminal.
The response should look similar to the following (response truncated - actual responses will vary):
The model's response will be in the choices list, specifically in the assistant role shown. For example, the exact response begins "Sure, here's a short story: once upon a time..."
For more information on the OpenAI API, reference the official documentation.
Clean Up
When the deployment is no longer needed, it can be stopped to free up additional compute resources.
To stop the job, go to the Endpoints page in the UI and click the Delete button next to the nemotronh-8b-base endpoint shown in the list.
Citations
Blakeman, A., Basant, A., Khattar, A., Renduchintala, A., Bercovich, A., Ficek, A., Bjorlin, A., Taghibakhshi, A., Deshmukh, A. S., Mahabaleshwarkar, A. S., Tao, A., Shors, A., Aithal, A., Poojary, A., Dattagupta, A., Buddharaju, B., Chen, B., Ginsburg, B., Wang, B., ... Chen, Z. (2025). Nemotron-H: A family of accurate and efficient hybrid Mamba-Transformer models [Preprint]. arXiv. https://doi.org/10.48550/arXiv.2504.03624