Artistic Style (or astyle for short) is a source code indenter, formatter, and beautifier for the C, C++, C# and Java programming languages. It is a great tool to ensure your code is beautifully and consistently formatted and indented, and can be used to replace any tabs with spaces, ensuring consistent indentation regardless of the editor you use to view the code.
You can apply astyle from command line simply by:
astyle file.cpp
This would format the file with 4 spaces per indent. You can configure the way of formatting, either with command line options or by placing the default options into the ~/.astylerc file.
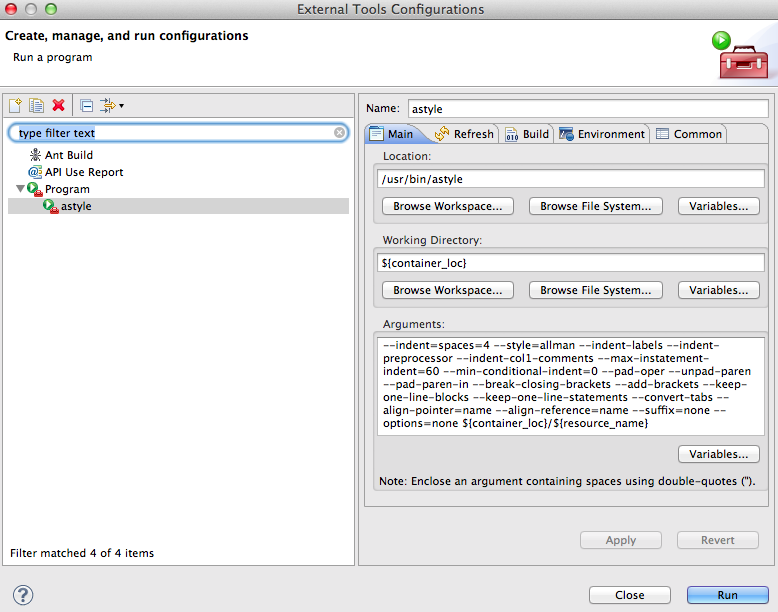
It is also possible to run an external tool on a file in the editor window in Eclipse. Select Run > External Tools > External Tools Configurations..., create a new Program configuration, and fill in the boxes as below:
For convenience, the parameters we have used are here:
--indent=spaces=4 --style=allman --indent-labels --indent-preprocessor --indent-col1-comments \
--max-instatement-indent=60 --min-conditional-indent=0 --pad-oper --unpad-paren --pad-paren-in \
--break-closing-brackets --add-brackets --keep-one-line-blocks --keep-one-line-statements \
--convert-tabs --align-pointer=name --align-reference=name --suffix=none --options=none
You should remove the newlines and backslashes if you copy-paste the text into the Arguments box. This version requires version 2.02 or newer — to use version 2.01, drop the parameter --align-reference=name.
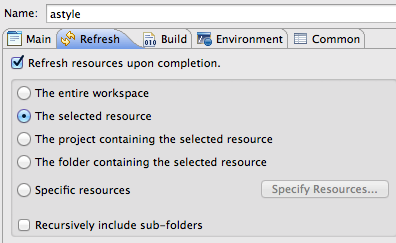
Note that after pasting the above parameters in the Arguments box, you need to append ${container_loc}/${resource_name}, specific for configuring the tool in Eclipse. Then configure the Refresh tab.
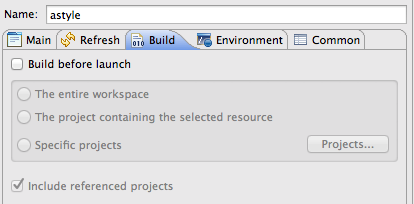
And configure the Build tab.
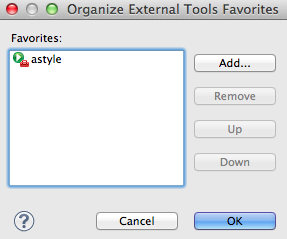
Next, select Run > External Tools > Organize Favorites... and add the astyle tool.
Now you can run astyle for the file that is selected in the edit window by clicking this button.
Note that you should save the file first as the input is taken from the file, not from the editor window. The content of the editor window is refreshed automatically.

Eclipse has a built-in formatter, but it is not as nice as astyle. Whereas astyle lets you format whitespace in the editor, such as aligning comments, assignments, or variable declarations in the consecutive lines and doesn't disturb the edits, Eclipse's formatter will reformat everything, and doesn't allow as much manual override. However, it's nice if Eclipse's default formatting is somewhat similar to what astyle will use. You can configure Eclipse by selecting Eclipse Window > Preferences > C/C++ > Code Style > Import and import the mvc_style.xml file.
You can apply the formatter by selecting text and hitting CTRL-SHIFT-F (or CMD-SHIFT-F on Mac).
Git is a distributed version control system. If you are not familiar with git, it is recommended that you read the Getting Started and Git Basics chapters. In this section, we will cover:
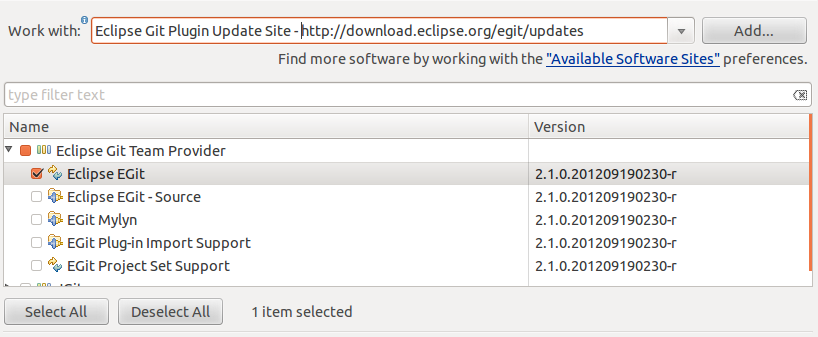
EGit is a plugin for Eclipse that provides Git integration. To setup EGit go to Help > Install New Software and select the http://download.eclipse.org/egit/updates site from the Work with drop down box. If you don't see the site listed, click on Available software sites and enable it if it is already on the list (usually the case) or add it if it is missing.
To enable Git integration for a project, right-click on the project and
After you have shared the project through Git, you will see a decoration next to the project name that tells you the repository name and the current branch. You can now execute Git commands using the Team context menu, most typically Team > Commit, Team > Pull, and Team > Switch To.
Git allows you to define a series of hooks to run at different stages of the Git workflow. One such hook is called the pre-commit hook and can be executed when you invoke the git commit command.

|
Note: The hooks we cover here are shell scripts that are executed locally, and as such, you must ensure they work on all operating systems the project can be developed on. The EGit plugin for Eclipse doesn't execute the hooks. |
We now show a sample pre-commit hook that invokes Astyle on all files to be committed. Copy the code into .git/hooks/pre-commit to enable it.
#!/bin/sh

if git rev-parse --verify HEAD >/dev/null 2>&1
then
    against=HEAD
else
    # Initial commit: diff against an empty tree object
    against=4b825dc642cb6eb9a060e54bf8d69288fbee4904
fi

# If you want to allow non-ascii filenames set this variable to true.
allownonascii=$(git config hooks.allownonascii)

# Cross platform projects tend to avoid non-ascii filenames; prevent
# them from being added to the repository. We exploit the fact that the
# printable range starts at the space character and ends with tilde.
if [ "$allownonascii" != "true" ] &&
    # Note that the use of brackets around a tr range is ok here, (it's
    # even required, for portability to Solaris 10's /usr/bin/tr), since
    # the square bracket bytes happen to fall in the designated range.
    test "$(git diff --cached --name-only --diff-filter=A -z $against |
    LC_ALL=C tr -d '[ -~]\0')"
then
    echo "Error: Attempt to add a non-ascii file name."
    echo
    echo "This can cause problems if you want to work"
    echo "with people on other platforms."
    echo
    echo "To be portable it is advisable to rename the file ..."
    echo
    echo "If you know what you are doing you can disable this"
    echo "check using:"
    echo
    echo "  git config hooks.allownonascii true"
    echo
    exit 1
fi

version=`astyle --version 2> /dev/null`
if test "x$version" != "x"; then
echo "SDF3 git pre-receive hook:"
echo "Did not find astyle, please install it before continuing."
exit 1
fi
ASTYLE=astyle

case `$ASTYLE --version 2> /dev/null` in
  Artistic*)
    ;;
  default)
    echo "SDF3 git pre-commit hook:"
    echo "Did not find astyle, please install it before continuing."
    exit 1
    ;;
esac

ASTYLE_PARAMETERS="\
    --indent=spaces=4 \
    --style=allman \
    --indent-labels \
    --indent-preprocessor \
    --indent-col1-comments \
    --max-instatement-indent=60 \
    --min-conditional-indent=0 \
    --pad-oper \
    --unpad-paren \
    --pad-paren-in \
    --break-closing-brackets \
    --add-brackets \
    --keep-one-line-blocks \
    --keep-one-line-statements \
    --convert-tabs \
    --align-pointer=name \
    --align-reference=name \
    --suffix=none \
    --options=none "

ASTYLE_PARAMETERS_JAVA="\
    --indent=spaces=4 \
    --style=java \
    --indent-labels \
    --indent-preprocessor \
    --indent-col1-comments \
    --max-instatement-indent=60 \
    --min-conditional-indent=0 \
    --pad-oper \
    --unpad-paren \
    --pad-paren-in \
    --break-closing-brackets \
    --add-brackets \
    --keep-one-line-blocks \
    --keep-one-line-statements \
    --convert-tabs \
    --align-pointer=name \
    --align-reference=name \
    --suffix=none \
    --options=none "

echo "--Formatting source code--"

files=`git-diff-index --diff-filter=ACMR --name-only -r --cached $against --`
for file in $files; do
    x=`echo $file |grep -E '(\.c$|\.cc$|\.h$|\.cpp$|\.hpp$)'`
    if test "x$x" != "x"; then
    # Save a temp copy of the origin file
    cp $file ${file}.orig
    $ASTYLE ${ASTYLE_PARAMETERS} $file
    git add $file
    # If the saved copy and the new file are the same
    # delete the temporary copy
    if diff $file ${file}.orig >/dev/null ; then
        rm ${file}.orig
    fi
fi

x=`echo $file |grep -E '(\.java$)'`
if test "x$x" != "x"; then
    # Save a temp copy of the origin file
    cp $file ${file}.orig
    $ASTYLE ${ASTYLE_PARAMETERS_JAVA} $file
    git add $file
    # If the saved copy and the new file are the same
    # delete the temporary copy
    if diff $file ${file}.orig >/dev/null ; then
        rm ${file}.orig
    fi
    git add $file
  fi
done

echo "--Formatting source code done--"
Documenting the code is important for many reasons: it clarifies your thinking of what the software really does, reminds you later of the same thing, and allows others to use your code. Writing documents separately from your code is error-prone, and quite often the documentation lags behind and gets stale as the code evolves. The solution is to automate as much of the process as possible, and tie the documentation and the program code together. Doxygen is the right tool for this task.
Let's try using it: install doxygen, go to /tutorials/SimpleImageOpenCV_GL_Complete/jni, and run:
doxygen -g
to generate a default *Doxyfile*, with default configuration that you can edit, and:
doxygen
which generates the documentation.
Then open html/index.html. Click Classes > Engine, and you'll see the documentation for the Engine class.
This piece of the header file...

...has turned into this piece of documentation.
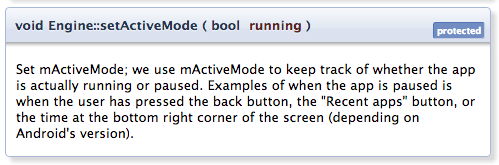
The trick is the special syntax of the comment, where the comment starts with /**. FCam documentation has been created using doxygen. Open fcam4tegra.zip and unzip it; then open modules/fcam/docs/html/index.html to see the documentation.
You can create documentation at many levels. If you open fcam/include/FCam/FCam.h, you see several types of tags. One of them is \mainpage, which produces the main page of FCam documentation. Various types of links are provided, and you can even include bitmap images. Every file can be documented with the \file tag.
If you open fcam/include/FCam/Image.h, you see that a comment before the class definition is used to provide an overview of the class, a comment before a method documents the method, and a comment before a member variable documents that. There are keywords that support documenting function arguments and the return values.
A detailed manual is provided. Here is an example of documented code, from that manual (you should set JAVADOC_AUTOBRIEF to YES in Doxyfile with this example):
/**
*  A test class. A more elaborate class description.
*/
class Test
{
public:
/**
* An enum.
* More detailed enum description.
*/
enum TEnum
{
TVal1, /**< enum value TVal1. */
TVal2, /**< enum value TVal2. */
TVal3  /**< enum value TVal3. */
}
*enumPtr, /**< enum pointer. Details. */
enumVar;  /**< enum variable. Details. */
/**
* A constructor.
* A more elaborate description of the constructor.
*/
Test();
/**
* A destructor.
* A more elaborate description of the destructor.
*/
~Test();
/**
* A normal member taking two arguments and returning an integer value.
* @param a an integer argument.
* @param s a constant character pointer.
* @see Test()
* @see ~Test()
* @see testMeToo()
* @see publicVar()
* @return The test results
*/
int testMe( int a, const char *s );
/**
* A pure virtual member.
* @see testMe()
* @param c1 the first argument.
* @param c2 the second argument.
*/
virtual void testMeToo( char c1, char c2 ) = 0;
/**
* A public variable.
* Details.
*/
int publicVar;
/**
* A function variable.
* Details.
*/
int ( *handler )( int a, int b );
};
The output will look like this. Click here for more details. You can even include LaTeX formulas. Additional information, including quick-start guides, can be found here.
Unit test is one of the most important stages in any development project. Unit test will reduce the number of bugs, the cost of change of the existing code, and even improve the design of the project. Here are good articles that show why writing unit tests is necessary: Top 12 reasons to Write Unit Tests, and Wrong reasons Not to Write Unit Tests.
Google's C++ unit test framework (we will call it as Gtest from now on) provides a variety of testing capabilities for C++ based projects. It supports automatic test discovery, a rich set of assertions, user-defined assertions, death tests, and various options for running the tests. In this tutorial, we show how to use Gtest library in an Android project.
To make its use in Android easy for you, we have already built the library, and added the library, header files, and Android.mk in tutorials/UnitTestDriver. You can still download Gtest source code, then build it yourself if needed.
Now let's start by importing our unit test driver project, tutorials/UnitTestDriver (if you need help, see importing a project into Eclipse).
Then, let's first look into tutorials/UnitTestDriver/jni/gtest-1.6.0:
[...]
include
libs
[...]
Android.mk
There are other files inside the folder, but the pre-built library for Android, libgtest.a, can be found in gtest-1.6.0/libs/armeabi-v7a/. The paths for the library are defined in gtest-1.6.0/Android.mk as shown below.
LOCAL_PATH := $(call my-dir)
include $(CLEAR_VARS)

LOCAL_MODULE := gtest
LOCAL_EXPORT_C_INCLUDES := $(LOCAL_PATH)/include
LOCAL_SRC_FILES := ./libs/$(TARGET_ARCH_ABI)/libgtest.a
include $(PREBUILT_STATIC_LIBRARY)
Now, let's check out if we correctly include ``gtest.h`` at the beginning of ``unittestdriver.h``::
#include <gtest/gtest.h>
Then, let's open and look at unittestdriver.cpp. This file is a driver file that loads and initializes Gtest, and runs the testing code. Because Gtest internally prints out the result streams, the driver function handles the output of the testing streams from Gtest, and prints them out on the display in Android app.
The following code shows the UnitTestDriver::run() function that runs unit test.
void UnitTestDriver::run()
{
    char * argv[] =
    { ( char * ) "UnitTestDriver" };
    int argc = sizeof( argv ) / sizeof( const char * );

    logStream() << "*** Starting Unit Test ***" << std::endl << flush();

    // Initialize the testing framework
 ::testing::InitGoogleTest( &argc, argv );

    // Add this class as an event listener
 ::testing::UnitTest::GetInstance()->listeners().Append( this );

    // Run all the tests.
 mTestResult = RUN_ALL_TESTS();
}
In the code above, we first set the initial argument with the name of the whole test, then added the current driver class as an event listener to the Gtest class. Finally, we run all the tests by calling RUN_ALL_TESTS() function. By calling this function, Gtest will search all types of unit test (TEST(string, string)) that are shown in any source files inside jni directory.
Now we can write actual tests. In jni folder, we have added unittest.cpp. The following code shows some sample unit tests using Gtest.
#include<gtest/gtest.h>
unsigned int Fibonacci( unsigned int n )
{
    if ( n == 1 ) return 1;
    if ( n == 0 ) return 0;

    return Fibonacci( n - 1 ) + Fibonacci( n - 2 );
}

// Tests Fibonacci of 0, 1
TEST(FibonacciTest, HandlesZeroInput)
{
    EXPECT_EQ( 0, Fibonacci(0) );
    EXPECT_EQ( 1, Fibonacci(1) );
}

// Tests Fibonacci of numbers greater than 1
TEST(FibonacciTest, HandlesGreaterThan1)
{
    EXPECT_EQ( 1, Fibonacci(2) );
    EXPECT_EQ( 2, Fibonacci(3) );
    EXPECT_EQ( 21, Fibonacci(8) );
    EXPECT_EQ( 55, Fibonacci(10) );
}
We first define a testing module as a function, Fibonacci (unsigned int n) at the beginning, and call this module inside each testing function TEST(). In each test function, the first argument refers to the module, and the second one refers to each unit test.
Many types of assertion and comparison functions are introduced in GTest basic assertion page. Next, modify jni/Android.mk as shown below.
[...]

# Driver source files
LOCAL_SRC_FILES := unittestdriver.cpp com_nvidia_unittest_UnitTestDriver.cpp

# Add your test files here
LOCAL_SRC_FILES += unittest.cpp

# GTest required library
LOCAL_STATIC_LIBRARIES := gtest

# Add your additional libraries here
LOCAL_STATIC_LIBRARIES +=

[...]

$(call import-add-path, $(LOCAL_PATH))
$(call import-module, gtest-1.6.0)
Now, let's build and run the project. The following image shows the result.
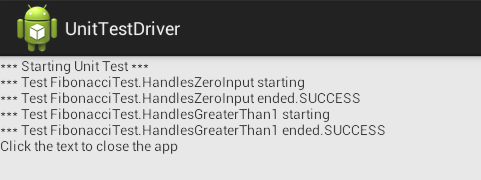
The results shows that the tests for Fibonacci function was successful.
Now, you can test your own code by locating the source code at /jni folder. However, in practice, we may want to test existing codes from other projects. In next section, we will show how to construct a code organization to modulize the projects, then we will show that we can directly test the existing codes from each module.
In the above sections, we have shown how to perform unit testing, and to construct an organization of modules. Now we show how to test the modulized codes with our Gtest driver projects. First, let's look at the organization of tutorials/UnitTestDriver_module folder.
/tutorials/UnitTestDriver_module/
	/UnitTestDriver/
		jni/
		    Android.mk
	/modules/
		OpenCVSupport/
			include/
			src/
			Android.mk
		OpenCVSupport2/
			include/
			src/
			Android.mk
There are two folders, UnitTestDriver and modules inside the main folder. The project UnitTestDriver is the same driver project used in previous sections. In the module folder, there are two modules called OpenCVSupport and OpenCVSupport2, and we assume that these two modules are existing codes. In this tutorial, the main driver project calls each module, which is built as a separate static library and runs Gtest for the functions in each module.
The modules contain several functions using OpenCV, and we will test the modules by calling functions that detect FAST features in the image lena.jpg (which is already used in the OpenCV tutorial) with fixed parameters. If you did not follow the OpenCV tutorial section and did not upload the image onto your Cardhu, please upload it now to /storage/sdcard0/DCIM.
However, each module also includes an external library such as OpenCV; therefore, we have to set the project so that (1) the driver can acceess the functions in each module, (2) the driver can also use library functions that are included in the module (OpenCV), and (3) the build settings in Android.mk for each module should avoid loading the same libraries (i.e., OpenCV in this example).
Let's first import a unit testing driver projects from the folder in tutorials/UnitTestDriver_module/UnitTestDriver (if you need help, see importing a project into Eclipse).
After importing the UnitTestDriver, open the Android.mk file in the /jni folder. Then, let's specify the static libraries for unit testing. See the following example in Android.mk.
LOCAL_PATH := $(call my-dir)

include $(CLEAR_VARS)

LOCAL_MODULE    := unittestdriver

# Enable <memory>
LOCAL_CFLAGS += -std=gnu++0x

ifeq (1, $(NDK_DEBUG))
LOCAL_CFLAGS += -DWAIT_FOR_DEBUGGER
endif
# Driver source files
LOCAL_SRC_FILES := unittestdriver.cpp com_nvidia_unittest_UnitTestDriver.cpp

# Add your test files here
LOCAL_SRC_FILES += unittest.cpp opencv_test.cpp

# GTest required library
LOCAL_STATIC_LIBRARIES += gtest

# Add your additional libraries here
LOCAL_STATIC_LIBRARIES += OpenCVSupportLib OpenCVSupportLib2

# If you add shared libraries, don't forget to
# add a System.loadLibrary() call in UnitTestDriver.java
LOCAL_SHARED_LIBRARIES +=

LOCAL_LDLIBS := ./obj/local/armeabi-v7a/libgnustl_static.a -landroid

include $(BUILD_SHARED_LIBRARY)

$(call import-add-path, $(LOCAL_PATH))
$(call import-module, gtest-1.6.0)
# add here
$(call import-module, OpenCVSupport)
$(call import-module, OpenCVSupport2)
In the above example, LOCAL_SRC_FILES specifies a source file where the actual testing codes are located. Here, opencv_test.cpp is supposed to call functions in module OpenCVSupport and OpenCVSupport2. The names of the libraries for both modules are then specified in LOCAL_STATIC_LIBRARIES. At the end of the above code, we have also specified that we import these modules for testing.
Because all sources inside UnitTestDriver do not recognize the location of modules at this moment, we have to specify the location of them. In Project > Properties > C/C++ Build > Environment, Click Add button, and define NDK_MODULE_PATH with the absolute paths for the module directory.
Now open the opencv_test.cpp which was added to the /jni folder. The following codes are added in the file.
#include<gtest/gtest.h>
#include<OpenCVSupport/OpenCV_native.h>
#include<OpenCVSupport2/OpenCV_native2.h>

TEST(OpenCVTest, FeatureDetection)
{
    COpenCVSample pCv;
    int i = pCv.FeatureDetecTest();
    EXPECT_EQ( 141, i ) <<"number of features for this test1 = " << i;

}

TEST(OpenCVTest, FeatureDetection2)
{
    COpenCVSample2 pCv;
    int i = pCv.FeatureDetecTest();
    EXPECT_EQ( 141, i ) <<"number of features for this test2 = " << i;

}
In the above code, we first include header files for our existing codes (OpenCV_native.h and OpenCV_native2.h) to test.
Then two Gtest functions TEST(OpenCVTest, FeatureDetection) and TEST(OpenCVTest2, FeatureDetection2) are calling FeatureDetecTest() functions from both modules (for simplicity, we added the same function to both modules).
Now the assertion function EXPECT_EQ(141,i) will print out "success" if the number of detected features in the image is equal to 141.
Now the unit test is ready to test the modules as long as it can access each library for the modules. Let's look at the settings for both modules now.
The following code shows the settings for Android.mk in the module OpenCVSupport (which is almost identical to OpenCVSupport2).
LOCAL_PATH := $(call my-dir)

include $(CLEAR_VARS)

ifeq ($(OPENCV_MODULES),)

OPENCV_CAMERA_MODULES  := on
OPENCV_INSTALL_MODULES := on
OPENCV_LIB_TYPE        := STATIC
include $(NVPACK_PATH)/OpenCV-2.4.2-Tegra-sdk/sdk/native/jni/OpenCV-tegra3.mk
OPENCV_LOCAL_STATIC_LIBRARIES := $(LOCAL_STATIC_LIBRARIES)
OPENCV_LOCAL_LD_LIBS := $(LOCAL_LD_LIBS)

endif

LOCAL_MODULE := OpenCVSupportLib

MY_PREFIX          := $(LOCAL_PATH)
MY_SOURCES         := $(wildcard $(LOCAL_PATH)/src/*.cpp)
MY_SOURCES         += $(wildcard $(LOCAL_PATH)/src/*.c)
LOCAL_SRC_FILES    += $(MY_SOURCES:$(MY_PREFIX)%=%)
LOCAL_LDLIBS    	+= -lc -lm -llog -landroid -ldl -lGLESv2 -lEGL
LOCAL_C_INCLUDES 	:= $(LOCAL_PATH)/include $(OPENCV_LOCAL_C_INCLUDES)

# for the module test
LOCAL_EXPORT_C_INCLUDES := $(LOCAL_PATH)/include $(OPENCV_LOCAL_C_INCLUDES)
LOCAL_EXPORT_STATIC_LIBRARIES := $(OPENCV_LOCAL_STATIC_LIBRARIES)
LOCAL_EXPORT_CFLAGS 	+= -std=gnu++0x $(OPENCV_LOCAL_CFLAGS)
LOCAL_EXPORT_LDLIBS    += $(OPENCV_LOCAL_LD_LIBS) -lc -lm -llog -landroid -ldl -lGLESv2 -lEGL -lz

include $(BUILD_STATIC_LIBRARY)
In the above settings, we first set the OpenCV library at the begining, to avoid the multiple load of same library (in case when a main application loads several modules that are using OpenCV seperately) by adding the condition, ifeq($(OPENCV_MODULES),). If the OpenCV library is not yet loaded, we set some flags used for OpenCV.mk, and specify the paths for the location of OpenCV library.
Then, we specify the name of this module (LOCAL_MODULE), and also set the paths for sources and header files.
Finally, we have to specify the exporting setup, because this module is built as a static library, and will be used in other applications outside this module. We first specify the paths of the headers in this module, then we also need to pass through the OpenCV library (LOCAL_EXPORT_STATIC_LIBRARIES := $(OPENCV_LOCAL_STATIC_LIBRARIES)) and its supporting libraries to the other applications.
Now we are done with the settings for one module. We can also apply the same set up to OpenCVSupportLib2.
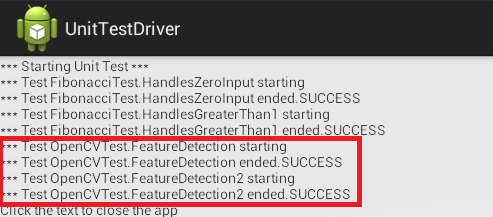
Then, let's build and run the UnitTestDriver application. After running the application, you will see the SUCCESS message from both tests.

NVIDIA® GameWorks™ Documentation Rev. 1.0.220830 ©2014-2022. NVIDIA Corporation and affiliates. All Rights Reserved.