` must be local on the server. The file pattern can contain wildcards if you want to load multiple files. In addition to CSV, TSV, and TXT files, you can import compressed files in TAR, ZIP, 7-ZIP, RAR, GZIP, BZIP2, or TGZ format.
`COPY FROM` appends data from the source into the target table. It does not truncate the table or overwrite existing data.
You can import client-side files (`\copy` command in `heavysql`) but it is significantly slower. For large files, HEAVY.AI recommends that you first `scp` the file to the server, and then issue the COPY command.
HEAVYAI supports Latin-1 ASCII format and UTF-8. If you want to load data with another encoding (for example, UTF-16), convert the data to UTF-8 before loading it to HEAVY.AI.
Available properties in the optional WITH clause are described in the following table.
| Parameter | Description | Default Value |
| ---------------------- | ----------------------------------------------------------------------------------------------------------------------------------------------------------------------------------------------------------------------------------------------------------------------------------------------------------------------------------------------------------------------------------------------------------------------------------------------------------------------------------------------------------------------------------------------------------------------------------------------------------------------------------------------------------------------------------------------------------------------------------------------------------------------------------------------------------------------- | ----------------------------------------------------------------------------------------------------------------------------------------------------------------------------------------------------------- |
| `array_delimiter` | A single-character string for the delimiter between input values contained within an array. | `,` (comma) |
| `array_marker` | A two-character string consisting of the start and end characters surrounding an array. | `{ }`(curly brackets). For example, data to be inserted into a table with a string array in the second column (for example, `BOOLEAN, STRING[], INTEGER`) can be written as `true,{value1,value2,value3},3` |
| `buffer_size` | Size of the input file buffer, in bytes. | `8388608` |
| `delimiter` | A single-character string for the delimiter between input fields; most commonly:
, for CSV files- for tab-delimited files
Other delimiters include
| ,\~, ^, and;.
Note: OmniSci does not use file extensions to determine the delimiter.
|
| `escape` | A single-character string for escaping quotes. | `'"'` (double quote) |
| `geo` | Import geo data. Deprecated and scheduled for removal in a future release. | `'false'` |
| `header` | Either `'true'` or `'false'`, indicating whether the input file has a header line in Line 1 that should be skipped. | `'true'` |
| `line_delimiter` | A single-character string for terminating each line. | `'\n'` |
| `lonlat` | In HEAVY.AI, POINT fields require longitude before latitude. Use this parameter based on the order of longitude and latitude in your source data. | `'true'` |
| `max_reject` | Number of records that the COPY statement allows to be rejected before terminating the COPY command. Records can be rejected for a number of reasons, including invalid content in a field, or an incorrect number of columns. The details of the rejected records are reported in the ERROR log. COPY returns a message identifying how many records are rejected. The records that are not rejected are inserted into the table, even if the COPY stops because the max\_reject count is reached.
Note: If you run the COPY command from OmniSci Immerse, the COPY command does not return messages to Immerse once the SQL is verified. Immerse does not show messages about data loading, or about data-quality issues that result in max\_reject triggers.
| `100,000` |
| `nulls` | A string pattern indicating that a field is NULL. | An empty string, `'NA'`, or |
| `parquet` | Import data in Parquet format. Parquet files can be compressed using Snappy. Other archives such as .gz or .zip must be unarchived before you import the data. Deprecated and scheduled for removal in a future release. | `'false'` |
| `plain_text` | Indicates that the input file is plain text so that it bypasses the `libarchive` decompression utility. | CSV, TSV, and TXT are handled as plain text. |
| `quote` | A single-character string for quoting a field. | `"` (double quote). All characters inside quotes are imported “as is,” except for line delimiters. |
| `quoted` | Either `'true'` or `'false'`, indicating whether the input file contains quoted fields. | `'true'` |
| `source_srid` | When importing into GEOMETRY(\*, 4326) columns, specifies the SRID of the incoming geometries, all of which are transformed on the fly.
For example, to import from a file that contains EPSG:2263 (NAD83 / New York Long Island) geometries, run the COPY command and include WITH (source\_srid=2263). Data targeted at non-4326 geometry columns is not affected.
| 0 |
| `source_type=''` | Type can be one of the following:
delimited\_file - Import as CSV.
geo\_file - Import as Geo file. Use for shapefiles, GeoJSON, and other geo files. Equivalent to deprecated geo='true'.
raster\_file - Import as a raster file.
parquet\_file - Import as a Parquet file. Equivalent to deprecated parquet='true'.
| `delimited_file` |
| `threads` | Number of threads for performing the data import. | Number of CPU cores on the system |
| `trim_spaces` | Indicate whether to trim side spaces ('`true'`) or not (`'false'`). | `'false'` |
By default, the CSV parser assumes one row per line. To import a file with multiple lines in a single field, specify `threads = 1` in the `WITH` clause.
#### Examples
```
COPY tweets FROM '/tmp/tweets.csv' WITH (nulls = 'NA');
COPY tweets FROM '/tmp/tweets.tsv' WITH (delimiter = '\t', quoted = 'false');
COPY tweets FROM '/tmp/*' WITH (header='false');
COPY trips FROM '/mnt/trip/trip.parquet/part-00000-0284f745-1595-4743-b5c4-3aa0262e4de3-c000.snappy.parquet' with (parquet='true');
```
### Parquet Import
You can use `COPY FROM` to import Parquet files by setting the `source_type` option to `parquet_file` i.e.
```
COPY FROM 'source' WITH (source_type='parquet_file', ...);
```
The following WITH options are available for parquet file imports:
| Parameter | Description | Default Value |
| ----------------------- | -------------------------------------------------------------------------------------------------------------------------------------------------------------------------------------------------------------------------------------------------------------------------------------------------------------------------------------------------------------------------------------------------------------------------------------------------------------------------------------- | ---------------------------------- |
| `max_reject` | Number of records that the COPY statement allows to be rejected before terminating the COPY command. | `100,000` |
| `threads` | Number of threads for performing the data import. | Number of CPU cores on the system. |
| `lonlat` | In HEAVY.AI, POINT fields require longitude before latitude. Use this parameter based on the order of longitude and latitude in your source data. | `'true'` |
| `geo_validate_geometry` | Boolean value indicating if the importer passes any incoming POLYGON or MULTIPOLYGON data through a validation process. If the geo is considered invalid by OGC (PostGIS) standards (for example, self-intersecting polygons), then the row or feature that contains it is rejected.
This option is available only if the optional GEOS library is installed; otherwise invoking the option throws an error.
| `false` |
### Geo Import
You can use `COPY FROM` to import geo files. You can create the table based on the source file and then load the data:
```
COPY FROM 'source' WITH (source_type='geo_file', ...);
```
You can also append data to an existing, predefined table:
```
COPY tableName FROM 'source' WITH (source_type='geo_file', ...);
```
Use the following syntax, depending on the file source.
| Local server | `COPY [tableName] FROM '/`*`filepath`*`' WITH (source_type='geo_file', ...)`; |
| ------------ | ------------------------------------------------------------------------------------------------------------------------------------------------------------------------------------- |
| Web site | `COPY [tableName] FROM '[`*`http`*` `` ``_https_]://_website/filepath_' WITH (source_type='geo_file', ...); ` |
| Amazon S3 | `COPY [tableName] FROM 's3://`*`bucket/filepath`*`' WITH (source_type='geo_file', s3_region='`*`region`*`', s3_access_key='`*`accesskey`*`', s3_secret_key='`*`secretkey`*`', ... );` |
* If you are using `COPY FROM` to load to an existing table, the field type must match the metadata of the source file. If it does not, `COPY FROM` throws an error and does not load the data.
* `COPY FROM` appends data from the source into the target table. It does not truncate the table or overwrite existing data.
* Supported `DATE` formats when using `COPY FROM` include `mm/dd/yyyy`, `dd-mmm-yy`, `yyyy-mm-dd`, and `dd/mmm/yyyy`.
* `COPY FROM` fails for records with latitude or longitude values that have more than 4 decimal places.
The following `WITH` options are available for geo file imports from all sources.
| Parameter | Description | Default Value |
|---|
geo_coords_type | Coordinate type used; must be geography. | N/A |
geo_coords_encoding | Coordinates encoding; can be geoint(32) or none. | geoint(32) |
geo_coords_srid | Coordinates spatial reference; must be 4326 (WGS84 longitude/latitude). | N/A |
geo_explode_collections | Explodes MULTIPOLYGON, MULTILINESTRING, or MULTIPOINT geo data into multiple rows in a POLYGON, LINESTRING, or POINT column, with all other columns duplicated. When importing from a WKT CSV with a MULTIPOLYGON column, the table must have been manually created with a POLYGON column. When importing from a geo file, the table is automatically created with the correct type of column. When the input column contains a mixture of MULTI and single geo, the MULTI geo are exploded, but the singles are imported normally. For example, a column containing five two-polygon MULTIPOLYGON rows and five POLYGON rows imports as a POLYGON column of fifteen rows. | false |
geo_validate_geometry | Boolean value indicating if the importer passes any incoming POLYGON or MULTIPOLYGON data through a validation process. If the geo is considered invalid by OGC (PostGIS) standards (for example, self-intersecting polygons), then the row or feature that contains it is rejected. This option is available only if the optional GEOS library is installed; otherwise invoking the option throws an error. | false |
Currently, a manually created geo table can have only one geo column. If it has more than one, import is not performed.
Any GDAL-supported file type can be imported. If it is not supported, GDAL throws an error.
An ESRI file geodatabase can have multiple layers, and importing it results in the creation of one table for each layer in the file. This behavior differs from that of importing shapefiles, GeoJSON, or KML files, which results in a single table. For more information, see [Importing an ESRI File Geodatabase](/loading-and-exporting-data/supported-data-sources/import-geo#importing_esri_file_geodatabase).
The first compatible file in the bundle is loaded; subfolders are traversed until a compatible file is found. The rest of the contents in the bundle are ignored. If the bundle contains multiple filesets, unpack the file manually and specify it for import.
For more information about importing specific geo file formats, see [Importing Geospatial Files](/loading-and-exporting-data/supported-data-sources/import-geo).
CSV files containing WKT strings are not considered geo files and should *not* be parsed with the `source_type='geo'` option. When importing WKT strings from CSV files, you must create the table first. The geo column type and encoding are specified as part of the DDL. For example, for a polygon with no encoding, try the following:
```
ggpoly GEOMETRY(POLYGON, 4326) ENCODING COMPRESSED(32)
```
### Raster Import
You can use `COPY FROM` to import raster files supported by GDAL as one row per *pixel*, where a pixel may consist of one or more data *bands*, with optional corresponding pixel or world-space coordinate columns. This allows the data to be rendered as a point/symbol cloud that approximates a 2D image.
```
COPY FROM 'source' WITH (source_type='raster_file', ...);
```
Use the same syntax that you would for [geo files](/loading-and-exporting-data/command-line/load-data#geo-import), depending on the file source.
The following `WITH` options are available for raster file imports from all sources.
| Parameter | Description | Default Value |
| --------------------------------------------------- | ------------------------------------------------------------------------------------------------------------------------------------------------------------------------------------------------------------------------------------------------------------------------------------------------------------------------------------------------------------------------------------------------------------------------------------------------------------------------------------------------------------------------------------------------------------------------------------------------------------------------------------------------------------------------------------------------------------------------------------------------------------------------------------------------------------------------------------------------------------------------------------------------------------------------------------------------------------------------------------------ | ------------------------------------------------------------------------------------ |
| `raster_import_bands='[,,...]'` | Allows specification of one or more band names to selectively import; useful in the context of large raster files where not all the bands are relevant.
Bands are imported in the order provided, regardless of order in the file.
You can rename bands using \=\\[,\=\]
Names must be those discovered by the detection process, including any suffixes for de-duplication.
| An empty string, indicating to import all bands from all datasets found in the file. |
| `raster_point_transform=''` | Specifies the processing for floating-point coordinate values:
auto - Transform based on raster file type (world for geo, none for non-geo).
none - No affine or world-space conversion. Values will be equivalent to the integer pixel coordinates.
file - File-space affine transform only. Values will be in the file's coordinate system, if any (e.g. geospatial).
world - World-space geospatial transform. Values will be projected to WGS84 lon/lat (if the file has a geospatial SRID).
| `auto` |
| `raster_point_type=''` | Specifies the required type for the additional pixel coordinate columns:
auto - Create columns based on raster file type (double for geo, int or smallint for non-geo, dependent on size).
none - Do not create pixel coordinate columns.
smallint or int - Create integer columns of names raster\_x and raster\_y and fill with the raw pixel coordinates from the file.
float or double - Create floating-point columns of names raster\_x and raster\_y (or raster\_lon and raster\_lat) and fill with file-space or world-space projected coordinates.
point - Create a POINT column of name raster\_point and fill with file-space or world-space projected coordinates.
| `auto` |
Illegal combinations of `raster_point_type` and `raster_point_transform` are rejected. For example, `world` transform can only be performed on raster files that have a geospatial coordinate system in their metadata, and cannot be performed if `` is an integer format (which cannot represent world-space coordinate values).
Any GDAL-supported file type can be imported. If it is not supported, GDAL throws an error.
HDF5 and possibly other GDAL drivers may not be thread-safe, so use `WITH (threads=1)` when importing.
Archive file import (.zip, .tar, .tar.gz) is not currently supported for raster files.
**Band and Column Names**
The following raster file formats contain the metadata required to derive sensible names for the bands, which are then used for their corresponding columns:
* GRIB2 - geospatial/meteorological format
* OME TIFF - an OpenMicroscopy format
The band names from the file are sanitized (illegal characters and spaces removed) and de-duplicated (addition of a suffix in cases where the same band name is repeated within the file or across datasets).
For other formats, the columns are named `band_1_1`, `band_1_2` , and so on.
The sanitized and de-duplicated names must be used for the `raster_import_bands` option.
**Band and Column Data Types**
Raster files can have bands in the following data types:
* Signed or unsigned 8-, 16-, or 32-bit integer
* 32- or 64-bit floating point
* Complex number formats (not supported)
Signed data is stored in the directly corresponding column type, as follows:
`int8` -> `TINYINT`\
`int16` -> `SMALLINT`\
`int32` -> `INT`\
`float32` -> `FLOAT`\
`float64` -> `DOUBLE`
Unsigned integer column types are not currently supported, so any data of those types is converted to the next size up signed column type:
`uint8` -> `SMALLINT`\
`uint16` -> `INT`\
`uint32` -> `BIGINT`
Column types cannot currently be overridden.
### Raster Tiled Import
Tiled Raster Import is currently a beta feature and currently does not have suppport for some of the features and flags supported by the existing Raster Import. For best performance, we currently suggest specifying point data as raster\_lon/raster\_lat DOUBLE values.
A new feature allows raster import to support data-tiling and can be used by using the flag `enable-legacy-raster-import=false` at startup. This will allow the import to organize raster data by geospatial coordinates to better optimize data access.
Once the server flag is set, the functionality is invoked using the `COPY FROM` sql command. A notable difference between the tiled import and the legacy import is that the tiled import requires the table to be created in advance with columns specified, and uses some new `WITH` options.
```sql wordWrap
CREATE TABLE (raster_lon DOUBLE, raster_lat DOUBLE, );
COPY FROM 'source' WITH (source_type='raster_file', ...);
```
The following additional `WITH` options are available for raster files using the new tiled importer
| Parameter | Description | Default Value |
| -------------------------------- | ------------------------------------------------------------------------------------------------------------------------------------------------------------------------------------------------------------------------------ | ------------- |
| `raster_tile_width` | Specifies the file/block width by which the raster data should be grouped. If none is specified, this will default to the block size provided by the file. | `auto` |
| `raster_tile_height` | Specifies the file/block height by which the raster data should be grouped. If none is specified, this will default to the block size provided by the file. | `auto` |
| `raster_point_type` (deprecated) | Raster point type is no longer a necessary option using the tiled importer, as this import process requires the column types to be specified before import, and therefore the point type can be deduced from the column types. | |
### ODBC Import
ODBC import is currently a beta feature.
You can use `COPY FROM` to import data from a Relational Database Management System (RDMS) or data warehouse using the Open Database Connectivity (ODBC) interface.
```
COPY FROM '' WITH (source_type = 'odbc', ...);
```
The following WITH options are available for ODBC import.
| `data_source_name` | Data source name (DSN) configured in the odbc.ini file. Only one of `data_source_name` or `connection_string` can be specified. |
| ------------------- | ------------------------------------------------------------------------------------------------------------------------------------------------------------------------------------------------------------------------------------------------------------------------------------------------------------------ |
| `connection_string` | A set of semicolon-separated key=value pairs that define the connection parameters for an RDMS. For example:
Driver=DriverName;Database=DatabaseName;Servername=HostName;Port=1234
Only one of data\_source\_name or connection\_string can be specified.
|
| `sql_order_by` | Comma-separated list of column names that provide a unique ordering for the result set returned by the specified SQL SELECT statement. |
| `username` | Username on the RDMS. Applies only when `data_source_name` is used. |
| `password` | Password credential for the RDMS. This option only applies when `data_source_name` is used. |
| `credential_string` | A set of semicolon separated “key=value” pairs, which define the access credential parameters for an RDMS. For example:
Username=username;Password=password
Applies only when connection\_string is used.
|
#### Examples
Using a data source name:
```sql
COPY example_table
FROM 'SELECT * FROM remote_postgres_table WHERE event_timestamp > ''2020-01-01'';'
WITH
(source_type = 'odbc',
sql_order_by = 'event_timestamp',
data_source_name = 'postgres_db_1',
username = 'my_username',
password = 'my_password');
```
Using a connection string:
```sql
COPY example_table
FROM 'SELECT * FROM remote_postgres_table WHERE event_timestamp > ''2020-01-01'';'
WITH
(source_type = 'odbc',
sql_order_by = 'event_timestamp',
connection_string = 'Driver=PostgreSQL;Database=my_postgres_db;Servername=my_postgres.example.com;Port=1234',
credential_string = 'Username=my_username;Password=my_password');
```
For information about using ODBC HeavyConnect, see [ODBC Data Wrapper Reference](/heavyconnect/odbc-data-wrapper-reference).
### Globbing, Filtering, and Sorting Parquet and CSV Files
These examples assume the following folder and file structure:
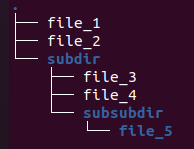
#### Globbing
Local Parquet/CSV files can now be globbed by specifying either a path name with a wildcard or a folder name.
Globbing a folder recursively returns all files under the specified folder. For example,
`COPY table_1 FROM ".../subdir";`
returns `file_3`, `file_4`, `file_5`.
Globbing with a wildcard returns any file paths matching the expanded file path. So
`COPY table_1 FROM ".../subdir/file*";`\
\
returns `file_3`, `file_4`.
Does not apply to S3 cases, because file paths specified for S3 always use prefix matching.
#### Filtering
Use file filtering to filter out unwanted files that have been globbed. To use filtering, specify the `REGEX_PATH_FILTER` option. Files not matching this pattern are not included on import. Consistent across local and S3 use cases.
The following regex expression:
`COPY table_1 from ".../" WITH (REGEX_PATH_FILTER=".*file_[4-5]");`
returns `file_4`, `file_5`.
#### Sorting
Use the `FILE_SORT_ORDER_BY` option to specify the order in which files are imported.
**FILE\_SORT\_ORDER\_BY Options**
* `pathname` (default)
* `date_modified`
* `regex` \*
* `regex_date` \*
* `regex_number` \*
\*FILE\_SORT\_REGEX option required
**Using FILE\_SORT\_ORDER\_BY**
`COPY table_1 from ".../" WITH (FILE_SORT_ORDER_BY="date_modified");`
**Using FILE\_SORT\_ORDER\_BY with FILE\_SORT\_REGEX**
Regex sort keys are formed by the concatenation of all capture groups from the `FILE_SORT_REGEX` expression. Regex sort keys are strings but can be converted to dates or FLOAT64 with the appropriate `FILE_SORT_ORDER_BY` option. File paths that do not match the provided capture groups or that cannot be converted to the appropriate date or FLOAT64 are treated as NULLs and sorted to the front in a deterministic order.
Multiple Capture Groups:
`FILE_SORT_REGEX=".*/data_(.*)_(.*)_"`\
`/root/dir/unmatchedFile` → ``\
`/root/dir/data_andrew_54321_` → `andrew54321`\
`/root/dir2/data_brian_Josef_` → `brianJosef`
Dates:
`FILE_SORT_REGEX=".*data_(.*)`\
`/root/data_222` → ` (invalid date conversion)`\
`/root/data_2020-12-31` → `2020-12-31`\
`/root/dir/data_2021-01-01` → `2021-01-01`
Import:
`COPY table_1 from ".../" WITH (FILE_SORT_ORDER_BY="regex", FILE_SORT_REGEX=".*file_(.)");`
### **Geo and Raster File Globbing**
Limited filename globbing is supported for both geo and raster import. For example, to import a sequence of same-format GeoTIFF files into a single table, you can run the following:
`COPY table FROM '/path/path/something_*.tiff' WITH (source_type='raster_file')`
The files are imported in alphanumeric sort order, per regular glob rules, and all appended to the same table. This may fail if the files are not all of the same format (band count, names, and types).
For non-geo/raster files (CSV and Parquet), you can provide just the path to the directory OR a wildcard; for example:
`/path/to/directory/`\
`/path/to/directory`\
`/path/to/directory/*`
For geo/raster files, a wildcard is required, as shown in the last example.
## SQLImporter
SQLImporter is a Java utility run at the command line. It runs a SELECT statement on another database through JDBC and loads the result set into HeavyDB.
### Usage
```
java -cp [HEAVY.AI utility jar file]:[3rd party JDBC driver]
SQLImporter
-u ; -p ; [(--binary|--http|--https [--insecure])]
-s -db --port
[-d ] -c
-su -sp -ss
-t -b -f
[-tr] [-nprg] [-adtf] [-nlj] -i
```
### Flags
```
-r Row load limit
-h,--help Help message
-r ; Row load limit
-h,--help Help message
-u,--user ; HEAVY.AI user
-p,--passwd ; HEAVY.AI password
--binary Use binary transport to connect to HEAVY.AI
--http Use http transport to connect to HEAVY.AI
--https Use https transport to connect to HEAVY.AI
-s,--server ; HEAVY.AI Server
-db,--database ; HEAVY.AI Database
--port ; HEAVY.AI Port
--ca-trust-store ; CA certificate trust store
--ca-trust-store-passwd ; CA certificate trust store password
--insecure ; Insecure TLS - Do not validate server HEAVY.AI
server certificates
-d,--driver ; JDBC driver class
-c,--jdbcConnect ; JDBC connection string
-su,--sourceUser ; Source user
-sp,--sourcePasswd ; Source password
-ss,--sqlStmt ; SQL Select statement
-t,--targetTable ; HEAVY.AI Target Table
-b,--bufferSize ; Transfer buffer size
-f,--fragmentSize ; Table fragment size
-tr,--truncate Truncate table if it exists
-nprg,--noPolyRenderGroups Disable render group assignment
-adtf,--allowDoubleToFloat Allow narrow casting
-nlj,--no-log-jdbc-connection-string Omit JDBC connection string from logs
-i,--initializeFile ; File containing init command for DB
```
HEAVY.AI recommends that you use a service account with read-only permissions when accessing data from a remote database.
In release 4.6 and higher, the user ID (`-u`) and password (`-p`) flags are required. If your password includes a special character, you must escape the character using a backslash (\\).
If the table does not exist in HeavyDB, `SQLImporter` creates it. If the target table in HeavyDB does not match the SELECT statement metadata, `SQLImporter` fails.
If the truncate flag is used, `SQLImporter` truncates the table in HeavyDB before transferring the data. If the truncate flag is not used, `SQLImporter` appends the results of the SQL statement to the target table in HeavyDB.
The `-i` argument provides a path to an initialization file. Each line of the file is sent as a SQL statement to the remote database. You can use `-i` to set additional custom parameters before the data is loaded.
The `SQLImporter` string is case-sensitive. Incorrect case returns the following:
`Error: Could not find or load main class com.mapd.utility.SQLimporter`
### PostgreSQL/PostGIS Support
You can migrate geo data types from a PostgreSQL database. The following table shows the correlation between PostgreSQL/PostGIS geo types and HEAVY.AI geo types.
| point | point |
| ------------ | ------------ |
| lseg | linestring |
| linestring | linestring |
| polygon | polygon |
| multipolygon | multipolygon |
Other PostgreSQL types, including circle, box, and path, are not supported.
### HeavyDB Example
```
java -cp /opt/heavyai/bin/heavyai-utility-.jar
com.mapd.utility.SQLImporter -u admin -p HyperInteractive -db heavyai --port 6274
-t mytable -su admin -sp HyperInteractive -c "jdbc:heavyai:myhost:6274:heavyai"
-ss "select * from mytable limit 1000000000"
```
By default, 100,000 records are selected from HeavyDB. To select a larger number of records, use the LIMIT statement.
### Hive Example
```
java -cp /opt/heavyai/bin/heavyai-utility-.jar:/hive-jdbc-1.2.1000.2.6.1.0-129-standalone.jar
com.mapd.utility.SQLImporter
-u user -p password
-db Heavyai_database_name --port 6274 -t Heavyai_table_name
-su source_user -sp source_password
-c "jdbc:hive2://server_address:port_number/database_name"
-ss "select * from source_table_name"
```
### Google Big Query Example
```
java -cp /opt/heavyai/bin/heavyai-utility-.jar:./GoogleBigQueryJDBC42.jar:
./google-oauth-client-1.22.0.jar:./google-http-client-jackson2-1.22.0.jar:./google-http-client-1.22.0.jar:./google-api-client-1.22.0.jar:
./google-api-services-bigquery-v2-rev355-1.22.0.jar
com.mapd.utility.SQLImporter
-d com.simba.googlebigquery.jdbc42.Driver
-u user -p password
-db Heavyai_database_name --port 6274 -t Heavyai_table_name
-su source_user -sp source_password
-c "jdbc:bigquery://https://www.googleapis.com/bigquery/v2:443;ProjectId=project-id;OAuthType=0;
OAuthServiceAcctEmail==email@domain.iam.gserviceaccount.com;OAuthPvtKeyPath=/home/simba/myproject.json;"
-ss "select * from schema.source_table_name"
```
### PostgreSQL Example
```
java -cp /opt/heavyai/bin/heavyai-utility-.jar:/tmp/postgresql-42.2.5.jar
com.mapd.utility.SQLImporter
-u user -p password
-db Heavyai_database_name --port 6274 -t Heavyai_table_name
-su source_user -sp source_password
-c "jdbc:postgresql://127.0.0.1/postgres"
-ss "select * from schema_name.source_table_name"
```
### SQLServer Example
```
java -cp /opt/heavyai/bin/heavyai-utility-.jar:/path/sqljdbc4.jar
com.mapd.utility.SQLImporter
-d com.microsoft.sqlserver.jdbc.SQLServerDriver
-u user -p password
-db Heavyai_database_name --port 6274 -t Heavyai_table_name
-su source_user -sp source_password
-c "jdbc:sqlserver://server:port;DatabaseName=database_name"
-ss "select top 10 * from dbo.source_table_name"
```
### MySQL Example
```
java -cp /opt/heavyai/bin/heavyai-utility-.jar:mysql/mysql-connector-java-5.1.38-bin.jar
com.mapd.utility.SQLImporter
-u user -p password
-db Heavyai_database_name --port 6274 -t Heavyai_table_name
-su source_user -sp source_password
-c "jdbc:mysql://server:port/database_name"
-ss "select * from schema_name.source_table_name"
```
## StreamInsert
Stream data into HeavyDB by attaching the StreamInsert program to the end of a data stream. The data stream can be another program printing to standard out, a Kafka endpoint, or any other real-time stream output. You can specify the appropriate batch size, according to the expected stream rates and your insert frequency. The target table must exist before you attempt to stream data into the table.
```
| StreamInsert \
{-u|--user} {-p|--passwd} [{--host} ] \
[--port ][--delim ][--null ] \
[--line ][--batch ][{-t|--transform} \
transformation ...][--retry_count ] \
[--retry_wait ][--print_error][--print_transform]
```
| Setting | Default | Description | |
| ------------------- | ------------- | ---------------------------------------------------- | -------------------- |
| `` | n/a | Name of the target table in OmniSci | |
| `` | n/a | Name of the target database in OmniSci | |
| `-u` | n/a | User name | |
| `-p` | n/a | User password | |
| `--host` | n/a | Name of OmniSci host | |
| `--delim` | comma (,) | Field delimiter, in single quotes | |
| `--line` | newline (\n) | Line delimiter, in single quotes | |
| `--batch` | 10000 | Number of records in a batch | |
| `--retry_count` | 10 | Number of attempts before job fails | |
| `--retry_wait` | 5 | Wait time in seconds after server connection failure | |
| `--null` | n/a | String that represents null values | |
| `--port` | 6274 | Port number for OmniSciDB on localhost | |
| \`-t | --transform\` | n/a | Regex transformation |
| `--print_error` | False | Print error messages | |
| `--print_transform` | False | Print description of transform. | |
| `--help` | n/a | List options | |
For more information on creating regex transformation statements, see [RegEx Replace](http://www.oracle.com/webfolder/technetwork/data-quality/edqhelp/Content/processor_library/transformation/regex_replace.htm).
#### Example
```
cat file.tsv | /path/to/heavyai/SampleCode/StreamInsert stream_example \
heavyai --host localhost --port 6274 -u imauser -p imapassword \
--delim '\t' --batch 1000
```
## Importing AWS S3 Files
You can use the SQL `COPY FROM` statement to import files stored on Amazon Web Services Simple Storage Service (AWS S3) into an HEAVY.AI table, in much the same way you would with local files. In the `WITH` clause, specify the S3 credentials and region information of the bucket accessed.
```
COPY FROM '' WITH ([[s3_access_key = '',s3_secret_key = '',] | [s3_session_token - '
HEAVY.AI does not support the use of asterisks (\*) in URL strings to import items. To import multiple files, pass in an S3 path instead of a file name, and `COPY FROM` imports all items in that path and any subpath.
### Custom S3 Endpoints
HEAVY.AI supports custom S3 endpoints, which allows you to import data from S3-compatible services, such as Google Cloud Storage.
To use custom S3 endpoints, add `s3_endpoint` to the `WITH` clause of a `COPY FROM` statement; for example, to set the S3 endpoint to point to Google Cloud Services:
```
COPY trips FROM 's3://heavyai-importtest-data/trip-data/trip_data_9.gz' WITH (header='true', s3_endpoint='storage.googleapis.com');
```
For information about interoperability and setup for Google Cloud Services, see [Cloud Storage Interoperability](https://cloud.google.com/storage/docs/interoperability).
You can also configure custom S3 endpoints by passing the `s3_endpoint` field to Thrift `import_table`.
### Examples
The following examples show failed and successful attempts to copy the table [trips](https://docs.omnisci.com/latest/6_loading_data.html#trips-table) from AWS S3.
```
heavysql> COPY trips FROM 's3://heavyai-s3-no-access/trip_data_9.gz';
Exception: failed to list objects of s3 url 's3://heavyai-s3-no-access/trip_data_9.gz': AccessDenied: Access Denied
```
```
heavysql> COPY trips FROM 's3://heavyai-s3-no-access/trip_data_9.gz' with (s3_access_key='xxxxxxxxxx',s3_secret_key='yyyyyyyyy');
Exception: failed to list objects of s3 url 's3://heavyai-s3-no-access/trip_data_9.gz': AuthorizationHeaderMalformed: Unable to parse ExceptionName: AuthorizationHeaderMalformed Message: The authorization header is malformed; the region 'us-east-1' is wrong; expecting 'us-west-1'
```
```
heavysql> COPY trips FROM 's3://heavyai-testdata/trip.compressed/trip_data_9.csv' with (s3_access_key='xxxxxxxx',s3_secret_key='yyyyyyyy',s3_region='us-west-1');
Result
Loaded: 100 recs, Rejected: 0 recs in 0.361000 secs
```
The following example imports all the files in the `trip.compressed` directory.
```
heavysql> copy trips from 's3://heavyai-testdata/trip.compressed/' with (s3_access_key='xxxxxxxx',s3_secret_key='yyyyyyyy',s3_region='us-west-1');
Result
Loaded: 105200 recs, Rejected: 0 recs in 1.890000 secs
```
#### trips Table
The table `trips` is created with the following statement:
```
heavysql> \d trips
CREATE TABLE trips (
medallion TEXT ENCODING DICT(32),
hack_license TEXT ENCODING DICT(32),
vendor_id TEXT ENCODING DICT(32),
rate_code_id SMALLINT,
store_and_fwd_flag TEXT ENCODING DICT(32),
pickup_datetime TIMESTAMP,
dropoff_datetime TIMESTAMP,
passenger_count SMALLINT,
trip_time_in_secs INTEGER,
trip_distance DECIMAL(14,2),
pickup_longitude DECIMAL(14,2),
pickup_latitude DECIMAL(14,2),
dropoff_longitude DECIMAL(14,2),
dropoff_latitude DECIMAL(14,2))
WITH (FRAGMENT_SIZE = 75000000);
```
### Using Server Privileges to Access AWS S3
You can configure HEAVY.AI server to provide AWS credentials, which allows S3 Queries to be run without specifying AWS credentials. S3 Regions are not configured by the server, and will need to be passed in either as a client side environment variable or as an option with the request.
*Example Commands*
* `\detect`:\
`$ export AWS_REGION=us-west-1`\
`heavysql > \detect '" "" '' 'TCopyParams(s3_region="'us-west-1'")'`
* `COPY FROM`:\
`heavysql > COPY FROM WITH(s3_region='us-west-1');`
#### Configuring AWS Credentials
1. Enable server privileges in the server configuration file `heavy.conf`\
`allow-s3-server-privileges = true`
2. For bare metal installations set the following environment variables and restart the HeavyDB service:\
`AWS_ACCESS_KEY_ID=xxx`\
`AWS_SECRET_ACCESS_KEY=xxx`\
`AWS_SESSION_TOKEN=xxx` (required only for AWS STS credentials)
3. For HeavyDB docker images, start a new container mounted with the configuration file using the option:\
`-v :/var/lib/heavyai`\
and set the following environment options:\
`-e AWS_ACCESS_KEY_ID=xxx`\
`-e AWS_SECRET_ACCESS_KEY=xxx`\
`-e AWS_SESSION_TOKEN=xxx` (required only for AWS STS credentials)
1. Enable server privileges in the server configuration file `heavy.conf`\
`allow-s3-server-privileges = true`
2. For bare metal installations Specify a shared AWS credentials file and profile with the following environment variables and restart the HeavyDB service.\
`AWS_SHARED_CREDENTIALS_FILE=~/.aws/credentials`\
`AWS_PROFILE=default`
3. For HeavyDB docker images, start a new container mounted with the configuration file and AWS shared credentials file using the following options:\
`-v :/var/lib/heavyai`\
`-v :/`\
and set the following environment options:\
`-e AWS_SHARED_CREDENTIALS_FILE=`\
`-e AWS_PROFILE=`
**Prerequisites**
1. An IAM Policy that has sufficient access to the S3 bucket.
2. An IAM AWS Service Role of type `Amazon EC2` , which is assigned the IAM Policy from (1).
**Setting Up an EC2 Instance with Roles**
For a new EC2 Instance:
1. AWS Management Console > Services > Compute > EC2 > Launch Instance.
2. Select desired Amazon Machine Image (AMI) > Select.
3. Select desired Instance Type > Next: Configure Instance Details.
4. IAM Role > Select desired IAM Role > Review and Launch.
5. Review other options > Launch.
For an existing EC2 Instance:
1. AWS Management Console > Services > Compute > EC2 > Instances.
2. Mark desired instance(s) > Actions > Security > Modify IAM Role.
3. Select desired IAM Role > Save.
4. Restart the EC2 Instance.
## KafkaImporter
You can ingest data from an existing Kafka producer to an existing table in HEAVY.AI using `KafkaImporter` on the command line:
```
KafkaImporter {-u|--user \
{-p|--passwd } [{--host} ] \
[--port ] [--http] [--https] [--skip-verify] \
[--ca-cert ] [--delim ] [--batch ] \
[{-t|--transform} transformation ...] [retry_count ] \
[--retry_wait ] --null [--quoted true|false] \
[--line ] --brokers= \
--group-id= --topic= [--print_error] [--print_transform]
```
`KafkaImporter` requires a functioning Kafka cluster. See the [Kafka website](https://kafka.apache.org/documentation) and the [Confluent schema registry documentation](https://docs.confluent.io/current/schema-registry/docs/index.html).
### KafkaImporter Options
| Setting | Default | Description | |
| ------------------------------------- | -------------- | ------------------------------------------------------------------------- | -------------------- |
| `` | n/a | Name of the target table in OmniSci | |
| `` | n/a | Name of the target database in OmniSci | |
| `-u ` | n/a | User name | |
| `-p ` | n/a | User password | |
| `--host ` | localhost | Name of OmniSci host | |
| `--port ` | 6274 | Port number for OmniSciDB on localhost | |
| `--http` | n/a | Use HTTP transport | |
| `--https` | n/a | Use HTTPS transport | |
| `--skip-verify` | n/a | Do not verify validity of SSL certificate | |
| `--ca-cert ` | n/a | Path to the trusted server certificate; initiates an encrypted connection | |
| `--delim ` | comma (,) | Field delimiter, in single quotes | |
| `--line ` | newline (\n) | Line delimiter, in single quotes | |
| `--batch ` | 10000 | Number of records in a batch | |
| `--retry_count ` | 10 | Number of attempts before job fails | |
| `--retry_wait ` | 5 | Wait time in seconds after server connection failure | |
| `--null ` | n/a | String that represents null values | |
| `--quoted ` | false | Whether the source contains quoted fields | |
| \`-t | --transform\` | n/a | Regex transformation |
| `--print_error` | false | Print error messages | |
| `--print_transform` | false | Print description of transform | |
| `--help` | n/a | List options | |
| `--group-id ` | n/a | Kafka group ID | |
| `--topic ` | n/a | The Kafka topic to be ingested | |
| `--brokers ` | localhost:9092 | One or more brokers | |
### KafkaImporter Logging Options
| KafkaImporter Logging Options | | |
| -------------------------------- | ---------- | -------------------------------------------------------------------------------------------------- |
| Setting | Default | Description |
| `--log-directory ` | mapd\_log | Logging directory; can be relative to data directory or absolute |
| `--log-file-name ` | n/a | Log filename relative to logging directory; has format KafkaImporter.\{SEVERITY}.%Y%m%d-%H%M%S.log |
| `--log-symlink ` | n/a | Symlink to active log; has format KafkaImporter.\{SEVERITY} |
| `--log-severity ` | INFO | Log-to-file severity level: INFO, WARNING, ERROR, or FATAL |
| `--log-severity-clog ` | ERROR | Log-to-console severity level: INFO, WARNING, ERROR, or FATAL |
| `--log-channels` | n/a | Log channel debug info |
| `--log-auto-flush` | n/a | Flush logging buffer to file after each message |
| `--log-max-files ` | 100 | Maximum number of log files to keep |
| `--log-min-free-space ` | 20,971,520 | Minimum number of bytes available on the device before oldest log files are deleted |
| `--log-rotate-daily` | 1 | Start new log files at midnight |
| `--log-rotation-size ` | 10485760 | Maximum file size, in bytes, before new log files are created |
Configure `KafkaImporter` to use your target table. `KafkaImporter` listens to a pre-defined Kafka topic associated with your table. You must create the table before using the `KafkaImporter` utility. For example, you might have a table named `customer_site_visit_events` that listens to a topic named `customer_site_visit_events_topic`.
The data format must be a record-level format supported by HEAVY.AI.
`KafkaImporter` listens to the topic, validates records against the target schema, and ingests topic batches of your designated size to the target table. Rejected records use the existing reject reporting mechanism. You can start, shut down, and configure `KafkaImporter` independent of the HeavyDB engine. If KafkaImporter is running and the database shuts down, KafkaImporter shuts down as well. Reads from the topic are nondestructive.
`KafkaImporter` is not responsible for event ordering; a streaming platform outside HEAVY.AI (for example, Spark streaming, flink) should handle the stream processing. HEAVY.AI ingests the end-state stream of post-processed events.
`KafkaImporter` does not handle dynamic schema creation on first ingest, but must be configured with a specific target table (and its schema) as the basis. There is a 1:1 correspondence between target table and topic.
```
cat tweets.tsv | -./KafkaImporter tweets_small heavyai-u imauser-p imapassword--delim '\t'--batch 100000--retry_count 360--retry_wait 10--null null--port 9999--brokers=localhost:9092--group-id=testImport1--topic=tweet
cat tweets.tsv | ./KafkaImporter tweets_small heavyai
-u imauser
-p imapassword
--delim '\t'
--batch 100000
--retry_count 360
--retry_wait 10
--null null
--port 9999
--brokers=localhost:9092
--group-id=testImport1
--topic=tweet
```
## StreamImporter
StreamImporter is an updated version of the StreamInsert utility used for streaming reads from delimited files into HeavyDB. StreamImporter uses a binary columnar load path, providing improved performance compared to StreamInsert.
You can ingest data from a data stream to an existing table in HEAVY.AI using `StreamImporter` on the command line.
```
StreamImporter {-u|--user \
{-p|--passwd } [{--host} ] [--port ] \
[--http] [--https] [--skipverify] [--ca-cert ] [--delim ] \
[--null ] [--line ] [--quoted ] \
[--batch ] [{-t|--transform} transformation ...] \
[retry_count ] [--retry_wait ] \
[--print_error] [--print_transform]
```
### StreamImporter Options
| Setting | Default | Description | |
| ------------------------------ | ------------- | ----------------------------------------------------------------------------------- | -------------------- |
| `` | n/a | Name of the target table in OmniSci | |
| `` | n/a | Name of the target database in OmniSci | |
| `-u ` | n/a | User name | |
| `-p ` | n/a | User password | |
| `--host ` | n/a | Name of OmniSci host | |
| `--port ` | 6274 | Port number for OmniSciDB on localhost | |
| `--http` | n/a | Use HTTP transport | |
| `--https` | n/a | Use HTTPS transport | |
| `--skip-verify` | n/a | Do not verify validity of SSL certificate | |
| `--ca-cert ` | n/a | Path to the trusted server certificate; initiates an encrypted connection | |
| `--delim ` | comma (,) | Field delimiter, in single quotes | |
| `--null ` | n/a | String that represents null values | |
| `--line ` | newline (\n) | Line delimiter, in single quotes | |
| `--quoted ` | `true` | Either `true` or `false`, indicating whether the input file contains quoted fields. | |
| `--batch ` | 10000 | Number of records in a batch | |
| `--retry_count ` | 10 | Number of attempts before job fails | |
| `--retry_wait ` | 5 | Wait time in seconds after server connection failure | |
| \`-t | --transform\` | n/a | Regex transformation |
| `--print_error` | false | Print error messages | |
| `--print_transform` | false | Print description of transform | |
| `--help` | n/a | List options | |
### StreamImporter Logging Options
| Setting | Default | Description |
| -------------------------------- | ---------- | --------------------------------------------------------------------------------------------------- |
| `--log-directory ` | mapd\_log | Logging directory; can be relative to data directory or absolute |
| `--log-file-name ` | n/a | Log filename relative to logging directory; has format StreamImporter.\{SEVERITY}.%Y%m%d-%H%M%S.log |
| `--log-symlink ` | n/a | Symlink to active log; has format StreamImporter.\{SEVERITY} |
| `--log-severity ` | INFO | Log-to-file severity level: INFO, WARNING, ERROR, or FATAL |
| `--log-severity-clog ` | ERROR | Log-to-console severity level: INFO, WARNING, ERROR, or FATAL |
| `--log-channels` | n/a | Log channel debug info |
| `--log-auto-flush` | n/a | Flush logging buffer to file after each message |
| `--log-max-files ` | 100 | Maximum number of log files to keep |
| `--log-min-free-space ` | 20,971,520 | Minimum number of bytes available on the device before oldest log files are deleted |
| `--log-rotate-daily` | 1 | Start new log files at midnight |
| `--log-rotation-size ` | 10485760 | Maximum file size, in bytes, before new log files are created |
Configure `StreamImporter` to use your target table. `StreamImporter` listens to a pre-defined data stream associated with your table. You must create the table before using the `StreamImporter` utility.
The data format must be a record-level format supported by HEAVY.AI.
`StreamImporter` listens to the stream, validates records against the target schema, and ingests batches of your designated size to the target table. Rejected records use the existing reject reporting mechanism. You can start, shut down, and configure `StreamImporter` independent of the HeavyDB engine. If StreamImporter is running but the database shuts down, StreamImporter shuts down as well. Reads from the stream are non-destructive.
`StreamImporter` is not responsible for event ordering - a first class streaming platform outside HEAVY.AI (for example, Spark streaming, flink) should handle the stream processing. HEAVY.AI ingests the end-state stream of post-processed events.
`StreamImporter` does not handle dynamic schema creation on first ingest, but must be configured with a specific target table (and its schema) as the basis.
There is a 1:1 correspondence between target table and a stream record.
```
cat tweets.tsv | ./StreamImporter tweets_small heavyai
-u imauser
-p imapassword
--delim '\t'
--batch 100000
--retry_count 360
--retry_wait 10
--null null
--port 9999
```
## Importing Data from HDFS with Sqoop
You can consume a CSV or Parquet file residing in HDFS (Hadoop Distributed File System) into HeavyDB.
Copy the HEAVY.AI JDBC driver into the Apache Sqoop library, normally found at /usr/lib/sqoop/lib/.
### Example
The following is a straightforward import command. For more information on options and parameters for using Apache Sqoop, see the user guide at [sqoop.apache.org](https://sqoop.apache.org/).
```
sqoop-export --table iAmATable \
--export-dir /user/cloudera/ \
--connect "jdbc:heavyai:000.000.000.0:6274:heavyai" \
--driver com.heavyai.jdbc.HeavyaiDriver \
--username imauser \
--password imapassword \
--direct \
--batch
```
The `--connect` parameter is the address of a valid JDBC port on your HEAVY.AI instance.
## Troubleshooting: Avoiding Duplicate Rows
To detect duplication prior to loading data into HeavyDB, you can perform the following steps. For this example, the files are labeled A,B,C...Z.
1. Load file A into table `MYTABLE`.
2. Run the following query.
```
select count(t1.uniqueCol) as dups from MYTABLE t1 join MYTABLE t2 on t1.uCol = t2.uCol;
```
There should be no rows returned; if rows are returned, your first A file is not unique.
3. Load file B into table `TEMPTABLE`.
4. Run the following query.
```
select count(t1.uniqueCol) as dups from MYTABLE t1 join MYTABLE t2 on t1.uCol = t2.uCol;
```
There should be no rows returned if file B is unique. Fix B if the information is not unique using details from the selection.
5. Load the fixed B file into `MYFILE`.
6. Drop table `TEMPTABLE`.
7. Repeat steps 3-6 for the rest of the set for each file prior to loading the data to the real `MYTABLE` instance.