Step-by-Step for Enabling Secure Boot#
This guide walks through the end-to-end process of enabling secure boot on an NVIDIA IGX Thor device, from environment setup through ISO installation.
Environment Setup#
It is recommended to have multiple terminal windows to follow this guide:
Window 1 - The primary terminal window on your host machine. This is the default terminal window you are using to run commands unless otherwise noted.
Window 2 - This is the terminal window you are going to use to reset the device or set it into recovery mode.
SSH into the BMC:
### Default BMC address is 192.168.1.110
ssh root@192.168.1.110
Set the device into recovery mode using the BMC:
### To set device into recovery mode
powerctrl recovery
Window 3 - This is the terminal window you will use to monitor the Tegra UART output.
First, SSH into the BMC:
Set the Tegra UART Port to mux to Tegra:
ssh root@192.168.1.110
### Set gpiochip0 60 to 1 to switch to Tegra UART port
gpioset -m exit gpiochip0 60=1
exit
Now, SSH into the BMC on port 2200 to view Tegra UART logs:
ssh root@192.168.1.110 -p 2200
Window 4 - This is the terminal window you will use to show the RCM port status.
lsusbon host machine should output something similar to the following after you have set the IGX Thor to recovery mode:Bus 003 Device 043: ID 0955:7026 NVIDIA Corp. APX
Note
In the event that you aren’t able to see the above mentioned USB port, you can try first setting the GPIO pin before setting the device into recovery mode in terminal window 2 as shown below:
### In terminal window 2: re-direct the tegra usb device connection to external port from
### BMC (this enables lsusb from host to show the USB port):
gpioset -m exit gpiochip0 4=1
Requirements#
The steps below are to be done on a Linux host machine (Ubuntu 22.04 or later) connected to your IGX Thor using the ethernet cable and USB C flash port.
You will need the following:
Results.zip - FSKP package requested from NVIDIA that includes:
fskp_select.txt
oem_fskp_per_entry_psc.bin.rsa_wrap (fskp key encrypted with your public.cer)
IGX Thor BSP packages:
Jetson_Linux_<VERSION>_aarch64.tbz2
Tegra_Linux_Sample-Root-Filesystem_<VERSION>_aarch64.tbz2
host_overlay_fskp_tools_<VERSION>_aarch64.tbz2
public_sources.tbz2
In terminal window 1, execute the following commands:
Make a working directory on your host machine:
mkdir ~/work_dir
cd ~/work_dir
Unzip your Results.zip into this work directory under a subdirectory called fskp_key:
unzip Results.zip > fskp_key
cd fskp_key
Decrypt the fskp key in this directory to obtain the fskp_key.bin which you will need later:
openssl rsautl -decrypt -inkey YOUR_PRIVATE_KEY_GOES_HERE.pem -in \
   oem_fskp_per_entry_psc.bin.rsa_wrap > fskp_key.bin
Download the BSP packages into ~/work_dir, then unzip and install the BSP packages as follows:
# Execute the following commands in ~/work_dir
tar -xpvf ./Jetson_Linux_<VERSION>_aarch64.tbz2

sudo tar -xpf ./Tegra_Linux_Sample-Root-Filesystem_<VERSION>_aarch64.tbz2 -C \
   Linux_for_Tegra/rootfs/

tar -xvjf ./host_overlay_fskp_tools_<VERSION>_aarch64.tbz2
tar -xvf ./public_source.tbz2
cd Linux_for_Tegra/source
tar -xvf ./nvidia-jetson-optee-source.tbz2

cd ~/work_dir/Linux_for_Tegra/
sudo ./apply_binaries.sh
sudo ./tools/l4t_flash_prerequisites.sh
You will refer to the Linux_for_Tegra/ directory as <top> throughout the rest of this guide. Some utilities must be run from this parent directory and will be denoted with <top> in the command path.
Pre-UEFI#
Pre-UEFI includes low-level firmware boot components like mb1, mb2, and CPU bootloader UEFI. Secure boot at this level is ensured through fuse. So, you need to prepare a fuse configuration file that contains public key hash, convert the file into a fuseblob, then burn your fuseblob to the device.
Preparing the PKC Keys#
Create a directory for your PKC keys:
### In terminal window 1
cd ~/work_dir
mkdir pkc_keys
cd pkc_keys
touch pkc_keylist.xml
Generate PKC keys:
You may refer to A. Generate the PKC Asymmetric Key Pairs and Key List for details on key generation.
Note
NVIDIA recommends you generate all 16 keys to use as you can only burn keys once!
Add all keys to pkc_keylist.xml.
Ensure all keys are listed in the pkc_keylist.xml as shown in the example below.
<entry_list>
   <bct active_index="0" chip_id="0x260" pcp_file="nv_combo.pcp" pcps_file="nv_combo.pcps"
pcps_hash_file="nv_combo.pcps.hash" />
   <entry hash_file="nv_rsa3k_v3_0.pub.hash"
key="/home/nvidia/work_dir/pkc_key/nv_rsa3k_v3_0.pem"    key_id="0" mode=""
pub_file="nv_rsa3k_v3_0.pub" />
   <entry hash_file="nv_rsa3k_v3_1.pub.hash"
key="/home/nvidia/work_dir/pkc_key/nv_rsa3k_v3_1.pem"    key_id="1" mode=""
pub_file="nv_rsa3k_v3_1.pub" />
   <entry hash_file="nv_rsa3k_v3_2.pub.hash"
key="/home/nvidia/work_dir/pkc_key/nv_rsa3k_v3_2.pem"    key_id="2" mode=""
pub_file="nv_rsa3k_v3_2.pub" />
   <entry hash_file="nv_rsa3k_v3_3.pub.hash"
key="/home/nvidia/work_dir/pkc_key/nv_rsa3k_v3_3.pem"    key_id="3" mode=""
pub_file="nv_rsa3k_v3_3.pub" />
   <entry hash_file="nv_ecp256_v3_0.pub.hash"
key="/home/nvidia/work_dir/pkc_key/nv_ecp256_v3_0.pem"   key_id="4" mode=""
pub_file="nv_ecp256_v3_0.pub" />
   <entry hash_file="nv_ecp256_v3_1.pub.hash"
key="/home/nvidia/work_dir/pkc_key/nv_ecp256_v3_1.pem"   key_id="5" mode=""
pub_file="nv_ecp256_v3_1.pub" />
   <entry hash_file="nv_ecp256_v3_2.pub.hash"
key="/home/nvidia/work_dir/pkc_key/nv_ecp256_v3_2.pem"   key_id="6" mode=""
pub_file="nv_ecp256_v3_2.pub" />
   <entry hash_file="nv_ecp256_v3_3.pub.hash"
key="/home/nvidia/work_dir/pkc_key/nv_ecp256_v3_3.pem"   key_id="7" mode=""
pub_file="nv_ecp256_v3_3.pub" />
   <entry hash_file="nv_ecp521_v3_0.pub.hash"
key="/home/nvidia/work_dir/pkc_key/nv_ecp521_v3_0.pem"   key_id="8" mode=""
pub_file="nv_ecp521_v3_0.pub" />
   <entry hash_file="nv_ecp521_v3_1.pub.hash"
key="/home/nvidia/work_dir/pkc_key/nv_ecp521_v3_1.pem"   key_id="9" mode=""
pub_file="nv_ecp521_v3_1.pub" />
   <entry hash_file="nv_ecp521_v3_2.pub.hash"
key="/home/nvidia/work_dir/pkc_key/nv_ecp521_v3_2.pem"   key_id="10" mode=""
pub_file="nv_ecp521_v3_2.pub" />
   <entry hash_file="nv_ecp521_v3_3.pub.hash"
key="/home/nvidia/work_dir/pkc_key/nv_ecp521_v3_3.pem"   key_id="11" mode=""
pub_file="nv_ecp521_v3_3.pub" />
   <entry hash_file="xmss_v3_0.pub.hash"
key="/home/nvidia/work_dir/pkc_key/xmss_v3_0.key"        key_id="12" mode=""
pub_file="xmss_v3_0.pub" />
   <entry hash_file="xmss_v3_1.pub.hash"
key="/home/nvidia/work_dir/pkc_key/xmss_v3_1.key"        key_id="13" mode=""
pub_file="xmss_v3_1.pub" />
   <entry hash_file="xmss_v3_2.pub.hash"
key="/home/nvidia/work_dir/pkc_key/xmss_v3_2.key"        key_id="14" mode=""
pub_file="xmss_v3_2.pub" />
   <entry hash_file="xmss_v3_3.pub.hash"
key="/home/nvidia/work_dir/pkc_key/xmss_v3_3.key"        key_id="15" mode=""
pub_file="xmss_v3_3.pub"/>
</entry_list>
Note
As of the current release the value of “key” in each entry needs to be the absolute path to the key.
Generate the PKC hash you will use in your fuse blob with tegrasign_v3.py.
After all keys have been entered into the PKC list, you need to generate the PKC hash to enter into the fuse.xml with the command shown below:
sudo <top>/bootloader/tegrasign_v3.py --key <pkc_keylist> --pubkeyhash <active_pkc.pcp> \
   <pkc_keylist.hash>
Where:
<pkc_keylist>is the name of the PKC key list file generated in the previous step.<active_pkc.pcp>is the name of the output public cryptography parameter file of the active key.<pkc_keylist.hash>is the name of the output public key digest of all the public keys in the PKC key list.
The resulting hash will be printed to the terminal which you should save. You will need to copy and paste
YOUR_PKC_HASHinto the fuse.xml as described in the next section.
Preparing the Fuse Configuration File#
Add fuse values to your fuse.xml.
Make your fuse configuration directory and create a fuse.xml file:
### In terminal window 1
cd ~/work_dir
mkdir fuse_config
cd fuse_config
touch fuse.xml
The PKC hash must be registered to your fuse.xml as shown below:
<fuse name="PublicKeyHash" size="64" value="YOUR_PKC_HASH"/>
Fill in other fuse values as shown in the example fuse.xml. The following xml file is for enabling signature verification only.
<genericfuse MagicId="0x45535546" version="1.0.0">
   <fuse name ="PublicKeyHash" size="64"
value="0xaa7ab9bf57a5747af4af080b86c1b7a651f839141da6ee80ebe3c562a5a8fb34e981d964bee653e93
cd56e6b0896753d191ded586a12503fc8797d3d62ac3c08"/>
   <fuse name="OptInEnable" size="4" value="0x00000001"/>
   <fuse name="PscOemKdk0" size="32"
value="0x6208e3cd81ed0cd77b214db0c875ade40c26bca09382ad82cd0e24046cc8c64e"/>
   <fuse name="PscOemKdk1" size="32"
value="0x112233445566778899aabbccddeeff00112233445566778899aabbccddeeff00"/>
   <fuse name="OespOemKdk0" size="32"
value="0xac88dead695089ed2aee491b180264873e966a61b609db4977f073aea41b132b"/>
   <fuse name="OespOemKdk1" size="32"
value="0xbd88ccea074705402afe649806ce6c5771730dc36a676fe23054c104aa48ddc0"/>
   <fuse name="SbOemKdk0" size="32"
value="0x8261530878e05d37b8cab1d93e44c2ab0a17190c2f7b8366721b5201595909f5"/>
   <fuse name="SbOemKdk1" size="32"
value="0xf1429596951a75f31aa7f787b4d7d1e23799f4f4ae02b17be73cafa62b7910a8"/>
   <fuse name="OdmInfo" size="4" value="0x0021"/>
   <fuse name="OdmId" size="8" value="0x0000001000218010"/>
   <fuse name="BootSecurityInfo" size="4" value="0x2220"/>
   <!--13: fTPM Enable + 9: OEM key valid + 5: Revocation policy enable-->
   <fuse name="SecurityMode" size="4" value="0x1"/>
</genericfuse>
A sample xml file for enabling encryption and signature verification is shown below.
Note
As of the current release, the SBK value in PSC, OESP and SB need to be set to the same value.
<genericfuse MagicId="0x45535546" version="1.0.0">
   <fuse name ="PublicKeyHash" size="64"
value="0xaa7ab9bf57a5747af4af080b86c1b7a651f839141da6ee80ebe3c562a5a8fb34e981d964bee653e93
cd56e6b0896753d191ded586a12503fc8797d3d62ac3c08"/>
   <fuse name="OptInEnable" size="4" value="0x00000001"/>
   <fuse name="PscOemKdk0" size="32"
value="0x6208e3cd81ed0cd77b214db0c875ade40c26bca09382ad82cd0e24046cc8c64e"/>
   <fuse name="PscOemKdk1" size="32"
value="0x112233445566778899aabbccddeeff00112233445566778899aabbccddeeff00"/>
   <fuse name="OespOemKdk0" size="32"
value="0xc008421905de5493ff350b7e69b15196028fdf073f2b3f5e41f4f58f37240f29"/>
   <fuse name="OespOemKdk1" size="32"
value="0xbd88ccea074705402afe649806ce6c5771730dc36a676fe23054c104aa48ddc0"/>
   <fuse name="SbOemKdk0" size="32"
value="0x8261530878e05d37b8cab1d93e44c2ab0a17190c2f7b8366721b5201595909f5"/>
   <fuse name="SbOemKdk1" size="32"
value="0xf1429596951a75f31aa7f787b4d7d1e23799f4f4ae02b17be73cafa62b7910a8"/>
   <fuse name="OdmInfo" size="4" value="0x0021"/>
   <fuse name="OdmId" size="8" value="0x0000001000218010"/>
   <fuse name="PscSecureBootKey" size="32"
value="0x123456789abcdef0fedcba987654321023456789abcdef01edcba9876543210f"/>
   <fuse name="OespSecureBootKey" size="32"
value="0x123456789abcdef0fedcba987654321023456789abcdef01edcba9876543210f"/>
   <fuse name="SbSecureBootKey" size="32"
value="0x123456789abcdef0fedcba987654321023456789abcdef01edcba9876543210f"/>
   <fuse name="BootSecurityInfo" size="4" value="0x2228"/>
   <!--13: fTPM Enable + 9: OEM key valid + 5: Revocation policy enable +
   3: Secure boot encryption enable-->
   <fuse name="SecurityMode" size="4" value="0x1"/>
</genericfuse>
Fusing the Board (using x86 Host)#
Generate your encrypted fuse blob. You can refer to E. Generate the Encrypted and Signed Blob for extra details on generating your fuse blob.
First copy the
fskp_selectcontent from your fskp_select.txt to use in your blob generation command.### In terminal window 1 cd ~/work_dir/fuse_config ### Copy contents of fskp_select.txt into the following command cat fskp_select.txt
Note
The output of the previous command is YOUR_FSKP_SELECT.
Note
The following command will generate a dry-run fuse blob. If you use this dry-run fuse blob when executing Step 2: Burning the fuse, the fuse blob will be sent but not actually get burned to the device.
To prepare a fuse blob that will be burned to the device, replace
--testwith--burnin the command below.cd <top>/l4t/tools/flashtools/fuseburn sudo ./fskp_fuseburn.py --board-spec igx-thor-board-spec.txt \ -f <top>/../fuse_config/fuse.xml -i YOUR_FSKP_SELECT --test \ -k <top>/../fskp_key/fskp_key.bin -g out/ -c 0x26 -B <top>/igx-thor-devkit.conf
Select “No” when prompted for continuation of the board fusing. You should now have an /out folder in <top>/l4t/tools/flashtools/fuseburn.
Burning the fuse
Set your device to recovery mode.
### In terminal window 2
powerctrl recovery
Run the following command below on terminal window 1 to send the pre-generated fuse blob and trigger the fuse burning process.
Caution
Verify your fuse blob generation command before proceeding. Fuse burning is irreversible and permanently modifies your board. The command will burn fuses only if you used
--burnmode instead of--testmode for your fuse blob.### In terminal window 1 cd <top>/l4t/tools/flashtools/fuseburn sudo ./fskp_fuseburn.py --board-spec igx-thor-board-spec.txt -P out/ \ -c 0x26 -B <top>/igx-thor-devkit.conf
Select “Yes” when prompted to continue. You can verify successful dry run or fuse burn by checking the UART output of the board for a confirmation message in terminal window 3.
Preparing the EKB Image#
EKB is used to securely store user keys that cannot be burned to fuses. To generate the EKB image, you will need to use the PSC KDK key that you have just burned to the fuse. The <sym_t264.key>, <sym2_t264.key>, and <auth_t264.key> are keys stored inside the Encrypted Key Blob (EKB). The <oem_kdk1.key> burned to the PSC_OEM_KDK1 fuse is used to encrypt and sign EKB. For more information, refer to A. Generate a New EKB File.
<auth_t264.key> is the UEFI variable authentication key. In current L4T reference implementation, this is the UEFI Variable Protection key.
### Fill PscOemKdk1 as oem_kdk1.key that is burned in the previous step
cd <top>/source/optee/samples/hwkey-agent/host/tool/gen_ekb
python3 gen_ekb.py -chip t264
                   -oem_kdk1_key <oem_kdk1.key> \
                   -in_sym_key <sym_t264.key> \
                   -in_sym_key2 <sym2_t264.key> \
                   -in_auth_key <auth_t264.key> \
                   -out eks_t264.img

### Move the newly generated image into <top>/bootloader
sudo mv eks_t264.img <top>/bootloader/
Details on these steps can be found in A. Generate a New EKB File.
Secure UEFI#
Enable UEFI Secure Boot to ensure that the UEFI payload signature, specifically the OS loader, is verified prior to execution.
Prepare UEFI Keys (PK, KEK, db)#
To generate the PK, KEK, and db RSA key pairs, their certificates, and the EFI signature list files, run the following commands:
cd <top>
mkdir uefi_keys
cd uefi_keys
GUID=$(uuidgen)

### Generate PK RSA Key Pair, Certificate, and EFI Signature List File
openssl req -newkey rsa:2048 -nodes -keyout PK.key  -new -x509 -sha256 -days 3650 -subj \
   "/CN=my Platform Key/" -out PK.crt
cert-to-efi-sig-list -g "${GUID}" PK.crt PK.esl

### Generate KEK RSA Key Pair, Certificate, and EFI Signature List File
openssl req -newkey rsa:2048 -nodes -keyout KEK.key  -new -x509 -sha256 -days 3650 -subj \
   "/CN=my Key Exchange Key/" -out KEK.crt
cert-to-efi-sig-list -g "${GUID}" KEK.crt KEK.esl

### Generate db_1 RSA Key Pair, Certificate, and EFI Signature List File
openssl req -newkey rsa:2048 -nodes -keyout db_1.key  -new -x509 -sha256 -days 3650 -subj \
   "/CN=my Signature Database key/" -out db_1.crt
cert-to-efi-sig-list -g "${GUID}" db_1.crt db_1.esl

### Generate db_2 RSA Key Pair, Certificate, and EFI Signature List File
openssl req -newkey rsa:2048 -nodes -keyout db_2.key  -new -x509 -sha256 -days 3650 -subj \
   "/CN=my another Signature Database key/" -out db_2.crt
cert-to-efi-sig-list -g "${GUID}" db_2.crt db_2.esl
Creating Kernels and Kernel Module Keys#
Kernel type |
Canonical-signed Kernel |
OEM-signed kernel |
||
|---|---|---|---|---|
Signing key |
Key location |
Signing key |
Key location |
|
Shim |
Microsoft Key |
UEFI db |
Microsoft Key |
UEFI db |
Grub |
Canonical Key |
Shim |
OEM key |
UEFI db |
Kernel |
Canonical Key |
Shim |
OEM key |
UEFI db |
Kernel module |
Canonical Key |
Kernel |
OEM key |
UEFI db |
Ensuring kernels are signed by a trusted third party requires enrolling the signing key into the specified key location (see chart above). Specifically, keys must be included in the key configuration (.dtbo file) for enrollment into the UEFI db. The following section describes the procedure for generating the necessary keys.
Canonical Kernel#
This kernel is signed by Canonical, and its public key is built into the Shim binary provided by Ubuntu. This built-in key allows the Ubuntu Shim to verify and launch subsequent boot stages (like GRUB and the Linux kernel) signed by Canonical.
The Ubuntu Shim is signed by Microsoft key. Thus the Microsoft public key needs to be enrolled in UEFI secure db at the next step (Signing QSPI images).
You can download the Microsoft KEK and DB certificate files, and create an EFI Signature List from Microsoft’s DER format KEK certificate using Microsoft’s GUID (77fa9abd-0359-4d32-bd60-28f4e78f784b).
Note
The Microsoft Corporation KEK CA 2011 certificate and Microsoft Corporation UEFI CA 2011 certificate will expire in June 2026.
### download Microsoft Corporation KEK CA 2011 certificate(Expires in June 2026):
curl -O https://www.microsoft.com/pkiops/certs/MicCorKEKCA2011_2011-06-24.crt

sbsiglist --owner 77fa9abd-0359-4d32-bd60-28f4e78f784b --type x509 --output \
   MS_Win_KEK_2011.esl MicCorKEKCA2011_2011-06-24.crt

### download Microsoft Corporation KEK 2K CA 2023 certificate:
curl \
   https://www.microsoft.com/pkiops/certs/microsoft%20corporation%20kek%202k%20ca%202023.crt \
   > microsoft_corporation_kek_2k_ca_2023.crt

sbsiglist --owner 77fa9abd-0359-4d32-bd60-28f4e78f784b --type x509 --output \
   MS_Win_KEK_2023.esl microsoft_corporation_kek_2k_ca_2023.crt

### Combine the two KEK esl files:
cat MS_Win_KEK_2011.esl MS_Win_KEK_2023.esl > MS_Win_KEK.esl

### download Microsoft Corporation UEFI CA 2011 certificate(Expires in June 2026):
curl -O https://www.microsoft.com/pkiops/certs/MicCorUEFCA2011_2011-06-27.crt

sbsiglist --owner 77fa9abd-0359-4d32-bd60-28f4e78f784b --type x509 --output \
   MS_UEFI_db_2011.esl MicCorUEFCA2011_2011-06-27.crt

### download Microsoft UEFI CA 2023 certificate:
curl https://www.microsoft.com/pkiops/certs/microsoft%20uefi%20ca%202023.crt > \
   microsoft_uefi_ca_2023.crt

sbsiglist --owner 77fa9abd-0359-4d32-bd60-28f4e78f784b --type x509 --output \
   MS_UEFI_db_2023.esl microsoft_uefi_ca_2023.crt

### Combine the two db esl files:
cat MS_UEFI_db_2011.esl MS_UEFI_db_2023.esl > MS_UEFI_db.esl
OEM Kernel#
For self-signed kernel (and/or Grub), you can enroll the signing key to the UEFI db as demonstrated in the following section.
Use the db_1.key generated in step “Prepare UEFI Keys (PK, KEK, db)” to sign your grub/kernel/kernel module. Make sure to enroll db_1.key into your key configuration: more details can be found in Creating UEFI Keys and Enrolling Keys to Key Configuration File (.dtbo).
Use the same steps as the previous section (Canonical Kernel) to download the Microsoft KEK and DB certificates, and create EFI Signature List from them.
Canonical Kernel Module#
Since Canonical-signed kernel modules have their keys pre-registered in the kernel, you do not need to perform any extra steps to register them with UEFI.
OEM Kernel Module#
The details for OEM kernel module signing can be found in Kernel Module Verification.
Creating UEFI Keys and Enrolling Keys to Key Configuration File (.dtbo)#
Create a UEFI keys config file. If enrolling an OEM kernel key, ensure that the
UEFI_DEFAULT_DB_ESL_1entry corresponds to the db_1.esl file generated in the Prepare UEFI Keys (PK, KEK, db) section for signing that OEM kernel.cd to <top>/uefi_keys vim uefi_keys.conf ### Insert the following lines: UEFI_DEFAULT_PK_ESL="PK.esl" UEFI_DEFAULT_KEK_ESL_0="MS_Win_KEK.esl" UEFI_DEFAULT_DB_ESL_0="MS_UEFI_db.esl" UEFI_DEFAULT_KEK_ESL_1="KEK.esl" UEFI_DEFAULT_DB_ESL_1="db_1.esl"
Generate the UefiDefaultSecurityKeys.dtbo file.
cd ..
sudo tools/gen_uefi_keys_dts.sh --no-signing-key uefi_keys/uefi_keys.conf
sudo cp uefi_keys/UefiDefaultSecurityKeys.dtbo bootloader/
Signing QSPI#
We separated the QSPI flashing process into distinct steps: image signing and flashing. This allows signing to occur in a secure environment while flashing can take place on the factory floor.
To generate our signed QSPI images, follow the steps below:
First set the device into recovery mode:
### In terminal window 2
powerctrl recovery
Double check that the device has successfully rebooted into recovery mode by listing your USB devices on your host machine and seeing if the NVIDIA device is listed as described in Environment Setup:
### In terminal window 4
sudo lsusb
Run the following command to generate the QSPI images:
### In terminal window 1
cd <top>
sudo ADDITIONAL_DTB_OVERLAY_OPT="UefiDefaultSecurityKeys.dtbo" ./l4t_initrd_flash.sh \
   --no-flash -u <top>/../pkc_key/pkc_keylist.xml [-v <sbk_keyfile> ] --qspi-only \
   igx-thor-devkit internal
Flashing QSPI (using x86 Host)#
Set the device into recovery mode:
### In terminal window 2
powerctrl recovery
Double check that the device has successfully rebooted into recovery mode by listing your USB devices on your host machine and seeing if the NVIDIA device is listed as described in Environment Setup:
### In terminal window 4
sudo lsusb
To flash your QSPI image onto the IGX Thor execute the following command:
### In terminal window 1
cd <top>

sudo ./l4t_initrd_flash.sh --flash-only igx-thor-devkit internal
ISO Installation#
Create a Bootable USB Flash Drive#
We recommend using BalenaEtcher to create an ISO installer of the IGX BaseOS which can be found on the IGX Download Center.
Insert a bootable thumb drive into your host machine, and then open up BalenaEtcher. You should see a similar prompt to what is pictured below. Select the ISO image you wish to use, the bootable thumb drive you have inserted, then click “Flash!”

Figure 1. BalenaEtcher ISO flashing interface.#
Complete the Installation#
Insert the USB flash drive into any of the USB A ports on the IGX Thor.
Power on the unit, and boot the system. Press Esc when the NVIDIA logo appears to access the UEFI menu.
Enter the UEFI Boot Manager. You should see something similar to the image below:
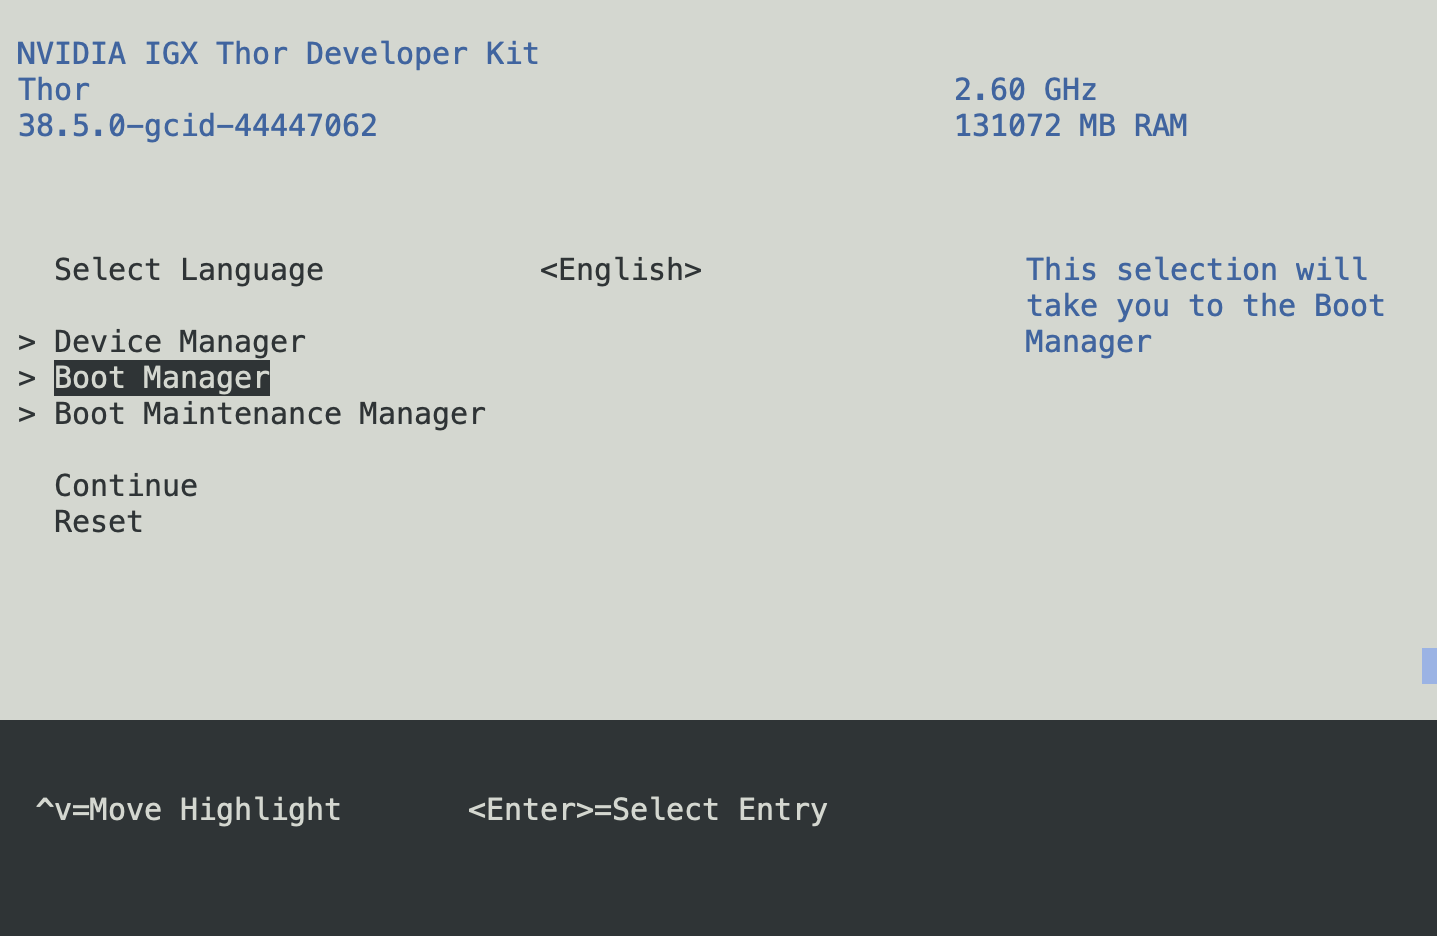
Figure 2. UEFI Boot Manager device selection.#
Select the USB volume name that corresponds to the inserted USB flash drive and boot the system from that drive.
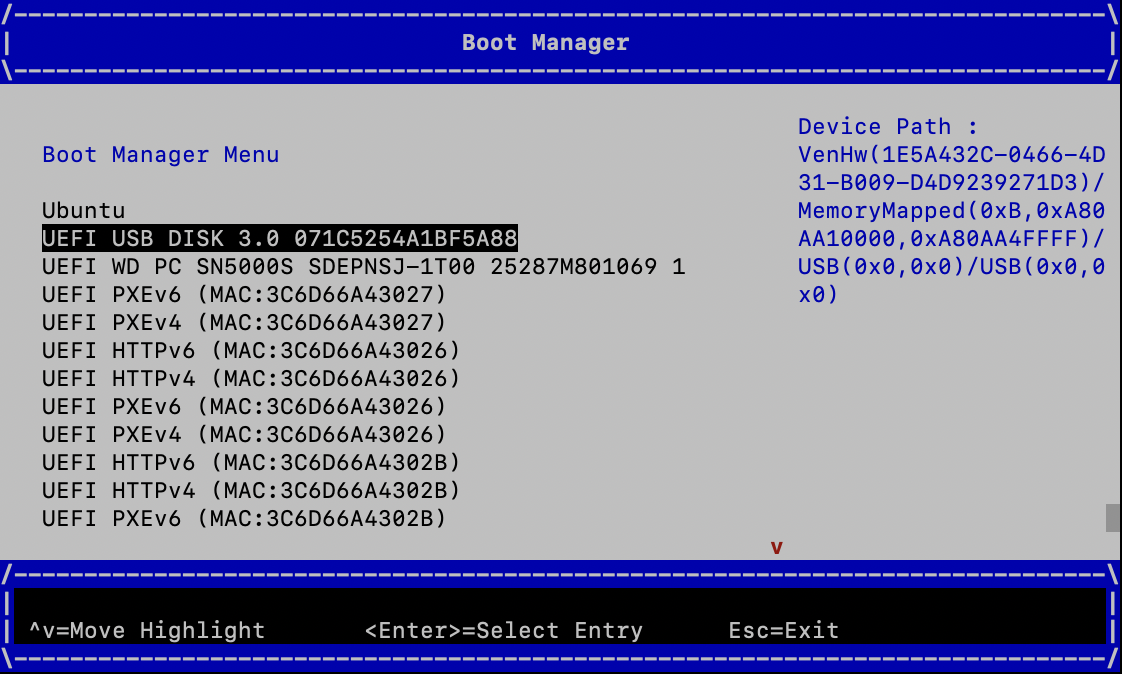
Figure 3. Boot Manager USB device selection.#
Continue to the IGX Thor options in the GRUB menu.
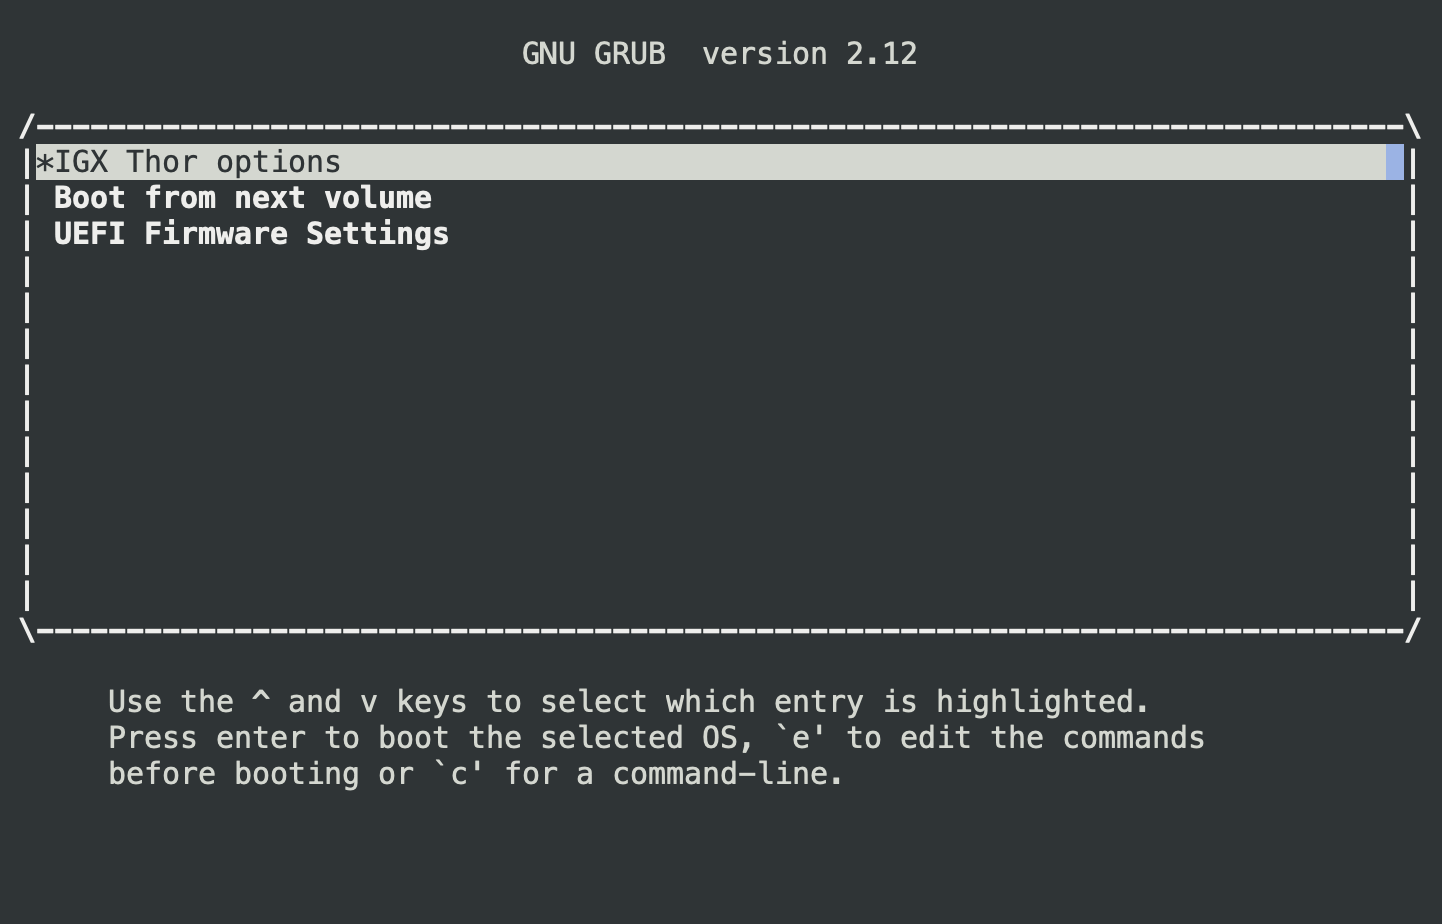
Figure 4. GRUB menu with IGX Thor boot options.#
Choose the OS you wish to install for your ISO installation. The installation may take up to 20 minutes to complete.
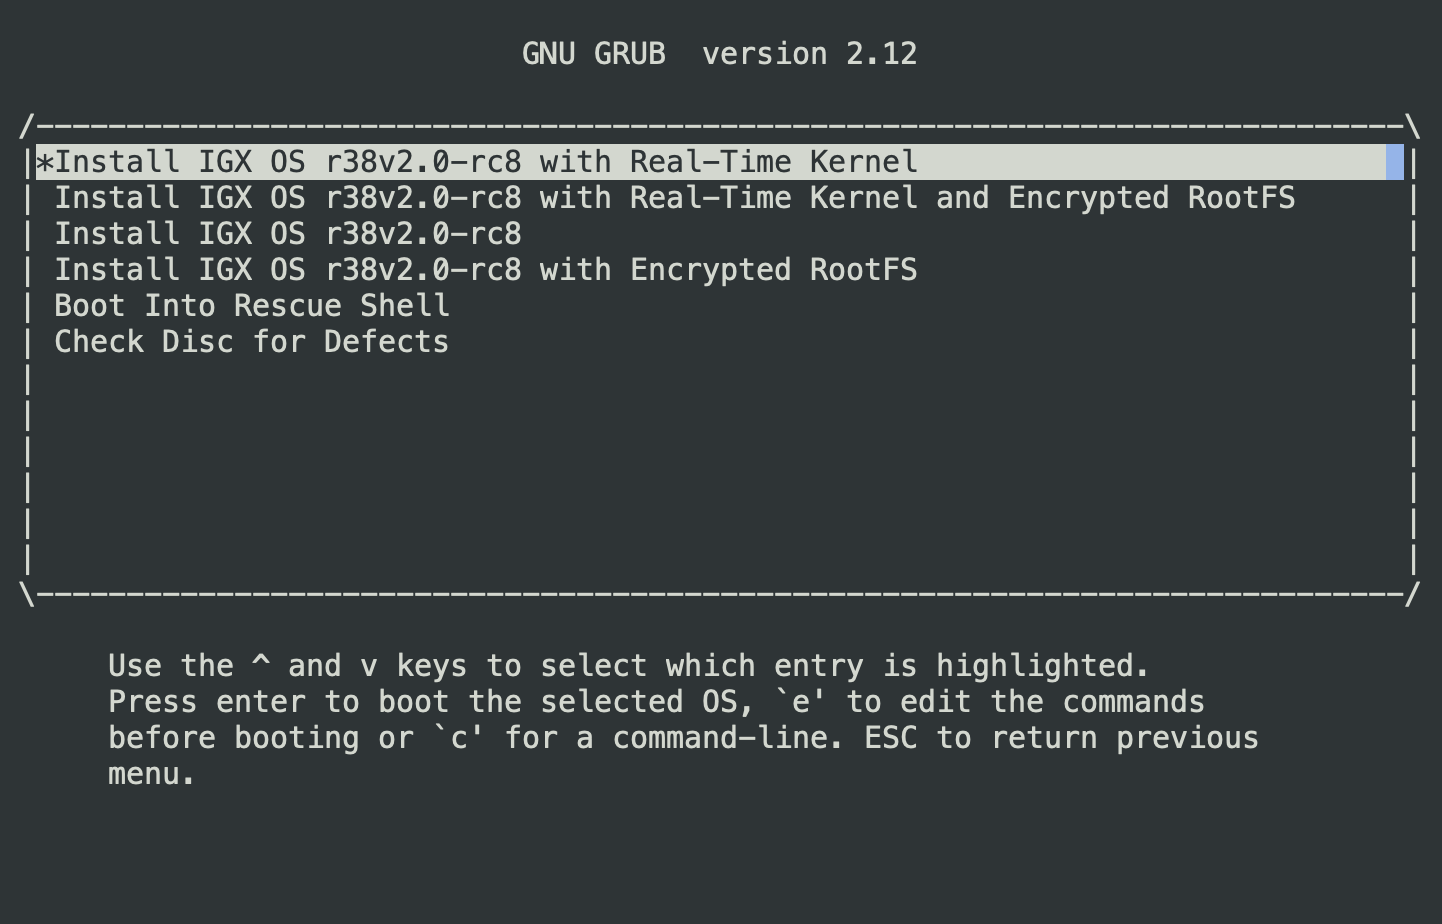
Figure 5. GRUB OS installation selection menu.#
After installing the IGX ISO, the Dev Kit will reboot. For an unfused board or a board without secure boot enabled, the capsule update will update the board twice (once each for partition A and B).
Note
The capsule update will not occur if you have burned the PKC fuses and enabled secure boot!
After the ISO installation completes, the OS will reboot automatically.
Complete the NVIDIA OOBE on the monitor to configure the system and create an account/password.