Clocks
NVIDIA® Tegra® Board Support Package (BSP) supports configuring Tegra clocks and peripheral clocks through the software. This topic describes how to check clock status, get maximum rates for clocks, and configure clock sources.
Note: | For information about available Tegra clock sources and capabilities, see the “Clock and Reset Controller” section of Xavier Series Technical Reference Manual or Tegra Technical Reference Manual (TRM) for your chip. This section of the TRM also describes clock source multiplexers and provides descriptions of available clock sources for each component. |
In kernel 4.9 and following, the common clock framework (CCF) is supported. As a result:
• All device drivers use the public CCF APIs include/linux/clk.h, and include/linux/clk-provider.h, including functions such as clk_get, clk_enable, devm_clk_get, clk_prepare_enable, clk_prepare_disable, clk_disable, and others, instead of Tegra specific APIs.
• All clock drivers, including the Tegra custom clk driver, implement clk_ops.
• Clock sources and clocks required by devices are defined in the Device Tree.
• Clocks are controlled by an R5 called the Boot and Power Management Processor. It runs RTOS software from bpmp.bin. The Linux kernel running on CCPLEX requests this software for clock programming.
The Linux Tegra clock driver wrapper is available in the nvidia/drivers/clk/tegra/ directory.
To check clock status
Applies to: Jetson AGX Xavier and Jetson TX2 series
• On the device, enter the following command to launch debugfs and check the clock:
sudo -s
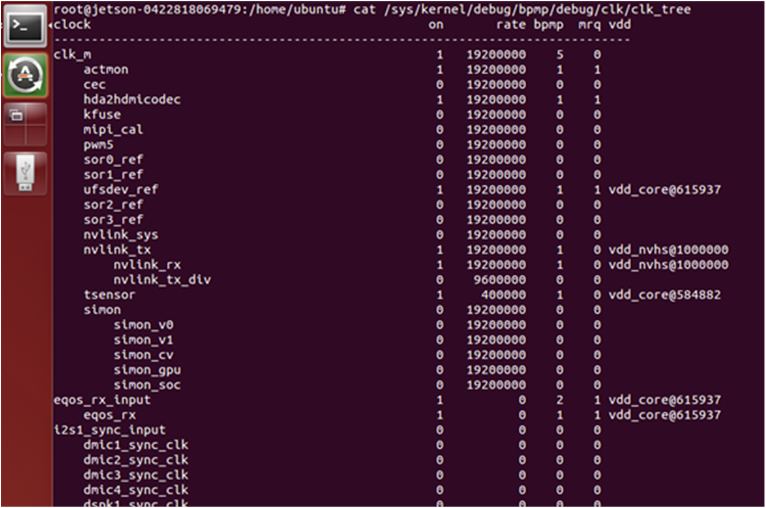
# cat /sys/kernel/debug/bpmp/debug/clk/clk_tree
This is an example of debugfs output for NVIDIA® Jetson AGX Xavier™:
Overriding Default Clock Rates
The default clock rate of each component is set during boot and updated under control of the driver by requesting BPMP. The debugfs service provides a way to override the default clock rate and set a fixed clock rate. Use debugfs for debugging and experimental purposes only.
You can find the child nodes shown below under each clock node. You can use them to change the nodes’ parent and rates. For example:
root@jetson-0422818069479:/sys/kernel/debug/bpmp/debug/clk/can1# ls
all children children dvfs
flags fmon hz _ off
max_rate min_rate mrq_rate_locked parent
possible_parents pto_counter rate state
vdd_aon
The Jetson AGX Xavier clocks are controlled by BPMP. For example, override the EMC rate with the following commands:
echo 1 > /sys/kernel/debug/bpmp/debug/clk/emc/mrq_rate_locked
echo 1 > /sys/kernel/debug/bpmp/debug/clk/emc/state
echo x > /sys/kernel/debug/bpmp/debug/clk/emc/rate
Configuring GPU Clocks
With GPU DVFS enabled using the devfreq framework, GPU frequency changes based on load. You can instead run the GPU at a fixed frequency if necessary.
To run the GPU at a fixed frequency
1. Enter the following command.
• For gp10b:
# cd /sys/devices/17000000.gp10b/devfreq/17000000.gp10b/
• For gv11b:
# cd /sys/devices/gpu.0/devfreq/17000000.gv11b/
2. List the available frequencies:
cat available_frequencies
114750000 216750000 318750000 420750000 522750000 624750000 675750000 828750000 905250000 1032750000 1198500000 1236750000 1338750000 1377000000
3. Fix the frequency.
• To fix the frequency at maximum supported frequency:
echo <max> min_freq
Where
<max> in the maximum supported frequency. For example, to fix the frequency at the maximum supported frequency from the list in step
2:
echo 1377000000> min_freq
• To fix any other supported frequency:
echo <freq> > min_freq
echo <freq> > max_freq
Where <freq> in the desired supported frequency. For example, to fix the frequency at 828750000:
echo 828750000 > min_freq
echo 828750000 > max_freq
Configuring Clocks
In general, each block or module has a dedicated clock source register. For detailed information about a given register, see CLK_RST_CONTROLLER_CLK_SOURCE_<module_name> in the Technical Reference Manual (TRM).
Clock source registers provide clock source selection and clock divider control for the module. The divider is typically 8 bits, 7 integer bits and 1 fractional bit (U7.1).
To change clock configurations in the kernel device driver module
4. Declare clocks in Device Tree. For example, for padctl-uphy, clocks can be declared as follows:
clocks = <&tegra_car TEGRA210_CLK_HSIC_TRK>,
<&tegra_car TEGRA210_CLK_USB2_TRK>,
<&tegra_car TEGRA210_CLK_PLL_E>;
clock-names = "hsic_trk", "usb2_trk", "pll_e";
5. Use the devm_clk_get function to obtain the desired clock source using clock-names.
6. Use the clk_get_parent function to obtain the parent clock for the desired clock.
7. Use the clk_set_parent function to select the specified clock source for the target clock.
8. Use the clk_set_rate function to set the frequency of the target clock.
The divider is calculated automatically according to the target rate. Successful clock frequency settings must meet the available divider of that module and the frequency of the clock source.
9. Use the clk_round_rate function to get the exact clock frequency that can be configured from the current clock source.
10. Use clk_prepare_enable (or clk_prepare and clk_enable) functions to ungate/enable the clock. The clk_prepare function can be used instead of clk_enable to ungate a clock if the operation may sleep.