GPUDirect RDMA Testing#
This section includes information about the GPUDirect RDMA test on Grace Blackwell with CX8 platform and includes examples.
Testing GPUDirect RDMA in Baremetal#
Before you begin, verify that the NVIDIA Driver, CUDA Toolkit, and DOCA-OFED are installed on the Host. Apply the ACS settings (as described in the following sections) for correct operation.
Identifying the correct GPU, CX8, and Data Direct Function#
The Blackwell single compute node can have two or four NVIDIA Blackwell GPUs and
multiple CX8s. To run the GPUDirect RDMA, you must identify the NVIDIA Blackwell
GPU, the CX8 NIC, and the corresponding CX8 Data Direct Interface. The
rdma_topo tool identifies and lists the correct GPU, CX8, and Data Direct
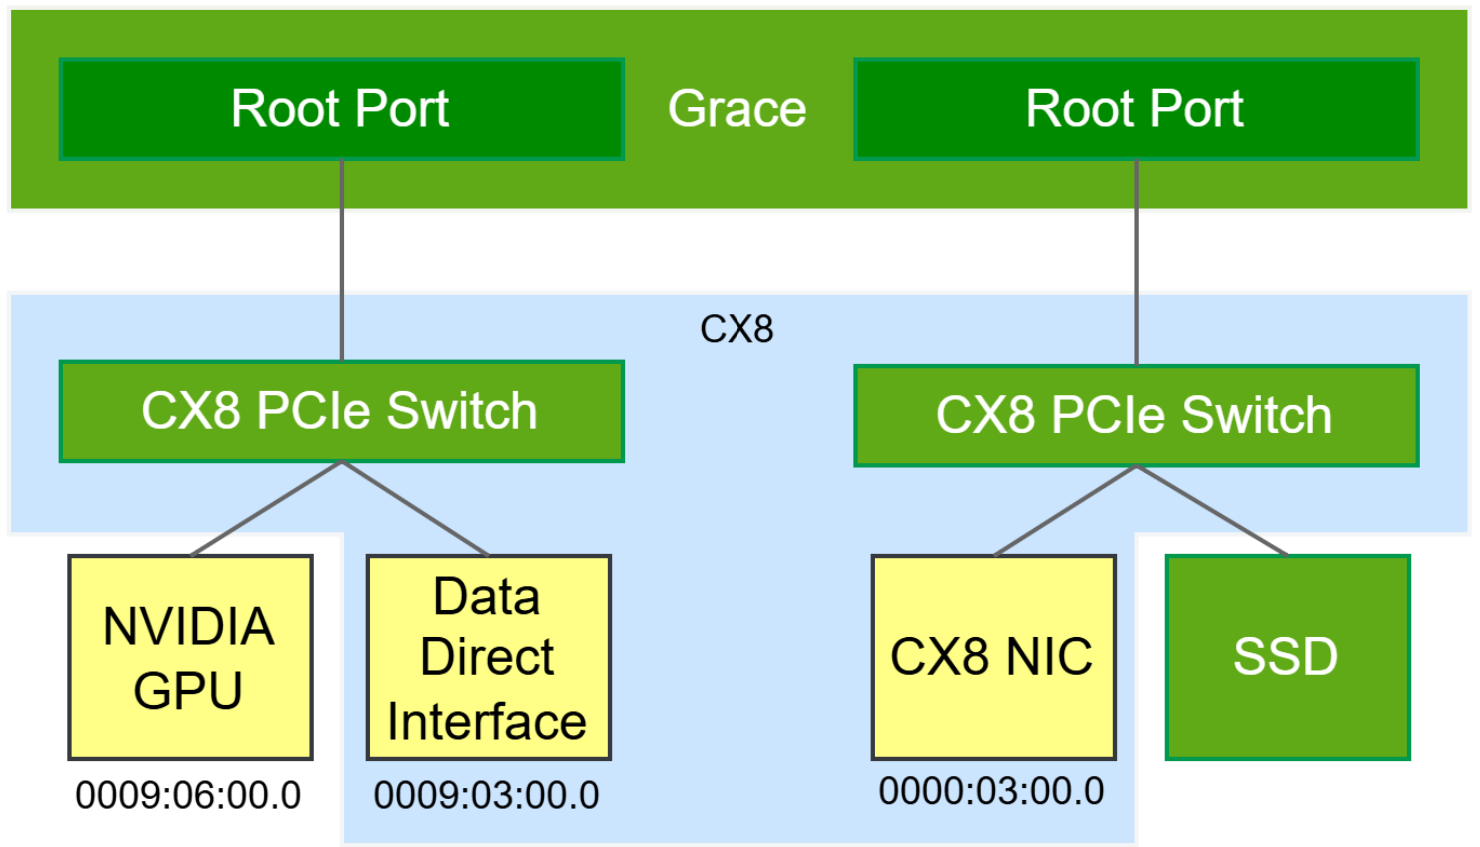
Interface for GPUDirect RDMA functionality. The following figure shows the PCIe
topology from the Grace system, including single GPU, CX8, and Data Direct
Interfaces.
Run the rdma_topo topo to identify the GPU, CX8 NIC, and the corresponding
CX8 Data Direct Interface:
$ rdma_topo topo
RDMA NIC=0000:03:00.0, GPU=0009:06:00.0, RDMA DMA Function=0009:03:00.0
       NVIDIA Dual ConnectX-8 SuperNIC C8280Z Mezzanine Board for GB200 NVL72 systems, Crypto Enabled, Secure Boot Enabled, partner cool. -Prime
       NUMA Node: 0
       NIC PCI device: 0000:03:00.0
       RDMA device: ibp3s0
       Net device: ibp3s0
       DRM devices: card2, renderD129
       NVMe device: nvme3
RDMA NIC=0002:03:00.0, GPU=0008:06:00.0, RDMA DMA Function=0008:03:00.0
       NVIDIA Dual ConnectX-8 SuperNIC C8280Z Mezzanine Board for GB200 NVL72 systems, Crypto Enabled, Secure Boot Enabled, partner cool. -Aux[1]
       NUMA Node: 0
       NIC PCI device: 0002:03:00.0
       RDMA device: ibP2p3s0
       Net device: ibP2p3s0
       DRM devices: card1, renderD128
       NVMe device: nvme4
RDMA NIC=0010:03:00.0, GPU=0019:06:00.0, RDMA DMA Function=0019:03:00.0
       NVIDIA Dual ConnectX-8 SuperNIC C8280Z Mezzanine Board for GB200 NVL72 systems, Crypto Enabled, Secure Boot Enabled, partner cool. -Prime
       NUMA Node: 1
       NIC PCI device: 0010:03:00.0
       RDMA device: ibP16p3s0
       Net device: ibP16p3s0
       DRM devices: card4, renderD131
       NVMe device: nvme1
RDMA NIC=0012:03:00.0, GPU=0018:06:00.0, RDMA DMA Function=0018:03:00.0
       NVIDIA Dual ConnectX-8 SuperNIC C8280Z Mezzanine Board for GB200 NVL72 systems, Crypto Enabled, Secure Boot Enabled, partner cool. -Aux[1]
       NUMA Node: 1
       NIC PCI device: 0012:03:00.0
       RDMA device: ibP18p3s0
       Net device: ibP18p3s0
       DRM devices: card3, renderD130
       NVMe device: nvme2
Analysis of the rdma_topo output confirms the following device mappings:
The B300 GPU is located at address 0009:06:00.0.
The CX8 NIC (Physical Function or NET-PF) is at 0000:03:00.0 and its corresponding CX8 Data Direct Interface resides at 0009:03:00.0.
Note
The rdma_topo output shown above is from the NVIDIA Grace Blackwell system with B300 GPUs and CX8 also referred to as GB300 with CX8. The tool is part of the recommended DOCA Host package and can be found under the following ‘/usr/sbin/rdma_topo’.
ACS Configuration#
GPUDirect implementations require specific ACS settings to enable essential P2P routes.
The ACS is configured using the kernel parameter config_acs with the BDFs of Mellanox ConnectX/BlueField Family mlx5Gen PCIe Bridges that are attached to CX8s, CX8 Data Direct Interfaces, and GPU under the same switch as the target GPUs.
Note
The ACS configuration is unique for Grace Blackwell platforms with CX8 Data Direct Interfaces and different from the previous generation of NVIDIA DGX Systems. NVIDIA requires these ACS settings on baremetal for proper GPUDirect operation.
For bridges that are connected to GPUs#
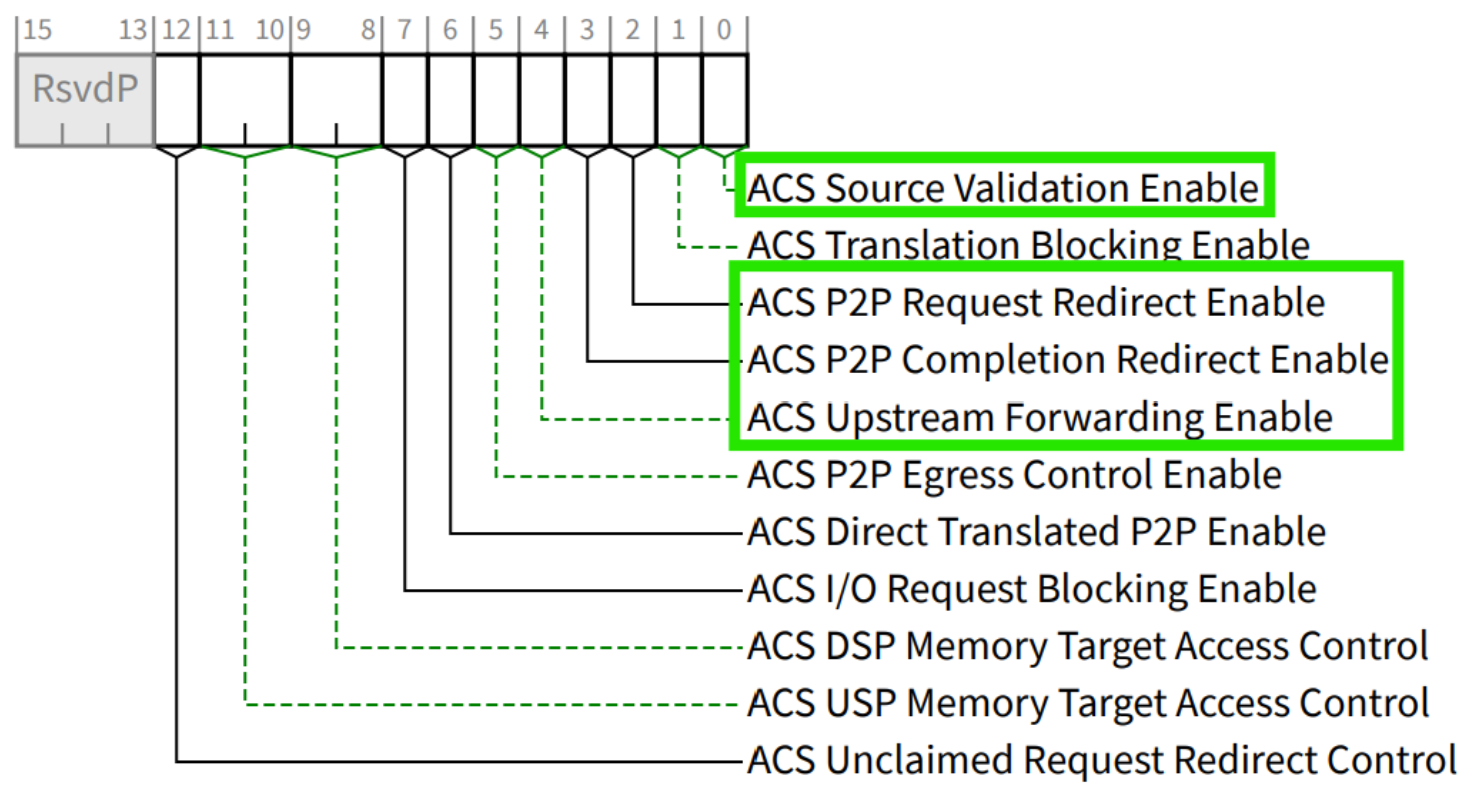
Enable and disable the following bits:
Enable:
bit-4 : ACS Upstream Forwarding
bit-2 : ACS P2P Request Redirect
bit-0 : ACS Source Validation
Disable:
bit-3 : ACS P2P Completion Redirect
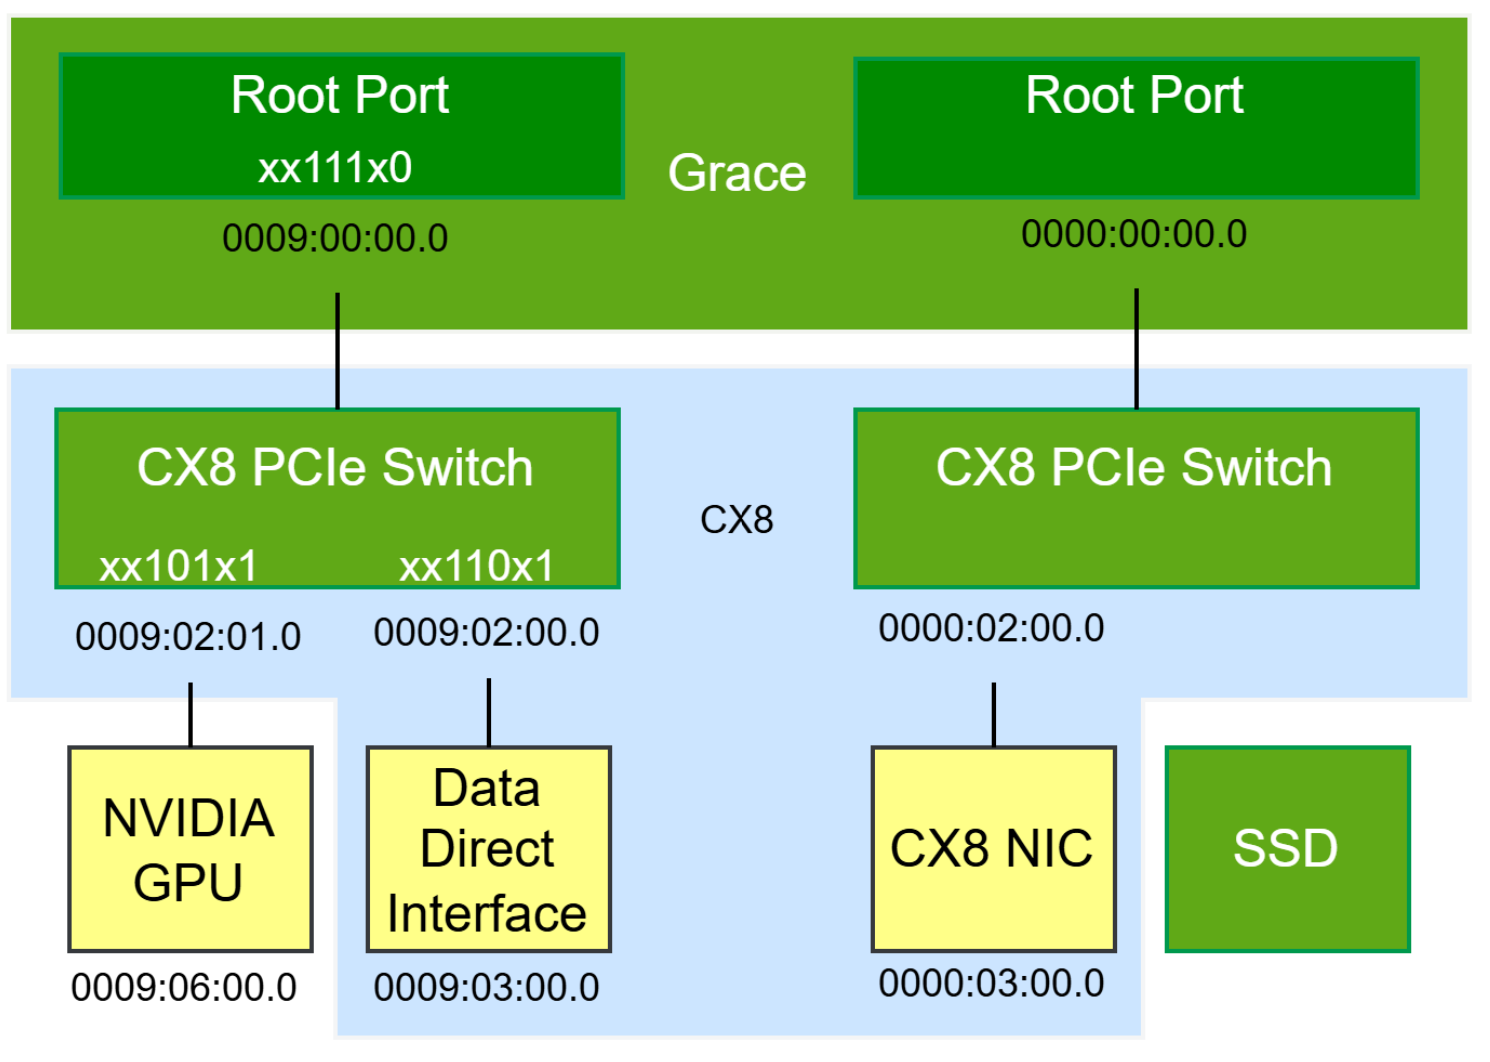
For example, xx101x1
For bridges that are connected to CX8 Data Direct Interfaces#
Enable and disable the following bits:
Enable:
bit-4 : ACS Upstream Forwarding
bit-3 : ACS P2P Completion Redirect
bit-0 : ACS Source Validation
Disable:
bit-2 : ACS P2P Request Redirect
For example, xx110x1
For Grace root ports upstream of a GPU#
Enable and disable the following bits:
Enable:
bit-4 : ACS Upstream Forwarding
bit-3 : ACS P2P Completion Redirect
bit-2 : ACS P2P Request Redirect
Disable:
bit-0 : ACS Source Validation
For example, xx111x0
The following figure shows the PCIe topology from the Grace system annotated with the correct configurations.
Configuring ACS using rdma_topo tool#
The following instructions explain how to configure the ACS using the rdma_topo
tool and run the test.
Use the rdma_topo tool to view, generate, set, and verify the PCI
Access Control Flags (ACS) related to the DirectNIC topology on supported NVIDIA
platforms with ConnectX and Blackwell family GPUs.
Note
The ACS recommendations have been updated from earlier versions of this document. On some older NVIDIA BaseOS releases, the legacy package nvidia-acs-disable may be installed. Remove it to prevent ACS from being forcibly disabled. To ensure compatibility, use the kernel command line from the rdma_topo tool.
Show the ACS configuration.
$ rdma_topo write-grub-acs --dry-run
Create an ACS configuration grub file.
$ rdma_topo write-grub-acs

#Note: On Ubuntu/Debian based systems this generates ACS config in /etc/default/grub.d/config-acs.cfg and grub will be updated.
Reboot the system.
$ reboot
Verify that the ACS configuration is applied without failures.
$ rdma_topo check

# Note: The PCIe endpoint device driver must be bound to the device to ensure the device is added to the correct iommu group before running the ‘rdma_topo check’.
Running the Test#
Based on the rdma_topo topology output, execute the following
ib_write_bw commands.
Run the following command to start a server process.
ib_write_bw -d <RDMA device> -F --report_gbits -D 30 --use_cuda_bus_id=<GPU> --use_cuda_dmabuf --use_data_direct -p 18001 --qp=4
Run the following command to start a client process.
ib_write_bw -d <RDMA device> -F --report_gbits -D 30 --use_cuda_bus_id=<GPU> --use_cuda_dmabuf --use_data_direct -p 18001 --qp=4 <server_ip/hostname>
Using NIC Virtual Function and enabling ‘data-direct’ feature#
Data Direct is enabled by default for PFs; however, it isn’t enabled for Virtual Functions (VFs),
and you must explicitly enable it. Enabling data direct on VFs requires a
tool called doca_mgmt_data_direct.
Use the following steps to get the tool, create a VF, and enable it for data direct usage.
Get the
doca_mgmt_data_directsources and the required packages and build it.$ apt install doca-samples $ apt install libdoca-sdk-mgmt-dev $ apt install libdoca-sdk-argp-dev $ cd /opt/mellanox/doca/samples/doca_mgmt/mgmt_data_direct $ meson setup build $ meson compile -C build $ cd build
Configure the NET PF 0000:03:00.0 to operate in switchdev mode. This creates representor ports on the host and allows the device’s virtual functions to be managed by the hardware.
$ /opt/mellanox/iproute2/sbin/devlink dev eswitch set pci/0000:03:00.0 mode switchdev
Create a VF for 0000:03:00.0 NET PF.
$ echo 1 > /sys/bus/pci/devices/0000:03:00.0/sriov_numvfs
Display the pfnum and vfnum of the newly created VF.
$ /opt/mellanox/iproute2/sbin/devlink port show
pci/0000:03:00.0/1: type eth netdev enp3s0r0 flavour pcivf controller 0 pfnum 0 vfnum 0 external false splittable false
  function:
    hw_addr 00:00:00:00:00:00 roce enable ipsec_crypto disable ipsec_packet disable max_io_eqs 24

# pfnum is 0 and vfnum is 0
Display the PCI address of the newly created VF.
$ NET_PF="0000:03:00.0"; VFNUM=0; readlink /sys/bus/pci/devices/$NET_PF/virtfn$VFNUM | xargs basename
0000:03:00.2
Unbind the VF from its host driver. This is required to enable data direct.
$ echo 0000:03:00.2 > /sys/bus/pci/devices/0000:03:00.2/driver/unbind
Display the current status of
data-directon the VFSpecify the VF using the--repparameter in the following formatpci/<parent_pf_pci_address>,pf<pfnum>vf<vfnum>. In this case,pci/0000:03:00.0,pf0vf0.$ ./doca_mgmt_data_direct get --rep pci/0000:03:00.0,pf0vf0 [2025-10-20 17:46:53:314785][1659072064][DOCA][INF][doca_log.cpp:633][_common_write_version_to_backend] DOCA version 3.2.0093 [2025-10-20 17:46:53:332028][1659072064][DOCA][INF][mgmt_data_direct_sample.c:79][mgmt_data_direct_get] Data direct: DISABLED
Enable
data-directon the VF.$ ./doca_mgmt_data_direct set --rep pci/0000:03:00.0,pf0vf0 --enabled true
Verify
data-directon the VF.$ ./doca_mgmt_data_direct get --rep pci/0000:03:00.0,pf0vf0 [2025-10-20 17:50:26:874762][3569458752][DOCA][INF][doca_log.cpp:633][_common_write_version_to_backend] DOCA version 3.2.0093 [2025-10-20 17:50:26:894803][3569458752][DOCA][INF][mgmt_data_direct_sample.c:79][mgmt_data_direct_get] Data direct: ENABLED
For more details, please see the README file for doca_mgmt_data_direct, which is
available at /opt/mellanox/doca/samples/doca_mgmt/README.md.
Running a test using VF#
Prior to running the test, use the following command to verify that the VF is bound to the Host driver and the VF RDMA device is up.
$ echo <VF_BDF> > /sys/bus/pci/drivers/mlx5_core/bind
Run the following command to start a server process.
ib_write_bw -d <RDMA VF_device> -F --report_gbits -D 30 --use_cuda_bus_id=<GPU> --use_cuda_dmabuf --use_data_direct -p 18001 --qp=4
Run the following command to start a client process.
ib_write_bw -d <RDMA VF_device> -F --report_gbits -D 30 --use_cuda_bus_id=<GPU> --use_cuda_dmabuf --use_data_direct -p 18001 --qp=4 <server_ip/hostname>