Virtual Routing and Forwarding - VRF
Cumulus Linux provides virtual routing and forwarding (VRF) to allow for the presence of multiple independent routing tables working simultaneously on the same router or switch. This permits multiple network paths without the need for multiple switches. Think of this feature as VLAN for layer 3, but unlike VLANs, there is no field in the IP header carrying it. Other implementations call this feature VRF-Lite.
The primary use cases for VRF in a data center are similar to VLANs at layer 2: using common physical infrastructure to carry multiple isolated traffic streams for multi-tenant environments, where these streams are allowed to cross over only at configured boundary points, typically firewalls or IDS. You can also use it to burst traffic from private clouds to enterprise networks where the burst point is at layer 3. Or you can use it in an OpenStack deployment.
VRF is fully supported in the Linux kernel, so it has the following characteristics:
- The VRF is presented as a layer 3 master network device with its own associated routing table.
- The layer 3 interfaces (VLAN interfaces, bonds, switch virtual interfaces/SVIs) associated with the VRF are enslaved to that VRF; IP rules direct FIB (forwarding information base) lookups to the routing table for the VRF device.
- The VRF device can have its own IP address, known as a VRF-local loopback.
- Applications can use existing interfaces to operate in a VRF context - by
binding sockets to the VRF device or passing the
ifindexusingcmsg. By default, applications on the switch run against the default VRF. Services started bysystemdrun in the default VRF unless the VRF instance is used. If management VRF is enabled, logins to the switch default to the management VRF. This is a convenience for users to not have to specify management VRF for each command. - Listen sockets used by services are VRF-global by default unless the application is configured to use a more limited scope - for example, read about services in the management VRF. Connected sockets (like TCP) are then bound to the VRF domain in which the connection originates. The kernel provides a sysctl that allows a single instance to accept connections over all VRFs. For TCP, connected sockets are bound to the VRF the first packet was received. This sysctl is enabled for Cumulus Linux.
- Connected and local routes are placed in appropriate VRF tables.
- Neighbor entries continue to be per-interface, and you can view all entries associated with the VRF device.
- A VRF does not map to its own network namespace; however, you can nest VRFs in a network namespace.
- You can use existing Linux tools to interact with it, such as
tcpdump.
Cumulus Linux supports up to 255 VRFs on a switch.
You configure VRF by associating each subset of interfaces to a VRF routing table, and configuring an instance of the routing protocol - BGP or OSPFv2 - for each routing table.
Configure VRF
Each routing table is called a VRF table, and has its own table ID. You configure VRF using NCLU, then place the layer 3 interface in the VRF. You can have a maximum of 255 VRFs on a switch.
When you configure a VRF, you follow a similar process to other network interfaces. Keep in mind the following for a VRF table:
- It can have an IP address, a loopback interface for the VRF.
- Associated rules are added automatically.
- You can also add a default route to avoid skipping across tables when the kernel forwards the packet.
- Names for VRF tables can be a maximum of 15 characters. You cannot use the name
mgmt; Cumulus Linux uses this name for the management VRF. Also, you cannot use these reserved names:default,unspec,main, orlocal.
To configure a VRF, run:
cumulus@switch:~$ net add vrf rocket vrf-table auto
cumulus@switch:~$ net add interface swp1 vrf rocket
cumulus@switch:~$ net pending
cumulus@switch:~$ net commit
These commands result in the following VRF configuration in the
/etc/network/interfaces file:
auto swp1
iface swp1
    vrf rocket

auto rocket
iface rocket
    vrf-table auto
Specify a Table ID
Instead of having Cumulus Linux assign a table ID for the VRF table, you
can specify your own table ID in the configuration. The table ID to name
mapping is saved in /etc/iproute2/rt_tables.d/ for name-based
references. So instead of using the auto option above, specify the
table ID like this:
cumulus@switch:~$ net add vrf rocket vrf-table 1016
cumulus@switch:~$ net pending
cumulus@switch:~$ net commit
If you do specify a table ID, it must be in the range of 1001 to 1255 which is reserved in Cumulus Linux for VRF table IDs.
Bring a VRF Up after Downing It with ifdown
If you take down a VRF using ifdown, to bring it back up you need to
do one of two things:
- Use
ifup --with-depends <vrf> - Use
ifreload -a
For example:
cumulus@switch:~$ sudo ifdown rocket
cumulus@switch:~$ sudo ifup --with-depends rocket
vrf Command
The vrf command returns information about VRF tables that is otherwise
not available in other Linux commands, such as iproute. You can also
use it to execute non-VRF-specific commands and perform other tasks
related to VRF tables.
To get a list of VRF tables, run:
cumulus@switch:~$ vrf list

VRF              Table
---------------- -----
rocket            1016
To return a list of processes and PIDs associated with a specific VRF
table, run ip vrf pids <vrf-name>. For example:
cumulus@switch:~$ ip vrf pids rocket

VRF: rocket
-----------------------
dhclient           2508
sshd               2659
bash               2681
su                 2702
bash               2720
vrf                2829
To determine which VRF table is associated with a particular PID, run
ip vrf identify <pid>. For example:
cumulus@switch:~$ ip vrf identify 2829

rocket
IPv4 and IPv6 Commands in a VRF Context
You can execute non-VRF-specific Linux commands and perform other tasks
against a given VRF table. This typically applies to single-use commands
started from a login shell, as they affect only AF_INET and AF_INET6
sockets opened by the command that gets executed; it has no impact on
netlink sockets, associated with the ip command.
To execute such a command against a VRF table, run
ip vrf exec <vrf-name> <command>. For example, to SSH from the switch
to a device accessible through VRF rocket:
cumulus@switch:~$ sudo ip vrf exec rocket ssh user@host
You should manage long-running services with systemd using the
service@vrf notation; for example, systemctl start ntp@mgmt.
systemd-based services are stopped when a VRF is deleted and started
when the VRF is created. For example, restarting networking or running
an ifdown/ifup sequence.
Services in VRFs
For services that need to run against a specific VRF, Cumulus Linux uses
systemd instances, where the instance is the VRF. In general, you
start a service within a VRF like this:
cumulus@switch:~$ sudo systemctl start <service>@<vrf>
For example, you can run the NTP service in the turtle VRF using:
cumulus@switch:~$ sudo systemctl start ntp@turtle
In most cases, the instance running in the default VRF needs to be
stopped before a VRF instance can start. This is because the instance
running in the default VRF owns the port across all VRFs - that is, it
is VRF global. systemd-based services are stopped when the VRF is
deleted and started when the VRF is created. For example, when you
restart networking or run an ifdown/ifup sequence - as mentioned above. The
management VRF chapter
details how to do this.
In Cumulus Linux, the following services work with VRF instances:
chef-clientcollectddhcpddhcrelayhsflowdnetq-agentntppuppetsnmptrapdsshzabbix-agent
There are cases where systemd instances do not work; you must use a
service-specific configuration option instead. For example, you can
configure rsyslogd to send messages to remote systems over a VRF:
action(type="omfwd" Target="hostname or ip here" Device="mgmt" Port=514
Protocol="udp")
VRF Route Leaking
The most common use case for VRF is to use multiple independent routing and forwarding tables; however, there are situations where destinations in one VRF must be reachable (leaked) from another VRF. For example, to make a service (such as a firewall) available to multiple VRFs or to enable routing to external networks (or the Internet) for multiple VRFs, where the external network itself is reachable through a specific VRF.
Cumulus Linux provides two options for route leaking across VRFs: static route leaking and dynamic route leaking.
- An interface is always assigned to only one VRF; any packets received on that interface are routed using the associated VRF routing table.
- Route leaking is not allowed for overlapping addresses.
- Route leaking is supported for both IPv4 and IPv6 routes.
- Do not mix static and dynamic route leaking in a fabric.
- Dynamic route leaking should be used in favor of static route leaking, as it replaces the older static VRF route leaking feature.
- VRF route leaking is not supported between the tenant VRF and the default VRF with onlink next hops (BGP unnumbered).
- The NCLU command to configure route leaking fails if the VRF is named
red(lowercase letters only). This is not a problem if the VRF is namedRED(uppercase letters) or has a name other than red.
To work around this issue, rename the VRF or run thevtyshcommand instead.
This is a known limitation innetwork-docopt.
Configure Static Route Leaking
For static route leaking, you configure routes manually in a VRF whose next hops are reachable over an interface that is part of another VRF. This is useful where one or more specific destinations in a different VRF need to be reachable from another VRF. You can use static route leaking to reach remote destinations (through a next hop router) or directly-connected destinations in another VRF.
Consider using dynamic route leaking instead of static route leaking. Dynamic route leaking is easier to configure, easier to maintain (static route leaking configuration requires changes when you want to leak new routes), and supports route maps for better control. See Configure Dynamic Route Leaking.
To configure static route leaking in a non-EVPN configuration, follow the steps below. To configure static route leaking with EVPN, see Configure Static Route Leaking with EVPN.
In the
/etc/cumulus/switchd.conffile, change thevrf_route_leak_enableoption toTRUEand uncomment the line. Then, restartswitchdfor the change to take effect.cumulus@switch:~$ sudo nano /etc/cumulus/switchd.conf ... #static vrf route leak enable vrf_route_leak_enable = TRUE vrf_route_leak_enable_dynamic = falsecumulus@switch:~$ sudo systemctl restart switchd.service
Restarting the
switchdservice causes all network ports to reset, interrupting network services, in addition to resetting the switch hardware configuration.Set only the
vrf_route_leak_enableoption toTRUEfor static VRF route leaking (make surevrf_route_leak_enable_dynamicis set to false, as that is used only for dynamic route leaking.Use the keyword
nexthop-vrfto specify the VRF through which the next hop router is reachable. The example command below adds a static route (10.1.0.0/24) to a VRF namedturtle, which is reachable through a next-hop router (192.168.200.1) over a different VRF,rocket.cumulus@switch:~$ net add routing route 10.1.0.0/24 192.168.200.1 vrf turtle nexthop-vrf rocket cumulus@switch:~$ net pending cumulus@switch:~$ net commit
Configure Static Route Leaking with EVPN
Static route leaking is supported with EVPN symmetric routing only.
You cannot leak the default route.
To configure static route leaking with EVPN symmetric routing:
Enable VRF route leaking, as shown in step 1 of configure-static-routing above.
Configure static route leaking for EVPN. The following commands provide examples.
To configure static route leaking between VRF1 and VRF2, where VRF1 contains subnets 10.50.1.0/24, 10.50.2.0/24, 10.50.3.0/24, and 10.50.4.0/24 and VRF2 contains subnets 10.60.1.0/24, 10.60.2.0/24, 10.60.3.0/24, and 10.60.4.0/24, run these commands:
cumulus@switch:~$ net add routing route 10.60.0.0/21 vrf2 vrf vrf1 nexthop-vrf vrf2
cumulus@switch:~$ net add routing route 10.50.0.0/21 vrf1 vrf vrf2 nexthop-vrf vrf1
cumulus@switch:~$ net pending
cumulus@switch:~$ net commit
To configure static route leaking between the default VRF and VRF1, where swp1s0 is the egress port for subnets under 10.10.0.0/16 in the default VRF, run these commands:
cumulus@switch:~$ net add routing route 10.10.0.0/16 swp1s0 vrf vrf1 nexthop-vrf default-IP-Routing-Table
cumulus@switch:~$ net add routing route 10.50.0.0/21 vrf1 nexthop-vrf vrf1
cumulus@switch:~$ net pending
cumulus@switch:~$ net commit
Configure Dynamic Route Leaking
For dynamic route leaking, a destination VRF is interested in the routes of a source VRF. As routes come and go in the source VRF, they are dynamically leaked to the destination VRF through BGP. If the routes in the source VRF are learned through BGP, no additional configuration is necessary. If the routes in the source VRF are learned through OSPF, or if they are statically configured or directly-connected networks have to be reached, the routes need to be first redistributed into BGP (in the source VRF) for them to be leaked.
You can also use dynamic route leaking to reach remote destinations as well as directly connected destinations in another VRF. Multiple VRFs can import routes from a single source VRF and a VRF can import routes from multiple source VRFs. This is typically used when a single VRF provides connectivity to external networks or a shared service for many other VRFs.
You can control the routes that are leaked dynamically across VRFs with a route-map.
Because dynamic route leaking happens through BGP, the underlying mechanism relies on the BGP constructs of the Route Distinguisher (RD) and Route Targets (RTs). However, you do not need to configure these parameters; they are automatically derived when you enable route leaking between a pair of VRFs.
- Dynamic route leaking with EVPN is supported in Cumulus Linux 3.7.4 and later.
- You cannot reach the loopback address of a VRF (the address assigned to the VRF device) from another VRF.
- When using dynamic route leaking, you must use the
redistributecommand in BGP to leak non-BGP routes (connected or static routes); you cannot use thenetworkcommand. - Routes in the management VRF with the next-hop as eth0 or the management interface are not leaked.
- Routes learned with iBGP or multi-hop eBGP in a VRF can be leaked even if their next hops become unreachable. Therefore, route leaking for BGP-learned routes is recommended only when they are learned through single-hop eBGP.
- You cannot configure VRF instances of BGP in multiple autonomous systems (AS) or an AS that is not the same as the global AS.
- Do not use the default VRF as a shared service VRF. Create another VRF for shared services.
- An EVPN symmetric routing configuration on a Mellanox switch with a Spectrum ASIC or a Broadcom switch has certain limitations when leaking routes between the default VRF and non-default VRFs. The default VRF has underlay routes (routes to VTEP addresses) that cannot be leaked to any tenant VRFs. If you need to leak routes between the default VRF and a non-default VRF, you must filter out routes to the VTEP addresses to prevent leaking these routes. Use caution with such a configuration. Run common services in a separate VRF (service VRF) instead of the default VRF to simplify configuration and avoid using route-maps for filtering.
In the
/etc/cumulus/switchd.conffile, change thevrf_route_leak_enable_dynamicoption toTRUEand uncomment the line. Then, restartswitchdfor the change to take effect.cumulus@switch:~$ sudo nano /etc/cumulus/switchd.conf ... #static vrf route leak enable vrf_route_leak_enable = false vrf_route_leak_enable_dynamic = TRUEcumulus@switch:~$ sudo systemctl restart switchd.service
Restarting the
switchdservice causes all network ports to reset, interrupting network services, in addition to resetting the switch hardware configuration.Set only the
vrf_route_leak_enable_dynamicoption toTRUEfor dynamic VRF route leaking (make surevrf_route_leak_enableis set to false, as that is used only for static route leaking.Use NCLU to configure dynamic route leaking. For example, in the commands below, routes in the BGP routing table of VRF
rocketare dynamically leaked into VRFturtle.cumulus@switch:~$ net add bgp vrf rocket autonomous-system 65001 cumulus@switch:~$ net add bgp vrf turtle autonomous-system 65001 cumulus@switch:~$ net add bgp vrf turtle ipv4 unicast import vrf rocket cumulus@switch:~$ net pending cumulus@switch:~$ net commit
The NCLU commands save the configuration in the /etc/frr/frr.conf
file. For example:
cumulus@leaf01:~$ sudo cat /etc/frr/frr.conf
...

hostname leaf01
log syslog informational
service integrated-vtysh-config
!
router bgp 65001 vrf rocket
 !
 address-family l2vpn evpn
 exit-address-family
!
router bgp 65001 vrf turtle
 !
 address-family ipv4 unicast
  import vrf rocket
 exit-address-family
 !
 address-family l2vpn evpn
 exit-address-family
!
router bgp 65001
!
line vty
!
Exclude Certain Prefixes
To exclude certain prefixes from being imported, you can use a route map.
The following example configures a route map to match the source
protocol BGP and imports the routes from VRF turtle to VRF rocket.
For the imported routes, the community is set to 11:11 in VRF rocket.
cumulus@switch:~$ net add bgp vrf rocket ipv4 unicast import vrf turtle
cumulus@switch:~$ net add routing route-map turtle-to-rocket-IPV4 permit 10
cumulus@switch:~$ net add routing route-map turtle-to-rocket-IPV4 permit 10 match source-protocol bgp
cumulus@switch:~$ net add routing route-map turtle-to-rocket-IPV4 permit 10 set community 11:11
cumulus@switch:~$ net add bgp vrf rocket ipv4 unicast import vrf route-map turtle-to-rocket-IPV4
cumulus@switch:~$ net pending
cumulus@switch:~$ net commit
Dynamic Route Leaking Between VRFs where Subnets Extend across Racks
When you configure dynamic VRF route leaking to leak routes between VRFs, especially in an EVPN deployment where subnets are extended across racks, be aware of following considerations:
- If end systems (hosts or VMs) are present in one VRF at the router where route leaking is configured that need to be reached from another VRF, you must configure the router to announce a subnet route for the corresponding subnet. Either redistribute the connected subnets into BGP or inject the specific subnet into BGP in the source VRF. This step is necessary because VRF route leaking only leaks routes in the BGP VRF routing table from one VRF into another, which includes only subnet routes and remote host routes, but not routes to local hosts.
- If the leaked routes are being aggregated in the target VRF for route announcement, and if the aggregate matches with a subnet being leaked, you need to configure static routes for the local hosts either in the source VRF or in the destination VRF. Without this configuration, when the aggregate becomes active in the target VRF due to the presence of more-specific contributing leaked routes, a blackhole/discard route is installed in the target VRF, and because this matches one of the leaked subnets, connectivity to any local hosts in that subnet is lost from the target VRF.
Verify Dynamic Route Leaking Configuration
To check the status of dynamic VRF route leaking, run the NCLU
net show bgp vrf <vrf-name> ipv4|ipv6 unicast route-leak command.
For example:
cumulus@switch:~$ net show bgp vrf turtle ipv4 unicast route-leak
This VRF is importing IPv4 Unicast routes from the following VRFs:
  rocket
Import RT(s): 0.0.0.0:3
This VRF is exporting IPv4 Unicast routes to the following VRFs:
  rocket
RD: 10.1.1.1:2
Export RT: 10.1.1.1:2
- To view the BGP routing table, run the NCLU
net show bgp vrf <vrf-name> ipv4|ipv6 unicastcommand. - To view the FRR IP routing table, run the NCLU
net show route vrf <vrf-name>command. This command shows all routes, including routes leaked from other VRFs.
The following example command shows all routes in VRF turtle,
including routes leaked from VRF rocket:
cumulus@switch:~$ net show route vrf turtle
Codes: K - kernel route, C - connected, S - static, R - RIP,
       O - OSPF, I - IS-IS, B - BGP, P - PIM, E - EIGRP, N - NHRP,
       T - Table, v - VNC, V - VNC-Direct, A - Babel, D - SHARP,
       F - PBR,
       > - selected route, * - FIB route

VRF turtle:
K * 0.0.0.0/0 [255/8192] unreachable (ICMP unreachable), 6d07h01m
C>* 10.1.1.1/32 is directly connected, turtle, 6d07h01m
B>* 10.0.100.1/32 [200/0] is directly connected, rocket(vrf rocket), 6d05h10m
B>* 10.0.200.0/24 [20/0] via 10.10.2.2, swp1.11, 5d05h10m
B>* 10.0.300.0/24 [200/0] via 10.20.2.2, swp1.21(vrf rocket), 5d05h10m
C>* 10.10.2.0/30 is directly connected, swp1.11, 6d07h01m
C>* 10.10.3.0/30 is directly connected, swp2.11, 6d07h01m
C>* 10.10.4.0/30 is directly connected, swp3.11, 6d07h01m
B>* 10.20.2.0/30 [200/0] is directly connected, swp1.21(vrf rocket), 6d05h10m
Delete Dynamic Route Leaking Configuration
To remove dynamic route leaking configuration, run the following commands. These commands ensure that all leaked routes are removed and routes are no longer leaked from the specified source VRF.
The following example commands delete leaked routes from VRF rocket to
VRF turtle:
cumulus@switch:~$ net del bgp vrf turtle ipv4 unicast import vrf rocket
cumulus@switch:~$ net pending
cumulus@switch:~$ net commit
Do not use the kernel commands; they are no longer supported and might cause issues when used with VRF route leaking in FRR.
FRRouting Operation in a VRF
In Cumulus Linux 3.5 and later, BGP, OSPFv2 and static routing (IPv4 and IPv6) are supported within a VRF context. Various FRRouting routing constructs, such as routing tables, next hops, router-id, and related processing are also VRF-aware.
FRRouting learns of VRFs provisioned on the system as well as interface attachment to a VRF through notifications from the kernel.
You can assign switch ports to each VRF table with an interface-level configuration, and BGP instances can be assigned to the table with a BGP router-level command.
Because BGP is VRF-aware, they support per-VRF neighbors, both iBGP and eBGP as well as numbered and unnumbered interfaces. Non-interface-based VRF neighbors are bound to the VRF, which is how you can have overlapping address spaces in different VRFs. Each VRF can have its own parameters, such as address families and redistribution. Incoming connections rely on the Linux kernel for VRF-global sockets. BGP neighbors can be tracked using BFD, both for single and multiple hops. You can configure multiple BGP instances, associating each with a VRF.
A VRF-aware OSPFv2 configuration also supports numbered and unnumbered interfaces. Supported layer 3 interfaces include SVIs, sub-interfaces and physical interfaces. The VRF supports types 1 through 5 (ABR/ASBR - external LSAs) and types 9 through 11 (opaque LSAs) link state advertisements, redistributing other routing protocols, connected and static routes, and route maps. As with BGP, you can track OSPF neighbors with BFD.
Cumulus Linux does not support multiple VRFs in multi-instance OSPF.
VRFs are provisioned using NCLU. VRFs can be pre-provisioned in FRRouting too, but they become active only when configured with NCLU.
- You pre-provision a VRF in FRRouting by running the command
vrf vrf-name. - A BGP instance corresponding to a VRF can be pre-provisioned by
configuring
net add bgp vrf <VRF> autonomous-system <ASN>. Under this context, all existing BGP parameters can be configured: neighbors, peer-groups, address-family configuration, redistribution, and so forth. - An OSPFv2 instance can be configured using the
net add ospf vrf <VRF>command; as with BGP, all OSPFv2 parameters can be configured. - Static routes (IPv4 and IPv6) can be provisioned in a VRF by
specifying the VRF along with the static route configuration. For
example,
ip route prefix dev vrf vrf-name. The VRF has to exist for this configuration to be accepted - either already defined through/etc/network/interfacesor pre-provisioned in FRRouting. If you want to leak a static route in a VRF, see the note above.
Example BGP and OSPF Configurations
Here’s an example VRF configuration in BGP:
cumulus@switch:~$ net add bgp vrf vrf1012 autonomous-system 64900
cumulus@switch:~$ net add bgp vrf vrf1012 router-id 6.0.2.7
cumulus@switch:~$ net add bgp vrf vrf1012 neighbor ISL peer-group
cumulus@switch:~$ net add bgp vrf vrf1012 neighbor ISLv6 peer-group
cumulus@switch:~$ net add bgp vrf vrf1012 neighbor swp1.2 interface v6only peer-group ISLv6
cumulus@switch:~$ net add bgp vrf vrf1012 neighbor swp1.2 remote-as external
cumulus@switch:~$ net add bgp vrf vrf1012 neighbor swp3.2 interface v6only peer-group ISLv6
cumulus@switch:~$ net add bgp vrf vrf1012 neighbor swp3.2 remote-as external
cumulus@switch:~$ net add bgp vrf vrf1012 neighbor 169.254.2.18 remote-as external
cumulus@switch:~$ net add bgp vrf vrf1012 neighbor 169.254.2.18 peer-group ISL
cumulus@switch:~$ net add bgp vrf vrf1012 ipv4 unicast network 20.7.2.0/24
cumulus@switch:~$ net add bgp vrf vrf1012 ipv4 unicast neighbor ISL activate
cumulus@switch:~$ net add bgp vrf vrf1012 neighbor ISL route-map ALLOW_BR2 out
cumulus@switch:~$ net add bgp vrf vrf1012 ipv6 unicast network 2003:7:2::/125
cumulus@switch:~$ net add bgp vrf vrf1012 ipv6 unicast neighbor ISLv6 activate
cumulus@switch:~$ net add bgp vrf vrf1012 neighbor ISLv6 route-map ALLOW_BR2_v6 out
These commands produce the following configuration in the /etc/frr/frr.conf file.
router bgp 64900 vrf vrf1012
  bgp router-id 6.0.2.7
  no bgp default ipv4-unicast
  neighbor ISL peer-group
  neighbor ISLv6 peer-group
  neighbor swp1.2 interface v6only peer-group ISLv6
  neighbor swp1.2 remote-as external
  neighbor swp3.2 interface v6only peer-group ISLv6
  neighbor swp3.2 remote-as external
  neighbor 169.254.2.18 remote-as external
  neighbor 169.254.2.18 peer-group ISL
  !
  address-family ipv4 unicast
    network 20.7.2.0/24
    neighbor ISL activate
    neighbor ISL route-map ALLOW_BR2 out
  exit-address-family
  !
  address-family ipv6 unicast
    network 2003:7:2::/125
    neighbor ISLv6 activate
    neighbor ISLv6 route-map ALLOW_BR2_v6 out
  exit-address-family
!
Here is the FRRouting OSPF configuration:
cumulus@switch:~$ net add ospf vrf vrf1
cumulus@switch:~$ net add ospf vrf vrf1 router-id 4.4.4.4
cumulus@switch:~$ net add ospf vrf vrf1 log-adjacency-changes detail
cumulus@switch:~$ net add ospf vrf vrf1 network 10.0.0.0/24 area 0.0.0.1
cumulus@switch:~$ net add ospf vrf vrf1 network 9.9.0.0/16 area 0.0.0.0
cumulus@switch:~$ net add ospf vrf vrf1 redistribute connected
cumulus@switch:~$ net add ospf vrf vrf1 redistribute bgp
cumulus@switch:~$ net add interface swp1 ospf network point-to-point
cumulus@switch:~$ net add interface swp2 ospf network point-to-point
cumulus@switch:~$ net pending
cumulus@switch:~$ net commit
These commands create the following configuration in the /etc/frr/frr.conf file:
!
interface swp1
 ip ospf network point-to-point
!
interface swp2
 ip ospf network point-to-point
!
router ospf vrf vrf1
 ospf router-id 4.4.4.4
 log-adjacency-changes detail
 redistribute connected
 redistribute bgp
 network 9.9.0.0/16 area 0.0.0.0
 network 10.0.0.0/24 area 0.0.0.1
!
Example Commands to Show VRF Data
There are a number of ways to interact with VRFs, including NCLU,
vtysh (the FRRouting CLI) and iproute2.
Show VRF Data Using NCLU Commands
To show the routes in the VRF:
cumulus@switch:~$ net show route vrf rocket
RIB entry for rocket
=================
Codes: K - kernel route, C - connected, S - static, R - RIP,
       O - OSPF, I - IS-IS, B - BGP, T - Table,
       > - selected route, * - FIB route

C>* 169.254.2.8/30 is directly connected, swp1.2
C>* 169.254.2.12/30 is directly connected, swp2.2
C>* 169.254.2.16/30 is directly connected, swp3.2
To show the BGP summary for the VRF:
cumulus@switch:~$ net show bgp vrf rocket summary
BGP router identifier 6.0.2.7, local AS number 64900 vrf-id 14
BGP table version 0
RIB entries 1, using 120 bytes of memory
Peers 6, using 97 KiB of memory
Peer groups 2, using 112 bytes of memory

Neighbor        V    AS MsgRcvd MsgSent   TblVer  InQ OutQ Up/Down  State/PfxRcd
s3(169.254.2.18)
                4 65000  102039  102040        0    0    0 3d13h03m        0
s1(169.254.2.10)
                4 65000  102039  102040        0    0    0 3d13h03m        0
s2(169.254.2.14)
                4 65000  102039  102040        0    0    0 3d13h03m        0

Total number of neighbors 3
To show BGP (IPv4) routes in the VRF:
cumulus@switch:~$ net show bgp vrf vrf1012
BGP table version is 0, local router ID is 6.0.2.7
Status codes: s suppressed, d damped, h history, * valid, > best, = multipath,
              i internal, r RIB-failure, S Stale, R Removed
Origin codes: i - IGP, e - EGP, ? - incomplete

   Network          Next Hop            Metric LocPrf Weight Path
   20.7.2.0/24      0.0.0.0                  0         32768 i

Total number of prefixes 1
However, to show BGP IPv6 routes in the VRF, you need to use vtysh,
the FRRouting CLI:
cumulus@switch:~$ sudo vtysh
switch# show bgp vrf vrf1012
BGP table version is 0, local router ID is 6.0.2.7
Status codes: s suppressed, d damped, h history, * valid, > best, = multipath,
              i internal, r RIB-failure, S Stale, R Removed
Origin codes: i - IGP, e - EGP, ? - incomplete

   Network          Next Hop            Metric LocPrf Weight Path
   2003:7:2::/125   ::                       0         32768 i

Total number of prefixes 1
switch# exit
cumulus@switch:~$
To show the OSPF VRFs:
cumulus@switch:~$ net show ospf vrf all
Name                                  Id         RouterId
Default-IP-Routing-Table              0          6.0.0.7
vrf1012                               45         9.9.12.7
vrf1013                               52         9.9.13.7
vrf1014                               59         9.9.14.7
vrf1015                               65535      0.0.0.0      <- OSPF instance not active, pre-provisioned config.
vrf1016                               65535      0.0.0.0

Total number of OSPF VRFs: 6
To show all the OSPF routes in a VRF:
cumulus@switch:~$ net show ospf vrf vrf1012 route
Codes: K - kernel route, C - connected, S - static, R - RIP,
       O - OSPF, I - IS-IS, B - BGP, P - PIM, E - EIGRP, N - NHRP,
       T - Table, v - VNC, V - VNC-Direct, A - Babel,
       > - selected route, * - FIB route

VRF vrf1012:
O>* 6.0.0.1/32 [110/210] via 200.254.2.10, swp2s0.2, 00:13:30
  *                      via 200.254.2.14, swp2s1.2, 00:13:30
  *                      via 200.254.2.18, swp2s2.2, 00:13:30
O>* 6.0.0.2/32 [110/210] via 200.254.2.10, swp2s0.2, 00:13:30
  *                      via 200.254.2.14, swp2s1.2, 00:13:30
  *                      via 200.254.2.18, swp2s2.2, 00:13:30
O>* 9.9.12.5/32 [110/20] via 200.254.2.10, swp2s0.2, 00:13:29
  *                      via 200.254.2.14, swp2s1.2, 00:13:29
  *                      via 200.254.2.18, swp2s2.2, 00:13:29
To show which interfaces are in a VRF (either BGP or OSPF), run the net show vrf list command. The following command shows which interfaces are
in the VRFs configured on the switch:
cumulus@switch:~$ net show vrf list
VRF: mgmt
--------------------
eth0              UP     a0:00:00:00:00:11 <BROADCAST,MULTICAST,UP,LOWER_UP>

VRF: turtle
--------------------
vlan13@bridge     UP     44:38:39:00:00:03 <BROADCAST,MULTICAST,UP,LOWER_UP>
vlan13-v0@vlan13  UP     44:39:39:ff:00:13 <BROADCAST,MULTICAST,UP,LOWER_UP>
vlan24@bridge     UP     44:38:39:00:00:03 <BROADCAST,MULTICAST,UP,LOWER_UP>
vlan24-v0@vlan24  UP     44:39:39:ff:00:24 <BROADCAST,MULTICAST,UP,LOWER_UP>
vlan4001@bridge   UP     44:39:39:ff:40:94 <BROADCAST,MULTICAST,UP,LOWER_UP>
To show the interfaces for a specific VRF, run the net show vrf list <vrf_name> command. The following
command shows which interfaces are in VRF turtle:
cumulus@switch:~$ net show vrf list turtle
VRF: turtle
--------------------
vlan13@bridge     UP      44:38:39:00:00:03 <BROADCAST,MULTICAST,UP,LOWER_UP>
vlan13-v0@vlan13  UP      44:39:39:ff:00:13 <BROADCAST,MULTICAST,UP,LOWER_UP>
vlan24@bridge     UP      44:38:39:00:00:03 <BROADCAST,MULTICAST,UP,LOWER_UP>
vlan24-v0@vlan24  UP      44:39:39:ff:00:24 <BROADCAST,MULTICAST,UP,LOWER_UP>
vlan4001@bridge   UP      44:39:39:ff:40:94 <BROADCAST,MULTICAST,UP,LOWER_UP>
You can only specify one VRF with the net show vrf list <vrf_name>
command. For example, net show vrf list mgmt turtle is an invalid
command.
To show the VNIs for the interfaces in a VRF, run the net show vrf vni command. For example:
cumulus@switch:~$ net show vrf vni
VRF         VNI     VxLAN IF    L3-SVI    State  Rmac
turtle      104001  vxlan4001   vlan4001  Up     44:39:39:ff:40:94
To see the VNIs for the interfaces in a
VRF in JSON format, run the net show vrf vni json command. For example:
cumulus@switch:~$ net show vrf vni json
{
  "vrfs":[
    {
      "vrf":"turtle",
      "vni":104001,
      "vxlanIntf":"vxlan4001",
      "sviIntf":"vlan4001",
      "state":"Up",
      "routerMac":"44:39:39:ff:40:94"
    }
  ]
}
Show VRF Data Using FRRouting Commands
Show all VRFs learned by FRRouting from the kernel. The table ID shows the corresponding routing table in the kernel either automatically assigned or manually defined:
cumulus@switch:~$ sudo vtysh
switch# show vrf
vrf vrf1012 id 14 table 1012
vrf vrf1013 id 21 table 1013
vrf vrf1014 id 28 table 1014
switch# exit
cumulus@switch:~$
Show VRFs configured in BGP, including the default. A non-zero ID is a
VRF that has also been actually provisioned - that is, defined in
/etc/network/interfaces:
cumulus@switch:~$ sudo vtysh
switch# show bgp vrfs
Type  Id     RouterId          #PeersCfg  #PeersEstb  Name
DFLT  0      6.0.0.7                   0           0  Default
 VRF  14     6.0.2.7                   6           6  vrf1012
 VRF  21     6.0.3.7                   6           6  vrf1013
 VRF  28     6.0.4.7                   6           6  vrf1014

Total number of VRFs (including default): 4
switch# exit
cumulus@switch:~$
Display interfaces known to FRRouting and attached to this VRF:
cumulus@switch:~$ sudo vtysh
switch# show interface vrf vrf1012
Interface br2 is up, line protocol is down
  PTM status: disabled
  vrf: vrf1012
  index 13 metric 0 mtu 1500
  flags: <UP,BROADCAST,MULTICAST>
  inet 20.7.2.1/24

  inet6 fe80::202:ff:fe00:a/64
  ND advertised reachable time is 0 milliseconds
  ND advertised retransmit interval is 0 milliseconds
  ND router advertisements are sent every 600 seconds
  ND router advertisements lifetime tracks ra-interval
  ND router advertisement default router preference is medium
  Hosts use stateless autoconfig for addresses.
switch# exit
cumulus@switch:~$
To show VRFs configured in OSPF:
cumulus@switch:~$ sudo vtysh
switch# show ip ospf vrfs
Name                            Id     RouterId
Default-IP-Routing-Table        0      0.0.0.0
rocket                          57     0.0.0.10
turtle                          58     0.0.0.20
Total number of OSPF VRFs (including default): 3
switch# exit
cumulus@switch:~$
To show all OSPF routes in a VRF:
cumulus@switch:~$ sudo vtysh
switch# show ip ospf vrf all route
============ OSPF network routing table ============
N    7.0.0.0/24            [10] area: 0.0.0.0
                           directly attached to swp2

============ OSPF router routing table =============

============ OSPF external routing table ===========

============ OSPF network routing table ============
N    8.0.0.0/24            [10] area: 0.0.0.0
                           directly attached to swp1

============ OSPF router routing table =============

============ OSPF external routing table ===========

switch# exit
cumulus@switch:~$
To see the routing table for each VRF, use the show up route vrf all
command. The OSPF route is denoted in the row that starts with O:
cumulus@switch:~$ sudo vtysh
switch# show ip route vrf all
Codes: K - kernel route, C - connected, S - static, R - RIP,
       O - OSPF, I - IS-IS, B - BGP, P - PIM, E - EIGRP, N - NHRP,
       T - Table, v - VNC, V - VNC-Direct, A - Babel,
       > - selected route, * - FIB route
VRF turtle:
K>* 0.0.0.0/0 [0/8192] unreachable (ICMP unreachable)
O   7.0.0.0/24 [110/10] is directly connected, swp2, 00:28:35
C>* 7.0.0.0/24 is directly connected, swp2
C>* 7.0.0.5/32 is directly connected, turtle
C>* 7.0.0.100/32 is directly connected, turtle
C>* 50.1.1.0/24 is directly connected, swp31s1
VRF rocket:
K>* 0.0.0.0/0 [0/8192] unreachable (ICMP unreachable)
O
8.0.0.0/24 [110/10]
is directly connected, swp1, 00:23:26
C>* 8.0.0.0/24 is directly connected, swp1
C>* 8.0.0.5/32 is directly connected, rocket
C>* 8.0.0.100/32 is directly connected, rocket
C>* 50.0.1.0/24 is directly connected, swp31s0
switch# exit
cumulus@switch:~$
Show VRF Data Using ip Commands
To list all VRFs provisioned, showing the VRF ID (vrf1012, vrf1013 and vrf1014 below) as well as the table ID:
cumulus@switch:~$ ip -d link show type vrf
14: vrf1012: <NOARP,MASTER,UP,LOWER_UP> mtu 1500 qdisc pfifo_fast state UNKNOWN mode DEFAULT group default qlen 1000
    link/ether 46:96:c7:64:4d:fa brd ff:ff:ff:ff:ff:ff promiscuity 0
    vrf table 1012 addrgenmode eui64
21: vrf1013: <NOARP,MASTER,UP,LOWER_UP> mtu 1500 qdisc pfifo_fast state UNKNOWN mode DEFAULT group default qlen 1000
    link/ether 7a:8a:29:0f:5e:52 brd ff:ff:ff:ff:ff:ff promiscuity 0
    vrf table 1013 addrgenmode eui64
28: vrf1014: <NOARP,MASTER,UP,LOWER_UP> mtu 1500 qdisc pfifo_fast state UNKNOWN mode DEFAULT group default qlen 1000
    link/ether e6:8c:4d:fc:eb:b1 brd ff:ff:ff:ff:ff:ff promiscuity 0
    vrf table 1014 addrgenmode eui64
To list the interfaces attached to a specific VRF:
cumulus@switch:~$ ip -d link show vrf vrf1012
8: swp1.2@swp1: <BROADCAST,MULTICAST,UP,LOWER_UP> mtu 1500 qdisc noqueue master vrf1012 state UP mode DEFAULT group default
    link/ether 00:02:00:00:00:07 brd ff:ff:ff:ff:ff:ff promiscuity 0
    vlan protocol 802.1Q id 2 <REORDER_HDR>
    vrf_slave addrgenmode eui64
9: swp2.2@swp2: <BROADCAST,MULTICAST,UP,LOWER_UP> mtu 1500 qdisc noqueue master vrf1012 state UP mode DEFAULT group default
    link/ether 00:02:00:00:00:08 brd ff:ff:ff:ff:ff:ff promiscuity 0
    vlan protocol 802.1Q id 2 <REORDER_HDR>
    vrf_slave addrgenmode eui64
10: swp3.2@swp3: <BROADCAST,MULTICAST,UP,LOWER_UP> mtu 1500 qdisc noqueue master vrf1012 state UP mode DEFAULT group default
    link/ether 00:02:00:00:00:09 brd ff:ff:ff:ff:ff:ff promiscuity 0
    vlan protocol 802.1Q id 2 <REORDER_HDR>
    vrf_slave addrgenmode eui64
11: swp4.2@swp4: <BROADCAST,MULTICAST,UP,LOWER_UP> mtu 1500 qdisc noqueue master vrf1012 state UP mode DEFAULT group default
    link/ether 00:02:00:00:00:0a brd ff:ff:ff:ff:ff:ff promiscuity 0
    vlan protocol 802.1Q id 2 <REORDER_HDR>
    vrf_slave addrgenmode eui64
12: swp5.2@swp5: <BROADCAST,MULTICAST,UP,LOWER_UP> mtu 1500 qdisc noqueue master vrf1012 state UP mode DEFAULT group default
    link/ether 00:02:00:00:00:0b brd ff:ff:ff:ff:ff:ff promiscuity 0
    vlan protocol 802.1Q id 2 <REORDER_HDR>
    vrf_slave addrgenmode eui64
13: br2: <NO-CARRIER,BROADCAST,MULTICAST,UP> mtu 1500 qdisc noqueue master vrf1012 state DOWN mode DEFAULT group default
    link/ether 00:00:00:00:00:00 brd ff:ff:ff:ff:ff:ff promiscuity 0
    bridge forward_delay 100 hello_time 200 max_age 2000 ageing_time 30000 stp_state 0 priority 32768
    vlan_filtering 0 vlan_protocol 802.1Q bridge_id 8000.0:0:0:0:0:0 designated_root 8000.0:0:0:0:0:0
    root_port 0 root_path_cost 0 topology_change 0 topology_change_detected 0 hello_timer    0.00
    tcn_timer    0.00 topology_change_timer    0.00 gc_timer  202.23 vlan_default_pvid 1 group_fwd_mask 0
    group_address 01:80:c2:00:00:00 mcast_snooping 1 mcast_router 1 mcast_query_use_ifaddr 0 mcast_querier 0
    mcast_hash_elasticity 4096 mcast_hash_max 4096 mcast_last_member_count 2 mcast_startup_query_count 2
    mcast_last_member_interval 100 mcast_membership_interval 26000 mcast_querier_interval 25500
    mcast_query_interval 12500 mcast_query_response_interval 1000 mcast_startup_query_interval 3125
    nf_call_iptables 0 nf_call_ip6tables 0 nf_call_arptables 0
    vrf_slave addrgenmode eui64
To show IPv4 routes in a VRF:
cumulus@switch:~$ ip route show table vrf1012
unreachable default  metric 240
broadcast 20.7.2.0 dev br2  proto kernel  scope link  src 20.7.2.1 dead linkdown
20.7.2.0/24 dev br2  proto kernel  scope link  src 20.7.2.1 dead linkdown
local 20.7.2.1 dev br2  proto kernel  scope host  src 20.7.2.1
broadcast 20.7.2.255 dev br2  proto kernel  scope link  src 20.7.2.1 dead linkdown
broadcast 169.254.2.8 dev swp1.2  proto kernel  scope link  src 169.254.2.9
169.254.2.8/30 dev swp1.2  proto kernel  scope link  src 169.254.2.9
local 169.254.2.9 dev swp1.2  proto kernel  scope host  src 169.254.2.9
broadcast 169.254.2.11 dev swp1.2  proto kernel  scope link  src 169.254.2.9
broadcast 169.254.2.12 dev swp2.2  proto kernel  scope link  src 169.254.2.13
169.254.2.12/30 dev swp2.2  proto kernel  scope link  src 169.254.2.13
local 169.254.2.13 dev swp2.2  proto kernel  scope host  src 169.254.2.13
broadcast 169.254.2.15 dev swp2.2  proto kernel  scope link  src 169.254.2.13
broadcast 169.254.2.16 dev swp3.2  proto kernel  scope link  src 169.254.2.17
169.254.2.16/30 dev swp3.2  proto kernel  scope link  src 169.254.2.17
local 169.254.2.17 dev swp3.2  proto kernel  scope host  src 169.254.2.17
broadcast 169.254.2.19 dev swp3.2  proto kernel  scope link  src 169.254.2.17
To show IPv6 routes in a VRF:
cumulus@switch:~$ ip -6 route show table vrf1012
local fe80:: dev lo  proto none  metric 0  pref medium
local fe80:: dev lo  proto none  metric 0  pref medium
local fe80:: dev lo  proto none  metric 0  pref medium
local fe80:: dev lo  proto none  metric 0  pref medium
local fe80::202:ff:fe00:7 dev lo  proto none  metric 0  pref medium
local fe80::202:ff:fe00:8 dev lo  proto none  metric 0  pref medium
local fe80::202:ff:fe00:9 dev lo  proto none  metric 0  pref medium
local fe80::202:ff:fe00:a dev lo  proto none  metric 0  pref medium
fe80::/64 dev br2  proto kernel  metric 256 dead linkdown  pref medium
fe80::/64 dev swp1.2  proto kernel  metric 256  pref medium
fe80::/64 dev swp2.2  proto kernel  metric 256  pref medium
fe80::/64 dev swp3.2  proto kernel  metric 256  pref medium
ff00::/8 dev br2  metric 256 dead linkdown  pref medium
ff00::/8 dev swp1.2  metric 256  pref medium
ff00::/8 dev swp2.2  metric 256  pref medium
ff00::/8 dev swp3.2  metric 256  pref medium
unreachable default dev lo  metric 240  error -101 pref medium
To see a list of links associated with a particular VRF table, run
ip link list <vrf-name>. For example:
cumulus@switch:~$ ip link list rocket

VRF: rocket
--------------------
swp1.10@swp1     UP             6c:64:1a:00:5a:0c <BROADCAST,MULTICAST,UP,LOWER_UP>
swp2.10@swp2     UP             6c:64:1a:00:5a:0d <BROADCAST,MULTICAST,UP,LOWER_UP>
To see a list of routes associated with a particular VRF table, run
ip route list <vrf-name>. For example:
cumulus@switch:~$ ip route list rocket

VRF: rocket
--------------------
unreachable default  metric 8192
10.1.1.0/24 via 10.10.1.2 dev swp2.10
10.1.2.0/24 via 10.99.1.2 dev swp1.10
broadcast 10.10.1.0 dev swp2.10  proto kernel  scope link  src 10.10.1.1
10.10.1.0/28 dev swp2.10  proto kernel  scope link  src 10.10.1.1
local 10.10.1.1 dev swp2.10  proto kernel  scope host  src 10.10.1.1
broadcast 10.10.1.15 dev swp2.10  proto kernel  scope link  src 10.10.1.1
broadcast 10.99.1.0 dev swp1.10  proto kernel  scope link  src 10.99.1.1
10.99.1.0/30 dev swp1.10  proto kernel  scope link  src 10.99.1.1
local 10.99.1.1 dev swp1.10  proto kernel  scope host  src 10.99.1.1
broadcast 10.99.1.3 dev swp1.10  proto kernel  scope link  src 10.99.1.1

local fe80:: dev lo  proto none  metric 0  pref medium
local fe80:: dev lo  proto none  metric 0  pref medium
local fe80::6e64:1aff:fe00:5a0c dev lo  proto none  metric 0  pref medium
local fe80::6e64:1aff:fe00:5a0d dev lo  proto none  metric 0  pref medium
fe80::/64 dev swp1.10  proto kernel  metric 256  pref medium
fe80::/64 dev swp2.10  proto kernel  metric 256  pref medium
ff00::/8 dev swp1.10  metric 256  pref medium
ff00::/8 dev swp2.10  metric 256  pref medium
unreachable default dev lo  metric 8192  error -101 pref medium
You can also show routes in a VRF using ip [-6] route show vrf <name>.
This command omits local and broadcast routes, which can clutter the
output.
BGP Unnumbered Interfaces with VRF
BGP unnumbered interface configurations
are supported with VRF. In BGP unnumbered, there are no addresses on any
interface. However, debugging tools like traceroute need at least a
single IP address per node as the node’s source IP address. Typically,
this address was assigned to the loopback device. With VRF, you need a
loopback device for each VRF table since VRF is based on interfaces, not
IP addresses. While Linux does not support multiple loopback devices, it
does support the concept of a dummy interface, which is used to achieve
the same goal.
An IP address can be associated with the VRF device, which will then act as the dummy (loopback-like) interface for that VRF.
Configure the BGP unnumbered configuration. The BGP unnumbered configuration is
the same for a non-VRF, applied under the VRF context
(router bgp asn vrf <vrf-name>).
cumulus@switch:~$ net add vrf vrf1 vrf-table auto
cumulus@switch:~$ net add vrf vrf1 ip address 6.1.0.6/32
cumulus@switch:~$ net add vrf vrf1 ipv6 address 2001:6:1::6/128
cumulus@switch:~$ net add interface swp1 link speed 10000
cumulus@switch:~$ net add interface swp1 link autoneg on
cumulus@switch:~$ net add vlan 101 vrf vrf1
cumulus@switch:~$ net add vlan 101 ip address 20.1.6.1/24
cumulus@switch:~$ net add vlan 101 ipv6 address 2001:20:1:6::1/80
cumulus@switch:~$ net add bridge bridge ports swp1
These commands create the following configuration in the /etc/network/interfaces file:
...

auto swp1
iface swp1
    link-autoneg on
    link-speed 10000

auto bridge
iface bridge
    bridge-ports swp1
    bridge-vids 101
    bridge-vlan-aware yes

auto vlan101
iface vlan101
    address 20.1.6.1/24
    address 2001:20:1:6::1/80
    vlan-id 101
    vlan-raw-device bridge
    vrf vrf1

auto vrf1
iface vrf1
    address 6.1.0.6/32
    address 2001:6:1::6/128
    vrf-table auto
Here is the FRRouting BGP configuration:
cumulus@switch:~$ net add bgp vrf vrf1 autonomous-system 65001
cumulus@switch:~$ net add bgp vrf vrf1 bestpath as-path multipath-relax
cumulus@switch:~$ net add bgp vrf vrf1 bestpath compare-routerid
cumulus@switch:~$ net add bgp vrf vrf1 neighbor LEAF peer-group
cumulus@switch:~$ net add bgp vrf vrf1 neighbor LEAF remote-as external
cumulus@switch:~$ net add bgp vrf vrf1 neighbor LEAF capability extended-nexthop
cumulus@switch:~$ net add bgp vrf vrf1 neighbor swp1.101 interface peer-group LEAF
cumulus@switch:~$ net add bgp vrf vrf1 neighbor swp2.101 interface peer-group LEAF
cumulus@switch:~$ net add bgp vrf vrf1 ipv4 unicast redistribute connected
cumulus@switch:~$ net add bgp vrf vrf1 ipv4 unicast neighbor LEAF activate
cumulus@switch:~$ net add bgp vrf vrf1 ipv6 unicast redistribute connected
cumulus@switch:~$ net add bgp vrf vrf1 ipv6 unicast neighbor LEAF activate
cumulus@switch:~$ net pending
cumulus@switch:~$ net commit
These commands create the following configuration in the /etc/frr/frr.conf file:
!
router bgp 65001 vrf vrf1
 no bgp default ipv4-unicast
 bgp bestpath as-path multipath-relax
 bgp bestpath compare-routerid
 neighbor LEAF peer-group
 neighbor LEAF remote-as external
 neighbor LEAF capability extended-nexthop
 neighbor swp1.101 interface peer-group LEAF
 neighbor swp2.101 interface peer-group LEAF
 !
 address-family ipv4 unicast
  redistribute connected
  neighbor LEAF activate
 exit-address-family
 !
 address-family ipv6 unicast
  redistribute connected
  neighbor LEAF activate
 exit-address-family
!
DHCP with VRF
Because you can use VRF to bind IPv4 and IPv6 sockets to non-default VRF
tables, you have the ability to start DHCP servers and relays in any
non-default VRF table using the dhcpd and dhcrelay services,
respectively. These services must be managed by systemd in order to
run in a VRF context; in addition, the services must be listed in
/etc/vrf/systemd.conf. By default, this file already lists these two
services, as well as others like ntp. You can add more
services as needed, such as dhcpd6 and dhcrelay6 for IPv6.
If you edit /etc/vrf/systemd.conf, run sudo systemctl daemon-reload
to generate the systemd instance files for the newly added service(s).
Then you can start the service in the VRF using
systemctl start <service>@<vrf-name>.service, where <service> is the
name of the service - such as dhcpd or dhcrelay - and <vrf-name> is
the name of the VRF.
For example, to start the dhcrelay service after you configured a VRF
named turtle, run:
cumulus@switch:~$ sudo systemctl start dhcrelay@turtle.service
To enable the service at boot time you should also run
systemctl enable <service>@<vrf-name>. To continue with the previous example:
cumulus@switch:~$ sudo systemctl enable dhcrelay@turtle.service
In addition, you need to create a separate default file in
/etc/default for every instance of a DHCP server and/or relay in a
non-default VRF; this is where you set the server and relay options. To
run multiple instances of any of these services, you need a separate
file for each instance. The files must be named as follows:
- isc-dhcp-server-<vrf-name>
- isc-dhcp-server6-<vrf-name>
- isc-dhcp-relay-<vrf-name>
- isc-dhcp-relay6-<vrf-name>
See the example configuration below for more details.
Caveats for DHCP with VRF
- Cumulus Linux does not support DHCP server and relay across VRFs, so the server and host cannot be in different VRF tables. In addition, the server and relay cannot be in different VRF tables.
- Typically a service running in the default VRF owns a port across all VRFs. If the VRF local instance is preferred, the global one may need to be disabled and stopped first.
- VRF is a layer 3 routing feature. It only makes sense to run programs that use AF_INET and AF_INET6 sockets in a VRF. VRF context does not affect any other aspects of the operation of a program.
- This method only works with
systemd-based services.
Example Configuration
In the following example, there is one IPv4 network with a VRF named rocket and one IPv6 network with a VRF named turtle.
| IPv4 DHCP Server/relay network | IPv6 DHCP Server/relay network |
|---|---|
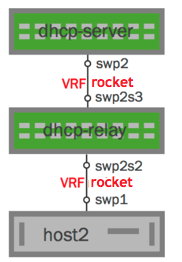 | 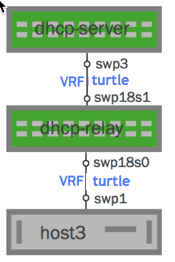 |
Configure each DHCP server and relay as follows:
Sample DHCP Server Configuration
You can create this configuration using the | Sample DHCP6 Server Configuration
You can create this configuration using the |
Sample DHCP Relay Configuration
You can create this configuration using the | Sample DHCP6 Relay Configuration
You can create this configuration using the |
ping or traceroute on a VRF
You can run ping or traceroute on a VRF from the default VRF.
To ping a VRF from the default VRF, run the ping -I <vrf-name>
command. For example:
cumulus@switch:~$ ping -I turtle
To run traceroute on a VRF from the default VRF, run the
traceroute -i <vrf-name> command. For example:
cumulus@switch:~$ sudo traceroute -i turtle
Caveats and Errata
- Switches using the Hurricane2 ASIC (such as the Penguin Computing Arctica 4804IP) do not support VRFs.
- Table selection based on the incoming interface only; currently, packet attributes or output-interface-based selection are not available.
- Setting the router ID outside of BGP via the
router-idoption causes all BGP instances to get the same router ID. If you want each BGP instance to have its own router ID, specify therouter-idunder the BGP instance usingbgp router-id. If both are specified, the one under the BGP instance overrides the one provided outside BGP. - You cannot configure EVPN address families within a VRF.
- When EVPN is configured, FRRouting supports only a single autonomous system number (ASN) for all VRFs configured with BGP on the system.
- When you take down a VRF using
ifdown, Cumulus Linux removes all routes associated with that VRF from FRR but it does not remove the routes from the kernel.