Lightweight Network Virtualization Overview
As of Cumulus Linux 3.7, the lightweight network virtualization feature (LNV) has been deprecated. The feature will be removed in Cumulus Linux 4.0. Use EVPN for network virtualization.
Lightweight Network Virtualization (LNV) is a technique for deploying VXLANs without a central controller on bare metal switches. This solution requires no external controller or software suite; it runs the VXLAN service and registration daemons on Cumulus Linux itself. The data path between bridge entities is established on top of a layer 3 fabric by means of a simple service node coupled with traditional MAC address learning.
To see an example of a full solution before reading the following background information, read this chapter.
You cannot use LNV and EVPN at the same time.
LNV Concepts
Consider the following example deployment:
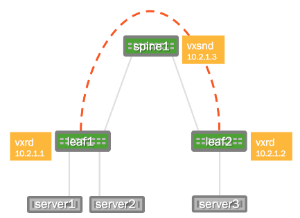
The two switches running Cumulus Linux, called leaf1 and leaf2, each have a bridge configured. These two bridges contain the physical switch port interfaces connecting to the servers as well as the logical VXLAN interface associated with the bridge. By creating a logical VXLAN interface on both leaf switches, the switches become VTEPs (virtual tunnel end points). The IP address associated with this VTEP is most commonly configured as its loopback address; in the image above, the loopback address is 10.2.1.1 for leaf1 and 10.2.1.2 for leaf2.
Acquire the Forwarding Database at the Service Node
To connect these two VXLANs together and forward BUM (Broadcast, Unknown-unicast, Multicast) packets to members of a VXLAN, the service node needs to acquire the addresses of all the VTEPs for every VXLAN it serves. The service node daemon does this through a registration daemon running on each leaf switch that contains a VTEP participating in LNV. The registration process informs the service node of all the VXLANs to which the switch belongs.
MAC Learning and Flooding
With LNV, as with traditional bridging of physical LANs or VLANs, a bridge automatically learns the location of hosts as a side effect of receiving packets on a port.
For example, when server1 sends a layer 2 packet to server3, leaf2 learns that the MAC address for server1 is located on that particular VXLAN and the VXLAN interface learns that the IP address of the VTEP for server1 is 10.2.1.1. So when server3 sends a packet to server1, the bridge on leaf2 forwards the packet out of the port to the VXLAN interface and the VXLAN interface sends it, encapsulated in a UDP packet, to the address 10.2.1.1.
But what if server3 sends a packet to some address that has yet to send it a packet (server2, for example)? In this case, the VXLAN interface sends the packet to the service node, which sends a copy to every other VTEP that belongs to the same VXLAN. This is called service node replication and is one of two techniques for handling BUM (Broadcast Unknown-unicast and Multicast) traffic.
BUM Traffic
Cumulus Linux has two ways of handling BUM (Broadcast Unknown-unicast and Multicast) traffic:
- Head end replication
- Service node replication
Head end replication is enabled by default in Cumulus Linux.
You cannot have both service node and head end replication configured simultaneously, as this causes the BUM traffic to be duplicated; both the source VTEP and the service node send their own copy of each packet to every remote VTEP.
Head End Replication
Broadcom switches with Tomahawk, Trident II+, and Trident II ASICs and switches with Spectrum ASICs are capable of head end replication (HER), which is the ability to generate all the BUM traffic in hardware. The most scalable solution available with LNV is to have each VTEP (top of rack switch) generate all of its own BUM traffic instead of relying on an external service node. HER is enabled by default in Cumulus Linux.
Cumulus Linux verified support for up to 128 VTEPs with head end replication.
To disable head end replication, edit the /etc/vxrd.conf file and set
head_rep to False.
Service Node Replication
Cumulus Linux also supports service node replication for VXLAN BUM
packets. This is useful with LNV if you have more than 128 VTEPs.
However, it is not recommended because it forces the spine switches
running the vxsnd (service node daemon) to replicate the packets in
software instead of in hardware, unlike head end replication.
To enable service node replication:
Disable head end replication; set
head_repto False in the/etc/vxrd.conffile.Configure a service node IP address for every VXLAN interface using the
vxlan-svcnodeipparameter:cumulus@switch:~$ net add vxlan VXLAN vxlan svcnodeip IP_ADDRESSYou only specify this parameter when head end replication is disabled. For the loopback, the parameter is still named
vxrd-svcnode-ip.Edit the
/etc/vxsnd.conffile and configure the following:Set the same service node IP address that you configured in the previous step:
svcnode_ip = <>To forward VXLAN data traffic, set the following variable to True:
enable_vxlan_listen = true
Requirements
Hardware Requirements
Switches with the Broadcom Tomahawk, Trident II+, or Trident II ASIC or switches with the Mellanox Spectrum ASIC running Cumulus Linux 2.5.4 or later.
Configuration Requirements
- The VXLAN has an associated VXLAN Network Identifier (VNI), also interchangeably called a VXLAN ID.
- The VNI cannot be 0 or 16777215, as these two numbers are reserved values under Cumulus Linux.
- The VXLAN link and physical interfaces are added to the bridge to create the association between the port, VLAN, and VXLAN instance.
- Each bridge on the switch has only one VXLAN interface. Cumulus Linux does not support more than one VXLAN link in a bridge; however, a switch can have multiple bridges.
- An SVI (Switch VLAN Interface) or layer 3 address on the bridge is not supported. For example, you cannot ping from the leaf1 SVI to the leaf2 SVI through the VXLAN tunnel; you need to use server1 and server2 to verify.
Install the LNV Packages
vxfld is installed by default on all new installations of Cumulus
Linux 3.x. If you are upgrading from an earlier version, run sudo -E apt-get install python-vxfld to install the LNV package.
Sample LNV Configuration
The following images illustrate the configuration that is referenced throughout this chapter.
| Physical Cabling Diagram | Network Virtualization Diagram |
|---|---|
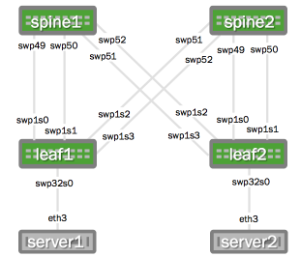 | 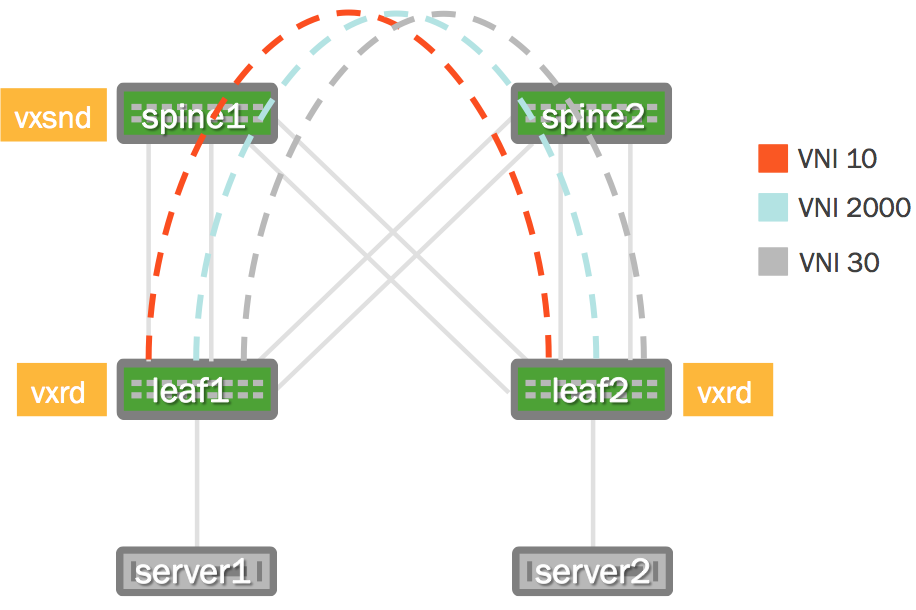 |
Want to try out configuring LNV and do not have a Cumulus Linux switch? Check out Cumulus VX.
Network Connectivity
There must be full network connectivity before you can configure LNV.
The layer 3 IP addressing information as well as the OSPF configuration
(/etc/frr/frr.conf) below is provided to make the LNV example easier
to understand.
OSPF is not a requirement for LNV, LNV just requires layer 3 connectivity. With Cumulus Linux this can be achieved with static routes, OSPF or BGP.
Layer 3 IP Addressing
Here is the configuration for the IP addressing information used in this example.
spine1: These commands create the following configuration: | spine2: These commands create the following configuration: |
leaf1: These commands create the following configuration: | leaf2: These commands create the following configuration: |
Layer 3 Fabric
The service nodes and registration nodes must all be routable between each other. The layer 3 fabric on Cumulus Linux can either be BGP or OSPF. In this example, OSPF is used to demonstrate full reachability. Click to expand the FRRouting configurations below.
Click to expand the OSPF configuration ...
FRRouting configuration using OSPF:
spine1: These commands create the following configuration: | spine2: These commands create the following configuration: |
leaf1: These commands create the following configuration: | leaf2: These commands create the following configuration: |
In this example, the servers are running Ubuntu 14.04. There needs to be a trunk mapped from server1 and server2 to the respective switch. In Ubuntu this is done with subinterfaces. You can expand the configurations below.
Click to expand the host configurations ...
server1: | server2: |
cumulus@server1:~$ sudo ifup eth3.10
Set name-type for VLAN subsystem. Should be visible in /proc/net/vlan/config
Added VLAN with VID == 10 to IF -:eth3:-
cumulus@server1:~$ sudo ifup eth3.20
Set name-type for VLAN subsystem. Should be visible in /proc/net/vlan/config
Added VLAN with VID == 20 to IF -:eth3:-
cumulus@server1:~$ sudo ifup eth3.30
Set name-type for VLAN subsystem. Should be visible in /proc/net/vlan/config
Added VLAN with VID == 30 to IF -:eth3:-
Configure the VLAN to VXLAN Mapping
Configure the VLANs and associated VXLANs. In this example, there are 3
VLANs and 3 VXLAN IDs (VNIs). VLANs 10, 20 and 30 are used and
associated with VNIs 10, 2000 and 30 respectively. The loopback address,
used as the vxlan-local-tunnelip, is the only difference between leaf1
and leaf2 for this demonstration.
leaf1: These commands create the following configuration in the | leaf2: These commands create the following configuration in the |
Why is vni-2000 not vni-20? For example, why not tie VLAN 20 to VNI 20, or why was 2000 used? VXLANs and VLANs do not need to be the same number. However if you are using fewer than 4096 VLANs, there is no reason not to make it easy and correlate VLANs to VXLANs. It is completely up to you.
Verify the VLAN to VXLAN Mapping
Use the brctl show command to see the physical and logical interfaces
associated with that bridge:
cumulus@leaf1:~$ brctl show
bridge name bridge id           STP enabled     interfaces
bridge      8000.443839008404   yes             swp32s0.10
                                                vni-10
                                                vni-2000
                                                vni-30
As with any logical interfaces on Linux, the name does not matter (other
than a 15-character limit). To verify the associated VNI for the logical
name, use the ip -d link show command:
cumulus@leaf1:~$ ip -d link show vni-10
43: vni-10: <BROADCAST,MULTICAST,UP,LOWER_UP> mtu 1500 qdisc noqueue master br-10 state UNKNOWN mode DEFAULT
    link/ether 02:ec:ec:bd:7f:c6 brd ff:ff:ff:ff:ff:ff
    vxlan id 10 srcport 32768 61000 dstport 4789 ageing 1800
    bridge_slave
The vxlan id 10 indicates the VXLAN ID/VNI is indeed 10 as the logical name suggests.
Enable and Manage Service Node and Registration Daemons
Every VTEP must run the registration daemon (vxrd). Typically, every
leaf switch acts as a VTEP. A minimum of 1 switch (a switch not already
acting as a VTEP) must run the service node daemon (vxsnd). The
instructions for enabling these daemons follows.
Enable the Service Node Daemon
The service node daemon (vxsnd) is included in the Cumulus Linux
repository as vxfld-vxsnd. The service node daemon can run on any
switch running Cumulus Linux as long as that switch is not also a VXLAN
VTEP. In this example, enable the service node only on the spine1
switch, then restart the service.
cumulus@spine1:~$ sudo systemctl enable vxsnd.service
cumulus@spine1:~$ sudo systemctl restart vxsnd.service
Do not run vxsnd on a switch that is already acting as a VTEP.
Enable the Registration Daemon
The registration daemon (vxrd) is included in the Cumulus Linux
package as vxfld-vxrd. The registration daemon must run on each VTEP
participating in LNV, so you must enable it on every TOR (leaf) switch
acting as a VTEP, then restart the vxrd daemon. For example, on leaf1:
cumulus@leaf1:~$ sudo systemctl enable vxrd.service
cumulus@leaf1:~$ sudo systemctl restart vxrd.service
Then enable and restart the vxrd daemon on leaf2:
cumulus@leaf2:~$ sudo systemctl enable vxrd.service
cumulus@leaf2:~$ sudo systemctl restart vxrd.service
Check the Daemon Status
To determine if the daemon is running, use the systemctl status <daemon name>.service command.
For the service node daemon:
cumulus@spine1:~$ sudo systemctl status vxsnd.service
● vxsnd.service - Lightweight Network Virt Discovery Svc and Replicator
   Loaded: loaded (/lib/systemd/system/vxsnd.service; enabled)
   Active: active (running) since Wed 2016-05-11 11:42:55 UTC; 10min ago
 Main PID: 774 (vxsnd)
   CGroup: /system.slice/vxsnd.service
           └─774 /usr/bin/python /usr/bin/vxsnd

May 11 11:42:55 cumulus vxsnd[774]: INFO: Starting (pid 774) ...
For the registration daemon:
cumulus@leaf1:~$ sudo systemctl status vxrd.service
● vxrd.service - Lightweight Network Virtualization Peer Discovery Daemon
   Loaded: loaded (/lib/systemd/system/vxrd.service; enabled)
   Active: active (running) since Wed 2016-05-11 11:42:55 UTC; 10min ago
 Main PID: 929 (vxrd)
   CGroup: /system.slice/vxrd.service
           └─929 /usr/bin/python /usr/bin/vxrd

May 11 11:42:55 cumulus vxrd[929]: INFO: Starting (pid 929) ...
Configure the Registration Node
The registration node was configured earlier in /etc/network/interfaces in the
VXLAN mapping section above; no additional
configuration is typically needed. However, if you need to modify the registration
node configuration, edit /etc/vxrd.conf.
Configuring the registration node in /etc/vxrd.conf ...
cumulus@leaf1:~$ sudo nano /etc/vxrd.conf
Then edit the svcnode_ip variable:
svcnode_ip = 10.2.1.3
Then perform the same on leaf2:
cumulus@leaf2:~$ sudo nano /etc/vxrd.conf
And again edit the svcnode_ip variable:
svcnode_ip = 10.2.1.3
Enable, then restart the registration node daemon for the change to take effect:
cumulus@leaf1:~$ sudo systemctl enable vxrd.service
cumulus@leaf1:~$ sudo systemctl restart vxrd.service
Restart the daemon on leaf2:
cumulus@leaf2:~$ sudo systemctl enable vxrd.service
cumulus@leaf2:~$ sudo systemctl restart vxrd.service
Registration node options ...
| Name | Description | Default |
|---|---|---|
| loglevel | The log level: DEBUG, INFO, WARNING, ERROR, CRITICAL. | INFO |
| logdest | The destination for log messages. The destination can be a file name, stdout, or syslog. | syslog |
| logfilesize | The log file size in bytes. Used when logdest is a file name. | 512000 |
| logbackupcount | The maximum number of log files stored on the disk. Used when logdest is a file name. | 14 |
| pidfile | The PIF file location for the vxrd daemon. | /var/run/vxrd.pid |
| udsfile | The file name for the Unix domain socket used for management. | /var/run/vxrd.sock |
| vxfld_port | The UDP port used for VXLAN control messages. | 10001 |
| svcnode_ip | The address to which registration daemons send control messages for registration and or BUM packets for replication. You can also configure this option in the /etc/network/interfaces file with the vxrd-svcnode-ip keyword. | |
| holdtime | The hold time (in seconds) for soft state, which is how long the service node waits before ageing out an IP address for a VNI. The vxrd includes this in the register messages it sends to a vxsnd. | 90 seconds |
| src_ip | The local IP address to bind to for receiving control traffic from the service node daemon. | |
| refresh_rate | The number of times to refresh within the hold time. The higher this number, the more lost UDP refresh messages can be tolerated. | 3 seconds |
| config_check_rate | The number of seconds to poll the system for current VXLAN membership. | 5 seconds |
| head_rep | Enables self replication. Instead of using the service node to replicate BUM packets, it is done in hardware on the VTEP switch. | true |
Use 1, yes, true, or on for True for each relevant option. Use 0, no, false, or off for False.
Configure the Service Node
To configure the service node daemon, edit the /etc/vxsnd.conf
configuration file.
For the example configuration, default values are used, except for the
svcnode_ip field.
cumulus@spine1:~$ sudo nano /etc/vxsnd.conf
The address field is set to the loopback address of the switch running
the vxsnd daemon.
svcnode_ip = 10.2.1.3
Enable, then restart the service node daemon for the change to take effect:
cumulus@spine1:~$ sudo systemctl enable vxsnd.service
cumulus@spine1:~$ sudo systemctl restart vxsnd.service
The complete list of options you can configure is listed below:
| Name | Description | Default |
|---|---|---|
| loglevel | The log level: DEBUG, INFO, WARNING, ERROR, CRITICAL. | INFO |
| logdest | The destination for log messages. The destination can be a file name, stdout, or syslog. | syslog |
| logfilesize | The log file size in bytes. Used when logdest is a file name. | 512000 |
| logbackupcount | The maximum number of log files stored on disk. Used when logdest is a file name. | 14 |
| pidfile | The PID file location for the vxrd daemon. | /var/run/vxrd.pid |
| udsfile | The file name for the Unix domain socket used for management. | /var/run/vxrd.sock |
| vxfld_port | The UDP port used for VXLAN control messages. | 10001 |
| svcnode_ip | The address to which registration daemons send control messages for registration and or BUM packets for replication. | 0.0.0.0 |
| holdtime | The holdtime (in seconds) for soft state. This option is used when sending a register message to peers in response to learning a <vni, addr> from a VXLAN data packet. | 90 |
| src_ip | The local IP address to bind to for receiving inter-vxsnd control traffic. | 0.0.0.0 |
| svcnode_peers | A space-separated list of IP addresses with which the vxsnd shares its state. | |
| enable_vxlan_listen | When set to true, the service node listens for VXLAN data traffic. | true |
| install_svcnode_ip | When set to true, the snd_peer_address gets installed on the loopback interface. It gets withdrawn when the vxsnd is not in service. If set to true, you must define the snd_peer_address configuration variable. | false |
| age_check | Number of seconds to wait before checking the database to age out stale entries. | 90 seconds |
Use 1, yes, true, or on for True for each relevant option. Use 0, no, false, or off for False.
Advanced LNV Usage
Scale LNV by Load Balancing with Anycast
The above configuration assumes a single service node, which can quickly be overwhelmed by BUM traffic. To load balance BUM traffic across multiple service nodes, use Anycast. Anycast enables BUM traffic to reach the topologically nearest service node instead of overwhelming a single service node.
Enable the Service Node Daemon on Additional Spine Switches
In this example, spine1 already has the service node daemon enabled.
Enable it on the spine2 switch, then restart the vxsnd daemon:
cumulus@spine2:~$ sudo systemctl enable vxsnd.service
cumulus@spine2:~$ sudo systemctl restart vxsnd.service
Configure the Anycast Address on All Participating Service Nodes
spine1: Add the 10.10.10.10/32 address to the loopback address: These commands create the following configuration in the Verify the IP address is configured: | spine2: Add the 10.10.10.10/32 address to the loopback address: These commands create the following configuration in the Verify the IP address is configured: |
Configure the Service Node vxsnd.conf File
spine1: Use a text editor to edit the network configuration: Change the following values: This sets the address on which the service node listens to VXLAN messages to the configured Anycast address and sets it to sync with spine2. Enable, then restart the | spine2: Use a text editor to edit the network configuration: Change the following values: This sets the address on which the service node listens to VXLAN messages to the configured Anycast address and sets it to sync with spine1. Enable, then restart the |
Reconfigure the VTEPs (Leafs) to Use the Anycast Address
leaf1: Change the These commands create the following configuration in the Verify the new service node is configured: The Use the | leaf2: Change the These commands create the following configuration in the Verify the new service node is configured: The Use the |
Test Connectivity
Repeat the ping tests from the previous section. Here is the table again for reference:
| VNI | server1 | server2 |
|---|---|---|
| 10 | 10.10.10.1 | 10.10.10.2 |
| 2000 | 10.10.20.1 | 10.10.20.2 |
| 30 | 10.10.30.1 | 10.10.30.2 |
cumulus@server1:~$ ping 10.10.10.2
PING 10.10.10.2 (10.10.10.2) 56(84) bytes of data.
64 bytes from 10.10.10.2: icmp_seq=1 ttl=64 time=5.32 ms
64 bytes from 10.10.10.2: icmp_seq=2 ttl=64 time=0.206 ms
^C
--- 10.10.10.2 ping statistics ---
2 packets transmitted, 2 received, 0% packet loss, time 1001ms
rtt min/avg/max/mdev = 0.206/2.767/5.329/2.562 ms

PING 10.10.20.2 (10.10.20.2) 56(84) bytes of data.
64 bytes from 10.10.20.2: icmp_seq=1 ttl=64 time=1.64 ms
64 bytes from 10.10.20.2: icmp_seq=2 ttl=64 time=0.187 ms
^C
--- 10.10.20.2 ping statistics ---
2 packets transmitted, 2 received, 0% packet loss, time 1001ms
rtt min/avg/max/mdev = 0.187/0.914/1.642/0.728 ms

cumulus@server1:~$ ping 10.10.30.2
PING 10.10.30.2 (10.10.30.2) 56(84) bytes of data.
64 bytes from 10.10.30.2: icmp_seq=1 ttl=64 time=1.63 ms
64 bytes from 10.10.30.2: icmp_seq=2 ttl=64 time=0.191 ms
^C
--- 10.10.30.2 ping statistics ---
2 packets transmitted, 2 received, 0% packet loss, time 1001ms
rtt min/avg/max/mdev = 0.191/0.913/1.635/0.722 ms
Restart Network Removes vxsnd Anycast IP Address from Loopback Interface
If you have not configured a loopback anycast IP address in the
/etc/network/interfaces file, but you have enabled the vxsnd
(service node daemon) log to automatically add anycast IP addresses,
when you restart networking (with systemctl restart networking), the
anycast IP address gets removed from the loopback interface.
To prevent this issue from occurring, specify an anycast IP address for
the loopback interface in both the /etc/network/interfaces file and
the vxsnd.conf file. This way, in case vxsnd fails, you can withdraw
the IP address.