spine1:/etc/vxsnd.conf [common]
# Log level is one of DEBUG, INFO, WARNING, ERROR, CRITICAL
#loglevel = INFO
# Destination for log message. Can be a file name, 'stdout', or 'syslog'
#logdest = syslog
# log file size in bytes. Used when logdest is a file
#logfilesize = 512000
# maximum number of log files stored on disk. Used when logdest is a file
#logbackupcount = 14
# The file to write the pid. If using monit, this must match the one
# in the vxsnd.rc
#pidfile = /var/run/vxsnd.pid
# The file name for the unix domain socket used for mgmt.
#udsfile = /var/run/vxsnd.sock
# UDP port for vxfld control messages
#vxfld_port = 10001
# This is the address to which registration daemons send control messages for
# registration and/or BUM packets for replication
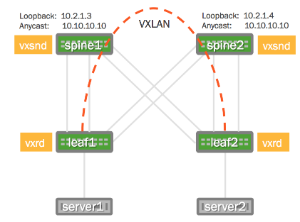
svcnode_ip = 10.10.10.10
# Holdtime (in seconds) for soft state. It is used when sending a
# register msg to peers in response to learning a <vni, addr> from a
# VXLAN data pkt
#holdtime = 90
# Local IP address to bind to for receiving inter-vxsnd control traffic
src_ip = 10.2.1.3
[vxsnd]
# Space separated list of IP addresses of vxsnd to share state with
svcnode_peers = 10.2.1.4
# When set to true, the service node will listen for vxlan data traffic
# Note: Use 1, yes, true, or on, for True and 0, no, false, or off,
# for False
#enable_vxlan_listen = true
# When set to true, the svcnode_ip will be installed on the loopback
# interface, and it will be withdrawn when the vxsnd is no longer in
# service. If set to true, the svcnode_ip configuration
# variable must be defined.
# Note: Use 1, yes, true, or on, for True and 0, no, false, or off,
# for False
#install_svcnode_ip = false
# Seconds to wait before checking the database to age out stale entries
#age_check = 90
| spine2:/etc/vxsnd.conf [common]
# Log level is one of DEBUG, INFO, WARNING, ERROR, CRITICAL
#loglevel = INFO
# Destination for log message. Can be a file name, 'stdout', or 'syslog'
#logdest = syslog
# log file size in bytes. Used when logdest is a file
#logfilesize = 512000
# maximum number of log files stored on disk. Used when logdest is a file
#logbackupcount = 14
# The file to write the pid. If using monit, this must match the one
# in the vxsnd.rc
#pidfile = /var/run/vxsnd.pid
# The file name for the unix domain socket used for mgmt.
#udsfile = /var/run/vxsnd.sock
# UDP port for vxfld control messages
#vxfld_port = 10001
# This is the address to which registration daemons send control messages for
# registration and/or BUM packets for replication
svcnode_ip = 10.10.10.10
# Holdtime (in seconds) for soft state. It is used when sending a
# register msg to peers in response to learning a <vni, addr> from a
# VXLAN data pkt
#holdtime = 90
# Local IP address to bind to for receiving inter-vxsnd control traffic
src_ip = 10.2.1.4
[vxsnd]
# Space separated list of IP addresses of vxsnd to share state with
svcnode_peers = 10.2.1.3
# When set to true, the service node will listen for vxlan data traffic
# Note: Use 1, yes, true, or on, for True and 0, no, false, or off,
# for False
#enable_vxlan_listen = true
# When set to true, the svcnode_ip will be installed on the loopback
# interface, and it will be withdrawn when the vxsnd is no longer in
# service. If set to true, the svcnode_ip configuration
# variable must be defined.
# Note: Use 1, yes, true, or on, for True and 0, no, false, or off,
# for False
#install_svcnode_ip = false
# Seconds to wait before checking the database to age out stale entries
#age_check = 90
|