Installing a New Cumulus Linux Image
You can install a new Cumulus Linux disk image using ONIE, an open source project (equivalent to PXE on servers) that enables the installation of network operating systems (NOS) on bare metal switches.
Before you install Cumulus Linux, the switch can be in two different states:
- No image is installed on the switch (the switch is only running ONIE).
- Cumulus Linux is already installed on the switch but you want to use ONIE to reinstall Cumulus Linux or upgrade to a newer version.
The sections below describe some of the different ways you can install the Cumulus Linux disk image, such as using a DHCP/web server, FTP, T, a local file, or a USB drive. Steps are provided for both installing directly from ONIE (if no image is installed on the switch) and from Cumulus Linux (if the image is already installed on the switch), where applicable. For additional methods to find and install the Cumulus Linux image, see the ONIE Design Specification.
You can download a Cumulus Linux image from the NVIDIA Enterprise support portal page.
Installing the Cumulus Linux disk image is destructive; configuration files on the switch are not saved; copy them to a different server before installing.
In the following procedures:
- You can name your Cumulus Linux installer disk image using any of the ONIE naming schemes mentioned here.
- In the example commands,
[PLATFORM]can be any supported Cumulus Linux platform, such as x86_64, or arm. - Run the
sudo onie-install -hcommand to show the ONIE installer options. - After you install the Cumulus Linux disk image, you need to install the license file. Refer to Install the License.
Install Using a DHCP/Web Server with DHCP Options
To install Cumulus Linux using a DHCP/web server with DHCP options, set up a DHCP/web server on your laptop and connect the eth0 management port of the switch to your laptop. After you connect the cable, the installation proceeds as follows:
- The bare metal switch boots up and requests an IP address (DHCP request).
- The DHCP server acknowledges and responds with DHCP option 114 and the location of the installation image.
- ONIE downloads the Cumulus Linux disk image, installs, and reboots.
- Success! You are now running Cumulus Linux.

The most common method is to send DHCP option 114 with the entire URL to the web server (this can be the same system). However, there are many other ways to use DHCP even if you do not have full control over DHCP. See the ONIE user guide for help with partial installer URLs and advanced DHCP options; both articles list more supported DHCP options.
Here is an example DHCP configuration with an ISC DHCP server:
subnet 172.0.24.0 netmask 255.255.255.0 {
  range 172.0.24.20 172.0.24.200;
  option default-url = "http://172.0.24.14/onie-installer-[PLATFORM]";
}
Here is an example DHCP configuration with dnsmasq (static address assignment):
dhcp-host=sw4,192.168.100.14,6c:64:1a:00:03:ba,set:sw4
dhcp-option=tag:sw4,114,"http://roz.rtplab.test/onie-installer-[PLATFORM]"
If you do not have a web server, you can use this free Apache example.
Install Using a DHCP/Web Server without DHCP Options
Follow the steps below if you can log into the switch on a serial console (ONIE), or log in on the console or with ssh (Install from Cumulus Linux).
Place the Cumulus Linux disk image in a directory on the web server.
Run the
onie-nos-installcommand:ONIE:/ #onie-nos-install http://10.0.1.251/path/to/cumulus-install-[PLATFORM].bin
Place the Cumulus Linux disk image in a directory on the web server.
From the Cumulus Linux command prompt, run the
onie-installcommand, then reboot the switch.cumulus@switch:~$ sudo onie-install -a -i http://10.0.1.251/path/to/cumulus-install-[PLATFORM].bin
Install Using a Web Server with no DHCP
Follow the steps below if you can log into the switch on a serial console (ONIE), or log in on the console or with ssh (Install from Cumulus Linux) but no DHCP server is available.
You need a console connection to access the switch; you cannot perform this procedure remotely.
ONIE is in discovery mode. You must disable discovery mode with the following command:
onie# onie-discovery-stopOn older ONIE versions, if the
onie-discovery-stopcommand is not supported, run:onie# /etc/init.d/discover.sh stopAssign a static address to eth0 with the
ip addr addcommand:ONIE:/ #ip addr add 10.0.1.252/24 dev eth0Place the Cumulus Linux disk image in a directory on your web server.
Run the installer manually (because there are no DHCP options):
ONIE:/ #onie-nos-install http://10.0.1.251/path/to/cumulus-install-[PLATFORM].bin
Place the Cumulus Linux disk image in a directory on your web server.
From the Cumulus Linux command prompt, run the
onie-installcommand, then reboot the switch.cumulus@switch:~$ sudo onie-install -a -i http://10.0.1.251/path/to/cumulus-install-[PLATFORM].bin
Install Using FTP Without a Web Server
Follow the steps below if your laptop is on the same network as the switch eth0 interface but no DHCP server is available.
Set up DHCP or static addressing for eth0. The following example assigns a static address to eth0:
ONIE:/ #ip addr add 10.0.1.252/24 dev eth0If you are using static addressing, disable ONIE discovery mode:
onie# onie-discovery-stopOn older ONIE versions, if the
onie-discovery-stopcommand is not supported, run:onie# /etc/init.d/discover.sh stopPlace the Cumulus Linux disk image into a TFTP or FTP directory.
If you are not using DHCP options, run one of the following commands (tftp for TFTP or ftp for FTP):
ONIE# onie-nos-install ftp://local-ftp-server/cumulus-install-[PLATFORM].bin

ONIE# onie-nos-install tftp://local-tftp-server/cumulus-install-[PLATFORM].bin
Place the Cumulus Linux disk image into an FTP directory (TFTP is not supported in Cumulus Linux).
From the Cumulus Linux command prompt, run the following command, then reboot the switch.
cumulus@switch:~$ sudo onie-install -a -i ftp://local-ftp-server/cumulus-install-[PLATFORM].bin
Install Using a Local File
Follow the steps below to install the disk image referencing a local file.
Set up DHCP or static addressing for eth0. The following example assigns a static address to eth0:
ONIE:/ #ip addr add 10.0.1.252/24 dev eth0If you are using static addressing, disable ONIE discovery mode.
onie# onie-discovery-stopOn older ONIE versions, if the
onie-discovery-stopcommand is not supported, run:onie# /etc/init.d/discover.sh stopUse scp to copy the Cumulus Linux disk image to the switch.
Run the installer manually from ONIE:
ONIE:/ #onie-nos-install /path/to/local/file/cumulus-install-[PLATFORM].bin
Copy the Cumulus Linux disk image to the switch.
From the Cumulus Linux command prompt, run the
onie-installcommand, then reboot the switch.cumulus@switch:~$ sudo onie-install -a -i /path/to/local/file/cumulus-install-[PLATFORM].bin
Install Using a USB Drive
Follow the steps below to install the Cumulus Linux disk image using a USB drive. Instructions are provided for x86 and ARM platforms.
Installing Cumulus Linux using a USB drive is fine for a single switch here and there but is not scalable. DHCP can scale to hundreds of switch installs with zero manual input unlike USB installs.
Prepare for USB Installation
From the NVIDIA Enterprise support portal, download the appropriate Cumulus Linux image for your x86 or ARM platform.
From a computer, prepare your USB drive by formatting it using one of the supported formats: FAT32, vFAT or EXT2.
Copy the Cumulus Linux disk image to the USB drive, then rename the image file to:
onie-installer-x86_64, if installing on an x86 platformonie-installer-arm, if installing on an ARM platform
You can also use any of the ONIE naming schemes mentioned here.
When using a Mac or Windows computer to rename the installation file, the file extension might still be present. Make sure to remove the file extension otherwise ONIE is not able to detect the file.
Insert the USB drive into the switch, then continue with the appropriate instructions below for your x86 or ARM platform.
Prepare the switch for installation:
- If the switch is offline, connect to the console and power on the switch.
- If the switch is already online in ONIE, use the
rebootcommand.
SSH sessions to the switch get dropped after this step. To complete the remaining instructions, connect to the console of the switch. Cumulus Linux switches display their boot process to the console; you need to monitor the console specifically to complete the next step.
Monitor the console and select the ONIE option from the first GRUB screen shown below.
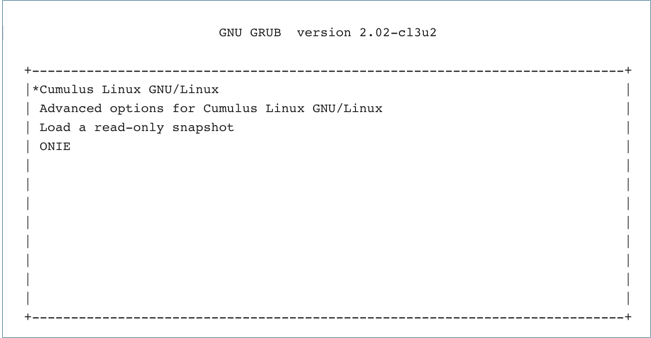
Cumulus Linux on x86 uses GRUB chainloading to present a second GRUB menu specific to the ONIE partition. No action is necessary in this menu to select the default option ONIE: Install OS.
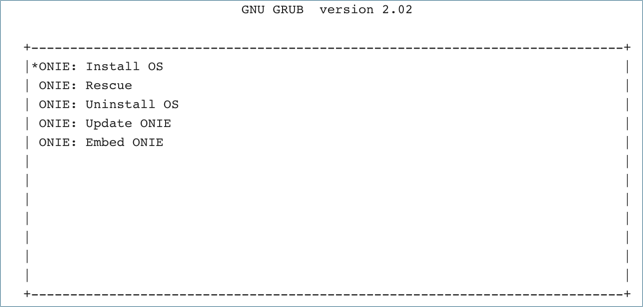
The USB drive is recognized and mounted automatically. The image file is located and automatic installation of Cumulus Linux begins. Here is some sample output:
ONIE: OS Install Mode  ...

Version : quanta_common_rangeley-2019.05.05-6919d98-201410171013
Build  Date: 2019-10-17T10:13+0800
Info: Mounting kernel filesystems...  done.
Info: Mounting LABEL=ONIE-BOOT on /mnt/onie-boot  ...
initializing eth0...
scsi 6:0:0:0: Direct-Access  SanDisk Cruzer Facet 1.26 PQ: 0 ANSI: 6
sd 6:0:0:0: [sdb] 31266816 512-byte logical blocks: (16.0 GB/14.9 GiB)
sd 6:0:0:0: [sdb] Write Protect is off
sd 6:0:0:0: [sdb] Write cache: disabled, read cache: enabled, doesn't support DPO or FUA
sd 6:0:0:0: [sdb] Attached SCSI disk

<...snip...>

ONIE:  Executing installer: file://dev/sdb1/onie-installer-x86_64
Verifying image checksum ... OK.
Preparing image archive ... OK.
Dumping image info...
Control File Contents
=====================
Description: Cumulus Linux
OS-Release:  4.1.0
Architecture: amd64
Date:  Fri, 22 November 2019 17:10:30 -0700
Installer-Version:  1.2
Platforms: accton_as5712_54x accton_as6712_32x  mlx_sx1400_i73612 dell_s4000_c2338 dell_s3000_c2338  cel_redstone_xp cel_smallstone_xp cel_pebble quanta_panther  quanta_ly8_rangeley quanta_ly6_rangeley quanta_ly9_rangeley

Homepage: http://www.cumulusnetworks.com/
After installation completes, the switch automatically reboots into the newly installed instance of Cumulus Linux.
Prepare the switch for installation:
- If the switch is offline, connect to the console and power on the switch.
- If the switch is already online in ONIE, use the
rebootcommand.
SSH sessions to the switch get dropped after this step. To complete the remaining instructions, connect to the console of the switch. Cumulus Linux switches display their boot process to the console; you need to monitor the console specifically to complete the next step.
Interrupt the normal boot process before the countdown (shown below) completes. Press any key to stop the autoboot.
U-Boot 2013.01-00016-gddbf4a9-dirty (Feb 14 2014 - 16:30:46) Accton: 1.4.0.5

CPU0: P2020, Version: 2.1, (0x80e20021)
Core: E500, Version: 5.1, (0x80211051)
Clock Configuration:
    CPU0:1200 MHz, CPU1:1200 MHz,
    CCB:600 MHz,
    DDR:400 MHz (800 MT/s data rate) (Asynchronous), LBC:37.500 MHz
L1: D-cache 32 kB enabled
I-cache 32 kB enabled

<...snip ...>

USB: USB2513 hub OK
Hit any key to stop autoboot: 0
A command prompt appears so that you can run commands. Execute the following command:
run onie_bootcmdThe USB drive is recognized and mounted automatically. The image file is located and automatic installation of Cumulus Linux begins. Here is some sample output:
Loading Open Network Install Environment  ...
Platform: arm-as4610_54p-r0
Version : 1.6.1.3
WARNING: adjusting available memory to 30000000
## Booting kernel from Legacy Image at ec040000  ...
    Image Name:   as6701_32x.1.6.1.3
    Image Type:   ARM Linux Multi-File Image (gzip compressed)
    Data Size:    4456555 Bytes = 4.3 MiB
    Load Address: 00000000
    Entry Point:  00000000
    Contents:
        Image 0: 3738543 Bytes = 3.6 MiB
        Image 1: 706440 Bytes = 689.9 KiB
        Image 2: 11555 Bytes = 11.3 KiB
Verifying Checksum ... OK
## Loading init Ramdisk from multi component Legacy Image at ec040000  ...
## Flattened Device Tree from multi component Image at EC040000
Booting using the fdt at 0xec47d388
Uncompressing Multi-File Image ... OK
Loading Ramdisk to 2ff53000, end 2ffff788 ... OK
Loading Device Tree to 03ffa000, end 03fffd22 ... OK

<...snip...>

ONIE: Starting ONIE Service Discovery
ONIE: Executing installer: file://dev/sdb1/onie-installer-arm
Verifying image checksum ... OK.
Preparing image archive ... OK.
Dumping image info ...
Control File Contents
=====================
Description: Cumulus Linux
OS-Release: 4.1.0
Architecture: arm
Date: Fri, 13 March 2020 17:08:35 -0700
Installer-Version: 1.2
Platforms: accton_as4600_54t, accton_as6701_32x, accton_5652, accton_as5610_52x, dni_6448, dni_7448, dni_c7448n, cel_kennisis, cel_redstone, cel_smallstone, cumulus_p2020, quanta_lb9, quanta_ly2, quanta_ly2r, quanta_ly6_p2020
Homepage: http://www.cumulusnetworks.com/
After installation completes, the switch automatically reboots into the newly installed instance of Cumulus Linux.