Using Nutanix Prism as a Monitoring Tool
Nutanix Prism is a graphical user interface (GUI) for managing infrastructure and virtual environments. You need to take special steps within Cumulus Linux before you can configure Prism.
Configure Cumulus Linux
SSH to the Cumulus Linux switch that needs to be configured, replacing
[switch]below as appropriate:cumulus@switch:~$ ssh cumulus@[switch]Open the
/etc/snmp/snmpd.conffile in an editor.Uncomment the following 3 lines in the
/etc/snmp/snmpd.conffile, then save the file:bridge_pp.py
pass_persist .1.3.6.1.2.1.17 /usr/share/snmp/bridge_pp.pyCommunity
rocommunity public default -V systemonlyLine directly below the Q-BRIDGE-MIB (.1.3.6.1.2.1.17)
\# BRIDGE-MIB and Q-BRIDGE-MIB tables
view   systemonly  included   .1.3.6.1.2.1.17
Restart
snmpd:cumulus@switch:~$ sudo systemctl restart snmpd.service Restarting network management services: snmpd.
Configure Nutanix
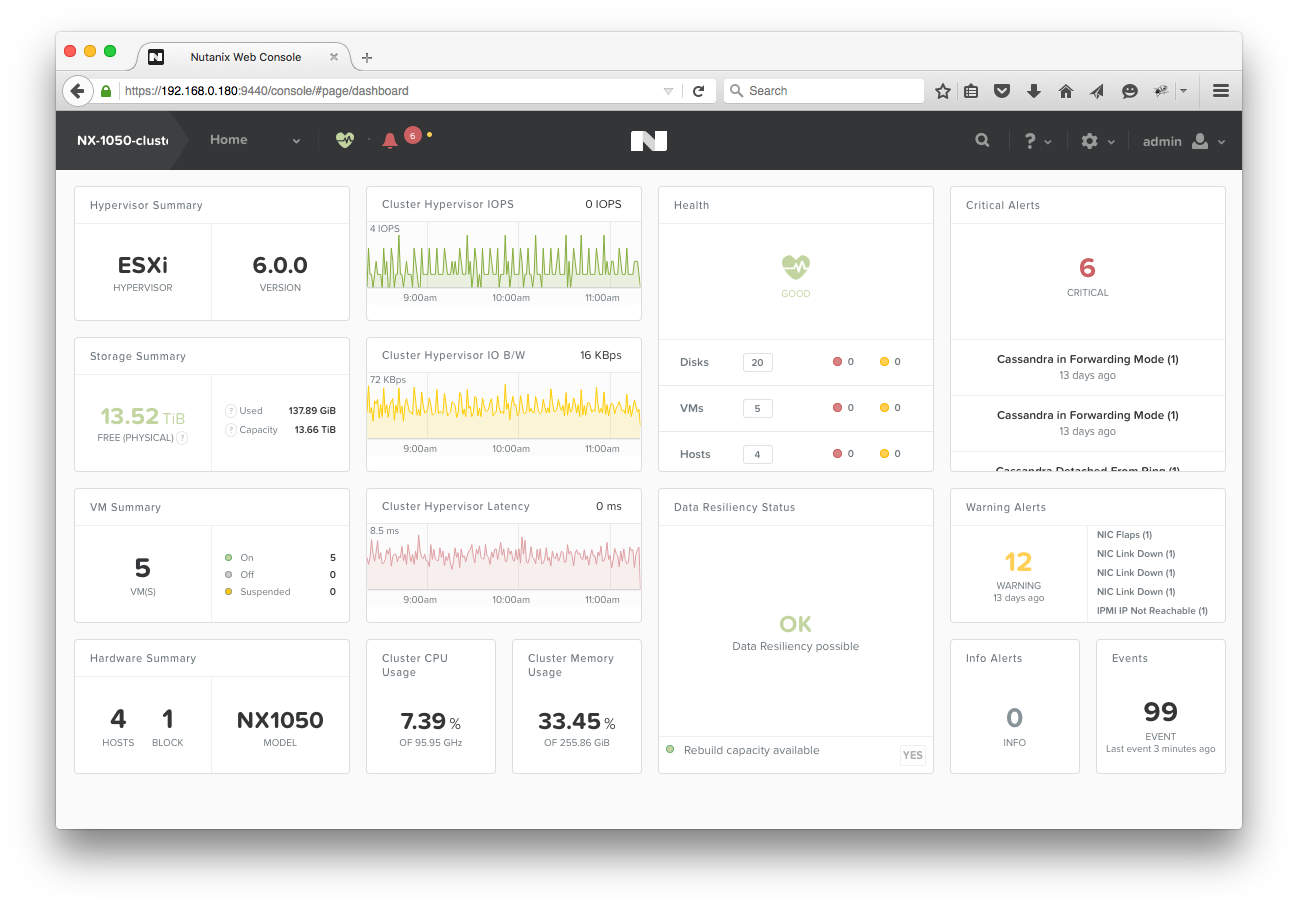
Log into the Nutanix Prism. Nutanix defaults to the Home menu, referred to as the Dashboard:
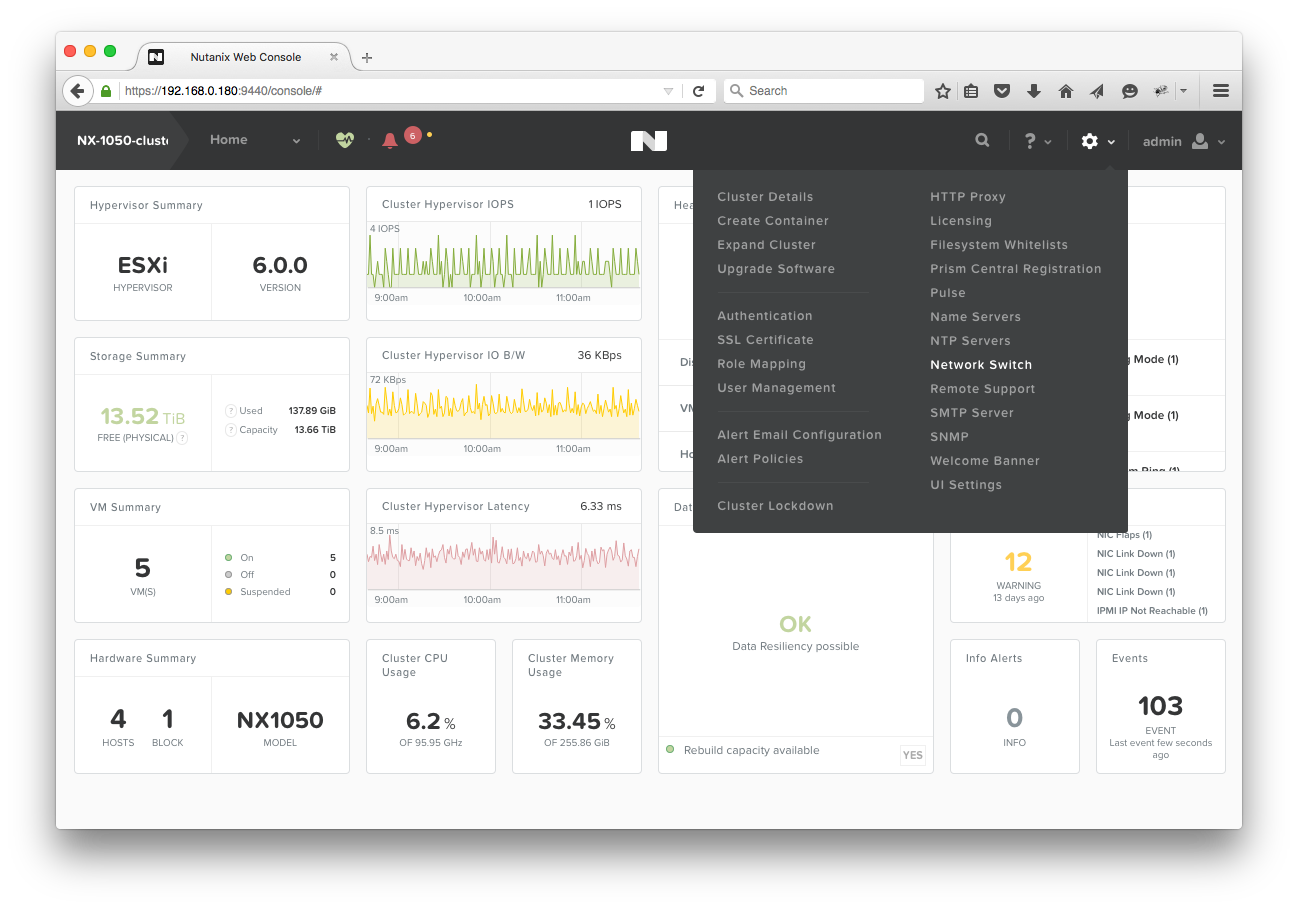
Click on the gear icon in the top right corner of the dashboard, then select NetworkSwitch:
Click the +Add Switch Configuration button in the Network Switch Configuration pop up window.
Fill out the Network Switch Configuration for the Top of Rack (ToR) switch configured for snmpd in the previous section:
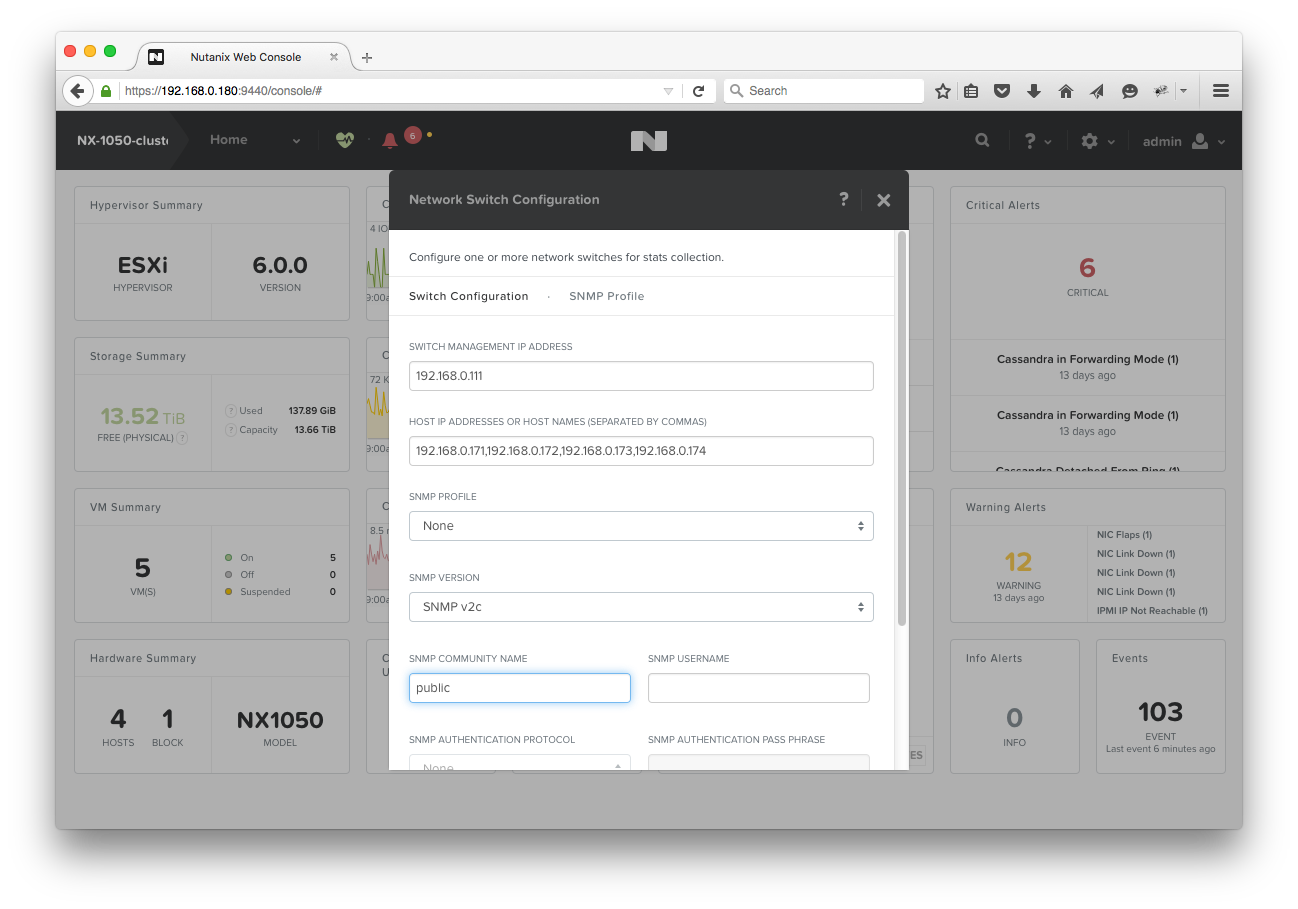
Configuration Parameter Description Value Used in Example Switch Management IP Address This can be any IP address on the box. In the screenshot above, the eth0 management IP is used. 192.168.0.111 Host IP Addresses or Host Names IP addresses of Nutanix hosts connected to that particular ToR switch. 192.168.0.171,192.168.0.172,192.168.0.173,192.168.0.174 SNMP Profile Saved profiles, for easy configuration when hooking up to multiple switches. None SNMP Version SNMP v2c or SNMP v3. Cumulus Linux has only been tested with SNMP v2c for Nutanix integration. SNMP v2c SNMP Community Name SNMP v2c uses communities to share MIBs. The default community for snmpd is ‘public’. public The rest of the values were not touched for this demonstration. They are usually used with SNMP v3.
Save the configuration. The switch will now be present in the Network Switch Configuration menu now.
Close the pop up window to return to the dashboard.
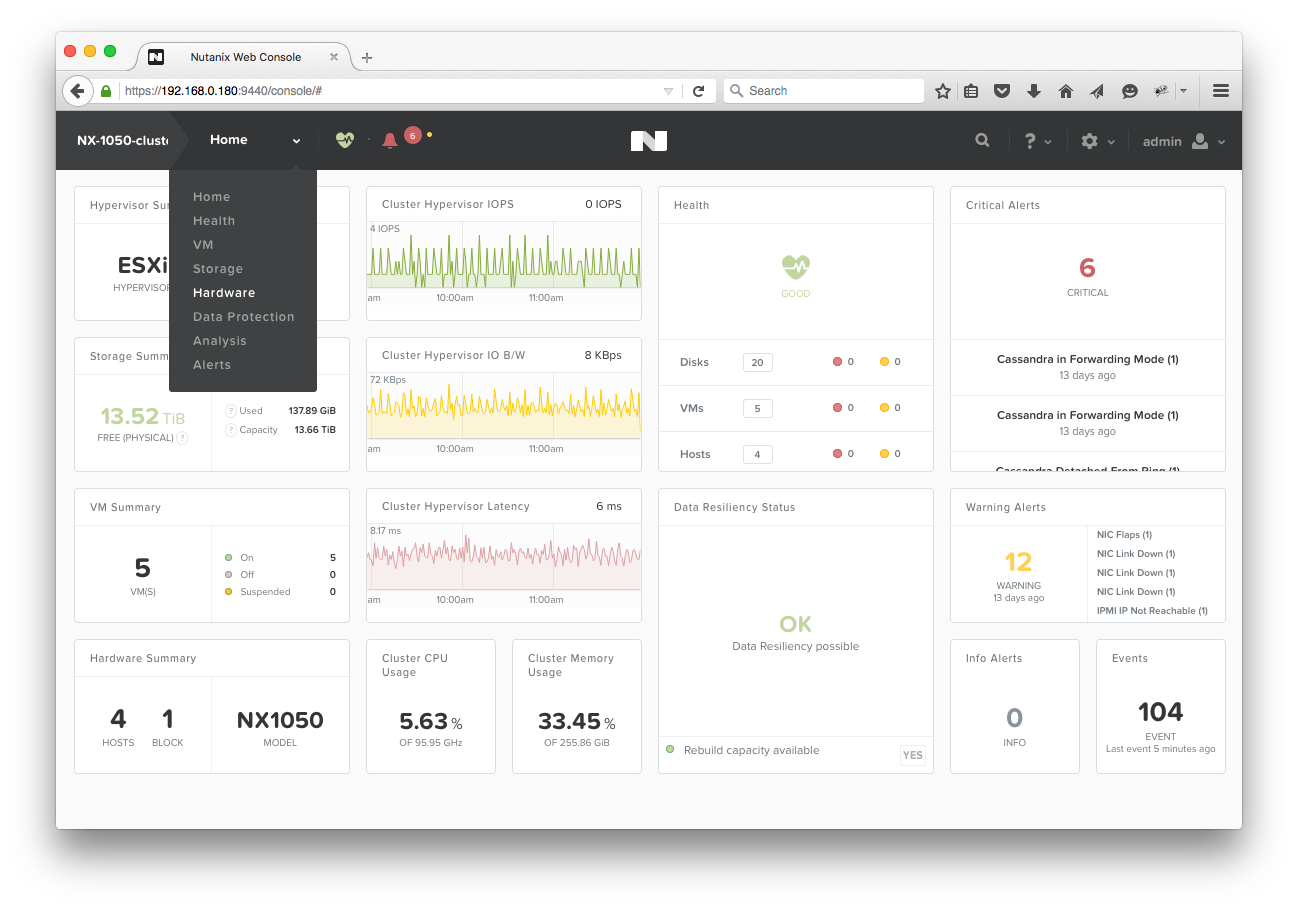
Open the Hardware option from the Home dropdown menu:
Click the Table button.
Click the Switch button. Configured switches are shown in the table, as indicated in the screenshot below, and can be selected in order to view interface statistics:
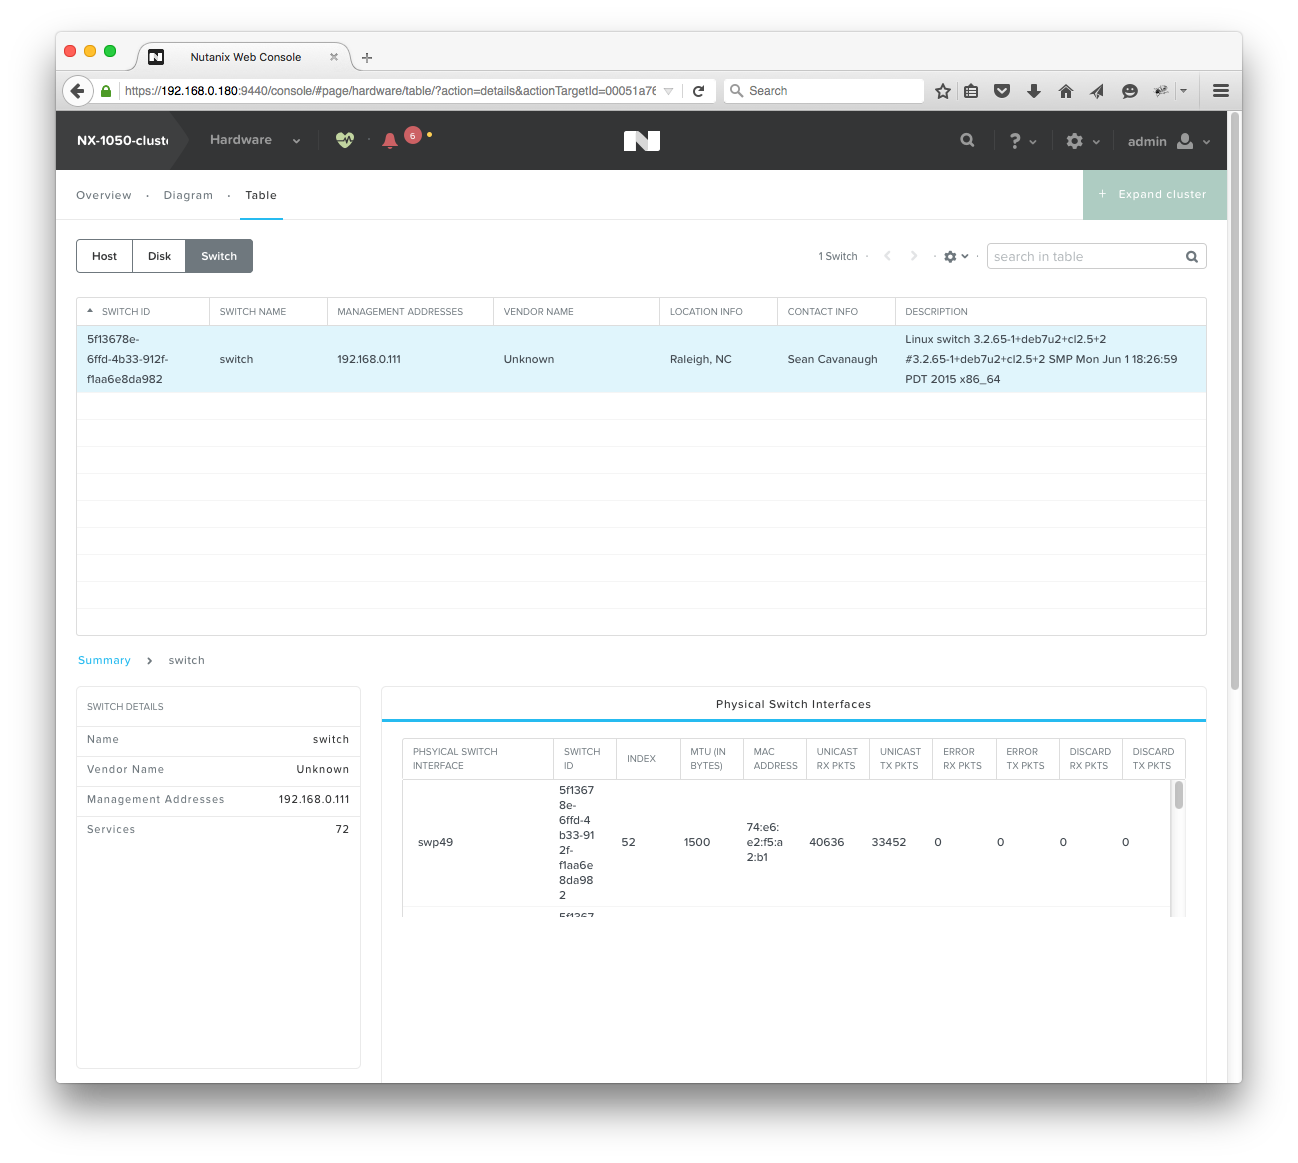
The switch has been added correctly when interfaces hooked up to the Nutanix hosts are visible.
Switch Information Displayed on Nutanix Prism
- Physical Interface (e.g. swp1, swp2). This will only display swp interfaces connected to Nutanix hosts by default.
- Switch ID - Unique identifier that Nutanix keeps track of each port ID (see below)
- Index - interface index, in the above demonstration swp49 maps to Index 52 because there is a loopback and two ethernet interface before the swp starts.
- MTU of interface
- MAC Address of Interface
- Unicast RX Packets (Received)
- Unicast TX Packets (Transmitted)
- Error RX Packets (Received)
- Error TX Packets (Transmitted)
- Discard RX Packets (Received)
- Discard TX Packets (Transmitted)
The Nutanix appliance will use Switch IDs that can also be viewed on the Prism CLI (by SSHing to the box). To view information from the Nutanix CLI, login using the default username nutanix, and the password nutanix/4u.
nutanix@NTNX-14SM15270093-D-CVM:192.168.0.184:~$ ncli network list-switch
    Switch ID                 : 00051a76-f711-89b6-0000-000000003bac::5f13678e-6ffd-4b33-912f-f1aa6e8da982
    Name                      : switch
    Switch Management Address : 192.168.0.111
    Description               : Linux switch 3.2.65-1+deb7u2+cl2.5+2 #3.2.65-1+deb7u2+cl2.5+2 SMP Mon Jun 1 18:26:59 PDT 2015 x86_64
    Object ID                 : enterprises.40310
    Contact Information       : Admin <admin@company.com>
    Location Information      : Raleigh, NC
    Services                  : 72
    Switch Vendor Name        : Unknown
    Port Ids                  : 00051a76-f711-89b6-0000-000000003bac::5f13678e-6ffd-4b33-912f-f1aa6e8da982:52, 00051a76-f711-89b6-0000-000000003bac::5f13678e-6ffd-4b33-912f-f1aa6e8da982:53, 00051a76-f711-89b6-0000-000000003bac::5f13678e-6ffd-4b33-912f-f1aa6e8da982:54, 00051a76-f711-89b6-0000-000000003bac::5f13678e-6ffd-4b33-912f-f1aa6e8da982:55
Troubleshooting
To help visualize the following diagram is provided:
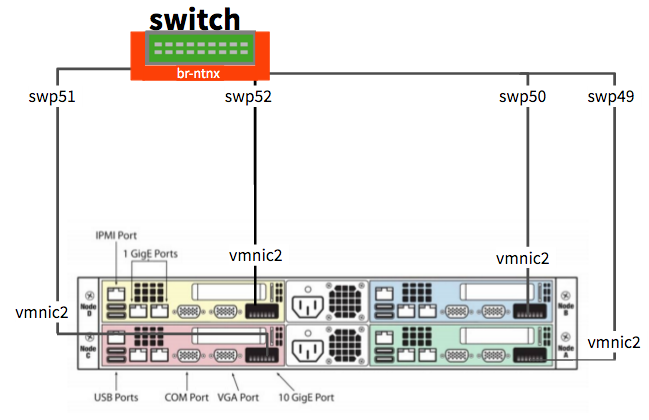
| Nutanix Node | Physical Port | Cumulus Linux Port |
|---|---|---|
| Node A (Green) | vmnic2 | swp49 |
| Node B (Blue) | vmnic2 | swp50 |
| Node C (Red) | vmnic2 | swp51 |
| Node D (Yellow) | vmnic2 | swp52 |
Enable LLDP/CDP on VMware ESXi (Hypervisor on Nutanix)
Follow the directions on one of the following websites to enable CDP:
- VMware knowledge base article: Configuring the Cisco Discovery Protocol (CDP) with ESX/ESXi (1003885)
- Wahl Network: Utilizing CDP and LLDP with vSphere Networking
For example, switch CDP on:
root@NX-1050-A:~] esxcli network vswitch standard set -c both -v vSwitch0Then confirm it is running:
root@NX-1050-A:~] esxcli network vswitch standard list -v vSwitch0
vSwitch0
    Name: vSwitch0
    Class: etherswitch
    Num Ports: 4082
    Used Ports: 12
    Configured Ports: 128
    MTU: 1500
    CDP Status: both
    Beacon Enabled: false
    Beacon Interval: 1
    Beacon Threshold: 3
    Beacon Required By:
    Uplinks: vmnic3, vmnic2, vmnic1, vmnic0
    Portgroups: VM Network, Management Network
both means CDP is now running and the lldp dameon on Cumulus Linux is capable of seeing CDP devices.
After the next CDP interval, the Cumulus Linux box will pick up the interface via the
lldpdaemon:cumulus@switch:~$ lldpctl show neighbor swp49 ------------------------------------------------------------------------------- LLDP neighbors: ------------------------------------------------------------------------------- Interface: swp49, via: CDPv2, RID: 6, Time: 0 day, 00:34:58 Chassis: ChassisID: local NX-1050-A SysName: NX-1050-A SysDescr: Releasebuild-2494585 running on VMware ESX MgmtIP: 0.0.0.0 Capability: Bridge, on Port: PortID: ifname vmnic2 PortDescr: vmnic2 -------------------------------------------------------------------------------Use
net showto look atlldpinformation:cumulus@switch:~$ net show lldp Local Port Speed Mode Remote Port Remote Host Summary ------------ ------- ------------- ---- ----------------- --------------- ------------------------- eth0 1G Mgmt ==== swp6 oob-mgmt-switch IP: 192.168.0.11/24(DHCP) swp1 1G Access/L2 ==== 44:38:39:00:00:03 server01 Untagged: br0 swp51 1G NotConfigured ==== swp1 spine01 swp52 1G NotConfigured ==== swp1 spine02
Nutanix Acropolis is an alternate hypervisor that Nutanix supports. Acropolis Hypervisor uses the yum packaging system and is capable of installing normal Linux lldp daemons to operating just like Cumulus Linux. LLDP should be enabled for each interface on the host. Refer to this article from Mellanox, https://portal.nutanix.com/page/documents/kbs/details/?targetId=kA032000000TVfiCAG, for setup instructions.
Troubleshoot Connections without LLDP or CDP
Find the MAC address information in the Prism GUI, located in: Hardware > Table > Host > Host NICs
Select a MAC address to troubleshoot (e.g. 0c:c4:7a:09:a2:43 represents vmnic0 which is tied to NX-1050-A).
List out all the MAC addresses associated to the bridge:
cumulus@switch:~$ brctl showmacs br-ntnx
port name mac addr        vlan    is local?   ageing timer
swp9      00:02:00:00:00:06   0   no        66.94
swp52     00:0c:29:3e:32:12   0   no         2.73
swp49     00:0c:29:5a:f4:7f   0   no         2.73
swp51     00:0c:29:6f:e1:e4   0   no         2.73
swp49     00:0c:29:74:0c:ee   0   no         2.73
swp50     00:0c:29:a9:36:91   0   no         2.73
swp9      08:9e:01:f8:8f:0c   0   no        13.56
swp9      08:9e:01:f8:8f:35   0   no         2.73
swp4      0c:c4:7a:09:9e:d4   0   no        24.05
swp1      0c:c4:7a:09:9f:8e   0   no        13.56
swp3      0c:c4:7a:09:9f:93   0   no        13.56
swp2      0c:c4:7a:09:9f:95   0   no        24.05
swp52     0c:c4:7a:09:a0:c1   0   no         2.73
swp51     0c:c4:7a:09:a2:35   0   no         2.73
swp49     0c:c4:7a:09:a2:43   0   no         2.73
swp9      44:38:39:00:82:04   0   no         2.73
swp9      74:e6:e2:f5:a2:80   0   no         2.73
swp1      74:e6:e2:f5:a2:81   0   yes        0.00
swp2      74:e6:e2:f5:a2:82   0   yes        0.00
swp3      74:e6:e2:f5:a2:83   0   yes        0.00
swp4      74:e6:e2:f5:a2:84   0   yes        0.00
swp5      74:e6:e2:f5:a2:85   0   yes        0.00
swp6      74:e6:e2:f5:a2:86   0   yes        0.00
swp7      74:e6:e2:f5:a2:87   0   yes        0.00
swp8      74:e6:e2:f5:a2:88   0   yes        0.00
swp9      74:e6:e2:f5:a2:89   0   yes        0.00
swp10     74:e6:e2:f5:a2:8a   0   yes        0.00
swp49     74:e6:e2:f5:a2:b1   0   yes        0.00
swp50     74:e6:e2:f5:a2:b2   0   yes        0.00
swp51     74:e6:e2:f5:a2:b3   0   yes        0.00
swp52     74:e6:e2:f5:a2:b4   0   yes        0.00
swp9      8e:0f:73:1b:f8:24   0   no         2.73
swp9      c8:1f:66:ba:60:cf   0   no        66.94
Alternatively, you can use
grep:cumulus@switch:~$ brctl showmacs br-ntnx | grep 0c:c4:7a:09:a2:43 swp49 0c:c4:7a:09:a2:43 0 no 4.58vmnic1 is now hooked up to swp49. This matches what is seen in
lldp:cumulus@switch:~$ lldpctl show neighbor swp49 ------------------------------------------------------------------------------- LLDP neighbors: ------------------------------------------------------------------------------- Interface: swp49, via: CDPv2, RID: 6, Time: 0 day, 01:11:12 Chassis: ChassisID: local NX-1050-A SysName: NX-1050-A SysDescr: Releasebuild-2494585 running on VMware ESX MgmtIP: 0.0.0.0 Capability: Bridge, on Port: PortID: ifname vmnic2 PortDescr: vmnic2 -------------------------------------------------------------------------------