802.1X Interfaces
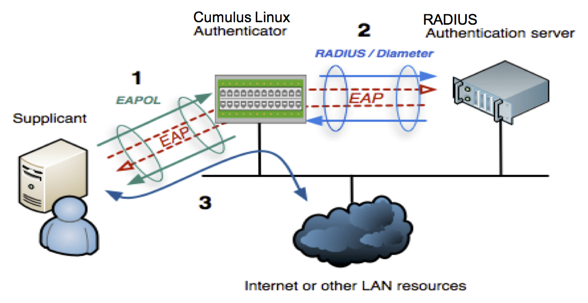
The IEEE 802.1X protocol provides a method of authenticating a client (called a supplicant) over wired media. It also provides access for individual MAC addresses on a switch (called the authenticator) after those MAC addresses have been authenticated by an authentication server, typically a RADIUS (Remote Authentication Dial In User Service, defined by RFC 2865) server.
A Cumulus Linux switch acts as an intermediary between the clients connected to the wired ports and the authentication server, which is reachable over the existing network. EAPOL (Extensible Authentication Protocol (EAP) over LAN - EtherType value of 0x888E, defined by RFC 3748) operates on top of the data link layer; the switch uses EAPOL to communicate with supplicants connected to the switch ports.
Cumulus Linux implements 802.1X through the Debian hostapd package, which has been modified to provide the PAE (port access entity).
Supported Features
- 802.1X is supported on Broadcom-based switches (except the Hurricane2 switch). The Tomahawk, Tomahawk2, and Trident3 switch must be running in nonatomic mode.
- 802.1X is supported on physical interfaces only, such as swp1 or swp2s0 (bridged/access only and routed interfaces).
- The interfaces cannot be part of a bond.
- 802.1X is not supported on eth0.
- You can configure 802.1X interfaces for bridges in both VLAN-aware mode and traditional mode using the following features:
- Parking VLAN.
- Dynamic VLAN.
- MAB (MAC-based authentication bypass).
- MAB, parking VLAN, and dynamic VLAN all require a bridge access port.
- In traditional bridge mode, parking VLANs and dynamic VLANs both require the destination bridge to have a parking VLAN ID or dynamic VLAN ID tagged subinterface.
- When you enable or disable 802.1X on ports,
hostapdreloads; however, existing authorized sessions do not reset. - Changing the 802.1X interface, MAB, or parking VLAN settings do not reset existing authorized user ports. However, removing all 802.1X interfaces or changing any of the following RADIUS parameters restarts
hostapd, which forces existing, authorized users to re-authenticate:- RADIUS server IP address, shared secret, authentication port or accounting port.
- Parking VLAN ID.
- MAB activation delay.
- EAP reauthentication period.
- You can configure up to three RADIUS servers (in case of failover). However, do not use a Cumulus Linux switch as the RADIUS server.
- You can configure 802.1X interfaces with dynamic ACLs in VLAN-aware bridge mode only.
- 802.1X on Cumulus Linux has been tested with only a few
wpa_supplicant(Debian), Windows 10 and Windows 7 supplicants. - RADIUS authentication is supported with FreeRADIUS and Cisco ACS.
- 802.1X supports simple login and password, PEAP/MSCHAPv2 (Win7) and EAP-TLS (Debian).
- 802.1X supports RFC 5281 for EAP-TTLS, which provides more secure transport layer security.
- Mako template-based configurations are not supported.
- Cumulus Linux supports Multi Domain Authentication (MDA), where 802.1X is extended to allow authorization of multiple devices (a data and a voice device) on a single port and assign different VLANs to the devices based on authorization.
- MDA is enabled by default; however, you need to assign a tagged VLAN for voice devices (see Configure 802.1X Interfaces for a VLAN-aware Bridge).
- A maximum of four authorized devices (MAB + EAPOL) per port are supported.
- The 802.1X-enabled port must be a trunk port to allow tagged voice traffic from a phone; you cannot enable 802.1X on an access port.
- Only one untagged VLAN and one tagged VLAN is supported on the 802.1X enabled ports.
- Multiple MAB (non voice) devices on a port are supported for VLAN-aware bridges only. Authorization of multiple MAB devices for different VLANs is not supported.
- Cumulus Linux does not support 802.1X with MLAG; the switch cannot synchronize 802.1X authenticated MAC addresses over the peerlink.
Configure the RADIUS Server
Before you can authenticate with 802.1x on your switch, you must configure a RADIUS server somewhere in your network. Popular examples of commercial software with RADIUS capability include Cisco ISE and Aruba ClearPass.
There are also open source versions of software supporting RADIUS such as PacketFence and FreeRADIUS. This section discusses how to add FreeRADIUS to a Debian server on your network.
Do not use a Cumulus Linux switch as the RADIUS server.
To add FreeRADIUS on a Debian server, do the following:
root@radius:~# apt-get update
root@radius:~# apt-get install freeradius
When installed and configured, the FreeRADIUS server can serve Cumulus Linux running hostapd as a RADIUS client.
For more information, see the FreeRADIUS documentation.
Configure 802.1X Interfaces
All the 802.1X interfaces share the same RADIUS server settings. Make sure you configure the RADIUS server before you configure the 802.1X interfaces. See Configure the RADIUS Server above.
To configure an 802.1X interface, you need to set the following parameters, then enable 802.1X on the interface:
- The RADIUS accounting port, which defaults to 1813.
- The RADIUS Server IPv4 or IPv6 address, which has no default, but is required. You can also specify a VRF.
- The RADIUS shared secret, which has no default, but is required.
Configure 802.1X Interfaces for a VLAN-aware Bridge
NCLU handles all the 802.1X interface configuration, updating hostapd and other components so you do not have to manually modify configuration files.
Create a simple interface bridge configuration on the switch and add the switch ports that are members of the bridge. You can use glob syntax to add a range of interfaces. The MAB and parking VLAN configurations require interfaces to be bridge access ports. The VLAN-aware bridge must be named bridge and there can be only one VLAN-aware bridge on a switch.
cumulus@switch:~$ net add bridge bridge ports swp1-4Add the 802.1X RADIUS server IP address and shared secret:
cumulus@switch:~$ net add dot1x radius server-ip 127.0.0.1
cumulus@switch:~$ net add dot1x radius shared-secret mysecret
You can specify a VRF for outgoing RADIUS accounting and authorization packets. The following example specifies a VRF called turtle:
cumulus@switch:~$ net add dot1x radius server-ip 127.0.0.1 vrf turtle
cumulus@switch:~$ net add dot1x radius shared-secret mysecret
Enable 802.1X on the interfaces, then review and commit the new configuration:
cumulus@switch:~$ net add interface swp1-4 dot1x
cumulus@switch:~$ net pending
cumulus@switch:~$ net commit
To assign a tagged VLAN for voice devices and assign different VLANs to the devices based on authorization, run these commands:
cumulus@switch:~$ net add interface swp1-4 dot1x voice-enable
cumulus@switch:~$ net add interface swp1-4 dot1x voice-enable vlan 200
cumulus@switch:~$ net pending
cumulus@switch:~$ net commit
Edit the
/etc/network/interfacesfile to create a simple interface bridge configuration on the switch and add the switch ports that are members of the bridge. The MAB and parking VLAN configurations require interfaces to be bridge access ports. The VLAN-aware bridge must be named bridge and there can be only one VLAN-aware bridge on a switch. The following example shows that swp1 thru swp4 are members of the bridge.cumulus@switch:~$ sudo nano /etc/network/interfaces ... auto bridge iface bridge bridge-ports swp1 swp2 swp3 swp4 bridge-vlan-aware yes ...Edit the
/etc/hostapd.conffile to configure 802.1X settings. The example below sets:- The IP address of the 802.1X RADIUS server to 127.0.0.1 (
auth_server_addr=127.0.0.1). You can specify a VRF for outgoing RADIUS accounting and authorization packets (for example, to specify a VRF called turtle:auth_server_addr=127.0.0.1%turtle). - The shared secret to mysecret (
auth_server_shared_secret=mysecret). - 802.1X on swp1 thru swp4 (
interfaces=swp1,swp2,swp3,swp4).
cumulus@switch:~$ sudo nano /etc/hostapd.conf ... interfaces=swp1,swp2,swp3,swp4 mab_interfaces= parking_vlan_interfaces= parking_vlan_id= mab_activation_delay=30 eap_reauth_period=0 eap_send_identity=0 ctrl_interface=/var/run/hostapd nas_identifier=localhost auth_server_addr=127.0.0.1 auth_server_port=1812 auth_server_shared_secret=mysecret acct_server_addr= acct_server_port=1813 acct_server_shared_secret=mysecret ...- The IP address of the 802.1X RADIUS server to 127.0.0.1 (
Enable then restart the
hostapdservice so that the configuration persists between reboots:cumulus@switch:~$ sudo systemctl enable hostapd cumulus@switch:~$ sudo systemctl restart hostapd
Configure 802.1X Interfaces for a Traditional Mode Bridge
NCLU and hostapd might change traditional mode configurations on the bridge-ports line in the /etc/network/interface file by adding or deleting special 802.1X traditional mode bridge-ports configuration stanzas in /etc/network/interfaces.d/. The source configuration command in /etc/network/interfaces must include these special configuration filenames. It must include at least source /etc/network/interfaces.d/*.intf so that these files are sourced during an ifreload.
Create uplink ports. The following example uses bonds:
cumulus@switch:~$ net add bond bond1 bond slaves swp5-6 cumulus@switch:~$ net add bond bond2 bond slaves swp7-8Create a traditional mode bridge configuration on the switch and add the switch ports that are members of the bridge. A traditional bridge cannot be named **** bridge as that name is reserved for the single VLAN-aware bridge on the switch. You can use glob syntax to add a range of interfaces.
cumulus@switch:~$ net add bridge bridge1 ports swp1-4Create bridge associations with the parking VLAN ID and the dynamic VLAN IDs. In this example, 600 is used for the parking VLAN ID and 700 is used for the dynamic VLAN ID:
cumulus@switch:~$ net add bridge br-vlan600 ports bond1.600 cumulus@switch:~$ net add bridge br-vlan700 ports bond2.700Add the 802.1X RADIUS server IP address and shared secret:
cumulus@switch:~$ net add dot1x radius server-ip 127.0.0.1 cumulus@switch:~$ net add dot1x radius shared-secret mysecretYou can specify a VRF for outgoing RADIUS accounting and authorization packets.The following example specifies a VRF called turtle:
cumulus@switch:~$ net add dot1x radius server-ip 127.0.0.1 vrf turtle cumulus@switch:~$ net add dot1x radius shared-secret mysecretEnable 802.1X on the interfaces, then review and commit the new configuration:
cumulus@switch:~$ net add interface swp1-2 dot1x cumulus@switch:~$ net pending cumulus@switch:~$ net commit
Edit the
/etc/network/interfacesfile to create uplink ports and create a traditional mode bridge configuration on the switch.a. Create uplink ports. The following example uses bonds:
cumulus@switch:~$ sudo nano /etc/network/interfaces ... auto bond1 iface bond1 bond-slaves swp5 swp6 auto bond2 iface bond2 bond-slaves swp7 swp8 ...b. Create a traditional mode bridge configuration on the switch and add the switch ports that are members of the bridge. You must also create bridge associations with the parking VLAN ID and the dynamic VLAN IDs. In this example, 600 is used for the parking VLAN ID and 700 is used for the dynamic VLAN ID.
A traditional bridge cannot be named **** bridge as that name is reserved for the single VLAN-aware bridge on the switch. You can use glob syntax to add a range of interfaces.
cumulus@switch:~$ sudo nano /etc/network/interfaces ... auto bridge1 iface bridge1 bridge-ports swp1-swp4 bridge-vlan-aware no auto br-vlan600 iface br-vlan600 bridge-ports bond1.600 bridge-vlan-aware no auto br-vlan700 iface br-vlan700 bridge-ports bond1.700 bridge-vlan-aware noEdit the
/etc/hostapd.conffile to configure 802.1X settings. The example below sets:- The IP address of the 802.1X RADIUS server to 127.0.0.1 (
auth_server_addr=127.0.0.1). You can specify a VRF for outgoing RADIUS accounting and authorization packets (for example, to specify a VRF called turtle:auth_server_addr=127.0.0.1%turtle). - The shared secret to mysecret (
auth_server_shared_secret=mysecret). - 802.1X on swp1, swp2, swp3, and swp4 (
interfaces=swp1,swp2,swp3,swp4).
cumulus@switch:~$ sudo nano /etc/hostapd.conf ... interfaces=swp1,swp2,swp3,swp4 mab_interfaces= parking_vlan_interfaces= parking_vlan_id= mab_activation_delay=30 eap_reauth_period=0 eap_send_identity=0 ctrl_interface=/var/run/hostapd nas_identifier=localhost auth_server_addr=127.0.0.1 auth_server_port=1812 auth_server_shared_secret=mysecret acct_server_addr= acct_server_port=1813 acct_server_shared_secret=testing123 ...- The IP address of the 802.1X RADIUS server to 127.0.0.1 (
Enable then restart the
hostapdservice so that the configuration persists between reboots:cumulus@switch:~$ sudo systemctl enable hostapd cumulus@switch:~$ sudo systemctl restart hostapd
Configure the Linux Supplicants
A sample FreeRADIUS server configuration needs to contain the entries for users host1 and host2 on swp1 and swp2 for them to be placed in a VLAN.
host1 Cleartext-Password := "host1password"
host2 Cleartext-Password := "host2password"
After being configured, each supplicant needs the proper credentials:
user@host1:~# cat /etc/wpa_supplicant.conf
ctrl_interface=/var/run/wpa_supplicant
ctrl_interface_group=0
eapol_version=2
ap_scan=0
network={
key_mgmt=IEEE8021X
eap=TTLS MD5
identity="host1"
anonymous_identity="host1"
password="host1password"
phase1="auth=MD5"
eapol_flags=0
}
user@host2:~# cat /etc/wpa_supplicant.conf
ctrl_interface=/var/run/wpa_supplicant
ctrl_interface_group=0
eapol_version=2
ap_scan=0
network={
key_mgmt=IEEE8021X
eap=TTLS MD5
identity="host2"
anonymous_identity="host2"
password="host2password"
phase1="auth=MD5"
eapol_flags=0
}
To test that a supplicant (client) can communicate with the Cumulus Linux Authenticator switch, install the wpasupplicant package:
root@radius:~# apt-get update
root@radius:~# apt-get install wpasupplicant
And run the following command from the supplicant:
root@host1:/home/cumulus# wpa_supplicant -c /etc/wpa_supplicant.conf -D wired -i swp1
Successfully initialized wpa_supplicant
swp1: Associated with 01:80:c2:00:00:03
swp1: CTRL-EVENT-EAP-STARTED EAP authentication started
swp1: CTRL-EVENT-EAP-PROPOSED-METHOD vendor=0 method=4
swp1: CTRL-EVENT-EAP-METHOD EAP vendor 0 method 4 (MD5) selected
swp1: CTRL-EVENT-EAP-SUCCESS EAP authentication completed successfully
swp1: CTRL-EVENT-CONNECTED - Connection to 01:80:c2:00:00:03 compl
Or from another supplicant:
root@host2:/home/cumulus# wpa_supplicant -c /etc/wpa_supplicant.conf -D wired -i swp1
Successfully initialized wpa_supplicant
swp1: Associated with 01:80:c2:00:00:03
swp1: CTRL-EVENT-EAP-STARTED EAP authentication started
swp1: CTRL-EVENT-EAP-PROPOSED-METHOD vendor=0 method=4
swp1: CTRL-EVENT-EAP-METHOD EAP vendor 0 method 4 (MD5) selected
swp1: CTRL-EVENT-EAP-SUCCESS EAP authentication completed successfully
swp1: CTRL-EVENT-CONNECTED - Connection to 01:80:c2:00:00:03 comp
Configure Accounting and Authentication Ports
You can configure the accounting and authentication ports in Cumulus Linux. The default values are 1813 for the accounting port and 1812 for the authentication port. You can also change the reauthentication period for Extensible Authentication Protocol (EAP). The period defaults to 0 (no re-authentication is performed by the switch).
To use different ports:
The following example commands change:
- The authentication port to 2812
- The accounting port to 2813
- The reauthentication period for EAP to 86400
cumulus@switch:~$ net add dot1x radius authentication-port 2812
cumulus@switch:~$ net add dot1x radius accounting-port 2813
cumulus@switch:~$ net add dot1x eap-reauth-period 86400
cumulus@switch:~$ net pending
cumulus@switch:~$ net commit
Edit the /etc/hostapd.conf file to change the accounting and authentication ports. The example below sets:
- The accounting port to 2813 (
auth_server_port=2813) - The authentication port to 2812
- The reauthentication period for EAP to 86400 (
eap_reauth_period=86400)
cumulus@switch:~$ sudo nano /etc/hostapd.conf
...
eap_reauth_period=86400
eap_send_identity=0
ctrl_interface=/var/run/hostapd
nas_identifier=localhost
auth_server_addr=127.0.0.1
auth_server_port=2812
auth_server_shared_secret=mysecret
acct_server_addr=
acct_server_port=2813
...
Restart the hostapd service :
cumulus@switch:~$ sudo systemctl restart hostapd
Configure MAC Authentication Bypass
MAC authentication bypass (MAB) enables bridge ports to allow devices to bypass authentication based on their MAC address. This is useful for devices that do not support PAE, such as printers or phones.
MAB must be configured on both the RADIUS server and the RADIUS client (the Cumulus Linux switch).
When using a VLAN-aware bridge, the switch port must be part of bridge named bridge.
To configure MAB:
Enable a bridge port for MAB. The following example commands enable bridge port swp1 for MAB:
cumulus@switch:~$ net add interface swp1 dot1x mab
cumulus@switch:~$ net pending
cumulus@switch:~$ net commit
Edit the /etc/hostapd.conf file to enable a bridge port for MAB. The following example enables bridge port swp1 for MAB.
cumulus@switch:~$ sudo nano hostapd.conf
...
mab_interfaces=swp1
parking_vlan_interfaces=
parking_vlan_id=
...
Restart the hostapd service:
cumulus@switch:~$ sudo systemctl restart hostapd
Configure a Parking VLAN
If a non-authorized supplicant tries to communicate with the switch, you can route traffic from that device to a different VLAN and associate that VLAN with one of the switch ports to which the supplicant is attached.
For VLAN-aware bridges, the parking VLAN is assigned by manipulating the PVID of the switch port. For traditional mode bridges, Cumulus Linux identifies the bridge associated with the parking VLAN ID and moves the switch port into that bridge. If an appropriate bridge is not found for the move, the port remains in an unauthenticated state where no packets can be received or transmitted.
When using a VLAN-aware bridge, the switch port must be part of bridge named bridge.
Run the following commands:
cumulus@switch:~$ net add dot1x parking-vlan-id 777
cumulus@switch:~$ net add interface swp1 dot1x parking-vlan
cumulus@switch:~$ net pending
cumulus@switch:~$ net commit
If the authentication for swp1 fails, the port is moved to the parking VLAN:
cumulus@switch:~$ net show dot1x interface swp1 details
Interface MAC Address Attribute Value
--------- ----------------- ---------------------------- -----------------
swp1 00:02:00:00:00:08 Status Flags [PARKED_VLAN]
Username vlan60
Authentication Type MD5
VLAN 777
Session Time (seconds) 24772
EAPOL Frames RX 9
EAPOL Frames TX 12
EAPOL Start Frames RX 1
EAPOL Logoff Frames RX 0
EAPOL Response ID Frames RX 4
EAPOL Response Frames RX 8
EAPOL Request ID Frames TX 4
EAPOL Request Frames TX 8
EAPOL Invalid Frames RX 0
EAPOL Length Error Frames Rx 0
EAPOL Frame Version 2
EAPOL Auth Last Frame Source 00:02:00:00:00:08
EAPOL Auth Backend Responses 8
RADIUS Auth Session ID C2FED91A39D8D605
The following output shows a parking VLAN association failure. A VLAN association failure only occurs with traditional mode bridges when there is no traditional bridge available with a parking VLAN ID-tagged subinterface (notice the [UNKNOWN_BR] status in the output):
cumulus@switch:~$ net show dot1x interface swp3 details
Interface MAC Address Attribute Value
--------- ----------------- ---------------------------- -------------------------
swp1 00:02:00:00:00:08 Status Flags [PARKED_VLAN][UNKNOWN_BR]
Username vlan60
Authentication Type MD5
VLAN 777
Session Time (seconds) 24599
EAPOL Frames RX 3
EAPOL Frames TX 3
EAPOL Start Frames RX 1
EAPOL Logoff Frames RX 0
EAPOL Response ID Frames RX 1
EAPOL Response Frames RX 2
EAPOL Request ID Frames TX 1
EAPOL Request Frames TX 2
EAPOL Invalid Frames RX 0
EAPOL Length Error Frames Rx 0
EAPOL Frame Version 2
EAPOL Auth Last Frame Source 00:02:00:00:00:08
EAPOL Auth Backend Responses 2
RADIUS Auth Session ID C2FED91A39D8D605
Edit the /etc/hostapd.conf file to add the parking VLAN ID and port. The following example adds the parking VLAN ID 777 (parking_vlan_id=777) and port swp1 (parking_vlan_interfaces=swp1)
cumulus@switch:~$ sudo nano hostapd.conf
...
parking_vlan_interfaces=swp1
parking_vlan_id=777
...
If the authentication for swp1 fails, the port is moved to the parking VLAN.
Configure Dynamic VLAN Assignments
A common requirement for campus networks is to assign dynamic VLANs to specific users in combination with IEEE 802.1x. After authenticating a supplicant, the user is assigned a VLAN based on the RADIUS configuration.
For VLAN-aware bridges, the dynamic VLAN is assigned by manipulating the PVID of the switch port. For traditional mode bridges, Cumulus Linux identifies the bridge associated with the dynamic VLAN ID and moves the switch port into that bridge. If an appropriate bridge is not found for the move, the port remains in an unauthenticated state where no packets can be received or transmitted.
To enable dynamic VLAN assignment globally, where VLAN attributes sent from the RADIUS server are applied to the bridge:
Run the following commands:
cumulus@switch:~$ net add dot1x dynamic-vlan
cumulus@switch:~$ net pending
cumulus@switch:~$ net commit
You can specify the require option in the command so that VLAN attributes are required. If VLAN attributes do not exist in the access response packet returned from the RADIUS server, the user is not authorized and has no connectivity. If the RADIUS server returns VLAN attributes but the user has an incorrect password, the user is placed in the parking VLAN (if you have configured parking VLAN).
cumulus@switch:~$ net add dot1x dynamic-vlan require
cumulus@switch:~$ net pending
cumulus@switch:~$ net commit
The following example shows a typical RADIUS configuration (shown for FreeRADIUS, not typically configured or run on the Cumulus Linux device) for a user with dynamic VLAN assignment:
# # VLAN 100 Client Configuration for Freeradius RADIUS Server.
# # This is not part of the CL configuration.
vlan100client Cleartext-Password := "client1password"
Service-Type = Framed-User,
Tunnel-Type = VLAN,
Tunnel-Medium-Type = "IEEE-802",
Tunnel-Private-Group-ID = 100
Verify the configuration (notice the [AUTHORIZED] status in the output):
cumulus@switch:~$ net show dot1x interface swp1 details
Interface MAC Address Attribute Value
--------- ----------------- ---------------------------- --------------------------
swp1 00:02:00:00:00:08 Status Flags [DYNAMIC_VLAN][AUTHORIZED]
Username host1
Authentication Type MD5
VLAN 888
Session Time (seconds) 799
EAPOL Frames RX 3
EAPOL Frames TX 3
EAPOL Start Frames RX 1
EAPOL Logoff Frames RX 0
EAPOL Response ID Frames RX 1
EAPOL Response Frames RX 2
EAPOL Request ID Frames TX 1
EAPOL Request Frames TX 2
EAPOL Invalid Frames RX 0
EAPOL Length Error Frames Rx 0
EAPOL Frame Version 2
EAPOL Auth Last Frame Source 00:02:00:00:00:08
EAPOL Auth Backend Responses 2
RADIUS Auth Session ID 939B1A53B624FC56
cumulus@switch:~$ net show dot1x interface summary
Interface MAC Address Username State Authentication Type MAB VLAN
--------- ----------------- ------------ ------------ ------------------- --- ----
swp1 00:02:00:00:00:08 000200000008 AUTHORIZED unknown NO 888
The following output shows a dynamic VLAN association failure. VLAN association failure only occurs with traditional mode bridges when there is no traditional bridge available with a parking VLAN ID-tagged subinterface in it (notice the [UNKNOWN_BR] status in the output):
cumulus@switch:~$ net show dot1x interface swp1 details
Interface MAC Address Attribute Value
--------- ----------------- ---------------------------- --------------------------------------
swp1 00:02:00:00:00:08 Status Flags [DYNAMIC_VLAN][AUTHORIZED][UNKNOWN_BR]
Username host2
Authentication Type MD5
VLAN 888
Session Time (seconds) 11
EAPOL Frames RX 3
EAPOL Frames TX 3
EAPOL Start Frames RX 1
EAPOL Logoff Frames RX 0
EAPOL Response ID Frames RX 1
EAPOL Response Frames RX 2
EAPOL Request ID Frames TX 1
EAPOL Request Frames TX 2
EAPOL Invalid Frames RX 0
EAPOL Length Error Frames Rx 0
EAPOL Frame Version 2
EAPOL Auth Last Frame Source 00:02:00:00:00:08
EAPOL Auth Backend Responses 2
RADIUS Auth Session ID BDF731EF2B765B78
Edit the /etc/hostapd.conf file to add the following options:
dynamic_vlan=1(Specifydynamic_vlan=2if you want VLAN attributes to be required. If VLAN attributes do not exist in the access response packet returned from the RADIUS server, the user is not authorized and has no connectivity. If the RADIUS server returns VLAN attributes but the user has an incorrect password, the user is placed in the parking VLAN, if you have configured parking VLAN).- radius_das_port=
- radius_das_time_window=300
- radius_das_require_event_timestamp=1
- radius_das_require_message_authenticator=1
Remove the eap_send_identity=0 option. For example:
cumulus@switch:~$ sudo nano /etc/hostapd.conf
eap_server=0
ieee8021x=1
driver=wired
dynamic_vlan=1
interfaces=swp1,swp2,swp3,swp4
mab_interfaces=
parking_vlan_interfaces=swp1
parking_vlan_id=777
mab_activation_delay=30
eap_reauth_period=0
ctrl_interface=/var/run/hostapd
nas_identifier=localhost
auth_server_addr=127.0.0.1
auth_server_port=1812
auth_server_shared_secret=mysecret
acct_server_addr=
acct_server_port=1813
acct_server_shared_secret=
radius_das_port=
radius_das_time_window=300
radius_das_require_event_timestamp=1
radius_das_require_message_authenticator=1
Restart the hostapd service :
cumulus@switch:~$ sudo systemctl restart hostapd
The following example shows a typical RADIUS configuration (shown for FreeRADIUS, not typically configured or run on the Cumulus Linux device) for a user with dynamic VLAN assignment:
# # VLAN 100 Client Configuration for Freeradius RADIUS Server.
# # This is not part of the CL configuration.
vlan100client Cleartext-Password := "client1password"
Service-Type = Framed-User,
Tunnel-Type = VLAN,
Tunnel-Medium-Type = "IEEE-802",
Tunnel-Private-Group-ID = 100
To disable dynamic VLAN assignment, where VLAN attributes sent from the RADIUS server are ignored and users are authenticated based on existing credentials:
Run the net del dot1x dynamic-vlan command:
cumulus@switch:~$ net del dot1x dynamic-vlan
cumulus@switch:~$ net pending
cumulus@switch:~$ net commit
Edit the /etc/hostapd.conf file to remove the following options:
- dynamic_vlan=1
- radius_das_port=
- radius_das_time_window=300
- radius_das_require_event_timestamp=1
- radius_das_require_message_authenticator=1
Add the eap_send_identity=0 option. The following example shows the options in the /etc/hostapd.conf file
cumulus@switch:~$ sudo nano /etc/hostapd.conf
eap_server=0
ieee8021x=1
driver=wired
interfaces=
mab_interfaces=
parking_vlan_interfaces=swp1
parking_vlan_id=777
mab_activation_delay=30
eap_reauth_period=0
eap_send_identity=0
ctrl_interface=/var/run/hostapd
nas_identifier=localhost
auth_server_addr=127.0.0.1
auth_server_port=1812
auth_server_shared_secret=mysecret
acct_server_addr=
acct_server_port=1813
acct_server_shared_secret=
Restart the hostapd service.
cumulus@switch:~$ sudo systemctl restart hostapd
Enabling or disabling dynamic VLAN assignment restarts hostapd, which forces existing, authorized users to re-authenticate.
Dynamic ACLs
In high-security campus environments where 802.1X interfaces are in use, you can implement network access control at the user (supplicant) level using dynamic access control lists, or DACLs. A pre-auth ACL permits some traffic to traverse the network before 802.1X authorization takes place, then a dynamic ACL can be applied for that supplicant that is specific to an interface and the MAC address that was authorized (sometimes called a station).
Since DACLs restrict access to network resources at the user level, multiple users on the same VLAN can access different resources based on the policy provided by the RADIUS server. DACLs utilize NAS-Filter-Rule (RADIUS attribute 92), so you can configure them in your RADIUS server configuration and not on each switch.
The DACLs are also dynamically modified to fit the specific authenticating supplicant. For example, specific MAC addresses may be restricted to talk only to certain L3/L4 destinations.
DACLs work with Voice VLAN for phones (MDA).
- You can configure DACLs for VLAN-aware bridges only.
- Port security (MAC address restrictions) cannot be used at the same time as DACLs.
- Cumulus Linux does not support configuring both Dynamic VLAN and DACLs on a given switch port at the same time.
- The source MAC address of the user gaining authorization in the
ebtablesfilter replaces thefrom anysource IPv4 address. - Only a single destination port integer is supported; port ranges are not supported.
- Any IPv4 protocol is supported either by name or number as supported in the Cumulus Linux
ebtablesimplementation.
How It Works
- A supplicant sends packets over a network port. A pre-802.1X authorization ACL executes. You can manually create your own pre-auth ACL filter or just use the Cumulus Linux default (see below). There are no NCLU commands for creating the filter itself.
- When
dot1x dynamic-aclis enabled on an interface, Cumulus Linux installs the pre-auth ACL defaults for the port (once you executenet commit). - When a supplicant on the port tries to get 802.1X authorized, the RADIUS server may (or may not) send along some NAS-Filter-Rule attributes in the Access-Accept message.
- If any filters are sent from the RADIUS server, Cumulus Linux applies them before the default pre-auth ACL.
- If no filters are sent, Cumulus Linux leaves the defaults in place, and no special access is granted to the user.
The NAS-Filter-Rule Attribute
The NAS-Filter-Rule attribute is a string of one or more octets that contains filter rules in the IPFilterRule syntax defined by RFC 6733. The IPFilterRule filters must follow this format:
action dir proto from src to dst [options]
| Keyword | Definition |
|---|---|
action | permit: Allow packets that match the rule. deny: Drop packets that match the rule. |
dir | Direction: in is from the terminal, out is to the terminal. Only the in direction is supported. |
proto | An IP protocol specified by number. The ip keyword means any protocol will match. Only IPv4 ACLs are supported. |
src / dst | Source and destination IP address/subnet mask, and optional ports. |
The syntax for NAS-Filter-Rule attributes configured in the RADIUS server varies widely by RADIUS vendor. But the resulting format for these rules contained in the Access-Accept must conform to the IPFilterRule syntax defined in by RFC 6733, Section 4.3, as mentioned above. When the Cumulus Linux switch gets these rules for a particular user, they are converted to ebtables rules using the actual user MAC address, and are then combined with the default pre-auth ACL rules.
The rules for the appropriate direction are evaluated in order, with the first matched rule terminating the evaluation. Each packet is evaluated once. If no rule matches, the packet is dropped if the last rule was a deny.
If these rules are invalid — for example, they contain contain port ranges or IPv6 addresses — the port does not get authorized and a log message is written to /var/log/syslog.
Get Started
To start applying a DACL to a port, configure the RADIUS server and client, then configure the port with the following:
- An untagged data VLAN
- The DACL and pre-auth ACL
- Optionally, a voice VLAN
Configure a Dynamic ACL
You configure DACLs on the RADIUS server on your network using the methods provided by the RADIUS software, then you enable it for one or more switch ports on a given switch. This section shows the configuration methods for the FreeRADIUS server.
Configure the RADIUS Server
On the RADIUS server, set the password for the RADIUS client (that is, the Cumulus Linux switch) in the /etc/freeradius/3.0/clients.conf file as follows, using the src IP address of the switch:
client leaf01 {
ipaddr = 10.0.0.1
secret = CumulusLinux!
}
Add the DACL configuration to the /etc/freeradius/3.0/users file. For example:
leaf01 Cleartext-Password := "CumulusLinux!"
Service-Type = Framed-User,
Tunnel-Type = VLAN,
Tunnel-Medium-Type = "IEEE-802",
Tunnel-Private-Group-ID = 222,
NAS-Filter-Rule = "permit in udp from any to any 67",
NAS-Filter-Rule = "permit in udp from any to 10.0.0.0/9 53",
NAS-Filter-Rule = "permit in udp from any to 10.0.0.0/9 123",
NAS-Filter-Rule = "permit in icmp from any to any",
NAS-Filter-Rule = "permit in ip from any to 172.16.0.99",
NAS-Filter-Rule = "permit in ip from any to 172.16.0.33",
NAS-Filter-Rule = "permit in ip from any to 172.16.0.105",
NAS-Filter-Rule = "permit in ip from any to 172.16.0.224",
NAS-Filter-Rule = "permit in ip from any to 172.16.224.142",
NAS-Filter-Rule = "permit in tcp from any to 172.16.224.0/9 8883",
NAS-Filter-Rule = "deny in ip from any to any"
ebtables converts this to a temporary file on the switch called something like /etc/cumulus/acl/policy.d/150_dot1x_dacl_swp2_000200000002.rules (the filename is always prefaced with 150_; default rules filenames are prefaced with 200_). It looks like the following:
cumulus@switch:~$ cat /etc/cumulus/acl/policy.d/150_dot1x_dacl_swp2_000200000002.rules
######## hostapd generated Dynamic ACL EBTABLES rule file ########
[ebtables]
-A FORWARD -i swp2 -s 00:02:00:00:00:02 -p IPV4 --ip-protocol UDP --ip-dport 67 -j mark --set-mark 2
-A FORWARD -i swp2 -s 00:02:00:00:00:02 -p IPV4 --ip-protocol UDP --ip-dport 67 -j ACCEPT
-A FORWARD -i swp2 -s 00:02:00:00:00:02 -p IPV4 --ip-dst 10.0.0.0/9 --ip-protocol UDP --ip-dport 53 -j mark --set-mark 2
-A FORWARD -i swp2 -s 00:02:00:00:00:02 -p IPV4 --ip-dst 10.0.0.0/9 --ip-protocol UDP --ip-dport 53 -j ACCEPT
-A FORWARD -i swp2 -s 00:02:00:00:00:02 -p IPV4 --ip-dst 10.0.0.0/9 --ip-protocol UDP --ip-dport 123 -j mark --set-mark 2
-A FORWARD -i swp2 -s 00:02:00:00:00:02 -p IPV4 --ip-dst 10.0.0.0/9 --ip-protocol UDP --ip-dport 123 -j ACCEPT
-A FORWARD -i swp2 -s 00:02:00:00:00:02 -p IPV4 --ip-dst 10.0.0.3 --ip-protocol ICMP -j mark --set-mark 2
-A FORWARD -i swp2 -s 00:02:00:00:00:02 -p IPV4 --ip-dst 10.0.0.3 --ip-protocol ICMP -j DROP
-A FORWARD -i swp2 -s 00:02:00:00:00:02 -p IPV4 --ip-dst 172.16.0.99 -j mark --set-mark 2
-A FORWARD -i swp2 -s 00:02:00:00:00:02 -p IPV4 --ip-dst 172.16.0.99 -j ACCEPT
-A FORWARD -i swp2 -s 00:02:00:00:00:02 -p IPV4 --ip-dst 172.16.131.99 -j mark --set-mark 2
-A FORWARD -i swp2 -s 00:02:00:00:00:02 -p IPV4 --ip-dst 172.16.131.99 -j ACCEPT
-A FORWARD -i swp2 -s 00:02:00:00:00:02 -p IPV4 --ip-dst 172.16.0.33 -j mark --set-mark 2
-A FORWARD -i swp2 -s 00:02:00:00:00:02 -p IPV4 --ip-dst 172.16.0.33 -j ACCEPT
-A FORWARD -i swp2 -s 00:02:00:00:00:02 -p IPV4 --ip-dst 172.16.131.105 -j mark --set-mark 2
-A FORWARD -i swp2 -s 00:02:00:00:00:02 -p IPV4 --ip-dst 172.16.131.105 -j ACCEPT
-A FORWARD -i swp2 -s 00:02:00:00:00:02 -p IPV4 --ip-dst 10.72.169.224 -j mark --set-mark 2
-A FORWARD -i swp2 -s 00:02:00:00:00:02 -p IPV4 --ip-dst 10.72.169.224 -j ACCEPT
-A FORWARD -i swp2 -s 00:02:00:00:00:02 -p IPV4 --ip-dst 10.72.168.142 -j mark --set-mark 2
-A FORWARD -i swp2 -s 00:02:00:00:00:02 -p IPV4 --ip-dst 10.72.168.142 -j ACCEPT
-A FORWARD -i swp2 -s 00:02:00:00:00:02 -p IPV4 --ip-dst 10.0.0.0/9 --ip-protocol TCP --ip-dport 8883 -j mark --set-mark 2
-A FORWARD -i swp2 -s 00:02:00:00:00:02 -p IPV4 --ip-dst 10.0.0.0/9 --ip-protocol TCP --ip-dport 8883 -j ACCEPT
-A FORWARD -i swp2 -s 00:02:00:00:00:02 -p IPV4 --ip-dst 10.0.0.0/9 --ip-protocol TCP --ip-dport 32768 -j mark --set-mark 2
-A FORWARD -i swp2 -s 00:02:00:00:00:02 -p IPV4 --ip-dst 10.0.0.0/9 --ip-protocol TCP --ip-dport 32768 -j ACCEPT
-A FORWARD -i swp2 -s 00:02:00:00:00:02 -p IPV4 -j mark --set-mark 2
-A FORWARD -i swp2 -s 00:02:00:00:00:02 -p IPV4 -j DROP
In the above rules file, the --set-mark 2 option ensures that the nearly identical next rule gets installed in the dedicated TCAM slice for 802.1X.
Configure the RADIUS Client
The Cumulus Linux switch is the RADIUS client.
Configure the Cumulus Linux switch as a RADIUS client using the net add dot1x radius command, and include your RADIUS server’s IP address and secret:
cumulus@leaf01:~$ net add dot1x radius server-ip 10.0.0.1
cumulus@leaf01:~$ net add dot1x radius shared-secret mysecret
Enable one or more switch ports for DACLs by running the net add dot1x interface <INTERFACE> dot1x dynamic-acl command. You can also enable MAC authentication bypass by including the mab option at the end of the command.
cumulus@leaf01:~$ net add interface swp1 dot1x dynamic-acl [mab]
cumulus@leaf01:~$ net pending
cumulus@leaf01:~$ net commit
Edit the
/etc/hostapd.conffile to configure the RADIUS client and the DACL interface. The example below sets the IP address of the 802.1X RADIUS server to 10.0.0.1 (auth_server_addr=10.0.0.1), the shared secret to mysecret (auth_server_shared_secret=mysecret), 802.1X on swp1 and swp2 (interfaces=swp1,swp2), and swp2 as a DACL interface (dynamic_acl_interfaces=swp2).cumulus@switch:~$ sudo nano /etc/hostapd.conf eap_server=0 ieee8021x=1 driver=wired dynamic_vlan=0 eap_send_identity=0 interfaces=swp1,swp2 voice_interfaces= mab_interfaces= dynamic_acl_interfaces=swp2 default_dynamic_acl=default_preauth_dacl.rules parking_vlan_interfaces= parking_vlan_id= mab_activation_delay=0 max_num_sta=4 eap_reauth_period=0 ctrl_interface=/run/hostapd nas_identifier=localhost auth_server_addr=10.0.0.1 auth_server_port=1812 auth_server_shared_secret=mysecret acct_server_addr=10.0.0.1 acct_server_port=1813 acct_server_shared_secret=mysecret radius_das_port= radius_das_time_window=300 radius_das_require_event_timestamp=1 radius_das_require_message_authenticator=1Enable then restart the
hostapdservice so that the configuration persists between reboots:cumulus@switch:~$ sudo systemctl enable hostapd cumulus@switch:~$ sudo systemctl restart hostapd
Pre-auth ACLs
A pre-auth ACL is a static ACL that is applied to all 802.1X dynamic ACL-enabled ports by default. It provides some basic services that are available before 802.1X authorization occurs. The default pre-auth ACL in Cumulus Linux allows for DHCP and DNS to operate without authorizing the supplicant.
The default pre-auth ACL file is /etc/cumulus/acl/policy.d/dot1x_preauth_dacl/default_preauth_dacl.rules, which you can modify, or you can create your own. The default pre-auth ACL permits DHCP (using source port 68 and destination port 67) and DNS (using destination port 53) before 802.1X authorization. You configure pre-auth ACLs only with ebtables syntax.
cumulus@switch:~$ cat /etc/cumulus/acl/policy.d/dot1x_preauth_dacl/default_preauth_dacl.rules
[ebtables]
-A FORWARD -p IPV4 --ip-protocol UDP --ip-dport 53 -j ACCEPT
-A INPUT -p IPV4 --ip-protocol UDP --ip-dport 67 --ip-sport 68 -j ACCEPT
The pre-auth ACL is always applied to dynamic ACL-enabled 802.1X ports, even after authentication has already completed for any clients on a given switch port.
If you don’t use the default pre-auth ACL and don’t create your own, all traffic gets denied.
To create your own pre-auth ACL file, complete the following steps.
Create the pre-auth ACL file as shown in Linux Commands below, then run the net add dot1x default-dacl-preauth-filename <FILE> command.
cumulus@switch:~$ net add dot1x default-dacl-preauth-filename my_preauth_dacl.rules
cumulus@switch:~$ net pending
cumulus@switch:~$ net commit
Create your own pre-auth ACL file in the /etc/cumulus/acl/policy.d/dot1x_preauth_dacl/ directory. For example, the following file allows for DHCP, DNS and PXE to operate before authorizing the supplicant:
cumulus@switch:~$ sudo nano /etc/cumulus/acl/policy.d/dot1x_preauth_dacl/my_preauth_dacl.rules
[ebtables]
-A FORWARD -p IPV4 --ip-dst 8.8.8.8/32 --ip-protocol UDP --ip-dport 53 -j ACCEPT # DNS
-A FORWARD -p IPV4 --ip-protocol UDP --ip-dport 67 --ip-sport 68 -j ACCEPT # DHCP
-A FORWARD -p IPV4 --ip-dst 192.168.1.1/32 -j ACCEPT # PXE
Troubleshooting
To see which interfaces are enabled for 802.1X, run the net show dot1x status command. The Interfaces line shows all 802.1X-enabled interfaces while the Dynamic ACL Interfaces line shows only those 802.1X interfaces that are enabled for DACLs:
cumulus@switch:~$ net show dot1x status
Hostapd IEEE 802.11 AP and IEEE 802.1X/WPA/WPA2/EAP Authenticator Daemon
Attribute Value
----------------------- ----------------
Current Status active (running)
Reload Status enabled
Interfaces swp1 swp2
MAB Interfaces
Voice Interfaces
Parking VLAN Interfaces
Dynamic ACL Interfaces swp2
Dynamic VLAN Status Disabled
8021x ACL Rules 10 used/256 max
To see which interfaces have attempted authorization for DACLs, run net show dot1x interface summary:
cumulus@switch:~$ net show dot1x interface summary
Interface MAC Address Username State Authentication Type MAB VLAN DACL Active
--------- ----------------- -------- ---------- ------------------- --- ---- -----------
swp1 00:02:00:00:00:01 host1 AUTHORIZED MD5 NO NO
swp2 00:02:00:00:00:02 host2 AUTHORIZED MD5 NO YES
To determine the name of the DACL rules file for an interface after it has been authorized and has received DACL rules, run net show dot1x interface swp1 detail. Look for the DACL Filename line:
cumulus@switch:~$ net show dot1x interface swp2 detail
Interface MAC Address Attribute Value
--------- ----------------- ---------------------------- -----------------
swp2 00:02:00:00:00:01 Status Flags [AUTHORIZED]
Username host1
Authentication Type MD5
VLAN
DACL Filename 150_dot1x_dacl_swp2_000200000002.rules
Session Time (seconds) 65
EAPOL Frames RX 3
EAPOL Frames TX 3
EAPOL Start Frames RX 1
EAPOL Logoff Frames RX 0
EAPOL Response ID Frames RX 1
To see which ACLs are applied to a given interface, run net show dot1x interface <INTERFACE> applied-acls, which is similar to the output of cl-acltool -L eb | grep swp1.
cumulus@switch:~$ net show dot1x interface swp2 applied-acls
swp2 EBTABLES ACLs
========================
-p ! 802_1Q -s 0:2:0:0:0:2 -i swp2 -j mark --mark-set 0x2 --mark-target ACCEPT, pcnt = 1 -- bcnt = 421
-p ! 802_1Q -s 0:2:0:0:0:2 -i swp2 -j ACCEPT , pcnt = 1 -- bcnt = 421
-p IPv4 -i swp2 --ip-proto udp --ip-sport 68 --ip-dport 67 -j mark --mark-set 0x2 --mark-target ACCEPT, pcnt = 0 -- bcnt = 0
-p IPv4 -i swp2 --ip-proto udp --ip-sport 68 --ip-dport 67 -j ACCEPT , pcnt = 0 -- bcnt = 0
-p 0x888e -i swp2 -j mark --mark-set 0x2 --mark-target ACCEPT, pcnt = 3 -- bcnt = 192
-p 0x888e -i swp2 -j police --set-mode pkt --set-rate 100 --set-burst 100 , pcnt = 3 -- bcnt = 192
-i swp2 -j mark --mark-set 0x2 --mark-target ACCEPT, pcnt = 4 -- bcnt = 1684
-i swp2 -j DROP , pcnt = 4 -- bcnt = 1684
-p IPv4 -s 0:2:0:0:0:2 -i swp2 --ip-proto udp --ip-dport 67 -j mark --mark-set 0x2 --mark-target ACCEPT, pcnt = 0 -- bcnt = 0
-p IPv4 -s 0:2:0:0:0:2 -i swp2 --ip-proto udp --ip-dport 67 -j ACCEPT , pcnt = 0 -- bcnt = 0
-p IPv4 -s 0:2:0:0:0:2 -i swp2 --ip-dst 10.0.0.0/9 --ip-proto udp --ip-dport 53 -j mark --mark-set 0x2 --mark-target ACCEPT, pcnt = 0 -- bcnt = 0
-p IPv4 -s 0:2:0:0:0:2 -i swp2 --ip-dst 10.0.0.0/9 --ip-proto udp --ip-dport 53 -j ACCEPT , pcnt = 0 -- bcnt = 0
-p IPv4 -s 0:2:0:0:0:2 -i swp2 --ip-dst 10.0.0.0/9 --ip-proto udp --ip-dport 123 -j mark --mark-set 0x2 --mark-target ACCEPT, pcnt = 0 -- bcnt = 0
-p IPv4 -s 0:2:0:0:0:2 -i swp2 --ip-dst 10.0.0.0/9 --ip-proto udp --ip-dport 123 -j ACCEPT , pcnt = 0 -- bcnt = 0
-p IPv4 -s 0:2:0:0:0:2 -i swp2 --ip-proto icmp -j mark --mark-set 0x2 --mark-target ACCEPT, pcnt = 0 -- bcnt = 0
-p IPv4 -s 0:2:0:0:0:2 -i swp2 --ip-proto icmp -j ACCEPT , pcnt = 0 -- bcnt = 0
-p IPv4 -s 0:2:0:0:0:2 -i swp2 --ip-dst 172.16.0.99 -j mark --mark-set 0x2 --mark-target ACCEPT, pcnt = 0 -- bcnt = 0
-p IPv4 -s 0:2:0:0:0:2 -i swp2 --ip-dst 172.16.0.99 -j ACCEPT , pcnt = 0 -- bcnt = 0
-p IPv4 -s 0:2:0:0:0:2 -i swp2 --ip-dst 172.16.131.99 -j mark --mark-set 0x2 --mark-target ACCEPT, pcnt = 0 -- bcnt = 0
-p IPv4 -s 0:2:0:0:0:2 -i swp2 --ip-dst 172.16.131.99 -j ACCEPT , pcnt = 0 -- bcnt = 0
-p IPv4 -s 0:2:0:0:0:2 -i swp2 --ip-dst 172.16.0.33 -j mark --mark-set 0x2 --mark-target ACCEPT, pcnt = 0 -- bcnt = 0
-p IPv4 -s 0:2:0:0:0:2 -i swp2 --ip-dst 172.16.0.33 -j ACCEPT , pcnt = 0 -- bcnt = 0
-p IPv4 -s 0:2:0:0:0:2 -i swp2 --ip-dst 172.16.131.105 -j mark --mark-set 0x2 --mark-target ACCEPT, pcnt = 0 -- bcnt = 0
-p IPv4 -s 0:2:0:0:0:2 -i swp2 --ip-dst 172.16.131.105 -j ACCEPT , pcnt = 0 -- bcnt = 0
-p IPv4 -s 0:2:0:0:0:2 -i swp2 --ip-dst 10.72.169.224 -j mark --mark-set 0x2 --mark-target ACCEPT, pcnt = 0 -- bcnt = 0
-p IPv4 -s 0:2:0:0:0:2 -i swp2 --ip-dst 10.72.169.224 -j ACCEPT , pcnt = 0 -- bcnt = 0
-p IPv4 -s 0:2:0:0:0:2 -i swp2 --ip-dst 10.72.168.142 -j mark --mark-set 0x2 --mark-target ACCEPT, pcnt = 0 -- bcnt = 0
-p IPv4 -s 0:2:0:0:0:2 -i swp2 --ip-dst 10.72.168.142 -j ACCEPT , pcnt = 0 -- bcnt = 0
-p IPv4 -s 0:2:0:0:0:2 -i swp2 --ip-dst 10.0.0.0/9 --ip-proto tcp --ip-dport 8883 -j mark --mark-set 0x2 --mark-target ACCEPT, pcnt = 0 -- bcnt = 0
-p IPv4 -s 0:2:0:0:0:2 -i swp2 --ip-dst 10.0.0.0/9 --ip-proto tcp --ip-dport 8883 -j ACCEPT , pcnt = 0 -- bcnt = 0
-p IPv4 -s 0:2:0:0:0:2 -i swp2 --ip-dst 10.0.0.0/9 --ip-proto tcp --ip-dport 32768 -j mark --mark-set 0x2 --mark-target ACCEPT, pcnt = 0 -- bcnt = 0
-p IPv4 -s 0:2:0:0:0:2 -i swp2 --ip-dst 10.0.0.0/9 --ip-proto tcp --ip-dport 32768 -j ACCEPT , pcnt = 0 -- bcnt = 0
-p IPv4 -s 0:2:0:0:0:2 -i swp2 -j mark --mark-set 0x2 --mark-target ACCEPT, pcnt = 0 -- bcnt = 0
-p IPv4 -s 0:2:0:0:0:2 -i swp2 -j DROP , pcnt = 0 -- bcnt = 0
-p IPv4 -i swp2 --ip-proto udp --ip-dport 53 -j mark --mark-set 0x2 --mark-target ACCEPT, pcnt = 0 -- bcnt = 0
-p IPv4 -i swp2 --ip-proto udp --ip-dport 53 -j ACCEPT , pcnt = 0 -- bcnt = 0
-i swp2 -j mark --mark-set 0x2 --mark-target ACCEPT, pcnt = 0 -- bcnt = 0
-i swp2 -j DROP , pcnt = 0 -- bcnt = 0
Configure MAC Addresses per Port
You can specify the maximum number of authenticated MAC addresses allowed on a port.
Run the net add dot1x max-number-stations <value> command. You can specify any number between 0 and 255. The default value is 4.
cumulus@switch:~$ net add dot1x max-number-stations 10
cumulus@switch:~$ net pending
cumulus@switch:~$ net commit
Edit the /etc/hostapd.conf file to add the max_num_sta= option. For example:
cumulus@switch:~$ sudo nano /etc/hostapd.conf
eap_server=0
ieee8021x=1
driver=wired
dynamic_vlan=1
max_num_sta=10
interfaces=swp1,swp2,swp3,swp4
mab_interfaces=
parking_vlan_interfaces=swp1
parking_vlan_id=777
mab_activation_delay=30
eap_reauth_period=0
ctrl_interface=/var/run/hostapd
nas_identifier=localhost
auth_server_addr=127.0.0.1
auth_server_port=1812
auth_server_shared_secret=mysecret
acct_server_addr=
acct_server_port=1813
acct_server_shared_secret=
radius_das_port=
radius_das_time_window=300
radius_das_require_event_timestamp=1
radius_das_require_message_authenticator=1
Restart the hostapd service :
cumulus@switch:~$ sudo systemctl restart hostapd
Configure EAP Requests from the Switch
Cumulus Linux provides the send-eap-request-id option, which you can use to trigger EAP packets to be sent from the host side of a connection. For example, this option is required in a configuration where a PC connected to a phone attempts to send EAP packets to the switch via the phone but the PC does not receive a response from the switch (the phone might not be ready to forward packets to the switch after a reboot). Because the switch does not receive EAP packets, it attempts to authorize the PC with MAB instead of waiting for the packets. In this case, the PC might be placed into a parking VLAN to isolate it. To remove the PC from the parking VLAN, the switch needs to send an EAP request to the PC to trigger EAP.
To configure the switch send an EAP request, run these commands:
cumulus@switch:~$ net add dot1x send-eap-request-id
cumulus@switch:~$ net pending
cumulus@switch:~$ net commit
Only run this command if MAB is configured on an interface.
The PC might attempt 802.1X authorization through the bridged connection in the back of the phone before the phone completes MAB authorization. In this case, 802.1X authorization fails.
The net del dot1x send-eap-request-id command disables this feature.
RADIUS Change of Authorization and Disconnect Requests
Extensions to the RADIUS protocol (RFC 5176) enable the Cumulus Linux switch to act as a Dynamic Authorization Server (DAS) by listening for Change of Authorization (CoA) requests from the RADIUS server (Dynamic Authorization Client (DAC)) and taking action when needed, such as bouncing a port or terminating a user session. The IEEE 802.1x server (hostapd) running on Cumulus Linux has been adapted to handle these additional, unsolicited RADIUS requests.
Configure DAS
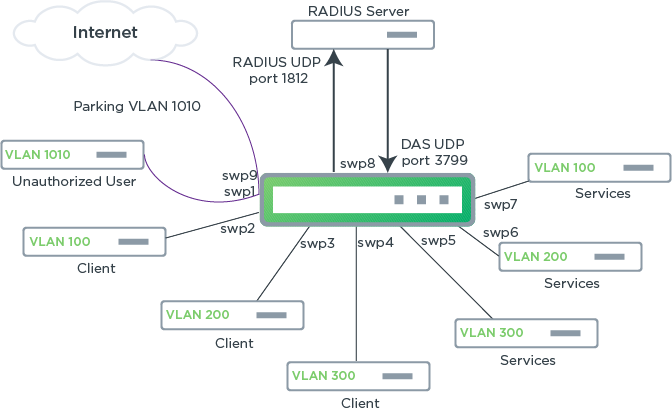
To configure DAS, provide the UDP port (3799 is the default port), the IP address, and the secret key for the DAS client.
The following example commands set the UDP port to the default port, the IP address of the DAS client to 10.0.2.228, and the secret key to myclientsecret:
cumulus@switch:~$ net add dot1x radius das-port default
cumulus@switch:~$ net add dot1x radius das-client-ip 10.0.2.228 das-client-secret mysecret123
cumulus@switch:~$ net commit
You can specify a VRF so that incoming RADIUS disconnect and CoA commands are received and acknowledged on the correct interface when VRF is configured. The following example specifies VRF turtle:
cumulus@switch:~$ net add dot1x radius das-port default
cumulus@switch:~$ net add dot1x radius das-client-ip 10.0.2.228 vrf turtle das-client-secret mysecret123
cumulus@switch:~$ net commit
You can configure up to four DAS clients to be authorized to send CoA commands. For example:
cumulus@switch:~$ net add dot1x radius das-port default
cumulus@switch:~$ net add dot1x radius das-client-ip 10.20.250.53 das-client-secret mysecret1
cumulus@switch:~$ net add dot1x radius das-client-ip 10.0.1.7 das-client-secret mysecret2
cumulus@switch:~$ net add dot1x radius das-client-ip 10.20.250.99 das-client-secret mysecret3
cumulus@switch:~$ net add dot1x radius das-client-ip 10.10.0.0.2 das-client-secret mysecret4
cumulus@switch:~$ net pending
cumulus@switch:~$ net commit
To see DAS configuration information, run the net show configuration dot1x command. For example:
cumulus@switch:~$ net show configuration dot1x
dot1x
mab-activation-delay 5
eap-reauth-period 0
parking-vlan-id 100
dynamic-vlan
radius
accounting-port 1813
das-client-ip 10.0.2.228 das-client-secret mysecret123
authentication-port 1812
das-port 3799
Edit the /etc/hostapd.conf file to add the following options to configure the UDP port, the IP address and secret key for the DAS client:
- radius_das_port
- radius_das_client
The following example sets the UDP port to the default port, the IP address of the DAS client to 10.0.2.228, and the secret key to mysecret123:
cumulus@switch:~$ sudo nano /etc/hostapd.conf
...
radius_das_port=3799
radius_das_client=10.0.2.228 mysecret123
You can specify a VRF so that incoming RADIUS disconnect and CoA commands are received and acknowledged on the correct interface when VRF is configured. The following example specifies VRF turtle:
cumulus@switch:~$ sudo nano /etc/hostapd.conf
...
radius_das_port=3799
radius_das_client=10.0.2.228%turtle mysecret123
You can configure up to four DAS clients to be authorized to send CoA commands. For example:
cumulus@switch:~$ sudo nano /etc/hostapd.conf
...
radius_das_port=3799
radius_das_client=10.20.250.53 mysecret1
radius_das_client=10.0.1.7 mysecret2
radius_das_client=10.20.250.99 mysecret3
radius_das_client=10.10.0.0.2 mysecret4
Restart the hostapd service:
cumulus@switch:~$ sudo systemctl restart hostapd
You can disable DAS in Cumulus Linux at any time by running the following commands:
cumulus@switch:~$ net del dot1x radius das-port
cumulus@switch:~$ net del dot1x radius das-client-ip
cumulus@switch:~$ net pending
cumulus@switch:~$ net commit
Edit the /etc/hostapd.conf file to remove the following options:
radius_das_portradius_das_client
Restart the hostapd service:
cumulus@switch:~$ sudo systemctl restart hostapd
Terminate a User Session
From the DAC, users can create a disconnect message using the radclient utility (included in the Debian freeradius-utils package) on the RADIUS server or other authorized client. A disconnect message is sent as an unsolicited RADIUS Disconnect-Request packet to the switch to terminate a user session and discard all associated session context. The Disconnect-Request packet is used when the RADIUS server wants to disconnect the user after the session has been accepted by the RADIUS Access-Accept packet.
This is an example of a disconnect message created using the radclient utility:
$ echo "Acct-Session-Id=D91FE8E51802097" > disconnect-packet.txt
$ ## OPTIONAL ## echo "User-Name=somebody" >> disconnect-packet.txt
$ echo "Message-Authenticator=1" >> disconnect-packet.txt
$ echo "Event-Timestamp=1532974019" >> disconnect-packet.txt
# now send the packet with the radclient utility (from freeradius-utils deb package)
$ cat disconnect-packet.txt | radclient -x 10.0.0.1:3799 disconnect myclientsecret
To prevent unauthorized servers from disconnecting users, the Disconnect-Request packet must include certain identification attributes (described below). For a session to be disconnected, all parameters must match their expected values at the switch. If the parameters do not match, the switch discards the Disconnect-Request packet and sends a Disconnect-NAK (negative acknowledgment message).
- The
Message-Authenticatorattribute is required. - If the packet comes from a different source IP address than the one defined by
das-client-ip, the session is not disconnected and thehostapdlogs the debug message:DAS: Drop message from unknown client. - The
Event-Timestampattribute is required. IfEvent-Timestampin the packet is outside the time window, a debug message is shown in thehostapdlogs:DAS: Unacceptable Event-Timestamp (1532978602; local time 1532979367) in packet from 10.10.0.21:45263 - drop - If the
Acct-Session-Idattribute is omitted, theUser-Nameattribute is used to find the session. If theUser-Nameattribute is omitted, theAcct-Session-Idattribute is used. If both theUser-Nameand theAcct-Session-Idattributes are supplied, they must match the username provided by the supplicant with theAcct-Session-Idprovided. If neither are given or there is no match, a Disconnect-NAK message is returned to the RADIUS server withError-Cause "Session-Context-Not-Found"and the following debug message is shown in the log:
RADIUS DAS: Acct-Session-Id match
RADIUS DAS: No matches remaining after User-Name check
hostapd_das_find_global_sta: checking ifname=swp2
RADIUS DAS: No matches remaining after Acct-Session-Id check
RADIUS DAS: No matching session found
DAS: Session not found for request from 10.10.0.1:58385
DAS: Reply to 10.10.0.1:58385
The following is an example of the Disconnect-Request packet received by the switch:
RADIUS Protocol
Code: Disconnect-Request (40)
Packet identifier: 0x4f (79)
Length: 53
Authenticator: c0e1fa75fdf594a1cfaf35151a43c6a7
Attribute Value Pairs
AVP: t=Acct-Session-Id(44) l=17 val=D91FE8E51802097
AVP: t=User-Name(1) l=10 val=somebody
AVP: t=Message-Authenticator(80) l=18 val=38cb3b6896623b4b7d32f116fa976cdc
AVP: t=Event-Timestamp(55) l=6 val=1532974019
AVP: t=NAS-IP-Address(4) l=6 val=10.0.0.1
Bounce a Port
You can create a CoA bounce-host-port message from the RADIUS server using the radclient utility (included in the Debian freeradius-utils package). The bounce port can cause a link flap on an authentication port, which triggers DHCP renegotiation from one or more hosts connected to the port.
The following is an example of a Cisco AVPair CoA bounce-host-port message sent from the radclient utility:
$ echo "Acct-Session-Id=D91FE8E51802097" > bounce-packet.txt
$ ## OPTIONAL ## echo "User-Name=somebody" >> bounce-packet.txt
$ echo "Message-Authenticator=1" >> bounce-packet.txt
$ echo "Event-Timestamp=1532974019" >> bounce-packet.txt
$ echo "cisco-avpair='subscriber:command=bounce-host-port' " >> bounce-packet.txt
$ cat bounce-packet.txt | radclient -x 10.0.0.1:3799 coa myclientsecret
The message received by the switch is:
RADIUS Protocol
Code: CoA-Request (43)
Packet identifier: 0x3a (58)
Length: 96
Authenticator: 6480d710802329269d5cae6a59bcfb59
Attribute Value Pairs
AVP: t=Acct-Session-Id(44) l=17 val=D91FE8E51802097
Type: 44
Length: 17
Acct-Session-Id: D91FE8E51802097
AVP: t=User-Name(1) l=10 val=somebody
Type: 1
Length: 10
User-Name: somebody
AVP: t=NAS-IP-Address(4) l=6 val=10.0.0.1
Type: 4
Length: 6
NAS-IP-Address: 10.0.0.1
AVP: t=Vendor-Specific(26) l=43 vnd=ciscoSystems(9)
Type: 26
Length: 43
Vendor ID: ciscoSystems (9)
VSA: t=Cisco-AVPair(1) l=37 val=subscriber:command=bounce-host-port
Type: 1
Length: 37
Cisco-AVPair: subscriber:command=bounce-host-port
Configure the NAS IP Address
You can send the NAS IPv4 or IPv6 address in access request and accounting packets. You can only configure one NAS IP address on the switch, which is used for all interface authorizations.
To configure the NAS IP address, run the following commands:
The following command example sets the NAS IP address to 10.0.0.1:
cumulus@switch:~$ net add dot1x radius nas-ip-address 10.0.0.1
Edit the /etc/hostapd.conf file and configure the own_ip_addr setting with the NAS IP address:
cumulus@switch:~$ sudo nano /etc/hostapd.conf
...
interfaces=swp1,swp2,swp3,swp4
mab_interfaces=
parking_vlan_interfaces=
parking_vlan_id=
mab_activation_delay=30
eap_reauth_period=0
eap_send_identity=0
ctrl_interface=/var/run/hostapd
own_ip_addr=10.0.0.1
Enable, then restart the hostapd service so that the configuration persists between reboots:
cumulus@switch:~$ sudo systemctl enable hostapd
cumulus@switch:~$ sudo systemctl restart hostapd
To delete the NAS IP address, either run the NCLU net del dot1x radius nas-ip-address command or edit the /etc/hostapd.conf file.
Troubleshooting
To check connectivity between two supplicants, ping one host from the other:
root@host1:/home/cumulus# ping 198.51.100.2
PING 10.0.0.2 (10.0.0.2) 56(84) bytes of data.
64 bytes from 10.0.0.2: icmp_seq=1 ttl=64 time=0.604 ms
64 bytes from 10.0.0.2: icmp_seq=2 ttl=64 time=0.552 ms
^C
--- 10.0.0.2 ping statistics ---
2 packets transmitted, 2 received, 0% packet loss, time 1000ms
rtt min/avg/max/mdev = 0.552/0.578/0
You can run net show dot1x with the following options for more data:
jsonprints the command output in JSON format.macsdisplays MAC address information.port-detailsshows counters from the IEEE8021-PAE-MIB for ports.radius-detailsshows counters from the RADIUS-CLIENT MIB (RFC 2618) for ports.statusdisplays the status of the daemon.
To check to see which MAC addresses have been authorized by RADIUS:
cumulus@switch:~$ net show dot1x macs
Interface     Attribute   Value
-----------   -------------  -----------------
swp1          MAC Addresses  00:02:00:00:00:01
swp2          No Data
swp3          No Data
swp4          No Data
To check the port detail counters:
cumulus@switch:~$ net show dot1x port-details

Interface  Attribute                                  Value
-----------  ----------------------------------------     ---------
swp1        Mac Addresses                              00:02:00:00:00:01
            authMultiSessionId                         96703ADC82D77DF2
            connected_time                             182
            dot1xAuthEapolFramesRx                     3
            dot1xAuthEapolFramesTx                     3
            dot1xAuthEapolLogoffFramesRx               0
            dot1xAuthEapolReqFramesTx                  2
            dot1xAuthEapolReqIdFramesTx                1
            dot1xAuthEapolRespFramesRx                 2
            dot1xAuthEapolRespIdFramesRx               1
            dot1xAuthEapolStartFramesRx                1
            dot1xAuthInvalidEapolFramesRx              0
            dot1xAuthLastEapolFrameSource              00:02:00:00:00:01
            dot1xAuthLastEapolFrameVersion             2
            dot1xAuthPaeState                          5
            dot1xAuthQuietPeriod                       60
            dot1xAuthReAuthEnabled                     FALSE
            dot1xAuthReAuthPeriod                      0
            dot1xAuthServerTimeout                     30
            dot1xAuthSessionAuthenticMethod            1
            dot1xAuthSessionId                         1B50FE8939FD9F5E
            dot1xAuthSessionTerminateCause             999
            dot1xAuthSessionTime                       182
            dot1xAuthSessionUserName                   testing
            dot1xPaePortProtocolVersion                2
            last_eap_type_as                           4 (MD5)
            last_eap_type_sta                          4 (MD5)
To check RADIUS counters:
cumulus@switch:~$ net show dot1x radius-details swp1

Interface  Attribute                                   Value
-----------  ----------------------------------------    ---------
swp1       radiusAccClientRequests                      1
           radiusAccClientResponses                     1
           radiusAccClientServerPortNumber              1813
           radiusAccServerAddress                       127.0.0.1
           radiusAuthClientAccessAccepts                1
           radiusAuthClientAccessChallenges             1
           radiusAuthClientAccessRejects                0
           radiusAuthClientAccessRequests               0
           radiusAuthClientServerPortNumber             1812
           radiusAuthServerAddress                      127.0.0.1
           radiusAuthServerIndex                        1

...
You can also check logging with the journalctl command:
cumulus@switch:~$ sudo journalctl -f -u hostapd
Apr 19 22:17:11 switch hostapd[12462]: swp1: interface state UNINITIALIZED->ENABLED
Apr 19 22:17:11 switch hostapd[12462]: swp1: AP-ENABLED
Apr 19 22:17:11 switch hostapd[12462]: Reading rule file /etc/cumulus/acl/policy.d/00control_ps ...
Apr 19 22:17:11 switch hostapd[12462]: Processing rules in file /etc/cumulus/acl/policy.d/00...
Apr 19 22:17:12 switch hostapd[12462]: Reading rule file /etc/cumulus/acl/policy.d/100_dot1x...
Apr 19 22:17:12 switch hostapd[12462]: Processing rules in file /etc/cumulus/acl/policy.d/ ..
Apr 19 22:17:12 switch hostapd[12462]: Reading rule file /etc/cumulus/acl/policy.d/99control
Apr 19 22:17:12 switch hostapd[12462]: Processing rules in file /etc/cumulus/acl/policy.d/99
Apr 19 22:17:12 switch hostapd[12462]: Installing acl policy
Apr 19 22:17:12 switch hostapd[12462]: done.
You can perform more advanced troubleshooting with the following commands.
To increase the debug level in hostapd, copy over the hostapd service file, then add -d, -dd or -ddd to the ExecStart line in the hostapd.service file:
cumulus@switch:~$ cp /lib/systemd/system/hostapd.service /etc/systemd/system/hostapd.service
cumulus@switch:~$ sudo nano /etc/systemd/system/hostapd.service
...
ExecStart=/usr/sbin/hostapd -ddd -c /etc/hostapd.conf
...
To watch debugs with journalctl as supplicants attempt to connect:
cumulus@switch:~$ sudo journalctl -n 1000  -u hostapd      # see the last 1000 lines of hostapd debug logging
cumulus@switch:~$ sudo journalctl -f -u hostapd            # continuous tail of the hostapd daemon debug logging
To check ACL rules in /etc/cumulus/acl/policy.d/100_dot1x_swpX.rules before and after a supplicant attempts to authenticate:
cumulus@switch:~$ sudo cl-acltool -L eb | grep swpXX
cumulus@switch:~$ sudo cl-netstat | grep swpXX           # look at interface counters
To check tc rules in /var/lib/hostapd/acl/tc_swpX.rules with:
cumulus@switch:~$ sudo tc -s filter show dev swpXX parent 1:
cumulus@switch:~$ sudo tc -s filter show dev swpXX parent ffff: