Open Shortest Path First v2 - OSPFv2
This topic describes OSPFv2, which is a link-state routing protocol for IPv4. For IPv6 commands, refer to Open Shortest Path First v3 - OSPFv3.
Basic OSPFv2 Configuration
You can configure OSPF using either numbered interfaces or unnumbered interfaces. Both methods are described below.
OSPFv2 Numbered
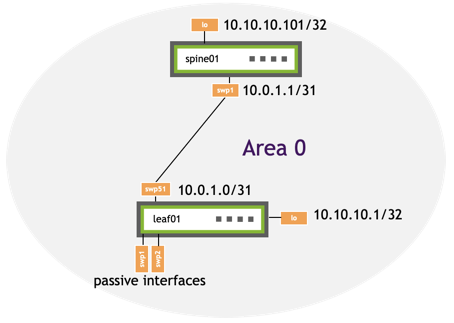
To configure OSPF using numbered interfaces, you specify the router ID, IP subnet prefix, and area address. All the interfaces on the switch with an IP address that matches the network subnet are put into the specified area. OSPF attempts to discover other OSPF routers on those interfaces. All matching interface network addresses are added to a Type-1 Router LSA and advertised to discovered neighbors for proper reachability.
If you do not want to bring up an OSPF adjacency on certain interfaces, but want to advertise those networks in the OSPF database, you can configure the interfaces as passive interfaces. A passive interface creates a database entry but does not send or recieve OSPF hello packets. For example, in a data center topology, the host-facing interfaces do not need to run OSPF, however, the corresponding IP addresses still need to be advertised to neighbors.
Network statements can be as inclusive or generic as necessary to cover the interface networks.
The following example commands configure OSPF numbered on leaf01 and spine01.
| leaf01 | spine01 |
|---|---|
|
|
The configuration below uses the network command to configure the IP subnet prefix with an area address per network (net add ospf network 10.0.1.0/31 area 0). Alternatively, you can configure OSPF per interface with the net add interface command (net add interface swp1 ospf area 0). However, you cannot use both methods in the same configuration.
When you commit a change that configures a new routing service such as OSPF, the FRR daemon restarts and might interrupt network operations for other configured routing services.
cumulus@leaf01:~$ net add loopback lo ip address 10.10.10.1/32
cumulus@leaf01:~$ net add interface swp51 ip address 10.0.1.0/31
cumulus@leaf01:~$ net add ospf router-id 10.10.10.1
cumulus@leaf01:~$ net add ospf network 10.10.10.1/32 area 0
cumulus@leaf01:~$ net add ospf network 10.0.1.0/31 area 0
cumulus@leaf01:~$ net add ospf passive-interface swp1
cumulus@leaf01:~$ net add ospf passive-interface swp2
cumulus@leaf01:~$ net pending
cumulus@leaf01:~$ net commit
You can use the net add ospf passive-interface default command to set all interfaces as passive and the net del ospf passive-interface <interface> command to selectively bring up protocol adjacency only on certain interfaces:
cumulus@leaf01:~$ net add ospf passive-interface default
cumulus@leaf01:~$ net del ospf passive-interface swp51
cumulus@spine01:~$ net add loopback lo ip address 10.10.10.101/32
cumulus@spine01:~$ net add interface swp1 ip address 10.0.1.1/31
cumulus@spine01:~$ net add ospf router-id 10.10.10.101
cumulus@spine01:~$ net add ospf network 10.10.10.101/32 area 0
cumulus@spine01:~$ net add ospf network 10.0.1.1/31 area 0
cumulus@spine01:~$ net pending
cumulus@spine01:~$ net commit
You can use the net add ospf passive-interface default command to set all interfaces as passive and the net del ospf passive-interface <interface> command to selectively bring up protocol adjacency only on certain interfaces:
cumulus@spine01:~$ net add ospf passive-interface default
cumulus@spine01:~$ net del ospf passive-interface swp1
Edit the
/etc/frr/daemonsfile to enable theospfdaemon, then start the FRRouting service (see Configure FRRouting).Edit the
/etc/network/interfacesfile to configure the IP address for the loopback and swp51:
cumulus@leaf01:~$ sudo nano /etc/network/interfaces
...
auto lo
iface lo inet loopback
  address 10.10.10.1/32
auto swp51
iface swp51
address 10.0.1.0/31
Run the
ifreload -acommand to load the new configuration:cumulus@leaf01:~$ sudo ifreload -aFrom the vtysh shell, configure OSPF:
cumulus@leaf01:~$ sudo vtyshleaf01# configure terminal leaf01(config)# router ospf leaf01(config-router)# ospf router-id 10.10.10.1 leaf01(config-router)# network 10.10.10.1/32 area 0 leaf01(config-router)# network 10.0.1.0/31 area 0 leaf01(config-router)# passive-interface swp1 leaf01(config-router)# passive-interface swp2 leaf01(config-router)# exit leaf01(config)# exit leaf01# write memory leaf01# exit cumulus@leaf01:~$
You can use the passive-interface default command to set all interfaces as passive and selectively bring up protocol adjacency only on certain interfaces:
leaf01(config)# router ospf
leaf01(config-router)# passive-interface default
leaf01(config-router)# no passive-interface swp51
Edit the
/etc/frr/daemonsfile to enable theospfdaemon, then start the FRRouting service (see Configure FRRouting).Edit the
/etc/network/interfacesfile to configure the IP address for the loopback and swp1:cumulus@spine01:~$ sudo nano /etc/network/interfaces ... auto lo iface lo inet loopback address 10.10.10.101/32auto swp51 iface swp51 address 10.0.1.1/31
Run the
ifreload -acommand to load the new configuration:cumulus@spine01:~$ sudo ifreload -aFrom the vtysh shell, configure OSPF:
cumulus@spine01:~$ sudo vtyshspine01# configure terminal spine01(config)# router ospf spine01(config-router)# ospf router-id 10.10.101.1 spine01(config-router)# network 10.10.10.101/32 area 0 spine01(config-router)# network 10.0.1.1/31 area 0 spine01(config-router)# exit spine01(config)# exit spine01# write memory spine01# exit cumulus@spine01:~$
You can use the passive-interface default command to set all interfaces as passive and selectively bring up protocol adjacency only on certain interfaces:
spine01(config)# router ospf
spine01(config-router)# passive-interface default
spine01(config-router)# no passive-interface swp1
The NCLU and vtysh commands save the configuration in the /etc/frr/frr.conf file. For example:
...
router ospf
 ospf router-id 10.10.10.1
 network 10.10.10.1/32 area 0
 network 10.0.1.0/31 area 0
 passive-interface swp1
 passive-interface swp2
...
...
router ospf
 ospf router-id 10.10.10.101
 network 10.10.10.101/32 area 0
 network 10.0.1.1/31 area 0
...
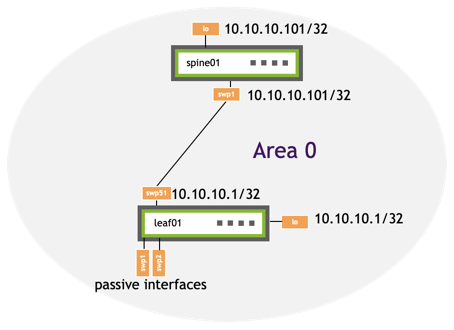
OSPFv2 Unnumbered
Unnumbered interfaces are interfaces without unique IP addresses; multiple interfaces share the same IP address. In OSPFv2, unnumbered interfaces reduce the need for unique IP addresses on leaf and spine interfaces and simplify the OSPF database, reducing the memory footprint and improving SPF convergence times.
To configure an unnumbered interface, take the IP address of loopback interface (called the anchor) and use that as the IP address of the unnumbered interface.
OSPF unnumbered is supported with point-to-point interfaces only and does not support network statements.
The following example commands configure OSPF unnumbered on leaf01 and spine01.
| leaf01 | spine01 |
|---|---|
|
|
Configure the unnumbered interface:
cumulus@leaf01:~$ net add loopback lo ip address 10.10.10.1/32
cumulus@leaf01:~$ net add interface swp51 ip address 10.10.10.1/32
cumulus@leaf01:~$ net pending
cumulus@leaf01:~$ net commit
Configure OSPF:
cumulus@leaf01:~$ net add ospf router-id 10.10.10.1
cumulus@leaf01:~$ net add loopback lo ospf area 0
cumulus@leaf01:~$ net add interface swp51 ospf area 0
cumulus@leaf01:~$ net add ospf passive-interface swp1
cumulus@leaf01:~$ net add ospf passive-interface swp2
cumulus@leaf01:~$ net add interface swp51 ospf network point-to-point
cumulus@leaf01:~$ net pending
cumulus@leaf01:~$ net commit
You can use the net add ospf passive-interface default command to set all interfaces as passive and the net del ospf passive-interface <interface> command to selectively bring up protocol adjacency only on certain interfaces:
cumulus@leaf01:~$ net add ospf passive-interface default
cumulus@leaf01:~$ net del ospf passive-interface swp51
Configure the unnumbered interface:
cumulus@spine01:~$ net add loopback lo ip address 10.10.10.101/32
cumulus@spine01:~$ net add interface swp1 ip address 10.10.10.101/32
cumulus@spine01:~$ net pending
cumulus@spine01:~$ net commit
Configure OSPF:
cumulus@spine01:~$ net add ospf router-id 10.10.10.101
cumulus@spine01:~$ net add loopback lo ospf area 0
cumulus@spine01:~$ net add interface swp1 ospf area 0
cumulus@spine01:~$ net add interface swp1 ospf network point-to-point
cumulus@spine01:~$ net pending
cumulus@spine01:~$ net commit
You can use the net add ospf passive-interface default command to set all interfaces as passive and the net del ospf passive-interface <interface> command to selectively bring up protocol adjacency only on certain interfaces:
cumulus@spine01:~$ net add ospf passive-interface default
cumulus@spine01:~$ net del ospf passive-interface swp1
Edit the
/etc/frr/daemonsfile to enable theospfdaemon, then start the FRRouting service (see Configure FRRouting).Edit the
/etc/network/interfacesfile to configure the loopback and unnumbered interface address:cumulus@leaf01:~$ sudo nano /etc/network/interfaces ... auto lo iface lo inet loopback address 10.10.10.1/32auto swp51 iface swp51 address 10.10.10.1/32
Run the
ifreload -acommand to load the new configuration:cumulus@leaf01:~$ ifreload -aFrom the
vtyshshell, configure OSPF:cumulus@leaf01:~$ sudo vtyshleaf01# configure terminal leaf01(config)# router ospf leaf01(config-router)# ospf router-id 10.10.10.1 leaf01(config-router)# interface swp51 leaf01(config-if)# ip ospf area 0 leaf01(config-if)# ip ospf network point-to-point leaf01(config-if)# exit leaf01(config)# interface lo leaf01(config-if)# ip ospf area 0 leaf01(config-if)# exit leaf01(config)# router ospf leaf01(config-router)# passive-interface swp1,swp2 leaf01(config-router)# end leaf01# write memory leaf01# exit cumulus@leaf01:~$
You can use the
passive-interface defaultcommand to set all interfaces as passive and selectively bring up protocol adjacency only on certain interfaces:leaf01(config)# router ospf leaf01(config-router)# passive-interface default leaf01(config-router)# no passive-interface swp51
Edit the
/etc/frr/daemonsfile to enable theospfdaemon, then start the FRRouting service (see Configure FRRouting).Edit the
/etc/network/interfacesfile to configure the loopback and unnumbered interface address:cumulus@spine01:~$ sudo nano /etc/network/interfaces ... auto lo iface lo inet loopback address 10.10.10.101/32auto swp1 iface swp1 address 10.10.10.101/32
Run the
ifreload -acommand to load the new configuration:cumulus@spine01:~$ sudo ifreload -aFrom the
vtyshshell, configure OSPF:cumulus@spine01:~$ sudo vtyshspine01# configure terminal spine01(config)# router ospf spine01(config)# ospf router-id 10.10.10.101 spine01(config)# interface swp1 spine01(config-if)# ip ospf area 0 spine01(config-if)# ip ospf network point-to-point spine01(config-if)# exit spine01(config)# interface lo spine01(config-if)# ip ospf area 0 spine01(config-if)# exit spine01(config-if)# end spine01# write memory spine01# exit cumulus@spine01:~$
You can use the
passive-interface defaultcommand to set all interfaces as passive and selectively bring up protocol adjacency only on certain interfaces:spine01(config)# router ospf spine01(config-router)# passive-interface default spine01(config-router)# no passive-interface swp1
The NCLU and vtysh commands save the configuration in the /etc/frr/frr.conf file. For example:
...
interface lo
 ip ospf area 0
interface swp51
 ip ospf area 0
 ip ospf network point-to-point
router ospf
 ospf router-id 10.10.10.1
 passive-interface swp1,swp2
...
...
interface lo
 ip ospf area 0
interface swp1
 ip ospf area 0
 ip ospf network point-to-point
router ospf
 ospf router-id 10.10.10.101
...
Optional OSPFv2 Configuration
This section describes optional configuration. The steps provided in this section assume that you already configured basic OSPFv2 as described in Basic OSPF Configuration, above.
Interface Parameters
You can define the following OSPF parameters per interface:
- Network type (point-to-point or broadcast). Broadcast is the default setting. Configure the interface as point-to-point unless you intend to use the Ethernet media as a LAN with multiple connected routers. Point-to-point provides a simplified adjacency state machine; there is no need for DR/BDR election and LSA reflection. See RFC5309 for a more information.
Point-to-point is required for OSPFv2 unnumbered.
- Hello interval. The number of seconds between hello packets sent on the interface. The default is 10 seconds.
- Dead interval. The number of seconds before neighbors declare the router down after they stop hearing hello packets. The default is 40 seconds.
- Priority in becoming the OSPF Designated Router (DR) on a broadcast interface. The default is priority 1.
The following command example sets the network type to point-to-point.
cumulus@switch:~$ net add interface swp51 ospf network point-to-point
cumulus@switch:~$ net pending
cumulus@switch:~$ net commit
cumulus@switch:~$ sudo vtysh

switch# configure terminal
switch(config)# interface swp51
switch(config-if)# ip ospf network point-to-point
switch(config-if)# end
switch# write memory
switch# exit
cumulus@switch:~$
The NCLU and vtysh commands save the configuration in the /etc/frr/frr.conf file. For example
...
interface swp51
 ip ospf network point-to-point
...
The following command example sets the hello interval to 5 seconds and the dead interval to 60 seconds. The hello interval and dead inteval can be any value between 1 and 65535 seconds.
cumulus@switch:~$ net add interface swp51 ospf hello-interval 5
cumulus@switch:~$ net add interface swp51 ospf dead-interval 60
cumulus@switch:~$ net pending
cumulus@switch:~$ net commit
cumulus@switch:~$ sudo vtysh

switch# configure terminal
switch(config)# interface swp51
switch(config-if)# ip ospf network hello-interval 5
switch(config-if)# ip ospf network dead-interval 60
switch(config-if)# end
switch# write memory
switch# exit
cumulus@switch:~$
The NCLU and vtysh commands save the configuration in the /etc/frr/frr.conf file. For example
...
interface swp51
 ip ospf hello-interval 5
 ip ospf dead-interval 60
...
The following command example sets the priority to 5 for swp51. The priority can be any value between 0 to 255 (0 configures the interface to never become the OSPF Designated Router (DR) on a broadcast interface).
cumulus@switch:~$ net add interface swp51 ospf priority 5
cumulus@switch:~$ net pending
cumulus@switch:~$ net commit
cumulus@switch:~$ sudo vtysh

switch# configure terminal
switch(config)# interface swp51
switch(config-if)# ip ospf network priority 5
switch(config-if)# end
switch# write memory
switch# exit
cumulus@switch:~$
The NCLU and vtysh commands save the configuration in the /etc/frr/frr.conf file. For example
...
interface swp51
 ip ospf priority 5
...
To see the currently configured OSPF interface parameter values, run the NCLU net show ospf interface command or the vtysh show ip ospf interface command.
SPF Timer Defaults
OSPF uses the following default timers to prevent consecutive SPFs from overburdening the CPU:
- 0 milliseconds from the initial event until SPF runs
- 50 milliseconds between consecutive SPF runs (the number doubles with each SPF, until it reaches the maximum time between SPF runs)
- 5000 milliseconds maximum between SPFs
The following example commands change the number of milliseconds from the initial event until SPF runs to 80, the number of milliseconds between consecutive SPF runs to 100, and the maximum number of milliseconds between SPFs to 6000.
cumulus@switch:~$ net add ospf timers throttle spf 80 100 6000
cumulus@switch:~$ net pending
cumulus@switch:~$ net commit
cumulus@switch:~$ sudo vtysh

switch# configure terminal
switch(config)# router ospf
switch(config-router)# timers throttle spf 80 100 6000
switch(config-router)# end
switch# write memory
switch# exit
cumulus@switch:~$
The NCLU and vtysh commands save the configuration in the /etc/frr/frr.conf file. For example:
...
router ospf
 ospf router-id 10.10.10.1
 passive-interface swp1
 passive-interface swp2
 network 10.10.10.1/32 area 0
 timers throttle spf 80 100 6000
...
To see the configured SPF timer values, run the NCLU net show ospf command or the vtysh show ip ospf command.
MD5 Authentication
To configure MD5 authentication on the switch, you need to create a key and a key ID, then enable MD5 authentication. The key ID must be a value between 1 and 255 that represents the key used to create the message digest. This value must be consistent across all routers on a link. The key must be a value with an upper range of 16 characters (longer strings are truncated) that represents the actual message digest.
The following example commands create key ID 1 with the key thisisthekey and enable MD5 authentication on swp51 on leaf01 and on swp1 on spine01.
cumulus@leaf01:~$ net add interface swp51 ospf message-digest-key 1 md5 thisisthekey
cumulus@leaf01:~$ net add interface swp51 ospf authentication message-digest
cumulus@leaf01:~$ net pending
cumulus@leaf01:~$ net commit
cumulus@spine01:~$ net add interface swp1 ospf message-digest-key 1 md5 thisisthekey
cumulus@spine01:~$ net add interface swp1 ospf authentication message-digest
cumulus@spine01:~$ net pending
cumulus@spine01:~$ net commit
cumulus@spine01:~$ sudo vtysh
leaf01# configure terminal
leaf01(config)# interface swp51
leaf01(config-if)# ip ospf authentication message-digest
leaf01(config-if)# ip ospf message-digest-key 1 md5 thisisthekey
leaf01(config-if)# end
leaf01# write memory
leaf01# exit
cumulus@leaf01:~$
cumulus@leaf01:~$ sudo vtysh
spine01# configure terminal
spine01(config)# interface swp1
spine01(config-if)# ip ospf authentication message-digest
spine01(config-if)# ip ospf message-digest-key 1 md5 thisisthekey
spine01(config-if)# end
spine01# write memory
spine01# exit
cumulus@spine01:~$
The NCLU and vtysh commands save the configuration in the /etc/frr/frr.conf file. For example:
...
interface swp51
 ip ospf authentication message-digest
 ip ospf message-digest-key 1 md5 thisisthekey
 ...
...
interface swp1
 ip ospf authentication message-digest
 ip ospf message-digest-key 1 md5 thisisthekey
 ...
To remove existing MD5 authentication hashes, run the NCLU net del command (net del interface swp51 ospf message-digest-key 1 md5 thisisthekey) or the vtysh no ip ospf command (no ip ospf message-digest-key 1 md5 thisisthekey).
Summarization and Prefix Range
By default, an area border router (ABR) creates a summary (type-3) LSA for each route in an area and advertises it in adjacent areas. Prefix range configuration optimizes this behavior by creating and advertising one summary LSA for multiple routes. OSPF only allows for route summarization between areas on a ABR. This is done with the area range command.
The following example shows a topology divided into area 0 and area 1. border01 and border02 are area border routers (ABRs) that have links to multiple areas and perform a set of specialized tasks, such as SPF computation per area and summarization of routes across areas.
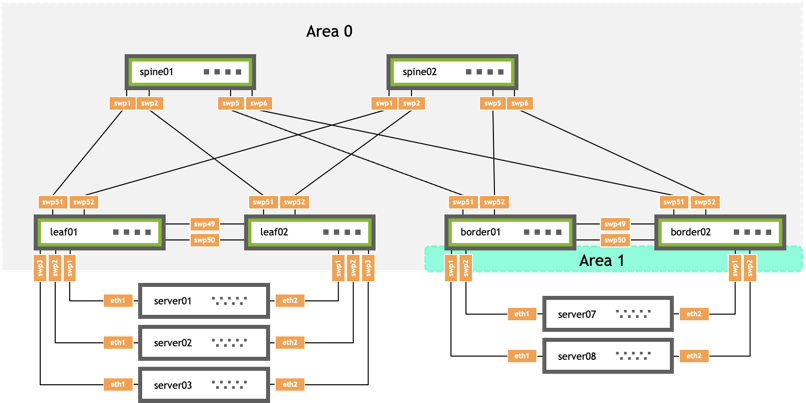
On border01:
- swp1 is in area 1 and is configured with IP addresses 10.0.0.24/31, 172.16.1.1/32, 172.16.1.2/32, and 172.16.1.3/32
- swp51 is in area 0 and is configured with IP address 10.0.1.9/31
These commands create a summary route for all the routes in the range 172.16.1.0/24 in area 0:
cumulus@leaf01:~$ sudo vtysh

leaf01# configure terminal
leaf01(config)# router ospf
leaf01(config-router)# area 0 range 172.16.1.0/24
leaf01(config-router)# end
leaf01# write memory
leaf01# exit
cumulus@leaf01:~$
The vtysh commands save the configuration in the /etc/frr/frr.conf file. For example:
cumulus@border01:mgmt:~$ sudo cat /etc/frr/frr.conf
...
interface lo
 ip ospf area 0
interface swp1
 ip ospf area 1
interface swp2
 ip ospf area 1
interface swp51
 ip ospf area 0
interface swp52
 ip ospf area 0
router ospf
 ospf router-id 10.10.10.63
 area 0 range 172.16.1.0/24
Stub Areas
External routes are the routes redistributed into OSPF from another protocol. They have an AS-wide flooding scope. In many cases, external link states make up a large percentage of the link-state database (LSDB). Stub areas reduce the LSDB size by not flooding AS-external LSAs.
All routers must agree that an area is a stub, otherwise they will not become OSPF neighbors.
To configure a stub area:
cumulus@switch:~$ net add ospf area 1 stub
cumulus@switch:~$ net pending
cumulus@switch:~$ net commit
cumulus@switch:~$ sudo vtysh

switch# configure terminal
switch(config)# router ospf
switch(config-router)# area 1 stub
switch(config-router)# end
switch# write memory
switch# exit
cumulus@switch:~$
The NCLU and vtysh commands save the configuration in the /etc/frr/frr.conf file. For example:
...
router ospf
 router-id 10.10.10.63
 area 1 stub
...
Stub areas still receive information about networks that belong to other areas of the same OSPF domain. If summarization is not configured (or is not comprehensive), the information can be overwhelming for the nodes. Totally stubby areas address this issue. Routers in totally stubby areas keep information about routing within their area in their LSDB.
To configure a totally stubby area:
cumulus@switch:~$ net add ospf area 1 stub no-summary
cumulus@switch:~$ net pending
cumulus@switch:~$ net commit
cumulus@switch:~$ sudo vtysh

switch# configure terminal
switch(config)# router ospf
switch(config-router)# area 1 stub no-summary
switch(config-router)# end
switch# write memory
switch# exit
cumulus@switch:~$
The NCLU and vtysh commands save the configuration in the /etc/frr/frr.conf file. For example:
...
router ospf
 router-id 10.10.10.63
 area 1 stub no-summary
...
Here is a brief summary of the area type differences:
| Type | Behavior |
|---|---|
| Normal non-zero area | LSA types 1, 2, 3, 4 area-scoped, type 5 externals, inter-area routes summarized |
| Stub area | LSA types 1, 2, 3, 4 area-scoped, no type 5 externals, inter-area routes summarized |
| Totally stubby area | LSA types 1, 2 area-scoped, default summary, no type 3, 4, 5 LSA types allowed |
Auto-Cost Reference Bandwidth
When you set the auto-cost reference bandwidth, Cumulus Linux dynamically calculates the OSPF interface cost to support higher speed links. The default value is 100000 for 100Gbps link speed. The cost of interfaces with link speeds lower than 100Gbps is higher.
To avoid routing loops, set the bandwidth to a consistent value across all OSPF routers.
The following example commands configure the auto-cost reference bandwidth for 90Gbps link speed:
cumulus@switch:~$ net add ospf auto-cost reference-bandwidth 90000
cumulus@switch:~$ net pending
cumulus@switch:~$ net commit
cumulus@switch:~$ sudo vtysh

switch# configure terminal
switch(config)# router ospf
switch(config-router)# auto-cost reference-bandwidth 90000
switch(config-router)# end
switch# write memory
switch# exit
cumulus@switch:~$
The NCLU and vtysh commands save the configuration in the /etc/frr/frr.conf file. For example:
...
router ospf
 router-id 10.10.10.1
 auto-cost reference-bandwidth 90000
...
Administrative Distance
Cumulus Linux uses the administrative distance to choose which routing protocol to use when two different protocols provide route information for the same destination. The smaller the distance, the more reliable the protocol. For example, if the switch receives a route from OSPF with an administrative distance of 110 and the same route from BGP with an administrative distance of 100, the switch chooses BGP.
Cumulus Linux provides several commands to change the distance for OSPF routes. The default value is 110.
The following example commands set the distance for an entire group of routes:
cumulus@switch:~$ net add ospf distance 254
cumulus@switch:~$ net pending
cumulus@switch:~$ net commit
cumulus@switch:~$ sudo vtysh

switch# configure terminal
switch(config)# router ospf
switch(config-router)# distance 254
switch(config-router)# end
switch# write memory
switch# exit
cumulus@switch:~$
The following example commands change the OSPF administrative distance to 150 for internal routes and 220 for external routes:
cumulus@switch:~$ net add ospf distance ospf intra-area 150 inter-area 150 external 220
cumulus@switch:~$ net pending
cumulus@switch:~$ net commit
cumulus@switch:~$ sudo vtysh

switch# configure terminal
switch(config)# router ospf
switch(config-router)# distance ospf intra-area 150 inter-area 150 external 220
switch(config-router)# end
switch# write memory
switch# exit
cumulus@switch:~$
The following example commands change the OSPF administrative distance to 150 for internal routes to a subnet or network inside the same area as the router:
cumulus@switch:~$ net add ospf distance ospf intra-area 150
cumulus@switch:~$ net pending
cumulus@switch:~$ net commit
cumulus@switch:~$ sudo vtysh

switch# configure terminal
switch(config)# router ospf
switch(config-router)# distance ospf intra-area 150
switch(config-router)# end
switch# write memory
switch# exit
cumulus@switch:~$
The following example commands change the OSPF administrative distance to 150 for internal routes to a subnet in an area of which the router is not a part:
cumulus@switch:~$ net add ospf distance ospf inter-area 150
cumulus@switch:~$ net pending
cumulus@switch:~$ net commit
cumulus@switch:~$ sudo vtysh

switch# configure terminal
switch(config)# router ospf
switch(config-router)# distance ospf inter-area 150
switch(config-router)# end
switch# write memory
switch# exit
cumulus@switch:~$
The NCLU and vtysh commands save the configuration to the /etc/frr/frr.conf file. For example:
...
router ospf
  ospf router-id 10.10.10.1
  distance ospf intra-area 150 inter-area 150 external 220
...
Topology Changes and OSPF Reconvergence
When you remove a router or OSPF interface, LSA updates trigger throughout the network to inform all routers of the topology change. When the LSA is received and SPF is run, it does a routing update. This can cause short-duration outages while the network detects the failure and updates the OSPF database.
If the outage is planned (during a maintenance window), you can configure the OSPF router with an OSPF max-metric to notify its neighbors not to use it as part of the OSPF topology. While the network converges, all traffic forwarded to the max-metric router is still forwarded. After the network is fully updated, the max-metric router no longer receives any traffic and can be safely modified. To remove a single interface, you can configure the OSPF cost for that specific interface.
For failure events, traffic might be lost during reconvergence (until SPF on all nodes computes an alternative path around the failed link or node to each of the destinations).
To configure the max-metric (for all interfaces):
cumulus@switch:~$ sudo vtysh
switch# configure terminal
switch(config)# router ospf
switch(config-router)# max-metric router-lsa administrative
switch(config-router)# end
switch# write memory
switch# exit
cumulus@switch:~$
To configure the cost (for a specific interface):
cumulus@switch:~$ net add interface swp51 ospf cost 65535
cumulus@switch:~$ net pending
cumulus@switch:~$ net commit
cumulus@switch:~$ sudo vtysh
switch# configure terminal
switch(config)# interface swp51
switch(config-if)# ospf cost 65535
switch(config-if)# end
switch# write memory
switch# exit
cumulus@switch:~$
Troubleshooting
Cumulus Linux provides several OSPF troubleshooting commands:
| To… | NCLU Command | vtysh Command |
|---|---|---|
| Show neighbor states | net show ospf neighbor | show ip ospf neighbor |
| Verify that the LSDB is synchronized across all routers in the network | net show ospf database | show ip ospf database |
| Determine why an OSPF route is not being forwarded correctly | net show route ospf | show ip route ospf |
| Show OSPF interfaces | net show ospf interface | show ip ospf interface |
| Show information about the OSPF process | net show ospf | show ip ospf |
The following example shows the net show ospf neighbor command output:
cumulus@leaf01:mgmt:~$ net show ospf neighbor
Neighbor ID     Pri State           Dead Time Address         Interface                        RXmtL RqstL DBsmL
10.10.10.101      1 Full/Backup       30.307s 10.0.1.1        swp51:10.0.1.0                       0     0     0
The following example shows the net show route ospf command output:
cumulus@leaf01:mgmt:~$ net show route ospf
RIB entry for ospf
==================
Codes: K - kernel route, C - connected, S - static, R - RIP,
       O - OSPF, I - IS-IS, B - BGP, E - EIGRP, N - NHRP,
       T - Table, v - VNC, V - VNC-Direct, A - Babel, D - SHARP,
       F - PBR, f - OpenFabric,
       > - selected route, * - FIB route, q - queued route, r - rejected route

O   10.0.1.0/31 [110/100] is directly connected, swp51, weight 1, 00:02:37
O   10.10.10.1/32 [110/0] is directly connected, lo, weight 1, 00:02:37
O>* 10.10.10.101/32 [110/100] via 10.0.1.1, swp51, weight 1, 00:00:57
To capture OSPF packets, run the sudo tcpdump -v -i swp1 ip proto ospf command.
For a list all of the OSPF debug options, refer to Debugging OSPF.
Related Information
- FRR OSPFv2
- Perlman, Radia (1999); Interconnections: Bridges, Routers, Switches, and Internetworking Protocols (2 ed.); Addison-Wesley
- Moy, John T.; OSPF: Anatomy of an Internet Routing Protocol; Addison-Wesley
- RFC 2328 OSPFv2
- RFC 3101 OSPFv2 Not-So-Stubby Area (NSSA)