Setting Date and Time
Setting the time zone, date and time requires root privileges; use sudo.
Set the Time Zone
You can use one of two methods to set the time zone on the switch:
- Edit the
/etc/timezonefile. - Use the guided wizard.
Edit the /etc/timezone File
To see the current time zone, list the contents of /etc/timezone:
cumulus@switch:~$ cat /etc/timezone
US/Eastern
Edit the file to add your desired time zone. A list of valid time zones can be found here.
Use the following command to apply the new time zone immediately.
cumulus@switch:~$ sudo dpkg-reconfigure --frontend noninteractive tzdata
Use the following command to change the /etc/localtime to reflect your current timezone. Use the same value as the previous step.
sudo ln -sf /usr/share/zoneinfo/US/Eastern /etc/localtime
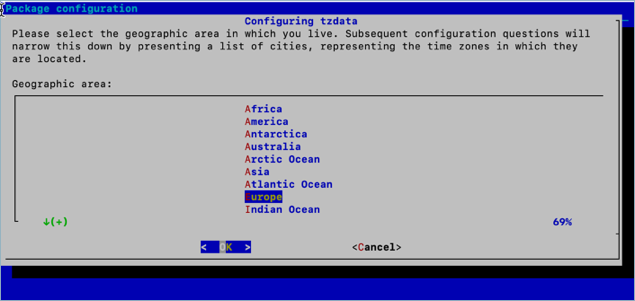
Use the Guided Wizard
To set the time zone using the guided wizard, run dpkg-reconfigure tzdata as root:
cumulus@switch:~$ sudo dpkg-reconfigure tzdata
Set the Date and Time
The switch contains a battery backed hardware clock that maintains the time while the switch is powered off and in between reboots. When the switch is running, the Cumulus Linux operating system maintains its own software clock.
During boot up, the time from the hardware clock is copied into the operating system’s software clock. The software clock is then used for all timekeeping responsibilities. During system shutdown, the software clock is copied back to the battery backed hardware clock.
You can set the date and time on the software clock using the date command. First, determine your current time zone:
cumulus@switch:~$ date +%Z
If you need to reconfigure the current time zone, refer to the instructions above.
Then, to set the system clock according to the time zone configured:
cumulus@switch:~$ sudo date -s "Tue Jan 12 00:37:13 2016"
See man date(1) for more information.
You can write the current value of the system (software) clock to the hardware clock using the hwclock command:
cumulus@switch:~$ sudo hwclock -w
See man hwclock(8) for more information.
Use NTP
The ntpd daemon running on the switch implements the NTP protocol. It synchronizes the system time with time servers listed in the /etc/ntp.conf file. The ntpd daemon is started at boot by default. See man ntpd(8) for details.
If you intend to run this service within a VRF, including the management VRF, follow these steps for configuring the service.
Configure NTP Servers
The default NTP configuration comprises the following servers, which are listed in the /etc/ntpd.conf file:
- server 0.cumulusnetworks.pool.ntp.org iburst
- server 1.cumulusnetworks.pool.ntp.org iburst
- server 2.cumulusnetworks.pool.ntp.org iburst
- server 3.cumulusnetworks.pool.ntp.org iburst
To add the NTP server or servers you want to use:
Run the following commands. Include the iburst option to increase the sync speed.
cumulus@switch:~$ net add time ntp server 4.cumulusnetworks.pool.ntp.org iburst
cumulus@switch:~$ net pending
cumulus@switch:~$ net commit
These commands add the NTP server to the list of servers in the /etc/ntp.conf file:
# pool.ntp.org maps to about 1000 low-stratum NTP servers.  Your server will
# pick a different set every time it starts up.  Please consider joining the
# pool: <http://www.pool.ntp.org/join.html>
server 0.cumulusnetworks.pool.ntp.org iburst
server 1.cumulusnetworks.pool.ntp.org iburst
server 2.cumulusnetworks.pool.ntp.org iburst
server 3.cumulusnetworks.pool.ntp.org iburst
server 4.cumulusnetworks.pool.ntp.org iburst
Edit the /etc/ntp.conf file to add or update NTP server information:
cumulus@switch:~$ sudo nano /etc/ntp.conf
# pool.ntp.org maps to about 1000 low-stratum NTP servers.  Your server will
# pick a different set every time it starts up.  Please consider joining the
# pool: <http://www.pool.ntp.org/join.html>
server 0.cumulusnetworks.pool.ntp.org iburst
server 1.cumulusnetworks.pool.ntp.org iburst
server 2.cumulusnetworks.pool.ntp.org iburst
server 3.cumulusnetworks.pool.ntp.org iburst
server 4.cumulusnetworks.pool.ntp.org iburst
To set the initial date and time with NTP before starting the ntpd daemon, run the ntpd -q command. This command is the same as ntpdate, which is to be retired and no longer available.
Be aware that ntpd -q can hang if the time servers are not reachable.
To verify that ntpd is running on the system:
cumulus@switch:~$ ps -ef | grep ntp
ntp       4074     1  0 Jun20 ?        00:00:33 /usr/sbin/ntpd -p /var/run/ntpd.pid -g -u 101:102
To check the NTP peer status:
Run the net show time ntp servers command:
cumulus@switch:~$ net show time ntp servers
      remote           refid      st t when poll reach   delay   offset  jitter
==============================================================================
+minime.fdf.net  58.180.158.150   3 u  140 1024  377   55.659    0.339   1.464
+69.195.159.158  128.138.140.44   2 u  259 1024  377   41.587    1.011   1.677
*chl.la          216.218.192.202  2 u  210 1024  377    4.008    1.277   1.628
+vps3.drown.org  17.253.2.125     2 u  743 1024  377   39.319   -0.316   1.384
Run the ntpq -p command:
cumulus@switch:~$ ntpq -p
      remote           refid      st t when poll reach   delay   offset  jitter
==============================================================================
+ec2-34-225-6-20 129.6.15.30      2 u   73 1024  377   70.414   -2.414   4.110
+lax1.m-d.net    132.163.96.1     2 u   69 1024  377   11.676    0.155   2.736
*69.195.159.158  199.102.46.72    2 u  133 1024  377   48.047   -0.457   1.856
-2.time.dbsinet. 198.60.22.240    2 u 1057 1024  377   63.973    2.182   2.692
To remove one or more NTP servers:
Run the net del time ntp <server> command. The following example commands remove some of the default NTP servers.
cumulus@switch:~$ net del time ntp server 0.cumulusnetworks.pool.ntp.org
cumulus@switch:~$ net del time ntp server 1.cumulusnetworks.pool.ntp.org
cumulus@switch:~$ net del time ntp server 2.cumulusnetworks.pool.ntp.org
cumulus@switch:~$ net del time ntp server 3.cumulusnetworks.pool.ntp.org
cumulus@switch:~$ net pending
cumulus@switch:~$ net commit
Edit the /etc/ntp.conf file to delete the NTP servers.
cumulus@switch:~$ sudo nano /etc/ntp.conf
...
# pool.ntp.org maps to about 1000 low-stratum NTP servers.  Your server will
# pick a different set every time it starts up.  Please consider joining the
# pool: <http://www.pool.ntp.org/join.html>
server 4.cumulusnetworks.pool.ntp.org iburst
...
Specify the NTP Source Interface
By default, the source interface that NTP uses is eth0. To change the source interface:
Run the net add time ntp source <interface> command. The following command example changes the NTP source interface to swp10.
cumulus@switch:~$ net add time ntp source swp10
cumulus@switch:~$ net pending
cumulus@switch:~$ net commit
These commands create the following configuration snippet in the ntp.conf file:
...
# Specify interfaces
interface listen swp10
...
Edit the /etc/ntp.conf file and modify the entry under the # Specify interfaces comment. The following example shows that the NTP source interface is swp10.
cumulus@switch:~$ sudo nano /etc/ntp.conf
...
# Specify interfaces
interface listen swp10
...
Use NTP in a DHCP Environment
You can use DHCP to specify your NTP servers. Ensure that the DHCP-generated configuration file named /run/ntp.conf.dhcp exists. This file is generated by the /etc/dhcp/dhclient-exit-hooks.d/ntp script and is a copy of the default /etc/ntp.conf with a modified server list from the DHCP server. If this file does not exist and you plan on using DHCP in the future, you can copy your current /etc/ntp.conf file to the location of the DHCP file.
To use DHCP to specify your NTP servers, run the sudo -E systemctl edit ntp.service command and add the ExecStart= line:
cumulus@switch:~$ sudo -E systemctl edit ntp.service
[Service]
ExecStart=
ExecStart=/usr/sbin/ntpd -n -u ntp:ntp -g -c /run/ntp.conf.dhcp
The sudo -E systemctl edit ntp.service command always updates the base ntp.service even if ntp@mgmt.service is used. The ntp@mgmt.service is re-generated automatically.
To validate that your configuration, run these commands:
cumulus@switch:~$ sudo systemctl restart ntp
cumulus@switch:~$ sudo systemctl status -n0 ntp.service
If the state is not Active, or the alternate configuration file does not appear in the ntp command line, it is likely that a mistake was made. In this case, correct the mistake and rerun the three commands above to verify.
When you use the above procedure to specify your NTP servers, the NCLU commands for changing NTP settings do not take effect.
Configure NTP with Authorization Keys
For added security, you can configure NTP to use authorization keys.
Configure the NTP Server
Create a
.keysfile, such as/etc/ntp.keys. Specify a key identifier (a number from 1-65535), an encryption method (M for MD5), and the password. The following provides an example:# # PLEASE DO NOT USE THE DEFAULT VALUES HERE. # #65535 M akey #1 M pass 1 M CumulusLinux!In the
/etc/ntp/ntp.conffile, add a pointer to the/etc/ntp.keysfile you created above and specify the key identifier. For example:keys /etc/ntp/ntp.keys trustedkey 1 controlkey 1 requestkey 1Restart NTP with the
sudo systemctl restart ntpcommand.
Configure the NTP Client
The NTP client is the Cumulus Linux switch.
Create the same
.keysfile you created on the NTP server (/etc/ntp.keys). For example:cumulus@switch:~$ sudo nano /etc/ntp.keys # # PLEASE DO NOT USE THE DEFAULT VALUES HERE. # #65535 M akey #1 M pass 1 M CumulusLinux!Edit the
/etc/ntp.conffile to specify the server you want to use, the key identifier, and a pointer to the/etc/ntp.keysfile you created in step 1. For example:cumulus@switch:~$ sudo nano /etc/ntp.conf ... # You do need to talk to an NTP server or two (or three). #pool ntp.your-provider.example # OR #server ntp.your-provider.example # pool.ntp.org maps to about 1000 low-stratum NTP servers. Your server will # pick a different set every time it starts up. Please consider joining the # pool: <http://www.pool.ntp.org/join.html> #server 0.cumulusnetworks.pool.ntp.org iburst #server 1.cumulusnetworks.pool.ntp.org iburst #server 2.cumulusnetworks.pool.ntp.org iburst #server 3.cumulusnetworks.pool.ntp.org iburst server 10.50.23.121 key 1 #keys keys /etc/ntp.keys trustedkey 1 controlkey 1 requestkey 1 ...Restart NTP in the active VRF (default or management). For example:
cumulus@switch:~$ systemctl restart ntp@mgmt.serviceWait a few minutes, then run the
ntpq -c ascommand to verify the configuration:cumulus@switch:~$ ntpq -c as ind assid status conf reach auth condition last_event cnt =========================================================== 1 40828 f014 yes yes ok reject reachable 1After authorization is accepted, you see the following command output:
cumulus@switch:~$ ntpq -c as

ind assid status  conf reach auth condition  last_event cnt
===========================================================
  1 40828  f61a   yes   yes   ok   sys.peer    sys_peer  1
Precision Time Protocol (PTP) Boundary Clock
With the growth of low latency and high performance applications, precision timing has become increasingly important. Precision Time Protocol (PTP) is used to synchronize clocks in a network and is capable of sub-microsecond accuracy. The clocks are organized in a master-slave hierarchy. The slaves are synchronized to their masters, which can be slaves to their own masters. The hierarchy is created and updated automatically by the best master clock (BMC) algorithm, which runs on every clock. The grandmaster clock is the top-level master and is typically synchronized by using a Global Positioning System (GPS) time source to provide a high-degree of accuracy.
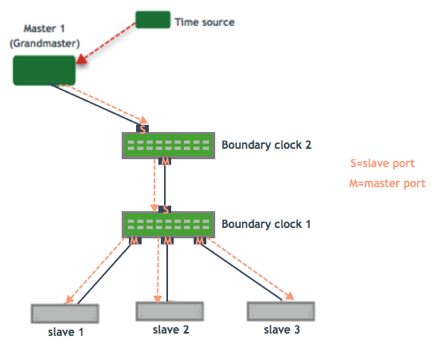
A boundary clock has multiple ports; one or more master ports and one or more slave ports. The master ports provide time (the time can originate from other masters further up the hierarchy) and the slave ports receive time. The boundary clock absorbs sync messages in the slave port, uses that port to set its clock, then generates new sync messages from this clock out of all of its master ports.
Cumulus Linux includes the linuxptp package for PTP, which uses the phc2sys daemon to synchronize the PTP clock with the system clock.
- Cumulus Linux currently supports PTP on the Mellanox Spectrum ASIC only.
- PTP is supported in boundary clock mode only (the switch provides timing to downstream servers; it is a slave to a higher-level clock and a master to downstream clocks).
- The switch uses hardware time stamping to capture timestamps from an Ethernet frame at the physical layer. This allows PTP to account for delays in message transfer and greatly improves the accuracy of time synchronization.
- Only IPv4/UDP PTP packets are supported.
- Only a single PTP domain per network is supported. A PTP domain is a network or a portion of a network within which all the clocks are synchronized.
In the following example, boundary clock 2 receives time from Master 1 (the grandmaster) on a PTP slave port, sets its clock and passes the time down from the PTP master port to boundary clock 1. Boundary clock 1 receives the time on a PTP slave port, sets its clock and passes the time down the hierarchy through the PTP master ports to the hosts that receive the time.
Enable the PTP Boundary Clock on the Switch
To enable the PTP boundary clock on the switch:
Open the
/etc/cumulus/switchd.conffile in a text editor and add the following line:ptp.timestamping = TRUERestart
switchd:cumulus@switch:~$ sudo systemctl restart switchd.service
Restarting the
switchdservice causes all network ports to reset, interrupting network services, in addition to resetting the switch hardware configuration.
Configure the PTP Boundary Clock
To configure a boundary clock:
Configure the interfaces on the switch that you want to use for PTP. Each interface must be configured as a layer 3 routed interface with an IP address.
PTP is supported on BGP unnumbered interfaces.
PTP is not supported on switched virtual interfaces (SVIs).
cumulus@switch:~$ net add interface swp13s0 ip address 10.0.0.9/32
cumulus@switch:~$ net add interface swp13s1 ip address 10.0.0.10/32
Configure PTP options on the switch:
Set the
gm-capableoption tonoto configure the switch to be a boundary clock.Set the priority, which selects the best master clock. You can set priority 1 or 2. For each priority, you can use a number between 0 and 255. The default priority is 255. For the boundary clock, use a number above 128. The lower priority is applied first.
Add the
time-stampingparameter. The switch automatically enables hardware time-stamping to capture timestamps from an Ethernet frame at the physical layer. If you are testing PTP in a virtual environment, hardware time-stamping is not available; however thetime-stampingparameter is still required.Add the PTP master and slave interfaces. You do not specify which is a master interface and which is a slave interface; this is determined by the PTP packet received. The following commands provide an example configuration:
cumulus@switch:~$ net add ptp global gm-capable no
cumulus@switch:~$ net add ptp global priority2 254
cumulus@switch:~$ net add ptp global priority1 254
cumulus@switch:~$ net add ptp global time-stamping
cumulus@switch:~$ net add ptp interface swp13s0
cumulus@switch:~$ net add ptp interface swp13s1
cumulus@switch:~$ net pending
cumulus@switch:~$ net commit
The
ptp4lman page describes all the configuration parameters.Restart the
ptp4landphc2sysdaemons:cumulus@switch:~$ sudo systemctl restart ptp4l.service phc2sys.serviceThe configuration is saved in the
/etc/ptp4l.conffile.Enable the services to start at boot time:
cumulus@switch:~$ sudo systemctl enable ptp4l.service phc2sys.service
Example Configuration
In the following example, the boundary clock on the switch receives time from Master 1 (the grandmaster) on PTP slave port swp3s0, sets its clock and passes the time down through PTP master ports swp3s1, swp3s2, and swp3s3 to the hosts that receive the time.
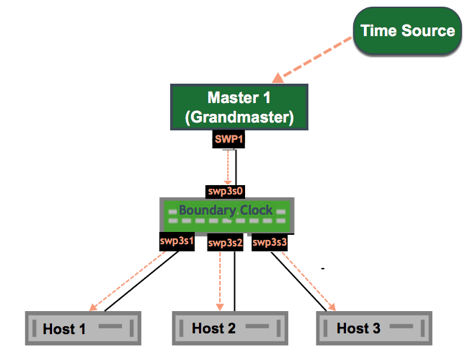
The configuration for the above example is shown below. The example assumes that you have already configured the layer 3 routed interfaces (swp3s0, swp3s1, swp3s2, and swp3s3) you want to use for PTP.
cumulus@switch:~$ net add ptp global gm-capable no
cumulus@switch:~$ net add ptp global priority2 254
cumulus@switch:~$ net add ptp global priority1 254
cumulus@switch:~$ net add ptp global time-stamping
cumulus@switch:~$ net add ptp interface swp3s0
cumulus@switch:~$ net add ptp interface swp3s1
cumulus@switch:~$ net add ptp interface swp3s2
cumulus@switch:~$ net add ptp interface swp3s3
cumulus@switch:~$ net pending
cumulus@switch:~$ net commit
Verify PTP Boundary Clock Configuration
To view a summary of the PTP configuration on the switch, run the net show configuration ptp command:
cumulus@switch:~$ net show configuration ptp

ptp
  global

    slaveOnly
      0

    priority1
      255

    priority2
      255

    domainNumber
      0

    logging_level
      5

    path_trace_enabled
      0

    use_syslog
      1

    verbose
      0

    summary_interval
      0

    time_stamping
      hardware

    gmCapable
      0
  swp15s0
  swp15s1
...
View PTP Status Information
To view PTP status information, run the net show ptp parent_data_set command:
cumulus@switch:~$ net show ptp parent_data_set
parent_data_set
===============
parentPortIdentity                    000200.fffe.000001-1
parentStats                           0
observedParentOffsetScaledLogVariance 0xffff
observedParentClockPhaseChangeRate    0x7fffffff
grandmasterPriority1                  127
gm.ClockClass                         248
gm.ClockAccuracy                      0xfe
gm.OffsetScaledLogVariance            0xffff
grandmasterPriority2                  127
grandmasterIdentity                   000200.fffe.000001
To view the additional PTP status information, including the delta in nanoseconds from the master clock, run the sudo pmc -u -b 0 'GET TIME_STATUS_NP' command:
cumulus@switch:~$ sudo pmc -u -b 0 'GET TIME_STATUS_NP'
sending: GET TIME_STATUS_NP
    7cfe90.fffe.f56dfc-0 seq 0 RESPONSE MANAGEMENT TIME_STATUS_NP
        master_offset              12610
        ingress_time               1525717806521177336
        cumulativeScaledRateOffset +0.000000000
        scaledLastGmPhaseChange    0
        gmTimeBaseIndicator        0
        lastGmPhaseChange          0x0000'0000000000000000.0000
        gmPresent                  true
        gmIdentity                 000200.fffe.000005
    000200.fffe.000005-1 seq 0 RESPONSE MANAGEMENT TIME_STATUS_NP
        master_offset              0
        ingress_time               0
        cumulativeScaledRateOffset +0.000000000
        scaledLastGmPhaseChange    0
        gmTimeBaseIndicator        0
        lastGmPhaseChange          0x0000'0000000000000000.0000
        gmPresent                  false
        gmIdentity                 000200.fffe.000005
    000200.fffe.000006-1 seq 0 RESPONSE MANAGEMENT TIME_STATUS_NP
        master_offset              5544033534
        ingress_time               1525717812106811842
        cumulativeScaledRateOffset +0.000000000
        scaledLastGmPhaseChange    0
        gmTimeBaseIndicator        0
        lastGmPhaseChange          0x0000'0000000000000000.0000
        gmPresent                  true
        gmIdentity                 000200.fffe.000005
Delete PTP Boundary Clock Configuration
To delete PTP configuration, delete the PTP master and slave interfaces. The following example commands delete the PTP interfaces swp3s0, swp3s1, and swp3s2.
cumulus@switch:~$ net del ptp interface swp3s0
cumulus@switch:~$ net del ptp interface swp3s1
cumulus@switch:~$ net del ptp interface swp3s2
cumulus@switch:~$ net pending
cumulus@switch:~$ net commit
Considerations
Spanning Tree and PTP
PTP frames are affected by STP filtering; events, such as an STP topology change (where ports temporarily go into the blocking state), can cause interruptions to PTP communications.
If you configure PTP on bridge ports, NVIDIA recommends that the bridge ports are spanning tree edge ports or in a bridge domain where spanning tree is disabled.