Protocol Independent Multicast - PIM
PIM is a multicast control plane protocol that advertises multicast sources and receivers over a routed layer 3 network. Layer 3 multicast relies on PIM to advertise information about multicast capable routers, and the location of multicast senders and receivers. Multicast does not go through a routed network without PIM.
PIM operates in PIM-SM or PIM-DM mode. Cumulus Linux supports PIM-SM only.
PIM-SM is a pull multicast distribution method; multicast traffic only goes through the network if receivers explicitly ask for it. When a receiver pulls multicast traffic, it must notify the network periodically that it wants to continue the multicast stream.
PIM-SM has three configuration options:
- ASM relies on a multicast rendezvous point (RP) to connect multicast senders and receivers that dynamically determine the shortest path through the network.
- SSM requires multicast receivers to know from which source they want to receive multicast traffic instead of relying on an RP.
- BiDir forwards all traffic through the RP instead of tracking multicast source IPs, allowing for greater scale but can cause inefficient traffic forwarding.
Cumulus Linux supports ASM and SSM only.
For additional information on PIM-SM, refer to RFC 7761 - Protocol Independent Multicast - Sparse Mode. For a brief description of how PIM works, refer to PIM Overview.
Cumulus Linux does not support IPv6 multicast routing with PIM.
Example PIM Topology
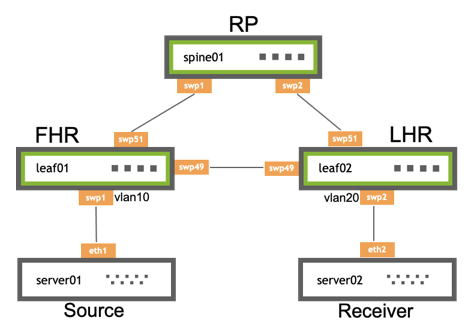
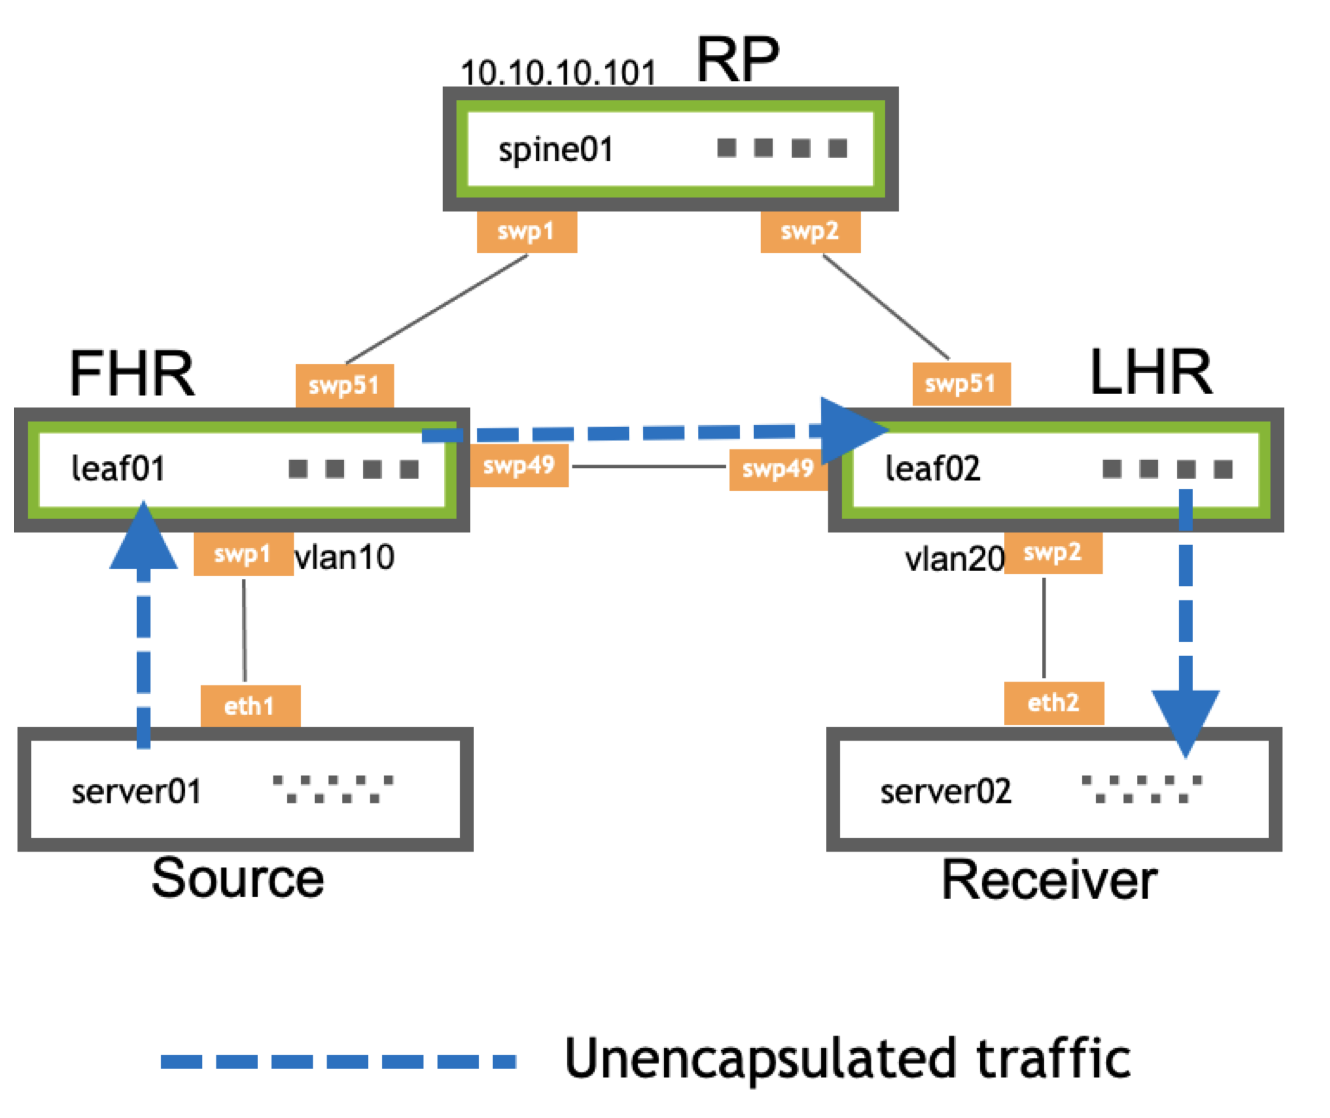
The following illustration shows a basic PIM ASM configuration:
- leaf01 is the FHR, which controls the PIM register process. The FHR is the device to which the multicast sources connect.
- leaf02 is the LHR, which is the last router in the path and attaches to an interested multicast receiver.
- spine01 is the RP, which receives multicast data from sources and forwards traffic down a shared distribution tree to the receivers.
Basic PIM Configuration
To configure PIM:
Enable PIM on all interfaces that connect to a multicast source or receiver, and on the interface with the RP address.
Enable IGMP on all interfaces that attach to a host and all interfaces that attach to a multicast receiver. IGMP version 3 is the default. Only specify the version if you want to use IGMP version 2. For SSM, you must use IGMP version 3.
For ASM, on each PIM enabled switch, specify the IP address of the RP for the multicast group. You can also configure PIM to send traffic from specific multicast groups to specific RPs.
SSM uses prefix lists to configure a receiver to only allow traffic to a multicast address from a single source. This removes the need for an RP because the receiver must know the source before accepting traffic. To enable SSM, you only need to enable PIM and IGMPv3 on the interfaces.
These example commands configure leaf01, leaf02 and spine01 as shown in the topology example above.
In Cumulus Linux 4.4, you cannot configure PIM with NVUE commands.
cumulus@leaf01:~$ net add vlan 10 pim
cumulus@leaf01:~$ net add vlan 10 igmp
cumulus@leaf01:~$ net add interface swp51 pim
cumulus@leaf01:~$ net add pim rp 10.10.10.101
cumulus@leaf01:~$ net pending
cumulus@leaf01:~$ net commit
cumulus@leaf02:~$ net add vlan 20 pim
cumulus@leaf02:~$ net add vlan 20 igmp
cumulus@leaf02:~$ net add interface swp51 pim
cumulus@leaf02:~$ net add pim rp 10.10.10.101
cumulus@leaf02:~$ net pending
cumulus@leaf02:~$ net commit
cumulus@spine01:~$ net add interface swp1 pim
cumulus@spine01:~$ net add interface swp2 pim
cumulus@spine01:~$ net add pim rp 10.10.10.101
cumulus@spine01:~$ net pending
cumulus@spine01:~$ net commit
The FRRouting package includes PIM. For proper PIM operation, PIM depends on Zebra. You must configure unicast routing and a routing protocol or static routes.
Edit the
/etc/frr/daemonsfile and addpimd=yesto the end of the file:cumulus@leaf01:~$ sudo nano /etc/frr/daemons ... pimd=yes ...
Restart FRR with this command:
cumulus@switch:~$ sudo systemctl restart frr.service
Restarting FRR restarts all the routing protocol daemons that are enabled and running.
In the vtysh shell, run the following commands to configure the PIM interfaces. PIM must be on all interfaces facing multicast sources or multicast receivers, as well as on the interface with the RP address.
cumulus@leaf01:~$ sudo vtysh
leaf01# configure terminal
leaf01(config)# interface vlan10
leaf01(config-if)# ip pim
leaf01(config-if)# exit
leaf01(config)# interface swp51
leaf01(config-if)# ip pim
leaf01(config-if)# exit
Enable IGMP on all interfaces that have attached hosts.
leaf01(config)# interface vlan10
leaf01(config-if)# ip igmp
leaf01(config-if)# exit
For ASM, configure a group mapping for a static RP:
leaf01(config)# ip pim rp 10.10.10.101
leaf01(config)# exit
leaf01# write memory
leaf01#  exit
cumulus@leaf01:~$
Edit the
/etc/frr/daemonsfile and addpimd=yesto the end of the file:cumulus@leaf02:~$ sudo nano /etc/frr/daemons ... pimd=yes ...
Restart FRR with this command:
cumulus@switch:~$ sudo systemctl restart frr.service
Restarting FRR restarts all the routing protocol daemons that are enabled and running.
In the vtysh shell, run the following commands to configure the PIM interfaces. PIM must be on all interfaces facing multicast sources or multicast receivers, as well as on the interface with the RP address.
cumulus@leaf02:~$ sudo vtysh
leaf02# configure terminal
leaf02(config)# interface vlan20
leaf02(config-if)# ip pim
leaf02(config-if)# exit
leaf02(config)# interface swp51
leaf02(config-if)# ip pim
leaf02(config-if)# exit
Enable IGMP on all interfaces that have attached hosts.
leaf02(config)# interface vlan20
leaf02(config-if)# ip igmp
leaf02(config-if)# exit
For ASM, configure a group mapping for a static RP:
leaf02(config)# ip pim rp 10.10.10.101
leaf02(config)# exit
leaf02# write memory
leaf02# exit
cumulus@leaf02:~$
Edit the
/etc/frr/daemonsfile and addpimd=yesto the end of the file:cumulus@spine01:~$ sudo nano /etc/frr/daemons ... pimd=yes ...
Restart FRR with this command:
cumulus@switch:~$ sudo systemctl restart frr.service
Restarting FRR restarts all the routing protocol daemons that are enabled and running.
In the vtysh shell, run the following commands to configure the PIM interfaces. PIM must be on all interfaces facing multicast sources or multicast receivers, as well as on the interface with the RP address.
cumulus@spine01:~$ sudo vtysh
spine01# configure terminal
spine01(config)# interface swp1
spine01(config-if)# ip pim
spine01(config-if)# exit
spine01(config)# interface swp2
spine01(config-if)# ip pim
spine01(config-if)# exit
For ASM, configure a group mapping for a static RP:
spine01(config)# ip pim rp 10.10.10.101
spine01(config-if)# end
spine01# write memory
spine01# exit
cumulus@spine01:~$
The above commands configure the switch to send all multicast traffic to RP 10.10.10.101. The following commands configure PIM to send traffic from multicast group 224.10.0.0/16 to RP 10.10.10.101 and traffic from multicast group 224.10.2.0/24 to RP 10.10.10.102:
cumulus@leaf01:~$ net add pim rp 10.10.10.101 224.10.0.0/16
cumulus@leaf01:~$ net add pim rp 10.10.10.102 224.10.2.0/24
cumulus@leaf01:~$ sudo vtysh
spine01# configure terminal
spine01(config)# ip pim rp 10.10.10.101 224.10.0.0/16
spine01(config)# ip pim rp 10.10.10.102 224.10.2.0/16
- NVIDIA recommends that you do not use a spine switch as an RP when using eBGP in a Clos network. See the PIM Overview knowledge-base article.
- zebra does not resolve the next hop for the RP through the default route. To prevent multicast forwarding from failing, either provide a specific route to the RP or run the vtysh
ip nht resolve-via-defaultconfiguration command to resolve the next hop for the RP through the default route.
Optional PIM Configuration
This section describes optional configuration procedures.
ASM SPT Infinity
When the LHR receives the first multicast packet, it sends a PIM (S,G) join towards the FHR to forward traffic through the network. This builds the SPT, or the tree that is the shortest path to the source. When the traffic arrives over the SPT, a PIM (S,G) RPT prune goes up the shared tree towards the RP. This removes multicast traffic from the shared tree; multicast data only goes over the SPT.
You can configure SPT switchover per group (SPT infinity), which allows for some groups to never switch to a shortest path tree. The LHR now sends both (*,G) joins and (S,G) RPT prune messages towards the RP.
To configure a group to never follow the SPT, create the necessary prefix lists, then configure SPT switchover for the prefix list:
cumulus@switch:~$ sudo vtysh
switch# configure terminal
switch(config)# ip prefix-list spt-range permit 235.0.0.0/8 ge 32
switch(config)# ip prefix-list spt-range permit 238.0.0.0/8 ge 32
switch(config)# ip pim spt-switchover infinity prefix-list spt-range
switch(config)# end
switch# exit
To view the configured prefix list, run the vtysh show ip mroute command or the NCLU net show mroute command. The following command shows that SPT switchover (pimreg) is on 235.0.0.0.
switch# show ip mroute
Source          Group           Proto   Input     Output     TTL  Uptime
*               235.0.0.0       IGMP     swp1     pimreg     1    00:03:3
                                IGMP              vlan10     1    00:03:38
*               238.0.0.0       IGMP     swp1     vlan10     1    00:02:08
SSM Multicast Group Ranges
For SSM, 232.0.0.0/8 is the default multicast group range. To change the multicast group range, define a prefix list and apply it. You can change the default group or add additional group ranges.
You must include 232.0.0.0/8 in the prefix list.
Create a prefix list with the permit keyword to match address ranges that you want to treat as multicast groups and the deny keyword for the address ranges you do not want to treat as multicast groups:
cumulus@switch:~$ net add routing prefix-list ipv4 my-custom-ssm-range seq 5 permit 232.0.0.0/8 ge 32
cumulus@switch:~$ net add routing prefix-list ipv4 my-custom-ssm-range seq 10 permit 238.0.0.0/8 ge 32
Apply the custom prefix list:
cumulus@switch:~$ net add pim ssm prefix-list my-custom-ssm-range
cumulus@switch:~$ net pending
cumulus@switch:~$ net commit
To view the configured prefix lists, run the net show ip prefix-list command:
cumulus@switch:~$ net show ip prefix-list my-custom-ssm-range
ZEBRA: ip prefix-list my-custom-ssm-range: 1 entries
   seq 5 permit 232.0.0.0/8 ge 32
PIM: ip prefix-list my-custom-ssm-range: 1 entries
   seq 10 permit 232.0.0.0/8 ge 32
Create a prefix list with the permit keyword to match address ranges that you want to treat as multicast groups and the deny keyword for the address ranges you do not want to treat as multicast groups:
cumulus@switch:~$ sudo vtysh
switch# configure terminal
switch(config)# ip prefix-list ssm-range seq 5 permit 232.0.0.0/8 ge 32
switch(config)# ip prefix-list ssm-range seq 10 permit 238.0.0.0/8 ge 32
Apply the custom prefix list as an ssm-range:
switch(config)# ip pim ssm prefix-list ssm-range
switch(config)# exit
switch# write memory
switch# exit
cumulus@switch:~$
To view the configured prefix lists, run the show ip prefix-list my-custom-ssm-range command:
switch#  show ip prefix-list my-custom-ssm-range
ZEBRA: ip prefix-list my-custom-ssm-range: 1 entries
   seq 5 permit 232.0.0.0/8 ge 32
PIM: ip prefix-list my-custom-ssm-range: 1 entries
   seq 10 permit 232.0.0.0/8 ge 32
PIM and ECMP
PIM uses RPF to choose an upstream interface to build a forwarding state. If you configure ECMP, PIM chooses the RPF based on the ECMP hash algorithm.
You can configure PIM to use all the available next hops when installing mroutes. For example, if you have four-way ECMP, PIM spreads the S,G and *,G mroutes across the four different paths.
You can also configure PIM to recalculate all stream paths over one of the ECMP paths if the switch loses a path. Otherwise, only the streams that are using the lost path move to alternate ECMP paths. This recalculation does not affect existing groups.
Recalculating all stream paths over one of the ECMP paths can cause some packet loss.
To configure PIM to use all the available next hops when installing mroutes, run the net add pim ecmp command:
cumulus@switch:~$ net add pim ecmp
cumulus@switch:~$ net pending
cumulus@switch:~$ net commit
To recalculate all stream paths over one of the ECMP paths if the switch loses a path, run the ip pim ecmp rebalance command:
cumulus@switch:~$ net add pim ecmp rebalance
cumulus@switch:~$ net pending
cumulus@switch:~$ net commit
To configure PIM to use all the available next hops when installing mroutes, run the ip pim ecmp command:
cumulus@switch:~$ sudo vtysh
switch# configure terminal
switch(config)# ip pim ecmp
switch(config)# exit
switch# write memory
switch# exit
cumulus@switch:~$
To recalculate all stream paths over one of the ECMP paths if the switch loses a path, run the ip pim ecmp rebalance command:
cumulus@switch:~$ sudo vtysh

switch# configure terminal
switch(config)# ip pim ecmp rebalance
switch(config)# exit
switch# write memory
switch# exit
cumulus@switch:~$
To show the next hop for a specific source or group, run the show ip pim nexthop command:
cumulus@switch:~$ sudo vtysh
switch# show ip pim nexthop
Number of registered addresses: 3
Address         Interface      Nexthop
-------------------------------------------
6.0.0.9         swp31s0        169.254.0.9
6.0.0.9         swp31s1        169.254.0.25
6.0.0.11        lo             0.0.0.0
6.0.0.10        swp31s0        169.254.0.9
6.0.0.10        swp31s1        169.254.0.25
IP Multicast Boundaries
Use multicast boundaries to limit the distribution of multicast traffic and push multicast to a subset of the network. With boundaries in place, the switch drops or accepts incoming IGMP or PIM joins according to a prefix list. To configure the boundary, apply an IP multicast boundary OIL (outgoing interface list) on an interface.
First create a prefix list, then run the following commands:
cumulus@switch:~$ net add interface swp1 multicast boundary oil my-prefix-list
cumulus@switch:~$ net pending
cumulus@switch:~$ net commit
cumulus@switch:~$ sudo vtysh
switch# configure terminal
switch(config)# interface swp1
switch(config-if)# ip multicast boundary oil my-prefix-list
switch(config-if)# end
switch# write memory
switch# exit
cumulus@switch:~$
MSDP
You can use MSDP to connect multiple PIM-SM multicast domains using the PIM-SM RPs. If you configure anycast RPs with the same IP address on multiple multicast switches (on the loopback interface), you can use more than one RP per multicast group.
When an RP discovers a new source (a PIM-SM register message), it sends an SA message to each MSDP peer. The peer then determines if there are any interested receivers.
- Cumulus Linux supports MSDP for anycast RP, not multiple multicast domains. You must configure each MSDP peer in a full mesh. The switch does not forward received SA messages.
- Cumulus Linux only supports one MSDP mesh group.
The following steps configure a Cumulus switch to use MSDP:
Add an anycast IP address to the loopback interface for each RP in the domain:
cumulus@rp01:~$ net add loopback lo ip address 10.10.10.101/32
cumulus@rp01:~$ net add loopback lo ip address 10.100.100.100/32
On every multicast switch, configure the group to RP mapping using the anycast address:
cumulus@switch:$ net add pim rp 10.100.100.100 224.0.0.0/4
cumulus@switch:$ net pending
cumulus@switch:$ net commit
Configure the MSDP mesh group for all active RPs. The following example uses three RPs:
The mesh group must include all RPs in the domain as members, with a unique address as the source. This configuration results in MSDP peerings between all RPs.
cumulus@rp01:$ net add msdp mesh-group cumulus member 100.1.1.2
cumulus@rp01:$ net add msdp mesh-group cumulus member 100.1.1.3

cumulus@rp02:$ net add msdp mesh-group cumulus member 100.1.1.1
cumulus@rp02:$ net add msdp mesh-group cumulus member 100.1.1.3

cumulus@rp03:$ net add msdp mesh-group cumulus member 100.1.1.1
cumulus@rp03:$ net add msdp mesh-group cumulus member 100.1.1.2
Pick the local loopback address as the source of the MSDP control packets:
cumulus@rp01:$ net add msdp mesh-group cumulus source 10.10.10.101

cumulus@rp02:$ net add msdp mesh-group cumulus source 10.10.10.102

cumulus@rp03:$ net add msdp mesh-group cumulus source 10.10.10.103
Inject the anycast IP address into the IGP of the domain. If the network uses unnumbered BGP as the IGP, avoid using the anycast IP address to establish unicast or multicast peerings. For PIM-SM, ensure that you use the unique address as the PIM hello source by setting the source:
cumulus@rp01:$ net add loopback lo pim use-source 100.100.100.100
cumulus@rp01:$ net pending
cumulus@rp01:$ net commit
Edit the
/etc/network/interfacesfile to add an anycast IP address to the loopback interface for each RP in the domain. For example:cumulus@rp01:~$ sudo nano /etc/network/interfaces auto lo iface lo inet loopback address 10.10.10.101/32 address 10.100.100.100/32 ...Run the
ifreload -acommand to load the new configuration:cumulus@switch:~$ ifreload -aOn every multicast switch, configure the group to RP mapping using the anycast address:
cumulus@rp01:~$ sudo vtysh

rp01# configure terminal
rp01(config)# ip pim rp 10.100.100.100 224.0.0.0/4
Configure the MSDP mesh group for all active RPs (the following example uses three RPs):
The mesh group must include all RPs in the domain as members, with a unique address as the source. This configuration results in MSDP peerings between all RPs.
rp01(config)# ip msdp mesh-group cumulus member 100.1.1.2
rp01(config)# ip msdp mesh-group cumulus member 100.1.1.3

rp02(config)# ip msdp mesh-group cumulus member 100.1.1.1
rp02(config)# ip msdp mesh-group cumulus member 100.1.1.3

rp03(config)# ip msdp mesh-group cumulus member 100.1.1.1
rp03(config)# ip msdp mesh-group cumulus member 100.1.1.2
Pick the local loopback address as the source of the MSDP control packets
rp01(config)# ip msdp mesh-group cumulus source 10.10.10.101
rp02(config)# ip msdp mesh-group cumulus source 10.10.10.102
rp03(config)# ip msdp mesh-group cumulus source 10.10.10.103
Inject the anycast IP address into the IGP of the domain. If the network uses unnumbered BGP as the IGP, avoid using the anycast IP address to establish unicast or multicast peerings. For PIM-SM, ensure that you use the unique address as the PIM hello source by setting the source:
rp01# interface lo
rp01(config-if)# ip pim use-source 100.100.100.100
rp01(config-if)# end
rp01# write memory
rp01# exit
cumulus@rp01:~$
PIM in a VRF
VRFs divide the routing table on a per-tenant basis to provide separate layer 3 networks over a single layer 3 infrastructure. With a VRF, each tenant has its own virtualized layer 3 network so IP addresses can overlap between tenants.
PIM in a VRF enables PIM trees and multicast data traffic to run inside a layer 3 virtualized network, with a separate tree per domain or tenant. Each VRF has its own multicast tree with its own RPs, sources, and so on. Therefore, you can have one tenant per corporate division, client, or product.
If you do not enable MP-BGP MPLS VPN, VRFs on different switches typically connect or peer over subinterfaces, where each subinterface is in its own VRF.
To configure PIM in a VRF:
Add the VRFs and associate them with switch ports:
cumulus@switch:~$ net add vrf RED
cumulus@switch:~$ net add vrf BLUE
cumulus@switch:~$ net add interface swp1 vrf RED
cumulus@switch:~$ net add interface swp2 vrf BLUE
Add PIM configuration:
cumulus@switch:~$ net add interface swp1 pim
cumulus@switch:~$ net add interface swp2 pim
cumulus@switch:~$ net add bgp vrf RED auto 65001
cumulus@switch:~$ net add bgp vrf BLUE auto 65000
cumulus@switch:~$ net add bgp vrf RED router-id 10.1.1.1
cumulus@switch:~$ net add bgp vrf BLUE router-id 10.1.1.2
cumulus@switch:~$ net add bgp vrf RED neighbor swp1 interface remote-as external
cumulus@switch:~$ net add bgp vrf BLUE neighbor swp2 interface remote-as external
cumulus@switch:~$ net pending
cumulus@switch:~$ net commit
Edit the /etc/network/interfaces file and to the VRFs and associate them with switch ports, then run ifreload -a to reload the configuration.
cumulus@switch:~$ sudo nano /etc/network/interfaces
...
auto swp1
iface swp1
    vrf RED

auto swp2
iface swp2
    vrf BLUE

auto RED
iface RED
    vrf-table auto

auto BLUE
iface BLUE
    vrf-table auto
...
Add the PIM configuration:
cumulus@switch:~$ sudo vtysh
switch# configure terminal
switch(config)# interface swp1
switch(config-if)# ip pim
switch(config-if)# exit
switch(config)# interface swp2
switch(config-if)# ip pim
switch(config-if)# exit
switch(config)# router bgp 65001 vrf RED
switch(config-router)# bgp router-id 10.1.1.2
switch(config-router)# neighbor swp1 interface remote-as external
switch(config-router)# exit
switch(config)# router bgp 65000 vrf BLUE
switch(config-router)# bgp router-id 10.1.1.1
switch(config-router)# neighbor swp2 interface remote-as external
switch(config-router)# end
switch# write memory
switch# exit
cumulus@switch:~$
BFD for PIM Neighbors
You can use BFD for PIM neighbors to detect link failures. When you configure an interface, include the pim bfd option. The following example commands configure BFD between leaf01 and spine01:
cumulus@leaf01:~$ net add interface swp51 pim bfd
cumulus@leaf01:~$ net pending
cumulus@leaf01:~$ net commit
cumulus@spine01:~$ net add interface swp1 pim bfd
cumulus@spine01:~$ net pending
cumulus@spine01:~$ net commit
cumulus@leaf01:~$ sudo vtysh
leaf01# configure terminal
leaf01(config)# interface swp51
leaf01(config-if)# ip pim bfd
leaf01(config-if)# end
leaf01# write memory
leaf01# exit
cumulus@leaf01:~$
cumulus@spine01:~$ sudo vtysh
spine01# configure terminal
spine01(config)# interface swp1
spine01(config-if)# ip pim bfd
spine01(config-if)# end
spine01# write memory
spine01# exit
cumulus@spine01:~$
Allow RP
To begin receiving multicast traffic for a group, a receiver expresses its interest in the group by sending an IGMP membership report on its connected LAN. The LHR receives this report and begins to build a multicast routing tree back towards the source. To build this tree, another router known both to the LHR and to the multicast source needs to exist to act as an RP for senders and receivers. The LHR looks up the RP for the group specified by the receiver and sends a PIM Join message towards the RP. Per RFC 7761, intermediary routers between the LHR and the RP must check that the RP for the group matches the one in the PIM Join, and if not, to drop the Join.
In some configurations, it is desirable to configure the LHR with an RP address that does not match the actual RP address for the group. In this case, you must configure the upstream routers to accept the Join and propagate it towards the appropriate RP for the group, ignoring the mismatched RP address in the PIM Join and replacing it with its own RP for the group.
You can configure the switch to allow joins from all upstream neighbors or you can provide a prefix list so that the switch only accepts joins with an upstream neighbor address.
The following example command configures PIM to ignore the RP check for all upstream neighbors:
cumulus@switch:~$ sudo vtysh
...
switch# configure terminal
switch(config)# interface swp50
switch(config-if)# ip pim allow-rp
switch(config-if)# end
switch# write memory
switch# exit
cumulus@switch:~$
The following example command configures PIM to only ignore the RP check for the upstream neighbors in the prefix list called ALLOW-RP:
cumulus@switch:~$ sudo vtysh
...
switch# configure terminal
switch(config)# interface swp50
switch(config-if)# ip pim allow-rp rp-list ALLOW-RP
switch(config-if)# end
switch# write memory
switch# exit
cumulus@switch:~$
PIM Timers
Cumulus Linux provides the following PIM timers:
| Timer | Description |
|---|---|
hello-interval | The interval in seconds at which the PIM router sends hello messages to discover PIM neighbors and maintain PIM neighbor relationships. You can specify a value between 1 and 180. The default setting is 30 seconds. You set the hello interval for a specific PIM enabled interface. |
holdtime | The number of seconds during which the neighbor must be in a reachable state. You can specify a value between 1 and 180. You set the holdtime for a specific PIM enabled interface. |
join-prune-interval | The interval in seconds at which a PIM router sends join/prune messages to its upstream neighbors for a state update. You can specify a value between 60 and 600. The default setting is 60 seconds. You set the join-prune-interval globally for all PIM enabled interfaces. NCLU also provides the option of setting the join-prune-interval for a specific VRF. |
keep-alive-timer | The timeout value for the S,G stream in seconds. You can specify a value between 31 and 60000. The default setting is 210 seconds. You can set the keep-alive timer globally for all PIM enabled interfaces or for a specific VRF. |
register-suppress-time | The number of seconds during which to stop sending register messages to the RP. You can specify a value between 5 and 60000. The default setting is 60 seconds. You set the register-suppress-time timer globally. NCLU also provides the option of setting the register-suppress-time timer for a specific VRF. |
The following example commands set the join-prune-interval to 100 seconds, the keep-alive-timer to 10000 seconds, and the register-suppress-time to 20000 seconds globally for all PIM enabled interfaces:
cumulus@switch:~$ net add pim join-prune-interval 100
cumulus@switch:~$ net add pim keep-alive-timer 10000
cumulus@switch:~$ net add pim register-suppress-time 20000
cumulus@switch:~$ net pending
cumulus@switch:~$ net commit
The following example commands set the hello-interval to 60 seconds and the holdtime to 120 seconds for swp51:
cumulus@switch:~$ net add interface swp1 pim hello 60 120
cumulus@switch:~$ net pending
cumulus@switch:~$ net commit
The following example commands set the join-prune-interval to 100 and the keep-alive-timer to 10000 for VRF RED:
cumulus@switch:~$ net add pim vrf RED join-prune-interval 100
cumulus@switch:~$ net add pim vrf RED keep-alive-timer 10000
cumulus@switch:~$ net pending
cumulus@switch:~$ net commit
The following example commands set the join-prune-interval to 100 seconds, the keep-alive-timer to 10000 seconds, and the register-suppress-time to 20000 seconds globally for all PIM enabled interfaces:
cumulus@switch:~$ sudo vtysh
...
switch# configure terminal
switch(config)# ip pim join-prune-interval 100
switch(config)# ip pim keep-alive-timer 10000
switch(config)# ip pim register-suppress-time 20000
switch(config)# end
switch# write memory
switch# exit
cumulus@switch:~$
The following example commands set the hello-interval to 60 seconds and the holdtime to 120 for swp51:
cumulus@switch:~$ sudo vtysh
...
switch# configure terminal
switch(config)# interface swp51
switch(config-if)# ip pim hello 60 120
switch(config-if)# end
switch# write memory
switch# exit
cumulus@switch:~$
The following example commands set the keep-alive-timer to 10000 seconds for VRF RED:
cumulus@switch:~$ sudo vtysh
...
switch# configure terminal
switch(config)# vrf RED
switch(config-vrf)# ip pim keep-alive-timer 10000
switch(config-if)# end
switch# write memory
switch# exit
cumulus@switch:~$
Improve Multicast Convergence
For large multicast environments, the default CoPP policer might be too restrictive. You can adjust the policer to improve multicast convergence.
- The default PIM forwarding rate is set to 2000 packets per second and the burst rate is set to 2000 packets.
- The default IGMP forwarding rate is set to 300 packets per second and the burst rate is set to 100 packets.
To tune the PIM and IGMP forwarding and burst rate, edit the /etc/cumulus/acl/policy.d/00control_plane.rules file and change --set-rate and --set-burst in the PIM and IGMP policer lines.
The following example command changes the PIM forwarding rate to 2050 packets per second and the burst rate to 2050 packets.
-A $INGRESS_CHAIN -p pim -j POLICE --set-mode pkt --set-rate 2050 --set-burst 2050
The following command example changes the IGMP forwarding rate to 400 packets per second and the burst rate to 200 packets.
-A $INGRESS_CHAIN -p igmp -j POLICE --set-mode pkt --set-rate 400 --set-burst 200
To apply the rules, run the sudo cl-acltool -i command:
cumulus@switch:~$ sudo cl-acltool -i
PIM Active-active with MLAG
When a multicast sender attaches to an MLAG bond, the sender hashes the outbound multicast traffic over a single member of the bond. Traffic arrives on one of the MLAG enabled switches. Regardless of which switch receives the traffic, it goes over the MLAG peer link to the other MLAG-enabled switch, because the peerlink is always the multicast router port and always receives the multicast stream.
Traffic from multicast sources attached to an MLAG bond always goes over the MLAG peerlink. Be sure to size the peerlink appropriately to accommodate this traffic.
The PIM DR for the VLAN where the source resides sends the PIM register towards the RP. The PIM DR is the PIM speaker with the highest IP address on the segment. After the PIM register process is complete and traffic is flowing along the SPT, either MLAG switch forwards traffic towards the receivers.
PIM joins sent towards the source can be ECMP load shared by upstream PIM neighbors. Either MLAG member can receive the PIM join and forward traffic, regardless of DR status.
A dual-attached multicast receiver sends an IGMP join on the attached VLAN. One of the MLAG switches receives the IGMP join, then adds the IGMP join to the IGMP Join table and layer 2 MDB table. The layer 2 MDB table, like the unicast MAC address table, synchronizes through MLAG control messages over the peerlink. This allows both MLAG switches to program IGMP and MDB table forwarding information. Both switches send *,G PIM Join messages towards the RP. If the source is already sending, both MLAG switches receive the multicast stream.
Traditionally, the PIM DR is the only node to send the PIM *,G Join. To provide resiliency in case of failure, both MLAG switches send PIM *,G Joins towards the RP to receive the multicast stream.
To prevent duplicate multicast packets, PIM elects a DF, which is the primary member of the MLAG pair. The MLAG secondary switch does not put the VLAN in the OIL, preventing duplicate multicast traffic.
Example Traffic Flow
The examples below show the flow of traffic between server02 and server03:
| Step 1 | |
|---|---|
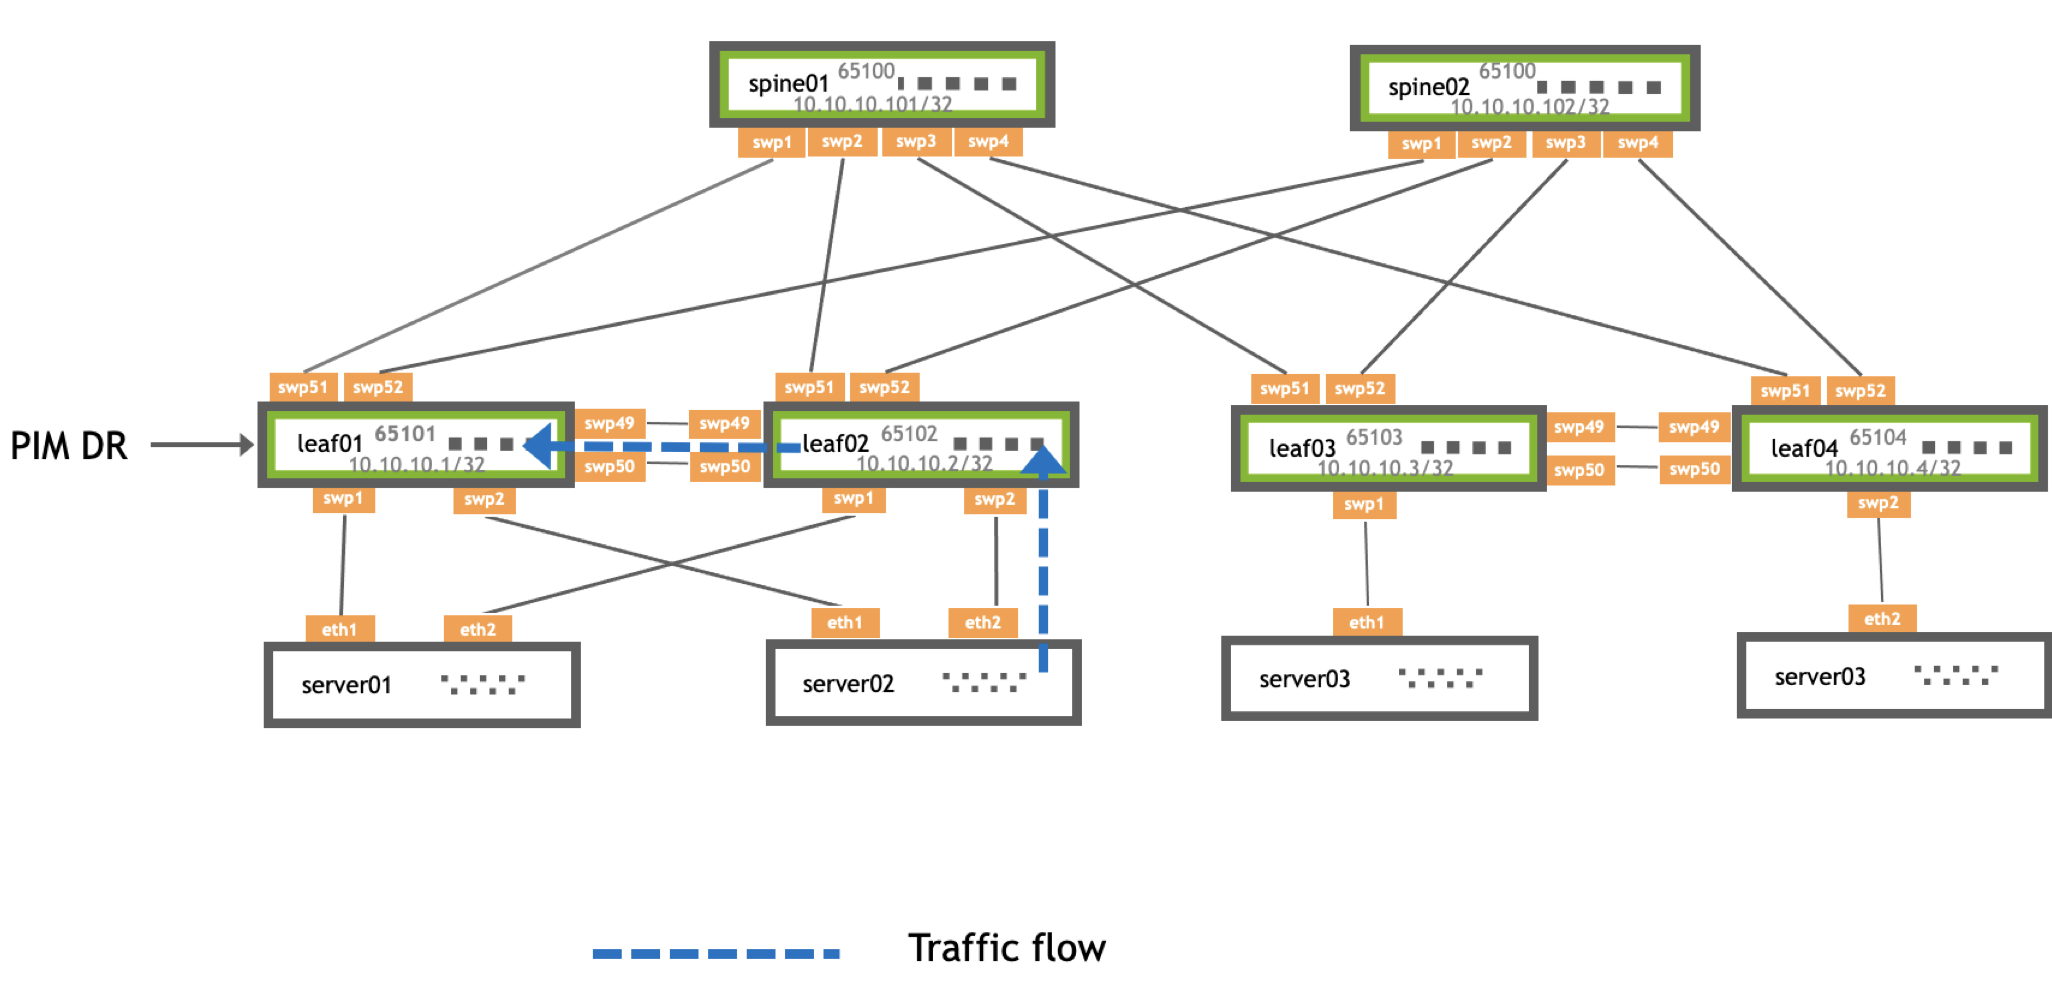 | 1. server02 sends traffic to leaf02. 2. leaf02 forwards traffic to leaf01 because the peerlink is a multicast router port. 3. spine01 receives a PIM register from leaf01, the DR. 4. leaf02 syncs the *,G table from leaf01 as an MLAG active-active peer. |
| Step 2 | |
|---|---|
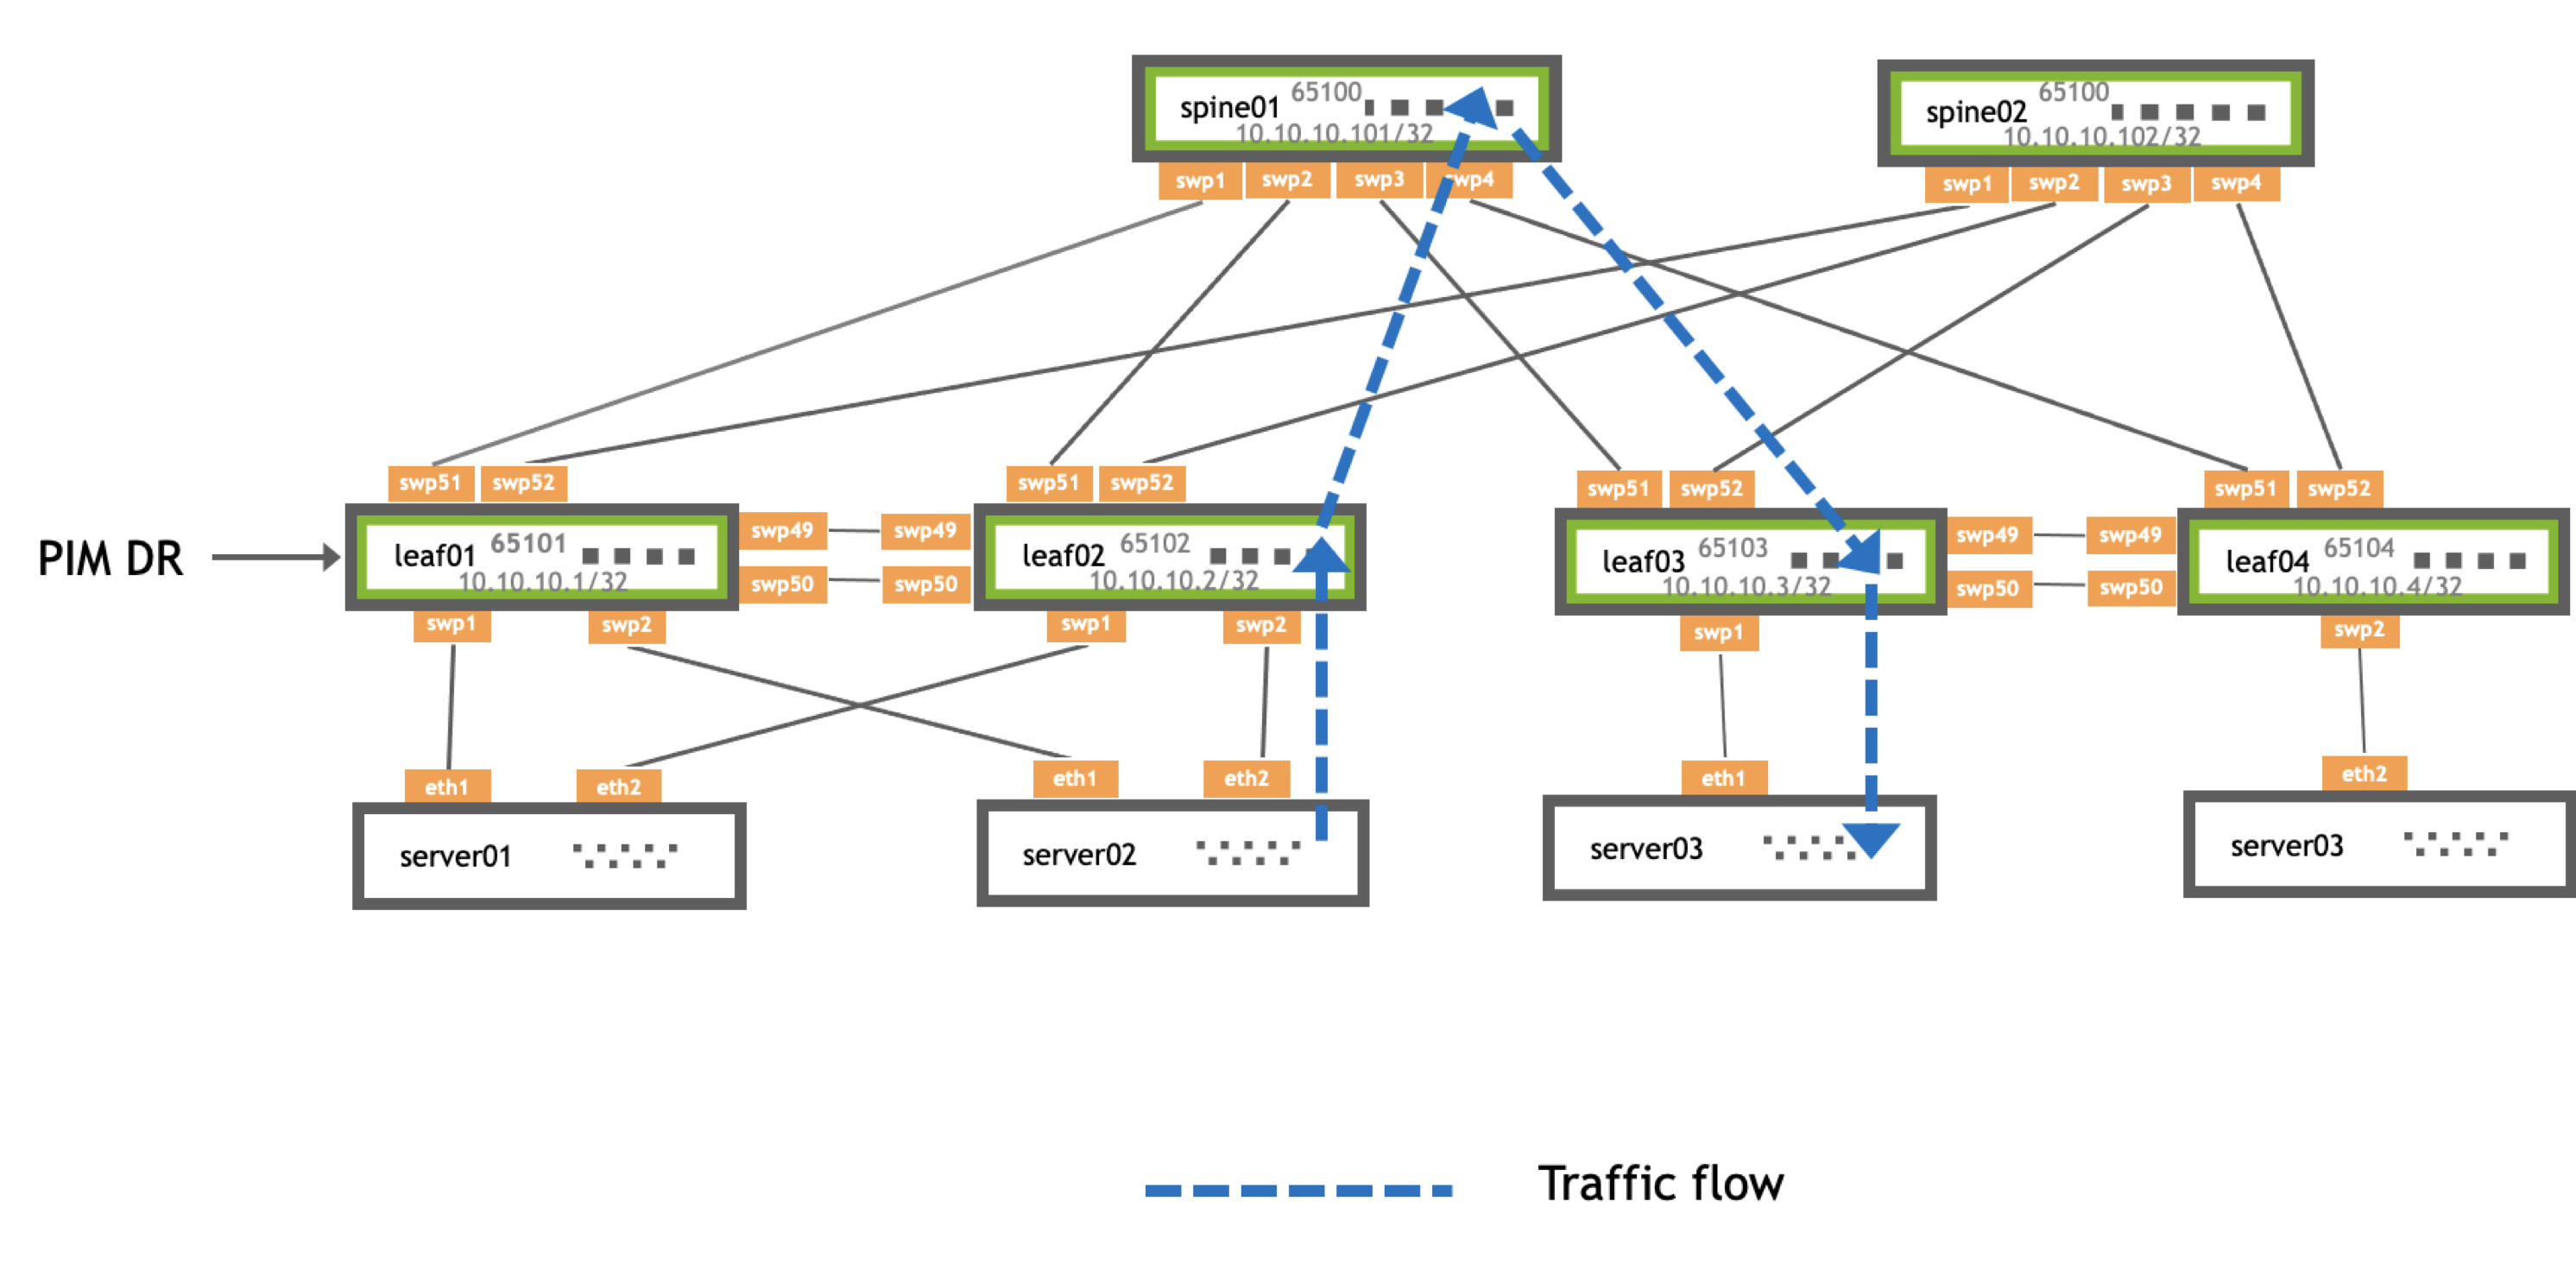 | 1. leaf02 has the *,G route indicating that it must forward traffic towards spine01. 2. Either leaf02 or leaf01 sends this traffic directly based on which MLAG switch receives it from the attached source. 3. In this case, leaf02 receives the traffic on the MLAG bond and forwards it directly upstream. |
Configure PIM with MLAG
To use a multicast sender or receiver over a dual-attached MLAG bond, you must configure pim active-active:
On the VLAN interface where multicast sources or receivers exist, configure
pim active-activeandigmp.cumulus@leaf01:~$ net add vlan 10 pim active-active cumulus@leaf01:~$ net add vlan 10 igmp cumulus@leaf01:~$ net pending cumulus@leaf01:~$ net commitEnabling PIM active-active automatically enables PIM on that interface.
Verify PIM active-active configuration with the
net show pim mlag summarycommand:cumulus@leaf01:mgmt:~$ net show pim mlag summary MLAG daemon connection: up MLAG peer state: up Zebra peer state: up MLAG role: PRIMARY Local VTEP IP: 0.0.0.0 Anycast VTEP IP: 0.0.0.0 Peerlink: peerlink.4094 Session flaps: mlagd: 0 mlag-peer: 0 zebra-peer: 0 Message Statistics: mroute adds: rx: 5, tx: 5 mroute dels: rx: 0, tx: 0 peer zebra status updates: 1 PIM status updates: 0 VxLAN updates: 0
On the VLAN interface where the multicast source or receiver exists, configure
ip pim active-activeandip igmp.cumulus@leaf01:~$ sudo vtysh leaf01# configure terminal leaf01(config)# interface vlan10 leaf01(config-if)# ip pim active-active leaf01(config-if)# ip igmpEnabling PIM active-active automatically enables PIM on that interface.
Verify PIM active-active configuration with the
show ip pim mlag summarycommand:leaf01# show ip pim mlag summary MLAG daemon connection: up MLAG peer state: up Zebra peer state: up MLAG role: PRIMARY Local VTEP IP: 0.0.0.0 Anycast VTEP IP: 0.0.0.0 Peerlink: peerlink.4094 Session flaps: mlagd: 0 mlag-peer: 0 zebra-peer: 0 Message Statistics: mroute adds: rx: 5, tx: 5 mroute dels: rx: 0, tx: 0 peer zebra status updates: 1 PIM status updates: 0 VxLAN updates: 0
Troubleshooting
This section provides commands to examine your PIM configuration and provides troubleshooting tips.
PIM Show Commands
To show the contents of the IP multicast routing table, run the NCLU net show mroute command or the vtysh show ip mroute command. You can verify the (S,G) and (*,G) state entries from the flags and check that the incoming and outgoing interfaces are correct:
cumulus@fhr:~$ net show mroute
IP Multicast Routing Table
Flags: S - Sparse, C - Connected, P - Pruned
       R - RP-bit set, F - Register flag, T - SPT-bit set

Source          Group           Flags    Proto  Input            Output           TTL  Uptime
10.1.10.101     239.1.1.1       SFP      none   vlan10           none             0    --:--:--
To see the active source on the switch, run the NCLU net show pim upstream command or the vtysh show ip pim upstream command:
cumulus@fhr:~$ net show pim upstream
Iif    Source        Group     State   Uptime    JoinTimer  RSTimer   KATimer   RefCnt
vlan10 10.1.10.101   239.1.1.1 Prune   00:07:40  --:--:--   00:00:36  00:02:50  1
To show upstream information for S,Gs and the desire to join the multicast tree, run the NCLU net show pim upstream-join-desired command or the vtysh show ip pim upstream-join-desired command:
cumulus@fhr:~$ net show pim upstream-join-desired
Source          Group           EvalJD
10.1.10.101     239.1.1.1       yes
To show the PIM interfaces on the switch, run the NCLU net show pim interface command or the vtysh show ip pim interface command:
cumulus@fhr:mgmt:~$ net show pim interface
Interface         State          Address  PIM Nbrs           PIM DR  FHR IfChannels
lo                   up       10.10.10.1         0            local    0          0
swp51                up       10.10.10.1         1     10.10.10.101    0          0
vlan10               up        10.1.10.1         0            local    1          0
The net show pim interface detail or vtysh show ip pim interface detail command shows more detail about the PIM interfaces on the switch:
cumulus@fhr:~$ net show pim interface detail
...
Interface  : vlan10
State      : up
Address    : 10.1.10.1 (primary)
             fe80::4638:39ff:fe00:31/64

Designated Router
-----------------
Address   : 10.1.10.1
Priority  : 1(0)
Uptime    : --:--:--
Elections : 1
Changes   : 0

FHR - First Hop Router
----------------------
239.1.1.1 : 10.1.10.101 is a source, uptime is 00:03:08
...
To show local membership information for a PIM interface, run the NCLU net show pim local-membership or vtysh show ip pim local-membership command:
cumulus@lhr:~$ net show pim local-membership
Interface         Address          Source           Group            Membership
vlan20            10.2.10.1        *                239.1.1.1        INCLUDE
To show information about known S,Gs, the IIF and the OIL, run the NCLU net show pim state command or the vtysh show ip pim state command:
cumulus@fhr:~$ net show pim state
Codes: J -> Pim Join, I -> IGMP Report, S -> Source, * -> Inherited from (*,G), V -> VxLAN, M -> Muted
Active Source           Group            RPT  IIF               OIL
1      10.1.10.101      239.1.1.1        n    vlan10
To verify that the receiver is sending IGMP reports (joins) for the group, run the NCLU net show igmp groups or the vtysh show ip igmp groups command:
cumulus@lhr:~$ net show igmp groups
Total IGMP groups: 1
Watermark warn limit(Not Set): 0
Interface   Address      Group        Mode Timer      Srcs V   Uptime
vlan20      10.2.10.1    239.1.1.1    EXCL 00:02:18   1    3   05:27:33
To show IGMP source information, run the NCLU net show igmp sources command or the vtysh show ip igmp sources command:
cumulus@lhr:~$ net show igmp sources
Interface        Address         Group           Source          Timer Fwd Uptime
vlan20           10.2.10.1       239.1.1.1       *               03:13   Y 05:28:42
FHR Stuck in the Registering Process
When a multicast source starts, the FHR sends unicast PIM register messages from the RPF interface towards the source. After the RP receives the PIM register, it sends a PIM register stop message to the FHR to end the register process. If an issue occurs with this communication, the FHR becomes stuck in the registering process, which can result in high CPU (the FHR CPU generates and sends PIM register packets to the RP CPU).
To assess this issue, review the FHR. You can see the output interface of pimreg here. If this does not change to an interface within a couple of seconds, it is possible that the FHR remains in the registering process.
cumulus@fhr:~$ net show mroute
Source          Group           Proto  Input      Output     TTL  Uptime
10.1.10.101     239.2.2.3       PIM    vlan10     pimreg     1    00:03:59
To troubleshoot the issue:
Validate that the FHR can reach the RP. If the RP and FHR can not communicate, the registration process fails:
cumulus@fhr:~$ ping 10.10.10.101
PING 10.10.10.101 (10.10.10.101) from 10.1.10.1: 56(84) bytes of data.
^C
--- 10.0.0.21 ping statistics ---
4 packets transmitted, 0 received, 100% packet loss, time 3000ms
On the RP, use
tcpdumpto see if the PIM register packets arrive:cumulus@rp01:~$ sudo tcpdump -i swp1 tcpdump: verbose output suppressed, use -v or -vv for full protocol decode listening on swp1, link-type EN10MB (Ethernet), capture size 262144 bytes 23:33:17.524982 IP 10.1.10.101 > 10.10.10.101: PIMv2, Register, length 66If the switch is receiving PIM registration packets, verify that PIM sees them by running the vtysh
debug pim packetscommand:cumulus@fhr:~$ sudo vtysh -c "debug pim packets" PIM Packet debugging is on cumulus@rp01:~$ sudo tail /var/log/frr/frr.log 2016/10/19 23:46:51 PIM: Recv PIM REGISTER packet from 172.16.5.1 to 10.0.0.21 on swp30: ttl=255 pim_version=2 pim_msg_size=64 checksum=a681Repeat the process on the FHR to see that it receives PIM register stop messages and passes them to the PIM process:
cumulus@fhr:~$ sudo tcpdump -i swp51
23:58:59.841625 IP 172.16.5.1 > 10.0.0.21: PIMv2, Register, length 28
23:58:59.842466 IP 10.0.0.21 > 172.16.5.1: PIMv2, Register Stop, length 18

cumulus@fhr:~$ sudo vtysh -c "debug pim packets"
PIM Packet debugging is on

cumulus@fhr:~$ sudo tail -f /var/log/frr/frr.log
2016/10/19 23:59:38 PIM: Recv PIM REGSTOP packet from 10.10.10.101 to 10.10.10.1 on swp51: ttl=255 pim_version=2 pim_msg_size=18 checksum=5a39
LHR Does Not Build *,G
If you do not enable both PIM and IGMP on an interface facing a receiver, the LHR does not build *,G.
lhr# show run
!
interface vlan20
 ip igmp
 ip pim
To troubleshoot this issue, ensure that the receiver sends IGMPv3 joins when you enable both PIM and IGMP:
cumulus@lhr:~$ sudo tcpdump -i vlan20 igmp
tcpdump: verbose output suppressed, use -v or -vv for full protocol decode
listening on vlan20, link-type EN10MB (Ethernet), capture size 262144 bytes
00:03:55.789744 IP 10.2.10.1 > igmp.mcast.net: igmp v3 report, 1 group record(s)
No mroute Created on the FHR
To troubleshoot this issue:
Verify that the FHR is receiving multicast traffic:
cumulus@fhr:~$ sudo tcpdump -i vlan10
tcpdump: verbose output suppressed, use -v or -vv for full protocol decode
listening on vlan10, link-type EN10MB (Ethernet), capture size 262144 bytes
19:57:58.429632 IP 10.1.10.101.42420 > 239.1.1.1.1000: UDP, length 8
19:57:59.431250 IP 10.1.10.101.42420 > 239.1.1.1.1000: UDP, length 8
Verify PIM configuration on the interface facing the source:
fhr# show run
!
interface vlan10
 ip igmp
 ip pim
!
Verify that the RPF interface for the source matches the interface that receives multicast traffic:
fhr# show ip rpf 10.1.10.1
Routing entry for 10.1.10.0/24 using Unicast RIB
Known via "connected", distance 0, metric 0, best
Last update 1d00h26m ago
* directly connected, vlan10
Verify RP configuration for the multicast group:
fhr# show ip pim rp-info
RP address       group/prefix-list   OIF               I am RP    Source
10.10.10.101     224.0.0.0/4         swp51             no         Static
No S,G on the RP for an Active Group
An RP does not build an mroute when there are no active receivers for a multicast group even though the FR creates the mroute.
cumulus@rp01:~$ net show mroute
Source          Group           Flags    Proto  Input            Output           TTL  Uptime
You can see the active source on the RP with either the NCLU net show pim upstream command or the vtysh show ip pim upstream command:
cumulus@rp01:~$ net show pim upstream
Iif             Source          Group           State       Uptime   JoinTimer RSTimer   KATimer   RefCnt
vlan10          10.1.10.101     239.1.1.1       Prune       00:08:03 --:--:--  --:--:--  00:02:20       1
No mroute Entry in Hardware
Use the cl-resource-query | grep Mcast command or the NCLU net show system asic | grep Mcast command to verify that the hardware IP multicast entry is the maximum value:
cumulus@switch:~$ cl-resource-query  | grep Mcast
Total Mcast Routes:         450,   0% of maximum value    450
Refer to TCAM Resource Profiles for Spectrum Switches.
Verify the MSDP Session State
To verify the state of MSDP sessions, run the NCLU net show msdp mesh-group command or the vtysh show ip msdp mesh-group command:
cumulus@switch:~$ net show msdp mesh-group
Mesh group : pod1
  Source : 10.1.10.101
  Member                 State
  10.1.10.102        established
  10.1.10.103        established

cumulus@switch:~$ net show msdp peer
Peer                    Local         State     Uptime    SaCnt
10.1.10.102       10.1.10.101   established    00:07:21       0
10.1.10.103       10.1.10.101   established    00:07:21       0
View the Active Sources
To review the active sources that the switch learns locally (through PIM registers) and from MSDP peers, run the NCLU net show msdp sa command or the vtysh show ip msdp sa command:
cumulus@switch:~$ net show msdp sa
Source                Group               RP   Local    SPT      Uptime
10.1.10.101       239.1.1.1     10.10.10.101       n      n    00:00:40
10.1.10.101       239.1.1.2    100.10.10.101       n      n    00:00:25
Example PIM Configuration
The following example configures PIM and BGP on leaf01, leaf02, and spine01.
- server01 (the source) connects to leaf01 (the FHR) through a VLAN-aware bridge (VLAN 10).
- leaf01 connects to spine01 (the RP) through swp51.
- spine01 connects to leaf02 (the LHR) through swp2.
- leaf02 connects to server02 (the receiver) through a VLAN-aware bridge (VLAN 20).
| Traffic Flow along the Shared Tree | |
|---|---|
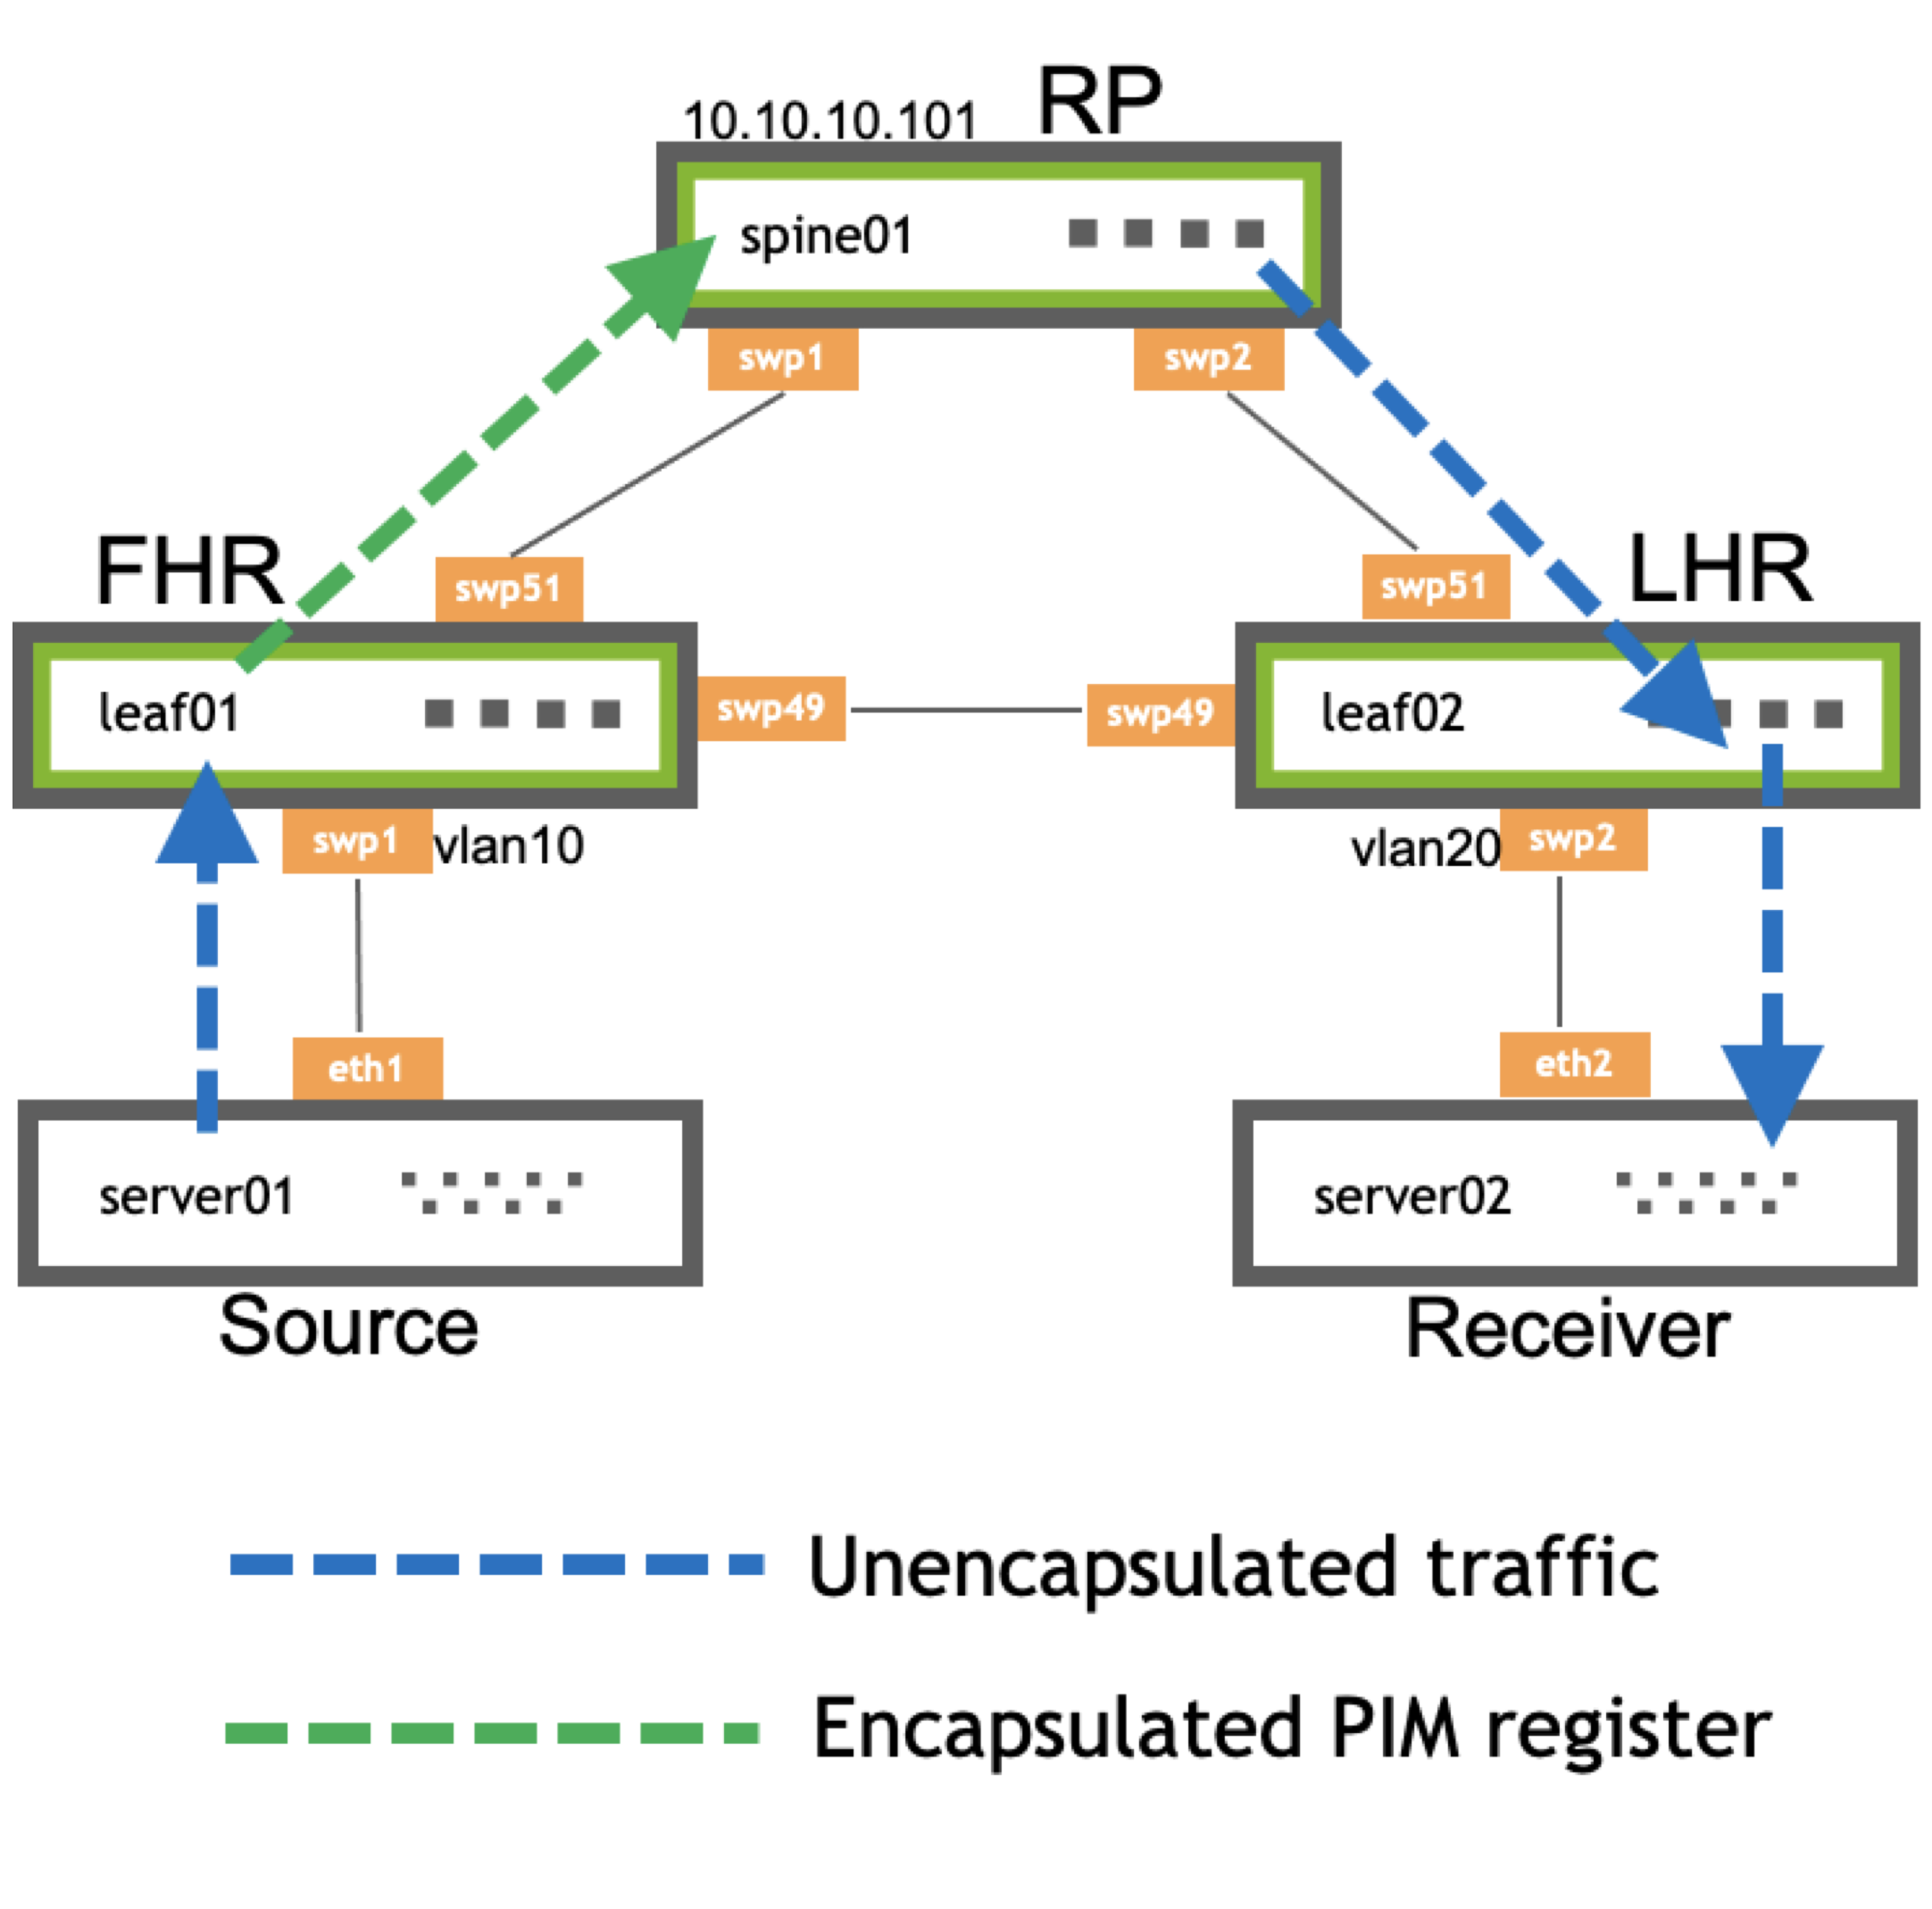 | 1. The FHR receives a multicast data packet from the source, encapsulates the packet in a unicast PIM register message, then sends it to the RP. 2. The RP builds an (S,G) mroute, decapsulates the multicast packet, then forwards it along the (*,G) tree towards the receiver. 3. The LHR receives multicast traffic and sees that it has a shorter path to the source. It requests the multicast stream from leaf01 and simultaneously sends the multicast stream to the receiver. |
| Traffic Flow for the Shortest Path Tree | |
|---|---|
 | 1. The FHR hears a PIM join directly from the LHR and forwards multicast traffic directly to it. 2. The LHR receives the multicast packet both from the FHR and the RP. The LHR discards the packet from the RP and prunes itself from the RP. 3. The RP receives a prune message from the LHR and instructs the FHR to stop sending PIM register messages 4. Traffic continues directly between the FHR and the LHR. |
cumulus@leaf01:~$ net add loopback lo ip address 10.10.10.1/32
cumulus@leaf01:~$ net add interface swp1,swp49,swp51
cumulus@leaf01:~$ net add bridge bridge ports swp1
cumulus@leaf01:~$ net add vlan 10 ip address 10.1.10.1/24
cumulus@leaf01:~$ net add interface swp1 bridge access 10
cumulus@leaf01:~$ net add bridge bridge vids 10
cumulus@leaf01:~$ net add bgp autonomous-system 65101
cumulus@leaf01:~$ net add bgp router-id 10.10.10.1
cumulus@leaf01:~$ net add bgp neighbor swp51 remote-as external
cumulus@leaf01:~$ net add bgp ipv4 unicast network 10.10.10.1/32
cumulus@leaf01:~$ net add bgp ipv4 unicast network 10.1.10.0/24
cumulus@leaf01:~$ net add loopback lo pim
cumulus@leaf01:~$ net add interface swp51 pim
cumulus@leaf01:~$ net add vlan 10 pim
cumulus@leaf01:~$ net add vlan 10 igmp
cumulus@leaf01:~$ net add pim rp 10.10.10.101
cumulus@leaf01:~$ net commit
cumulus@leaf02:~$ net add loopback lo ip address 10.10.10.2/32
cumulus@leaf02:~$ net add interface swp2,swp49,swp51
cumulus@leaf02:~$ net add bridge bridge ports swp2
cumulus@leaf02:~$ net add vlan 20 ip address 10.2.10.1/24
cumulus@leaf02:~$ net add interface swp2 bridge access 20
cumulus@leaf02:~$ net add bridge bridge vids 20
cumulus@leaf02:~$ net add bgp autonomous-system 65102
cumulus@leaf02:~$ net add bgp router-id 10.10.10.2
cumulus@leaf02:~$ net add bgp neighbor swp51 remote-as external
cumulus@leaf02:~$ net add bgp ipv4 unicast network 10.10.10.2/32
cumulus@leaf02:~$ net add bgp ipv4 unicast network 10.2.10.0/24
cumulus@leaf02:~$ net add loopback lo pim
cumulus@leaf02:~$ net add interface swp51 pim
cumulus@leaf02:~$ net add vlan 20 pim
cumulus@leaf02:~$ net add vlan 20 igmp
cumulus@leaf02:~$ net add pim rp 10.10.10.101
cumulus@leaf02:~$ net commit
cumulus@spine01:~$ net add loopback lo ip address 10.10.10.101/32
cumulus@spine01:~$ net add bgp autonomous-system 65199
cumulus@spine01:~$ net add bgp router-id 10.10.10.101
cumulus@spine01:~$ net add bgp neighbor swp1 remote-as external
cumulus@spine01:~$ net add bgp neighbor swp2 remote-as external
cumulus@spine01:~$ net add bgp ipv4 unicast network 10.10.10.101/32
cumulus@spine01:~$ net add loopback lo pim
cumulus@spine01:~$ net add interface swp1 pim
cumulus@spine01:~$ net add interface swp2 pim
cumulus@spine01:~$ net add pim rp 10.10.10.101
cumulus@spine01:~$ net commit
cumulus@leaf01:mgmt:~$ sudo cat /etc/network/interfaces
auto lo
iface lo inet loopback
    address 10.10.10.1/32
auto swp1
iface swp1
    bridge-access 10
auto swp49
iface swp49
auto swp51
iface swp51
auto bridge
iface bridge
    bridge-ports swp1
    bridge-vids 10
    bridge-vlan-aware yes
auto mgmt
iface mgmt
    vrf-table auto
    address 127.0.0.1/8
    address ::1/128
auto eth0
iface eth0 inet dhcp
    vrf mgmt
auto vlan10
iface vlan10
    address 10.1.10.1/24
    vlan-id 10
    vlan-raw-device bridge
cumulus@leaf02:mgmt:~$ sudo cat /etc/network/interfaces
auto lo
iface lo inet loopback
    address 10.10.10.2/32
auto swp2
iface swp2
    bridge-access 20
auto swp49
iface swp49
auto swp51
iface swp51
auto bridge
iface bridge
    bridge-ports swp2
    bridge-vids 20
    bridge-vlan-aware yes
auto mgmt
iface mgmt
    vrf-table auto
    address 127.0.0.1/8
    address ::1/128
auto eth0
iface eth0 inet dhcp
    vrf mgmt
auto vlan20
iface vlan20
    address 10.2.10.1/24
    vlan-id 20
    vlan-raw-device bridge
cumulus@spine01:mgmt:~$ sudo cat /etc/network/interfaces
auto lo
iface lo inet loopback
    address 10.10.10.101/32
auto swp1
iface swp1
auto swp2
iface swp2
auto mgmt
iface mgmt
    vrf-table auto
    address 127.0.0.1/8
    address ::1/128
auto eth0
iface eth0 inet dhcp
    vrf mgmt
cumulus@server01:~$ sudo cat /etc/network/interfaces
# The loopback network interface
auto lo
iface lo inet loopback
# The OOB network interface
auto eth0
iface eth0 inet dhcp
# The data plane network interfaces
auto eth1
iface eth1 inet manual
  address 10.1.10.101
  netmask 255.255.255.0
  mtu 9000
  post-up ip route add 10.0.0.0/8 via 10.1.10.1
cumulus@server02:~$ sudo cat /etc/network/interfaces
auto lo
iface lo inet loopback
# The OOB network interface
auto eth0
iface eth0 inet dhcp
# The data plane network interfaces
auto eth2
iface eth2 inet manual
  address 10.2.10.102
  netmask 255.255.255.0
  mtu 9000
  post-up ip route add 10.0.0.0/8 via 10.2.10.1
cumulus@leaf01:mgmt:~$ sudo cat /etc/frr/frr.conf
...
router bgp 65101
 bgp router-id 10.10.10.1
 neighbor swp51 interface
 neighbor swp51 remote-as external
 address-family ipv4 unicast
  network 10.10.10.1/32
  network 10.1.10.0/24
 exit-address-family
interface lo
 ip pim
interface swp51
 ip pim
interface vlan10
 ip pim
 ip igmp
ip pim rp 10.10.10.101
cumulus@leaf02:mgmt:~$ sudo cat /etc/frr/frr.conf
...
router bgp 65102
 bgp router-id 10.10.10.2
 neighbor swp51 interface
 neighbor swp51 remote-as external
 address-family ipv4 unicast
  network 10.10.10.2/32
  network 10.2.10.0/24
 exit-address-family
interface lo
 ip pim
interface swp51
 ip pim
interface vlan20
 ip pim
 ip igmp
ip pim rp 10.10.10.101
cumulus@spine01:mgmt:~$ sudo cat /etc/frr/frr.conf
...
router bgp 65199
 bgp router-id 10.10.10.101
 neighbor swp1 interface
 neighbor swp1 remote-as external
 neighbor swp2 interface
 neighbor swp2 remote-as external
 address-family ipv4 unicast
  network 10.10.10.101/32
 exit-address-family
interface lo
 ip pim
interface swp1
 ip pim
interface swp2
 ip pim
ip pim rp 10.10.10.101
Considerations
- Cumulus Linux does not support non-native forwarding (register decapsulation). Expect initial packet loss while the PIM *,G tree is building from the RP to the FHR to trigger native forwarding.
- Cumulus Linux does not build an S,G mroute when forwarding over an *,G tree.