FRRouting
Cumulus Linux uses FRR to provide the routing protocols for dynamic routing and supports the following routing protocols:
- Open Shortest Path First (v2 and v3)
- Border Gateway Protocol - BGP
Architecture
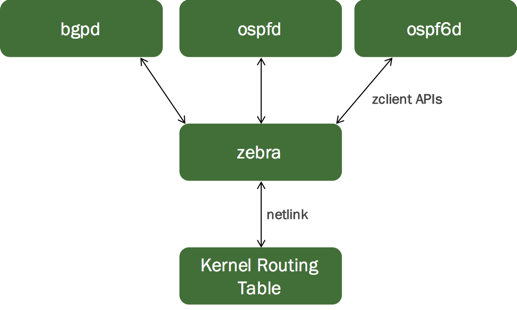
The FRR suite consists of various protocol-specific daemons and a protocol-independent daemon called zebra. Each of the protocol-specific daemons are responsible for running the relevant protocol and building the routing table based on the information exchanged.
It is not uncommon to have more than one protocol daemon running at the same time. For example, at the edge of an enterprise, protocols internal to an enterprise (called IGP for Interior Gateway Protocol) such as OSPF text or RIP run alongside the protocols that connect an enterprise to the rest of the world (called EGP or Exterior Gateway Protocol) such as BGP.
zebra is the daemon that resolves the routes provided by multiple protocols (including the static routes you specify) and programs these routes in the Linux kernel using netlink (in Linux). The FRRouting documentation defines zebra as the IP routing manager for FRR that provides kernel routing table updates, interface lookups, and redistribution of routes between different routing protocols.
Configure FRR
FRR does not start by default in Cumulus Linux. Before you run FRR, make sure you have enabled the relevant daemons that you intend to use (bgpd, ospfd, ospf6d or pimd) in the /etc/frr/daemons file.
Cumulus Linux enables the zebra daemon by default. You can enable the other daemons according to how you plan to route your network.
Before you start FRR, edit the /etc/frr/daemons file to enable each daemon you want to use. For example, to enable BGP, set bgpd to yes:
...
bgpd=yes
ospfd=no
ospf6d=no
ripd=no
ripngd=no
isisd=no
fabricd=no
pimd=no
ldpd=no
nhrpd=no
eigrpd=no
babeld=no
sharpd=no
pbrd=no
vrrpd=no
...
Enable and Start FRR
After you enable the appropriate daemons, enable and start the FRR service:
cumulus@switch:~$ sudo systemctl enable frr.service
cumulus@switch:~$ sudo systemctl start frr.service
- All the routing protocol daemons (
bgpd,ospfd,ospf6d,ripd,ripngd,isisdandpimd) are dependent onzebra. When you start FRR,systemddetermines whether zebra is running; if zebra is not running,systemdstartszebra, then starts the dependent service, such asbgpd. - If you restart a service, its dependent services also restart. For example, running
systemctl restart frr.servicerestarts any of the enabled routing protocol daemons that are running. - For more information on the
systemctlcommand and changing the state of daemons, see Services and Daemons in Cumulus Linux.
Integrated Configurations
By default in Cumulus Linux, FRR saves all daemon configurations in a single integrated configuration file, frr.conf.
You can disable this mode by running the following command in the vtysh CLI:
cumulus@switch:~$ sudo vtysh
...
switch# configure terminal
switch(config)# no service integrated-vtysh-config
To reenable integrated configuration file mode, run:
switch(config)# service integrated-vtysh-config
If you disable integrated configuration mode, FRR saves each daemon-specific configuration file in a separate file. For a daemon to start, you must enable that daemon and its daemon-specific configuration file must be present, even if the file is empty.
To save the current configuration:
switch# write memory
Building Configuration...
Integrated configuration saved to /etc/frr/frr.conf
[OK]
switch# exit
cumulus@switch:~$
You can use write file instead of write memory.
When you enable integrated configuration mode, the output looks like this:
switch# write memory
Building Configuration...
Configuration saved to /etc/frr/zebra.conf
Configuration saved to /etc/frr/bgpd.conf
[OK]
Restore the Default Configuration
If you need to restore the FRR configuration to the default running configuration, delete the frr.conf file and restart the frr service.
Back up frr.conf (or any configuration files you want to remove) before proceeding.
Confirm that
service integrated-vtysh-configis running.Remove
/etc/frr/frr.conf:cumulus@switch:~$ sudo rm /etc/frr/frr.confIf you disable integrated configuration file mode, remove all the configuration files (such as
zebra.conforospf6d.conf) instead offrr.conf.Restart FRR with this command:
cumulus@switch:~$ sudo systemctl restart frr.serviceRestarting FRR restarts all the routing protocol daemons that are enabled and running. NVIDIA recommends that you reboot the switch instead of restarting the FRR service to minimize traffic impact when redundant switches are present with MLAG.
Interface IP Addresses and VRFs
FRR inherits the IP addresses and any associated routing tables for the network interfaces from the /etc/network/interfaces file. This is the recommended way to define the addresses; do not create interfaces using FRR. For more information, see Configure IP Addresses and Virtual Routing and Forwarding - VRF.
vtysh Modal CLI
FRR provides a command-line interface (CLI) called vtysh for configuring and displaying protocol state. To start the CLI, run the sudo vtysh command:
cumulus@switch:~$ sudo vtysh

Hello, this is FRRouting (version 0.99.23.1+cl3u2).
Copyright 1996-2005 Kunihiro Ishiguro, et al.

switch#
vtysh provides a Cisco-like modal CLI and the commands are similar to Cisco IOS commands. There are different modes to the CLI and certain commands are only available within a specific mode. Configuration is available with the configure terminal command:
switch# configure terminal
switch(config)#
The prompt displays the current CLI mode. For example, when you run the interface-specific commands, the prompt changes to:
switch(config)# interface swp1
switch(config-if)#
When you run the routing protocol specific commands, the prompt changes:
switch(config)# router ospf
switch(config-router)#
? displays the list of available top-level commands:
switch(config-if)# ?
  bandwidth    Set bandwidth informational parameter
  description  Interface specific description
  end          End current mode and change to enable mode
  exit         Exit current mode and down to previous mode
  ip           IP Information
  ipv6         IPv6 Information
  isis         IS-IS commands
  link-detect  Enable link detection on interface
  list         Print command list
  mpls-te      MPLS-TE specific commands
  multicast    Set multicast flag to interface
  no           Negate a command or set its defaults
  ptm-enable   Enable neighbor check with specified topology
  quit         Exit current mode and down to previous mode
  shutdown     Shutdown the selected interface
?-based completion is also available to see the parameters that a command takes:
switch(config-if)# bandwidth ?
<1-10000000>  Bandwidth in kilobits
switch(config-if)# ip ?
address  Set the IP address of an interface
irdp     Alter ICMP Router discovery preference this interface
ospf     OSPF interface commands
rip      Routing Information Protocol
router   IP router interface commands
To search for specific vtysh commands so that you can identify the correct syntax to use, run the sudo vtysh -c 'find <term>' command. For example, to show only commands that include mlag:
cumulus@leaf01:mgmt:~$ sudo vtysh -c 'find mlag'
  (view)  show ip pim [mlag] vrf all interface [detail|WORD] [json]
  (view)  show ip pim [vrf NAME] interface [mlag] [detail|WORD] [json]
  (view)  show ip pim [vrf NAME] mlag upstream [A.B.C.D [A.B.C.D]] [json]
  (view)  show ip pim mlag summary [json]
  (view)  show ip pim vrf all mlag upstream [json]
  (view)  show zebra mlag
  (enable)  [no$no] debug zebra mlag
  (enable)  debug pim mlag
  (enable)  no debug pim mlag
  (enable)  test zebra mlag <none$none|primary$primary|secondary$secondary>
  (enable)  show ip pim [mlag] vrf all interface [detail|WORD] [json]
  (enable)  show ip pim [vrf NAME] interface [mlag] [detail|WORD] [json]
  (enable)  show ip pim [vrf NAME] mlag upstream [A.B.C.D [A.B.C.D]] [json]
  (enable)  show ip pim mlag summary [json]
  (enable)  show ip pim vrf all mlag upstream [json]
  (enable)  show zebra mlag
  (config)  [no$no] debug zebra mlag
  (config)  debug pim mlag
  (config)  ip pim mlag INTERFACE role [primary|secondary] state [up|down] addr A.B.C.D
  (config)  no debug pim mlag
  (config)  no ip pim mlag
You can display the state at any level, including the top level. For example, to see the routing table as seen by zebra:
switch# show ip route
Codes: K - kernel route, C - connected, S - static, R - RIP,
       O - OSPF, I - IS-IS, B - BGP, T - Table,
       > - selected route, * - FIB route
B>* 0.0.0.0/0 [20/0] via fe80::4638:39ff:fe00:c, swp29, 00:11:57
  *                  via fe80::4638:39ff:fe00:52, swp30, 00:11:57
B>* 10.0.0.1/32 [20/0] via fe80::4638:39ff:fe00:c, swp29, 00:11:57
  *                    via fe80::4638:39ff:fe00:52, swp30, 00:11:57
B>* 10.0.0.11/32 [20/0] via fe80::4638:39ff:fe00:5b, swp1, 00:11:57
B>* 10.0.0.12/32 [20/0] via fe80::4638:39ff:fe00:2e, swp2, 00:11:58
B>* 10.0.0.13/32 [20/0] via fe80::4638:39ff:fe00:57, swp3, 00:11:59
B>* 10.0.0.14/32 [20/0] via fe80::4638:39ff:fe00:43, swp4, 00:11:59
C>* 10.0.0.21/32 is directly connected, lo
B>* 10.0.0.51/32 [20/0] via fe80::4638:39ff:fe00:c, swp29, 00:11:57
  *                     via fe80::4638:39ff:fe00:52, swp30, 00:11:57
B>* 172.16.1.0/24 [20/0] via fe80::4638:39ff:fe00:5b, swp1, 00:11:57
  *                      via fe80::4638:39ff:fe00:2e, swp2, 00:11:57
B>* 172.16.3.0/24 [20/0] via fe80::4638:39ff:fe00:57, swp3, 00:11:59
  *                      via fe80::4638:39ff:fe00:43, swp4, 00:11:59
To run the same command at a config level, prepend do:
switch(config-router)# do show ip route
Codes: K - kernel route, C - connected, S - static, R - RIP,
       O - OSPF, I - IS-IS, B - BGP, T - Table,
       > - selected route, * - FIB route
B>* 0.0.0.0/0 [20/0] via fe80::4638:39ff:fe00:c, swp29, 00:05:17
  *                  via fe80::4638:39ff:fe00:52, swp30, 00:05:17
B>* 10.0.0.1/32 [20/0] via fe80::4638:39ff:fe00:c, swp29, 00:05:17
  *                    via fe80::4638:39ff:fe00:52, swp30, 00:05:17
B>* 10.0.0.11/32 [20/0] via fe80::4638:39ff:fe00:5b, swp1, 00:05:17
B>* 10.0.0.12/32 [20/0] via fe80::4638:39ff:fe00:2e, swp2, 00:05:18
B>* 10.0.0.13/32 [20/0] via fe80::4638:39ff:fe00:57, swp3, 00:05:18
B>* 10.0.0.14/32 [20/0] via fe80::4638:39ff:fe00:43, swp4, 00:05:18
C>* 10.0.0.21/32 is directly connected, lo
B>* 10.0.0.51/32 [20/0] via fe80::4638:39ff:fe00:c, swp29, 00:05:17
  *                     via fe80::4638:39ff:fe00:52, swp30, 00:05:17
B>* 172.16.1.0/24 [20/0] via fe80::4638:39ff:fe00:5b, swp1, 00:05:17
  *                      via fe80::4638:39ff:fe00:2e, swp2, 00:05:17
B>* 172.16.3.0/24 [20/0] via fe80::4638:39ff:fe00:57, swp3, 00:05:18
  *                      via fe80::4638:39ff:fe00:43, swp4, 00:05:18
To run single commands with vtysh, use the -c option:
cumulus@switch:~$ sudo vtysh -c 'sh ip route'
Codes: K - kernel route, C - connected, S - static, R - RIP,
       O - OSPF, I - IS-IS, B - BGP, A - Babel,
       > - selected route, * - FIB route

K>* 0.0.0.0/0 via 192.168.0.2, eth0
C>* 192.0.2.11/24 is directly connected, swp1
C>* 192.0.2.12/24 is directly connected, swp2
B>* 203.0.113.30/24 [200/0] via 192.0.2.2, swp1, 11:05:10
B>* 203.0.113.31/24 [200/0] via 192.0.2.2, swp1, 11:05:10
B>* 203.0.113.32/24 [200/0] via 192.0.2.2, swp1, 11:05:10
C>* 127.0.0.0/8 is directly connected, lo
C>* 192.168.0.0/24 is directly connected, eth0
To run a command multiple levels down:
cumulus@switch:~$ sudo vtysh -c 'configure terminal' -c 'router ospf' -c 'area 0.0.0.1 range 10.10.10.0/24'
The commands also take a partial command name (for example, sh ip route) as long as the partial command name is not aliased:
cumulus@switch:~$ sudo vtysh -c 'sh ip r'
% Ambiguous command.
To disable a command or feature in FRR, prepend the command with no. For example:
cumulus@switch:~$ sudo vtysh

switch# configure terminal
switch(config)# router ospf
switch(config-router)# no area 0.0.0.1 range 10.10.10.0/24
switch(config-router)# exit
switch(config)# exit
switch# write mem
switch# exit
cumulus@switch:~$
To view the current state of the configuration, run the show running-config command:
If you try to configure a routing protocol that is not running, vtysh ignores those commands.
Reload the FRR Configuration
If you make a change to your routing configuration, you need to reload FRR so your changes take place. FRR reload enables you to apply only the modifications you make to your FRR configuration, synchronizing its running state with the configuration in /etc/frr/frr.conf. This is useful for optimizing FRR automation in your environment or to apply changes made at runtime.
FRR reload only applies to an integrated service configuration, where your FRR configuration is in a single frr.conf file instead of one configuration file per FRR daemon (like zebra or bgpd).
To reload your FRR configuration after you modify /etc/frr/frr.conf, run:
cumulus@switch:~$ sudo systemctl reload frr.service
Examine the running configuration and verify that it matches the configuration in /etc/frr/frr.conf.
If the running configuration is not what you expect, submit a support request and supply the following information:
- The current running configuration (run
show running-configand output the contents to a file) - The contents of
/etc/frr/frr.conf - The contents of
/var/log/frr/frr-reload.log
FRR Logging
By default, Cumulus Linux configures FFR with syslog severity level 6 (informational). Log output writes to the /var/log/frr/frr.log file.
To write debug messages to the log file, you must run the log syslog debug command to configure FRR with syslog severity 7 (debug); otherwise, when you issue a debug command such as, debug bgp neighbor-events, no output goes to /var/log/frr/frr.log. However, when you manually define a log target with the log file /var/log/frr/debug.log command, FRR automatically defaults to severity 7 (debug) logging and the output logs to /var/log/frr/debug.log.
Considerations
Duplicate Hostnames
The switch can have two hostnames in the FRR configuration. For example:
cumulus@spine01:~$ sudo vtysh...
spine01# configure terminal
spine01(config)# hostname spine01-1
spine01-1(config)# do sh run
Building configuration...
Current configuration:
!
frr version 7.0+cl4u3
frr defaults datacenter
hostname spine01
hostname spine01-1
...
If you configure the same numbered BGP neighbor with both the neighbor x.x.x.x and neighbor swp# interface commands, two neighbor entries are present for the same IP address in the configuration. To correct this issue, update the configuration and restart the FRR service.
TCP Sockets and BGP Peering Sessions
The FRR startup configuration includes a setting for the maximum number of open files allowed. For BGP, open files include TCP sockets that BGP connections use. Either BGP speaker can start a BGP peering almost simultaneously; therefore, you can have two TCP sockets for a single BGP peer. These two sockets exist until the BGP protocol determines which socket to use, then the other socket closes.
The default setting of 1024 open files supports up to 512 BGP peering sessions. If you expect your network deployment to have more BGP peering sessions, you need to update this setting.
NVIDIA recommends you set the value to at least twice the maximum number of BGP peering sessions you expect.
To update the open files setting:
Edit the
/lib/systemd/system/frr.servicefile and change theLimitNOFILEparameter. The following example sets theLimitNOFILEparameter to 4096.cumulus@switch:~$ sudo cat /lib/systemd/system/frr.service [Unit] Description=FRRouting Documentation=https://frrouting.readthedocs.io/en/latest/setup.html After=networking.service csmgrd.service [Service] Nice=-5 Type=forking NotifyAccess=all StartLimitInterval=3m StartLimitBurst=3 TimeoutSec=2m WatchdogSec=60s RestartSec=5 Restart=on-abnormal LimitNOFILE=4096 ...Restart the FRR service.
cumulus@switch:~$ sudo systemctl restart frr.service