Precision Time Protocol - PTP
Cumulus Linux supports IEEE 1588-2008 Precision Timing Protocol (PTPv2), which defines the algorithm and method for synchronizing clocks of various devices across packet-based networks, including Ethernet switches and IP routers.
PTP is capable of sub-microsecond accuracy. The clocks are in a master-slave hierarchy, where the slaves synchronize to their masters, which can be slaves to their own masters. The Best Master Clock (BMC) algorithm, which runs on every clock, creates and updates the hierarchy automatically. The Grand Master clock is the top-level master. To provide a high-degree of accuracy, a Global Positioning System (GPS) time source typically synchronizes the Grand Master clock.
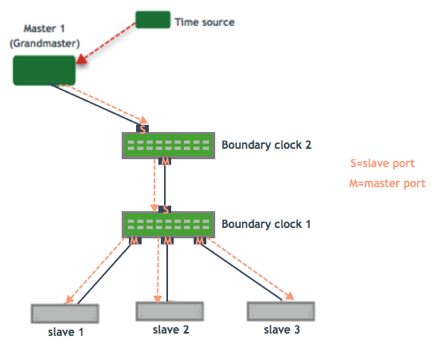
In the following example:
- Boundary clock 2 receives time from Master 1 (the Grand Master) on a PTP slave port, sets its clock and passes the time down from the PTP master port to Boundary clock 1.
- Boundary clock 1 receives the time on a PTP slave port, sets its clock and passes the time down the hierarchy through the PTP master ports to the hosts that receive the time.
Cumulus Linux and PTP
PTP in Cumulus Linux uses the linuxptp package that includes the following programs:
ptp4lprovides the PTP protocol and state machinesphc2sysprovides PTP Hardware Clock and System Clock synchronizationtimemasterprovides System Clock and PTP synchronization
Cumulus Linux supports:
- PTP boundary clock mode only (the switch provides timing to downstream servers; it is a slave to a higher-level clock and a master to downstream clocks).
- UDPv4, UDPv6, and 802.3 encapsulation.
- Only a single PTP domain per network.
- PTP on layer 3 interfaces, layer 3 bonds, trunk ports, and switch ports belonging to a VLAN.
- Multicast, unicast, and mixed message mode.
- End-to-End delay mechanism only. Cumulus Linux does not support Peer-to-Peer.
- One-step and two-step clock timestamp mode.
- Hardware timestamping for PTP packets. This allows PTP to avoid inaccuracies caused by message transfer delays and improves the accuracy of time synchronization.
- You cannot run both PTP and NTP on the switch.
- PTP supports the default VRF only.
- 1G links might have a lower accuracy for PTP due to hardware limitations. If your application needs high accuracy from PTP, use higher link speeds.
Cumulus Linux only supports PTP boundary clock mode; however, due to the internal delay accounting implementation, the switch might set the correction field to a non-zero value in the Sync message on a two-step egress port. This behavior is compliant with 1588-2008 and 1588-2019 PTP specifications to provide for better clock accuracy through the system. As a result, some downstream clocks might report the presence of a transparent clock between the Cumulus Linux switch and themselves.
Basic Configuration
Basic PTP configuration requires you:
- Disable NTP and remove default NTP configuration.
- Enable PTP on the switch.
- Configure PTP on at least one interface; this can be a layer 3 routed port, switch port, or trunk port. You do not need to specify which is a master interface and which is a slave interface; the PTP Best Master Clock Algorithm (BMCA) determines the master and slave.
If you configure PTP with Linux commands, you must also enable PTP timestamping; see step 1 of the Linux procedure below. NVUE enables timestamping when you enable PTP on the switch.
The basic configuration shown below uses the default PTP settings:
- The clock mode is Boundary. This is the only clock mode that Cumulus Linux supports.
- The PTP clock domain is 0.
- PTP Priority1 and Priority2 are both 128.
- The PTP interface transport mode is IPv4.
- Announce messages from any master are accepted.
- The PTP Interface Message Mode is multicast.
- The delay mechanism is End-to-End (E2E), where the slave measures the delay between itself and the master. The master and slave send delay request and delay response messages between each other to measure the delay.
- The clock timestamp mode is two-step.
To configure other settings, such as the PTP profile, domain, and priority, the PTP interface transport mode and timers, and PTP monitoring, see the Optional Configuration sections below.
Disable NTP
Remove the default NTP configuration on the switch:
cumulus@switch:~$ nv unset system ntp mgmt server 0.cumulusnetworks.pool.ntp.org
cumulus@switch:~$ nv unset system ntp mgmt server 1.cumulusnetworks.pool.ntp.org
cumulus@switch:~$ nv unset system ntp mgmt server 2.cumulusnetworks.pool.ntp.org
cumulus@switch:~$ nv unset system ntp mgmt server 3.cumulusnetworks.pool.ntp.org
cumulus@switch:~$ nv config apply
Stop and disable the NTP service in the management VRF:
cumulus@switch:~$ sudo systemctl stop ntpsec@mgmt.service
cumulus@switch:~$ sudo systemctl disable ntpsec@mgmt.service
Edit the
/etc/ntpsec/ntp.conffile to comment out the default NTP configuration:cumulus@switch:~$ sudo nano /etc/ntpsec/ntp.conf # server 0.cumulusnetworks.pool.ntp.org iburst # server 1.cumulusnetworks.pool.ntp.org iburst # server 2.cumulusnetworks.pool.ntp.org iburst # server 3.cumulusnetworks.pool.ntp.org iburst- Stop and disable the NTP service in the management VRF:
cumulus@switch:~$ sudo systemctl stop ntpsec@mgmt.service
cumulus@switch:~$ sudo systemctl disable ntpsec@mgmt.service
Configure PTP
The NVUE nv set service ptp commands require an instance number (1 in the example command below) for management purposes.
When you enable the PTP service with the nv set service ptp <instance> state enabled command, NVUE restarts the switchd service, which causes all network ports to reset in addition to resetting the switch hardware configuration.
cumulus@switch:~$ nv set service ptp 1 state enabled
cumulus@switch:~$ nv set interface swp1 ip address 10.0.0.9/32
cumulus@switch:~$ nv set interface swp2 ip address 10.0.0.10/32
cumulus@switch:~$ nv set interface swp1 ptp state enabled
cumulus@switch:~$ nv set interface swp2 ptp state enabled
cumulus@switch:~$ nv config apply
The configuration writes to the /etc/ptp4l.conf file.
Layer 2 Transport
cumulus@switch:~$ nv set service ptp 1 state enabled
cumulus@switch:~$ nv set bridge domain br_default
cumulus@switch:~$ nv set bridge domain br_default type vlan-aware
cumulus@switch:~$ nv set bridge domain br_default vlan 10-30
cumulus@switch:~$ nv set bridge domain br_default vlan 10 ptp state enabled
cumulus@switch:~$ nv set interface swp1 bridge domain br_default
cumulus@switch:~$ nv set interface swp1 bridge domain br_default vlan 10
cumulus@switch:~$ nv set interface swp1 bridge domain br_default vlan 20
cumulus@switch:~$ nv set interface swp1 ptp transport 802.3
cumulus@switch:~$ nv set interface swp1 ptp state enabled
cumulus@switch:~$ nv config apply
Layer 3 Transport
cumulus@switch:~$ nv set service ptp 1 state enabled
cumulus@switch:~$ nv set bridge domain br_default
cumulus@switch:~$ nv set bridge domain br_default type vlan-aware
cumulus@switch:~$ nv set bridge domain br_default vlan 10-30
cumulus@switch:~$ nv set bridge domain br_default vlan 10 ptp state enabled
cumulus@switch:~$ nv set interface vlan10 type svi
cumulus@switch:~$ nv set interface vlan10 ip address 10.1.10.2/24
cumulus@switch:~$ nv set interface vlan10 base-interface br_default
cumulus@switch:~$ nv set interface vlan10 ptp state enabled
cumulus@switch:~$ nv set interface swp1 bridge domain br_default
cumulus@switch:~$ nv set interface swp1 bridge domain br_default vlan 10
cumulus@switch:~$ nv set interface swp1 bridge domain br_default vlan 20
cumulus@switch:~$ nv set interface swp1 ptp state enabled
cumulus@switch:~$ nv config apply
- You can configure only one address; either IPv4 or IPv6.
- For IPv6, set the trunk port transport mode to IPv6.
- Layer 2 and layer 3 PTP transport cannot coexist.
- When you configure PTP layer 3 transport, you must configure:
- An SVI for VLAN-based routing.
- A base interface configuration to ensure proper packet forwarding.
The configuration writes to the /etc/ptp4l.conf file.
Layer 2 Transport
cumulus@switch:~$ nv set service ptp 1 state enabled
cumulus@switch:~$ nv set bridge domain br_default
cumulus@switch:~$ nv set bridge domain br_default type vlan-aware
cumulus@switch:~$ nv set bridge domain br_default vlan 10-30
cumulus@switch:~$ nv set bridge domain br_default vlan 10 ptp state enabled
cumulus@switch:~$ nv set interface swp2 bridge domain br_default
cumulus@switch:~$ nv set interface swp2 bridge domain br_default access 10
cumulus@switch:~$ nv set interface swp2 ptp transport 802.3
cumulus@switch:~$ nv set interface swp2 ptp state enabled
cumulus@switch:~$ nv config apply
Layer 3 Transport
cumulus@switch:~$ nv set service ptp 1 state enabled
cumulus@switch:~$ nv set bridge domain br_default
cumulus@switch:~$ nv set bridge domain br_default type vlan-aware
cumulus@switch:~$ nv set bridge domain br_default vlan 10-30
cumulus@switch:~$ nv set bridge domain br_default vlan 10 ptp state enabled
cumulus@switch:~$ nv set interface vlan10 type svi
cumulus@switch:~$ nv set interface vlan10 ip address 10.1.10.2/24
cumulus@switch:~$ nv set interface vlan10 base-interface br_default
cumulus@switch:~$ nv set interface swp2 bridge domain br_default
cumulus@switch:~$ nv set interface swp2 bridge domain br_default access 10
cumulus@switch:~$ nv set interface swp2 ptp state enabled
cumulus@switch:~$ nv config apply
- You can configure only one address; either IPv4 or IPv6.
- For IPv6, set the trunk port transport mode to IPv6.
- When you enable PTP on a bridge port, you must also enable PTP on the VLAN configured for the port with the
nv set bridge domain <domain> vlan <vlan-id> ptp state enabledcommand. - Layer 2 and layer 3 PTP transport cannot coexist.
- When you configure PTP layer 3 transport, you must configure:
- An SVI for VLAN-based routing.
- A base interface configuration to ensure proper packet forwarding.
The configuration writes to the /etc/ptp4l.conf file.
- Configure NVUE to stop managing PTP configuration files:
cumulus@switch:~$ nv set system config apply ignore /etc/linuxptp/phc2sys.conf
cumulus@switch:~$ nv set system config apply ignore /etc/ptp4l.conf
cumulus@switch:~$ nv set system config apply ignore /etc/cumulus/switchd.d/ptp.conf
cumulus@switch:~$ nv config apply
Edit the
/etc/cumulus/switchd.d/ptp.conffile to set theptp.timestampingparameter toTRUE:cumulus@switch:~$ sudo nano /etc/cumulus/switchd.d/ptp.conf ... ptp.timestamping TRUE ...Restart the
switchdservice:cumulus@switch:~$ sudo systemctl restart switchd.service
Restarting the switchd service causes all network ports to reset in addition to resetting the switch hardware configuration.
- Edit the
Default interface optionssection of the/etc/ptp4l.conffile to configure the interfaces on the switch that you want to use for PTP.
cumulus@switch:~$ sudo nano /etc/ptp4l.conf
...
#
# Default interface options
#
time_stamping                  hardware
# Interfaces in which ptp should be enabled
# these interfaces should be routed ports
# if an interface does not have an ip address
# the ptp4l will not work as expected.
[swp1]
udp_ttl                 1
masterOnly              0
delay_mechanism         E2E
[swp2]
udp_ttl                 1
masterOnly              0
delay_mechanism         E2E
For a trunk VLAN, add the VLAN configuration to the switch port stanza: set l2_mode to trunk, vlan_intf to the VLAN interface, and src_ip to the IP address of the VLAN interface:
[swp1]
l2_mode                 trunk
vlan_intf               vlan10
src_ip                  10.1.10.2
udp_ttl                 1
masterOnly              0
delay_mechanism         E2E
network_transport       RAWUDPv4
For a switch port VLAN, add the VLAN configuration to the switch port stanza: set l2_mode to access, vlan_intf to the VLAN interface, and src_ip to the IP address of the VLAN interface:
[swp2]
l2_mode                 access
vlan_intf               vlan10
src_ip                  10.1.10.2
udp_ttl                 1
masterOnly              0
delay_mechanism         E2E
network_transport       RAWUDPv4
Edit the
/etc/linuxptp/phc2sys.conffile to add the following parameters:cumulus@switch:~$ sudo nano /etc/linuxptp/phc2sys.conf # phc2sys is enabled [global] logging_level 6 path_trace_enabled 0 use_syslog 1 verbose 0 domainNumber 0Enable and start the
ptp4landphc2sysservices:cumulus@switch:~$ sudo systemctl enable ptp4l.service phc2sys.service cumulus@switch:~$ sudo systemctl start ptp4l.service phc2sys.service
Global Configuration
Cumulus Linux provides several ways to modify the default basic global configuration. You can:
- Use profiles.
- Modify the parameters directly with NVUE commands.
- Modify the Linux
/etc/ptp4l.conffile.
When a predefined profile is set, NVUE does not allow you to configure global parameters. Do not edit the Linux /etc/ptp4l.conf file to modify the global parameters when a predefined profile is in use. For information about profiles, see PTP Profiles.
Clock Domains
PTP domains allow different independent timing systems to be present in the same network without confusing each other. A PTP domain is a network or a portion of a network within which all the clocks synchronize. Every PTP message contains a domain number. A PTP instance works in only one domain and ignores messages that contain a different domain number. Cumulus Linux supports only one domain in the system.
You can specify multiple PTP clock domains. PTP isolates each domain from other domains so that each domain is a different PTP network. You can specify a number between 0 and 127.
The following example commands configure domain 3 when a profile is not set:
cumulus@switch:~$ nv set service ptp 1 domain 3
cumulus@switch:~$ nv config apply
Edit the Default Data Set section of the /etc/ptp4l.conf file to change the domainNumber setting, then restart the ptp4l service.
cumulus@switch:~$ sudo nano /etc/ptp4l.conf
[global]
#
# Default Data Set
#
slaveOnly               0
priority1               128
priority2               128
domainNumber            3
...
cumulus@switch:~$ sudo systemctl restart ptp4l.service
Clock Timestamp Mode
The Cumulus Linux switch provides the following clock timestamp modes:
- One-step, where PTP adds the precise time that the Sync packet egresses the port to the packet. There is no need for a follow up packet.
- Two-step, where PTP notes the precise time when the Sync packet egresses the port and sends it in a separate follow up message.
One-step mode significantly reduces the number of PTP messages. Two-step mode is the default configuration.
Cumulus Linux supports one-step mode on Spectrum-2 and later.
The following example commands configure one-step mode when a profile is not set:
cumulus@switch:~$ nv set service ptp 1 two-step off
cumulus@switch:~$ nv config apply
To revert the clock timestamp mode to the default setting (two-step mode), run the nv set service ptp 1 two-step on command.
To set the clock timestamp mode for a custom profile based on IEEE1588, ITU 8275-1 or ITU 8275-2, run the nv set service ptp <instance-id> profile <profile-id> two-step command. For example, to set one-step mode for the custom profile called CUSTOM1, run the nv set service ptp 1 profile CUSTOM1 two-step off command.
Edit the Default Data Set section of the /etc/ptp4l.conf file to change the twoStepFlag setting to 0, then restart the ptp4l service.
cumulus@switch:~$ sudo nano /etc/ptp4l.conf
[global]
#
# Default Data Set
#
slaveOnly               0
priority1               254
priority2               254
domainNumber            3

twoStepFlag             0
dscp_event              43
dscp_general            43
udp6_scope              0x0E
...
cumulus@switch:~$ sudo systemctl restart ptp4l.service
To revert the clock timestamp mode to the default setting (two-step mode), change the twoStepFlag setting to 1.
PTP Priority
The BMC selects the PTP master according to the criteria in the following order:
- Priority 1
- Clock class
- Clock accuracy
- Clock variance
- Priority 2
- Port ID
Use the PTP priority to select the Best Master Clock. You can set priority 1 and 2:
- Priority 1 overrides the clock class and quality selection criteria to select the Best Master Clock.
- Priority 2 identifies primary and backup clocks among identical redundant Grand Masters.
The range for both priority 1 and priority 2 is between 0 and 255. The default priority is 128. For the boundary clock, use a number above 128. The lower priority applies first.
The following example commands set priority 1 and priority 2 to 200 when a profile is not set:
cumulus@switch:~$ nv set service ptp 1 priority1 200
cumulus@switch:~$ nv set service ptp 1 priority2 200
cumulus@switch:~$ nv config apply
Edit the Default Data Set section of the /etc/ptp4l.conf file to change the priority1 and, or priority2 setting, then restart the ptp4l service.
cumulus@switch:~$ sudo nano /etc/ptp4l.conf
[global]
#
# Default Data Set
#
slaveOnly               0
priority1               200
priority2               200
domainNumber            3
...
cumulus@switch:~$ sudo systemctl restart ptp4l.service
Noise Transfer Servo
ITU-T noise transfer specifies the following key elements to measure, test, and classify the accuracy of a clock:
- Noise generation—jitter and wander noise in the output of a clock in reference to a PRTC.
- Noise tolerance—how much noise the clock can tolerate before it switches to another stable source.
- Noise transfer—smoothe out the input noise so that noise does not accumulate and increase over a network of clocks.
- Transient response—the response from the clock to a transient.
- Hold over—the time interval during which the clock maintains its output after losing the input reference signal.
Cumulus Linux PTP has an option to use a servo specifically designed to handle the ITU-T Noise Transfer specification. When you use this option, the PHC the Noise Transfer Servo resolves the jitter and wander noise from the Master clock.
- To use Noise Transfer Servo, you need to enable SyncE on the switch and on PTP interfaces.
- Cumulus Linux supports Noise Transfer Servo on Spectrum ASICs that support SyncE.
- NVIDIA recommends you use Noise Transfer Servo with PTP Telecom profiles. If you use other profiles or choose not to use a profile, make sure to set the sync interval to -3 or better.
- When you enable Noise Transfer Servo, the PTP log reporting offset is one every two seconds instead of one every second.
To enable Noise Transfer Servo:
The following example enables PTP, sets the profile to default-itu-8275-1, enables SyncE, enables PTP on swp3, and enables Noise Transfer Servo.
cumulus@switch:~$ nv set service ptp 1 state enabled
cumulus@switch:~$ nv set service ptp 1 current-profile default-itu-8275-1
cumulus@switch:~$ nv set system synce state enabled
cumulus@switch:~$ nv set interface swp3 ptp state enabled
cumulus@switch:~$ nv set service ptp 1 servo noise-transfer
cumulus@switch:~$ nv config apply
Edit the /etc/ptp4l.conf and the /etc/firefly_servo/servo.conf files; see examples below.
cumulus@switch:~$ sudo nano /etc/ptp4l.conf
[global]
#
# Default Data Set
#
slaveOnly                      0
free_running                   1
slave_event_monitor            /var/run/servo_slave_event_monitor
priority1                      128
priority2                      128
domainNumber                   24

twoStepFlag                    1
dscp_event                     46
dscp_general                   46
network_transport              L2
dataset_comparison             G.8275.x
G.8275.defaultDS.localPriority 128
ptp_dst_mac                    01:80:C2:00:00:0E
#
# Port Data Set
#
logAnnounceInterval            -3
logSyncInterval                -4
logMinDelayReqInterval         -4
announceReceiptTimeout         3
delay_mechanism                E2E

offset_from_master_min_threshold   -50
offset_from_master_max_threshold   50
mean_path_delay_threshold          200
tsmonitor_num_ts                   100
tsmonitor_num_log_sets             2
tsmonitor_num_log_entries          4
tsmonitor_log_wait_seconds         1
#
# Run time options
#
logging_level                  6
path_trace_enabled             0
use_syslog                     1
verbose                        0
summary_interval               0
#
# servo parameters
#
pi_proportional_const          0.000000
pi_integral_const              0.000000
pi_proportional_scale          0.700000
pi_proportional_exponent       -0.300000
pi_proportional_norm_max       0.700000
pi_integral_scale              0.300000
pi_integral_exponent           0.400000
pi_integral_norm_max           0.300000
first_step_threshold           0.000020
step_threshold                 0.000000025
servo_offset_threshold         20
servo_num_offset_values        10
write_phase_mode               1
max_frequency                  50000000
sanity_freq_limit              0
#
# Default interface options
#
time_stamping                  hardware

[swp3]
udp_ttl                      1
masterOnly                   0
delay_mechanism              E2E
cumulus@switch:~$ sudo nano /etc/firefly_servo/servo.conf
[global]
free_running                        0
domainNumber                        24

offset_from_master_min_threshold    -50
offset_from_master_max_threshold    50

# Debugging & Logging
doca_logging_level                  50

init_max_time_adjustment            0
max_time_adjustment                 1500
hold_over_timer                     0
# Sampling Window & servo logic
servo_window_timer                  3000
servo_window_min_samples            10
servo_num_offset_values             5
To show Noise Transfer Servo configuration settings, run the nv show service ptp <instance-id> servo command:
cumulus@switch:~$ nv show service ptp 1 servo
       operational  applied
-----  -----------  --------------
servo               noise-transfer
Ignore Source Port ID
If the master clock has Announce disabled, you can disable the source port ID check in SYNC, Follow Up, and Delay Response PTP messages. Disabling the source port ID check is also useful in rare implementations of PTP, where the master changes the source Port ID in the above messages from the one sent on Announce.
To disable the source port ID check, run the nv set service ptp 1 ignore-source-id on command:
cumulus@switch:~$ nv set service ptp 1 ignore-source-id on
cumulus@switch:~$ nv config apply
To reenable the source port ID check, run the nv set service ptp 1 ignore-source-id off command.
To disable the source port ID check, edit the /etc/ptp4l.conf file to add the ignore_source_id 1 parameter, then restart the ptp4l service.
cumulus@switch:~$ sudo nano /etc/ptp4l.conf
[global]
#
# Default Data Set
#
slaveOnly                      0
priority1                      128
priority2                      128
domainNumber                   0
ignore_source_id               1
...
cumulus@switch:~$ sudo systemctl restart ptp4l.service
Multicast MAC Address
PTP over Ethernet uses the following types of multicast MAC addresses:
- Forwarding, which is a standard MAC address that switches and bridges flood. The nodes that process these multicast messages might be intermediate nodes that do not support PTP. Cumulus Linux uses MAC address 01-1B-19-00-00-00.
- Non-forwarding, which is the reserved 802.1 Q address 01-80-C2-00-00-0E. Cumulus Linux does not forward this address on the bridge. This is the default setting.
For Telecom Profile ITU 8275-1, the multicast MAC address must be non-forwarding.
To set the multicast MAC address to forwarding, run the nv set service ptp 1 multicast-mac forwarding command.
cumulus@switch:~$ nv set service ptp 1 multicast-mac forwarding
cumulus@switch:~$ nv config apply
To set the multicast MAC address to non-forwarding:
cumulus@switch:~$ nv set service ptp 1 multicast-mac non-forwarding
cumulus@switch:~$ nv config apply
To set the multicast MAC address to non-forwarding, edit the /etc/ptp4l.conf file to add the ptp_dst_mac parameter, then restart the ptp4l service.
cumulus@switch:~$ sudo nano /etc/ptp4l.conf
...
#
# Run time options
#
logging_level                  6
path_trace_enabled             0
use_syslog                     1
verbose                        0
summary_interval               0
ptp_dst_mac                    01:80:C2:00:00:0E
cumulus@switch:~$ sudo systemctl restart ptp4l.service
Optional Global Configuration
Optional global PTP configuration includes configuring the DiffServ code point (DSCP). You can configure the DSCP value for all PTP IPv4 packets originated locally. You can set a value between 0 and 63.
cumulus@switch:~$ nv set service ptp 1 ip-dscp 22
cumulus@switch:~$ nv config apply
Edit the Default Data Set section of the /etc/ptp4l.conf file to change the dscp_event setting for PTP messages that trigger a timestamp read from the clock and the dscp_general setting for PTP messages that carry commands, responses, information, or timestamps.
After you save the /etc/ptp4l.conf file, restart the ptp4l service.
cumulus@switch:~$ sudo nano /etc/ptp4l.conf
[global]
#
# Default Data Set
#
slaveOnly               0
priority1               200
priority2               200
domainNumber            3

twoStepFlag             1
dscp_event              22
dscp_general            22
udp6_scope              0x0E
...
cumulus@switch:~$ sudo systemctl restart ptp4l.service
PTP Interface Configuration
Cumulus Linux provides several ways to modify the default basic interface configuration. You can:
- Use profiles
- Modify the parameters directly with NVUE commands
- Modify the Linux
/etc/ptp4l.confconfiguration file.
When a profile is in use, avoid configuring the following interface configuration parameters with NVUE or in the Linux configuration file so that the interface retains its profile settings.
Transport Mode
By default, Cumulus Linux encapsulates PTP messages in UDP IPv4 frames. To encapsulate PTP messages on an interface in UDP IPv6 frames:
cumulus@switch:~$ nv set interface swp1 ptp transport ipv6
cumulus@switch:~$ nv config apply
Edit the Default interface options section of the /etc/ptp4l.conf file to change the network_transport setting for the interface, then restart the ptp4l service.
cumulus@switch:~$ sudo nano /etc/ptp4l.conf
...
# Default interface options
#
time_stamping           hardware

# Interfaces in which ptp should be enabled
# these interfaces should be routed ports
# if an interface does not have an ip address
# the ptp4l will not work as expected.

[swp1]
udp_ttl                 1
masterOnly              0
delay_mechanism         E2E
network_transport       RAWUDPv6

[swp2]
udp_ttl                 1
masterOnly              0
delay_mechanism         E2E
network_transport       RAWUDPv6
...
cumulus@switch:~$ sudo systemctl restart ptp4l.service
Message Mode
Cumulus Linux supports the following PTP message modes:
- Multicast, where the ports subscribe to two multicast addresses, one for event messages with timestamps and the other for general messages without timestamps. The Sync message that the master sends is a multicast message; all slave ports receive this message because the slaves need the time from the master. The slave ports in turn generate a Delay Request to the master. This is a multicast message that the intended master for the message and other slave ports receive. Similarly, all slave ports in addition to the intended slave port receive the master’s Delay Response. The slave ports receiving the unintended Delay Requests and Responses need to drop the packets. This can affect network bandwidth if there are hundreds of slave ports.
- Mixed, where Sync and Announce messages are multicast messages but Delay Request and Response messages are unicast. This avoids the issue seen in multicast message mode where every slave port sees Delay Requests and Responses from every other slave port.
- Unicast, where you configure the port as a unicast client or server. See Unicast Mode.
Multicast mode is the default setting; when you enable PTP on an interface, the message mode is multicast.
To change the message mode to mixed on swp1:
cumulus@switch:~$ nv set interface swp1 ptp mixed-multicast-unicast enabled
cumulus@switch:~$ nv config apply
To change the message mode back to the default setting of multicast on swp1:
cumulus@switch:~$ nv set interface swp1 ptp mixed-multicast-unicast disabled
cumulus@switch:~$ nv config apply
Edit the Default interface options section of the /etc/ptp4l.conf file to add the hybrid_e2e 1 line under the interface, then restart the ptp4l service.
cumulus@switch:~$ sudo nano /etc/ptp4l.conf
...
# Default interface options
#
time_stamping           hardware

# Interfaces in which ptp should be enabled
# these interfaces should be routed ports
# if an interface does not have an ip address
# the ptp4l will not work as expected.

[swp1]
hybrid_e2e              1
...
cumulus@switch:~$ sudo systemctl restart ptp4l.service
To change the message mode back to the default setting of multicast, remove the hybrid_e2e line under the interface, then restart the ptp4l service.
PTP Interface Timers
You can set the following timers for PTP messages.
| Timer | Description |
|---|---|
announce-interval | The average interval between successive Announce messages. Specify the value as a power of two in seconds. |
announce-timeout | The number of announce intervals that have to occur without receiving an Announce message before a timeout occurs. Make sure that this value is longer than the announce-interval in your network. |
delay-req-interval | The minimum average time interval allowed between successive Delay Required messages. |
sync-interval | The interval between PTP synchronization messages on an interface. Specify the value as a power of two in seconds. |
- To set the timers with NVUE, run the
nv set interface <interface-id> ptp timers <timer> <value>command. - To set the timers with Linux commands, edit the
/etc/ptp4l.conffile and set the timers in theDefault interface optionssection.
The following example sets the announce interval between successive Announce messages on swp1 to -1.
cumulus@switch:~$ nv set interface swp1 ptp timers announce-interval -1
cumulus@switch:~$ nv config apply
The following example sets the mean sync-interval for multicast messages on swp1 to -5.
cumulus@switch:~$ nv set interface swp1 ptp timers sync-interval -5
cumulus@switch:~$ nv config apply
Edit the Default interface options section of the /etc/ptp4l.conf file:
- To set the announce interval between successive Announce messages on swp1 to -1, add
logAnnounceInterval -1under the interface stanza. - To set the mean sync-interval for multicast messages on swp1 to -5, add
logSyncInterval -5under the interface stanza.
After you edit the /etc/ptp4l.conf file, restart the ptp4l service.
cumulus@switch:~$ sudo nano /etc/ptp4l.conf
...
# Default interface options
#
time_stamping           hardware

# Interfaces in which ptp should be enabled
# these interfaces should be routed ports
# if an interface does not have an ip address
# the ptp4l will not work as expected.

[swp1]
logAnnounceInterval     -1
logSyncInterval         -5
udp_ttl                 20
masterOnly              1
delay_mechanism         E2E
...
cumulus@switch:~$ sudo systemctl restart ptp4l.service
Optional PTP Interface Configuration
Forced Master Mode
By default, PTP ports are in auto mode, where the BMC algorithm determines the state of the port.
You can configure Forced Master mode on a PTP port so that it is always in a master state and the BMC algorithm does not run for this port. This port ignores any Announce messages it receives.
cumulus@switch:~$ nv set interface swp1 ptp forced-master enabled
cumulus@switch:~$ nv config apply
Edit the Default interface options section of the /etc/ptp4l.conf file to change the masterOnly setting for the interface, then restart the ptp4l service.
cumulus@switch:~$ sudo nano /etc/ptp4l.conf
...
# Default interface options
#
time_stamping           hardware

# Interfaces in which ptp should be enabled
# these interfaces should be routed ports
# if an interface does not have an ip address
# the ptp4l will not work as expected.

[swp1]
udp_ttl                 1
masterOnly              1
delay_mechanism         E2E
...
cumulus@switch:~$ sudo systemctl restart ptp4l.service
TTL for a PTP Message
To restrict the number of hops a PTP message can travel, set the TTL on the PTP interface. You can set a value between 1 and 255.
cumulus@switch:~$ nv set interface swp1 ptp ttl 20
cumulus@switch:~$ nv config apply
Edit the Default interface options section of the /etc/ptp4l.conf file to change the udp_ttl setting for the interface, then restart the ptp4l service.
cumulus@switch:~$ sudo nano /etc/ptp4l.conf
...
# Default interface options
#
time_stamping           hardware

# Interfaces in which ptp should be enabled
# these interfaces should be routed ports
# if an interface does not have an ip address
# the ptp4l will not work as expected.

[swp1]
udp_ttl                 20
masterOnly              1
delay_mechanism         E2E
...
cumulus@switch:~$ sudo systemctl restart ptp4l.service
Unicast Mode
Cumulus Linux supports unicast mode so that a unicast client can perform Unicast Discover and Negotiation with servers. Unlike the default multicast mode, where both the server(master) and client(slave) start sending out announce requests and discover each other, in unicast mode, the client starts by sending out requests for unicast transmission. The client sends this to every server address in its Unicast Master Table. The server responds with an accept or deny to the request.
Global Unicast Configuration
Unicast clients need a unicast master table for unicast negotiation; you must configure at least one unicast master table on the switch.
To configure unicast globally:
- Set the unicast table ID; a unique ID that identifies the unicast master table.
- Set the unicast master address. You can set a maximum of four unicast master addresses, which can be IPv4, IPv6, or MAC addresses. NVUE shows an error if you try to set more than four unicast master addresses.
- Optional: Set the unicast master query interval, which is the mean interval between requests for Announce messages. Specify this value as a power of two in seconds. You can specify a value between -3 and 4. The default value is -0 (2 power).
cumulus@switch:~$ nv set service ptp 1 unicast-master 1 address 10.10.10.1 cumulus@switch:~$ nv set service ptp 1 unicast-master 1 query-interval 4 cumulus@switch:~$ nv set interface swp1 ptp unicast-master-table-id 1 cumulus@switch:~$ nv config applyAdd the following lines at the end of the
# Default interface optionssection of the/etc/ptp4l.conffile:cumulus@switch:~$ sudo nano /etc/ptp4l.conf ... # Default interface options ... [unicast_master_table] table_id 1 logQueryInterval 4 RAWUDPv4 10.10.10.1 ...Restart the
ptp4lservice.cumulus@switch:~$ sudo systemctl restart ptp4l.service
Interface Unicast Configuration
For interface unicast configuration, in addition to enabling PTP on an interface, you also need to configure the PTP interface to be either a unicast client or a unicast server.
When configuring multiple PTP interfaces on the switch to be unicast clients, you must configure a unicast table ID on every interface set as a unicast client. Each client must have a different table ID.
To configure a PTP interface to be the unicast client:
cumulus@switch:~$ nv set interface swp1 ptp unicast-service-mode client
cumulus@switch:~$ nv config apply
Add the following lines at the end of the interface section of the
/etc/ptp4l.conffile:[unicast_master_table] table_id 3 logQueryInterval 0 RAWUDPv4 100.100.100.1 [swp1] table_id 1 ...Restart the
ptp4lservice.cumulus@switch:~$ sudo systemctl restart ptp4l.service
To configure a PTP interface to be the unicast server:
cumulus@switch:~$ nv set interface swp1 ptp unicast-service-mode server
cumulus@switch:~$ nv config apply
Add the following lines at the end of the interface section of the
/etc/ptp4l.conffile:[swp1] ... unicast_listen 1 ...Restart the
ptp4lservice.cumulus@switch:~$ sudo systemctl restart ptp4l.service
To configure a unicast table ID:
cumulus@switch:~$ nv set interface swp1 ptp unicast-master-table-id 1
cumulus@switch:~$ nv config apply
Add the table ID at the end of the interface section of the
/etc/ptp4l.conffile:[swp1] ... table_id 1Restart the
ptp4lservice.cumulus@switch:~$ sudo systemctl restart ptp4l.service
To show the unicast master table configuration on the switch, run the nv show service ptp <instance-id> unicast-master <table-id> command.
To show unicast PTP related counters, run the nv show interface <interface-id> counters ptp command and examine the Signaling section in the output.
cumulus@switch:~$ nv show interface swp1 counters ptp
Packet Type                       Received       Transmitted
---------------------             ------------   ------------
Announce                                    0            681
Sync                                        0          43530
Follow-up                                   0          43530
Delay Request                           42064              0
Delay Response                              0          42064
Peer Delay Request                          0              0
Peer Delay Response                         0              0
Management                                  0              0
Signaling                                  94            282
  Announce Grant Request                   94              0
  Announce Grant Response                   0             94
  Announce Deny Response                    0              0
  Sync Grant Request                       94              0
  Sync Grant Response                       0             94
  Sync Deny Response                        0              0
  Delay Grant Request                      94              0
  Delay Grant Response                      0             94
  Delay Deny Response                       0              0
  Cancel Announce Request                   0              0
  Cancel Sync Request                       0              0
  Cancel Delay Request                      0              0
- The client sends unicast requests together in one signaling message (Announce, Sync, Delay request TLV), and the unicast server sees one signaling message and three TLVs. The counter increments for each request received.
- The server responds with a grant signaling message individually for each response; the response includes three signaling messages each with one TLV. The counters increment individually.
Optional Unicast Interface Configuration
You can set the unicast request duration for unicast clients, which is the service time in seconds requested by the unicast client during unicast negotiation. The default value is 300 seconds.
cumulus@switch:~$ nv set interface swp1 ptp unicast-request-duration 20
cumulus@switch:~$ nv config apply
Add the
unicast_request_durationparameter at the end of the interface section of the/etc/ptp4l.conffile:[swp1] ... table_id 1 unicast_request_duration 20Restart the
ptp4lservice.cumulus@switch:~$ sudo systemctl restart ptp4l.service
PTP Profiles
PTP profiles are a standardized set of configurations and rules intended to meet the requirements of a specific application. Profiles define required, allowed, and restricted PTP options, network restrictions, and performance requirements.
All interfaces inherit PTP profile parameter values. PTP parameter values configured under an interface take precedence over PTP profile parameter values.
Cumulus Linux supports three predefined profiles: IEEE 1588, and two Telecom profiles - ITU 8275-1 and ITU 8275-2.
| IEEE 1588 | ITU 8275-1 | ITU 8275-2 | |
|---|---|---|---|
| Application | Enterprise | Mobile Networks | Mobile Networks |
| Transport | Layer 2 and Layer 3 | Layer 2 | Layer 3 |
| Encapsulation | 802.3, UDPv4, or UDPv6 | 802.3 | UDPv4 or UDPv6 |
| Transmission | Unicast and Multicast | Multicast | Unicast |
| Supported Clock Types | Boundary Clock | Boundary Clock | Boundary Clock |
- You cannot modify the predefined profiles. If you want to set a parameter to a different value in a predefined profile, you need to create a custom profile. You can modify a custom profile within the range applicable to the profile type.
- You cannot set the current profile to a profile not yet created.
- You cannot set global PTP parameters in a profile currently in use.
- PTP profiles do not support bonds.
- If you set a predefined or custom profile, do not change any global PTP settings, such as the DSCP or the clock domain.
- For better performance in a high scale network with PTP on multiple interfaces, configure a higher system policer rate with the
nv set system control-plane policer lldp-ptp burst <value>andnv set system control-plane policer lldp-ptp rate <value>commands. The switch uses the LLDP policer for PTP protocol packets. The default value for the LLDP policer is 2500. When you use the ITU 8275.1 profile with higher sync rates, use higher policer values.
Set a Predefined Profile
To set a predefined profile:
- To set the ITU 8275.1 profile, run the
nv set service ptp <instance-id> current-profile default-itu-8275-1command. - To set the ITU 8275.2 profile, run the
nv set service ptp <instance-id> current-profile default-itu-8275-2command.
The following example sets the profile to ITU 8275.1
cumulus@switch:~$ nv set service ptp 1 current-profile default-itu-8275-1
cumulus@switch:~$ nv config apply
To set the IEEE 1588 profile:
cumulus@switch:~$ nv set service ptp 1 current-profile default-1588
cumulus@switch:~$ nv config apply
To set the predefined ITU 8275.1 profile, edit the /etc/ptp4l.conf file and set the parameters shown below, then restart the ptp4l service:
cumulus@switch:~$ sudo nano /etc/ptp4l.conf
...
...
[global]
#
# Default Data Set
#
slaveOnly                      0
priority1                      128
priority2                      128
domainNumber                   24

twoStepFlag                    1
dscp_event                     46
dscp_general                   46
dataset_comparison             G.8275.x
G.8275.defaultDS.localPriority 128
ptp_dst_mac                    01:80:C2:00:00:0E
...
cumulus@switch:~$ sudo systemctl restart ptp4l.service
To set the predefined ITU 8275.2 profile, edit the /etc/ptp4l.conf file and set the parameters shown below, then restart the ptp4l service:
cumulus@switch:~$ sudo nano /etc/ptp4l.conf
...
...
[global]
#
# Default Data Set
#
slaveOnly                      0
priority1                      128
priority2                      128
domainNumber                   24

twoStepFlag                    1
dscp_event                     46
dscp_general                   46
network_transport              RAWUDPv4
dataset_comparison             G.8275.x
G.8275.defaultDS.localPriority 128
hybrid_e2e                     1
inhibit_multicast_service      1
unicast_listen                 1
unicast_req_duration           60
...
cumulus@switch:~$ sudo systemctl restart ptp4l.service
To use the predefined IEEE 1588 profile, edit the /etc/ptp4l.conf file and set the parameters shown below, then restart the ptp4l service:
cumulus@switch:~$ sudo nano /etc/ptp4l.conf
[global]
#
# Default Data Set
#
slaveOnly                      0
priority1                      128
priority2                      128
domainNumber                   0

twoStepFlag                    1
dscp_event                     46
dscp_general                   46
network_transport              RAWUDPv4
dataset_comparison             ieee1588
...
cumulus@switch:~$ sudo systemctl restart ptp4l.service
Create a Custom Profile
To create a custom profile:
- Create a profile name.
- Set the profile type on which to base the new profile (
itu-g-8275-1itu-g-8275-2, orieee-1588). - Update any of the profile settings you want to change (
announce-interval,delay-req-interval,priority1,sync-interval,announce-timeout,domain,priority2,transport,delay-mechanism,local-priority). - Set the custom profile to be the current profile.
The following example commands create a custom profile called CUSTOM1 based on the predefined profile ITU 8275-1. The commands set the domain to 28 and the announce-timeout to 3, then set CUSTOM1 to be the current profile:
cumulus@switch:~$  nv set service ptp 1 profile CUSTOM1
cumulus@switch:~$  nv set service ptp 1 profile CUSTOM1 profile-type itu-g-8275-1
cumulus@switch:~$  nv set service ptp 1 profile CUSTOM1 domain 28
cumulus@switch:~$  nv set service ptp 1 profile CUSTOM1 announce-timeout 3
cumulus@switch:~$  nv set service ptp 1 current-profile CUSTOM1
cumulus@switch:~$  nv config apply
The following example /etc/ptp4l.conf file creates a custom profile based on the predefined profile ITU 8275-1 and sets the domain to 28 and the announce-timeout to 3.
cumulus@switch:~$ sudo nano /etc/ptp4l.conf
[global]
#
# Default Data Set
#
slaveOnly                      0
priority1                      128
priority2                      128
domainNumber                   28

twoStepFlag                    1
dscp_event                     46
dscp_general                   46
network_transport              L2
dataset_comparison             G.8275.x
G.8275.defaultDS.localPriority 128
ptp_dst_mac                    01:80:C2:00:00:0E

#
# Port Data Set
#
logAnnounceInterval            5
logSyncInterval                -4
logMinDelayReqInterval         -4
announceReceiptTimeout         3
delay_mechanism                E2E

offset_from_master_min_threshold   -50
offset_from_master_max_threshold   50
mean_path_delay_threshold          200
tsmonitor_num_ts                   100
tsmonitor_num_log_sets             3
tsmonitor_num_log_entries          4
tsmonitor_log_wait_seconds         1

#
# Run time options
#
logging_level                  6
path_trace_enabled             0
use_syslog                     1
verbose                        0
summary_interval               0

#
# servo parameters
#
pi_proportional_const          0.000000
pi_integral_const              0.000000
pi_proportional_scale          0.700000
pi_proportional_exponent       -0.300000
pi_proportional_norm_max       0.700000
pi_integral_scale              0.300000
pi_integral_exponent           0.400000
pi_integral_norm_max           0.300000
step_threshold                 0.000002
first_step_threshold           0.000020
max_frequency                  900000000
sanity_freq_limit              0

#
# Default interface options
#
time_stamping                  hardware


# Interfaces in which ptp should be enabled
# these interfaces should be routed ports
# if an interface does not have an ip address
# the ptp4l will not work as expected.

[swp1]
udp_ttl                 1
masterOnly              0
delay_mechanism         E2E

[swp2]
udp_ttl                 1
masterOnly              0
delay_mechanism         E2E
cumulus@switch:~$ sudo systemctl restart ptp4l.service
Telecom Profiles
ITU 8275-1 and ITU 8275-2 are Telecom profiles. You can use the PTP Telecom profiles for phase distribution in networks that have full timing support and for time distribution in networks that have partial timing support. While ITU 8275-1 uses 802.3 encapsulation, ITU 8275-2 uses unicast. When you use a Telecom profile, PTP uses the Alternate Best Master Clock Algorithm (BMCA), which provides the following functionality over the regular BMCA:
- Supports Master Only capability.
- Allows multiple Grand Masters to be active simultaneously.
- Supports local-priority capability to manually engineer synchronization network.
Local Priority
The local priority attributes of the Telecom profiles provide a powerful tool in building the synchronization topology. The profiles have two local priority configuration parameters:
clock-local-priority- You assign the clock local priority to the local clock. PTP uses the clock local priority as a tie breaker when deciding on a better Grand Master.local-priority- You assign the local priority to a port as a tie breaker when running Alternate BMCA. When you set this attribute at the profile level, it applies to all PTP enabled ports. There is also an interface-level configuration to override the profile value.
Both clock-local-priority and local-priority have default values of 128. When you use the default values, the Alternate BMCA determines the synchronization topology automatically. If you use non-default local priority values, you build the synchronization topology manually.
- Exercise caution when using local priority attributes to build the synchronization topology manually.
- With two connected switches, you must set the local priority on one switch higher than 128 and the local priority on the second switch lower than 128.
The following example commands set:
- The local priority to 10 for the custom profile called CUSTOM1, based on ITU 8275-2.
- The clock local priority to 100 for the custom profile called CUSTOM1, based on ITU 8275-2.
cumulus@switch:~$ nv set service ptp 1 profile CUSTOM1 local-priority 10
cumulus@switch:~$ nv set service ptp 1 profile CUSTOM1 clock-local-priority 100
cumulus@switch:~$ nv config apply
Add the G.8275.portDS.localPriority (local priority) option and the G.8275.defaultDS.localPriority (clock local priority) option to the Global section of the /etc/ptp4l.conf file, then restart the ptp4l service.
The following example sets:
- The local priority to 10.
- The clock local priority to 100.
cumulus@switch:~$ sudo nano /etc/ptp4l.conf
[global]
#
# Default Data Set
#
slaveOnly                      0
priority1                      128
priority2                      128
domainNumber                   28

twoStepFlag                    1
dscp_event                     46
dscp_general                   46
network_transport              L2
dataset_comparison             G.8275.x
G.8275.defaultDS.localPriority 100
G.8275.portDS.localPriority    10
...
cumulus@switch:~$ sudo systemctl restart ptp4l.service
The following example sets the local priority on swp1 to 120.
cumulus@switch:~$ nv set interface swp1 ptp 1 local-priority 120
cumulus@switch:~$ nv config apply
Add the G.8275.portDS.localPriority option to the interface section of the /etc/ptp4l.conf file, then restart the ptp4l service.
cumulus@switch:~$ sudo nano /etc/ptp4l.conf
...
[swp1]
udp_ttl                      1
hybrid_e2e                   1
masterOnly                   0
delay_mechanism              E2E
network_transport            RAWUDPv6
G.8275.portDS.localPriority  120
...
cumulus@switch:~$ sudo systemctl restart ptp4l.service
Show Profile Settings
To show the current PTP profile setting, run the nv show service ptp <ptp-instance> command:
cumulus@switch:~$ nv show service ptp 1
                             operational  applied             description
---------------------------  -----------  ------------------  --------------------------------------------------------------------
enable                       on           on                  Turn the feature 'on' or 'off'.  The default is 'off'.
current-profile                           default-itu-8275-1  Current PTP profile index
domain                       24           0                   Domain number of the current syntonization
ip-dscp                      46           46                  Sets the Diffserv code point for all PTP packets originated locally.
priority1                    128          128                 Priority1 attribute of the local clock
priority2                    128          128                 Priority2 attribute of the local clock
...
To show the settings for a profile, run the nv show service ptp <instance> profile <profile-name> command:
cumulus@switch:~$ nv show service ptp 1 profile CUSTOM1
                             operational  applied
---------------------------  -----------  ------------------
enable                                    on
current-profile                           default-itu-8275-1
domain                                    0
ip-dscp                                   46
logging-level                             info
priority1                                 128
priority2                                 128
[acceptable-master]
monitor
  max-offset-threshold                    50
  max-timestamp-entries                   100
  max-violation-log-entries               4
  max-violation-log-sets                  3
  min-offset-threshold                    -50
  path-delay-threshold                    200
  violation-log-interval                  1
Optional Acceptable Master Table
The acceptable master table option is a security feature that prevents a rogue player from pretending to be the Grand Master clock to take over the PTP network. To use this feature, you configure the clock IDs of known Grand Master clocks in the acceptable master table and set the acceptable master table option on a PTP port. The BMC algorithm checks if the Grand Master clock received in the Announce message is in this table before proceeding with the master selection. Cumulus Linux disables this option by default on PTP ports.
The following example command adds the Grand Master clock ID 24:8a:07:ff:fe:f4:16:06 to the acceptable master table and enables the PTP acceptable master table option for swp1:
cumulus@switch:~$ nv set service ptp 1 acceptable-master 24:8a:07:ff:fe:f4:16:06
cumulus@switch:~$ nv config apply
You can also configure an alternate priority 1 value for the Grand Master:
cumulus@switch:~$ nv set service ptp 1 acceptable-master 24:8a:07:ff:fe:f4:16:06 alt-priority 2
To enable the PTP acceptable master table option for swp1:
cumulus@switch:~$ nv set interface swp1 ptp acceptable-master on
cumulus@switch:~$ nv config apply
Edit the Default interface options section of the /etc/ptp4l.conf file to add acceptable_master_clockIdentity 248a07.fffe.f41606.
cumulus@switch:~$ sudo nano /etc/ptp4l.conf
...
#
# Default interface options
#
time_stamping           hardware


[acceptable_master_table]
maxTableSize 16
acceptable_master_clockIdentity 248a07.fffe.f41606
...
You can also configure an alternate priority 1 value for the Grand Master.
cumulus@switch:~$ sudo nano /etc/ptp4l.conf
...
#
# Default interface options
#
time_stamping           hardware


[acceptable_master_table]
maxTableSize 16
acceptable_master_clockIdentity 248a07.fffe.f41606 2
To enable the PTP acceptable master table option for swp1, add acceptable_master on under [swp1].
...
# Default interface options
#
time_stamping           hardware

# Interfaces in which ptp should be enabled
# these interfaces should be routed ports
# if an interface does not have an ip address
# the ptp4l will not work as expected.

[swp1]
udp_ttl                 20
masterOnly              1
delay_mechanism         E2E
acceptable_master       on
...
Restart the ptp4l service:
cumulus@switch:~$ sudo systemctl restart ptp4l.service
Optional Monitor Configuration
Cumulus Linux provides the following optional PTP monitoring configuration.
Configure Clock TimeStamp and Path Delay Thresholds
Cumulus Linux monitors clock timestamp and path delay against thresholds, and generates counters when PTP reaches the set thresholds. You can see the counters in the NVUE nv show command output and in log messages.
You can configure the following monitor settings:
| Command | Description |
|---|---|
nv set service ptp <instance> monitor min-offset-threshold | Sets the minimum difference allowed between the master and slave time. You can set a value between -1000000000 and 0 nanoseconds. The default value is -50 nanoseconds. |
nv set service ptp <instance> monitor max-offset-threshold | Sets the maximum difference allowed between the master and slave time. You can set a value between 0 and 1000000000 nanoseconds. The default value is 50 nanoseconds. |
nv set service ptp <instance> monitor path-delay-threshold | Sets the mean time that PTP packets take to travel between the master and slave. You can set a value between 0 and 1000000000 nanoseconds. The default value is 200 nanoseconds. |
nv set service ptp <instance> monitor max-timestamp-entries | Sets the maximum number of timestamp entries allowed. Cumulus Linux updates the timestamps continuously. You can specify a value between 100 and 200. The default value is 100 entries. |
The following example sets the minimum offset threshold to -1000, the maximum offset threshold to 1000, and the path delay threshold to 300:
cumulus@switch:~$ nv set service ptp 1 monitor min-offset-threshold -1000
cumulus@switch:~$ nv set service ptp 1 monitor max-offset-threshold 1000
cumulus@switch:~$ nv set service ptp 1 monitor path-delay-threshold 300
cumulus@switch:~$ nv config apply
You can configure the following monitor settings manually in the /etc/ptp4l.conf file. Be sure to run the sudo systemctl restart ptp4l.service to apply the settings.
| Parameter | Description |
|---|---|
offset_from_master_min_threshold | Sets the minimum difference allowed between the master and slave time. You can set a value between -1000000000 and 0 nanoseconds. The default value is -50 nanoseconds. |
offset_from_master_max_threshold | Sets the maximum difference allowed between the master and slave time. You can set a value between 0 and 1000000000 nanoseconds. The default value is 50 nanoseconds. |
mean_path_delay_threshold | Sets the mean time that PTP packets take to travel between the master and slave. You can set a value between 0 and 1000000000 nanoseconds. The default value is 200 nanoseconds. |
The following example sets the minimum offset threshold to -1000, the maximum offset threshold to 1000, and the path delay threshold to 300:
cumulus@switch:~$ sudo nano /etc/ptp4l.conf
...
[global]
#
# Default Data Set
#
slaveOnly               0
priority1               128
priority2               128
domainNumber            0

twoStepFlag             1
dscp_event              46
dscp_general            46

offset_from_master_min_threshold   -1000
offset_from_master_max_threshold   1000
mean_path_delay_threshold          300
...
Configure PTP Logging
A log set contains the log entries for clock timestamp and path delay violations at different times. You can set the number of entries to log and the interval between successive violation logs.
| Command | Description |
|---|---|
nv set service ptp 1 monitor max-violation-log-sets | Sets the maximum number of log sets allowed. You can specify a value between 2 and 4. The default value is 3. |
nv set service ptp 1 monitor max-violation-log-entries | Sets the maximum number of log entries allowed in a log set. You can specify a value between 4 and 8. The default value is 4. |
nv set service ptp 1 monitor violation-log-interval | Sets the number of seconds to wait before logging back-to-back violations. You can specify a value between 0 and 60. The default value is 1. |
The following example sets the maximum number of log sets allowed to 4, the maximum number of log entries allowed to 6, and the violation log interval to 10:
cumulus@switch:~$ nv set service ptp 1 monitor max-violation-log-sets 4
cumulus@switch:~$ nv set service ptp 1 monitor max-violation-log-entries 6
cumulus@switch:~$ nv set service ptp 1 monitor violation-log-interval 10
cumulus@switch:~$ nv config apply
You can configure the following monitor settings manually in the /etc/ptp4l.conf file. Be sure to run the sudo systemctl restart ptp4l.service to apply the settings.
| Parameter | Description |
|---|---|
tsmonitor_num_log_sets | Sets the maximum number of log sets allowed. You can specify a value between 2 and 4. The default value is 3. |
tsmonitor_num_log_entries | Sets the maximum number of log entries allowed in a log set. You can specify a value between 4 and 8. The default value is 4. |
tsmonitor_log_wait_seconds | Sets the number of seconds to wait before logging back-to-back violations. You can specify a value between 0 and 60. The default value is 1. |
The following example sets the maximum number of log sets allowed to 4, the maximum number of log entries allowed to 6, and the violation log interval to 10:
cumulus@switch:~$ sudo nano /etc/ptp4l.conf
...
[global]
#
# Default Data Set
#
slaveOnly               0
priority1               128
priority2               128
domainNumber            0

twoStepFlag             1
dscp_event              46
dscp_general            46

offset_from_master_min_threshold   -50
offset_from_master_max_threshold   50
mean_path_delay_threshold          300
tsmonitor_num_ts                   100
tsmonitor_num_log_sets             4
tsmonitor_num_log_entries          6
tsmonitor_log_wait_seconds         10
...
Show PTP Logs
PTP monitoring provides commands to show counters for violations as well as the timestamp log entries for a violation.
| Command | Description |
|---|---|
nv show service ptp <instance> monitor timestamp-log | Shows the last 25 PTP timestamps. |
nv show service ptp <instance> monitor violations | Shows the threshold violation count and the last time a violation of a specific type occurred. |
nv show service ptp 1 monitor violations log acceptable-master | Shows logs with violations that occur when a PTP server not in the Acceptable Master table sends an Announce request. |
nv show service ptp 1 monitor violations log forced-master | Shows logs with violations that occur when a forced master port gets a higher clock. |
nv show service ptp 1 monitor violations log max-offset | Shows logs with violations that occur when the timestamp offset is higher than the max offset threshold. |
nv show service ptp 1 monitor violations log min-Offset | Shows logs with violations that occur when the timestamp offset is lower than the minimum offset threshold. |
nv show service ptp 1 monitor violations log path-delay | Shows logs with violations that occur when the mean path delay is higher than the path delay threshold. |
The following example shows the threshold violation count and the last time a minimum offset threshold violation occurred:
cumulus@switch:~$ nv show service ptp 1 monitor violations
                  operational                  applied
----------------  ---------------------------  -------
last-max-offset
last-min-offset   2023-04-24T15:22:01.312295Z
last-path-delay
max-offset-count  0
min-offset-count  2
path-delay-count  0
Clear PTP Violation Logs
- To clear the maximum offset violation logs, run the
nv action clear service ptp <instance> monitor violations log max-offsetcommand. - To clear the minimum offset violation logs, run the
nv action clear service ptp <instance> monitor violations log min-offsetcommand. - To clear the path delay violation logs, run the
nv action clear service ptp <instance> monitor violations log path-delaycommand.
cumulus@leaf01:mgmt:~$ nv action clear service ptp 1 monitor violations log path-delay
Action succeeded
Delete PTP Configuration
To delete PTP configuration, delete the PTP master and slave interfaces. The following example commands delete the PTP interfaces swp1, swp2, and swp3.
cumulus@switch:~$ nv unset interface swp1 ptp
cumulus@switch:~$ nv unset interface swp2 ptp
cumulus@switch:~$ nv unset interface swp3 ptp
cumulus@switch:~$ nv config apply
Edit the /etc/ptp4l.conf file to remove the interfaces from the Default interface options section, then restart the ptp4l service.
cumulus@switch:~$ sudo nano /etc/ptp4l.conf
...
# Default interface options
#
time_stamping           hardware

# Interfaces in which ptp should be enabled
# these interfaces should be routed ports
# if an interface does not have an ip address
# the ptp4l will not work as expected.
cumulus@switch:~$ sudo systemctl restart ptp4l.service
To disable PTP on the switch and stop the ptp4l and phc2sys processes:
cumulus@switch:~$ nv set service ptp 1 state disabled
cumulus@switch:~$ nv config apply
cumulus@switch:~$ sudo systemctl stop ptp4l.service phc2sys.service
cumulus@switch:~$ sudo systemctl disable ptp4l.service phc2sys.service
Troubleshooting
Show PTP Configuration
To show a summary of the PTP configuration on the switch, run the nv show service ptp <instance> command:
cumulus@switch:~$ nv show service ptp 1
                             operational  applied
---------------------------  -----------  ------------------
enable                       on           on
current-profile                            default-itu-8275-2
domain                                    0
ip-dscp                                   46
logging-level                             info
priority1                                 128
priority2                                 128
[acceptable-master]
monitor
  max-offset-threshold                     50
  max-timestamp-entries                   100
  max-violation-log-entries               4
  max-violation-log-sets                  2
  min-offset-threshold                     -50
  path-delay-threshold                    200
  violation-log-interval                  1
[profile]                                  abc
[profile]                                  default-1588
[profile]                                  default-itu-8275-1
[profile]                                  default-itu-8275-2
[unicast-master]                          1
[unicast-master]                          2
[unicast-master]                          3
[unicast-master]                          4
...
You can drill down with the following nv show service ptp <instance> commands:
nv show service ptp <instance> acceptable-mastershows acceptable master configuration.nv show service ptp <instance> clock-qualityshows the clock quality status.nv show service ptp <instance> currentshows the local states learned during PTP message exchange.nv show service ptp <instance> domainshows the domain configuration.nv show service ptp <instance> ip-dscpshows PTP DSCP configuration.nv show service ptp <instance> monitorshows PTP monitor configuration.nv show service ptp <instance> profileshows PTP profile configuration.nv show service ptp <instance> parentshows the local states learned during PTP message exchange.nv show service ptp <instance> priority1shows PTP priority1 configuration.nv show service ptp <instance> priority2shows PTP priority2 configuration.nv show service ptp <instance> statusshows the status of all PTP interfaces.nv show service ptp <instance> time-propertiesshows the clock time attributes.nv show service ptp <instance> unicast-mastershows the unicast master configuration.
Show PTP Interface Configuration
To check configuration for a PTP interface, run the nv show interface <interface-id> ptp command.
cumulus@switch:~$ nv show interface swp1 ptp
                           operational  applied
-------------------------  -----------  ----------
state                                   enabled
acceptable-master                       off
delay-mechanism            end-to-end   end-to-end
forced-master              disabled     disabled
instance                                1
mixed-multicast-unicast                 disabled
transport                  ipv4         ipv4
ttl                        1            1
unicast-request-duration                300
timers
  announce-interval        0            0
  announce-timeout         3            3
  delay-req-interval       -3           -3
  sync-interval            -3           -3
peer-mean-path-delay       0
port-state                 master
protocol-version           2
Show PTP Counters
To show all PTP counters, run the nv show service ptp <instance> counters command:
cumulus@switch:~$ nv show service ptp 1 counters
Packet Type              Received       Transmitted
---------------------    ------------   ------------
Port swp4
  Announce                 0              10370
  Sync                     0              20731
  Follow-up                0              20731
  Delay Request            0              0
  Delay Response           0              0
  Peer Delay Request       0              0
  Peer Delay Response      0              0
  Management               0              0
  Signaling                0              0
To show PTP counters for an interface, run the nv show interface <interface-id> counters ptp command.
To clear PTP counters for an interface, run the nv action clear interface <interface-id> counters ptp command:
cumulus@switch:~$ nv action clear interface swp1 counters ptp
Action succeeded
Show the Status of All PTP Interfaces
To show the status of all PTP interfaces, run the nv show service ptp <instance> status command.
The command output shows the PTP enabled ports, the PTP port mode (unicast or multicast), the state of the port based on BMCA, the unicast state, and identifies the server address to which the client connects.
cumulus@switch:~$ nv show service ptp 1 status
Port   Mode   State    Ustate                           Server
-----  -----  -------  -------------------------------  -------
swp9   Ucast  SLAVE    Sync and Delay Granted (H_SYDY)  9.9.9.2
swp10  Ucast  PASSIVE  Initial State (WAIT)
swp11  Ucast  PASSIVE  Initial State (WAIT)
swp12  Ucast  PASSIVE  Initial State (WAIT)
Show the List of NVUE PTP Commands
- To see a full list of NVUE show commands for PTP, run the
nv list-commands service ptpcommand. - To show a full list of show commands for a PTP interface, run the
nv list-commands | grep 'nv show interface <interface-id> ptp'command.
cumulus@switch:~$ nv list-commands service ptp
nv show service ptp
nv show service ptp <instance-id>
nv show service ptp <instance-id> foreign-masters
nv show service ptp <instance-id> counters
nv show service ptp <instance-id> status
nv show service ptp <instance-id> acceptable-master
nv show service ptp <instance-id> acceptable-master <clock-id>
nv show service ptp <instance-id> unicast-master
nv show service ptp <instance-id> unicast-master <table-id>
...
cumulus@switch:~$ nv list-commands | grep 'nv show interface <interface-id> ptp'
...
nv show interface <interface-id> ptp
nv show interface <interface-id> ptp timers
nv show interface <interface-id> ptp shaper
...
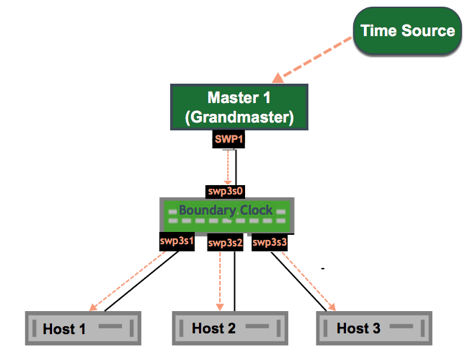
Example Configuration
In the following example, the boundary clock on the switch receives time from Master 1 (the Grand Master) on PTP slave port swp1, sets its clock and passes the time down through PTP master ports swp2, swp3, and swp4 to the hosts that receive the time.
The following example configuration assumes that you have already configured the layer 3 routed interfaces (swp1, swp2, swp3, and swp4) you want to use for PTP.
cumulus@switch:~$ nv set service ptp 1 state enabled
cumulus@switch:~$ nv set service ptp 1 priority2 254
cumulus@switch:~$ nv set service ptp 1 priority1 254
cumulus@switch:~$ nv set service ptp 1 domain 3
cumulus@switch:~$ nv set interface swp1 ptp state enabled
cumulus@switch:~$ nv set interface swp2 ptp state enabled
cumulus@switch:~$ nv set interface swp3 ptp state enabled
cumulus@switch:~$ nv set interface swp4 ptp state enabled
cumulus@switch:~$ nv config apply
cumulus@switch:~$ sudo cat /etc/nvue.d/startup.yaml
- set:
    interface:
      lo:
        ip:
          address:
            10.10.10.1/32: {}
        type: loopback
      swp1:
        ptp:
          enable: on
        type: swp
      swp2:
        ptp:
          enable: on
        type: swp
      swp3:
        ptp:
          enable: on
        type: swp
      swp4:
        ptp:
          enable: on
        type: swp
    service:
      ptp:
        '1':
          domain: 3
          enable: on
          priority1: 254
          priority2: 254
cumulus@switch:~$ sudo cat /etc/ptp4l.conf
...
[global]
#
# Default Data Set
#
slaveOnly                      0
priority1                      254
priority2                      254
domainNumber                   3

twoStepFlag                    1
dscp_event                     46
dscp_general                   46

offset_from_master_min_threshold   -50
offset_from_master_max_threshold   50
mean_path_delay_threshold          200
tsmonitor_num_ts                   100
tsmonitor_num_log_sets             2
tsmonitor_num_log_entries          4
tsmonitor_log_wait_seconds         1

#
# Run time options
#
logging_level                  6
path_trace_enabled             0
use_syslog                     1
verbose                        0
summary_interval               0

#
# servo parameters
#
pi_proportional_const          0.000000
pi_integral_const              0.000000
pi_proportional_scale          0.700000
pi_proportional_exponent       -0.300000
pi_proportional_norm_max       0.700000
pi_integral_scale              0.300000
pi_integral_exponent           0.400000
pi_integral_norm_max           0.300000
step_threshold                 0.000002
first_step_threshold           0.000020
max_frequency                  900000000
sanity_freq_limit              0

#
# Default interface options
#
time_stamping                  hardware


# Interfaces in which ptp should be enabled
# these interfaces should be routed ports
# if an interface does not have an ip address
# the ptp4l will not work as expected.

[swp1]
udp_ttl                      1
masterOnly                   0
delay_mechanism              E2E
network_transport            RAWUDPv4

[swp2]
udp_ttl                      1
masterOnly                   0
delay_mechanism              E2E
network_transport            RAWUDPv4

[swp3]
udp_ttl                      1
masterOnly                   0
delay_mechanism              E2E
network_transport            RAWUDPv4

[swp4]
udp_ttl                      1
masterOnly                   0
delay_mechanism              E2E
network_transport            RAWUDPv4
Considerations
PTP Version
Cumulus Linux uses a linuxptp package that is PTP v2.1 compliant, and sets the major PTP version to 2 and the minor PTP version to 1 by default in the configuration. If your PTP configuration does not work correctly when the minor version is set, you can change the minor version to 0.
cumulus@switch:~$ nv set service ptp 1 force-version 2.0
cumulus@switch:~$ nv config apply
To set the minor PTP version back to the default, run the nv unset service ptp 1 force-version command.
Edit the /etc/ptp4l.conf file to add ptp_minor_version 0 to the Global section, then restart the ptp4l service.
cumulus@switch:~$ sudo nano /etc/ptp4l.conf
...
[global]
#
# Default Data Set
#
slaveOnly                      0
priority1                      128
priority2                      128
domainNumber                   0

twoStepFlag                    1
dscp_event                     46
dscp_general                   46
ptp_minor_version              0
cumulus@switch:~$ sudo systemctl restart ptp4l.service
To set the minor PTP version back to the default value (1), remove ptp_minor_version 0 from the Global section of the /etc/ptp4l.conf file, then restart the ptp4l service.
To show that the PTP minor version is now 0, run the nv show service ptp <instance> force-version command:
cumulus@switch:~$ nv show service ptp 1 force-version
               applied
-------------  -------
force-version  2.0
Default and Custom Bridges
Cumulus Linux preconfigures default bridges (such as br_default) with virtual interfaces that do not require an explicit base interface for PTP to work; the host stack handles it transparently.
Custom bridges (such as bridge) are designed for layer 2 switching and have no external connectivity unless you add at least one physical interface. To enable PTP traffic to flow in and out, and to allow proper timestamping, you must configure a base interface. If there is no base interface, you see the error Base interface config missing for SVIs associated with vlan-ids and their bridge domain information: VLAN <vlan-id>: [bridge], which is critical for PTP.
The following example shows a PTP configuration with a custom bridge that includes a base interface:
cumulus@switch:~$ nv set bridge domain bridge vlan 10 ptp state enabled
cumulus@switch:~$ nv set interface swp1-8,21,24-30 bridge domain bridge vlan 10
cumulus@switch:~$ nv set interface swp1-8,21,24-30,vlan10 ptp state enabled
cumulus@switch:~$ nv set interface swp1-8,21,24-30 ptp transport ipv6
cumulus@switch:~$ nv set interface vlan10 ip address 10.1.10.2/24
cumulus@switch:~$ nv set interface vlan10 type svi
cumulus@switch:~$ nv set interface vlan10 vlan 100
cumulus@switch:~$ nv set interface vlan10 base-interface swp1
PTP Traffic Shaping
To improve performance on the NVIDIA Spectrum 1 switch for PTP-enabled ports with speeds lower than 100G, you can enable a pre-defined traffic shaping profile. For example, if you see that the PTP timing offset varies widely and does not stabilize, enable PTP shaping on all PTP enabled ports to reduce the bandwidth on the ports slightly and improve timing stabilization.
Switches with Spectrum-2 and later do not support PTP shaping.
Bonds do not support PTP shaping.
You cannot configure QoS traffic shaping and PTP traffic shaping on the same ports.
You must configure a strict priority for PTP traffic; for example:
cumulus@switch:~$ nv set qos egress-scheduler default-global traffic-class 0-5,7 mode dwrr
cumulus@switch:~$ nv set qos egress-scheduler default-global traffic-class 0-5,7 bw-percent 12
cumulus@switch:~$ nv set qos egress-scheduler default-global traffic-class 6 mode strict
For each PTP-enabled port on which you want to set traffic shaping, run the nv set interface <interface-id> ptp shaper stae enabled command.
cumulus@switch:~$ nv set interface swp1 ptp shaper state enabled
cumulus@switch:~$ nv set interface swp2 ptp shaper state enabled
cumulus@switch:~$ nv config apply
To see the PTP shaping setting for an interface, run the nv show interface <interface-id> ptp shaper command:
cumulus@switch:~$ nv show interface swp1 ptp shaper
        operational  applied
------  -----------  -------
state                enabled
In the /etc/cumulus/switchd.d/ptp_shaper.conf file, set the following parameters for the interfaces to which you want to apply traffic shaping and enable the traffic shaper. You must reload switchd for the changes to take effect.
cumulus@switch:~$ sudo nano /etc/cumulus/switchd.d/ptp_shaper.conf
## Per-port configuration for PTP shaper
ptp_shaper.port_group_list = [enable-group]
ptp_shaper.enable-group.port_set = swp1,swp2
ptp_shaper.enable-group.ptp_shaper_enable = true
cumulus@switch:~$ sudo systemctl reload switchd.service
Spanning Tree and PTP
PTP frames are affected by STP filtering; events, such as an STP topology change (where ports temporarily go into the blocking state), can cause interruptions to PTP communications.
If you configure PTP on bridge ports, NVIDIA recommends that the bridge ports are spanning tree edge ports or in a bridge domain where spanning tree is disabled.
PTP Log Reporting Offset
When you enable PPS In mode, the PTP log reporting offset is once every two seconds instead of once every second.