Focus Your Monitoring Using Workbenches
Workbenches are an integral structure of the NetQ UI. They are where you collect and view the data that is important to you.
Two types of workbenches are available:
- Default: Provided by NVIDIA for use as they exist; you cannot save changes you make to these workbenches
- Custom: Created by users when default workbenches need some adjustments to better meet your needs or you want a completely different collection of cards; changes made to these workbenches are saved automatically
Both types of workbenches display a set of cards. Default workbenches are public (available for viewing by all users), whereas custom workbenches are private (only viewable by the user who created them).
Default Workbenches
In this release, only one default workbench — the NetQ Workbench — is available to get you started. It contains Device Inventory, Switch Inventory, Alarm and Info Events, and Network Health cards, giving you a high-level view of how your network is operating.
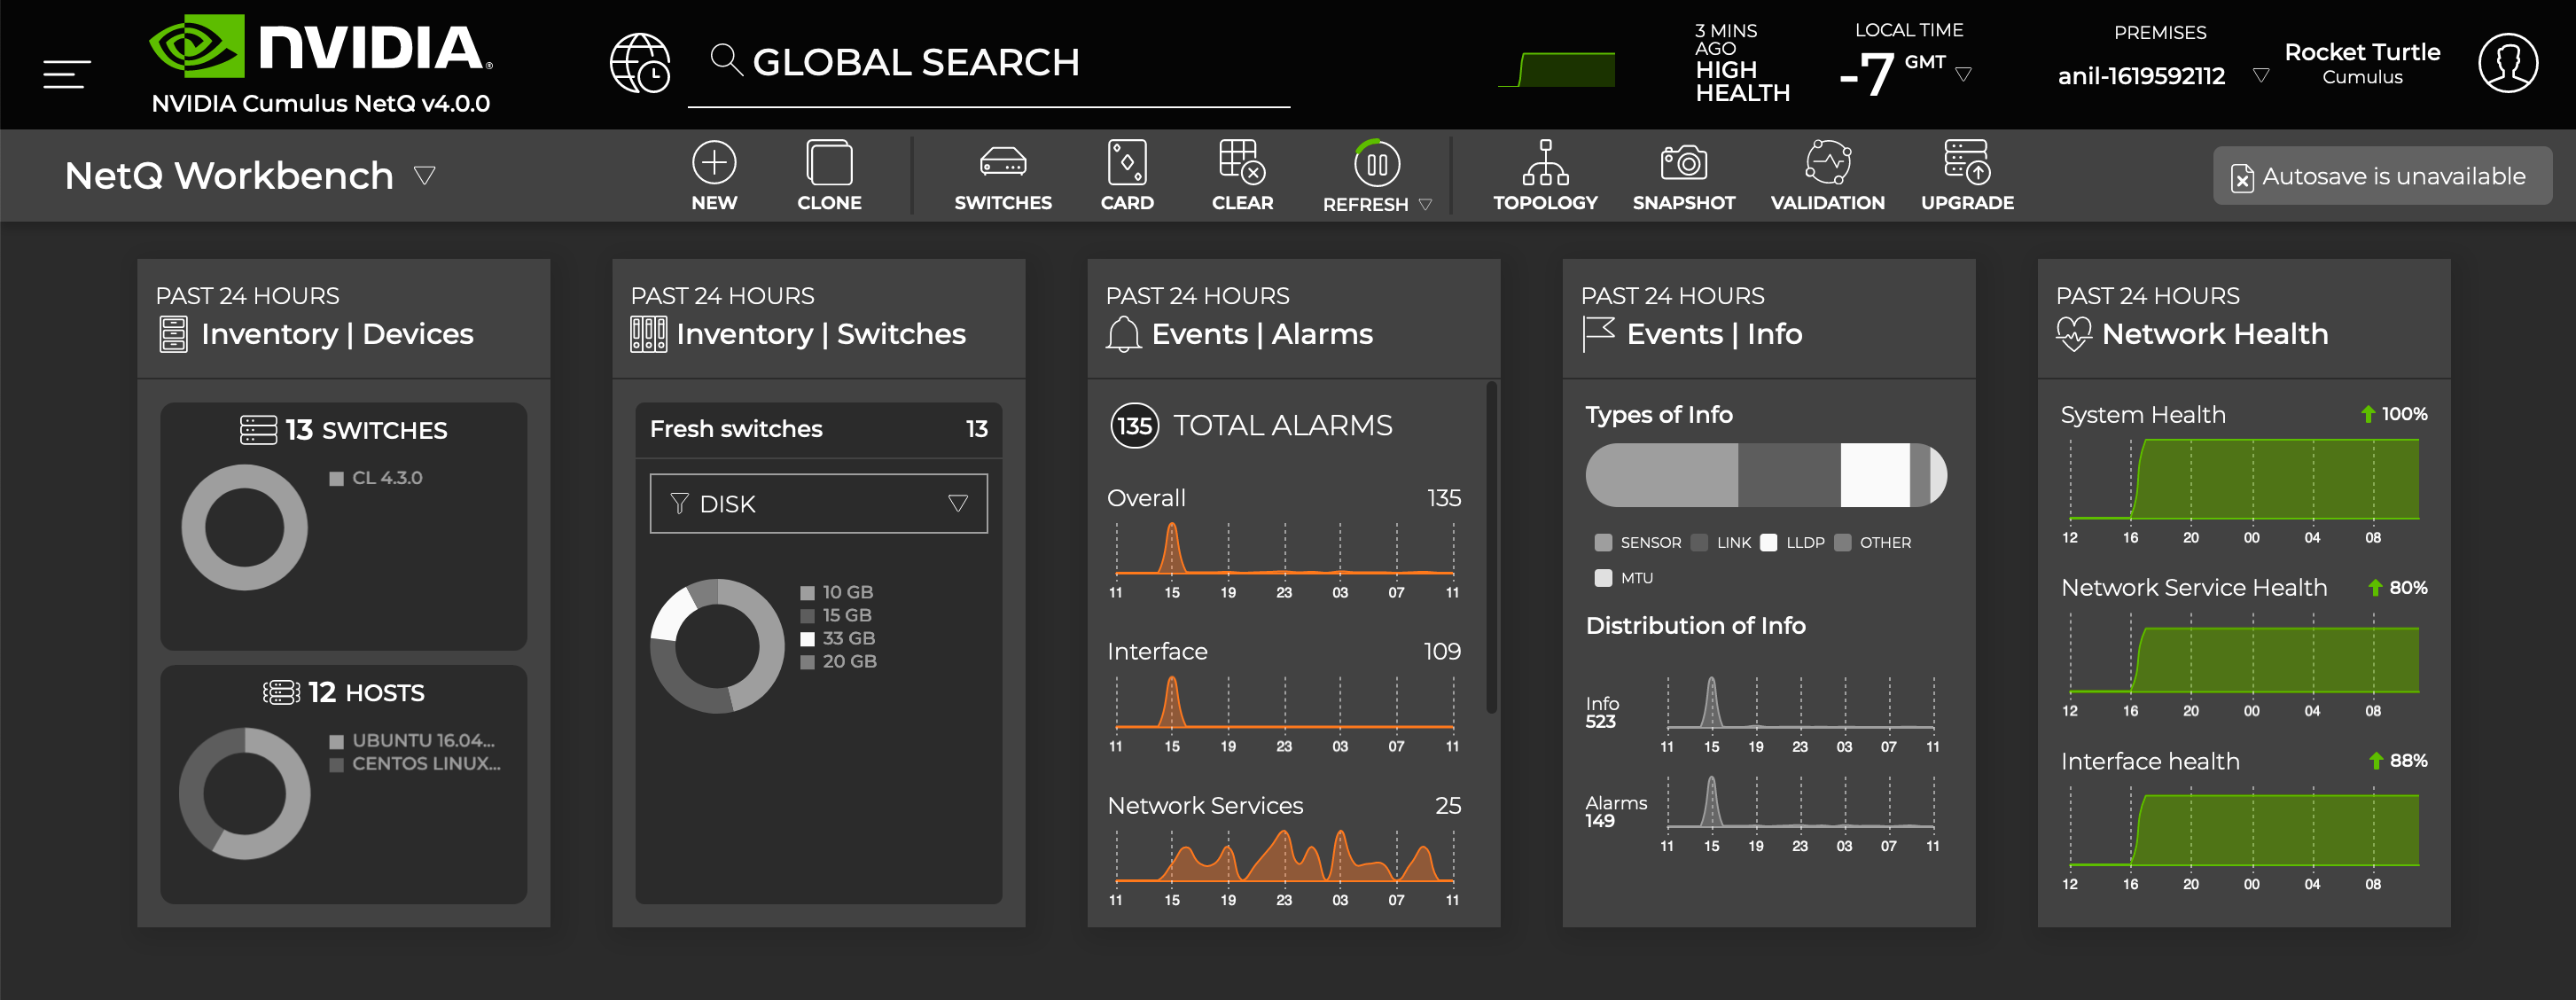
On initial login, the NetQ Workbench opens. On subsequent logins, the last workbench you used opens.
Custom Workbenches
Users with either administrative or user roles can create and save as many custom workbenches as suits their needs. For example, a user might create a workbench that:
- Shows all of the selected cards for the past week and one that shows all of the selected cards for the past 24 hours
- Only has data about your virtual overlays; EVPN plus events cards
- Has selected switches that you are troubleshooting
- Focused on application or user account management
And so forth.
Create a Workbench
To create a workbench:
Click
 in the workbench header.
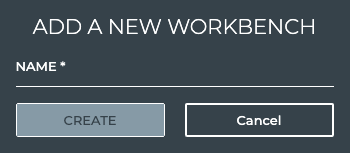
Enter a name for the workbench.
Click Create to open a blank new workbench, or Cancel to discard the workbench.
Add cards to the workbench using
 or
or  .
.
Refer to Access Data with Cards for information about interacting with cards on your workbenches.
Remove a Workbench
Once you have created a number of custom workbenches, you might find that you no longer need some of them. As an administrative user, you can remove any workbench, except for the default NetQ Workbench. Users with a user role can only remove workbenches they have created.
To remove a workbench:
Click
 in the application header to open the User Settings options.
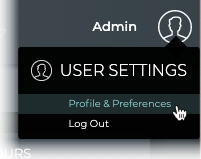
Click Profile & Preferences.
Locate the Workbenches card.
Hover over the workbench you want to remove, and click Delete.
Open an Existing Workbench
There are several options for opening workbenches:
- Open through the Workbench header
- Click
 next to the current workbench name and locate the workbench
- Under My Home, click the name of your favorite workbench
- Under My Most Recent, click the workbench if in list
- Search by workbench name
- Click All My WB to open all workbenches and select it from the list
- Click
- Open through the main menu
- Click
 (main menu) and select the workbench from the Favorites or NetQ columns
- Click
- Open through the NVIDIA logo
- Click the logo in the header to open your favorite workbench
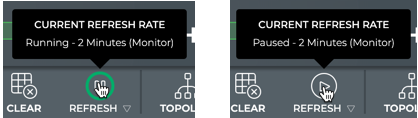
Manage Auto-refresh for Your Workbenches
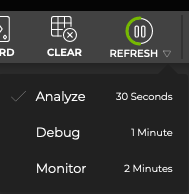
You can specify how often to update the data displayed on your workbenches. Three refresh rates are available:
- Analyze: updates every 30 seconds
- Debug: updates every minute
- Monitor: updates every two (2) minutes
By default, auto-refresh is enabled and configured to update every 30 seconds.
Disable/Enable Auto-refresh
To disable or pause auto-refresh of your workbenches, click the Refresh icon. This toggles between the two states, Running and Paused, where ![]() indicates it is currently disabled and
indicates it is currently disabled and ![]() indicates it is currently enabled.
indicates it is currently enabled.
While having the workbenches update regularly is good most of the time, you might find that you want to pause the auto-refresh feature when you are troubleshooting and you do not want the data to change on a given set of cards temporarily. In this case, you can disable the auto-refresh and then enable it again when you are finished.
View Current Settings
To view the current auto-refresh rate and operational status, hover over the Refresh icon on a workbench header, to open the tool tip as follows:
Change Settings
To modify the auto-refresh setting:
Click
the Refresh icon.Select the refresh rate you want. The refresh rate is applied immediately. A check mark is shown next to the current selection.
Manage Workbenches
To manage your workbenches as a group, either:
- Click next to the current workbench name, then click Manage My WB.
- Click , select Profiles & Preferences.
Both of these open the Profiles & Preferences page. Look for the Workbenches card and refer to Manage Your Workbenches for more information.