Upgrade Cumulus Linux Using LCM
LCM provides the ability to upgrade Cumulus Linux on one or more switches in your network through the NetQ UI or the NetQ CLI. You can run up to five upgrade jobs simultaneously; however, a given switch can only appear in one running job at a time.
You can upgrade Cumulus Linux from between the following releases:
- 3.6.z to later versions of 3.y.z
- 4.x to later versions of 4.y.z
- 3.6.0 or later to 4.2.0 or later
Workflows for Cumulus Linux Upgrades Using LCM
Three methods are available through LCM for upgrading Cumulus Linux on your switches based on whether the NetQ Agent is already installed on the switch or not, and whether you want to use the NetQ UI or the NetQ CLI:
- Use NetQ UI or NetQ CLI for switches with NetQ 2.4.x or later Agent already installed
- Use NetQ UI for switches without NetQ Agent installed
The workflows vary slightly with each approach:
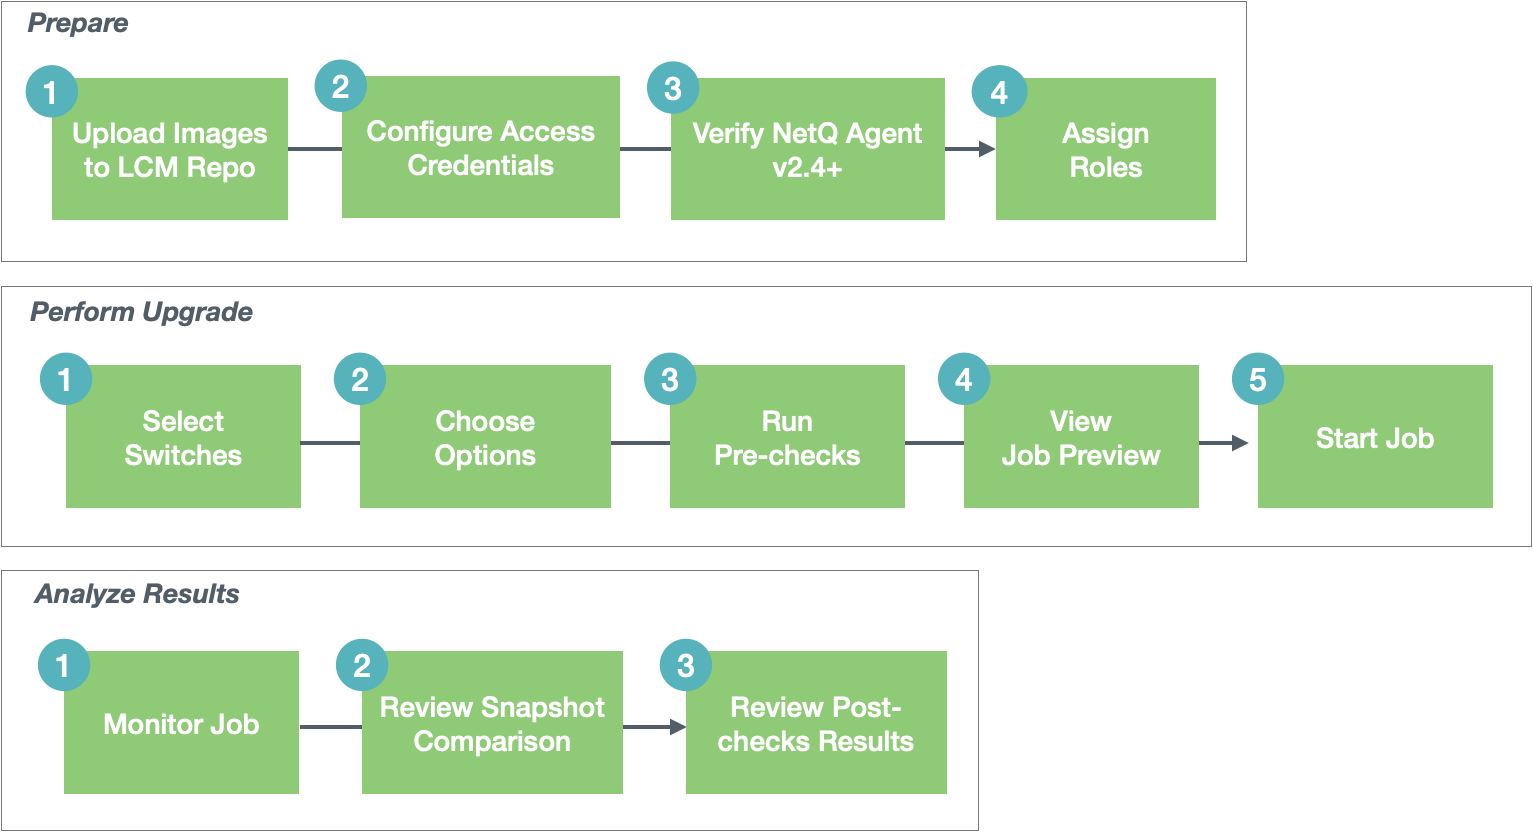
Using the NetQ UI for switches with NetQ Agent installed, the workflow is:
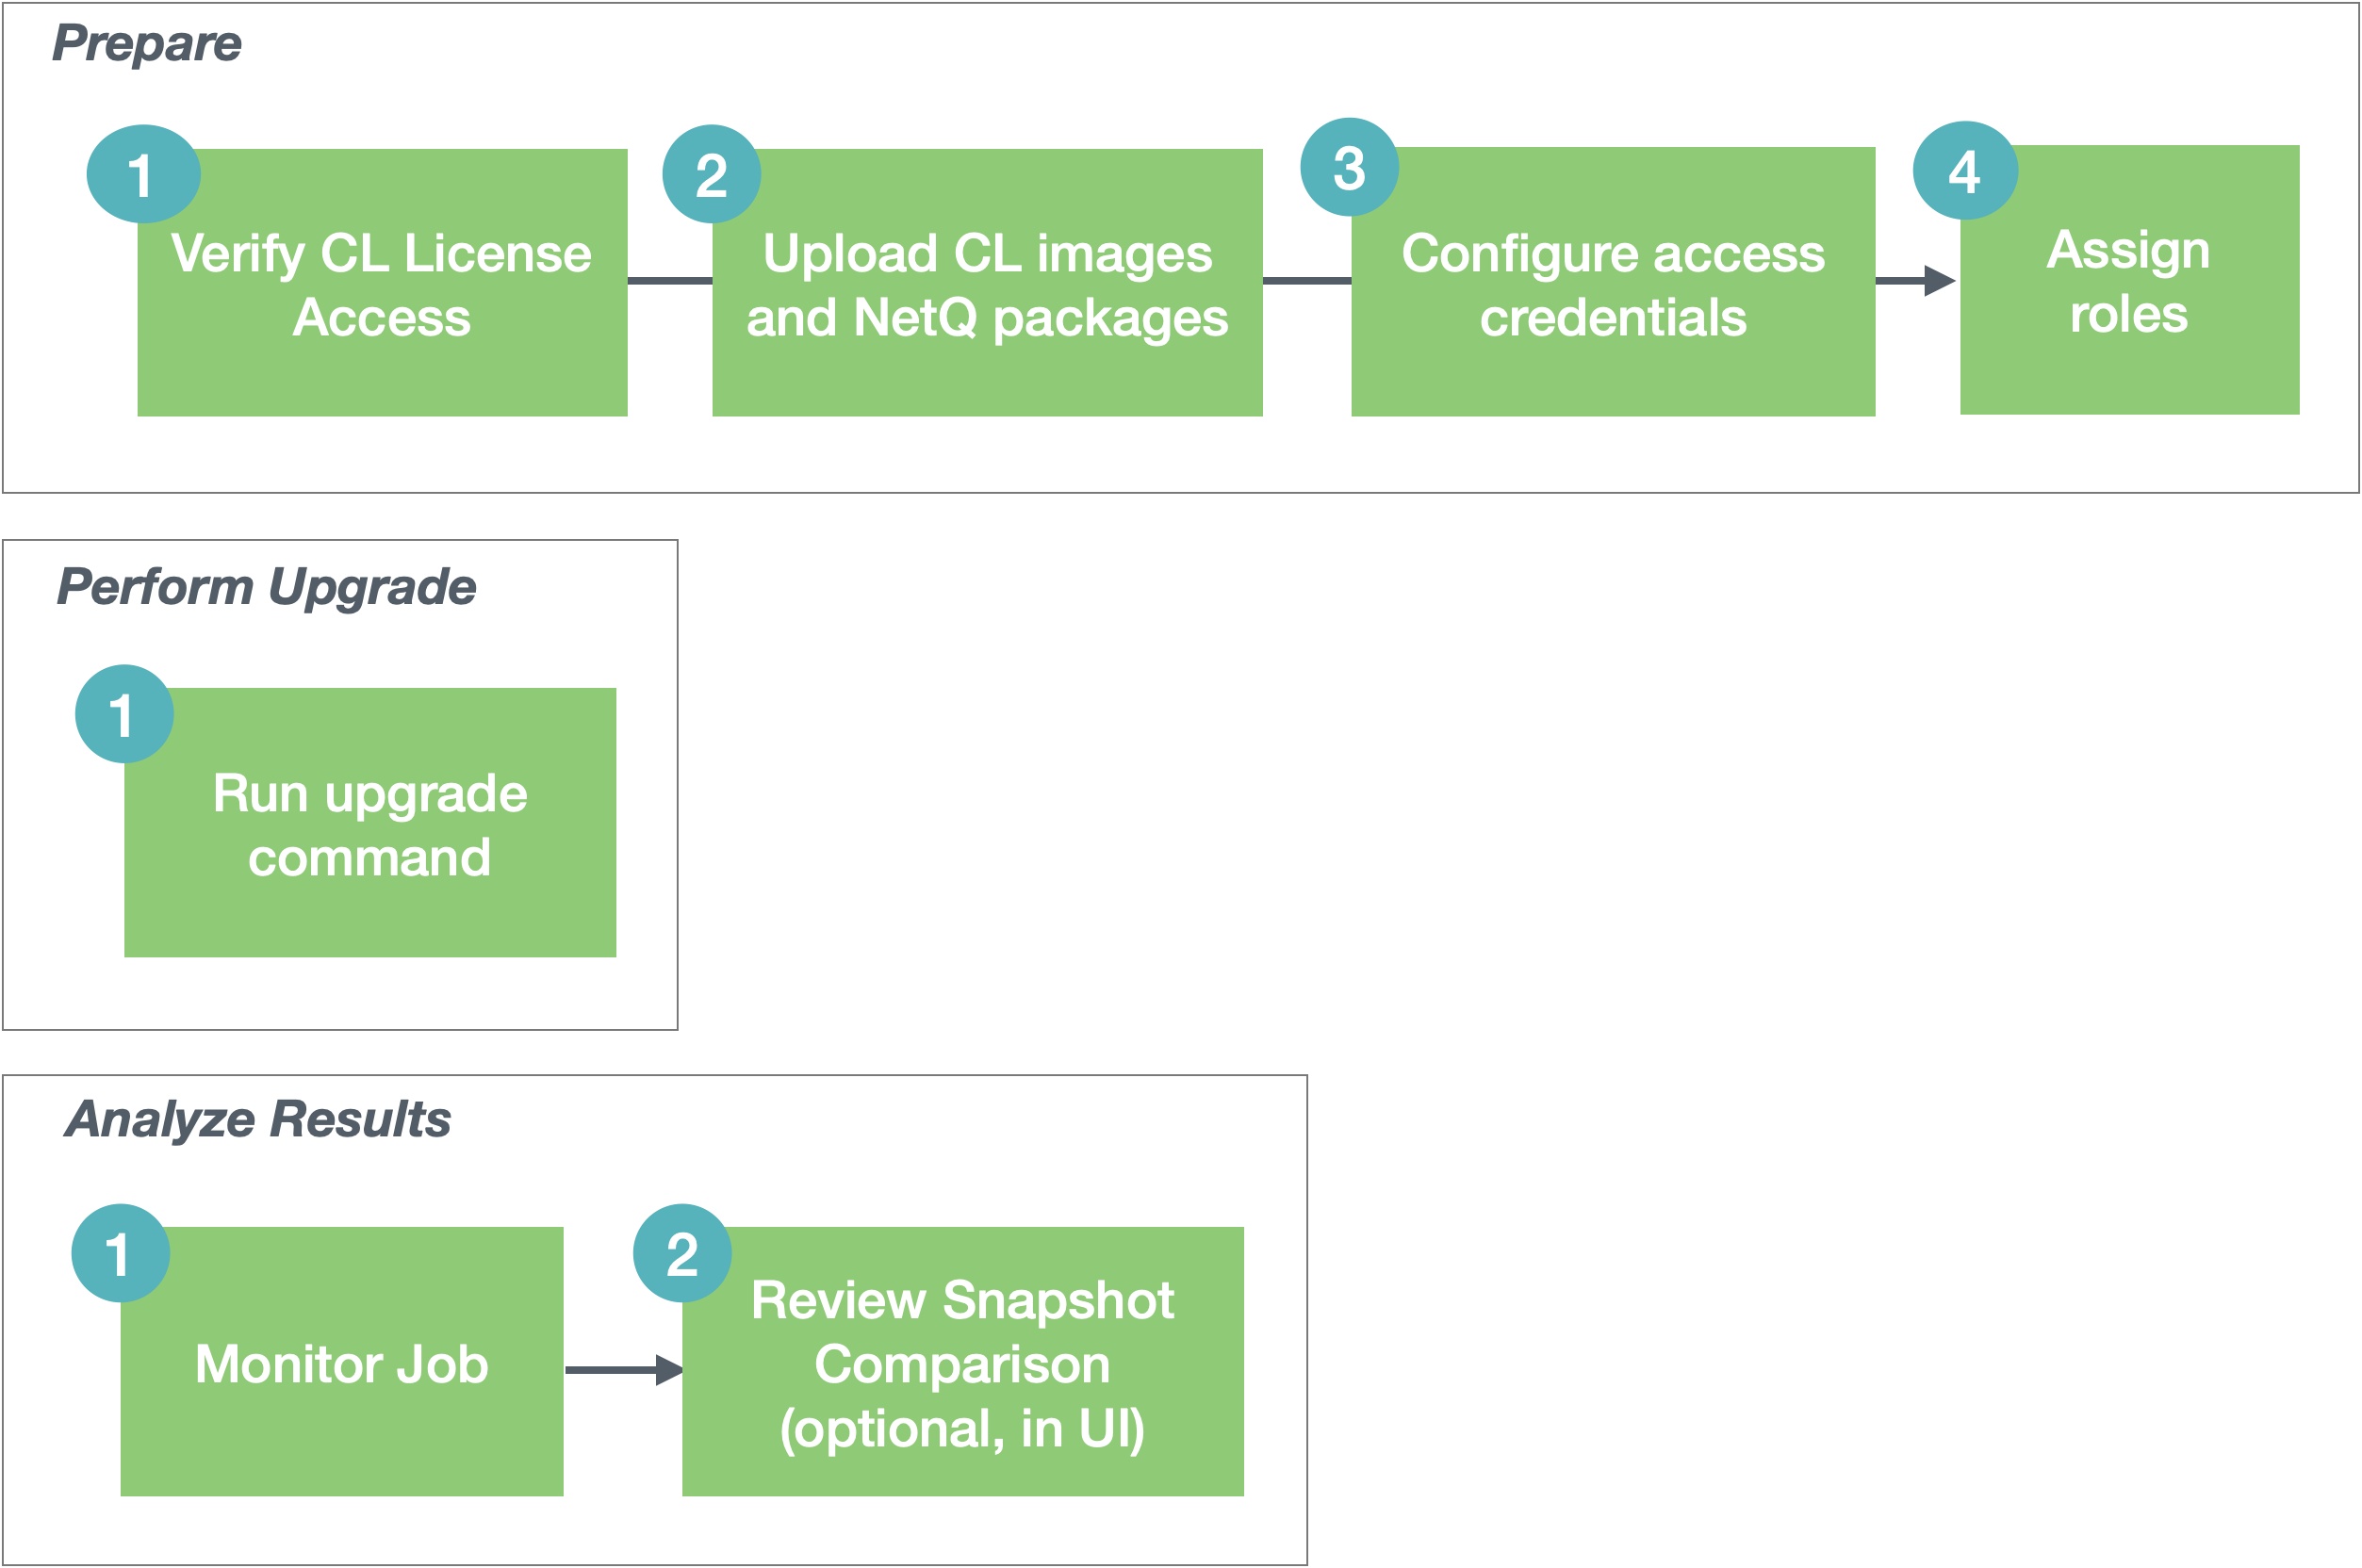
Using the NetQ CLI for switches with NetQ Agent installed, the workflow is:
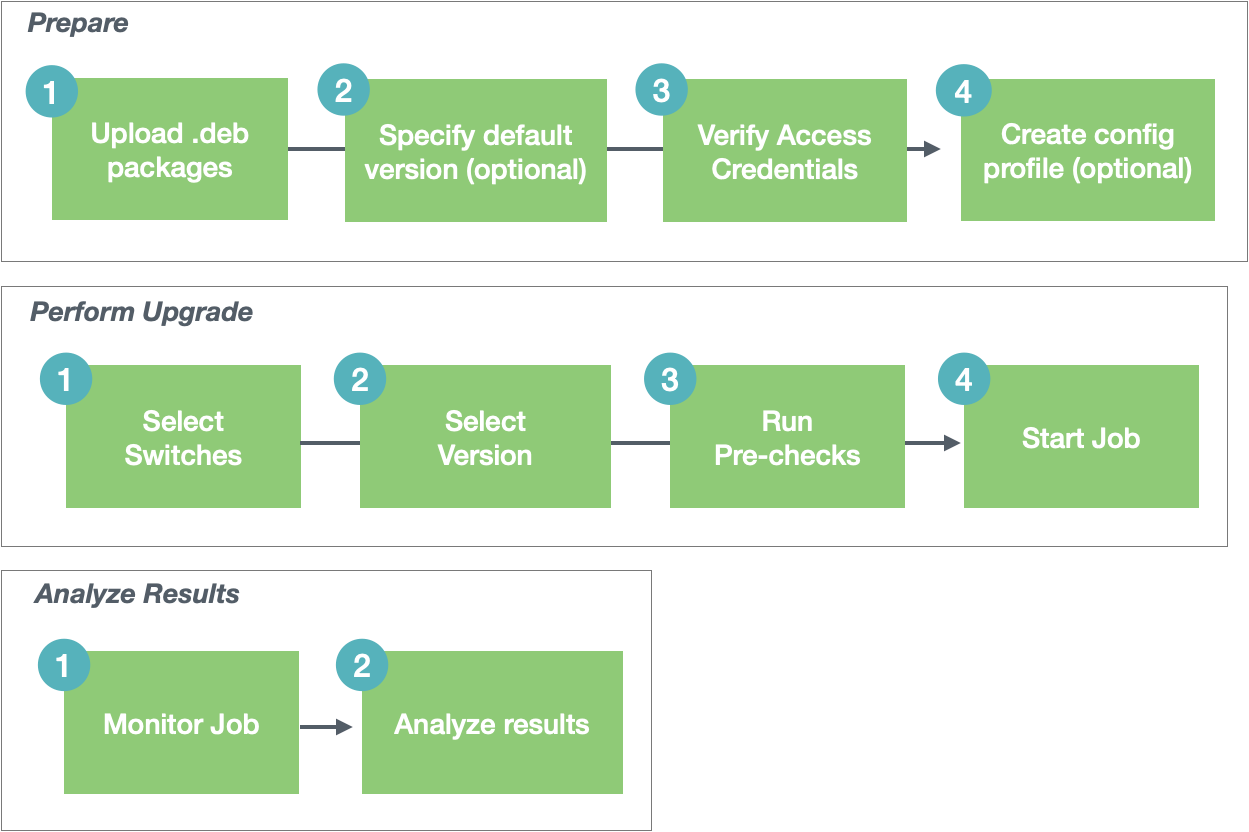
Using the NetQ UI for switches without NetQ Agent installed, the workflow is:
Upgrade Cumulus Linux on Switches with NetQ Agent Installed
You can upgrade Cumulus Linux on switches that already have a NetQ Agent (version 2.4.x or later) installed using either the NetQ UI or NetQ CLI.
Prepare for Upgrade
Click
(Switches) in any workbench header, then click Manage switches.
Upload the Cumulus Linux upgrade images.
Optionally, specify a default upgrade version.
Verify the switches you want to manage are running NetQ Agent 2.4 or later. Refer to Manage Switches.
Optionally, create a new NetQ configuration profile.
Configure switch access credentials.
Assign a role to each switch (optional, but recommended).
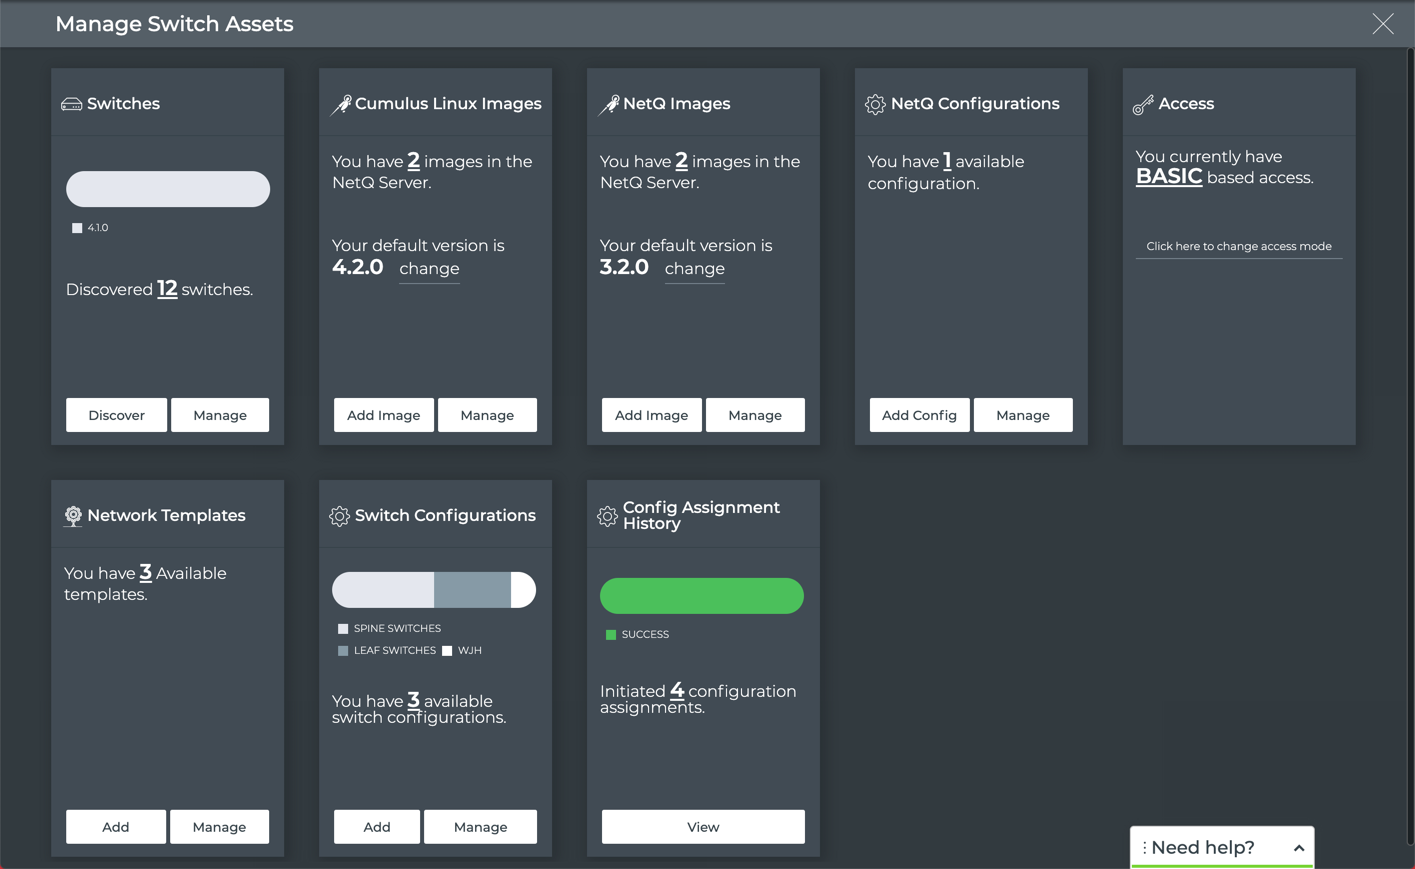
Your LCM dashboard should look similar to this after you have completed these steps:
Create a discovery job to locate Cumulus Linux switches on the network. Use the
netq lcm discovercommand, specifying a single IP address, a range of IP addresses where your switches are located in the network, or a CSV file containing the IP address, and optionally, the hostname and port for each switch on the network. If the port is blank, NetQ uses switch port 22 by default. They can be in any order you like, but the data must match that order.cumulus@switch:~$ netq lcm discover ip-range 10.0.1.12 NetQ Discovery Started with job id: job_scan_4f3873b0-5526-11eb-97a2-5b3ed2e556dbVerify the switches you want to manage are running NetQ Agent 2.4 or later. Refer to Manage Switches.
Upload the Cumulus Linux upgrade images.
Configure switch access credentials.
Assign a role to each switch (optional, but recommended).
Perform a Cumulus Linux Upgrade
Upgrade Cumulus Linux on switches through either the NetQ UI or NetQ CLI:
Click
(Switches) in any workbench header, then select Manage switches.
Click Manage on the Switches card.
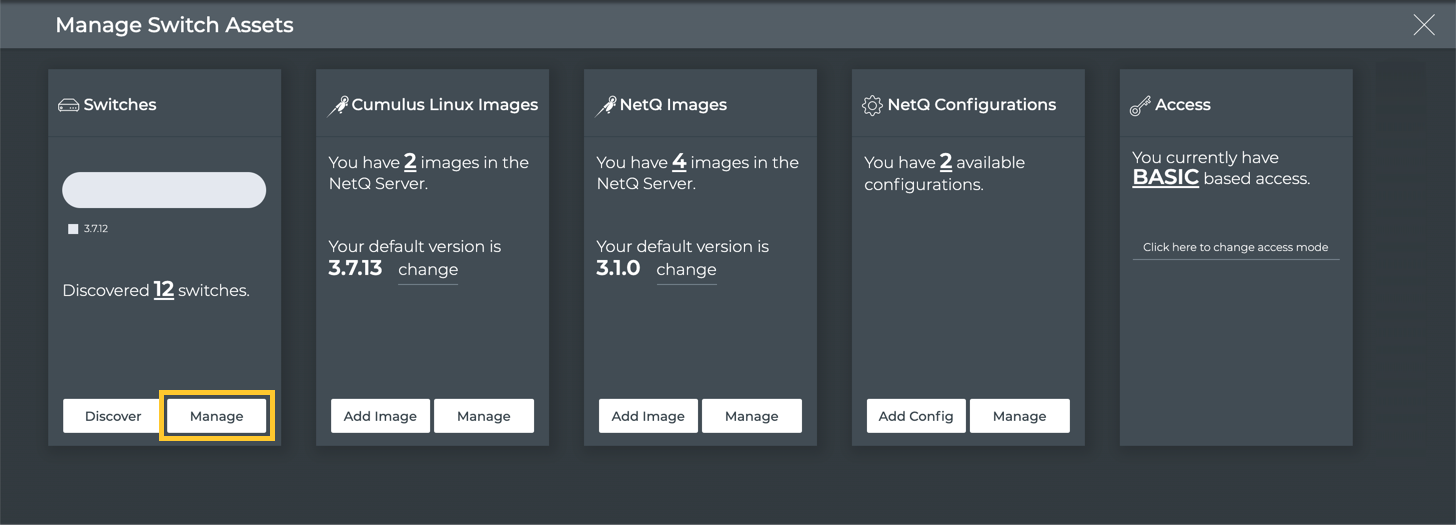
- Select the individual switches (or click
to select all switches) that you want to upgrade. If needed, use the filter to the narrow the listing and find the relevant switches.
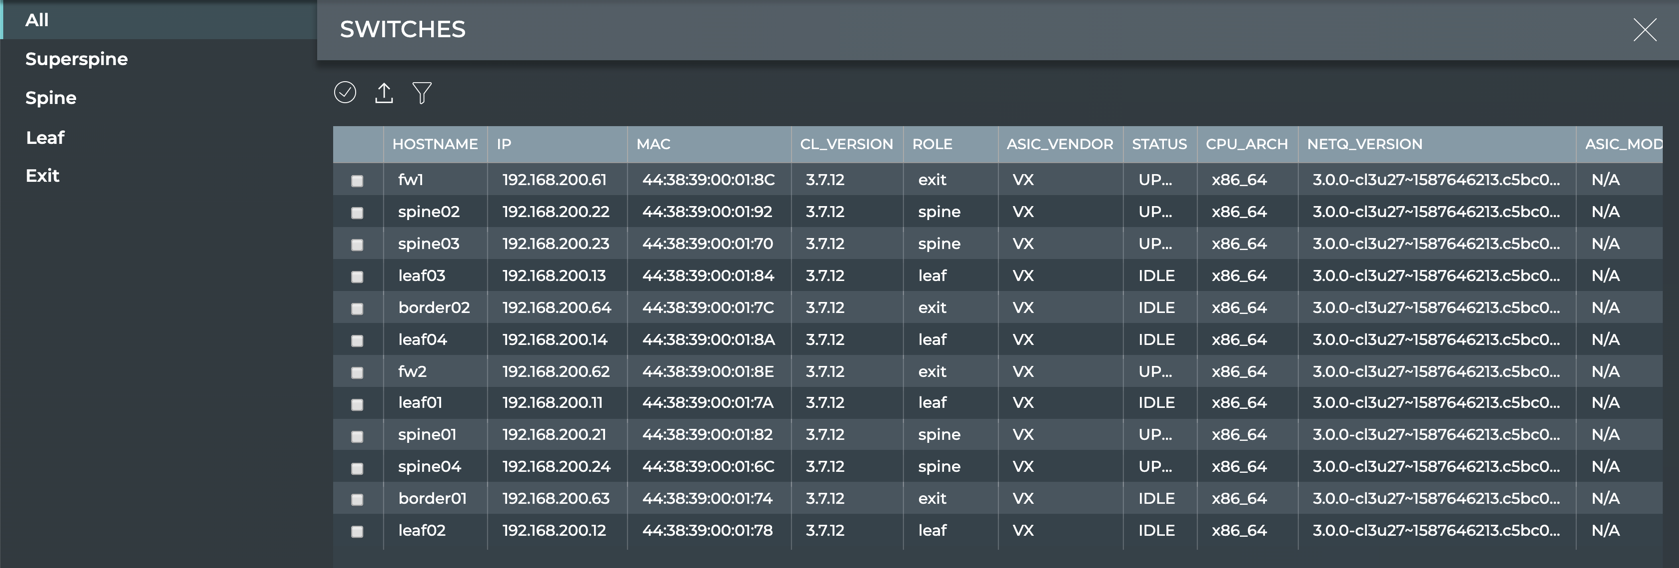
Click
 (Upgrade CL) above the table.
From this point forward, the software walks you through the upgrade process, beginning with a review of the switches that you selected for upgrade.
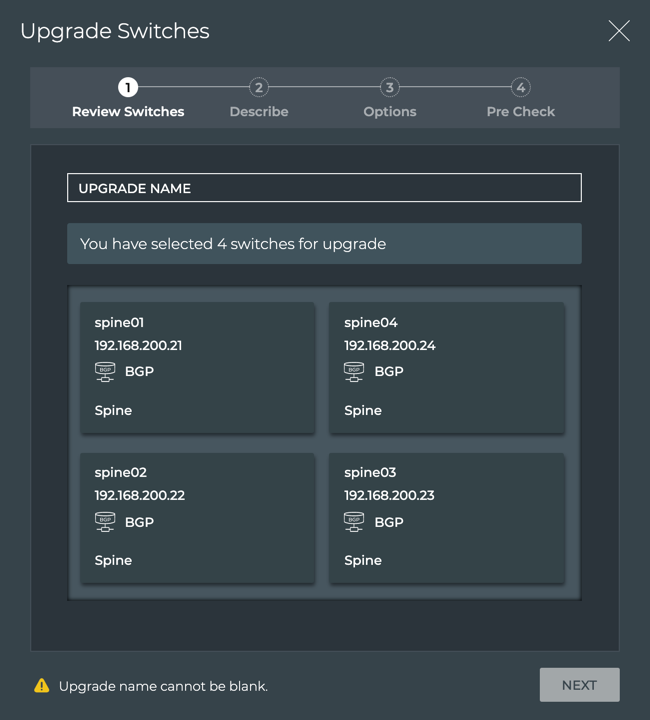
Give the upgrade job a name. This is required, but can be no more than 22 characters, including spaces and special characters.
Verify that the switches you selected are included, and that they have the correct IP address and roles assigned.
- If you accidentally included a switch that you do NOT want to upgrade, hover over the switch information card and click
to remove it from the upgrade job.
- If the role is incorrect or missing, click
, then select a role for that switch from the dropdown. Click
to discard a role change.
- If you accidentally included a switch that you do NOT want to upgrade, hover over the switch information card and click
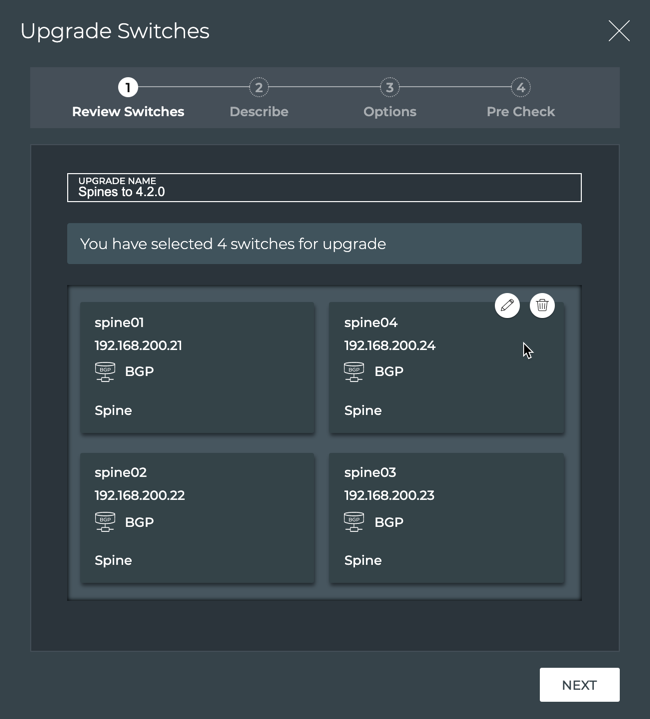
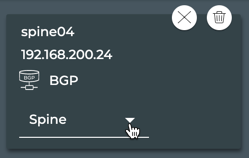
When you are satisfied that the list of switches is accurate for the job, click Next.
Verify that you want to use the default Cumulus Linux or NetQ version for this upgrade job. If not, click Custom and select an alternate image from the list.
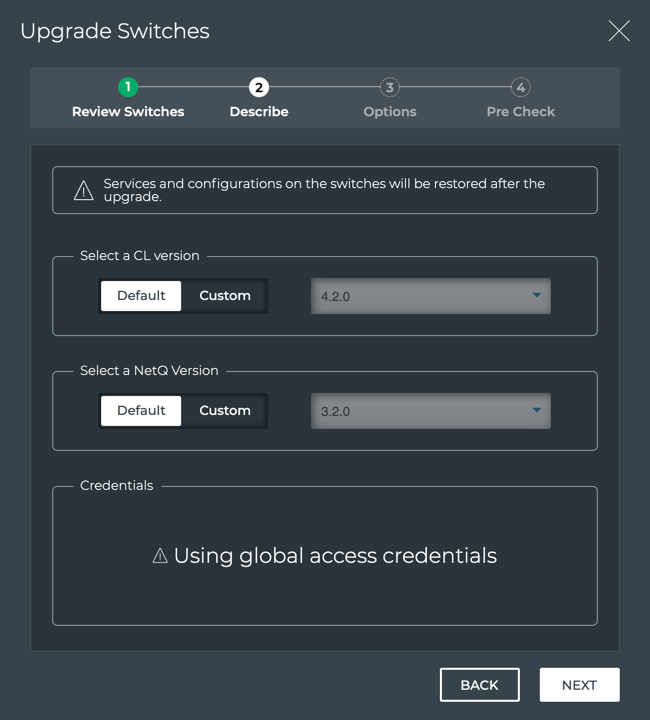
Default CL Version Selected

Custom CL Version Selected
Note that the switch access authentication method, Using global access credentials, indicates you have chosen either basic authentication with a username and password or SSH key-based authentication for all of your switches. Authentication on a per switch basis is not currently available.
Click Next.
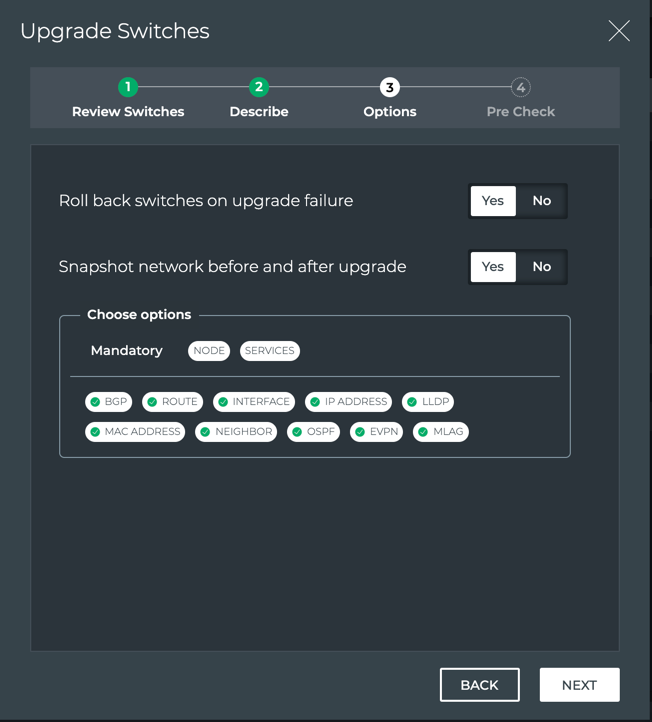
Verify the upgrade job options.
By default, NetQ takes a network snapshot before the upgrade and then one after the upgrade is complete. It also performs a roll back to the original Cumulus Linux version on any server which fails to upgrade.
You can exclude selected services and protocols from the snapshots. By default, node and services are included, but you can deselect any of the other items. Click on one to remove it; click again to include it. This is helpful when you are not running a particular protocol or you have concerns about the amount of time it will take to run the snapshot. Note that removing services or protocols from the job might produce non-equivalent results compared with prior snapshots.
While these options provide a smoother upgrade process and are highly recommended, you have the option to disable these options by clicking No next to one or both options.
Click Next.
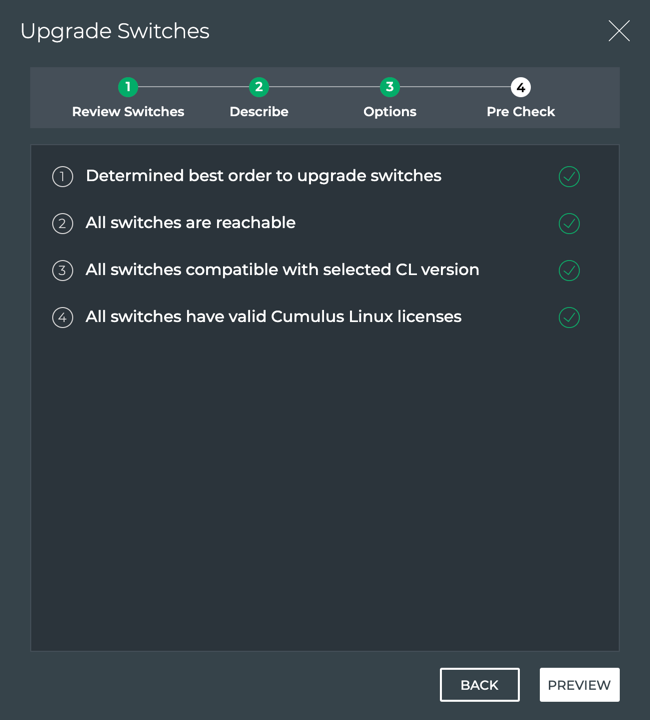
After the pre-checks have completed successfully, click Preview. If there are failures, refer to Precheck Failures.
These checks verify the following:
- Selected switches are not currently scheduled for, or in the middle of, a Cumulus Linux or NetQ Agent upgrade
- Selected versions of Cumulus Linux and NetQ Agent are valid upgrade paths
- All mandatory parameters have valid values, including MLAG configurations
- All switches are reachable
- The order to upgrade the switches, based on roles and configurations
Review the job preview.
When all of your switches have roles assigned, this view displays the chosen job options (top center), the pre-checks status (top right and left in Pre-Upgrade Tasks), the order in which the switches are planned for upgrade (center; upgrade starts from the left), and the post-upgrade tasks status (right).
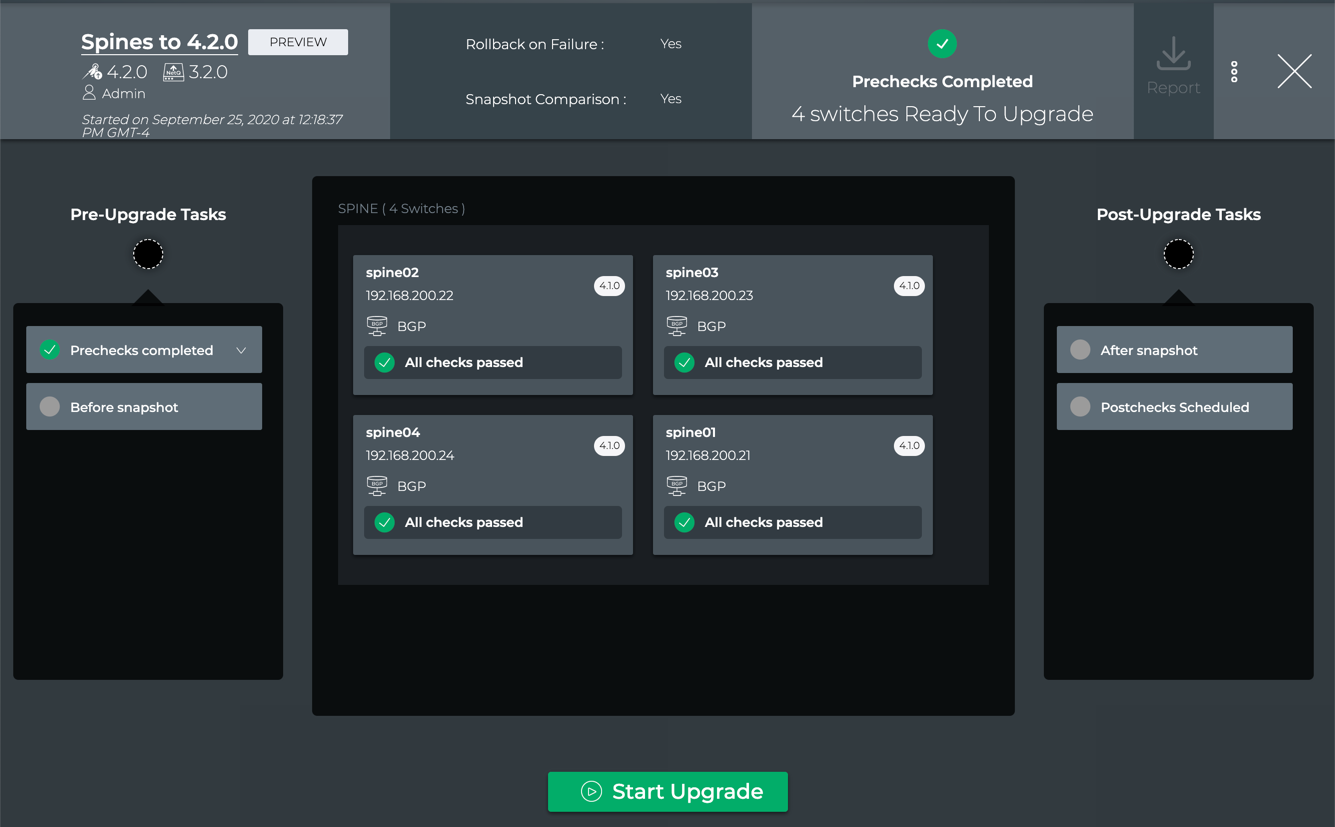
Roles assigned
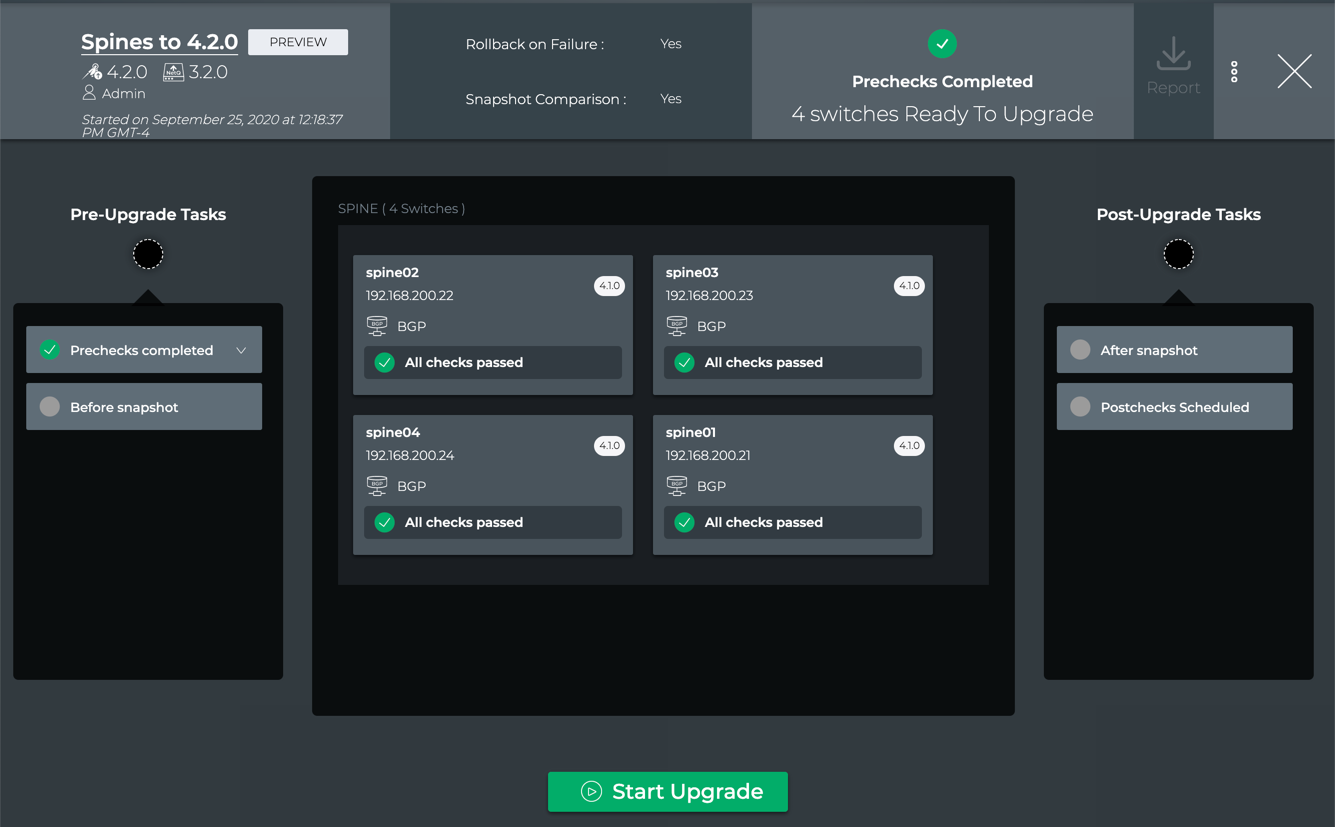
All roles the same
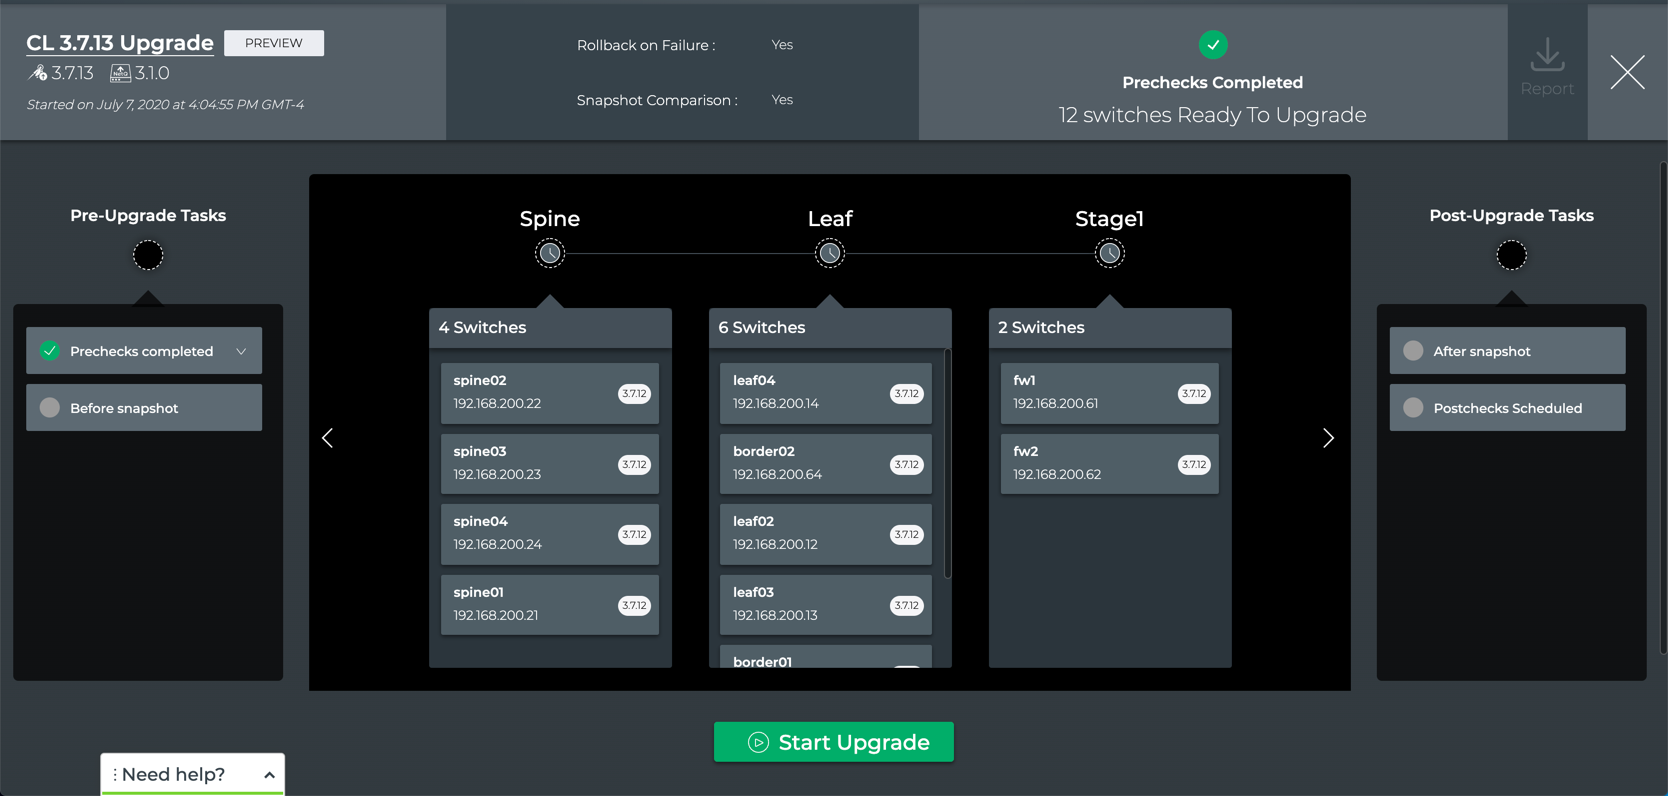
Some roles assigned
When you are happy with the job specifications, click Start Upgrade.
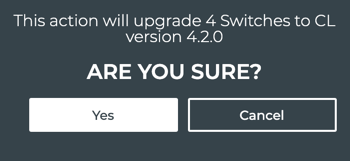
Click Yes to confirm that you want to continue with the upgrade, or click Cancel to discard the upgrade job.
Perform the upgrade using the netq lcm upgrade cl-image command, providing a name for the upgrade job, the Cumulus Linux and NetQ version, and a comma-separated list of the hostname(s) to be upgraded:
cumulus@switch:~$ netq lcm upgrade cl-image name upgrade-cl430 cl-version 4.3.0 netq-version 4.0.0 hostnames spine01,spine02
Network Snapshot Creation
You can also generate a Network Snapshot before and after the upgrade by adding the run-snapshot-before-after option to the command:
cumulus@switch:~$ netq lcm upgrade cl-image name upgrade-430 cl-version 4.3.0 netq-version 4.0.0 hostnames spine01,spine02,leaf01,leaf02 order spine,leaf run-snapshot-before-after
Restore on an Upgrade Failure
You can have LCM restore the previous version of Cumulus Linux if the upgrade job fails by adding the run-restore-on-failure option to the command. This is highly recommended.
cumulus@switch:~$ netq lcm upgrade cl-image name upgrade-430 cl-version 4.3.0 netq-version 4.0.0 hostnames spine01,spine02,leaf01,leaf02 order spine,leaf run-restore-on-failure
Precheck Failures
If one or more of the pre-checks fail, resolve the related issue and start the upgrade again. In the NetQ UI these failures appear on the Upgrade Preview page. In the NetQ CLI, it appears in the form of error messages in the netq lcm show upgrade-jobs cl-image command output.
Expand the following dropdown to view common failures, their causes and corrective actions.
Analyze Results
After starting the upgrade you can monitor the progress of your upgrade job and the final results. While the views are different, essentially the same information is available from either the NetQ UI or the NetQ CLI.
You can track the progress of your upgrade job from the Preview page or the Upgrade History page of the NetQ UI.
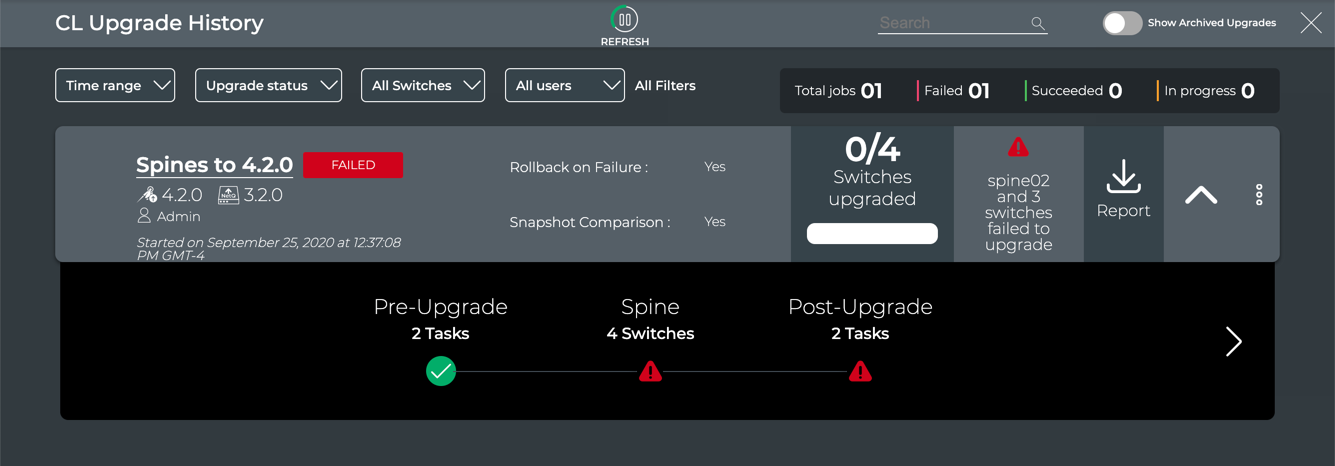
From the preview page, a green circle with rotating arrows appears each step as it is working. Alternately, you can close the detail of the job and see a summary of all current and past upgrade jobs on the Upgrade History page. The job started most recently appears at the bottom, and the data refreshes every minute.
If you get disconnected while the job is in progress, it might appear as if nothing is happening. Try closing (click ) and reopening your view (click
), or refreshing the page.
Several viewing options are available for monitoring the upgrade job.
- Monitor the job with full details open on the Preview page:
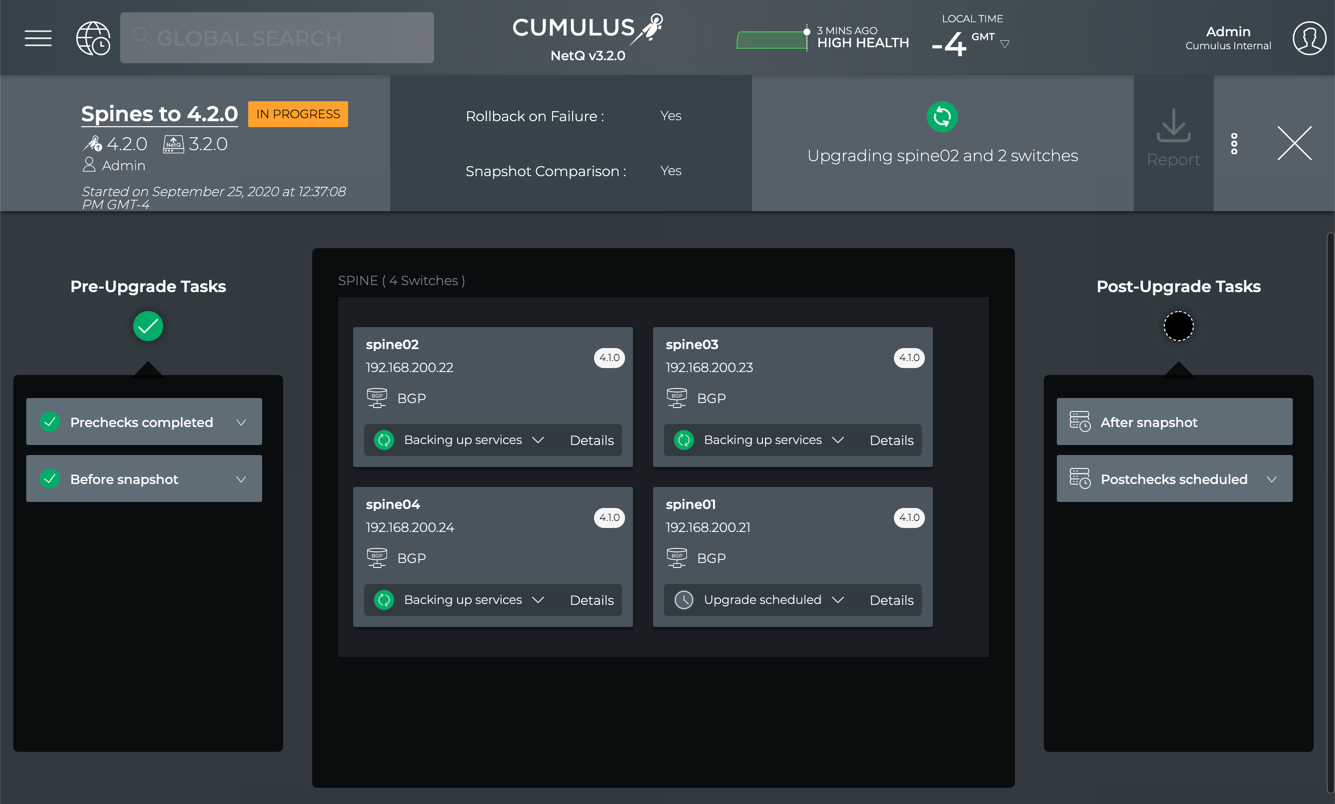
Single role
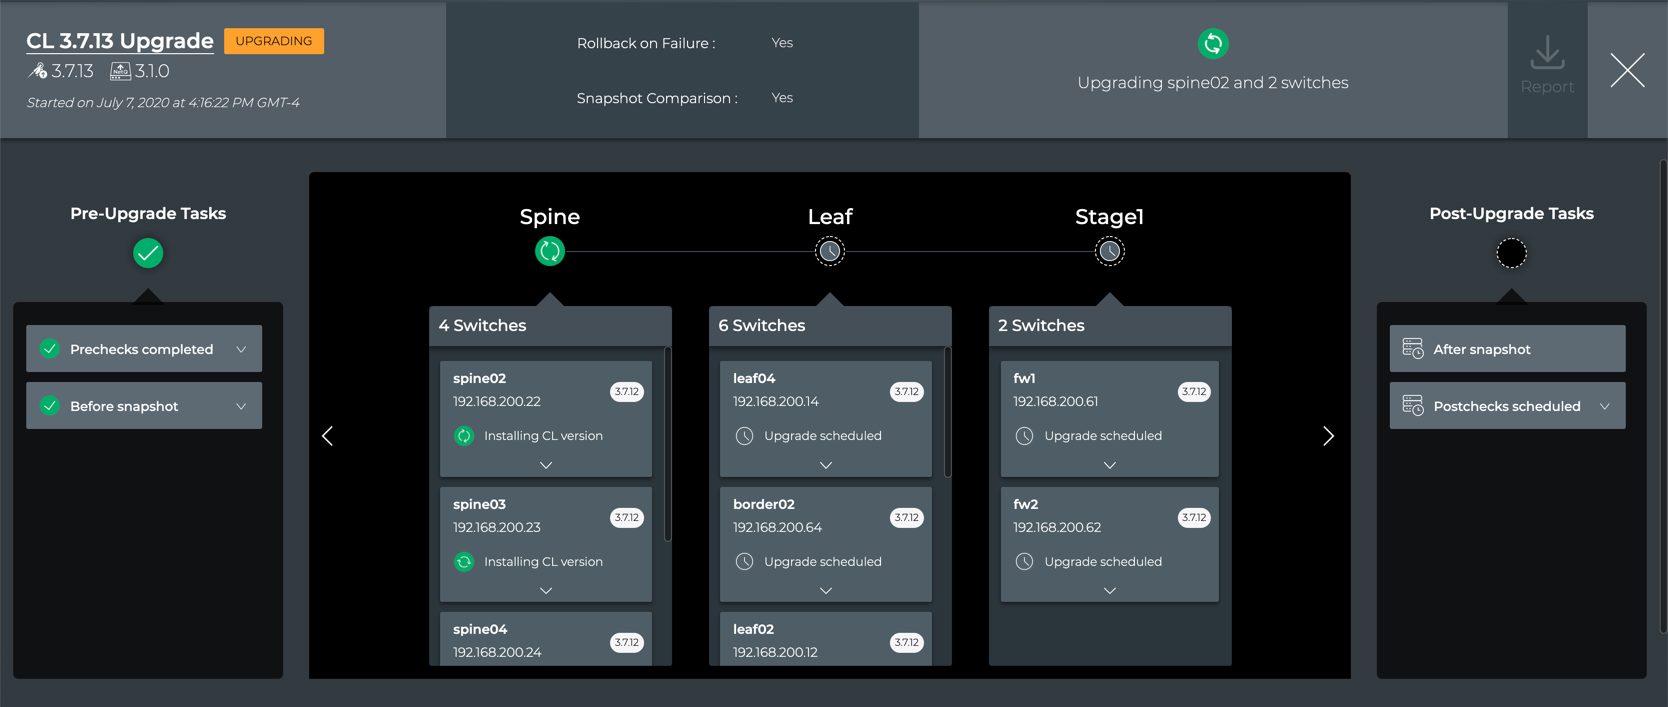
Multiple roles and some without roles
- Monitor the job with summary information only in the CL Upgrade History page. Open this view by clicking
in the full details view:

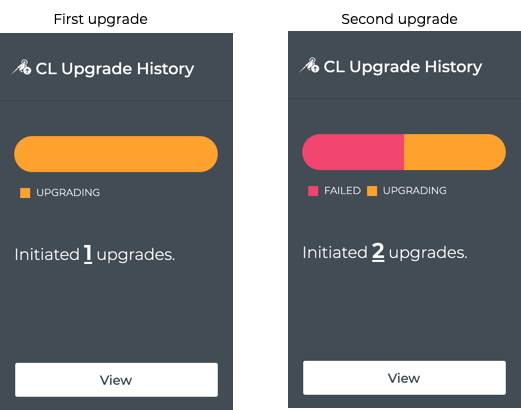
- Monitor the job through the CL Upgrade History card in the Job History tab. Click
twice to return to the LCM dashboard. As you perform more upgrades the graph displays the success and failure of each job.
Sample Successful Upgrade
On successful completion, you can:
- Compare the network snapshots taken before and after the upgrade.
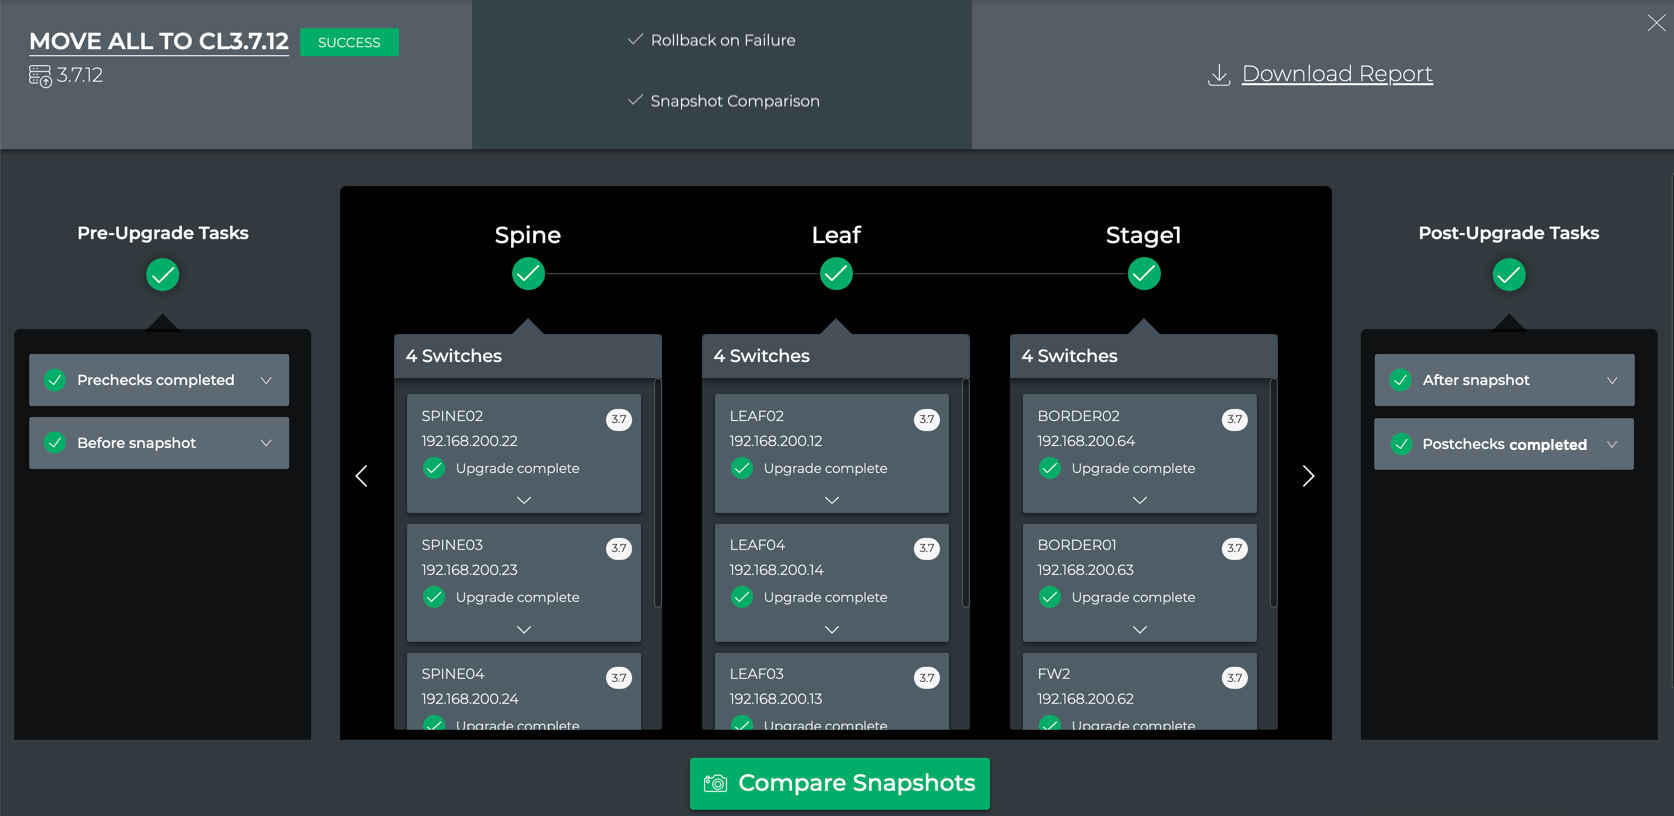
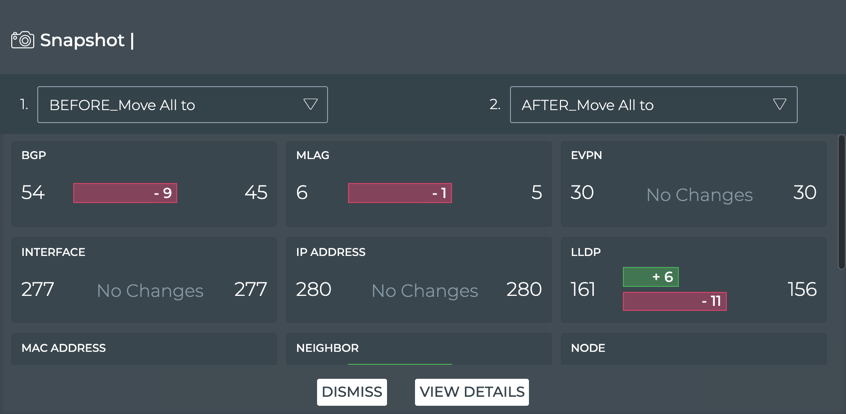
Download details about the upgrade in the form of a JSON-formatted file, by clicking Download Report.
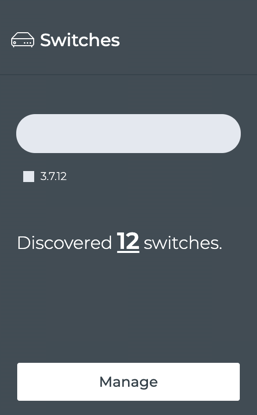
View the changes on the Switches card of the LCM dashboard.
Click
, then Upgrade Switches.
Sample Failed Upgrade
If an upgrade job fails for any reason, you can view the associated error(s):
- From the CL Upgrade History dashboard, find the job of interest.

Click
.
Click
.
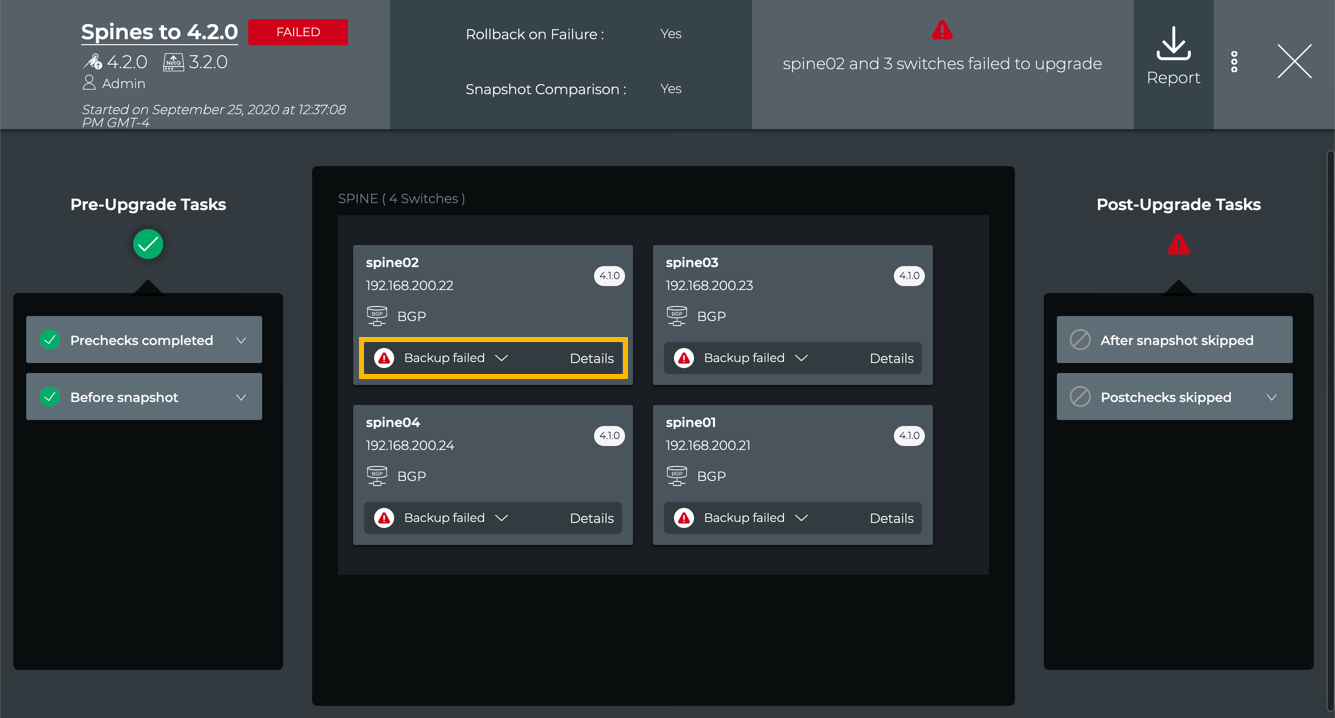
- To view what step in the upgrade process failed, click
and scroll down. Click
to close the step list.
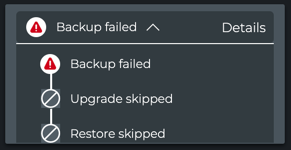
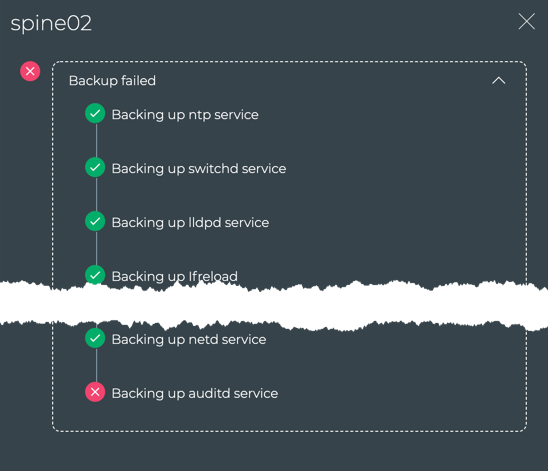
- To view details about the errors, either double-click the failed step or click Details and scroll down as needed. Click
collapse the step detail. Click
to close the detail popup.
To see the progress of current upgrade jobs and the history of previous upgrade jobs, run netq lcm show upgrade-jobs cl-image:
cumulus@switch:~$ netq lcm show upgrade-jobs cl-image
Job ID       Name            CL Version           Pre-Check Status                 Warnings         Errors       Start Time
------------ --------------- -------------------- -------------------------------- ---------------- ------------ --------------------
job_cl_upgra Leafs upgr to C 4.2.0                COMPLETED                                                      Fri Sep 25 17:16:10
de_ff9c35bc4 L410                                                                                                2020
950e92cf49ac
bb7eb4fc6e3b
7feca7d82960
570548454c50
cd05802
job_cl_upgra Spines to 4.2.0 4.2.0                COMPLETED                                                      Fri Sep 25 16:37:08
de_9b60d3a1f                                                                                                     2020
dd3987f787c7
69fd92f2eef1
c33f56707f65
4a5dfc82e633
dc3b860
job_upgrade_ 3.7.12 Upgrade  3.7.12               WARNING                                                        Fri Apr 24 20:27:47
fda24660-866                                                                                                     2020
9-11ea-bda5-
ad48ae2cfafb
job_upgrade_ DataCenter      3.7.12               WARNING                                                        Mon Apr 27 17:44:36
81749650-88a                                                                                                     2020
e-11ea-bda5-
ad48ae2cfafb
job_upgrade_ Upgrade to CL3. 3.7.12               COMPLETED                                                      Fri Apr 24 17:56:59
4564c160-865 7.12                                                                                                2020
3-11ea-bda5-
ad48ae2cfafb
To see details of a particular upgrade job, run netq lcm show status job-ID:
cumulus@switch:~$ netq lcm show status job_upgrade_fda24660-8669-11ea-bda5-ad48ae2cfafb
Hostname    CL Version    Backup Status    Backup Start Time         Restore Status    Restore Start Time        Upgrade Status    Upgrade Start Time
----------  ------------  ---------------  ------------------------  ----------------  ------------------------  ----------------  ------------------------
spine02     4.1.0         FAILED           Fri Sep 25 16:37:40 2020  SKIPPED_ON_FAILURE  N/A                   SKIPPED_ON_FAILURE  N/A
spine03     4.1.0         FAILED           Fri Sep 25 16:37:40 2020  SKIPPED_ON_FAILURE  N/A                   SKIPPED_ON_FAILURE  N/A
spine04     4.1.0         FAILED           Fri Sep 25 16:37:40 2020  SKIPPED_ON_FAILURE  N/A                   SKIPPED_ON_FAILURE  N/A
spine01     4.1.0         FAILED           Fri Sep 25 16:40:26 2020  SKIPPED_ON_FAILURE  N/A                   SKIPPED_ON_FAILURE  N/A
To see only Cumulus Linux upgrade jobs, run netq lcm show status cl-image job-ID.
Postcheck Failures
A successful upgrade can still have post-check warnings. For example, you updated the OS, but not all services are fully up and running after the upgrade. If one or more of the post-checks fail, warning messages appear in the Post-Upgrade Tasks section of the preview. Click the warning category to view the detailed messages.
Expand the following dropdown to view common failures, their causes and corrective actions.
Reasons for Upgrade Job Failure
Upgrades can fail at any of the stages of the process, including when backing up data, upgrading the Cumulus Linux software, and restoring the data. Failures can occur when attempting to connect to a switch or perform a particular task on the switch.
Some of the common reasons for upgrade failures and the errors they present:
| Reason | Error Message |
|---|---|
| Switch is not reachable via SSH | Data could not be sent to remote host “192.168.0.15.” Make sure this host can be reached over ssh: ssh: connect to host 192.168.0.15 port 22: No route to host |
| Switch is reachable, but user-provided credentials are invalid | Invalid/incorrect username/password. Skipping remaining 2 retries to prevent account lockout: Warning: Permanently added ‘<hostname-ipaddr>’ to the list of known hosts. Permission denied, please try again. |
| Upgrade task could not be run | Failure message depends on the why the task could not be run. For example: /etc/network/interfaces: No such file or directory |
| Upgrade task failed | Failed at- <task that failed>. For example: Failed at- MLAG check for the peerLink interface status |
| Retry failed after five attempts | FAILED In all retries to process the LCM Job |
Upgrade Cumulus Linux on Switches Without NetQ Agent Installed
When you want to update Cumulus Linux on switches without NetQ installed, NetQ provides the LCM switch discovery feature. The feature browses your network to find all Cumulus Linux switches, with and without NetQ currently installed and determines the versions of Cumulus Linux and NetQ installed. The results of switch discovery are then used to install or upgrade Cumulus Linux and NetQ on all discovered switches in a single procedure rather than in two steps. You can run up to five jobs simultaneously; however, a given switch can only appear in one running job at a time.
If all your Cumulus Linux switches already have NetQ 2.4.x or later installed, you can upgrade them directly. Refer to Upgrade Cumulus Linux.
To discover switches running Cumulus Linux and upgrade Cumulus Linux and NetQ on them:
Click
(Main Menu) and select Upgrade Switches, or click
(Switches) in the workbench header, then click Manage switches.
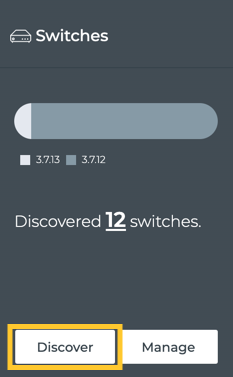
On the Switches card, click Discover.
- Enter a name for the scan.
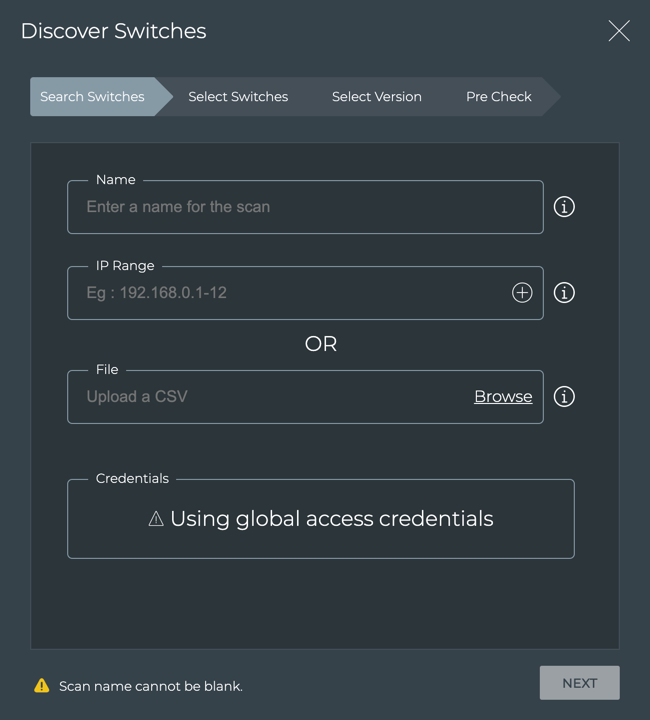
- Choose whether you want to look for switches by entering IP address ranges OR import switches using a comma-separated values (CSV) file.
If you do not have a switch listing, then you can manually add the address ranges where your switches are located in the network. This has the advantage of catching switches that might have been missed in a file.
A maximum of 50 addresses can be included in an address range. If necessary, break the range into smaller ranges.
To discover switches using address ranges:
Enter an IP address range in the IP Range field.
Ranges can be contiguous, for example 192.168.0.24-64, or non-contiguous, for example 192.168.0.24-64,128-190,235, but they must be contained within a single subnet.
Optionally, enter another IP address range (in a different subnet) by clicking
.
For example, 198.51.100.0-128 or 198.51.100.0-128,190,200-253.
Add additional ranges as needed. Click
to remove a range if needed.
If you decide to use a CSV file instead, the ranges you entered will remain if you return to using IP ranges again.
If you have a file of switches that you want to import, then it can be easier to use that, than to enter the IP address ranges manually.
To import switches through a CSV file:
Click Browse.
Select the CSV file containing the list of switches.
The CSV file must include a header containing hostname, ip, and port. They can be in any order you like, but the data must match that order. For example, a CSV file that represents the Cumulus reference topology could look like this:
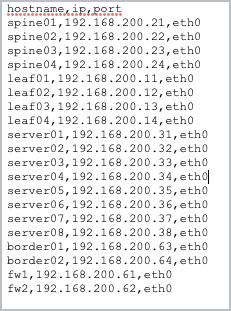
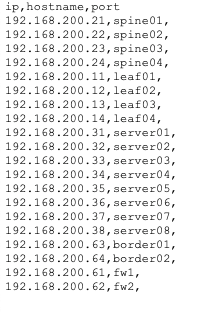
You must have an IP address in your file, but the hostname is optional and if the port is blank, NetQ uses switch port 22 by default.
Click Remove if you decide to use a different file or want to use IP address ranges instead. If you entered ranges before selecting the CSV file option, they remain.
Note that you can use the switch access credentials defined in Manage Switch Credentials to access these switches. If you have issues accessing the switches, you might need to update your credentials.
Click Next.
When the network discovery is complete, NetQ presents the number of Cumulus Linux switches it found. Each switch can be in one of the following categories:
- Discovered without NetQ: Switches found without NetQ installed
- Discovered with NetQ: Switches found with some version of NetQ installed
- Discovered but Rotten: Switches found that are unreachable
- Incorrect Credentials: Switches found that cannot are unreachable because the provided access credentials do not match those for the switches
- OS not Supported: Switches found that are running Cumulus Linux version not supported by the LCM upgrade feature
- Not Discovered: IP addresses which did not have an associated Cumulus Linux switch
If the discovery process does not find any switches for a particular category, then it does not display that category.
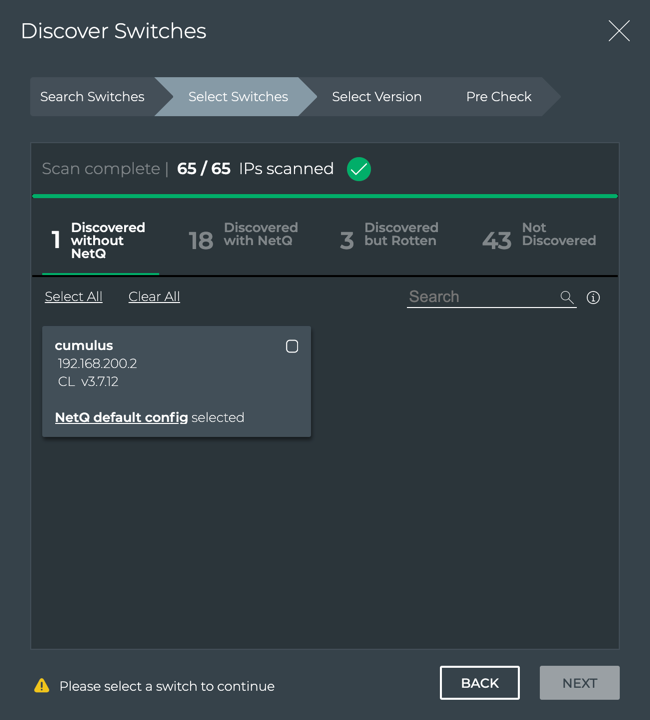
- Select which switches you want to upgrade from each category by clicking the checkbox on each switch card.
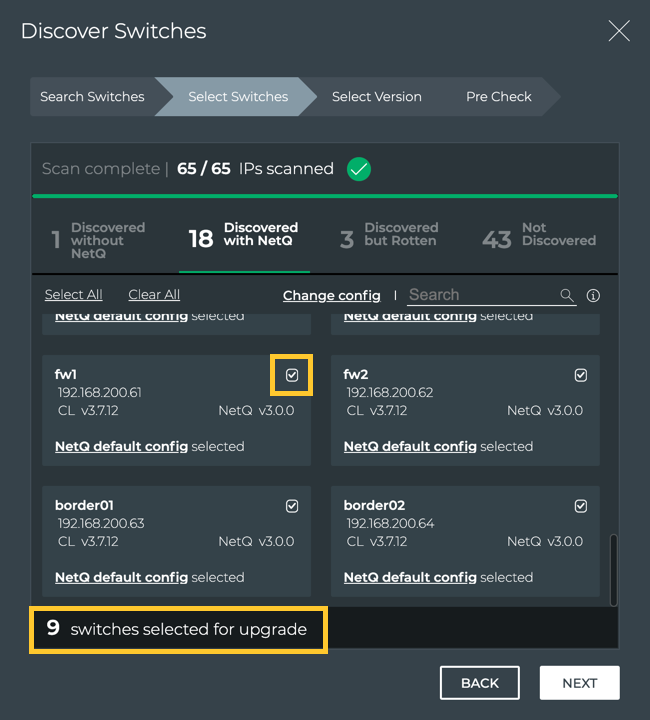
Click Next.
Verify the number of switches identified for upgrade and the configuration profile to be applied is correct.
Accept the default NetQ version or click Custom and select an alternate version.
By default, the NetQ Agent and CLI are upgraded on the selected switches. If you do not want to upgrade the NetQ CLI, click Advanced and change the selection to No.
Click Next.
Several checks are performed to eliminate preventable problems during the install process.
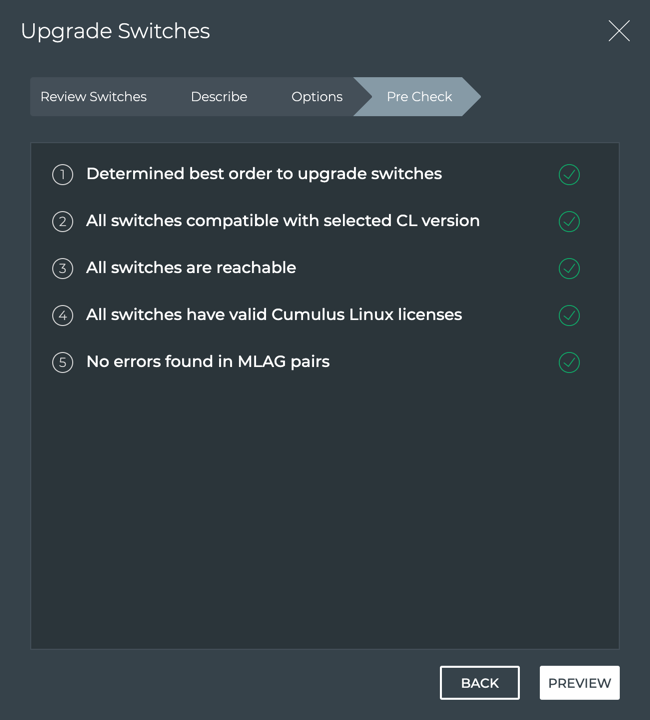
These checks verify the following:
- Selected switches are not currently scheduled for, or in the middle of, a Cumulus Linux or NetQ Agent upgrade
- Selected versions of Cumulus Linux and NetQ Agent are valid upgrade paths
- All mandatory parameters have valid values, including MLAG configurations
- All switches are reachable
- The order to upgrade the switches, based on roles and configurations
If any of the pre-checks fail, review the error messages and take appropriate action.
If all of the pre-checks pass, click Install to initiate the job.
Monitor the job progress.
After starting the upgrade you can monitor the progress from the preview page or the Upgrade History page.
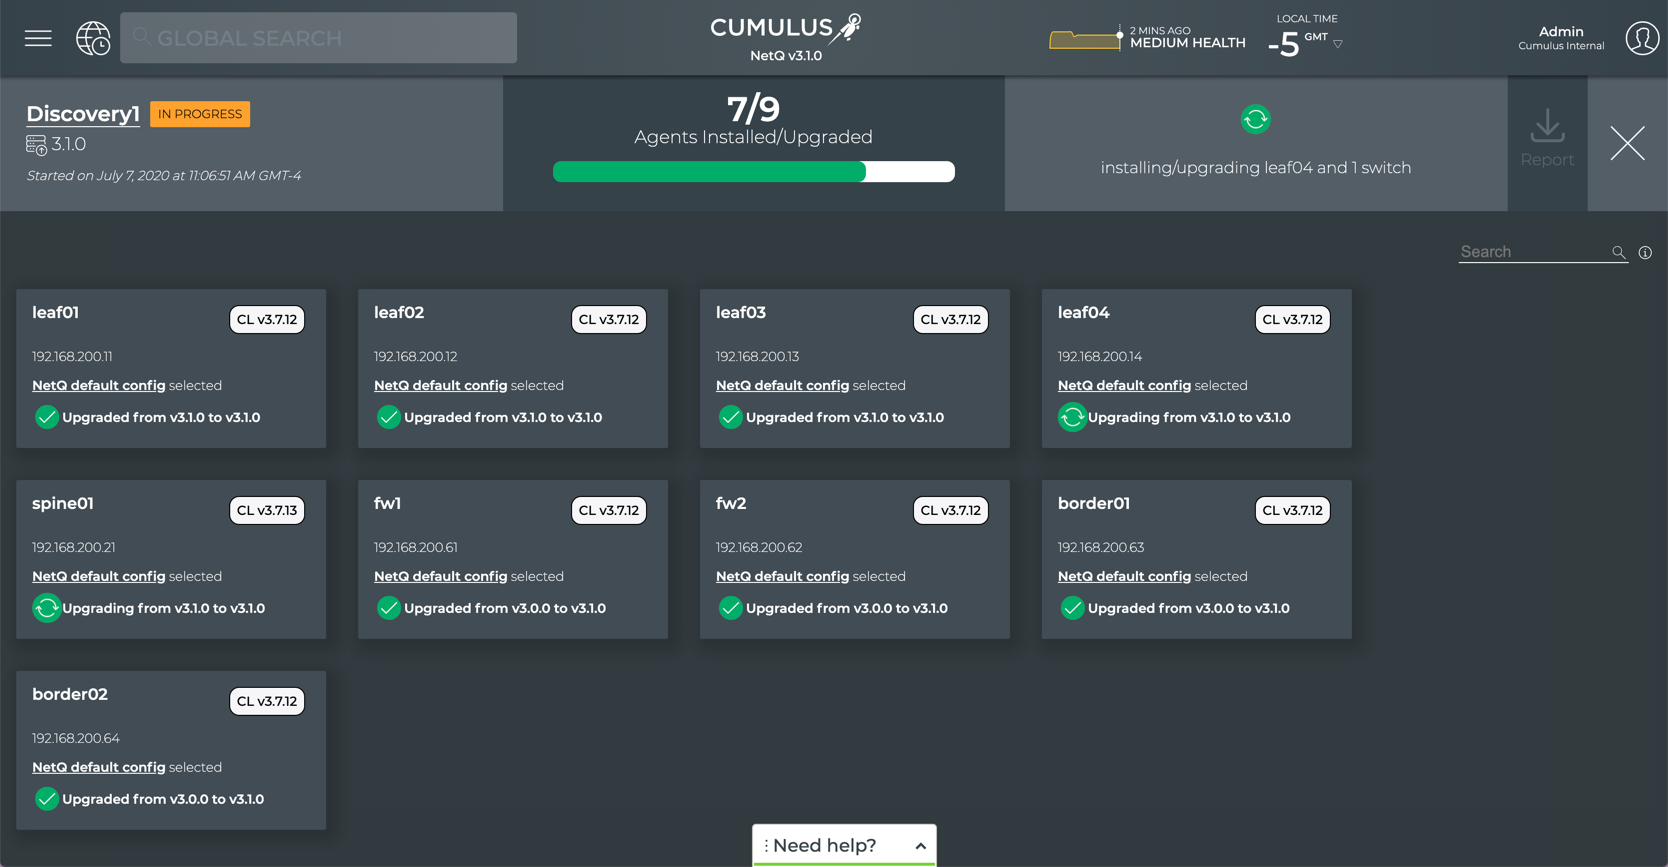
From the preview page, a green circle with rotating arrows is shown on each switch as it is working. Alternately, you can close the detail of the job and see a summary of all current and past upgrade jobs on the NetQ Install and Upgrade History page. The job started most recently is shown at the top, and the data is refreshed periodically.
If you are disconnected while the job is in progress, it might appear as if nothing is happening. Try closing (click ) and reopening your view (click
), or refreshing the page.
Several viewing options are available for monitoring the upgrade job.
- Monitor the job with full details open:
- Monitor the job with only summary information in the NetQ Install and Upgrade History page. Open this view by clicking
in the full details view; useful when you have multiple jobs running simultaneously

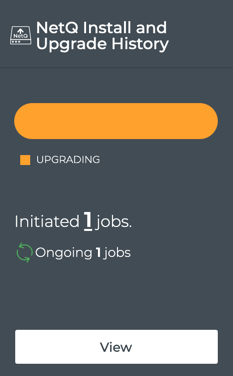
- Monitor the job through the NetQ Install and Upgrade History card on the LCM dashboard. Click
twice to return to the LCM dashboard.
- Investigate any failures and create new jobs to reattempt the upgrade.
If you previously ran a discovery job, as described above, you can show the results of that job by running the netq lcm show discovery-job command.
cumulus@switch:~$ netq lcm show discovery-job job_scan_921f0a40-5440-11eb-97a2-5b3ed2e556db
Scan COMPLETED

Summary
-------
Start Time: 2021-01-11 19:09:47.441000
End Time: 2021-01-11 19:09:59.890000
Total IPs: 1
Completed IPs: 1
Discovered without NetQ: 0
Discovered with NetQ: 0
Incorrect Credentials: 0
OS Not Supported: 0
Not Discovered: 1


Hostname          IP Address                MAC Address        CPU      CL Version  NetQ Version  Config Profile               Discovery Status Upgrade Status
----------------- ------------------------- ------------------ -------- ----------- ------------- ---------------------------- ---------------- --------------
N/A               10.0.1.12                 N/A                N/A      N/A         N/A           []                           NOT_FOUND        NOT_UPGRADING
cumulus@switch:~$
When the network discovery is complete, NetQ presents the number of Cumulus Linux switches it has found. The output displays their discovery status, which can be one of the following:
- Discovered without NetQ: Switches found without NetQ installed
- Discovered with NetQ: Switches found with some version of NetQ installed
- Discovered but Rotten: Switches found that are unreachable
- Incorrect Credentials: Switches found that are unreachable because the provided access credentials do not match those for the switches
- OS not Supported: Switches found that are running Cumulus Linux version not supported by the LCM upgrade feature
- NOT_FOUND: IP addresses which did not have an associated Cumulus Linux switch
After you determine which switches you need to upgrade, run the upgrade process as described above.