Manage NetQ and Network OS Images
You manage NetQ and network OS (Cumulus Linux and SONiC) images with LCM. You manage them in a similar manner.
You can upload Cumulus Linux and SONiC binary images to a local LCM repository for upgrading your switches. You can upload NetQ Debian packages to the local LCM repository for installation or upgrade. You can upload images from an external drive.
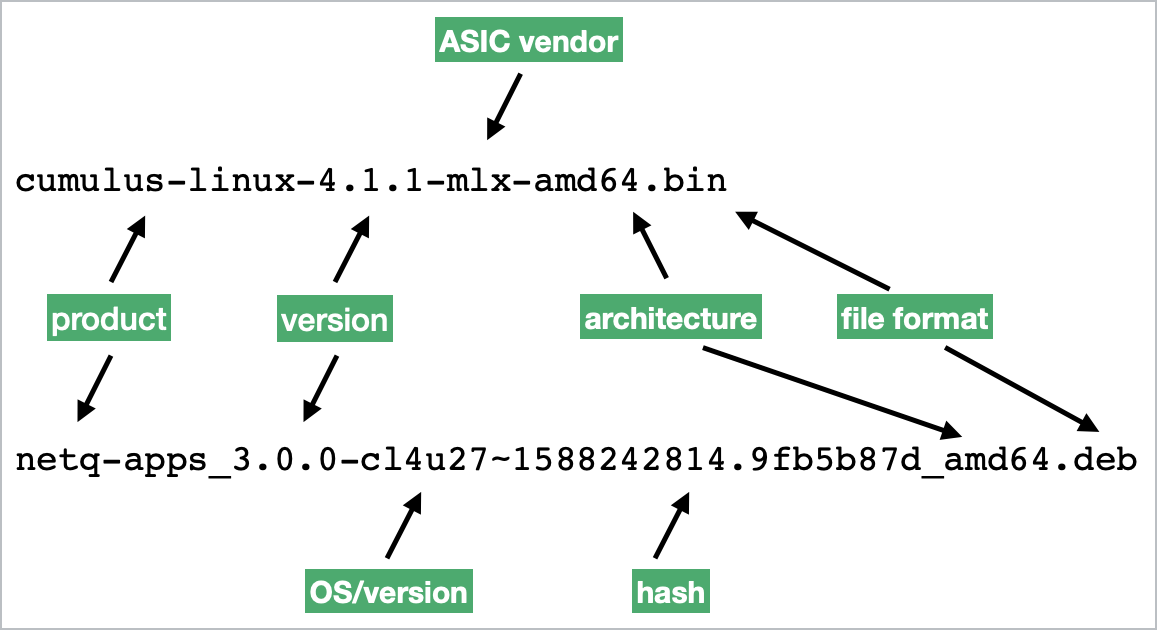
The network OS and NetQ images are available in several variants based on the software version (x.y.z), the CPU architecture (ARM, x86), platform (based on ASIC vendor), SHA checksum, and so forth. When LCM discovers Cumulus Linux switches running NetQ in your network, it extracts the metadata needed to select the appropriate image for a given switch. Similarly, LCM discovers and extracts the metadata from NetQ images.
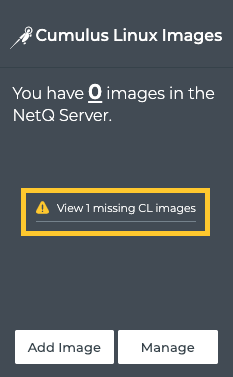
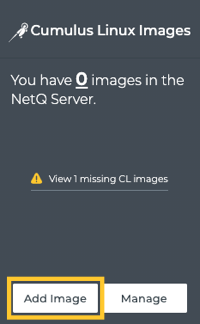
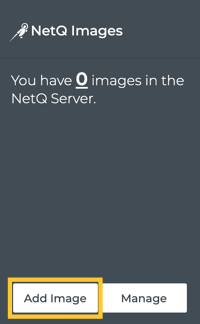
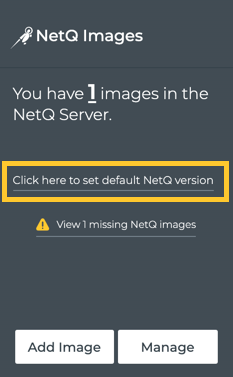
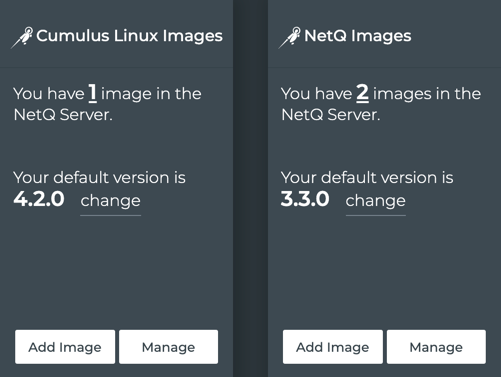
The Cumulus Linux Images and NetQ Images cards in the NetQ UI provide a summary of image status in LCM. They show the total number of images in the repository, a count of missing images, and the starting points for adding and managing your images.
The netq lcm show cl-images and netq lcm show netq-images commands also display a summary of the Cumulus Linux or NetQ images, respectively, uploaded to the LCM repo on the NetQ appliance or VM.
Default Version Assignment
You can assign a specific OS or NetQ version as the default version to use during installation or upgrade of switches. It is recommended that you choose the newest version that you intend to install or upgrade on all, or the majority, of your switches. The default selection can be overridden during individual installation and upgrade job creation if an alternate version is needed for a given set of switches.
Missing Images
You should upload images for each network OS and NetQ version currently installed in your inventory so you can support rolling back to a known good version should an installation or upgrade fail. The NetQ UI prompts you to upload any missing images to the repository.
For example, if you have both Cumulus Linux 3.7.3 and 3.7.11 versions, some running on ARM and some on x86 architectures, then LCM verifies the presence of each of these images. If only the 3.7.3 x86, 3.7.3 ARM, and 3.7.11 x86 images are in the repository, the NetQ UI would list the 3.7.11 ARM image as missing. For NetQ, you need both the netq-apps and netq-agent packages for each release variant.
If you have specified a default network OS and/or NetQ version, the NetQ UI also verifies that the necessary versions of the default image are available based on the known switch inventory, and if not, lists those that are missing.
While you do not have to upload images that NetQ determines to be missing, not doing so might cause failures when you attempt to upgrade your switches.
Upload Images
For fresh installations of NetQ 4.0, no images have yet been uploaded to the LCM repository. If you are upgrading from NetQ 3.0.x-3.2.x, the Cumulus Linux images you have previously added are still present.
In preparation for Cumulus Linux upgrades, the recommended image upload flow is:
In a fresh NetQ install, add images that match your current inventory: Upload Missing Images
Add images you want to use for upgrade: Upload Upgrade Images
In NetQ UI, optionally specify a default version for upgrades: Specify a Default Upgrade Image
In preparation for NetQ installation or upgrade, the recommended image upload flow is:
Add images you want to use for installation or upgrade: Upload Upgrade Images
Add any missing images: Upload Missing Images
In NetQ UI, optionally specify a default version for installation or upgrade: Specify a Default Upgrade Image
Upload Missing Images
Use the following instructions to upload missing network OS and NetQ images.
For network OS images:
On the Manage Switch Assets page, Click Upgrade, then click Image Management.
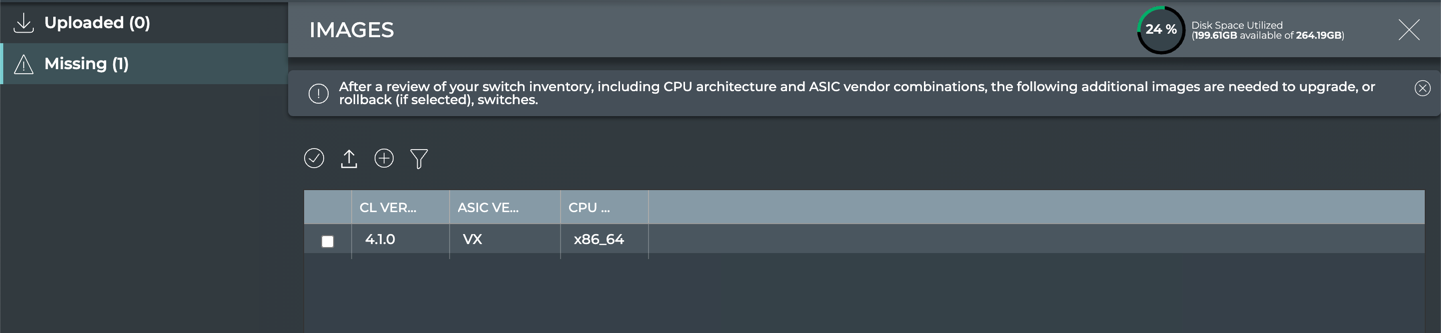
On the Cumulus Linux Images card, click the View # missing CL images link to see what images you need. This opens the list of missing images.
If you have already specified a default image, you must click Manage and then Missing to see the missing images.
- Select one or more of the missing images and make note of the version, ASIC vendor, and CPU architecture for each.
Download the network OS disk images (.bin files) needed for upgrade from the Cumulus Software downloads page, selecting the appropriate version, CPU, and ASIC. Place them in an accessible part of your local network.
Back in the UI, click
 (Add Image) above the table.
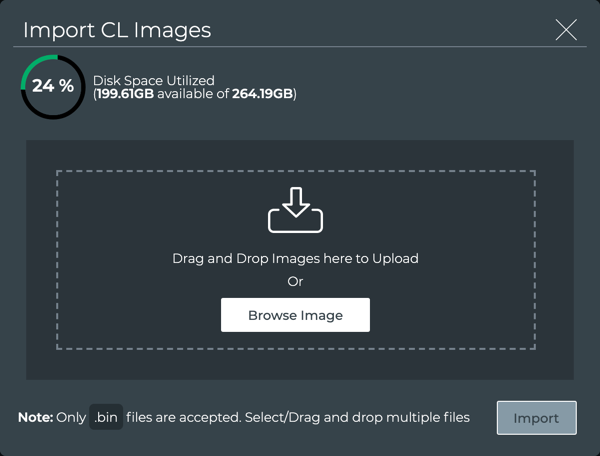
Provide the .bin file from an external drive that matches the criteria for the selected image(s), either by dragging and dropping onto the dialog or by selecting from a directory.
Click Import.
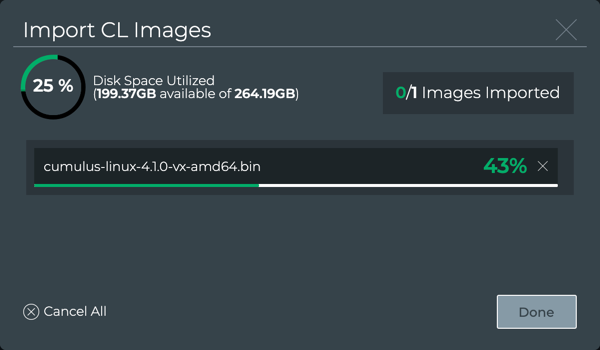
Click Done.
Click Uploaded to verify the image is in the repository.

Click
 to return to the LCM dashboard.
The Cumulus Linux Images card now shows the number of images you uploaded.
Download the network OS disk images (.bin files) needed for upgrade from the Cumulus Software downloads page, selecting the appropriate version, CPU, and ASIC. Place them in an accessible part of your local network.
Upload the images to the LCM repository. This example uses a Cumulus Linux 4.2.0 disk image.
cumulus@switch:~$ netq lcm add cl-image /path/to/download/cumulus-linux-4.2.0-mlnx-amd64.binRepeat Step 2 for each image you need to upload to the LCM repository.
For NetQ images:
Click Upgrade, then click Image Management.
On the NetQ Images card, click the View # missing NetQ images link to see what images you need. This opens the list of missing images.

If you have already specified a default image, you must click Manage and then Missing to see the missing images.
- Select one or all of the missing images and make note of the OS version, CPU architecture, and image type. Remember that you need both
netq-appsandneta-agentfor NetQ to perform the installation or upgrade.

Download the NetQ debian packages needed for upgrade from the NetQ repository, selecting the appropriate OS version and architecture. Place the files in an accessible part of your local network.
Back in the UI, click
(Add Image) above the table.
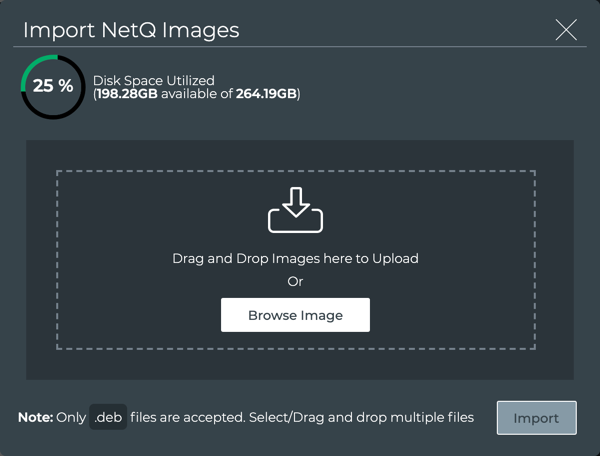
Provide the .deb file(s) from an external drive that matches the criteria for the selected image, either by dragging and dropping it onto the dialog or by selecting it from a directory.
Click Import.
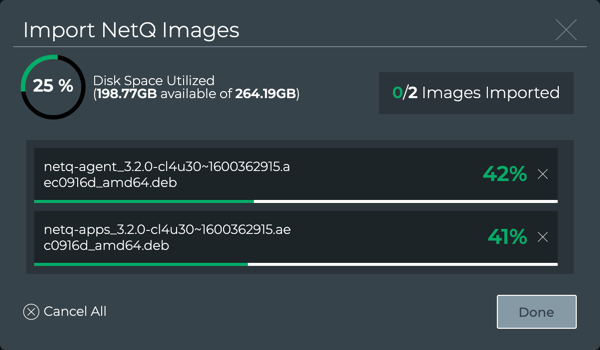
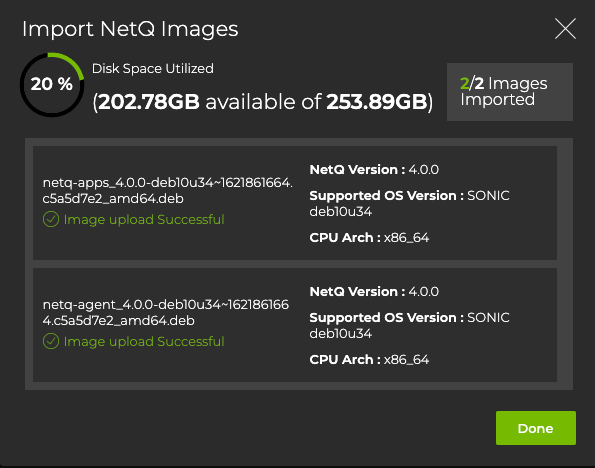
Click Done.
Click Uploaded to verify the images are in the repository.
After you upload all the missing images, the Missing list is empty.
Click
to return to the LCM dashboard.
The NetQ Images card now shows the number of images you uploaded.
Download the NetQ Debian packages needed for upgrade from the My Mellanox support page, selecting the appropriate version and hypervisor/platform. Place them in an accessible part of your local network.
Upload the images to the LCM repository. This example uploads the two packages (
netq-agentandnetq-apps) needed for NetQ version 4.0.0 for a NetQ appliance or VM running Ubuntu 18.04 with an x86 architecture.cumulus@switch:~$ netq lcm add netq-image /path/to/download/netq-agent_4.0.0-ub18.04u33~1614767175.886b337_amd64.deb cumulus@switch:~$ netq lcm add netq-image /path/to/download/netq-apps_4.0.0-ub18.04u33~1614767175.886b337_amd64.deb
Upload Upgrade Images
To upload the network OS or NetQ images that you want to use for upgrade, first download the Cumulus Linux or SONiC disk images (.bin files) and NetQ Debian packages needed for upgrade from the Downloads Center and NetQ repository, respectively. Place them in an accessible part of your local network.
If you are upgrading the network OS on switches with different ASIC vendors or CPU architectures, you need more than one image. For NetQ, you need both the netq-apps and netq-agent packages for each variant.
Then continue with the instructions here based on whether you want to use the NetQ UI or CLI.
Click Upgrade, then click Image Management.
Click Add Image on the Cumulus Linux Images or NetQ Images card.
Provide one or more images from an external drive, either by dragging and dropping onto the dialog or by selecting from a directory.
Click Import.
Monitor the progress until it completes. Click Done.
Click
to return to the LCM dashboard.The NetQ Images card is updated to show the number of additional images you uploaded.
Use the netq lcm add cl-image <text-image-path> and netq lcm add netq-image <text-image-path> commands to upload the images. Run the relevant command for each image that needs to be uploaded.
Network OS images:
cumulus@switch:~$ netq lcm add image /path/to/download/cumulus-linux-4.2.0-mlx-amd64.bin
NetQ images:
cumulus@switch:~$ netq lcm add image /path/to/download/	netq-agent_4.0.0-ub18.04u33~1614767175.886b337_amd64.deb
cumulus@switch:~$ netq lcm add image /path/to/download/netq-apps_4.0.0-ub18.04u33~1614767175.886b337_amd64.deb
Specify a Default Upgrade Version
Lifecycle management does not have a default network OS or NetQ upgrade version specified automatically. With the NetQ UI, you can specify the version that is appropriate for your network to ease the upgrade process.
To specify a default version in the NetQ UI:
Click Upgrade, then click Image Management.
Click the Click here to set the default CL version link in the middle of the Cumulus Linux Images card, or click the Click here to set the default NetQ version link in the middle of the NetQ Images card.
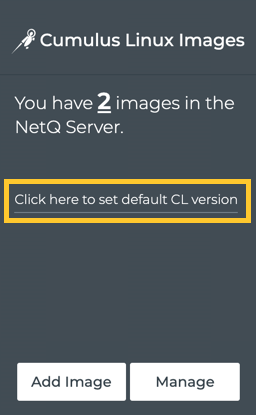
Select the version you want to use as the default for switch upgrades.
Click Save. The default version is now displayed on the relevant Images card.
To specify a default network OS version, run:
cumulus@switch:~$ netq lcm add default-version cl-images <text-cumulus-linux-version>
To specify a default NetQ version, run:
cumulus@switch:~$ netq lcm add default-version netq-images <text-netq-version>
After you have specified a default version, you have the option to change it.
To change the default version:
Click change next to the currently identified default image on the Cumulus Linux Images or NetQ Images card.
Select the image you want to use as the default version for upgrades.
Click Save.
To change the default network OS version, run:
cumulus@switch:~$ netq lcm add default-version cl-images <text-cumulus-linux-version>
To change the default NetQ version, run:
cumulus@switch:~$ netq lcm add default-version netq-images <text-netq-version>
In the CLI, you can check which version of the network OS or NetQ is the default.
To see which version of Cumulus Linux is the default, run netq lcm show default-version cl-images:
cumulus@switch:~$ netq lcm show default-version cl-images
ID                        Name            CL Version  CPU      ASIC            Last Changed
------------------------- --------------- ----------- -------- --------------- -------------------------
image_cc97be3955042ca4185 cumulus-linux-4 4.2.0       x86_64   VX              Tue Jan  5 22:10:59 2021
7c4d0fe95296bcea3e372b437 .2.0-vx-amd64-1
a535a4ad23ca300d52c3      594775435.dirty
                          zc24426ca.bin
To see which version of NetQ is the default, run netq lcm show default-version netq-images:
cumulus@switch:~$ netq lcm show default-version netq-images
ID                        Name            NetQ Version  CL Version  CPU      Image Type           Last Changed
------------------------- --------------- ------------- ----------- -------- -------------------- -------------------------
image_d23a9e006641c675ed9 netq-agent_4.0. 4.0.0         cl4u32      x86_64   NETQ_AGENT           Tue Jan  5 22:23:50 2021
e152948a9d1589404e8b83958 0-cl4u32_160939
d53eb0ce7698512e7001      1187.7df4e1d2_a
                          md64.deb
image_68db386683c796d8642 netq-apps_4.0.0 4.0.0         cl4u32      x86_64   NETQ_CLI             Tue Jan  5 22:23:54 2021
2f2172c103494fef7a820d003 -cl4u32_1609391
de71647315c5d774f834      187.7df4e1d2_am
                          d64.deb
Export Images
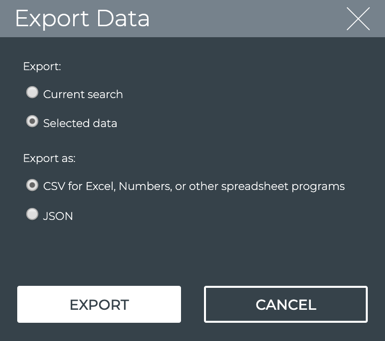
You can export a listing of the network OS and NetQ images stored in the LCM repository for reference.
To export image listings:
Open the LCM dashboard.
Click Upgrade, then click Image Management.
Click Manage on the Cumulus Linux Images or NetQ Images card.
Optionally, use the filter option above the table on the Uploaded tab to narrow down a large listing of images.

Click
 above the table.
Choose the export file type and click Export.
Use the json option with the netq lcm show cl-images command to output a list of the Cumulus Linux image files stored in the LCM repository.
cumulus@switch:~$ netq lcm show cl-images json
[
    {
        "id": "image_cc97be3955042ca41857c4d0fe95296bcea3e372b437a535a4ad23ca300d52c3",
        "name": "cumulus-linux-4.2.0-vx-amd64-1594775435.dirtyzc24426ca.bin",
        "clVersion": "4.2.0",
        "cpu": "x86_64",
        "asic": "VX",
        "lastChanged": 1600726385400.0
    },
    {
        "id": "image_c6e812f0081fb03b9b8625a3c0af14eb82c35d79997db4627c54c76c973ce1ce",
        "name": "cumulus-linux-4.1.0-vx-amd64.bin",
        "clVersion": "4.1.0",
        "cpu": "x86_64",
        "asic": "VX",
        "lastChanged": 1600717860685.0
    }
]
Remove Images from Local Repository
After you upgrade all your switches beyond a particular release, you can remove those images from the LCM repository to save space on the server.
To remove images:
Open the LCM dashboard.
Click Upgrade, then click Image Management.
Click Manage on the Cumulus Linux Images or NetQ Images card.
On Uploaded, select the images you want to remove. Use the filter option above the table to narrow down a large listing of images.
- Click
 .
.
To remove Cumulus Linux images, run:
netq lcm show cl-images [json]
netq lcm del cl-image <text-image-id>
Determine the ID of the image you want to remove.
cumulus@switch:~$ netq lcm show cl-images json
[
    {
        "id": "image_cc97be3955042ca41857c4d0fe95296bcea3e372b437a535a4ad23ca300d52c3",
        "name": "cumulus-linux-4.2.0-vx-amd64-1594775435.dirtyzc24426ca.bin",
        "clVersion": "4.2.0",
        "cpu": "x86_64",
        "asic": "VX",
        "lastChanged": 1600726385400.0
    },
    {
        "id": "image_c6e812f0081fb03b9b8625a3c0af14eb82c35d79997db4627c54c76c973ce1ce",
        "name": "cumulus-linux-4.1.0-vx-amd64.bin",
        "clVersion": "4.1.0",
        "cpu": "x86_64",
        "asic": "VX",
        "lastChanged": 1600717860685.0
    }
]
Remove the image you no longer need.
cumulus@switch:~$ netq lcm del cl-image image_c6e812f0081fb03b9b8625a3c0af14eb82c35d79997db4627c54c76c973ce1ceVerify the command removed the image.
cumulus@switch:~$ netq lcm show cl-images json
[
    {
        "id": "image_cc97be3955042ca41857c4d0fe95296bcea3e372b437a535a4ad23ca300d52c3",
        "name": "cumulus-linux-4.2.0-vx-amd64-1594775435.dirtyzc24426ca.bin",
        "clVersion": "4.2.0",
        "cpu": "x86_64",
        "asic": "VX",
        "lastChanged": 1600726385400.0
    }
]
To remove NetQ images, run:
netq lcm show netq-images [json]
netq lcm del netq-image <text-image-id>
Determine the ID of the image you want to remove.
cumulus@switch:~$ netq lcm show netq-images json
[
    {
        "id": "image_d23a9e006641c675ed9e152948a9d1589404e8b83958d53eb0ce7698512e7001",
        "name": "netq-agent_4.0.0-cl4u32_1609391187.7df4e1d2_amd64.deb",
        "netqVersion": "4.0.0",
        "clVersion": "cl4u32",
        "cpu": "x86_64",
        "imageType": "NETQ_AGENT",
        "lastChanged": 1609885430638.0
    },
    {
        "id": "image_68db386683c796d86422f2172c103494fef7a820d003de71647315c5d774f834",
        "name": "netq-apps_4.0.0-cl4u32_1609391187.7df4e1d2_amd64.deb",
        "netqVersion": "4.0.0",
        "clVersion": "cl4u32",
        "cpu": "x86_64",
        "imageType": "NETQ_CLI",
        "lastChanged": 1609885434704.0
    }
]
Remove the image you no longer need.
cumulus@switch:~$ netq lcm del netq-image image_68db386683c796d86422f2172c103494fef7a820d003de71647315c5d774f834Verify the command removed the image.
cumulus@switch:~$ netq lcm show netq-images json
[
    {
        "id": "image_d23a9e006641c675ed9e152948a9d1589404e8b83958d53eb0ce7698512e7001",
        "name": "netq-agent_4.0.0-cl4u32_1609391187.7df4e1d2_amd64.deb",
        "netqVersion": "4.0.0",
        "clVersion": "cl4u32",
        "cpu": "x86_64",
        "imageType": "NETQ_AGENT",
        "lastChanged": 1609885430638.0
    }
]