Manage Switch Inventory and Roles
On initial installation, the lifecycle management feature provides an inventory of switches that have been automatically discovered by NetQ and are available for software installation or upgrade through NetQ. This includes all switches running Cumulus Linux 3.6 or later, SONiC 202012 or later, and NetQ Agent 2.4 or later in your network. You assign network roles to switches and select switches for software installation and upgrade from this inventory listing.
View the LCM Switch Inventory
You can view the switch inventory from the NetQ UI and the NetQ CLI.
A count of the switches NetQ was able to discover and the network OS versions that are running on those switches is available from the LCM dashboard.
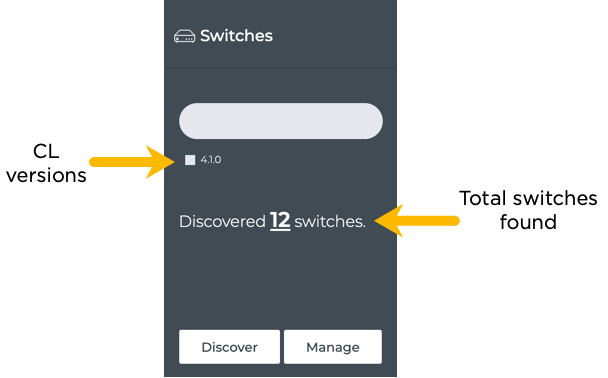
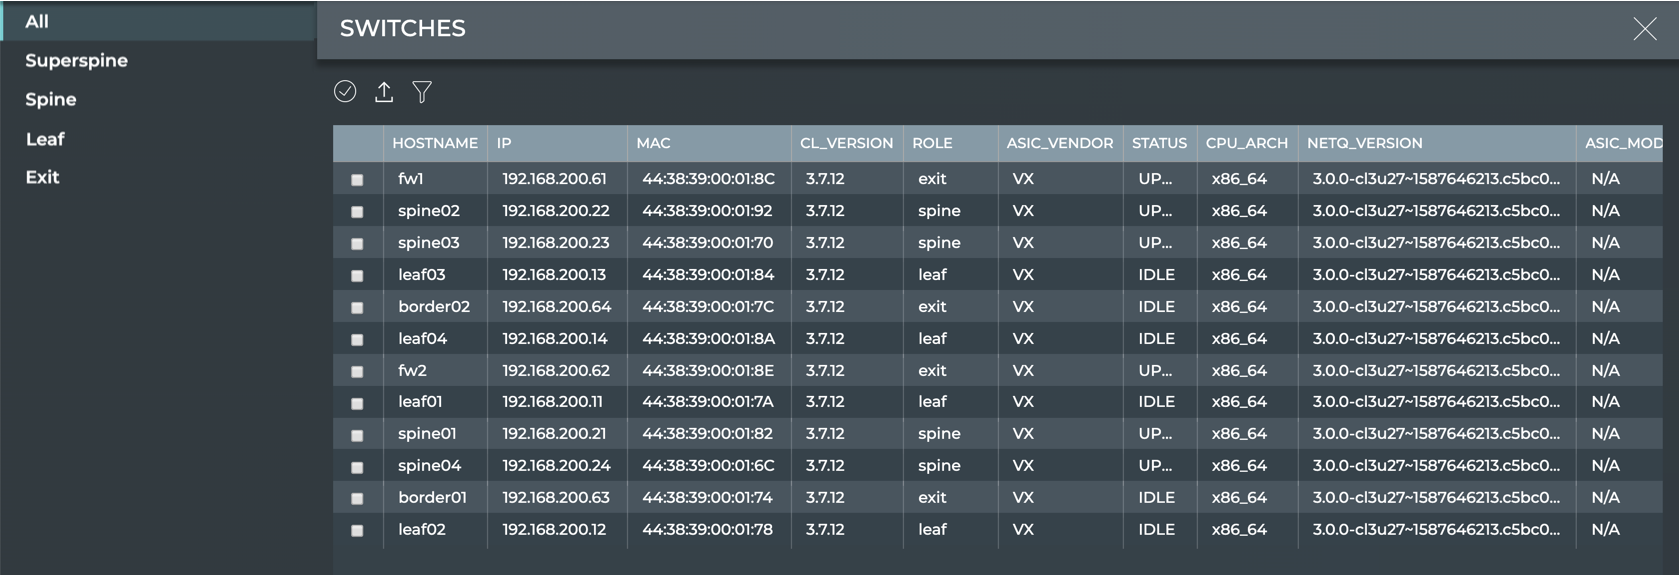
To view a list of all switches known to lifecycle management, click Manage on the Switches card.
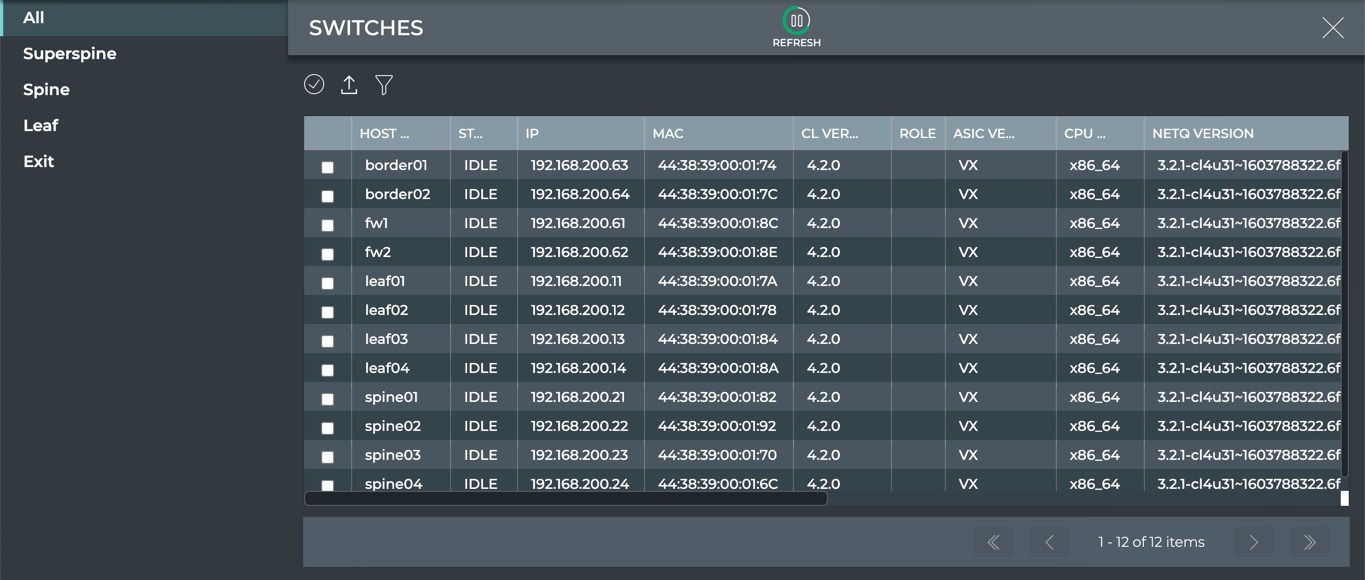
Review the list:
- Sort the list by any column; hover over column title and click to toggle between ascending and descending order
- Filter the list: click
 and enter parameter value of interest
If you have more than one network OS version running on your switches, you can click a version segment on the Switches card graph to open a list of switches pre-filtered by that version.
To view a list of all switches known to lifecycle management, run:
netq lcm show switches [version <text-cumulus-linux-version>] [json]
Use the version option to only show switches with a given network OS version, X.Y.Z.
This example shows all switches known by lifecycle management.
cumulus@switch:~$ netq lcm show switches
Hostname          Role       IP Address                MAC Address        CPU      CL Version           NetQ Version             Last Changed
----------------- ---------- ------------------------- ------------------ -------- -------------------- ------------------------ -------------------------
leaf01            leaf       192.168.200.11            44:38:39:00:01:7A  x86_64   4.1.0                3.2.0-cl4u30~1601410518. Wed Sep 30 21:55:37 2020
                                                                                                        104fb9ed
spine04           spine      192.168.200.24            44:38:39:00:01:6C  x86_64   4.1.0                3.2.0-cl4u30~1601410518. Tue Sep 29 21:25:16 2020
                                                                                                        104fb9ed
leaf03            leaf       192.168.200.13            44:38:39:00:01:84  x86_64   4.1.0                3.2.0-cl4u30~1601410518. Wed Sep 30 21:55:56 2020
                                                                                                        104fb9ed
leaf04            leaf       192.168.200.14            44:38:39:00:01:8A  x86_64   4.1.0                3.2.0-cl4u30~1601410518. Wed Sep 30 21:55:07 2020
                                                                                                        104fb9ed
border02                     192.168.200.64            44:38:39:00:01:7C  x86_64   4.1.0                3.2.0-cl4u30~1601410518. Wed Sep 30 21:56:49 2020
                                                                                                        104fb9ed
border01                     192.168.200.63            44:38:39:00:01:74  x86_64   4.1.0                3.2.0-cl4u30~1601410518. Wed Sep 30 21:56:37 2020
                                                                                                        104fb9ed
fw2                          192.168.200.62            44:38:39:00:01:8E  x86_64   4.1.0                3.2.0-cl4u30~1601410518. Tue Sep 29 21:24:58 2020
                                                                                                        104fb9ed
spine01           spine      192.168.200.21            44:38:39:00:01:82  x86_64   4.1.0                3.2.0-cl4u30~1601410518. Tue Sep 29 21:25:07 2020
                                                                                                        104fb9ed
spine02           spine      192.168.200.22            44:38:39:00:01:92  x86_64   4.1.0                3.2.0-cl4u30~1601410518. Tue Sep 29 21:25:08 2020
                                                                                                        104fb9ed
spine03           spine      192.168.200.23            44:38:39:00:01:70  x86_64   4.1.0                3.2.0-cl4u30~1601410518. Tue Sep 29 21:25:16 2020
                                                                                                        104fb9ed
fw1                          192.168.200.61            44:38:39:00:01:8C  x86_64   4.1.0                3.2.0-cl4u30~1601410518. Tue Sep 29 21:24:58 2020
                                                                                                        104fb9ed
leaf02            leaf       192.168.200.12            44:38:39:00:01:78  x86_64   4.1.0                3.2.0-cl4u30~1601410518. Wed Sep 30 21:55:53 2020
                                                                                                        104fb9ed
This listing is the starting point for network OS upgrades or NetQ installations and upgrades. If the switches you want to upgrade are not present in the list, you can:
- Work with the list you have and add them later
- Verify the missing switches are reachable using
ping - Verify the NetQ Agent is fresh and version 2.4.0 or later for switches that already have the agent installed (click
 , then click Agents or run
 netq show agents) - Install NetQ on the switch (refer to Install NetQ)
- Upgrade any NetQ Agents if needed (refer to Upgrade NetQ Agents for instructions)
Role Management
Four pre-defined switch roles are available based on the Clos architecture: Superspine, Spine, Leaf, and Exit. With this release, you cannot create your own roles.
Switch roles:
- Identify switch dependencies and determine the order in which switches get upgraded
- Determine when to stop the process if a failure occurs
When you assign roles, the upgrade process begins with switches having the superspine role, then continues with the spine switches, leaf switches, exit switches, and finally switches with no role assigned. The upgrade process for all switches with a given role must be successful before upgrading switches with the closest dependent role can begin.
For example, you select a group of seven switches to upgrade. Three are spine switches and four are leaf switches. After you successfully upgrade all the spine switches, then you upgrade all the leaf switches. If one of the spine switches fails to upgrade, NetQ upgrades the other two spine switches, but the upgrade process stops after that, leaving the leaf switches untouched, and the upgrade job fails.
When only some of the selected switches have roles assigned in an upgrade job, NetQ upgrades the switches with roles first, then upgrades all switches with no roles assigned.
While role assignment is optional, using roles can prevent switches from becoming unreachable due to dependencies between switches or single attachments. And when you deploy MLAG pairs, switch roles avoid upgrade conflicts. For these reasons, NVIDIA highly recommends assigning roles to all your switches.
Assign Switch Roles
You can assign roles to one or more switches using the NetQ UI or the NetQ CLI.
Open the LCM dashboard.
On the Switches card, click Manage.
Select one switch or multiple switches to assign to the same role.
Click
 .
.Select the role that applies to the selected switch(es).
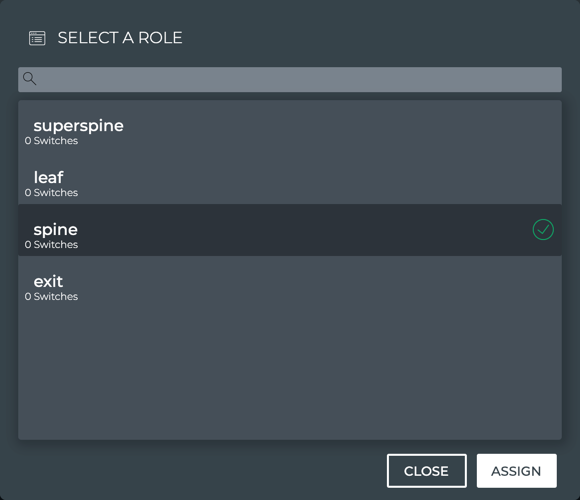
Click Assign.
Note that the Role column is updated with the role assigned to the selected switch(es). To return to the full list of switches, click All.
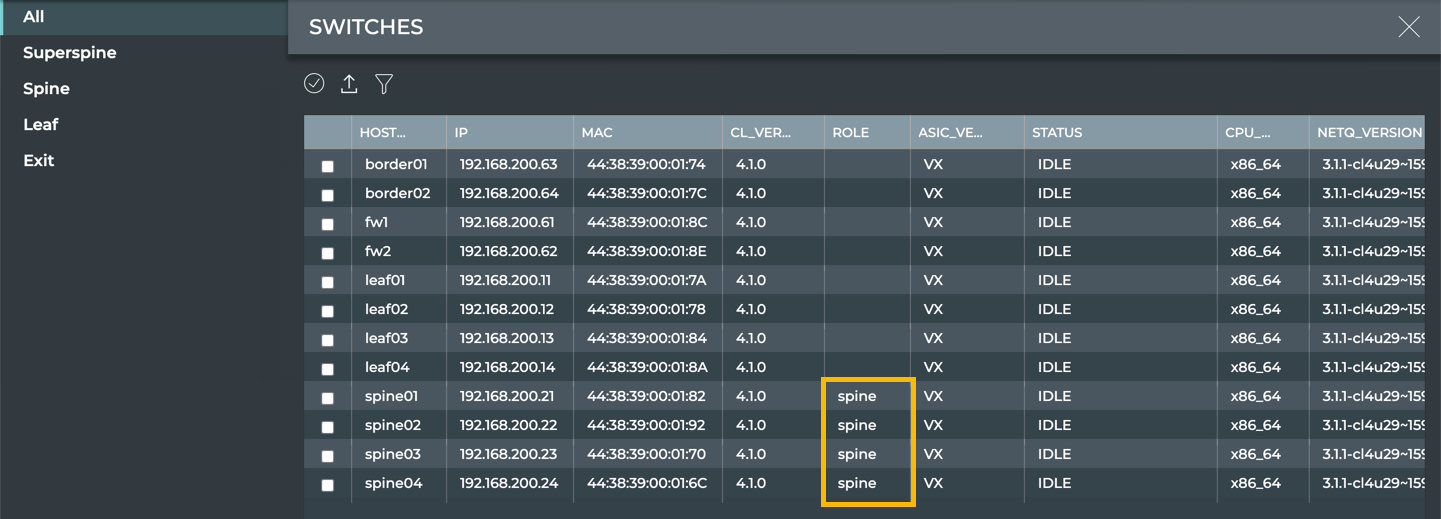
- Continue selecting switches and assigning roles until most or all switches have roles assigned.
A bonus of assigning roles to switches is that you can then filter the list of switches by their roles by clicking the appropriate tab.
To add a role to one or more switches, run:
netq lcm add role (superspine | spine | leaf | exit) switches <text-switch-hostnames>
For a single switch, run:
netq lcm add role leaf switches leaf01
To assign multiple switches to the same role, separate the hostnames with commas (no spaces). This example configures leaf01 through leaf04 switches with the leaf role:
netq lcm add role leaf switches leaf01,leaf02,leaf03,leaf04
View Switch Roles
You can view the roles assigned to the switches in the LCM inventory at any time.
Open the LCM dashboard.
On the Switches card, click Manage.
The assigned role appears in the Role column of the listing.
To view all switch roles, run:
netq lcm show switches [version <text-cumulus-linux-version>] [json]
Use the version option to only show switches with a given network OS version, X.Y.Z.
This example shows the role of all switches in the Role column of the listing.
cumulus@switch:~$ netq lcm show switches
Hostname          Role       IP Address                MAC Address        CPU      CL Version           NetQ Version             Last Changed
----------------- ---------- ------------------------- ------------------ -------- -------------------- ------------------------ -------------------------
leaf01            leaf       192.168.200.11            44:38:39:00:01:7A  x86_64   4.1.0                3.2.0-cl4u30~1601410518. Wed Sep 30 21:55:37 2020
                                                                                                        104fb9ed
spine04           spine      192.168.200.24            44:38:39:00:01:6C  x86_64   4.1.0                3.2.0-cl4u30~1601410518. Tue Sep 29 21:25:16 2020
                                                                                                        104fb9ed
leaf03            leaf       192.168.200.13            44:38:39:00:01:84  x86_64   4.1.0                3.2.0-cl4u30~1601410518. Wed Sep 30 21:55:56 2020
                                                                                                        104fb9ed
leaf04            leaf       192.168.200.14            44:38:39:00:01:8A  x86_64   4.1.0                3.2.0-cl4u30~1601410518. Wed Sep 30 21:55:07 2020
                                                                                                        104fb9ed
border02                     192.168.200.64            44:38:39:00:01:7C  x86_64   4.1.0                3.2.0-cl4u30~1601410518. Wed Sep 30 21:56:49 2020
                                                                                                        104fb9ed
border01                     192.168.200.63            44:38:39:00:01:74  x86_64   4.1.0                3.2.0-cl4u30~1601410518. Wed Sep 30 21:56:37 2020
                                                                                                        104fb9ed
fw2                          192.168.200.62            44:38:39:00:01:8E  x86_64   4.1.0                3.2.0-cl4u30~1601410518. Tue Sep 29 21:24:58 2020
                                                                                                        104fb9ed
spine01           spine      192.168.200.21            44:38:39:00:01:82  x86_64   4.1.0                3.2.0-cl4u30~1601410518. Tue Sep 29 21:25:07 2020
                                                                                                        104fb9ed
spine02           spine      192.168.200.22            44:38:39:00:01:92  x86_64   4.1.0                3.2.0-cl4u30~1601410518. Tue Sep 29 21:25:08 2020
                                                                                                        104fb9ed
spine03           spine      192.168.200.23            44:38:39:00:01:70  x86_64   4.1.0                3.2.0-cl4u30~1601410518. Tue Sep 29 21:25:16 2020
                                                                                                        104fb9ed
fw1                          192.168.200.61            44:38:39:00:01:8C  x86_64   4.1.0                3.2.0-cl4u30~1601410518. Tue Sep 29 21:24:58 2020
                                                                                                        104fb9ed
leaf02            leaf       192.168.200.12            44:38:39:00:01:78  x86_64   4.1.0                3.2.0-cl4u30~1601410518. Wed Sep 30 21:55:53 2020
                                                                                                        104fb9ed
Change the Role of a Switch
If you accidentally assign an incorrect role to a switch, you can easily change it to the correct role.
To change a switch role:
Open the LCM dashboard.
On the Switches card, click Manage.
Select the switches with the incorrect role from the list.
Click
.Select the correct role. (Note that you can select No Role here as well to remove the role from the switches.)
Click Assign.
You use the same command to assign a role as you use to change the role.
For a single switch, run:
netq lcm add role exit switches border01
To assign multiple switches to the same role, separate the hostnames with commas (no spaces). For example:
cumulus@switch:~$ netq lcm add role exit switches border01,border02
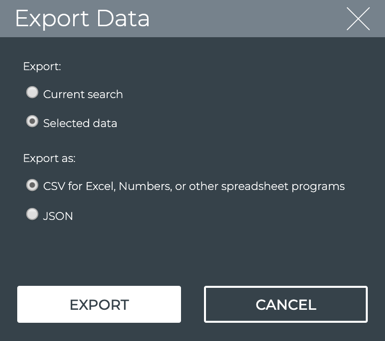
Export List of Switches
Using the Switch Management feature you can export a listing of all or a selected set of switches.
To export the switch listing:
Open the LCM dashboard.
On the Switches card, click Manage.
Select one or more switches, filtering as needed, or select all switches (click
 ).
).Click
 .
.Choose the export file type and click Export.
Use the json option with the netq lcm show switches command to output a list of all switches in the LCM repository. Alternately, output only switches running a particular network OS version by including the version option.
cumulus@switch:~$ netq lcm show switches json

cumulus@switch:~$ netq lcm show switches version 3.7.11 json