Post Installation Configuration Options
This topic describes how to configure deployment options that you can perform only after you finish installing or upgrading NetQ.
Install a Custom Signed Certificate
The NetQ UI ships with a self-signed certificate that is sufficient for non-production environments or cloud deployments. For on-premises deployments, however, you receive a warning from your browser that this default certificate is not trusted when you first log in to the NetQ UI. You can avoid this by installing your own signed certificate.
You need the following items to perform the certificate installation:
A valid X509 certificate.
A private key file for the certificate.
A DNS record name configured to access the NetQ UI.
The FQDN should match the common name of the certificate. If you use a wild card in the common name — for example, if the common name of the certificate is *.example.com — then the NetQ telemetry server should reside on a subdomain of that domain, accessible via a URL like netq.example.com.
NetQ is running.
You can verify this by running the
netq show opta-healthcommand.
You can install a certificate using the Admin UI or the NetQ CLI.
Enter https://<hostname-or-ipaddr-of-netq-appliance-or-vm>:8443 in your browser address bar to open the Admin UI.
From the Health page, click Settings.
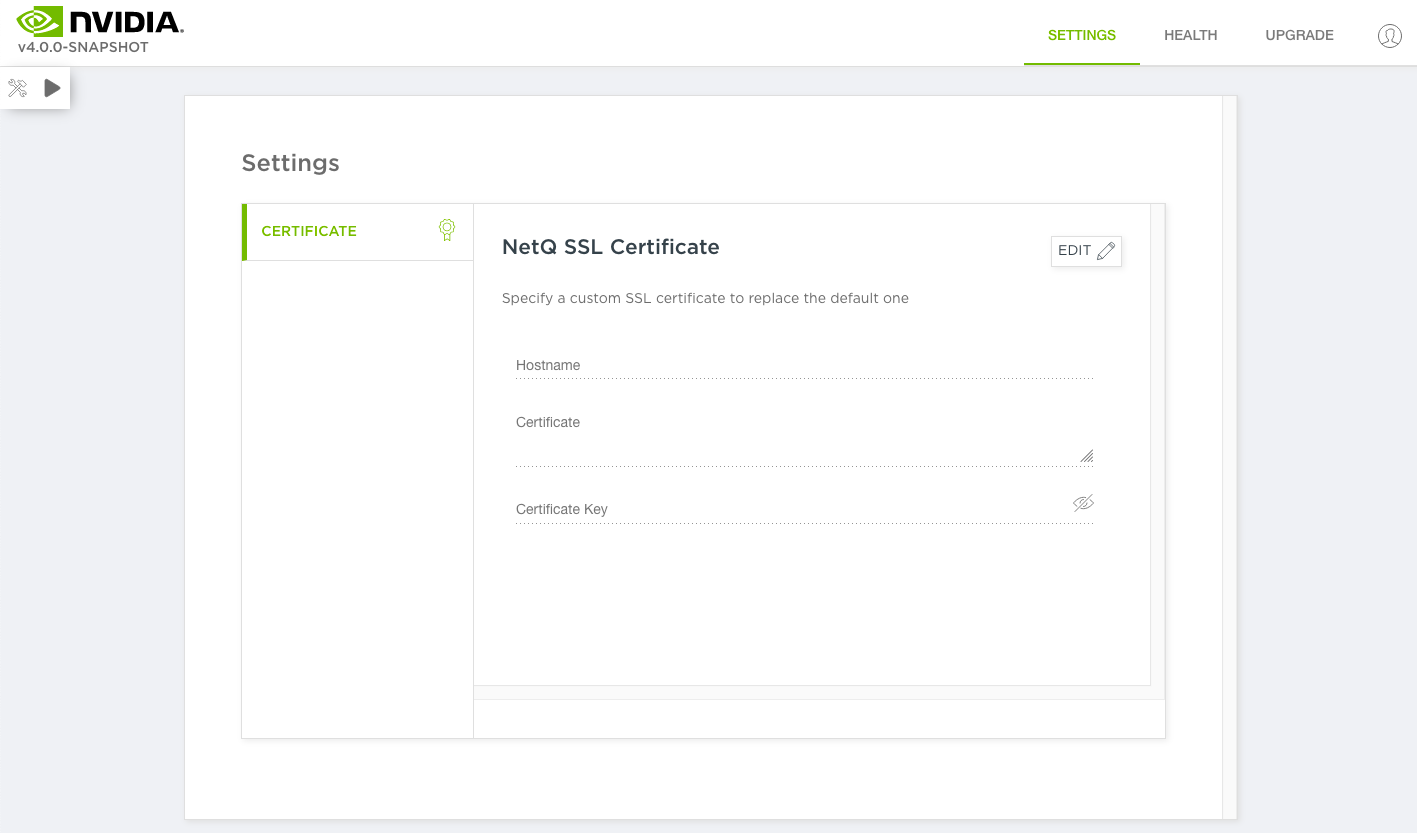
Click Edit.
Enter the hostname, certificate and certificate key in the relevant fields.
Click Lock.
Log in to the NetQ On-premises Appliance or VM via SSH and copy your certificate and key file there.
Generate a Kubernetes secret called
netq-gui-ingress-tls.cumulus@netq-ts:~$ kubectl create secret tls netq-gui-ingress-tls \ --namespace default \ --key <name of your key file>.key \ --cert <name of your cert file>.crtVerify that you created the secret successfully.
cumulus@netq-ts:~$ kubectl get secret

NAME                               TYPE                                  DATA   AGE
netq-gui-ingress-tls               kubernetes.io/tls                     2      5s
Update the ingress rule file to install self-signed certificates.
Create a new file called
ingress.yaml.Copy and add this content to the file.
apiVersion: extensions/v1beta1
kind: Ingress
metadata:
  annotations:
    kubernetes.io/ingress.class: "ingress-nginx"
    nginx.ingress.kubernetes.io/ssl-passthrough: "true"
    nginx.ingress.kubernetes.io/ssl-redirect: "true"
    nginx.ingress.kubernetes.io/backend-protocol: "HTTPS"
    nginx.ingress.kubernetes.io/proxy-connect-timeout: "3600"
    nginx.ingress.kubernetes.io/proxy-read-timeout: "3600"
    nginx.ingress.kubernetes.io/proxy-send-timeout: "3600"
    nginx.ingress.kubernetes.io/proxy-body-size: 10g
    nginx.ingress.kubernetes.io/proxy-request-buffering: "off"
  name: netq-gui-ingress-external
  namespace: default
spec:
  rules:
  - host: <your-hostname>
    http:
      paths:
      - backend:
          serviceName: netq-gui
          servicePort: 80
  tls:
  - hosts:
    - <your-hostname>
    secretName: netq-gui-ingress-tls
Replace
<your-hostname>with the FQDN of the NetQ On-premises Appliance or VM.
Apply the new rule.
cumulus@netq-ts:~$ kubectl apply -f ingress.yaml
ingress.extensions/netq-gui-ingress-external configured
A message like the one here appears if your ingress rule is successfully configured.
Your custom certificate should now be working. Verify this by opening the NetQ UI at https://<your-hostname-or-ipaddr> in your browser.
Update Your Cloud Activation Key
You use the cloud activation key (called the config-key) to access the cloud services, not the authorization keys you use for configuring the CLI. NVIDIA provides the key when you set up your premises.
On occasion, you might want to update your cloud service activation key. For example, if you mistyped the key during installation and now your existing key does not work, or you received a new key for your premises from NVIDIA.
Update the activation key using the Admin UI or NetQ CLI:
Open the Admin UI by entering https://<master-hostname-or-ipaddress>:8443 in your browser address field.
Click Settings.
Click Activation.
Click Edit.
Enter your new configuration key in the designated entry field.
Click Apply.
Run the following command on your standalone or master NetQ Cloud Appliance or VM replacing text-opta-key with your new key.
cumulus@<hostname>:~$ netq install standalone activate-job config-key <text-opta-key>
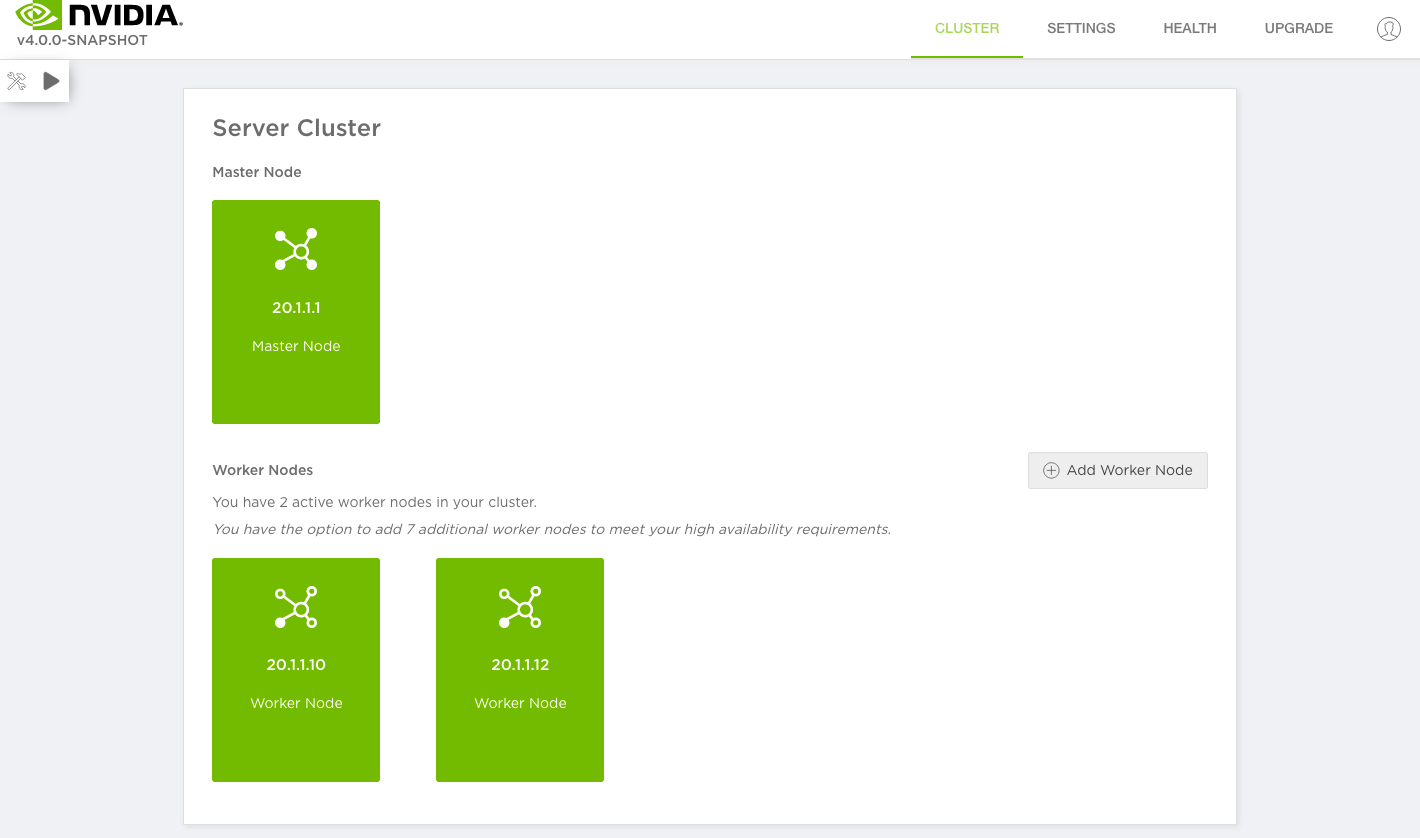
Add More Nodes to Your Server Cluster
Installation of NetQ with a server cluster sets up the master and two worker nodes. To expand your cluster to include up to a total of 10 nodes, use the Admin UI.
To add more worker nodes:
Prepare the nodes. Refer to the relevant server cluster instructions in Install the NetQ System.
Open the Admin UI by entering https://<master-hostname-or-ipaddress>:8443 in your browser address field.
This opens the Health dashboard for NetQ.
Click Cluster to view your current configuration.
On-premises deployment
This opens the Cluster dashboard, with the details about each node in the cluster.
Click Add Worker Node.
Enter the private IP address of the node you want to add.
Click Add.
Monitor the progress of the three jobs by clicking
 next to the jobs.
On completion, a card for the new node is added to the Cluster dashboard.
If the addition fails for any reason, download the log file by clicking
 , run
, run netq bootstrap reseton this new worker node, and then try again.Repeat this process to add more worker nodes as needed.