Upgrade NetQ Appliances and Virtual Machines
The first step in upgrading your NetQ installation to NetQ 4.1 is to upgrade your NetQ appliances or VMs. This topic describes how to upgrade this for both on-premises and remote deployments.
Prepare for Upgrade
You must complete the following three important steps to prepare to upgrade your NetQ Platform:
- Download the necessary software tarballs
- Update the Debian packages on physical server and VMs
- For Cloud VM deployments, increase the root volume disk image size
Optionally, you can choose to back up your NetQ Data before performing the upgrade.
To complete the preparation:
For on-premises deployments only, optionally back up your NetQ data. Refer to Back Up and Restore NetQ.
Download the relevant software.
- On the NVIDIA Application Hub, log in to your account.
- Select NVIDIA Licensing Portal.
- Select Software Downloads from the menu.
- Click Product Family and select NetQ.
- Select the relevant software for your hypervisor:
If you are upgrading NetQ Platform software for a NetQ On-premises Appliance or VM, select NetQ SW 4.1 Appliance to download the NetQ-4.1.0.tgz file. If you are upgrading NetQ software for a NetQ Cloud Appliance or VM, select NetQ SW 4.1 Appliance Cloud to download the NetQ-4.1.0-opta.tgz file.
- If prompted, agree to the license agreement and proceed with the download.
For enterprise customers, if you do not see a link to the NVIDIA Licensing Portal on the NVIDIA Application Hub, contact NVIDIA support.
For NVIDIA employees, download NetQ directly from the NVIDIA Licensing Portal.
- On the NVIDIA Application Hub, log in to your account.
Copy the file to the
/mnt/installables/directory on your appliance or VM.Update
/etc/apt/sources.list.d/cumulus-netq.listto netq-4.1 as follows:cat /etc/apt/sources.list.d/cumulus-netq.list deb [arch=amd64] https://apps3.cumulusnetworks.com/repos/deb bionic netq-4.1Update the NetQ
debianpackages.cumulus@<hostname>:~$ sudo apt-get update Get:1 https://apps3.cumulusnetworks.com/repos/deb bionic InRelease [13.8 kB] Get:2 https://apps3.cumulusnetworks.com/repos/deb bionic/netq-4.1 amd64 Packages [758 B] Hit:3 http://archive.ubuntu.com/ubuntu bionic InRelease Get:4 http://security.ubuntu.com/ubuntu bionic-security InRelease [88.7 kB] Get:5 http://archive.ubuntu.com/ubuntu bionic-updates InRelease [88.7 kB] ... Get:24 http://archive.ubuntu.com/ubuntu bionic-backports/universe Translation-en [1900 B] Fetched 4651 kB in 3s (1605 kB/s) Reading package lists... Donecumulus@<hostname>:~$ sudo apt-get install -y netq-agent netq-apps Reading package lists... Done Building dependency tree Reading state information... Done ... The following NEW packages will be installed: netq-agent netq-apps ... Fetched 39.8 MB in 3s (13.5 MB/s) ... Unpacking netq-agent (4.1.0-ub18.04u33~1621860085.c5a5d7e) ... ... Unpacking netq-apps (4.1.0-ub18.04u33~1621860085.c5a5d7e) ... Setting up netq-apps (4.1.0-ub18.04u33~1621860085.c5a5d7e) ... Setting up netq-agent (4.1.0-ub18.04u33~1621860085.c5a5d7e) ... Processing triggers for rsyslog (8.32.0-1ubuntu4) ... Processing triggers for man-db (2.8.3-2ubuntu0.1) ...
If upgrading from version 3.1.0 or earlier
If you are upgrading NetQ as a VM in the cloud from version 3.1.0 or earlier, you must increase the root volume disk image size for proper operation of the lifecycle management feature.Check the size of the existing disk in the VM to confirm it is 32 GB. In this example, the number of 1 MB blocks is 31583, or 32 GB.
cumulus@netq-310-cloud:~$ df -hm /
Filesystem     1M-blocks  Used Available Use% Mounted on
/dev/sda1          31583  4771     26797  16% /
Shutdown the VM.
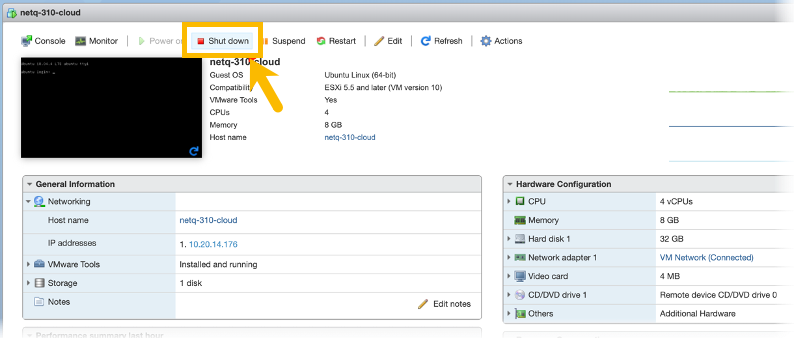
Shutting down VMware VM using Shut down button in ESX
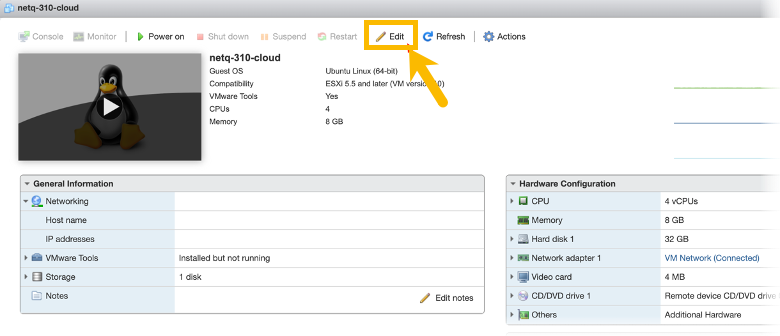
- After the VM is shutdown (Shut down button is grayed out), click Edit.
- In the Edit settings > Virtual Hardware > Hard disk field, change the 32 to 64 on the server hosting the VM.
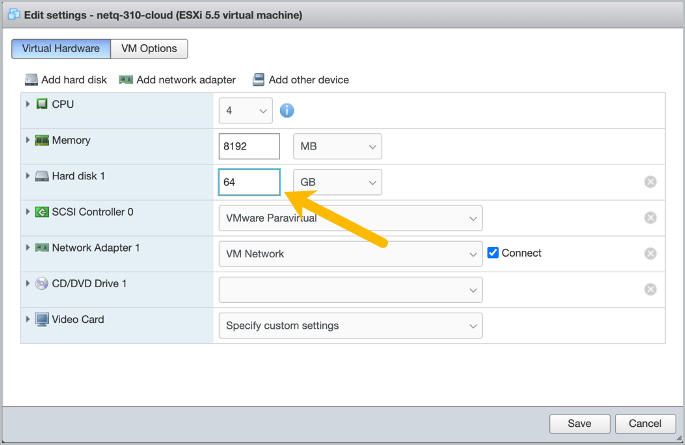
Click Save.
Start the VM, log back in.
From step 1 we know the name of the root disk is /dev/sda1. Use that to run the following commands on the partition.
cumulus@netq-310-cloud:~$ sudo growpart /dev/sda 1
CHANGED: partition=1 start=227328 old: size=66881503 end=67108831 new: size=133990367,end=134217695

cumulus@netq-310-cloud:~$ sudo resize2fs /dev/sda1
resize2fs 1.44.1 (24-Mar-2018)
Filesystem at /dev/sda1 is mounted on /; on-line resizing required
old_desc_blocks = 4, new_desc_blocks = 8
The filesystem on /dev/sda1 is now 16748795 (4k) blocks long.
Verify the disk is now configured with 64 GB. In this example, the number of 1 MB blocks is now 63341, or 64 GB.
cumulus@netq-310-cloud:~$ df -hm /
Filesystem     1M-blocks  Used Available Use% Mounted on
/dev/sda1          63341  4772     58554   8% /
Check the size of the existing hard disk in the VM to confirm it is 32 GB. In this example, the number of 1 MB blocks is 31583, or 32 GB.
cumulus@netq-310-cloud:~$ df -hm /
Filesystem     1M-blocks  Used Available Use% Mounted on
/dev/vda1          31583  1192     30375   4% /
Shutdown the VM.
Check the size of the existing disk on the server hosting the VM to confirm it is 32 GB. In this example, the size appears in the virtual size field.
root@server:/var/lib/libvirt/images# qemu-img info netq-3.1.0-ubuntu-18.04-tscloud-qemu.qcow2
image: netq-3.1.0-ubuntu-18.04-tscloud-qemu.qcow2
file format: qcow2
virtual size: 32G (34359738368 bytes)
disk size: 1.3G
cluster_size: 65536
Format specific information:
    compat: 1.1
    lazy refcounts: false
    refcount bits: 16
    corrupt: false
Add 32 GB to the image.
root@server:/var/lib/libvirt/images# qemu-img resize netq-3.1.0-ubuntu-18.04-tscloud-qemu.qcow2 +32G
Image resized.
Verify the change.
root@server:/var/lib/libvirt/images# qemu-img info netq-3.1.0-ubuntu-18.04-tscloud-qemu.qcow2
image: netq-3.1.0-ubuntu-18.04-tscloud-qemu.qcow2
file format: qcow2
virtual size: 64G (68719476736 bytes)
disk size: 1.3G
cluster_size: 65536
Format specific information:
    compat: 1.1
    lazy refcounts: false
    refcount bits: 16
    corrupt: false
Start the VM and log back in.
From step 1 you know the name of the root disk is /dev/vda 1. Use that to run the following commands on the partition.
cumulus@netq-310-cloud:~$ sudo growpart /dev/vda 1
CHANGED: partition=1 start=227328 old: size=66881503 end=67108831 new: size=133990367,end=134217695

cumulus@netq-310-cloud:~$ sudo resize2fs /dev/vda1
resize2fs 1.44.1 (24-Mar-2018)
Filesystem at /dev/vda1 is mounted on /; on-line resizing required
old_desc_blocks = 4, new_desc_blocks = 8
The filesystem on /dev/vda1 is now 16748795 (4k) blocks long.
Verify the disk is now configured with 64 GB. In this example, the number of 1 MB blocks is now 63341, or 64 GB.
cumulus@netq-310-cloud:~$ df -hm /
Filesystem     1M-blocks  Used Available Use% Mounted on
/dev/vda1          63341  1193     62132   2% /
You can now upgrade your appliance using the NetQ Admin UI, in the next section. Alternately, you can upgrade using the CLI here: Upgrade Your Platform Using the NetQ CLI.
Run the Upgrade
Verify the following items before upgrading NetQ. For cluster deployments, verify steps 1 and 3 on all nodes in the cluster:
- Check if enough disk space is available before you proceed with the upgrade:
cumulus@netq-appliance:~$ df -h /
Filesystem      Size  Used Avail Use% Mounted on
/dev/sda1       248G   70G  179G  28% /
cumulus@netq-appliance:~$
The recommended Use% to proceed with installation is under 70%.
You can delete previous software tarballs in the /mnt/installables/ directory to regain some space.
If you can not bring disk space to under 70% usage, contact the NVIDIA support team.
Run the
netq show opta-healthcommand and check that all pods are in theREADYstate. If not, contact the NVIDIA support team.If you are upgrading from NetQ 4.0.1 or previous verisons, check if the certificates have expired:
cumulus@netq-appliance:~$ sudo grep client-certificate-data /etc/kubernetes/kubelet.conf | cut -d: -f2 | xargs | base64 -d | openssl x509 -dates -noout | grep notAfter | cut -f2 -d=
Dec 18 17:53:16 2021 GMT
cumulus@netq-appliance:~$
If the date in the above output is in the past, run the following commands before proceeding with the upgrade:
sudo cp /etc/kubernetes/kubelet.conf /etc/kubernetes/kubelet.conf.bak
sudo sed -i 's/client-certificate-data.*/client-certificate: \/var\/lib\/kubelet\/pki\/kubelet-client-current.pem/g' /etc/kubernetes/kubelet.conf
sudo sed -i 's/client-key.*/client-key: \/var\/lib\/kubelet\/pki\/kubelet-client-current.pem/g' /etc/kubernetes/kubelet.conf
sudo systemctl restart kubelet
Check if the kubelet process is running with the sudo systemctl status kubelet command before proceeding with the upgrade.
If any issue occurs, contact the NVIDIA Support team.
You can upgrade the NetQ platform in one of two ways:
- Using the
netq upgradeCLI command, which works with any supported older versions - Using the NetQ Admin UI, which works only if you are upgrading from version 3.1.1 or later
Upgrade Using the NetQ CLI
After completing the preparation steps, upgrading your NetQ On-premises, Cloud Appliances or VMs is simple using the NetQ CLI.
To upgrade your NetQ software:
- Run the appropriate
netq upgradecommand.
netq upgrade bundle /mnt/installables/NetQ-4.1.0.tgz
netq upgrade bundle /mnt/installables/NetQ-4.1.0-opta.tgz
After the upgrade completes, confirm the upgrade was successful.
cumulus@<hostname>:~$ cat /etc/app-release
BOOTSTRAP_VERSION=4.1.0
APPLIANCE_MANIFEST_HASH=85575c98a3
APPLIANCE_VERSION=4.1.0
Upgrade Using the NetQ Admin UI
If you are upgrading from NetQ 3.1.1 or later, after completing the preparation steps, upgrading your NetQ On-premises or Cloud Appliances or VMs is simple using the Admin UI.
To upgrade your NetQ software:
Run the bootstrap CLI to upgrade the Admin UI application.
cumulus@<hostname>:~$ netq bootstrap master upgrade /mnt/installables/NetQ-4.1.0.tgz 2020-04-28 15:39:37.016710: master-node-installer: Extracting tarball /mnt/installables/NetQ-4.1.0.tgz 2020-04-28 15:44:48.188658: master-node-installer: Upgrading NetQ Admin container 2020-04-28 15:47:35.667579: master-node-installer: Removing old images ----------------------------------------------- Successfully bootstrap-upgraded the master nodenetq bootstrap master upgrade /mnt/installables/NetQ-4.1.0-opta.tgzOpen the Admin UI by entering http://<hostname-or-ipaddress>:8443 in your browser address field.
Enter your NetQ credentials to enter the application.
The default username is admin and the default password in admin.
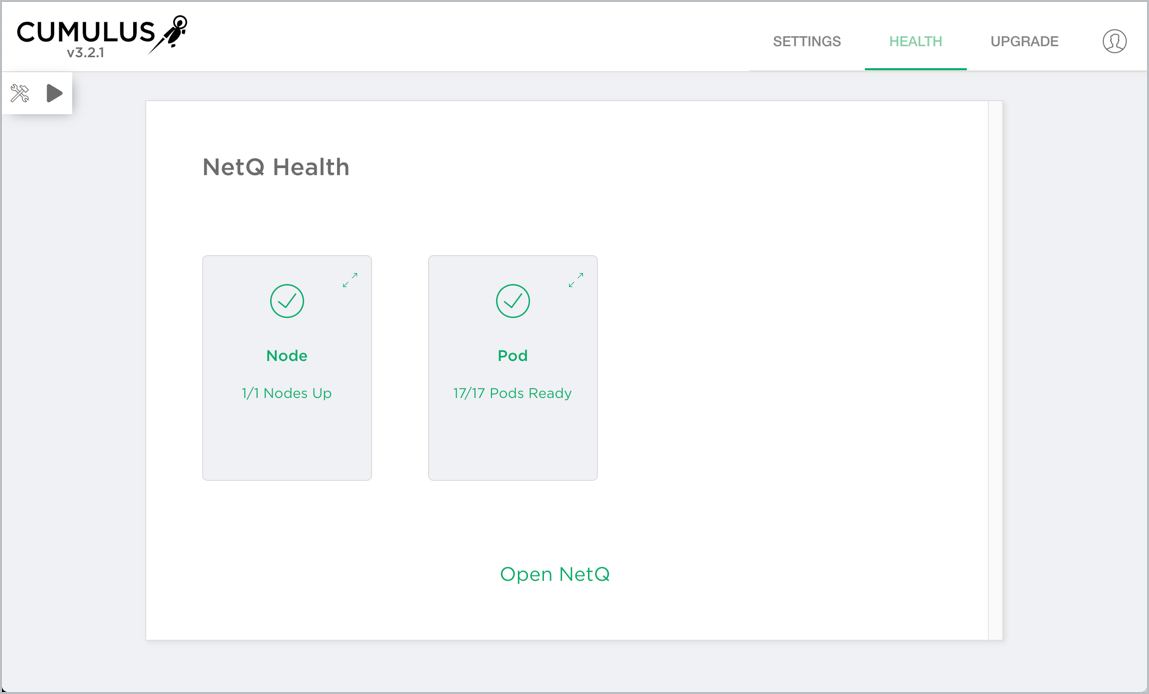
On-premises deployment
Remote (cloud) deployment
Click Upgrade in the upper right corner.
Enter NetQ-4.1.0.tgz or NetQ-4.1.0-opta.tgz and click
 .
.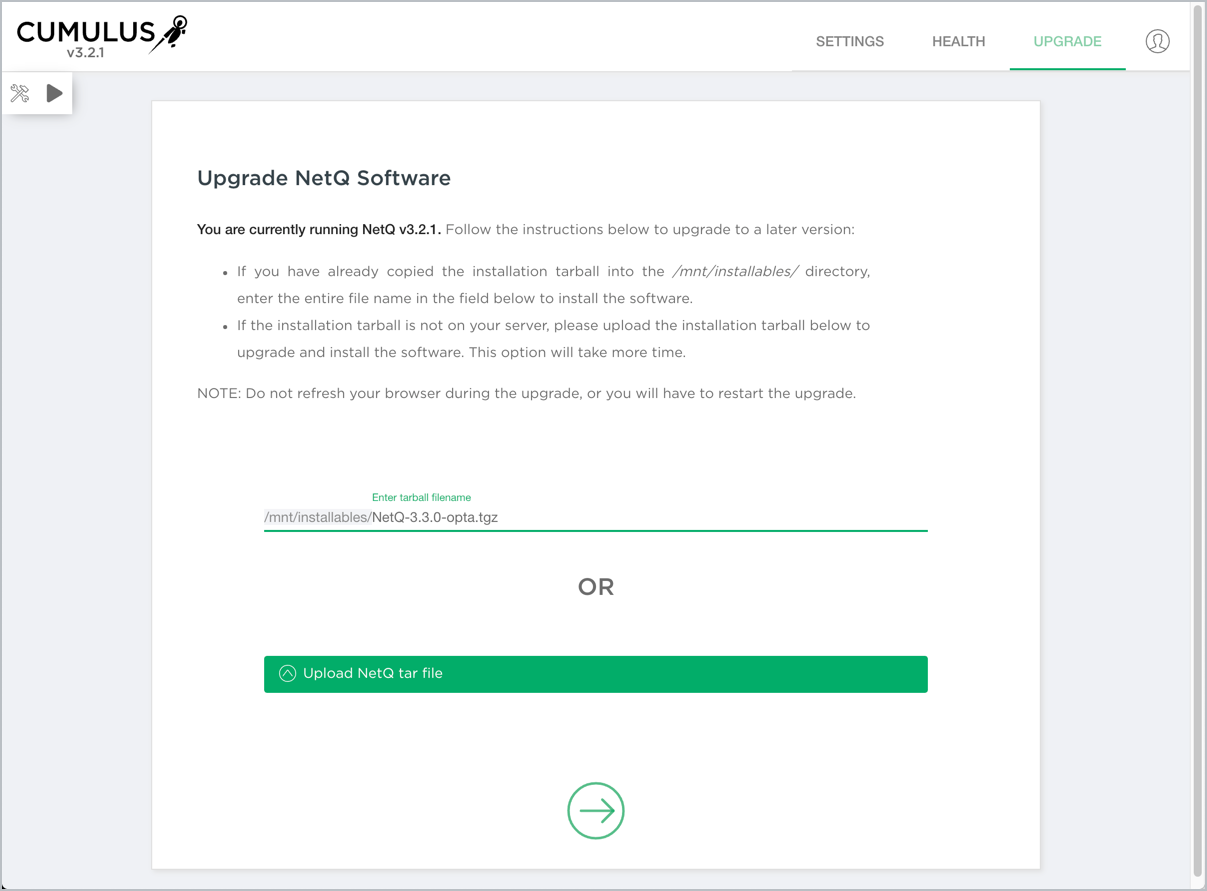
The
is only visible after you enter your tar file information.Monitor the progress. Click
 to monitor each step in the jobs.
The following example is for an on-premises upgrade. The jobs for a cloud upgrade are slightly different.
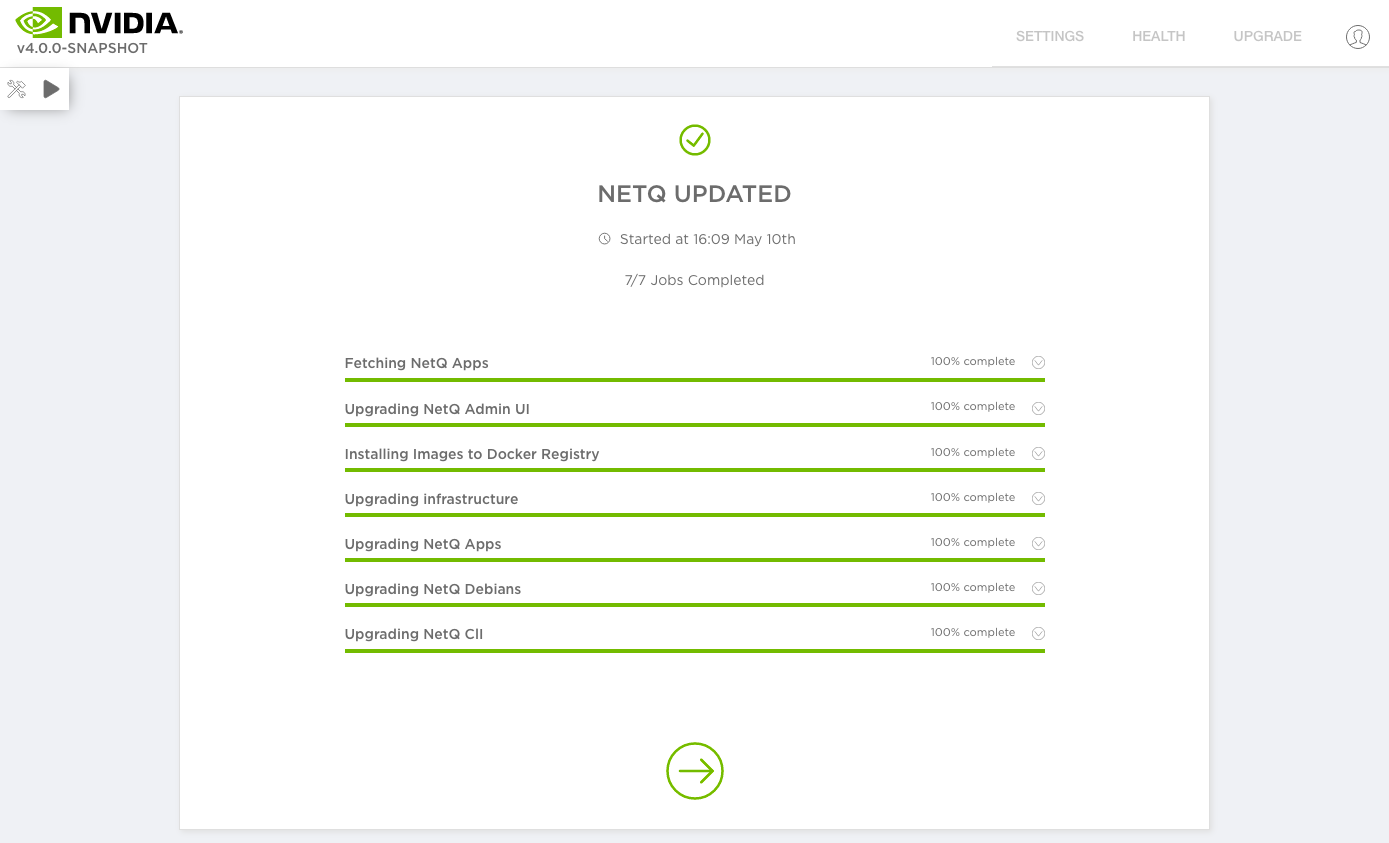
When it completes, click
to be returned to the Health dashboard.