Validate Network Protocol and Service Operations
In addition to the hourly validation checks that run by default, NetQ lets you validate the operation of the protocols and services running in your network either on-demand or according to a schedule. Both types can be customized to include or exclude particular tests or devices.
On-demand validations allow you to validate the operation of one or more network protocols and services right now.
Scheduled validations allow you to run validations according to a schedule. You can create and schedule up to 15 custom validation checks. The hourly, default validation checks do not count towards this limit.
Create a Validation
Using the NetQ UI, you can create an on-demand or scheduled validations for multiple protocols or services at the same time. This is handy when the protocols are strongly related regarding a possible issue or if you only want to create one validation request.
To create a validation in the UI:
In the workbench header, select
 Validation, then Create a validation. Choose whether the validation should run on all devices or on a group of devices.
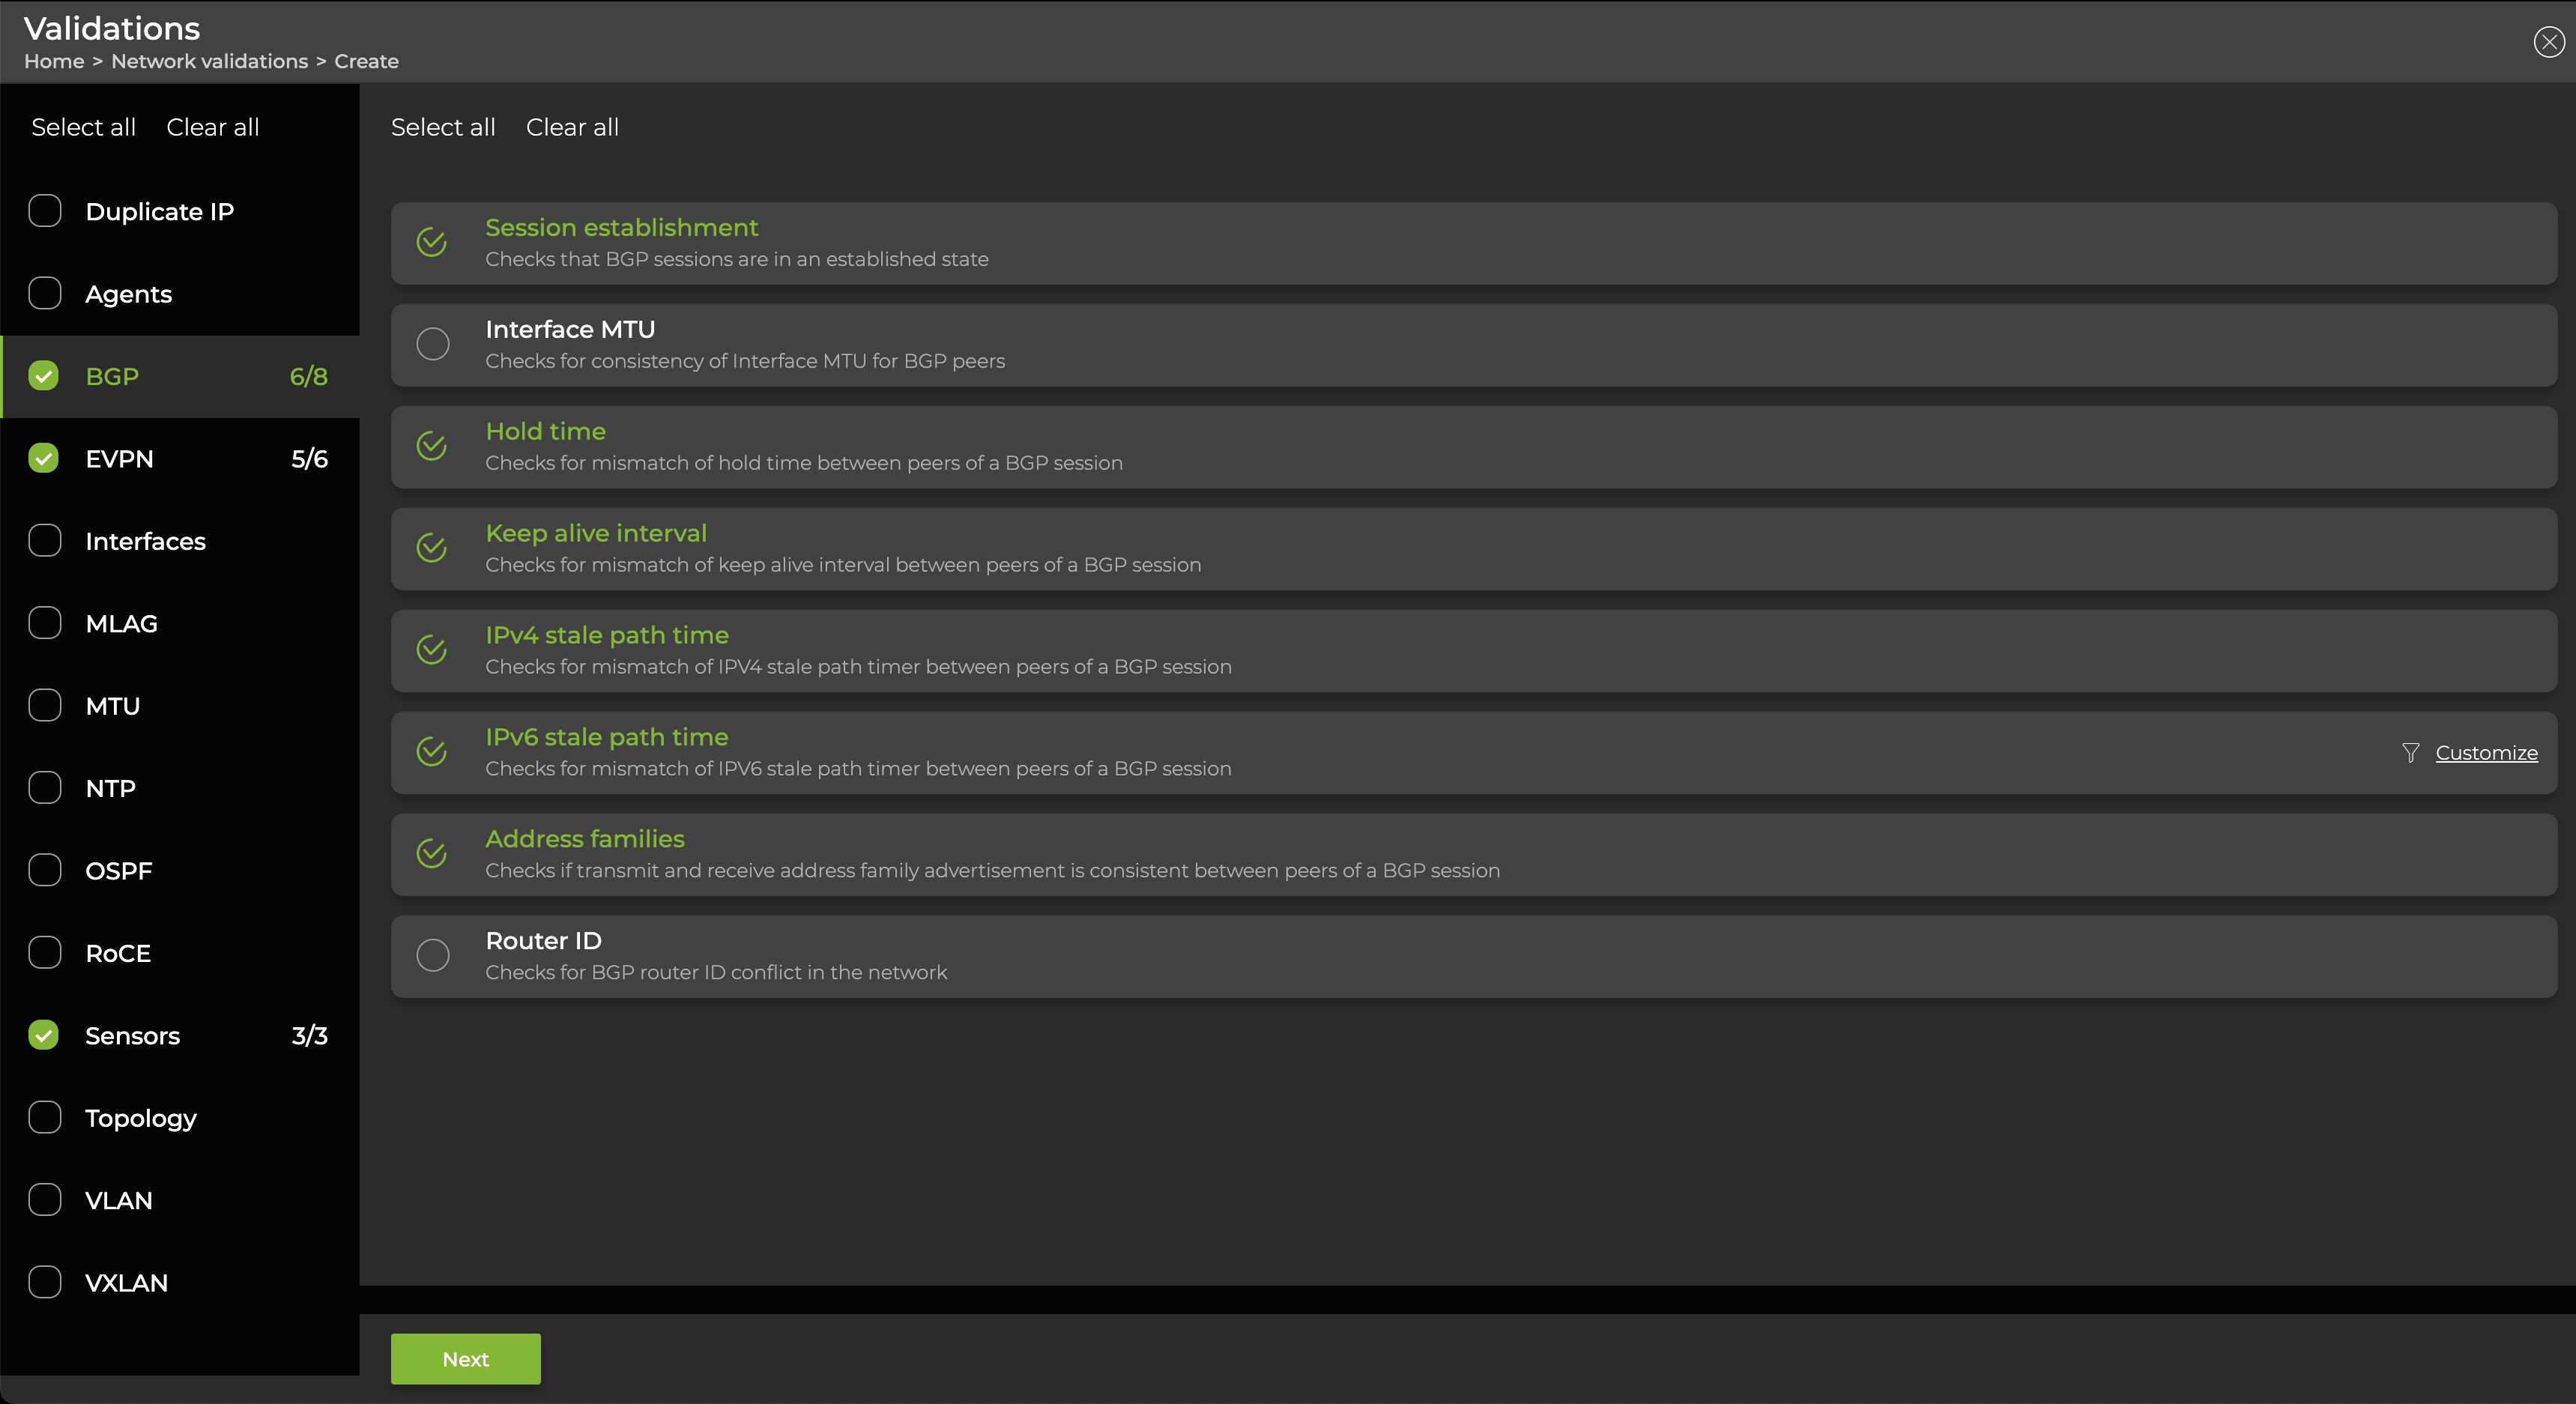
Select the protocols or services you want to include as part of the validation. All tests that comprise the validation are included by default, but you can select an individual test to exclude it from the validation check. Hover over an individual test and select Customize to configure filters which can exclude individual devices or failure reasons from the validation. Then click Next.
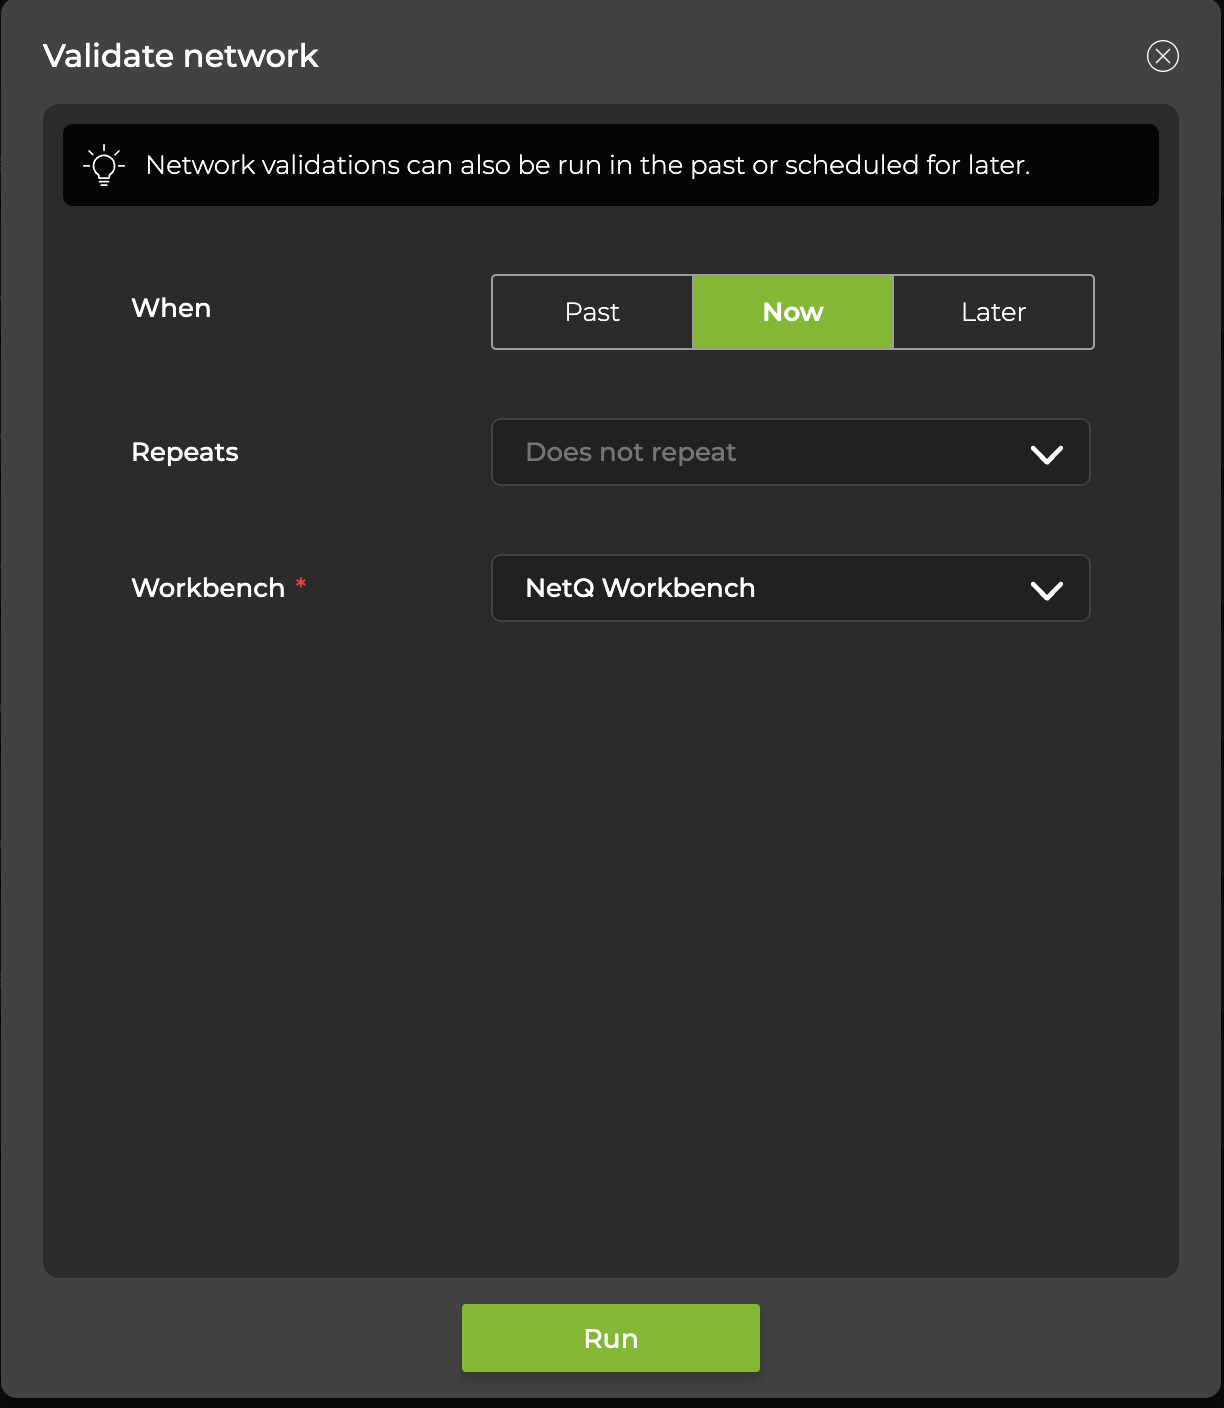
- Select the time and frequency parameters and specify the workbench where the validation results should appear. Then select Run or Schedule.
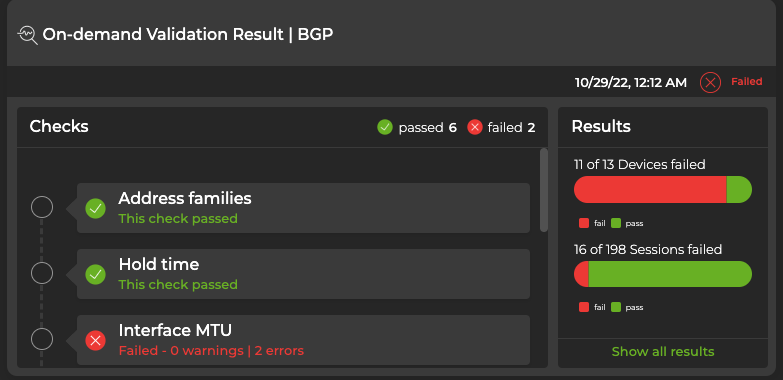
- If you chose to run the validation now, the results are displayed on the workbench you specified in the previous step. If you selected more than one protocol or service, a card opens for each selection. To view additional information about the errors reported, hover over a check and click View details. To view all data for all on-demand validation results for a given protocol, click Show all results.
If you scheduled the validation to run later, NetQ will display a dashboard containing all existing validation checks, including the one you just created. If you want to run a validation you scheduled for later right now, in the header select ![]() Validation, then Existing validations. Select one or more validations, then click View results. The associated Validation Result cards open on your workbench.
Validation, then Existing validations. Select one or more validations, then click View results. The associated Validation Result cards open on your workbench.
To view the list of tests for a given protocol or service, use either netq show unit-tests.
To run on-demand validations use the netq check commands.
You can include or exclude one or more of the various tests performed during the validation by including or excluding the test's number. The check command’s <protocol-number-range-list> value is used with the include and exclude options to indicate which tests to include. It is a number list separated by commas, or a range using a dash, or a combination of these. Do not use spaces after commas. For example:
- include 1,3,5
- include 1-5
- include 1,3-5
- exclude 6,7
- exclude 6-7
- exclude 3,4-7,9
You can create filters that suppress validation failures based on hostnames, failure reason, and other parameters with the netq add check filter command.
The following example displays a list of all the checks included in a BGP validation, along with their respective test numbers and filters, if any:
cumulus@switch:~$ netq show unit-tests bgp
   0 : Session Establishment     - check if BGP session is in established state
   1 : Address Families          - check if tx and rx address family advertisement is consistent between peers of a BGP session
   2 : Router ID                 - check for BGP router id conflict in the network
   3 : Hold Time                 - check for mismatch of hold time between peers of a BGP session
   4 : Keep Alive Interval       - check for mismatch of keep alive interval between peers of a BGP session
   5 : Ipv4 Stale Path Time      - check for mismatch of ipv4 stale path timer between peers of a BGP session
   6 : Ipv6 Stale Path Time      - check for mismatch of ipv6 stale path timer between peers of a BGP session
   7 : Interface MTU             - check for consistency of Interface MTU for BGP peers

Configured global result filters:

Configured per test result filters:
The following BGP validation includes only the session establishment (test number 0) and router ID (test number 2) tests. Note that you can obtain the same results using either of the include or exclude options and that the tests that are not run are marked skipped.
cumulus@switch:~$ netq check bgp include 0,2
bgp check result summary:

Total nodes         : 13
Checked nodes       : 0
Failed nodes        : 0
Rotten nodes        : 13
Warning nodes       : 0
Skipped nodes       : 0

Additional summary:
Failed Sessions     : 0
Total Sessions      : 0

Session Establishment Test   : passed
Address Families Test        : skipped
Router ID Test               : passed
Hold Time Test               : skipped
Keep Alive Interval Test     : skipped
Ipv4 Stale Path Time Test    : skipped
Ipv6 Stale Path Time Test    : skipped
Interface MTU Test           : skipped
To create a request containing checks on a single protocol or service run the netq add validation type command. Using this command adds validation results that can be accessed in the UI.
To create a scheduled validation, run the netq add validation command.
The following example creates a BGP validation that runs every 15 minutes:
cumulus@switch:~$ netq add validation name Bgp15m type bgp interval 15m
Successfully added Bgp15m running every 15m
Re-run this command for each additional scheduled validation.
Manage Validations
To view a dashboard of all validations that run according to a schedule, in the header select ![]() Validation, then click Scheduled validations.
Validation, then click Scheduled validations.
Edit or Delete a Scheduled Validation
You can edit or delete any scheduled validation that you created. This creates a new validation request and the original validation has the (old) label applied to the name. The old validation can no longer be edited. Default validations cannot be edited or deleted, but can be disabled.
To edit or delete a scheduled validation:
Click
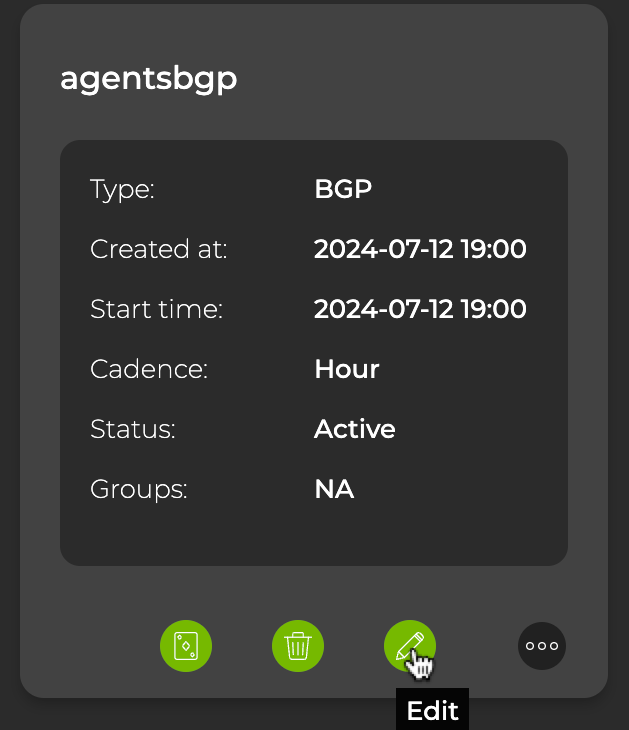
Validation, then click Scheduled validations.Hover over the validation then click
 Edit or
  Delete.
If editing, select which checks to add or remove from the validation request, then click Update.
Change the schedule for the validation, then click Update.
You can run the modified validation immediately or wait for it to run according to the schedule you specified.
- Determine the name of the scheduled validation you want to remove with the following command:
netq show validation summary
    [name <text-validation-name>]
    type (addr | agents | bgp | evpn | interfaces | mlag | mtu | ntp | ospf | roce | sensors | vlan | vxlan)
    [around <text-time-hr>]
    [json]
This example shows all scheduled validations for BGP:
cumulus@switch:~$ netq show validation summary type bgp
Name            Type             Job ID       Checked Nodes              Failed Nodes             Total Nodes            Timestamp
--------------- ---------------- ------------ -------------------------- ------------------------ ---------------------- -------------------------
    Bgp30m          scheduled        4c78cdf3-24a 0                          0                        0                      Thu Nov 12 20:38:20 2020
                                    6-4ecb-a39d-
                                    0c2ec265505f
    Bgp15m          scheduled        2e891464-637 10                         0                        10                     Thu Nov 12 20:28:58 2020
                                    a-4e89-a692-
                                    3bf5f7c8fd2a
    Bgp30m          scheduled        4c78cdf3-24a 0                          0                        0                      Thu Nov 12 20:24:14 2020
                                    6-4ecb-a39d-
                                    0c2ec265505f
    Bgp30m          scheduled        4c78cdf3-24a 0                          0                        0                      Thu Nov 12 20:15:20 2020
                                    6-4ecb-a39d-
                                    0c2ec265505f
    Bgp15m          scheduled        2e891464-637 10                         0                        10                     Thu Nov 12 20:13:57 2020
                                    a-4e89-a692-
                                    3bf5f7c8fd2a
    ...
- To remove the validation, run:
netq del validation <text-validation-name>
This example removes the scheduled validation named Bgp15m.
cumulus@switch:~$ netq del validation Bgp15m
 Successfully deleted validation Bgp15m
- Repeat these steps to remove additional scheduled validations.
Topology Validations
The topology validation compares your actual network topology derived from LLDP telemetry data against a topology blueprint (in Graphviz DOT format) that you upload to the UI.
This feature is in beta. Topology validations can only be run on-demand.
Configure LLDP
You must configure the LLDP service on switches and hosts that are defined in the topology blueprint to send the port ID subtype that matches the connection defined in the topology DOT file. The lldpd service allows you to configure the port ID by specifying either the interface name (ifname) or MAC address (macaddress) using the configure lldp portidsubtype [ifname | macaddress] command.
For example, if your host is configured to send the interface name in the LLDP port ID field, define the interface name in the topology DOT file:
"switch1":"swp1" -- "host5":"eth1"
If your host is configured to send the MAC address in the LLDP port ID field, define the MAC address in the topology DOT file:
"switch1":"swp1" -- "host5":"mac:48:b0:2d:f5:6b:b5"
You can use the lldpctl command to validate the current port ID received from a connected device.
- If you change the LLDP port ID subtype while the NetQ agent is running, restart the NetQ agent with the
netq config restart agentcommand - If you do not configure all of your network devices in the topology blueprint, the total number of devices accounted for in the validation results card might include additional devices that NetQ has received LLDP data from.
Create a Topology Validation
In the workbench header, select
Validation, then Create a validation.Select Topology and upload the topology blueprint file. The name of the blueprint file NetQ will use to validate the topology is displayed on the screen. To use a different file, upload it to the UI, then select Manage blueprint file. Select Activate to indicate the blueprint file you’d like NetQ to use.
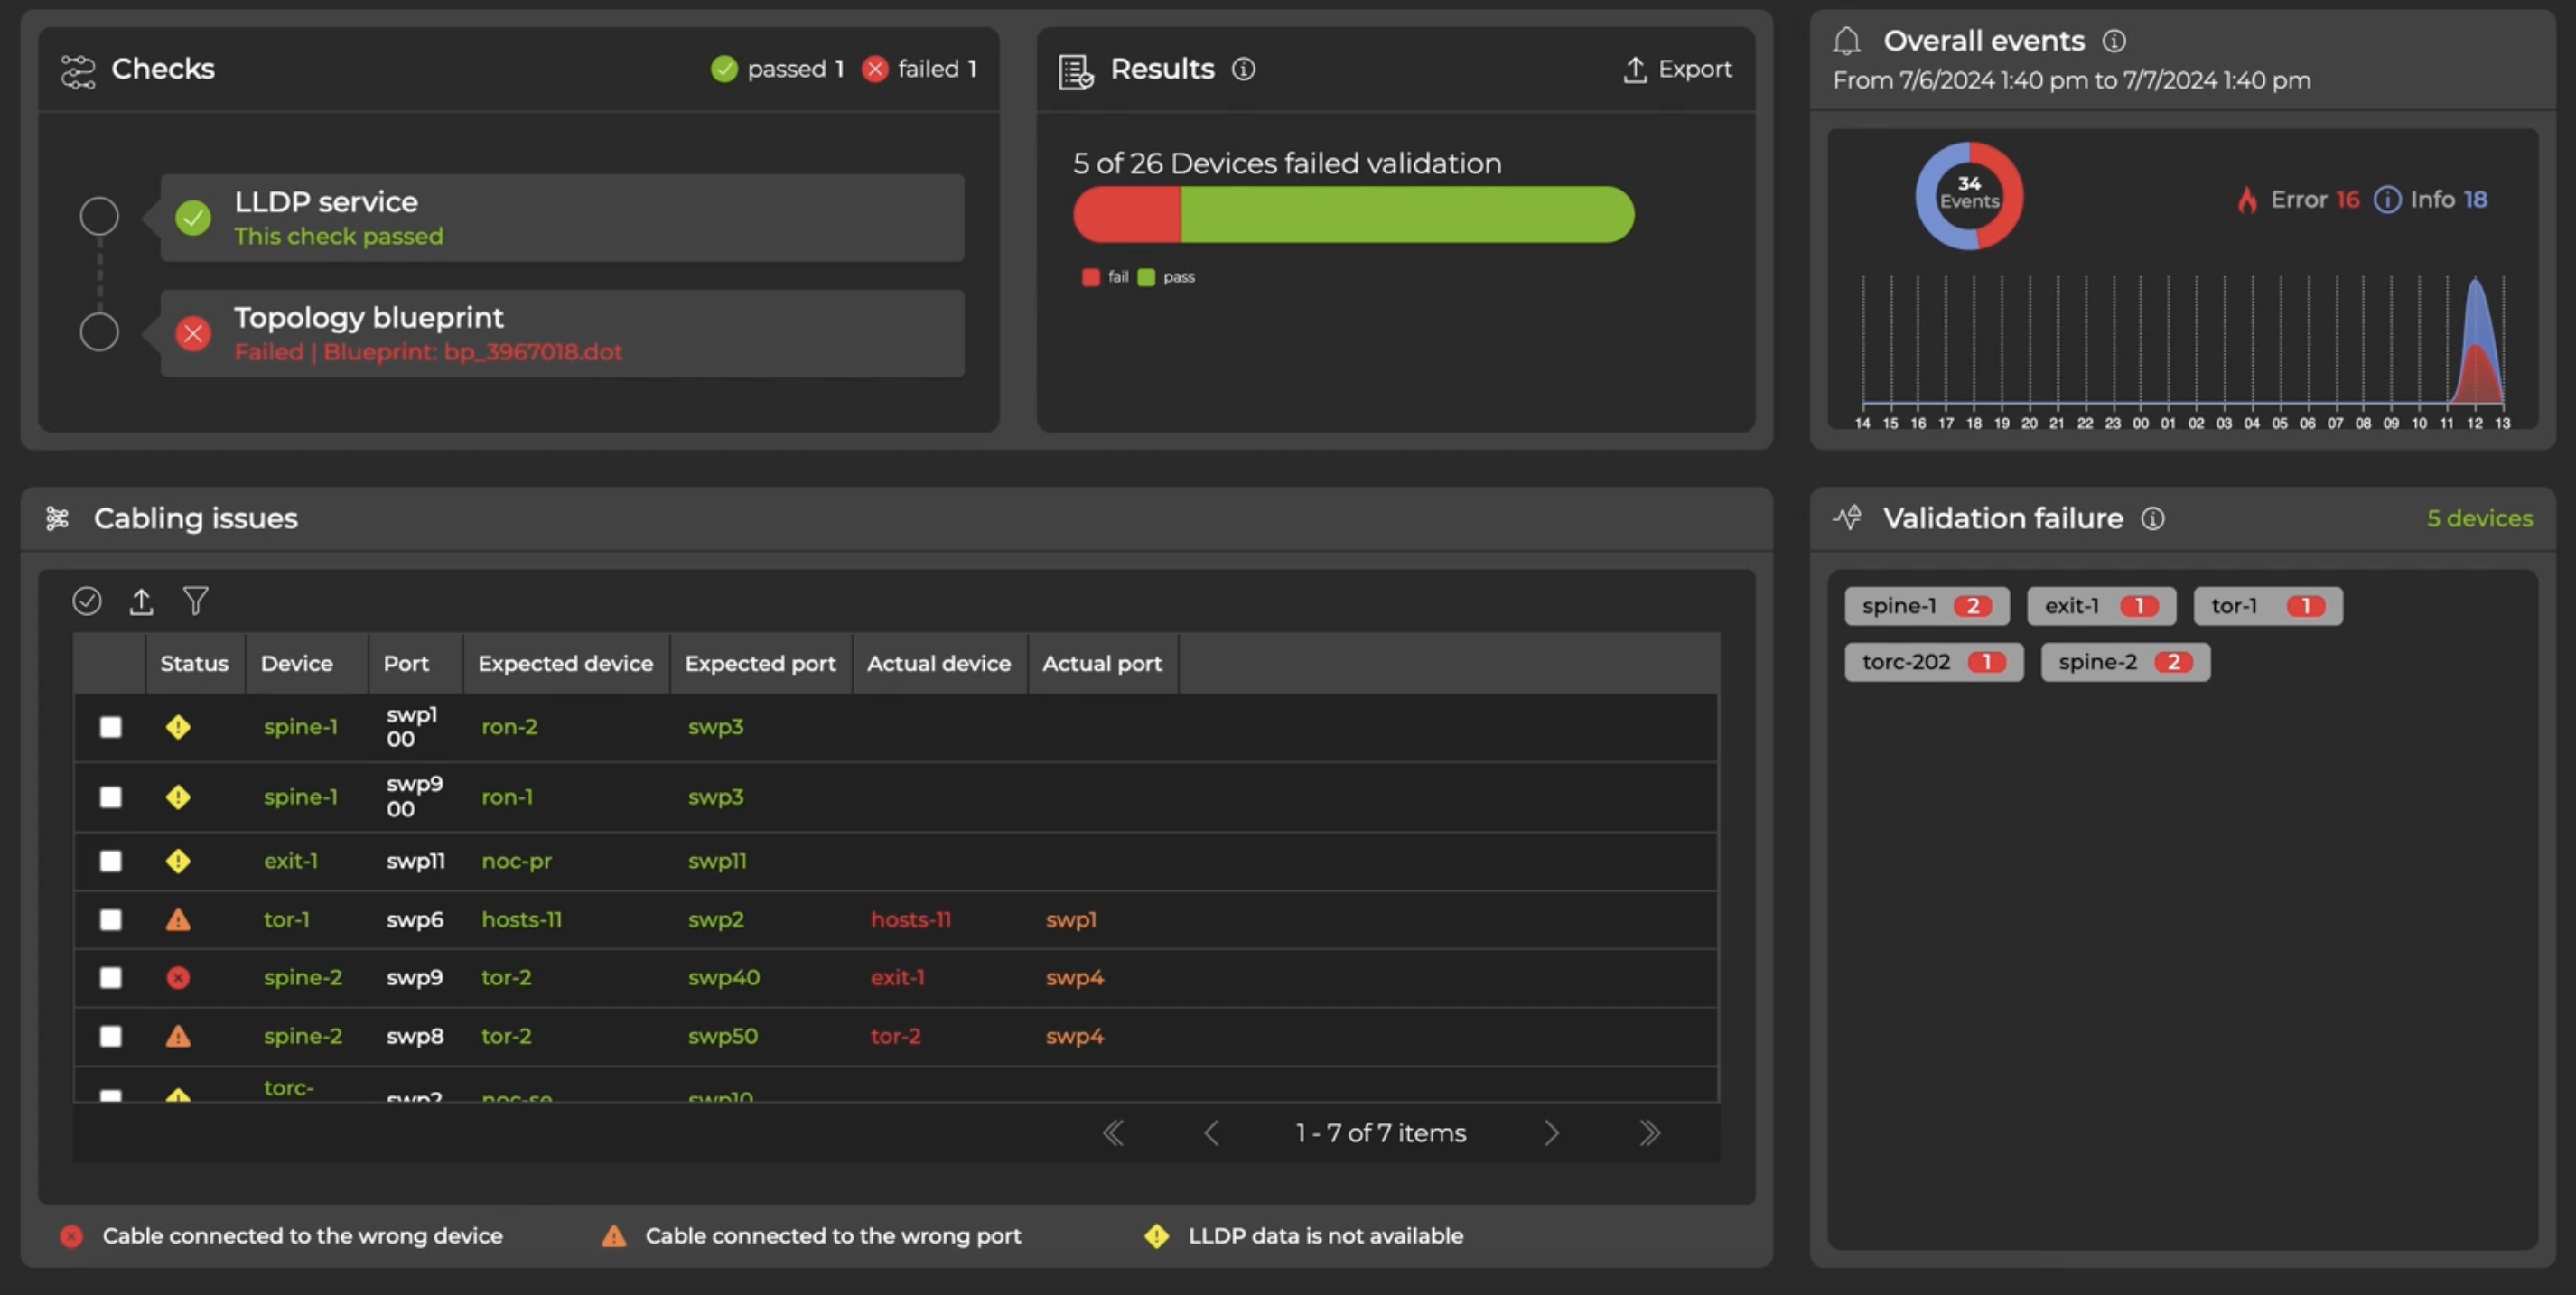
Upon completion, the dashboard displays the devices that failed the topology validation, along with a table listing cabling issues. NetQ only displays the network links that were defined in the topology blueprint.
Upload the topology blueprint file to the UI.
Run the netq check topology command.