Install a NetQ Cloud Appliance Cluster
This topic describes how to prepare your cluster of NetQ Cloud Appliances for installation of the NetQ Collector software.
Each system shipped to you contains:
- Your NVIDIA NetQ Cloud Appliance (a Supermicro SuperServer E300-9D)
- Hardware accessories, such as power cables and rack mounting gear (note that network cables and optics ship separately)
- Information regarding your order
For more detail about hardware specifications (including LED layouts and FRUs like the power supply or fans and accessories like included cables) or safety and environmental information, refer to the user manual.
Install Each Appliance
After you unbox the appliance:- Mount the appliance in the rack.
- Connect it to power following the procedures described in your appliance's user manual.
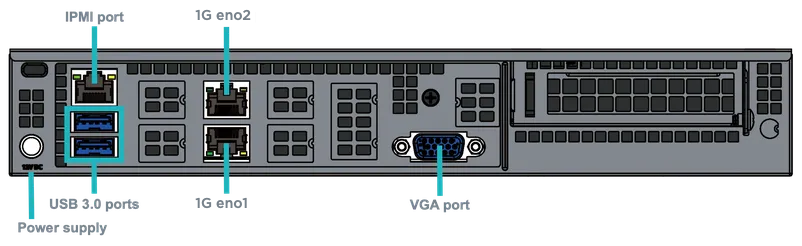
- Connect the Ethernet cable to the 1G management port (eno1).
- Power on the appliance.
If your network runs DHCP, you can configure NetQ over the network. If DHCP is not enabled, then you configure the appliance using the console cable provided.
Configure the Password, Hostname and IP Address
Change the password and specify the hostname and IP address for each appliance before installing the NetQ software.
Log in to the appliance that you intend to use as your master node using the default login credentials:
- Username: cumulus
- Password: cumulus
Change the password using the
passwdcommand:cumulus@hostname:~$ passwd Changing password for cumulus. (current) UNIX password: cumulus Enter new UNIX password: Retype new UNIX password: passwd: password updated successfullyThe default hostname for the NetQ Cloud Appliance is netq-appliance. Change the hostname to fit your naming conventions while meeting Internet and Kubernetes naming standards.
Kubernetes requires that hostnames comprise a sequence of labels concatenated with dots. For example, en.wikipedia.org is a hostname. Each label must be from 1 to 63 characters long. The entire hostname, including the delimiting dots, has a maximum of 253 ASCII characters.
The Internet standards (RFCs) for protocols specify that labels can contain only the ASCII letters a through z (in lower case), the digits 0 through 9, and the hyphen-minus character ('-').
Use the following command:
cumulus@hostname:~$ sudo hostnamectl set-hostname NEW_HOSTNAMEIdentify the IP address.
The appliance contains two Ethernet ports. It uses port eno1 for out-of-band management. This is where NetQ Agents should send the telemetry data collected from your monitored switches and hosts. By default, eno1 uses DHCPv4 to get its IP address. You can view the assigned IP address using the following command:
cumulus@hostname:~$ ip -4 -brief addr show eno1
eno1             UP             10.20.16.248/24
Alternately, you can configure the interface with a static IP address by editing the /etc/netplan/01-ethernet.yaml Ubuntu Netplan configuration file.
For example, to set your network interface eno1 to a static IP address of 192.168.1.222 with gateway 192.168.1.1 and DNS server as 8.8.8.8 and 8.8.4.4:
# This file describes the network interfaces available on your system
# For more information, see netplan(5).
network:
    version: 2
    renderer: networkd
    ethernets:
        eno1:
            dhcp4: no
            addresses: [192.168.1.222/24]
            gateway4: 192.168.1.1
            nameservers:
                addresses: [8.8.8.8,8.8.4.4]
Apply the settings.
cumulus@hostname:~$ sudo netplan applyRepeat these steps for each of the worker node appliances.
Verify NetQ Software and Appliance Readiness
Now that the appliances are up and running, verify that the software is available and each appliance is ready for installation.
On the master NetQ Cloud Appliance, verify that the needed packages are present and of the correct release, version 4.2.
cumulus@hostname:~$ dpkg -l | grep netq
ii  netq-agent   4.2.0-ub18.04u38~1652817271.25f4ac0_amd64  Cumulus NetQ Telemetry Agent for Ubuntu
ii  netq-apps    4.2.0-ub18.04u38~1652817271.25f4ac0_amd64  Cumulus NetQ Fabric Validation Application for Ubuntu
Verify the installation images are present and of the correct release, version 4.2.
cumulus@hostname:~$ cd /mnt/installables/
cumulus@hostname:/mnt/installables$ ls
NetQ-4.2.0-opta.tgz
Verify the master NetQ Cloud Appliance is ready for installation. Fix any errors indicated before installing the NetQ software.
cumulus@hostname:~$ sudo opta-check-cloud
On one of your worker NetQ Cloud Appliances, verify that the needed packages are present and of the correct release, version 4.2 and update 34.
cumulus@hostname:~$ dpkg -l | grep netq
ii  netq-agent   4.2.0-ub18.04u38~1652817271.25f4ac0_amd64  Cumulus NetQ Telemetry Agent for Ubuntu
ii  netq-apps    4.2.0-ub18.04u38~1652817271.25f4ac0_amd64  Cumulus NetQ Fabric Validation Application for Ubuntu
Configure the IP address, hostname, and password using the same steps as for the master node. Refer to Configure the Password, Hostname, and IP Address.
Make a note of the private IP addresses you assign to the master and worker nodes. You need them for later installation steps.
Verify that the needed packages are present and of the correct release, version 4.2.
cumulus@hostname:~$ dpkg -l | grep netq
ii  netq-agent   4.2.0-ub18.04u38~1652817271.25f4ac0_amd64  Cumulus NetQ Telemetry Agent for Ubuntu
ii  netq-apps    4.2.0-ub18.04u38~1652817271.25f4ac0_amd64  Cumulus NetQ Fabric Validation Application for Ubuntu
Verify that the needed files are present and of the correct release.
cumulus@hostname:~$ cd /mnt/installables/
cumulus@hostname:/mnt/installables$ ls
NetQ-4.2.0-opta.tgz
Verify the appliance is ready for installation. Fix any errors indicated before installing the NetQ software.
cumulus@hostname:~$ sudo opta-check-cloud
Repeat Steps 4-8 for each additional worker NetQ Cloud Appliance.
The final step is to install and activate the NetQ software using the CLI: