Upgrade NetQ Agent Using LCM
Lifecycle management lets you upgrade to the latest agent version on switches with an existing NetQ Agent. You can upgrade only the NetQ Agent or both the NetQ Agent and NetQ CLI simultaneously. You can run up to five jobs at the same time; however, a given switch can only appear in one running job at a time.
Upgrades can be performed with LCM for NetQ Agents versions 2.4.0 and later. For earlier versions, perform a new installation.
Prepare for a NetQ Agent Upgrade
Before you upgrade, make sure you have the appropriate files and credentials:
Click
 (Upgrade) in the workbench header.
Upload the upgrade images.
(Optional) Specify a default upgrade version.
Verify or add switch access credentials.
Verify or add switch access credentials.
Configure switch roles to determine the order in which the switches get upgraded.
Upload the Cumulus Linux upgrade images.
Perform a NetQ Agent Upgrade
After you complete the preparation steps, upgrade the NetQ Agents:
In the Switch Management tab, locate the Switches card and click Manage.
Select the switches you want to upgrade. You can filter by role or sort by column heading to narrow down the list.
Click
 (Upgrade NetQ) above the table and follow the steps in the UI.
Verify that the number of switches selected for upgrade matches your expectation.
Enter a name for the upgrade job. The name can contain a maximum of 22 characters (including spaces).
Review each switch:
- Is the NetQ Agent version 2.4.0 or later? If not, this switch can only be upgraded through the switch discovery process.
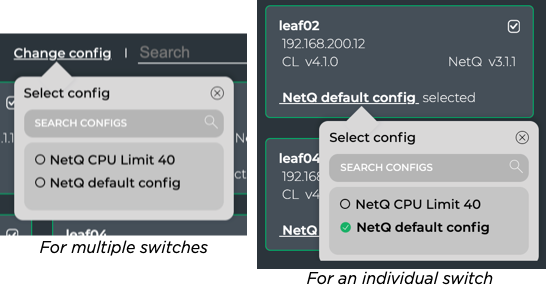
- Is the configuration profile the one you want to apply? If not, click Change config, then select an alternate profile to apply to all selected switches.
You can apply different profiles to switches in a single upgrade job by selecting a subset of switches then choosing a different profile. You can also change the profile on a per-switch basis by clicking the current profile link and selecting an alternate one.
Review the summary indicating the number of switches and the configuration profile to be used. If either is incorrect, click Back and review your selections.
Select the version of NetQ Agent for upgrade. If you have designated a default version, keep the Default selection. Otherwise, select an alternate version by clicking Custom and selecting it from the list.
By default, the NetQ Agent and CLI are upgraded on the selected switches. If you do not want to upgrade the NetQ CLI, click Advanced and change the selection to No.
- NetQ performs several checks to eliminate preventable problems during the upgrade process. When all of the pre-checks pass, click Upgrade to initiate the upgrade.
To upgrade the NetQ Agent on one or more switches, run:
netq-image job-name <text-job-name> [netq-version <text-netq-version>] [upgrade-cli True | upgrade-cli False] hostnames <text-switch-hostnames> [config_profile <text-config-profile>]
The following example creates a NetQ Agent upgrade job called upgrade-cl430-nq330. It upgrades the spine01 and spine02 switches with NetQ Agents version 4.1.0.
cumulus@switch:~$ netq lcm upgrade name upgrade-cl430-nq330 netq-version 4.1.0 hostnames spine01,spine02
Analyze the NetQ Agent Upgrade Results
After starting the upgrade you can monitor the progress in the NetQ UI. Successful upgrades are indicated by a green ![]() . Failed upgrades display error messages indicating the cause of failure.
. Failed upgrades display error messages indicating the cause of failure.
To view the progress of upgrade jobs using the CLI, run:
netq lcm show upgrade-jobs netq-image [json]
netq lcm show status <text-lcm-job-id> [json]
Reasons for NetQ Agent Upgrade Failure
Upgrades can fail at any stage of the process. The following table lists common reasons for upgrade failures:
| Reason | Error Message |
|---|---|
| Switch is not reachable via SSH | Data could not be sent to remote host “192.168.0.15.” Make sure this host can be reached over ssh: ssh: connect to host 192.168.0.15 port 22: No route to host |
| Switch is reachable, but user-provided credentials are invalid | Invalid/incorrect username/password. Skipping remaining 2 retries to prevent account lockout: Warning: Permanently added ‘<hostname-ipaddr>’ to the list of known hosts. Permission denied, please try again. |
| Upgrade task could not be run | Failure message depends on the why the task could not be run. For example: /etc/network/interfaces: No such file or directory |
| Upgrade task failed | Failed at- <task that failed>. For example: Failed at- MLAG check for the peerLink interface status |
| Retry failed after five attempts | FAILED In all retries to process the LCM Job |