LDAP Authentication
As an administrator, you can integrate the NetQ role-based access control (RBAC) with your lightweight directory access protocol (LDAP) server in on-premises deployments. NetQ maintains control over role-based permissions for the NetQ application. There are two roles, admin and user. With the RBAC integration, LDAP handles account authentication and your directory service (such as Microsoft Active Directory, Kerberos, OpenLDAP, and Red Hat Directory Service). A copy of each account from LDAP is stored in the local NetQ database.
Integrating with an LDAP server does not prevent you from configuring local accounts (stored and managed in the NetQ database) as well.
Get Started
LDAP integration requires information about how to connect to your LDAP server, the type of authentication you plan to use, bind credentials, and, optionally, search attributes.
Provide Your LDAP Server Information
To connect to your LDAP server, you need the URI and bind credentials. The URI identifies the location of the LDAP server. It comprises a FQDN (fully qualified domain name) or IP address, and the port of the LDAP server where the LDAP client can connect. For example: myldap.mycompany.com or 192.168.10.2. Typically you use port 389 for connection over TCP or UDP. In production environments, you deploy a secure connection with SSL. In this case, the port used is typically 636. Setting the Enable SSL toggle automatically sets the server port to 636.
Specify Your Authentication Method
There are two types of user authentication: anonymous and basic.
Anonymous: LDAP client does not require any authentication. The user can access all resources anonymously. This is not commonly used for production environments.
Basic: (Also called Simple) LDAP client must provide a bind DN and password to authenticate the connection. When selected, the Admin credentials appear: Bind DN and Bind Password. You define the distinguished name (DN) using a string of variables. Some common variables include:
Syntax Description or Usage cn Common name ou Organizational unit or group dc Domain name dc Domain extension - Bind DN: DN of user with administrator access to query the LDAP server; used for binding with the server. For example,
uid =admin,ou=ntwkops,dc=mycompany,dc=com. - Bind Password: Password associated with Bind DN.
The Bind DN and password get sent as clear text. Only users with these credentials can perform LDAP operations.
- Bind DN: DN of user with administrator access to query the LDAP server; used for binding with the server. For example,
If you are unfamiliar with the configuration of your LDAP server, contact your administrator to ensure you select the appropriate authentication method and credentials.
Define User Attributes
You need the following two attributes to define a user entry in a directory:
- Base DN: Location in directory structure where search begins. For example,
dc=mycompany,dc=com. - User ID: Type of identifier used to specify an LDAP user. This can vary depending on the authentication service you are using. For example, you can use the user ID (UID) or email address with OpenLDAP, whereas you might use the sAMAccountName with Active Directory.
Optionally, you can specify the first name, last name, and email address of the user.
Set Search Attributes
While optional, specifying search scope indicates where to start and how deep a given user can search within the directory. You specify the data to search for in the search query.
Search scope options include:
- Subtree: Search for users from base, subordinates at any depth (default)
- Base: Search for users at the base level only; no subordinates
- One level: Search for immediate children of user; not at base or for any descendants
- Subordinate: Search for subordinates at any depth of user; but not at base
A typical search query for users could be {userIdAttribute}={userId}.
Create an LDAP Configuration
You can configure one LDAP server per bind DN (distinguished name). After you configure LDAP, you can verify the connectivity and save the configuration.
To create an LDAP configuration:
Expand the
 Menu. Under Admin, select Management.
Locate the LDAP Server Info card, and click Configure LDAP.
Fill out the LDAP server configuration form according to your particular configuration.
Click Save to complete the configuration, or click Cancel to discard the configuration.
LDAP config cannot be changed after it is configured. If you need to change the configuration, you must delete the current LDAP configuration and create a new one. Note that if you change the LDAP server configuration, all users created against that LDAP server remain in the NetQ database and continue to be visible, but are no longer viable. You must manually delete those users if you do not want to see them.
Example LDAP Configurations
A variety of example configurations are provided here. Scenarios 1-3 are based on using an OpenLDAP or similar authentication service. Scenario 4 is based on using the Active Directory service for authentication.
Scenario 1: Base Configuration
In this scenario, we are configuring the LDAP server with anonymous authentication, a User ID based on an email address, and a search scope of base.
| Parameter | Value |
|---|---|
| Host Server URL | ldap1.mycompany.com |
| Host Server Port | 389 |
| Authentication | Anonymous |
| Base DN | dc=mycompany,dc=com |
| User ID | |
| Search Scope | Base |
| Search Query | {userIdAttribute}={userId} |
Scenario 2: Basic Authentication and Subset of Users
In this scenario, we are configuring the LDAP server with basic authentication, for access only by the persons in the network operators group, and a limited search scope.
| Parameter | Value |
|---|---|
| Host Server URL | ldap1.mycompany.com |
| Host Server Port | 389 |
| Authentication | Basic |
| Admin Bind DN | uid =admin,ou=netops,dc=mycompany,dc=com |
| Admin Bind Password | nqldap! |
| Base DN | dc=mycompany,dc=com |
| User ID | UID |
| Search Scope | One Level |
| Search Query | {userIdAttribute}={userId} |
Scenario 3: Scenario 2 with Widest Search Capability
In this scenario, we are configuring the LDAP server with basic authentication, for access only by the persons in the network administrators group, and an unlimited search scope.
| Parameter | Value |
|---|---|
| Host Server URL | 192.168.10.2 |
| Host Server Port | 389 |
| Authentication | Basic |
| Admin Bind DN | uid =admin,ou=netadmin,dc=mycompany,dc=com |
| Admin Bind Password | 1dap*netq |
| Base DN | dc=mycompany, dc=net |
| User ID | UID |
| Search Scope | Subtree |
| Search Query | userIdAttribute}={userId} |
Scenario 4: Scenario 3 with Active Directory Service
In this scenario, we are configuring the LDAP server with basic authentication, for access only by the persons in the given Active Directory group, and an unlimited search scope.
| Parameter | Value |
|---|---|
| Host Server URL | 192.168.10.2 |
| Host Server Port | 389 |
| Authentication | Basic |
| Admin Bind DN | cn=netq,ou=45,dc=mycompany,dc=com |
| Admin Bind Password | nq&4mAd! |
| Base DN | dc=mycompany, dc=net |
| User ID | sAMAccountName |
| Search Scope | Subtree |
| Search Query | {userIdAttribute}={userId} |
Add LDAP Users to NetQ
Click
Menu. Under Admin, select Management.Locate the User Accounts card, and click Manage.
On the User Accounts tab, click Add User.
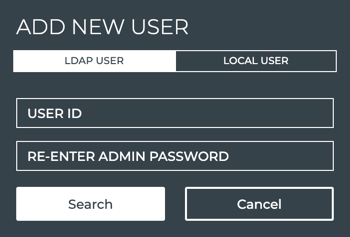
Select LDAP User, then enter the user’s ID.
Enter your administrator password, then select Search.
If the user is found, the email address, first, and last name fields are automatically populated. If searching is not enabled on the LDAP server, you must enter the information manually.

If the fields are not automatically filled in, and searching is enabled on the LDAP server, you might require changes to the mapping file.
Select the role for this user, admin or user.
Enter your admin password, and click Save, or click Cancel to discard the user account.
LDAP user passwords are not stored in the NetQ database and are always authenticated against LDAP.
Repeat these steps to add additional LDAP users.
Remove LDAP Users from NetQ
You can remove LDAP users in the same manner as local users.
Expand the
Menu. Under Admin, select Management.Locate the User Accounts card, and click Manage.
Select the user(s) you want to remove, then select
 .
.
If you delete an LDAP user in LDAP it is not automatically deleted from NetQ; however, the login credentials for these LDAP users stop working immediately.