SSO Authentication
You can integrate your NetQ Cloud deployment with a Microsoft Azure Active Directory (AD) or Google Cloud authentication server to support single sign-on (SSO) to NetQ. NetQ supports integration with SAML (Security Assertion Markup Language), OAuth (Open Authorization), and multi-factor authentication (MFA). Only one SSO configuration can be configured at a time.
You can create local accounts with default access roles by enabling SSO. After enabling SSO, users logging in for the first time can sign up for SSO through the NetQ login screen or with a link provided by an admin.
Add SSO Configuration and Accounts
To integrate your authentication server:
Expand the
 Menu on the NetQ dashboard.
Under Admin, select Management. Locate the SSO Configuration card and select Manage.
Select either SAML or OpenID (which uses OAuth with OpenID Connect)
Specify the parameters:
You need several pieces of data from your Microsoft Azure or Google account and authentication server to complete the integration.
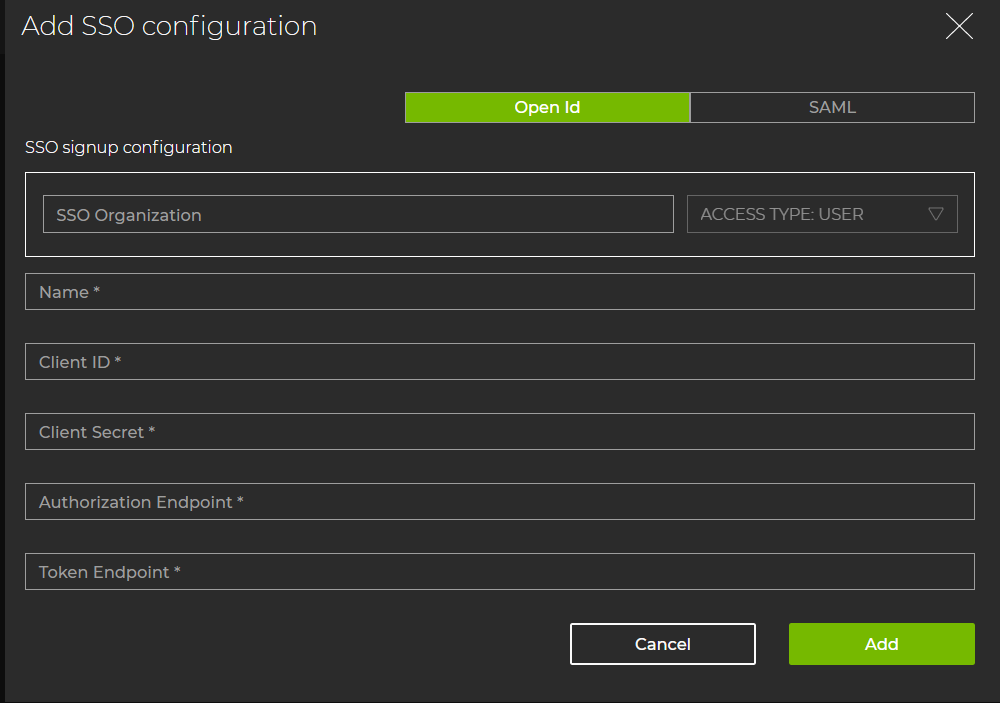
SSO Organization is typically a company’s name or a department. The name entered in this field will appear in the SSO signup URL.
Role (either user or admin) is automatically assigned when the account is initalized via SSO login.
Name is a unique name for the SSO configuration.
Client ID is the identifier for your resource server.
Client Secret is the secret key for your resource server.
Authorization Endpoint is the URL of the authorization application.
Token Endpoint is the URL of the authorization token.
After you enter the fields, select Add.
As indicated, copy the redirect URI (https://api.netq.nvidia.com/netq/auth/v1/sso-callback) into your OpenID Connect configuration.
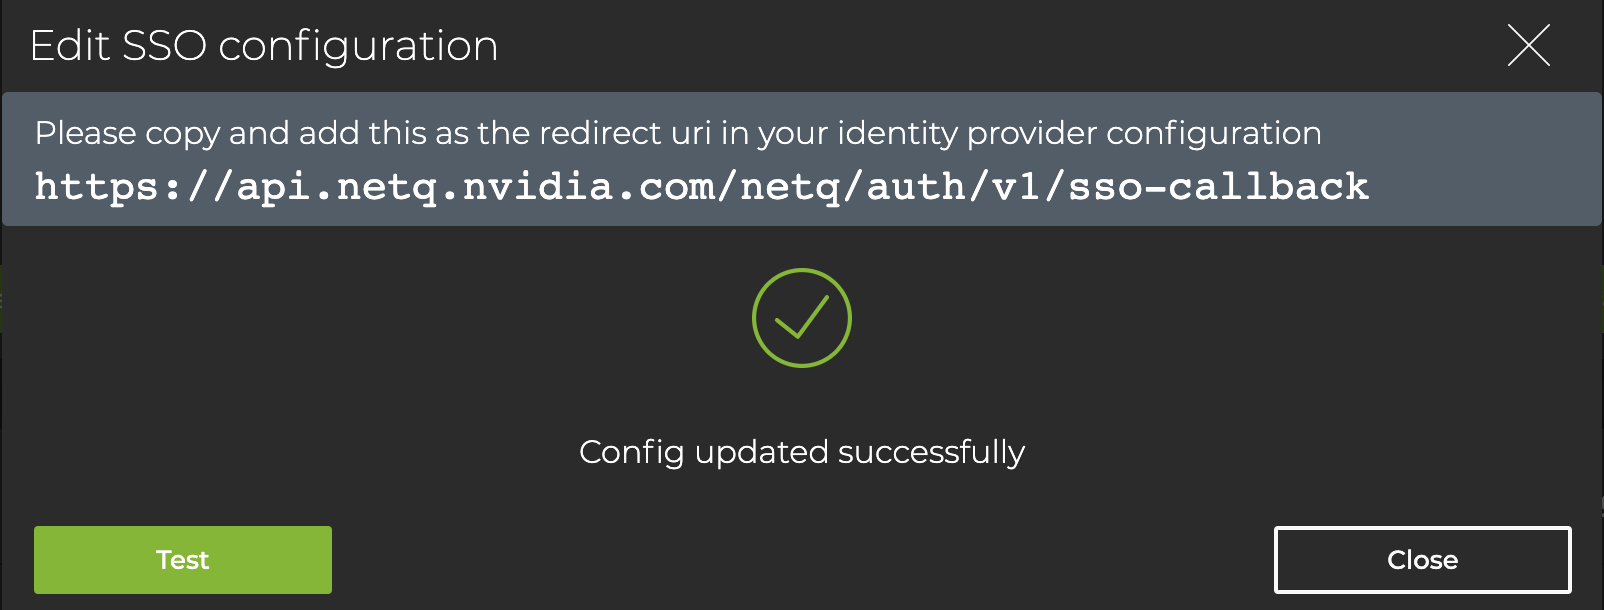
Select Test to verify the configuration and ensure that you can log in. If it is not working, you are logged out. Check your specification and retest the configuration until it is working properly.
Select Close. The card reflects the configuration:
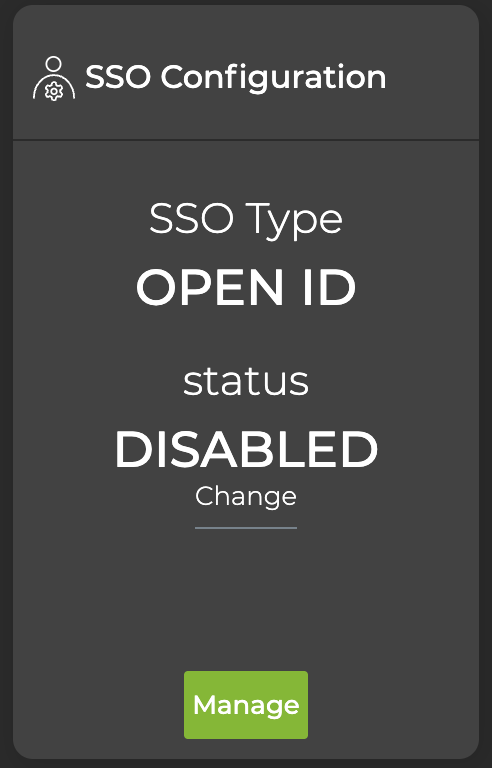
To require users to log in using this SSO configuration, select Change under the “Disabled” status and confirm. The card updates to reflect that SSO is enabled.
After an admin has configured and enabled SSO, users logging in for the first time can sign up for SSO.
Admins can also provide users with an SSO signup URL: https://netq.nvidia.com/signup?organization=SSO_Organization
The SSO organization you entered during the configuration will replace SSO_Organization in the URL.
You need several pieces of data from your Microsoft Azure or Google account and authentication server to complete the integration.
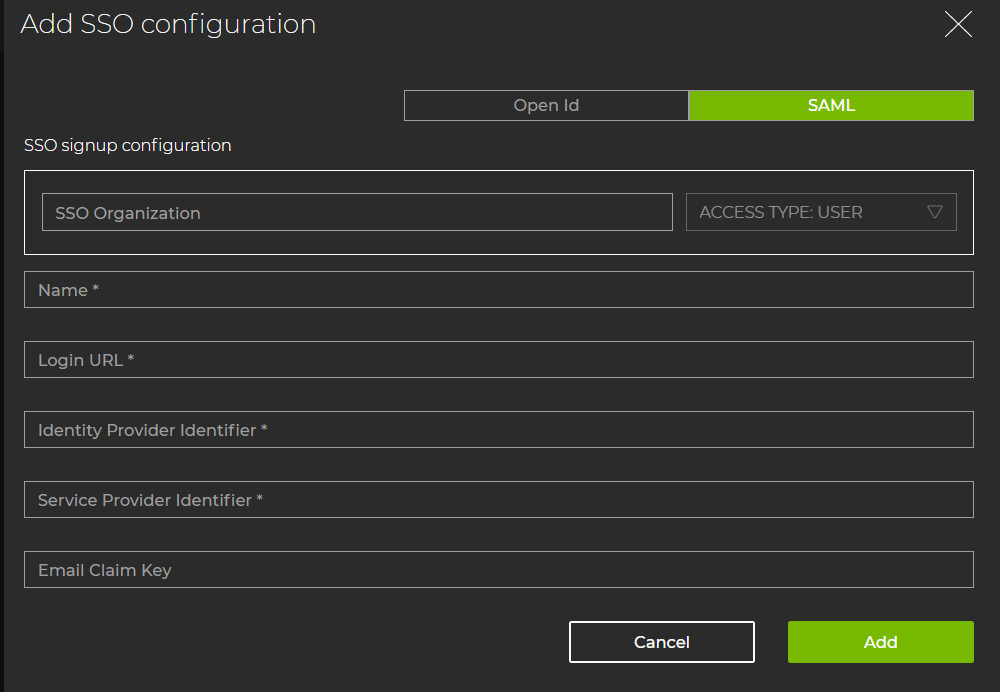
SSO Organization is typically a company’s name or a department. The name entered in this field will appear in the SSO signup URL.
Role (either user or admin) is automatically assigned when the account is initialized via SSO login.
Name is a unique name for the SSO configuration.
Login URL is the URL for the authorization server login page.
Identity Provider Identifier is the name of the authorization server.
Service Provider Identifier is the name of the application server.
Email Claim Key is an optional field. When left blank, the email address is captured.
After you enter the fields, select Add.
As indicated, copy the redirect URI (https://api.netq.nvidia.com/netq/auth/v1/sso-callback) into your OpenID Connect configuration.
Select Test to verify the configuration and ensure that you can log in. If it is not working, you are logged out. Check your specification and retest the configuration until it is working properly.
Select Close. The card reflects the configuration:
To require users to log in using this SSO configuration, select Change under the “Disabled” status and confirm. The card updates to reflect that SSO is enabled.
Select Submit to enable the configuration. The SSO card reflects the “enabled” status.
After an admin has configured and enabled SSO, users logging in for the first time can sign up for SSO.
Admins can also provide users with an SSO signup URL: https://netq.nvidia.com/signup?organization=SSO_Organization
The SSO organization you entered during the configuration will replace SSO_Organization in the URL.
Modify Configuration
You can change the specifications for SSO integration with your authentication server at any time, including changing to an alternate SSO type, disabling the existing configuration, or reconfiguring SSO.
Change SSO Type
From the SSO Configuration card:
Select Disable, then Yes.
Select Manage then select the desired SSO type and complete the form.
Copy the redirect URL on the success dialog into your identity provider configuration.
Select Test to verify that the login is working. Modify your specification and retest the configuration until it is working properly.
Select Update.
Disable SSO Configuration
From the SSO Configuration card:
Select Disable.
Select Yes to disable the configuration, or Cancel to keep it enabled.