Credentials and Profiles
Authentication credentials are stored in access profiles which can be assigned to individual switches. You can create credentials with either basic (SSH username/password) or SSH (public/private key) authentication. This section describes how to create, edit, and delete access profiles. After you create a profile, attach it to individual switches so that you can perform upgrades on those switches.
By default, NVIDIA supplies two access profiles: Netq-Default and Nvl4-Default (for NVLink devices). NVIDIA strongly recommends creating new access profiles or updating the default profiles with unique credentials. When you upgrade to NetQ 4.5 from 4.4, NetQ saves your 4.4 global access credentials to the Netq-Default profile. You cannot delete default profiles.
Create Access Profiles
Expand the
 Menu and select Manage switches.
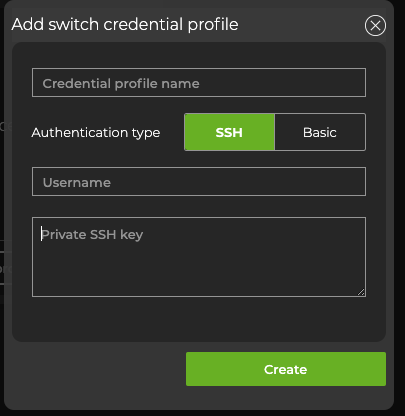
On the Access Profiles card, select Add profile.
Enter a name for the profile, then select the authentication method you want to use: SSH or Basic
You must have sudoer permission to configure switches when using the SSH key method.
Create a pair of SSH private and public keys:
ssh-keygen -t rsa -C "<USER>"Copy the SSH public key to each switch that you want to upgrade using one of the following methods:
- Manually copy the SSH public key to the /home/<USER>/.ssh/authorized_keys file on each switch, or
- Run
ssh-copy-id USER@<switch_ip>on the server where you generated the SSH key pair for each switch
Copy the SSH private key into the entry field:
For security, your private key is stored in an encrypted format, and only provided to internal processes while encrypted.
- (Optional) To verify that the new profile is listed among available profiles, select View profiles from the Access Profiles card.
Be sure to use credentials for an account that has permission to configure switches.
The default credentials for Cumulus Linux have changed from cumulus/CumulusLinux! to cumulus/cumulus for releases 4.2 and later. For details, read Cumulus Linux User Accounts.
Enter a username and password.
Click Create, then confirm.
(Optional) To verify that the new profile is listed among available profiles, select View profiles from the Access Profiles card.
To configure basic authentication, run:
cumulus@switch:~$ netq lcm add credentials profile_name NEWPROFILE username cumulus password cumulus
Specify a unique name for the configuration after profile_name.
The default credentials for Cumulus Linux have changed from cumulus/CumulusLinux! to cumulus/cumulus for releases 4.2 and later. For details, read Cumulus Linux User Accounts.
To configure SSH authentication using a public/private key:
You must have sudoer permission to properly configure switches when using the SSH key method.
If the keys do not yet exist, create a pair of SSH private and public keys.
ssh-keygen -t rsa -C "<USER>"Copy the SSH public key to each switch that you want to upgrade using one of the following methods:
- Manually copy the SSH public key to the /home/<USER>/.ssh/authorized_keys file on each switch, or
- Run
ssh-copy-id USER@<switch_ip>on the server where you generated the SSH key pair for each switch
Add these credentials to the switch. Specify a unique name for the configuration after
profile_name.cumulus@switch:~$ netq lcm add credentials profile_name NEWPROFILE ssh-key PUBLIC_SSH_KEY
Edit Access Profiles
Open the LCM dashboard.
On the Access Profiles card, select View profiles.
Select the checkbox next to the profile you’d like to edit. Then select
 Edit above the table.
Make your edits, then click Update.
The syntax for editing access profiles is:
cumulus@switch:~$ netq lcm edit credentials
    profile_id <text-switch-profile-id>
    [profile_name <text-switch-profile-name>]
    [auth-type <text-switch-auth-type>]
    [username <text-switch-username>]
    [password <text-switch-password> | ssh-key <text-ssh-key>]
Run netq lcm show credentials to obtain the profile ID. See the command line reference for further details.
To configure SSH authentication using a public/private key (requires sudoer permission):
If the new keys do not yet exist, create a pair of SSH private and public keys:
ssh-keygen -t rsa -C "<USER>"Copy the SSH public key to each switch that you want to upgrade using one of the following methods:
- Manually copy the SSH public key to the /home/<USER>/.ssh/authorized_keys file on each switch, or
- Run
ssh-copy-id USER@<switch_ip>on the server where you generated the SSH key pair for each switch
Add these new credentials to the switch:
cumulus@switch:~$ netq lcm edit credentials ssh-key PUBLIC_SSH_KEY
Delete Access Profiles
Any profile that is assigned to a switch can’t be deleted. You must attach a different profile to the switch first. Note that Netq-Default and Nvl4-Default can’t be deleted.
On the Access Profiles card, select View profiles.
From the list of profiles, select
 Delete in the profile’s row.
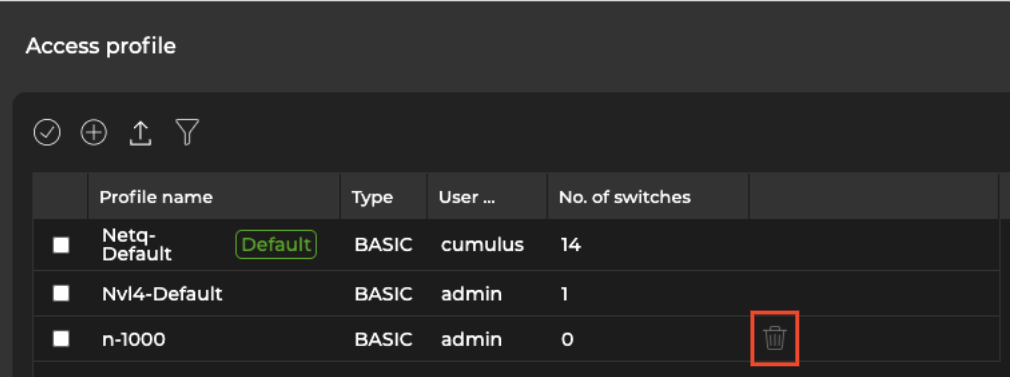
The delete icon only appears next to custom profiles that are not already attached to a switch.
- Select Remove.
- Run
netq lcm show credentials. Identify the profile you’d like to delete and copy its identifier from the Profile ID column. The following example deletes the n-1000 profile:
cumulus@switch:~$ netq lcm show credentials
Profile ID           Profile Name             Type             SSH Key        Username         Password         Number of switches                   Last Changed
-------------------- ------------------------ ---------------- -------------- ---------------- ---------------- ------------------------------------ -------------------------
credential_profile_d Netq-Default             BASIC                           cumulus          **************   11                                   Fri Feb  3 18:20:33 2023
9e875bd2e6784617b304
c20090ce28ff2bb46a4b
9bf23cda98f1bdf91128
5c9
credential_profile_3 Nvl4-Default             BASIC                           admin            **************   1                                    Fri Feb  3 19:18:26 2023
5a2eead7344fb91218bc
dec29b12c66ebef0d806
659b20e8805e4ff629bc
23e
credential_profile_3 n-1000                   BASIC                           admin            **************   0                                    Fri Feb  3 21:49:10 2023
eddab251bddea9653df7
cd1be0fc123c5d7a42f8
18b68134e42858e54a9c
289
- Run
netq lcm del credentials profile_id <text-credential-profile-id>:
cumulus@switch:~$ netq lcm del credentials profile_id credential_profile_3eddab251bddea9653df7cd1be0fc123c5d7a42f818b68134e42858e54a9c289
- Verify that the profile is deleted with
netq lcm show credentials.
View Access Profiles
You can view the type of credentials used to access your switches in the NetQ UI. You can view the details of the credentials using the NetQ CLI.
Open the LCM dashboard.
On the Access Profiles card, select View profiles.
To view a list of access profiles and their associated credentials, run netq lcm show credentials.
If you use an SSH key for the credentials, the public key appears in the command output.
If you use a username and password for the credentials, the username appears in the command output with the password masked.