Network Snapshots
Snapshots capture a network’s state—including the services running on the network—at a particular point in time. Comparing snapshots lets you check what (if anything) changed in the network, which can be helpful when upgrading a switch or modifying its configuration. This section outlines how to create, compare, and interpret snapshots.
Create a Network Snapshot
To create a snapshot:
From the workbench header, select
 Snapshot, then Create Snapshot:
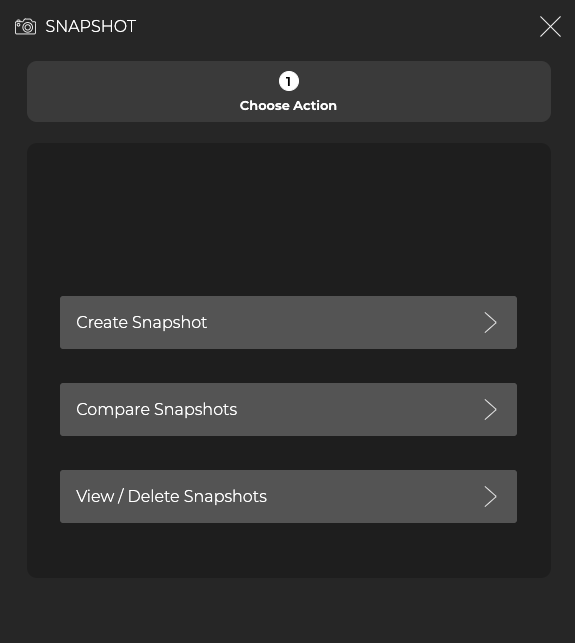
Next, enter the snapshot’s name, time frame, and the elements you’d like included in the snapshot:
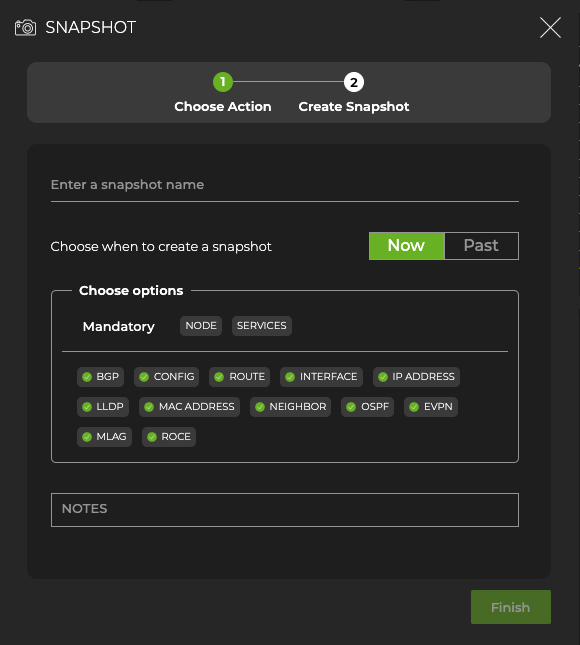
To capture the network’s current state, click Now. To capture the network’s state at a previous date and time, click Past, then in the Start Time field, select the calendar icon.
The Choose options field includes all the elements and services that may run on the network. All are selected by default. Click any element to remove it from the snapshot. Nodes and services are included in all snapshots.
The Notes field is optional. You can add a note to remind you of the snapshot’s purpose.
Select Finish. The card now appears on your workbench.
When you are finished viewing the snapshot, click Dismiss to remove it from your workbench. You can add it back by selecting
Snapshot in the header and navigating to the option to view snapshots.
Compare Network Snapshots
You can compare the state of your network before and after an upgrade or other configuration change to help avoid unwanted changes to your network’s state.
To compare network snapshots:
From the workbench header, select
Snapshot.Select Compare snapshots, then select the two snapshots you want to compare.
Click Finish.
If the snapshot cards are already on your workbench, place the cards side-by-side for a high-level comparison. For a more detailed comparison, click Compare on one of the cards and select a snapshot for comparison from the list.
Interpreting the Comparison Data
For each network element with changes, a visualization displays the differences between the two snapshots. Green represents additions, red represents subtractions, and orange represents updates.
In the following example, Snapshot 3 and Snapshot 4 are being compared. Snapshot 3 has a BGP count of 212 and Snapshot 4 has a BGP count of 186. The comparison also shows 98 BGP updates.
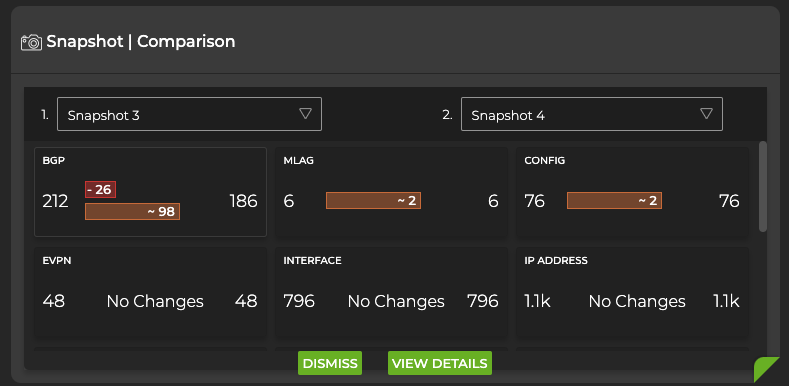
From this view, you can dismiss the snapshots or select View Details for additional information and to filter and export the data as a JSON file.
The following table describes the information provided for each element type when changes are present:
| Element | Data Descriptions |
|---|---|
| BGP |
|
| Interface |
|
| IP Address |
|
| Links |
|
| LLDP |
|
| MAC Address |
|
| MLAG |
|
| Neighbor |
|
| Node |
|
| OSPF |
|
| Route |
|
| Sensors |
|
| Services |
|