Upgrade Cumulus Linux
Lifecycle management (LCM) lets you upgrade Cumulus Linux on one or more switches in your network with the NetQ UI or the CLI. You do this by scheduling ‘upgrade jobs’ which upgrade Cumulus Linux on your switches. Each job can upgrade CL on up to 50 switches. NetQ upgrades the switches 5 at a time until all switches in the upgrade job are upgraded. You can schedule up to 5 upgrade jobs to run simultaneously.
You can upgrade switches running Cumulus Linux 5.0.0 or later that are managed with flat configuration files or with NVUE.
When you upgrade a switch that has not been configured using NVUE, LCM backs up and restores flat file configurations in Cumulus Linux. After you upgrade a switch that has been managed with flat files and subsequently run NVUE configuration commands, NVUE will overwrite the configuration restored by NetQ LCM. See Upgrading Cumulus Linux for additional information.
During the Cumulus Linux upgrade process, NetQ does not upgrade or reinstall packages that are not part of the Cumulus Linux image. For example, if you installed node_exporter packages on a switch, you must reinstall these packages after the upgrade is complete.
Prepare for a Cumulus Linux Upgrade
If the NetQ Agent is already installed on the switches you’d like to upgrade, follow the steps below. If the NetQ Agent is not installed on the switches you’d like to upgrade, run a switch discovery, then proceed with the upgrade.
Before you upgrade, make sure you have the appropriate files and credentials:
Upload the Cumulus Linux upgrade images.
(Optional) Specify a default upgrade version.
Verify or add switch access credentials.
(Optional) Assign a role to each switch.
Upgrade Cumulus Linux
After you complete the preparation steps, upgrade Cumulus Linux:
Click
 Devices in any workbench header, then select Manage switches.
Locate the Switches card and click Manage.
Select the switches you want to upgrade.
Click
 Upgrade OS above the table.
Follow the steps in the UI. Create a name for the upgrade and review the switches that you selected to upgrade:
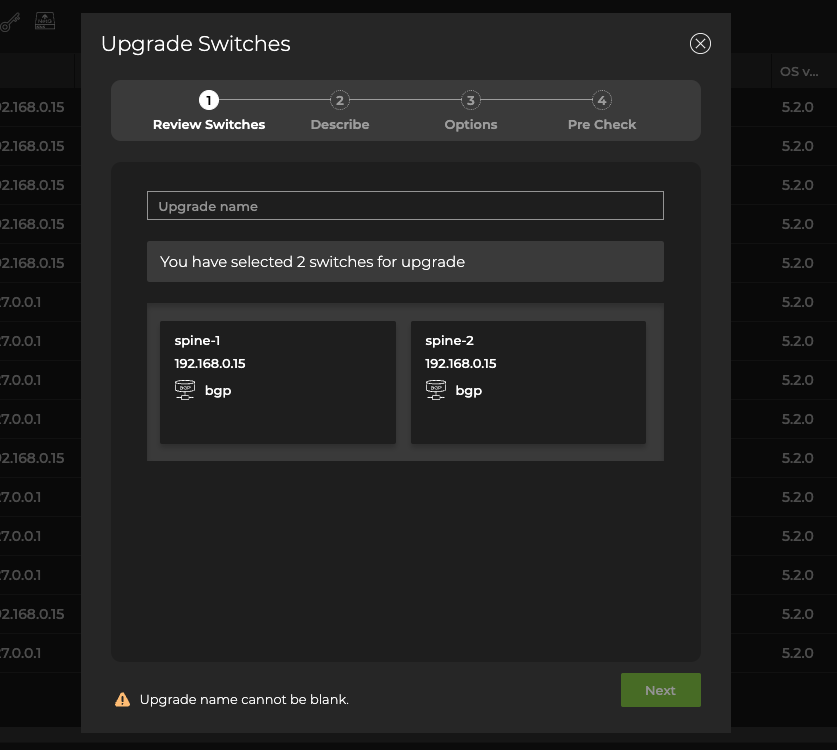
If you accidentally included a switch that you do not want to upgrade, hover over the switch information card and click ![]() Delete to remove it from the upgrade.
Delete to remove it from the upgrade.
If the role is incorrect or missing, click ![]() Edit, then select a role for that switch from the dropdown. Click
Edit, then select a role for that switch from the dropdown. Click ![]() Cancel to discard the change.
Cancel to discard the change.
Click Next.
Select either a default image or custom version.
Verify or add switch access credentials.
Click Next.
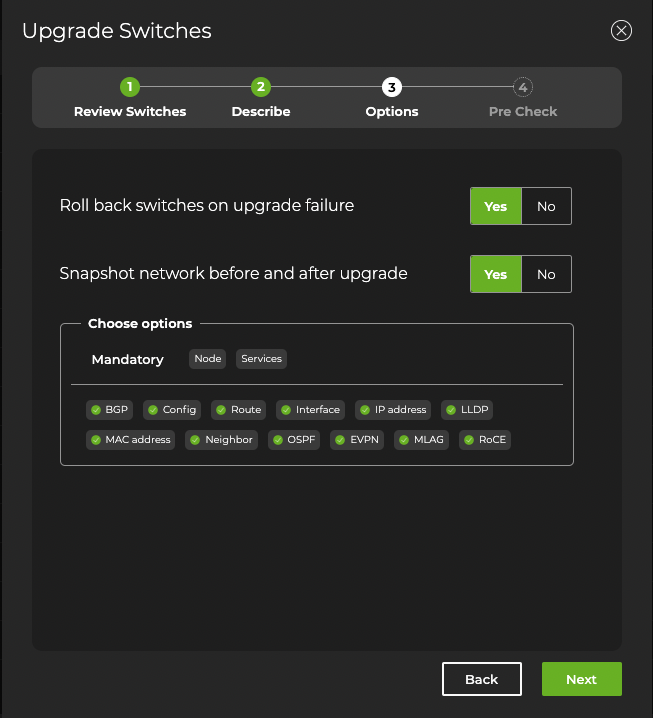
Verify the upgrade job options.
By default, NetQ performs a roll back to the original Cumulus Linux version on any server which fails to upgrade. It also takes network snapshots before and after the upgrade.
You can exclude selected services and protocols from the snapshots by clicking them. Node and services must be included.
Click Next.
NetQ performs several checks to eliminate preventable problems during the upgrade process. When all of the pre-checks pass, click Preview.
NetQ directs you to a screen where you can review the upgrade. After reviewing, select Start upgrade and confirm.
Perform the upgrade using the netq lcm upgrade cl-image command, providing a name for the upgrade job, the Cumulus Linux and NetQ version, and a comma-separated list of the hostname(s) to be upgraded:
cumulus@switch:~$ netq lcm upgrade cl-image job-name upgrade-480 cl-version 5.5.0 netq-version 4.8.0 hostnames spine01,spine02
Create a Network Snapshot
You can also generate a network snapshot before and after the upgrade by adding the run-snapshot-before-after option to the command:
cumulus@switch:~$ netq lcm upgrade cl-image job-name upgrade-480 cl-version 5.5.0 netq-version 4.8.0 hostnames spine01,spine02,leaf01,leaf02 order spine,leaf run-snapshot-before-after
Restore upon an Upgrade Failure
(Recommended) You can restore the previous version of Cumulus Linux if the upgrade job fails by adding the run-restore-on-failure option to the command.
cumulus@switch:~$ netq lcm upgrade cl-image name upgrade-540 cl-version 5.4.0 netq-version 4.8.0 hostnames spine01,spine02,leaf01,leaf02 order spine,leaf run-restore-on-failure
Pre-check Failures
If one or more of the pre-checks fail, resolve the related issue and start the upgrade again. In the NetQ UI these failures appear on the Upgrade Preview page. In the NetQ CLI, it appears in the form of error messages in the netq lcm show upgrade-jobs cl-image command output.
Analyze Results
After starting the upgrade you can monitor the progress in the NetQ UI. Successful upgrades are indicated by a green ![]() . Failed upgrades display error messages indicating the cause of failure.
. Failed upgrades display error messages indicating the cause of failure.
To view the progress of current upgrade jobs and the history of previous upgrade jobs using the CLI, run netq lcm show upgrade-jobs cl-image.
To see details of a particular upgrade job, run netq lcm show status job-ID.
To see only Cumulus Linux upgrade jobs, run netq lcm show status cl-image job-ID.
Upon successful upgrade, you can:
Compare network snapshots taken before and after the upgrade.
Download details about the upgrade in a JSON-formatted file, by clicking Download report.
Post-check Failures
A successful upgrade can still have post-check warnings. For example, you updated the OS, but not all services are fully up and running after the upgrade. If one or more of the post-checks fail, warning messages appear in the Post-Upgrade Tasks section of the preview. Click the warning category to view the detailed messages.
Upgrade Cumulus Linux on Switches Without NetQ Agent Installed
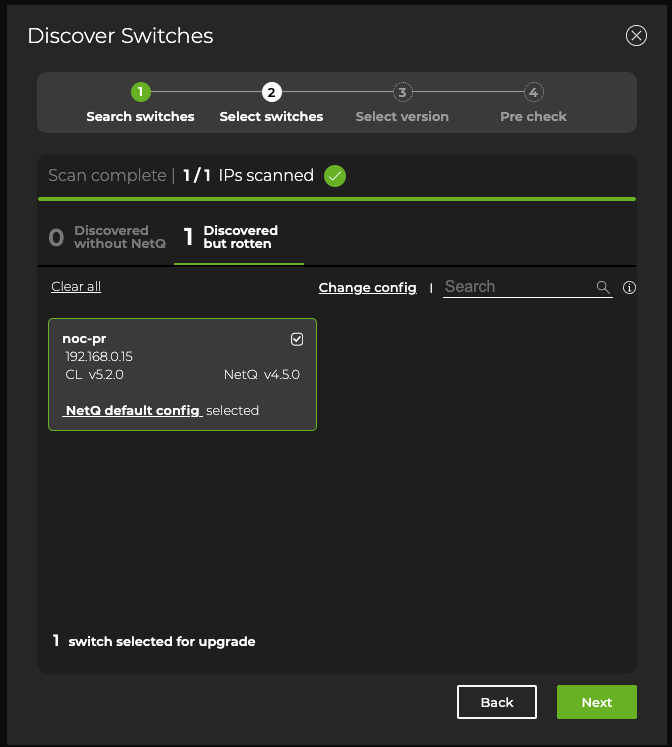
To upgrade Cumulus Linux on switches without NetQ installed, create a switch discovery. The discovery results are then used to install or upgrade Cumulus Linux and NetQ on all discovered switches in a single procedure. You can run up to five jobs simultaneously; however, a given switch can only appear in one running job at a time.
Run a switch discovery to discover switches without NetQ installed and add them to the device inventory.
Select which switches you want to upgrade from each discovered category by clicking the checkbox on each switch card. Then click Next.
Accept the default NetQ version or click Custom and select an alternate version.
By default, the NetQ Agent and CLI are upgraded on the selected switches. If you do not want to upgrade the NetQ CLI, click Advanced and change the selection to No.
Click Next.
NetQ performs several checks to eliminate preventable problems during the upgrade process. When all of the pre-checks pass, select Install.
After starting the upgrade you can monitor the progress from the preview page or the Upgrade History page.
- Run a switch discovery to discover switches without NetQ installed and add them to the device inventory.
Use the netq lcm discover command, specifying a single IP address, a range of IP addresses where your switches are located in the network, or a CSV file containing the IP address.
- After discovery and determining which switches you need to upgrade, run the upgrade process as described above.