Switch Management
Lifecycle management displays an inventory of switches that are available for software installation or upgrade through NetQ. From the inventory list, you can assign access profiles and roles to switches, and select switches for software installation and upgrades. You can also decommission switches, which removes them from the NetQ database.
If you manage a switch using an in-band network interface, additional configurations are required for LCM operations.
View the LCM Switch Inventory
From the LCM dashboard, select the Switch management tab. The Switches card displays the number of switches that NetQ discovered and the network OS versions that are running on those switches:
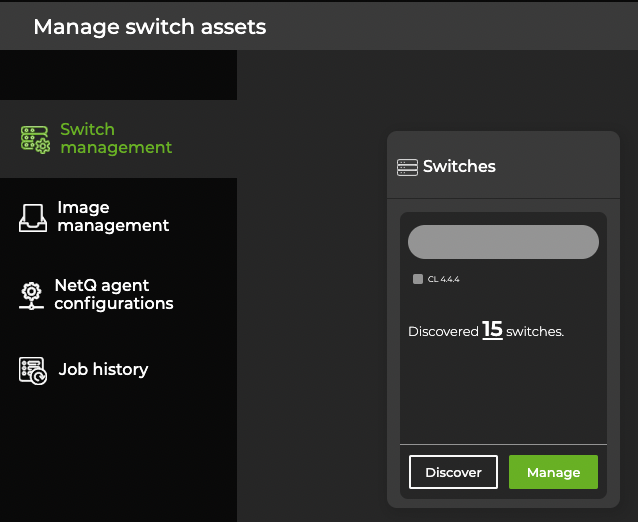
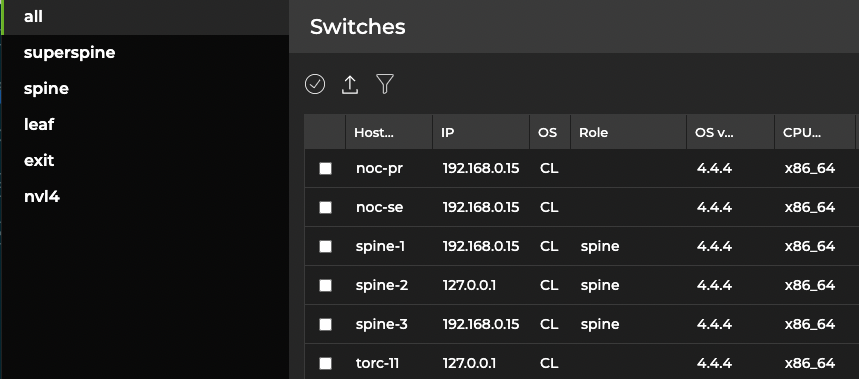
To view a table of all discovered switches and their attributes, select Manage on the Switches card.
If you have more than one network OS version running on your switches, you can click a version segment on the Switches card graph to open a list of switches pre-filtered by that version.
To view a list of all switches discovered by lifecycle management, run:
netq lcm show switches
    [cl-version <text-cumulus-linux-version>]
    [netq-version <text-netq-version>]
    [json]
Use the version options to display switches with a given OS version. For additional details, refer to the command line reference.
This list is the starting point for network OS upgrades or NetQ installations and upgrades. If the switches you want to upgrade are not present in the list, you can:
- Verify the missing switches are reachable using
ping - Run a switch discovery, which locates all switches running Cumulus Linux in your network’s fabric
- Install NetQ on the switch
- Verify the NetQ Agent is fresh and running version 4.1.0 or later for switches that already have the agent installed (click
 Menu, then click Agents or run
 netq show agents) - Upgrade NetQ Agents (if needed)
Switch Discovery
A switch discovery searches your network for all Cumulus Linux switches (with and without NetQ currently installed) and determines the versions of Cumulus Linux and NetQ installed. These results can be used to install or upgrade Cumulus Linux and NetQ on all discovered switches in a single procedure.
To discover switches running Cumulus Linux:
Click
 Devices in the workbench header, then click Manage switches.
On the Switches card, click Discover.
Enter a name for the scan.
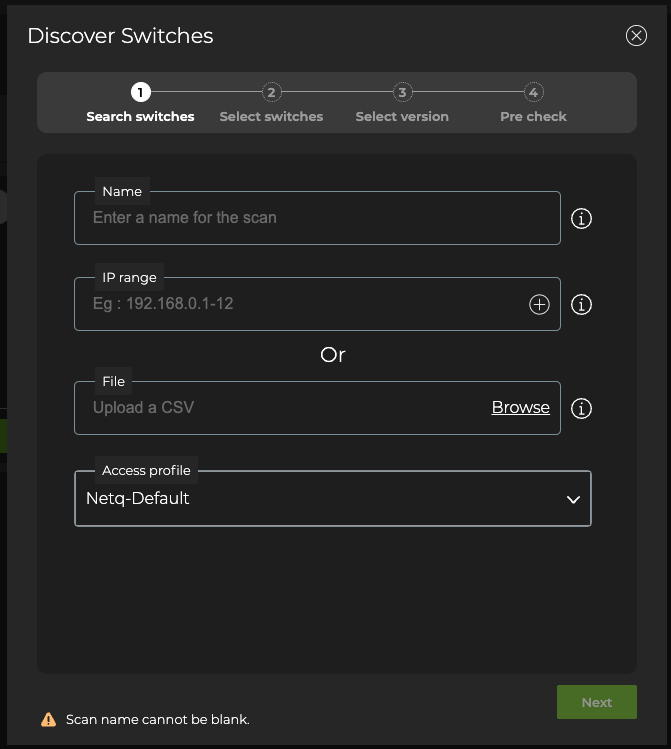
- Choose whether you want to look for switches by entering IP address ranges or import switches using a comma-separated values (CSV) file.
If you do not have a switch listing, then you can manually add the address ranges where your switches are located in the network. This has the advantage of catching switches that might have been missed in a file.
A maximum of 50 addresses can be included in an address range. If necessary, break the range into smaller ranges.
To discover switches using address ranges:
Enter an IP address range in the IP Range field.
Ranges can be contiguous, for example 192.168.0.24-64, or non-contiguous, for example 192.168.0.24-64,128-190,235, but they must be contained within a single subnet.
Optionally, enter another IP address range (in a different subnet) by clicking
 .
.For example, 198.51.100.0-128 or 198.51.100.0-128,190,200-253.
Add additional ranges as needed. Click
 to remove a range.
If you decide to use a CSV file instead, the ranges you entered will remain if you return to using IP ranges again.
To import switches through a CSV file:
Click Browse.
Select the CSV file containing the list of switches.
The CSV file must include a header containing hostname, ip, and port. They can be in any order you like, but the data must match that order. For example, a CSV file that represents the Cumulus reference topology could look like this:
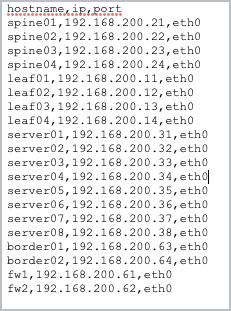
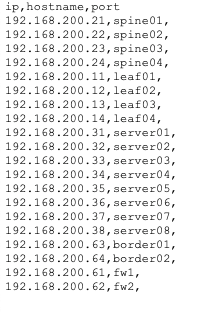
You must have an IP address in your file, but the hostname is optional. If the port is blank, NetQ uses switch port 22 by default.
Click Remove if you decide to use a different file or want to use IP address ranges instead. If you entered ranges before selecting the CSV file option, they remain.
Select an access profile from the dropdown menu. If you use Netq-Default you will see a message requesting that you create or update your credentials.
Click Next.
When the network discovery is complete, NetQ presents the number of Cumulus Linux switches it found. Each switch can be in one of the following categories:
- Discovered without NetQ: Switches found without NetQ installed
- Discovered with NetQ: Switches found with some version of NetQ installed
- Discovered but Rotten: Switches found that are unreachable
- Incorrect Credentials: Switches found that are unreachable because the provided access credentials do not match those for the switches
- OS not Supported: Switches found that are running a Cumulus Linux version not supported by LCM upgrades
- Not Discovered: IP addresses which did not have an associated Cumulus Linux switch
If the discovery process does not find any switches for a particular category, then it does not display that category.
Use the netq lcm discover command, specifying a single IP address, a range of IP addresses where your switches are located in the network, or a CSV file containing the IP address.
You must also specify the access profile ID, which you can obtain with the netq lcm show credentials command.
   cumulus@switch:~$ netq lcm discover ip-range 10.0.1.12 profile_id credential_profile_3eddab251bddea9653df7cd1be0fc123c5d7a42f818b68134e42858e54a9c289
   NetQ Discovery Started with job id: job_scan_4f3873b0-5526-11eb-97a2-5b3ed2e556db
When the network discovery is complete, NetQ presents the number of Cumulus Linux switches it has found. The output displays their discovery status, which can be one of the following:
- Discovered without NetQ: Switches found without NetQ installed
- Discovered with NetQ: Switches found with some version of NetQ installed
- Discovered but Rotten: Switches found that are unreachable
- Incorrect Credentials: Switches found that are unreachable because the provided access credentials do not match those for the switches
- OS not Supported: Switches found that are running Cumulus Linux version not supported by the LCM upgrade feature
- NOT_FOUND: IP addresses which did not have an associated Cumulus Linux switch
Note that if you previously ran a switch discovery, you can display its results with netq lcm show discovery-job:
cumulus@switch:~$ netq lcm show discovery-job job_scan_921f0a40-5440-11eb-97a2-5b3ed2e556db
Scan COMPLETED

Summary
-------
Start Time: 2021-01-11 19:09:47.441000
End Time: 2021-01-11 19:09:59.890000
Total IPs: 1
Completed IPs: 1
Discovered without NetQ: 0
Discovered with NetQ: 0
Incorrect Credentials: 0
OS Not Supported: 0
Not Discovered: 1


Hostname          IP Address                MAC Address        CPU      CL Version  NetQ Version  Config Profile               Discovery Status Upgrade Status
----------------- ------------------------- ------------------ -------- ----------- ------------- ---------------------------- ---------------- --------------
N/A               10.0.1.12                 N/A                N/A      N/A         N/A           []                           NOT_FOUND        NOT_UPGRADING
cumulus@switch:~$
Attach an Access Profile to a Switch
After creating access profiles from your credentials, you can attach a profile to one or more switches.
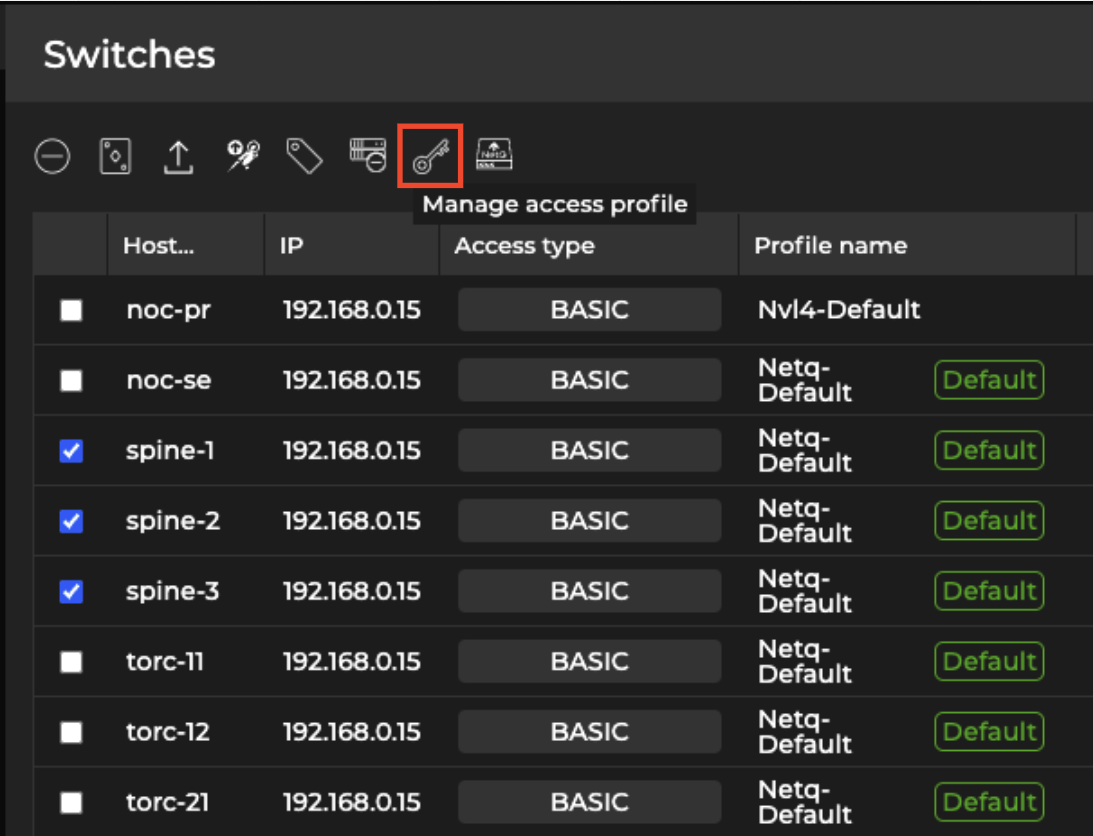
Expand the
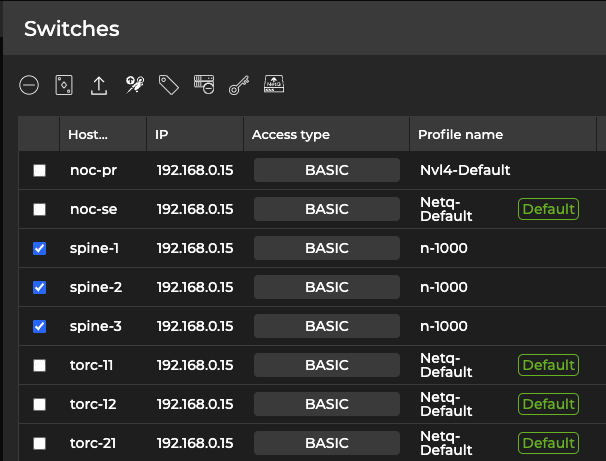
Menu and select Manage switches. On the Switches card, select Manage.The table displays a list of switches. The Access type column specifies whether the type of authentication is basic or SSH. The Profile name column displays the access profile that is assigned to the switch.
Select the switches you’d like to assign access profiles, then select ![]() Manage access profile above the table:
Manage access profile above the table:
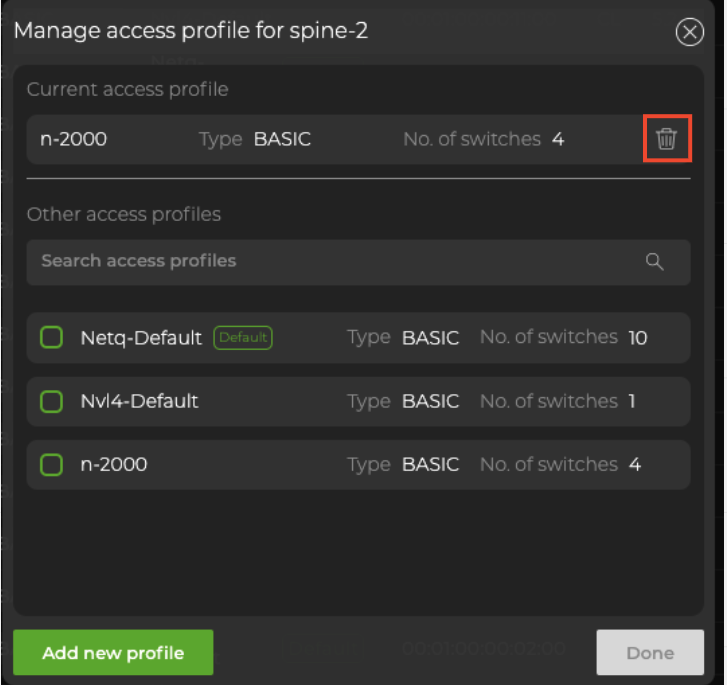
- Select the profile from the list, then click Done.
If the profile you want to use isn’t listed, select Add new profile and follow the steps to create an access profile.
- Select Ok on the confirmation dialog. The updated access profiles are now reflected in the Profile name column:
The command syntax to attach a profile to a switch is:
netq lcm attach credentials
    profile_id <text-switch-profile-id>
    hostnames <text-switch-hostnames>
Run
netq lcm show credentialsto display a list of access profiles. Note the profile ID that you’d like to assign to a switch.Run
netq lcm show switchesto display a list of switches. Note the hostname of the switch(es) you’d like to attach a profile to.Next, attach the credentials to the switch:
netq lcm attach credentials profile_id credential_profile_3eddab251bddea9653df7cd1be0fc123c5d7a42f818b68134e42858e54a9c289 hostnames tor-1,tor-2
Attached profile to switch(es).
- Run
netq lcm show switchesand verify the change in the credential profile column.
Reassign or Detach an Access Profile
Detaching a profile from a switch restores it to the default access profile, Netq-Default.
On the Switches card, click Manage.
The table displays a list of switches. In the profile name column, locate the access profile. Hover over the access type column and select Manage access:
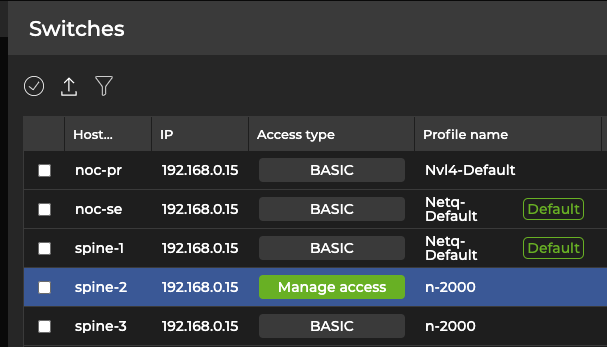
- To assign a different access profile to the switch, select it from the list. To detach the access profile, select
 Detach.
After you detach the profile from the switch, NetQ reassigns it to the Netq-Default profile.
The syntax for the detach command is netq lcm detach credentials hostname <text-switch-hostname>.
To obtain a list of hostnames, run
netq lcm show switches.Detach the access profile and specify the hostname. The following example detaches spine-1 from its assigned access profile:
cumulus@switch:~$ netq lcm detach credentials hostname spine-1
Detached profile from switch.
- Run
netq lcm show switchesand verify the change in the credential profile column.
Role Management
You can assign switches one of four roles: superspine, spine, leaf, and exit.
Switch roles identify switch dependencies and determine the order in which switches are upgraded. The upgrade process begins with switches assigned the superspine role, then continues with the spine switches, leaf switches, exit switches, and finally, switches with no role assigned. Upgrades for all switches with a given role must be successful before the upgrade proceeds to the switches with the closest dependent role.
Role assignment is optional, but recommended. Assigning roles can prevent switches from becoming unreachable due to dependencies between switches or single attachments. Additionally, when you deploy MLAG pairs, assigned roles avoid upgrade conflicts.
Assign Roles to Switches
On the Switches card, click Manage.
Select one switch or multiple switches to assign to the same role.
Above the table, select
 Assign role.
Select the role (superspine, leaf, spine, or exit) that applies to the selected switch(es).
Click Assign.
Note that the Role column is updated with the role assigned to the selected switch(es). To return to the full list of switches, click All.
- Continue selecting switches and assigning roles until most or all switches have roles assigned.
To add a role to one or more switches, run:
netq lcm add role (superspine | spine | leaf | exit) switches <text-switch-hostnames>
For a single switch, run:
netq lcm add role leaf switches leaf01
To assign multiple switches to the same role, separate the hostnames with commas (no spaces). This example configures leaf01 through leaf04 switches with the leaf role:
netq lcm add role leaf switches leaf01,leaf02,leaf03,leaf04
To view all switch roles, run:
netq lcm show switches [version <text-cumulus-linux-version>] [json]
Use the version option to only show switches with a given network OS version, X.Y.Z.
The Role column displays assigned roles:
cumulus@switch:~$ netq lcm show switches
Hostname          Role       IP Address                MAC Address        CPU      CL Version           NetQ Version             Last Changed
----------------- ---------- ------------------------- ------------------ -------- -------------------- ------------------------ -------------------------
leaf01            leaf       192.168.200.11            44:38:39:00:01:7A  x86_64   4.1.0                3.2.0-cl4u30~1601410518. Wed Sep 30 21:55:37 2020
                                                                                                        104fb9ed
spine04           spine      192.168.200.24            44:38:39:00:01:6C  x86_64   4.1.0                3.2.0-cl4u30~1601410518. Tue Sep 29 21:25:16 2020
                                                                                                        104fb9ed
leaf03            leaf       192.168.200.13            44:38:39:00:01:84  x86_64   4.1.0                3.2.0-cl4u30~1601410518. Wed Sep 30 21:55:56 2020
                                                                                                        104fb9ed
leaf04            leaf       192.168.200.14            44:38:39:00:01:8A  x86_64   4.1.0                3.2.0-cl4u30~1601410518. Wed Sep 30 21:55:07 2020
                                                                                                        104fb9ed
border02                     192.168.200.64            44:38:39:00:01:7C  x86_64   4.1.0                3.2.0-cl4u30~1601410518. Wed Sep 30 21:56:49 2020
                                                                                                        104fb9ed
border01                     192.168.200.63            44:38:39:00:01:74  x86_64   4.1.0                3.2.0-cl4u30~1601410518. Wed Sep 30 21:56:37 2020
                                                                                                        104fb9ed
fw2                          192.168.200.62            44:38:39:00:01:8E  x86_64   4.1.0                3.2.0-cl4u30~1601410518. Tue Sep 29 21:24:58 2020
                                                                                                        104fb9ed
spine01           spine      192.168.200.21            44:38:39:00:01:82  x86_64   4.1.0                3.2.0-cl4u30~1601410518. Tue Sep 29 21:25:07 2020
                                                                                                        104fb9ed
spine02           spine      192.168.200.22            44:38:39:00:01:92  x86_64   4.1.0                3.2.0-cl4u30~1601410518. Tue Sep 29 21:25:08 2020
                                                                                                        104fb9ed
spine03           spine      192.168.200.23            44:38:39:00:01:70  x86_64   4.1.0                3.2.0-cl4u30~1601410518. Tue Sep 29 21:25:16 2020
                                                                                                        104fb9ed
fw1                          192.168.200.61            44:38:39:00:01:8C  x86_64   4.1.0                3.2.0-cl4u30~1601410518. Tue Sep 29 21:24:58 2020
                                                                                                        104fb9ed
leaf02            leaf       192.168.200.12            44:38:39:00:01:78  x86_64   4.1.0                3.2.0-cl4u30~1601410518. Wed Sep 30 21:55:53 2020
                                                                                                        104fb9ed
Reassign Roles to Switches
On the Switches card, click Manage.
Select the switches with the incorrect role from the list.
Click
Assign role.Select the correct role. To leave a switch unassigned, select No Role.
Click Assign.
You use the same command to both assign a role and change a role.
For a single switch, run:
netq lcm add role exit switches border01
To assign multiple switches to the same role, separate the hostnames with commas (no spaces). For example:
cumulus@switch:~$ netq lcm add role exit switches border01,border02
Decommission a Switch with LCM
Decommissioning the switch or host removes information about the switch or host from the NetQ database. When the NetQ Agent restarts at a later date, it sends a connection request back to the database, so NetQ can monitor the switch or host again.
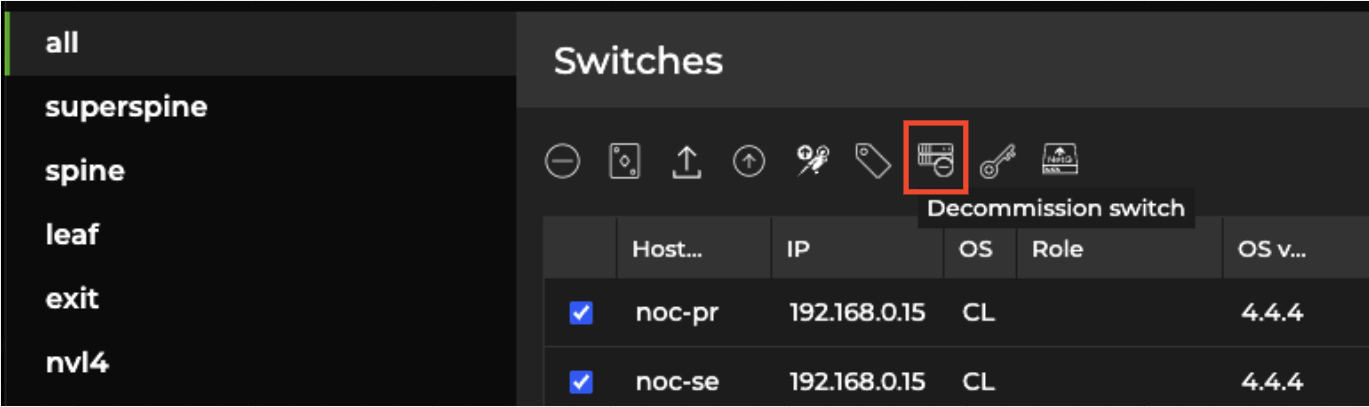
From the LCM dashboard, navigate to the Switch management tab.
On the Switches card, select Manage.
Select the devices to decommission, then select Decommission switch above the table:
If you attempt to decommission a switch that is assigned a default, unmodified access profile, the process will fail. Create a unique access profile (or update the default with unique credentials), then attach the profile to the switch you want to decommission.
Confirm the devices you want to decommission.
Wait for the decommission process to complete, then select Done.
To decommission a switch or host:
On the given switch or host, stop and disable the NetQ Agent service:
cumulus@switch:~$ sudo systemctl stop netq-agent
cumulus@switch:~$ sudo systemctl disable netq-agent
On the NetQ appliance or VM, decommission the switch or host:
cumulus@netq-appliance:~$ netq decommission <hostname-to-decommission>