Upgrade NetQ Agent
Lifecycle management lets you upgrade to the latest agent version on switches with an existing NetQ Agent. You can upgrade only the NetQ Agent or both the NetQ Agent and NetQ CLI simultaneously. You can run up to five jobs at the same time; however, a given switch can only appear in one running job at a time.
Prepare for a NetQ Agent Upgrade
Before you upgrade, make sure you have the appropriate files and credentials:
Upload the upgrade images.
(Optional) Specify a default upgrade version.
Verify or add switch access credentials.
(Optional) Create an agent configuration profile, as described in the next section.
Verify or add switch access credentials.
Configure switch roles to determine the order in which the switches get upgraded.
Upload the Cumulus Linux upgrade images.
(Optional) Create an agent configuration profile, as described in the next section.
Agent Configuration Profiles
You can set up a configuration profile to indicate how you want NetQ configured when it is installed or upgraded on your Cumulus Linux switches. When you create a configuration profile, you can adjust the following agent settings:
- The VRF the NetQ agent uses to communicate with the NetQ server
- Whether WJH is enabled or disabled
- The agent log level
- The agent CPU limit
The default configuration profile, NetQ default config, is set up to run in the management VRF and provide info-level logging. Both WJH and CPU limiting are disabled.
Create Configuration Profiles
Before creating a configuration profile, generate AuthKeys using the UI. Copy the access key and secret key to an accessible location.
Expand the
 Menu and select Manage switches.
Select NetQ agent configurations.
On the NetQ agent configurations card, select Add config.
Enter a profile name and choose the settings from the options presented in the UI. Select Advanced to set values for the log level and CPU limit:
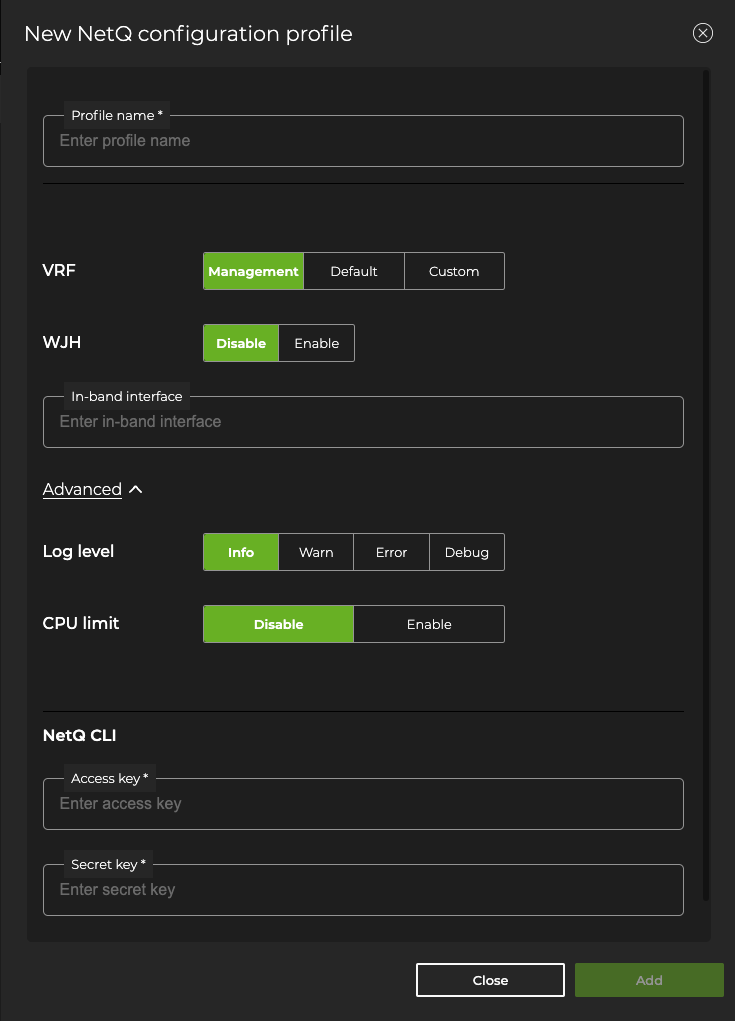
- Enter your NetQ CLI authentication keys and select Add.
Create a NetQ agent configuration profile with the netq lcm add netq-config command. If you manage the switch using an in-band interface, you must specify the interface name using the inband-interface option:
cumulus@netq-server:~$ netq lcm add netq-config
    config-profile-name <text-config-profile>
    accesskey <text-access-key>
    secret-key <text-secret-key>
    [cpu-limit <text-cpu-limit>]
    [log-level error | log-level warn | log-level info | log-level debug]
    [vrf default | vrf mgmt | vrf <text-config-vrf>]
    [wjh enable | wjh disable]
    [inband-interface <text-inband-interface>]
Perform a NetQ Agent Upgrade
The steps below assume that a version of NetQ is already installed on your switches. If NetQ is not installed, run a switch discovery to find all Cumulus Linux switches with and without NetQ currently installed and perform the upgrade as part of the discovery workflow.
Expand the
Menu and select Manage switches.Locate the Switches card and click Manage. Select the switches you want to upgrade.
Click
 Upgrade NetQ above the table and follow the steps in the UI.
Verify that the number of switches selected for upgrade matches your expectation.
Enter a name for the upgrade job. The name can contain a maximum of 22 characters (including spaces).
Review each switch. If you’d like to change the agent configuration profile, click Change config, then select an alternate profile to apply to all selected switches. Alternately, you can apply different profiles to each switch by clicking the current profile and selecting an alternate profile.
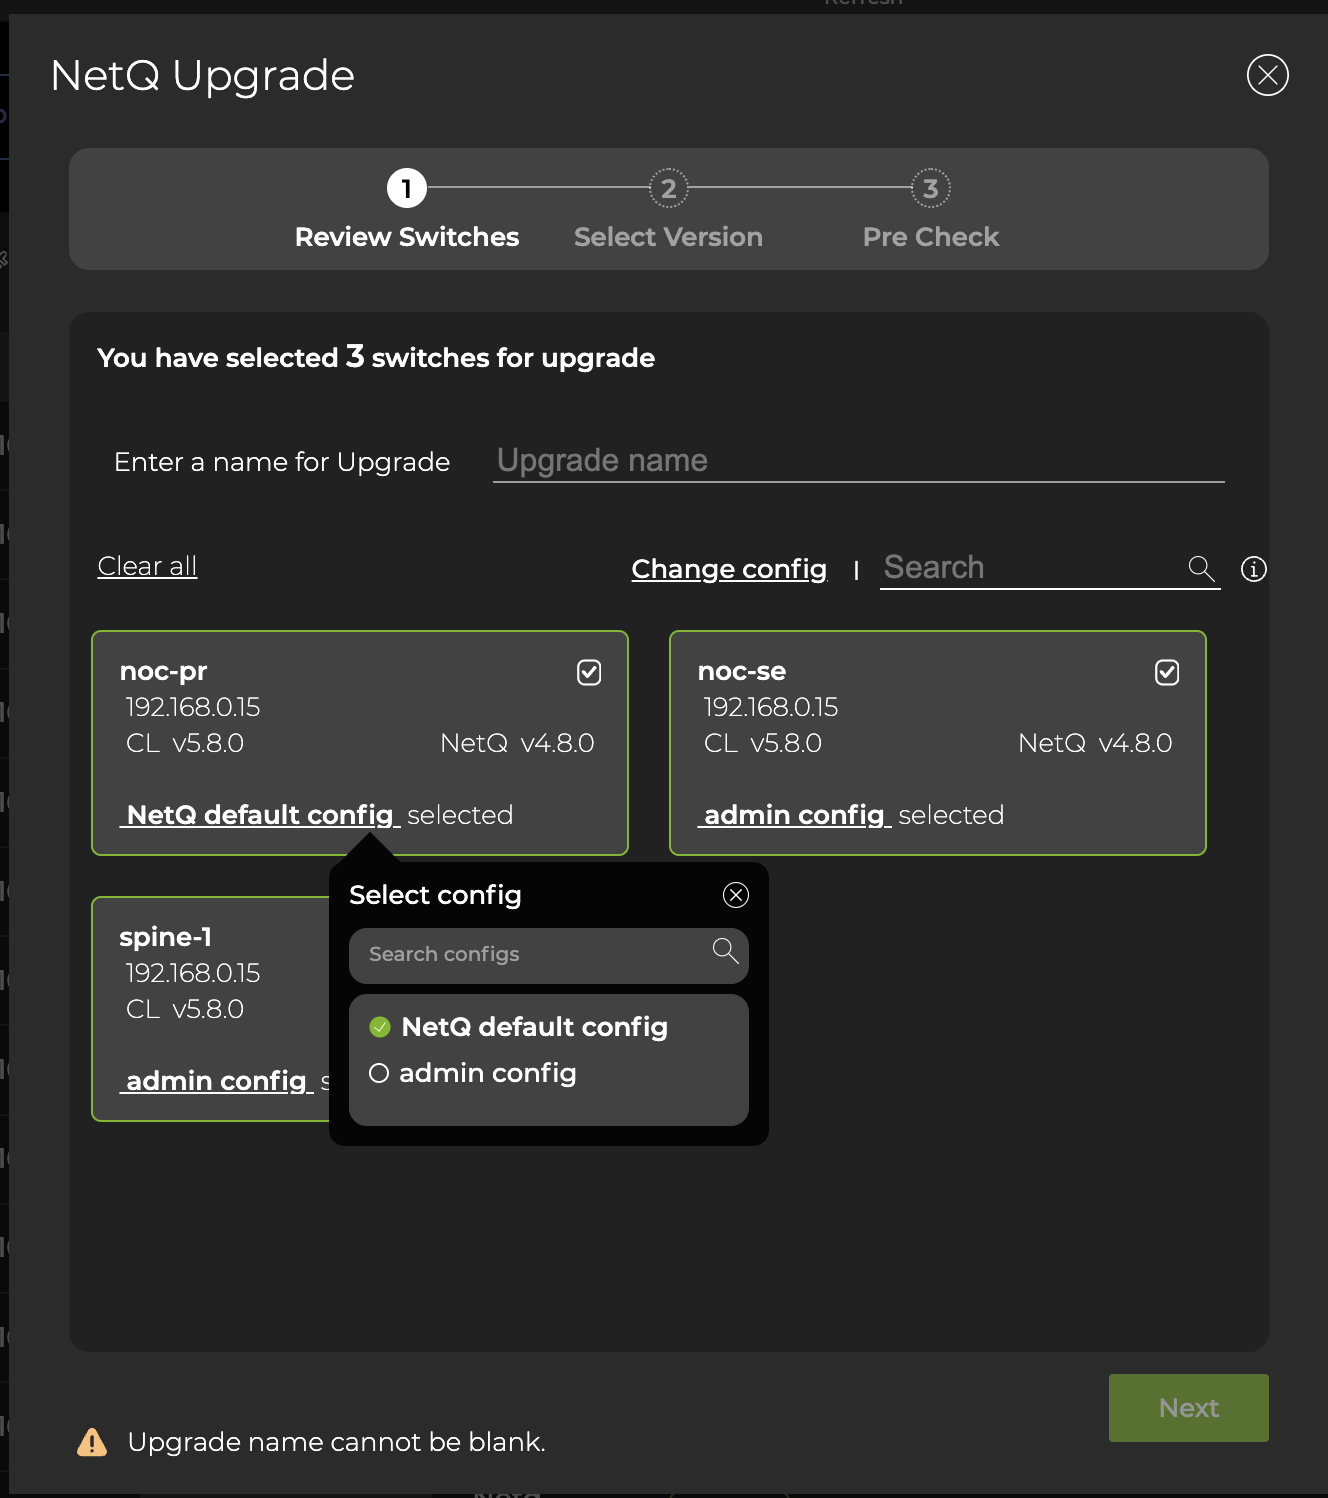
Review the summary indicating the number of switches and the configuration profile to be used. If either is incorrect, click Back and review your selections.
Select the version of NetQ Agent for upgrade. If you have designated a default version, keep the Default selection. Otherwise, select an alternate version by clicking Custom and selecting it from the list.
By default, the NetQ Agent and CLI are upgraded on the selected switches. If you do not want to upgrade the NetQ CLI, click Advanced and change the selection to No.
- NetQ performs several checks to eliminate preventable problems during the upgrade process. When all of the pre-checks pass, click Upgrade to initiate the upgrade.
To upgrade the NetQ Agent on one or more switches, run:
netq lcm upgrade netq-image
    job-name <text-job-name>
    [netq-version <text-netq-version>]
    [upgrade-cli True | upgrade-cli False]
    hostnames <text-switch-hostnames>
    [config_profile <text-config-profile>]
The following example creates a NetQ Agent upgrade job called upgrade-cl550-nq490. It upgrades the spine01 and spine02 switches with NetQ Agents version 4.9.0.
cumulus@switch:~$ netq lcm upgrade netq-image job-name upgrade-cl550-nq490 netq-version 4.9.0 hostnames spine01,spine02
Analyze the NetQ Agent Upgrade Results
After starting the upgrade you can monitor the progress in the NetQ UI. Successful upgrades are indicated by a green ![]() . Failed upgrades display error messages indicating the cause of failure.
. Failed upgrades display error messages indicating the cause of failure.
To view the progress of upgrade jobs using the CLI, run:
netq lcm show upgrade-jobs netq-image [json]
netq lcm show status <text-lcm-job-id> [json]