Set Up Your Virtual Machine for an On-premises HA Server Cluster
Follow these steps to set up and configure your VM on a cluster of servers in an on-premises deployment. First configure the VM on the master node, and then configure the VM on each worker node. NVIDIA recommends installing the virtual machines on different physical servers to increase redundancy in the event of a hardware failure.
System Requirements
Verify that each node in your cluster—the master node and two worker nodes—meets the VM requirements.
| Resource | Minimum Requirements |
|---|---|
| Processor | 16 virtual CPUs |
| Memory | 64 GB RAM |
| Local disk storage | 500 GB SSD with minimum disk IOPS of 1000 for a standard 4kb block size; P99 disk I/O latency < 10ms (Note: This must be an SSD; other storage options can lead to system instability and are not supported.) |
| Network interface speed | 1 Gb NIC |
| Hypervisor | KVM/QCOW (QEMU Copy on Write) image for servers running Ubuntu; VMware ESXi™ 6.5 or later (OVA image) for servers running Cumulus Linux or Ubuntu |
Port Requirements
Confirm that the required ports are open for communications.
| Port or Protocol Number | Protocol | Component Access |
|---|---|---|
| 4 | IP Protocol | Calico networking (IP-in-IP Protocol) |
| 22 | TCP | SSH |
| 80 | TCP | nginx |
| 179 | TCP | Calico networking (BGP) |
| 443 | TCP | NetQ UI |
| 2379 | TCP | etcd datastore |
| 4789 | UDP | Calico networking (VxLAN) |
| 5000 | TCP | Docker registry |
| 6443 | TCP | kube-apiserver |
| 30001 | TCP | DPU communication |
| 30008 | TCP | gRPC OTLP export |
| 30009 | TCP | HTTPS OTLP export |
| 31980 | TCP | NetQ Agent communication |
| 31982 | TCP | NetQ Agent SSL communication |
| 32710 | TCP | API Gateway |
Installation and Configuration
Download the NetQ image.
a. Log in to your NVIDIA Application Hub account.
b. Select NVIDIA Licensing Portal.
c. Select Software Downloads from the menu.
d. In the search field above the table, enter NetQ.
e. For deployments using KVM, download the NetQ SW 5.2.1 KVM image. For deployments using VMware, download the NetQ SW 5.2.1 VMware image
f. If prompted, read the license agreement and proceed with the download.
NVIDIA employees can download NetQ directly from the NVIDIA Licensing Portal.
- Open your hypervisor and configure your VM. You can use the following examples for reference or use your own hypervisor instructions.
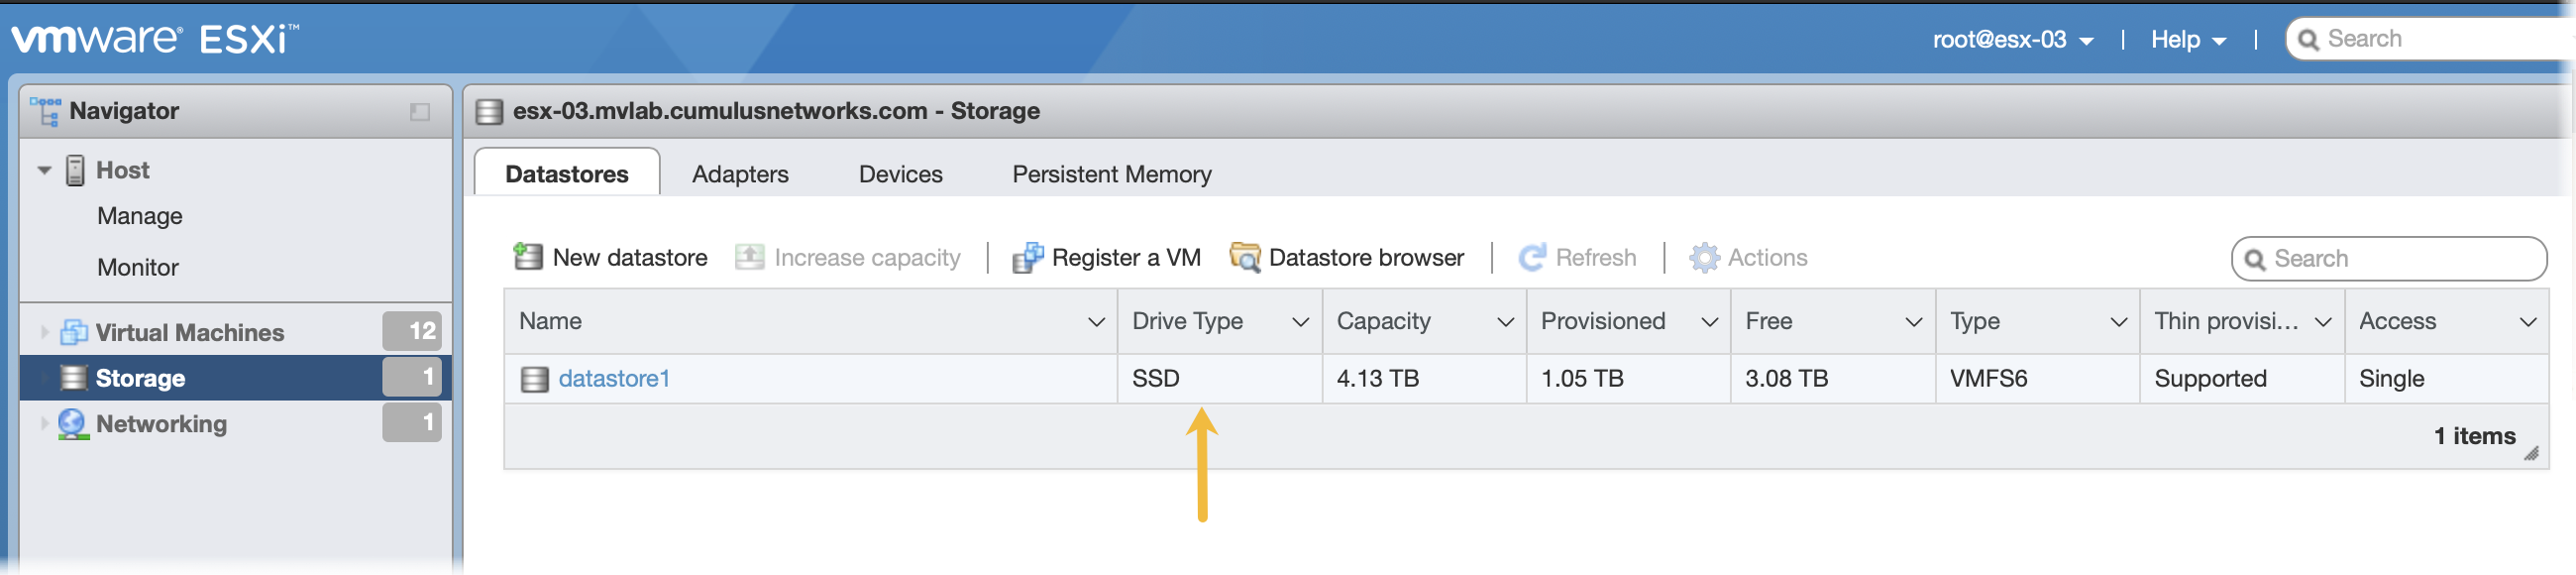
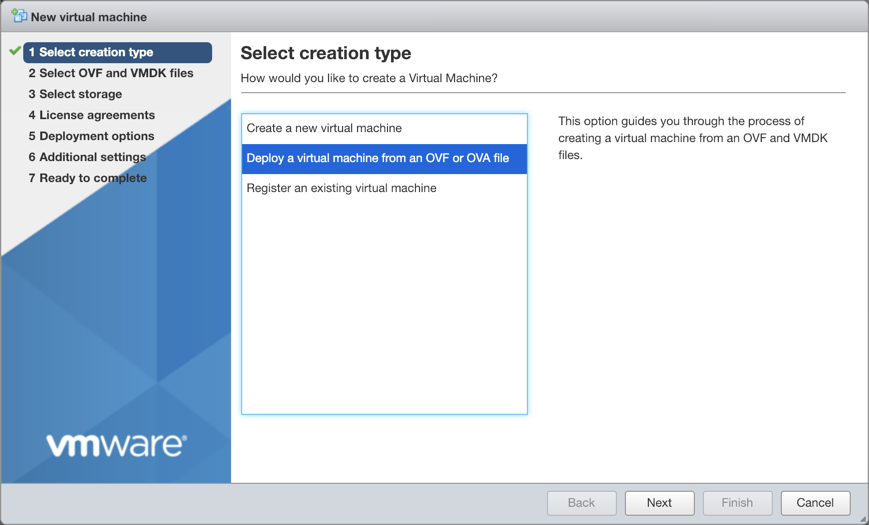
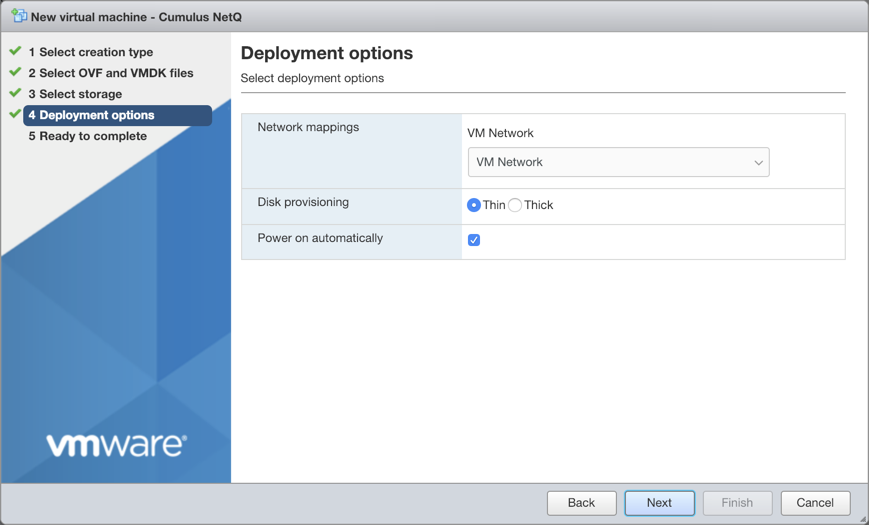
This example shows the VM setup process for a system with Libvirt and KVM/QEMU installed. Confirm that the SHA256 checksum matches the one posted on the NVIDIA Application Hub to ensure the image download has not been corrupted. Copy the QCOW2 image to a directory where you want to run it. Tip: Copy, instead of moving, the original QCOW2 image to avoid re-downloading it should you need to perform this process again. Create the VM. For a Direct VM, where the VM uses a MACVLAN interface on the physical host interface for its connectivity: For a Direct VM, where the VM uses a MACVLAN interface on a bonded interface for its connectivity: For a Bridged VM, where the VM attaches to a pre-configured bridge interface: Replace the bridge value ( Make note of the name used during install as this is needed in a later step. Direct VM/macvtap deployments only: Enable Enable To make this setting persist across host reboots, use a libvirt hook: Optionally, enable To make this setting persist across VM reboots: Watch the boot process in another terminal window. Enter the address of the hardware in your browser. Log in to VMware using credentials with root access. Click Storage in the Navigator to verify you have an SSD installed. Click Create/Register VM at the top of the right pane. Select Deploy a virtual machine from an OVF or OVA file, and click Next. Provide a name for the VM, for example NetQ. Tip: Make note of the name used during install as this is needed in a later step. Drag the NetQ image file you downloaded from the NVIDIA Application Hub to the installation wizard, then click Next. Select the storage type and data store for the image, then click Next. Accept the default deployment options or modify them according to your network needs. Click Next when you are finished. Review the configuration summary. Click Back to change any of the settings, or click Finish to continue with the creation of the VM. The progress of the request is shown in the Recent Tasks window at the bottom of the application. This may take some time. After the VM is deployed, the wizard displays the full hardware and configuration details.KVM Example Configuration
$ sha256sum ./Downloads/netq-5.2.1-ubuntu-24.04-ts-qemu.qcow2
$ a0d9a4f9ce8925b7dfb90a5a44616cadbf3fc667013abae07cd774555c08ff6f ./Downloads/netq-5.2.1-ubuntu-24.04-ts-qemu.qcow2$ sudo mkdir /vms
$ sudo cp ./Downloads/netq-5.2.1-ubuntu-24.04-ts-qemu.qcow2 /vms/ts.qcow2$ virt-install --name=netq_ts --vcpus=16 --memory=65536 --os-type=linux --os-variant=generic --disk path=/vms/ts.qcow2,format=qcow2,bus=virtio,cache=none --network=type=direct,source=eth0,model=virtio --import --noautoconsole
$ virt-install --name=netq_ts --vcpus=16 --memory=65536 --os-type=linux --os-variant=generic --disk path=/vms/ts.qcow2,format=qcow2,bus=virtio,cache=none --network=type=direct,source=bond1,source_mode=vepa,model=virtio --import --noautoconsole
allmulticast must be enabled on all host macvtap interfaces. Without it, macvtap drops multicast traffic required by keepalived, which can cause the virtual IP address to become unreachable. See step 4 for configuration instructions.$ virt-install --name=netq_ts --vcpus=16 --memory=65536 --os-type=linux --os-variant=generic \ --disk path=/vms/ts.qcow2,format=qcow2,bus=virtio,cache=none --network=bridge=br0,model=virtio --import --noautoconsole
br0) with the name of the bridge interface that connects the VM to the external network. The Bridged VM method is recommended for HA cluster deployments because it handles multicast traffic natively without additional configuration.allmulticast on the host macvtap interfaces and within each NetQ VM, and configure both settings to persist across reboots.allmulticast on each macvtap interface on the host. Replace macvtapX with the macvtap interface created for the VM:$ ip link show | grep macvtap
$ ip link set dev macvtapX allmulticast on$ mkdir -p /etc/libvirt/hooks
$ cat > /etc/libvirt/hooks/qemu << 'EOF'
#!/bin/bash
VMNAME=$1
ACTION=$2
if [ "$ACTION" == "started" ]; then
sleep 2
for iface in $(ip link show | grep macvtap | awk -F: '{print $2}' | tr -d ' '); do
ip link set dev "$iface" allmulticast on
logger "allmulticast enabled on $iface for VM $VMNAME"
done
fi
EOF
$ chmod +x /etc/libvirt/hooks/qemuallmulticast on eth0 within each NetQ VM to support components that use standard multicast sockets:$ ip link set dev eth0 allmulticast on
$ cat > /etc/systemd/system/allmulticast-eth0.service << 'EOF'
[Unit]
Description=Enable allmulticast on eth0
After=network.target

[Service]
Type=oneshot
ExecStart=/sbin/ip link set dev eth0 allmulticast on
RemainAfterExit=yes

[Install]
WantedBy=multi-user.target
EOF

$ systemctl enable --now allmulticast-eth0.service$ virsh console netq_ts
VMware Example Configuration
This example shows the VM setup process using an OVA file with VMware ESXi.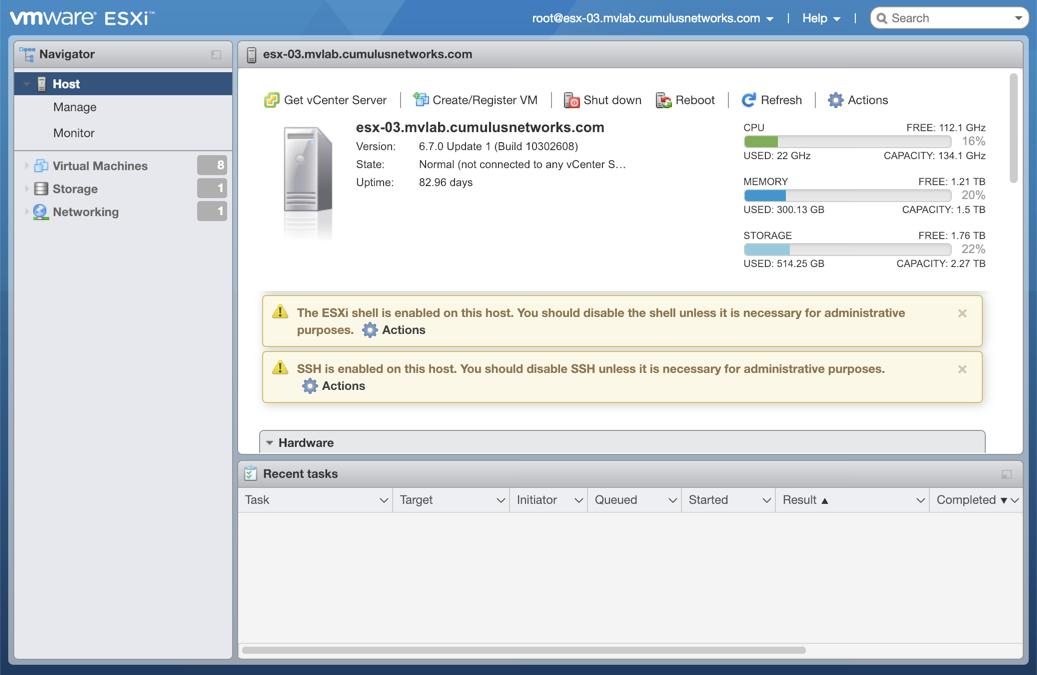

- Log in to the VM and change the password.
Use the default credentials to log in the first time:
- Username: nvidia
- Password: nvidia
$ ssh nvidia@<ipaddr>
Warning: Permanently added '<ipaddr>' (ECDSA) to the list of known hosts.
Ubuntu 24.04 LTS
nvidia@<ipaddr>'s password:
You are required to change your password immediately (root enforced)
System information as of Thu Dec  3 21:35:42 UTC 2024
System load:  0.09              Processes:           120
Usage of /:   8.1% of 61.86GB   Users logged in:     0
Memory usage: 5%                IP address for eth0: <ipaddr>
Swap usage:   0%
WARNING: Your password has expired.
You must change your password now and login again!
Changing password for nvidia.
(current) UNIX password: nvidia
Enter new UNIX password:
Retype new UNIX password:
passwd: password updated successfully
Connection to <ipaddr> closed.
Log in again with your new password.
$ ssh nvidia@<ipaddr>
Warning: Permanently added '<ipaddr>' (ECDSA) to the list of known hosts.
Ubuntu 24.04 LTS
nvidia@<ipaddr>'s password:
  System information as of Thu Dec  3 21:35:59 UTC 2024
  System load:  0.07              Processes:           121
  Usage of /:   8.1% of 61.86GB   Users logged in:     0
  Memory usage: 5%                IP address for eth0: <ipaddr>
  Swap usage:   0%
Last login: Thu Dec  3 21:35:43 2024 from <local-ipaddr>
nvidia@ubuntu:~$
- Verify that the master node is ready for installation. Fix any errors before installing the NetQ software.
nvidia@hostname:~$ sudo opta-check
- Change the hostname for the VM from the default value.
The default hostname for the NetQ virtual machines is ubuntu. Change the hostname to fit your naming conventions while meeting Internet and Kubernetes naming standards.
Kubernetes requires hostnames to be composed of a sequence of labels concatenated with dots. For example, “en.wikipedia.org” is a hostname. Each label must be from 1 to 63 characters long. The entire hostname, including the delimiting dots, has a maximum of 253 ASCII characters.
The Internet standards (RFCs) for protocols specify that labels may contain only the ASCII letters a through z (in lower case), the digits 0 through 9, and the hyphen-minus character ('-').
Use the following command:
nvidia@hostname:~$ sudo hostnamectl set-hostname NEW_HOSTNAME
Open your hypervisor and set up the VM in the same manner as for the master node.
Make a note of the private IP address you assign to the worker node. You will need it to complete the installation.
Verify that the worker node is ready for installation. Fix any errors indicated before installing the NetQ software.
nvidia@hostname:~$ sudo opta-check
Repeat steps 6 and 7 for each additional worker node in your cluster.
Install and activate the NetQ software using the CLI.
Run the following command on your master node to initialize the cluster. Copy the output of the command to use on your worker nodes:
nvidia@<hostname>:~$ netq install cluster master-init
    Please run the following command on all worker nodes:
    netq install cluster worker-init c3NoLXJzYSBBQUFBQjNOemFDMXljMkVBQUFBREFRQUJBQUFCQVFDM2NjTTZPdVM3dQN9MWTU1a
Run the
netq install cluster worker-init <ssh-key>command on each of your worker nodes.Run the installation command on your NetQ server. Follow the steps under Restore Data and New Install if you have a backup data tarball from a previous NetQ installation to restore.
Run the following commands on your master node, using the IP addresses of your worker nodes and the HA cluster virtual IP address (VIP). You can specify the IP address of the server instead of the interface name using the ip-addr <ip-address> argument. In both cases, you must use a static IP address.
The HA cluster virtual IP must be:
- An unused IP address allocated from the same subnet assigned to the default interface for your master and worker nodes. The default interface is the interface used in the netq install command.
- A different IP address than the primary IP assigned to the default interface.
The following example installs NetQ using the eth0 interface:
nvidia@<hostname>:~$ netq install cluster full interface eth0 bundle /mnt/installables/NetQ-5.2.1.tgz workers <worker-1-ip> <worker-2-ip> cluster-vip <vip-ip>
Example using IP address:
nvidia@hostname:~$ netq install cluster full ip-addr <ip-address> bundle /mnt/installables/NetQ-5.2.1.tgz workers <worker-1-ip> <worker-2-ip>
NetQ uses the 10.244.0.0/16 (pod-ip-range) and 10.96.0.0/16 (service-ip-range) networks for internal communication by default. If you are using these networks, you must override each range by specifying new subnets for these parameters in the install command:
nvidia@hostname:~$ netq install cluster full interface eth0 bundle /mnt/installables/NetQ-5.2.1.tgz pod-ip-range <pod-ip-range> service-ip-range <service-ip-range> workers <worker-1-ip> <worker-2-ip>
If this step fails for any reason, run netq bootstrap reset and then try again.
Restore your data with the backup file you created during a backup using the restore option with the netq install command. The restore option copies the data from the backup file to the database, decompresses it, verifies the restoration, and starts all necessary services.
Run the installation command on your master node, using the IP addresses of your worker nodes, the HA cluster virtual IP address (VIP), and referencing the path where the backup file resides.
The HA cluster virtual IP must be:
- An unused IP address allocated from the same subnet assigned to the default interface for your master and worker nodes. The default interface is the interface used in the netq install command.
- A different IP address than the primary IP assigned to the default interface.
nvidia@netq-server:~$ netq install cluster full interface eth0 bundle /mnt/installables/NetQ-5.2.1.tgz workers 10.188.44.219 10.188.45.164 cluster-vip 10.188.45.169 restore /home/nvidia/combined_backup_20241211111316.tar
Example using IP address:
nvidia@hostname:~$ netq install cluster full ip-addr <ip-addres> bundle /mnt/installables/NetQ-5.2.1.tgz workers 10.188.44.219 10.188.45.164 cluster-vip 10.188.45.169 restore /home/nvidia/combined_backup_20241211111316.tar
NetQ uses the 10.244.0.0/16 (pod-ip-range) and 10.96.0.0/16 (service-ip-range) networks for internal communication by default. If you are using these networks, you must override each range by specifying new subnets for these parameters in the install command:
nvidia@hostname:~$ netq install cluster full interface eth0 bundle /mnt/installables/NetQ-5.2.1.tgz workers <worker-1-ip> <worker-2-ip> pod-ip-range <pod-ip-range> service-ip-range <service-ip-range> restore /home/nvidia/combined_backup_20241211111316.tar
If this step fails for any reason, run netq bootstrap reset and then try again.
Verify Installation Status
To view the status of the installation, use the netq show status [verbose] command. The following example shows a successful on-premises installation:
State: Active
    NetQ Live State: Active
    Installation Status: FINISHED
    Version: 5.2.1
    Installer Version: 5.2.1
    Installation Type: Cluster
    Activation Key: EhVuZXRxLWVuZHBvaW50LWdhdGV3YXkYsagDIixPSUJCOHBPWUFnWXI2dGlGY2hTRzExR2E5aSt6ZnpjOUvpVVTaDdpZEhFPQ==
    Master SSH Public Key: c3NoLXJzYSBBQUFBQjNOemFDMXljMkVBQUFBREFRQUJBQUFCZ1FDNW9iVXB6RkczNkRC
    Is Cloud: False

    Kubernetes Cluster Nodes Status:
    IP Address    Hostname     Role    NodeStatus    Virtual IP
    ------------  -----------  ------  ------------  ------------
    10.213.7.52   10.213.7.52  Worker  Ready         10.213.7.53
    10.213.7.51   10.213.7.51  Worker  Ready         10.213.7.53
    10.213.7.49   10.213.7.49  Master  Ready         10.213.7.53

    In Summary, Live state of the NetQ is... Active
Run the netq show opta-health command to verify that all applications are operating properly. Allow at least 15 minutes for all applications to come up and report their status.
If any of the applications or services display a DOWN status after 30 minutes, open a support ticket and attach the output of the opta-support command.