KVM-QEMU and Vagrant
Running Cumulus VX with KVM-QEMU and Vagrant requires four components:
- KVM works exclusively with QEMU and performs hardware acceleration for x86 VMs with Intel and AMD CPUs. KVM and QEMU are hypervisors that emulate the VMs; the pair is often called KVM-QEMU or just KVM.
- QEMU is a machine emulator that can allow the host machine to emulate the CPU architecture of the guest machine. Because QEMU does not provide hardware acceleration, it works well with KVM.
- libvirt provides an abstraction language to define and launch VMs, but is normally used just to launch single VMs. It uses XML to represent and define the VM.
- Vagrant is an orchestration tool that makes it easier to manage groups of VMs by interconnecting them programmatically. Vagrant helps to tie all the components together and provides a user-friendly language to launch suites of VMs. Vagrant allows multiple Cumulus VX VMs to interconnect to simulate a network. Vagrant also allows Cumulus VX VMs to interconnect with other VMs (such as Ubuntu or CentOS) to emulate real world networks.
This section describes how to install and set up Cumulus VX with KVM-QEMU, Libvirt, and Vagrant on a Linux server to create the two leaf and one spine topology shown below.
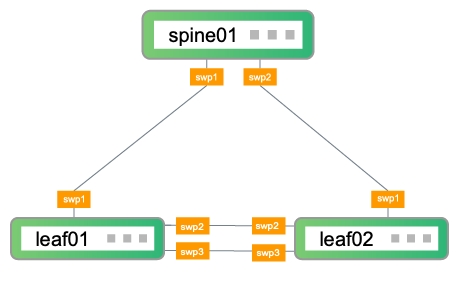
In the topology, leaf01 and leaf02 are the access layer switches on the network. leaf01 and leaf02 connect to spine01, which is the aggregation layer switch on the network. To facilitate additional configuration after the initial setup descibed in this guide, leaf01 and leaf02 also have two connections to each other.
Follow the steps below to:
- Create three VMs (leaf01, leaf02, and spine01) and the network connections between them
- Log in to the switches
- Perform basic switch configuration
- Verify configuration
These steps were tested with Cumulus VX 4.2, KVM/QEMU version 1:4.2-3ubuntu6.3, Libvirt version 6.0.0, and Vagrant version 2.2.9 on Ubuntu Linux version 20.04.
Create and Configure the VMs
The following procedure creates leaf01, leaf02, and spine01 and the network connections between them. This section assumes you have Linux, KVM, and Vagrant experience.
Download and Install the Software
Install Vagrant after you install libvirt so that Vagrant can detect all the necessary files.
Run the following commands to install KVM-QEMU and libvirt.
local@host:~$ sudo apt update -y
local@host:~$ sudo apt install -qy qemu ebtables dnsmasq-base qemu-kvm libvirt-clients libvirt-daemon-system bridge-utils virt-manager python3-pip
local@host:~$ sudo apt install -qy libxslt-dev libxml2-dev libvirt-dev zlib1g-dev ruby-dev
Add users to the
libvirtgroup so they can performvirshcommands.local@host:~$ sudo usermod -a -G libvirt <username>Run the following commands to install Vagrant and the necessary plugins:
local@host:~$ sudo wget https://releases.hashicorp.com/vagrant/2.2.9/vagrant_2.2.9_x86_64.deb
local@host:~$ sudo dpkg -i vagrant_2.2.9_x86_64.deb
local@host:~$ sudo vagrant plugin install vagrant-libvirt
Confirm that your Linux kernel and BIOS settings permit the use of KVM hardware acceleration:
local@host:~$ kvm-ok
INFO: /dev/kvm exists
KVM acceleration can be used
Create VMs and Network Connections
Create a folder to contain the Vagrant environment, then change directories into that folder.
local@host:~$ mkdir vagrant
local@host:~$ cd vagrant
Initialize the Vagrant environment to create a file called
Vagrantfilein the folder you just created.local@host:~/vagrant$ vagrant init A `Vagrantfile` has been placed in this directory. You are now ready to `vagrant up` your first virtual environment! Please read the comments in the Vagrantfile as well as documentation on `vagrantup.com` for more information on using Vagrant.Edit the
Vagrantfileand replace the contents of the file with the following:
- The following is a complete Vagrantfile for the two leaf and one spine example topology. For more information on writing a Vagrantfile, reference the Hashicorp Vagrant documentation.
- This Vagrantfile defines CPU, memory, and disk requirements for Cumulus VX, which requires at least 768MB of RAM and 6GB of disk space.
- For CumulusVX versions 4.3 and later requires 2 vCPUs.
- Run
vagrant upto start the VMs:
KVM starts all Vagrant defined VMs in parallel. In large topologies, this might cause host resource contention issues. Consider starting a subset of VMs at a time using the vagrant up <hostname> <hostname> command.
local@host:~/vagrant$ vagrant up
Bringing machine 'spine01' up with 'libvirt' provider...
Bringing machine 'leaf01' up with 'libvirt' provider...
Bringing machine 'leaf02' up with 'libvirt' provider...
...
Log in to the Switches
Log in to each switch with the vagrant ssh command. For example:
local@host:~/vagrant$ vagrant ssh leaf01
Basic Switch Configuration
Run these commands on each switch to bring up the interfaces.
cumulus@cumulus:mgmt:~$ net add interface swp1,swp2,swp3
cumulus@cumulus:mgmt:~$ net commit
cumulus@cumulus:mgmt:~$ exit
cumulus@cumulus:mgmt:~$ net add interface swp1,swp2,swp3
cumulus@cumulus:mgmt:~$ net commit
cumulus@cumulus:mgmt:~$ exit
cumulus@cumulus:mgmt:~$ net add interface swp1,swp2
cumulus@cumulus:mgmt:~$ net commit
cumulus@cumulus:mgmt:~$ exit
Verify Configuration
Run the following commands on each switch to verify the configuration:
It might take a few minutes for the LLDP information to update. If your command output is different from the output shown below, wait a few minutes, then run the command again.
cumulus@leaf01:mgmt:~$ net show lldp
LocalPort    Speed    Mode          RemoteHost     RemotePort
-----------  -------  ------------  ------------   ------------
swp1         1G       Default       spine01        swp1
swp2         1G       Default       leaf02         swp2
swp3         1G       Default       leaf02         swp3
cumulus@leaf02:mgmt:~$ net show lldp
LocalPort    Speed    Mode          RemoteHost     RemotePort
-----------  -------  ------------  ------------   ------------
swp1         1G       Default       spine01        swp2
swp2         1G       Default       leaf01         swp2
swp3         1G       Default       leaf01         swp3
cumulus@spine01:mgmt:~$ net show lldp
LocalPort    Speed    Mode          RemoteHost     RemotePort
-----------  -------  ------------  ------------   ------------
swp1         1G       Default       leaf01         swp1
swp2         1G       Default       leaf02         swp1
Run the following commands on each switch to show system information:
cumulus@leaf01:mgmt:~$ net show system
Hostname..............leaf01
Build.................Cumulus Linux 4.2.0
Uptime................0.00.23.740000
Model.................Cumulus VX
Memory................768MB
Disk..................6GB
Vendor Name...........Cumulus Networks
Part Number...........4.2.0
Base MAC Address......4:00:27:39:B1:12
Serial Number.........4:00:27:39:B1:12
Product Name..........VX
Next Steps
- Try out advanced configurations. You can update your virtual environment to be able to use the Cumulus Linux on-demand self-paced labs (a quick and easy way to learn the fundamentals). You can also run the topology converter to simulate a custom network topology with VirtualBox and Vagrant, or KVM-QEMU and Vagrant.
- Try NVIDIA Air, which is a free, personal, virtual data center network that provides a low-effort way to see Cumulus Networks technology in action. This is a good way to try out Cumulus Linux if you have platform or disk limitations.