VMware vSphere ESXi
This section describes how to install and set up Cumulus VX in VMware vSphere to create the two leaf and one spine topology shown below.
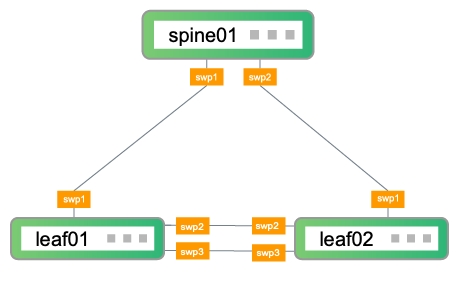
In the topology, leaf01 and leaf02 are the access layer switches on the network. leaf01 and leaf02 connect to spine01, which is the aggregation layer switch on the network. To facilitate additional configuration after the initial setup descibed in this guide, leaf01 and leaf02 also have two connections to each other.
Follow the steps below to:
- Create three VMs (leaf01, leaf02, and spine01) and the network connections between them
- Log in to the switches
- Perform basic switch configuration
- Verify configuration
These steps were tested with Cumulus VX 4.2, VMware vSphere (ESXi) 6.7.0, and VSphere web client (HTML5) version 6.7.0.30000.
Create and Configure the VMs
The following procedure creates leaf01, leaf02, and spine01 and the network connections between them. This section assumes you have VMware vSphere experience.
Download Cumulus VX
Download the OVA disk image for VMware.
Create the VMs
Follow these steps for each VM (leaf01, leaf02, and spine01):
From the vSphere web client, create a new folder under VMs and Templates.
Select the folder then click Deploy OVF Template from the Actions menu.
Select the Cumulus VX OVA image you downloaded, then click Next.
In the Virtual machine name field, enter
leaf01, then click Next.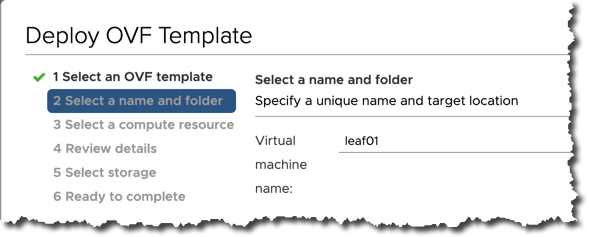
Select a compute source (ESXi host), then click Next.
The Cumulus VX image comes preconfigured, so there is no need for further setup. Click Next until you see the
Ready to Completedialog, then click Finish.You import and deploy the Cumulus VX OVA image as a VM. After the deployment process is complete, the VM appears in the list of VMs in the left pane.
The Cumulus VX OVA image defines the CPU, memory, and disk requirements. Cumulus VX requires at least 768MB of RAM and 6GB of disk space. CumulusVX versions 4.3 and later require 2 vCPUs. CumulusVX versions 5.0 and later require 2GB of RAM.
Repeat the previous steps to create two additional VMs:
leaf02andspine01.
Create Network Connections
Create the network connections between leaf01, leaf02, and spine01.
Create four virtual machine port groups:
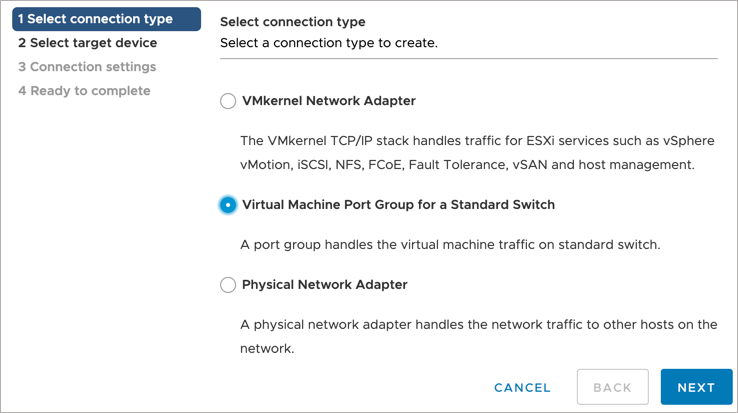
Under Hosts and clusters, select the ESXi host, then select Add Networking from the Actions menu.
Select Virtual Machine Port Group for a Standard Switch, then click Next.
Select New standard switch, then click Next.
In the Create a Standard Switch dialog, click Next, then click OK when the Physical Network Adapters warning displays.
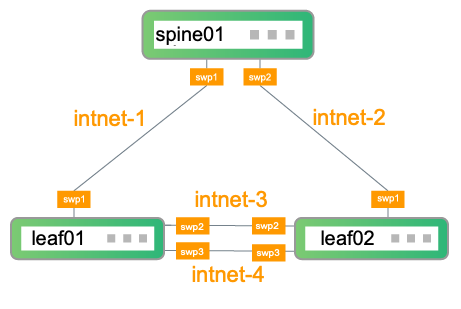
In the Network Label field, enter
intnet-1, click Next, then click Finish.Repeat the previous steps to create three additional port groups:
intnet-2,intnet-3, andintnet-4.
Configure the virtual hardware for each VM (leaf01, leaf02, and spine01):
Under VMs and Templates, select the VM in the left pane, then click the Edit Settings icon.

Under Virtual Hardware, configure the network adapters as shown below, then click OK.
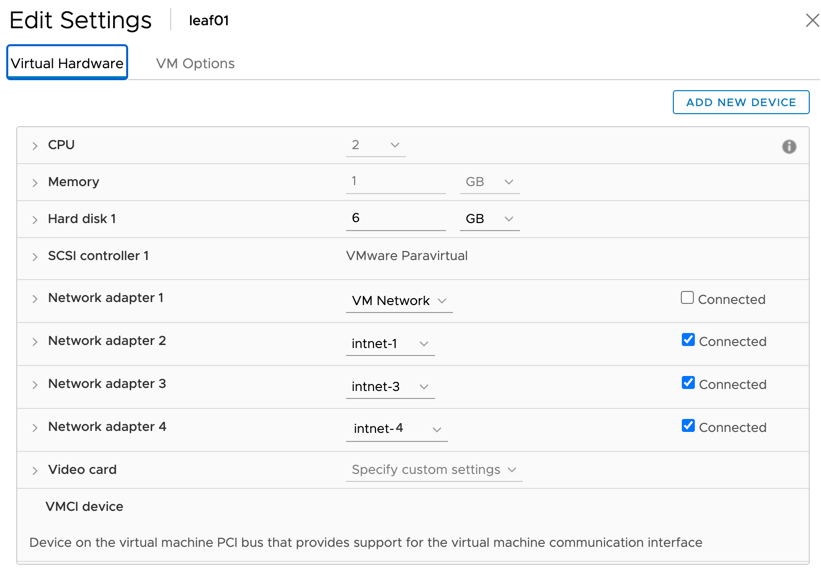
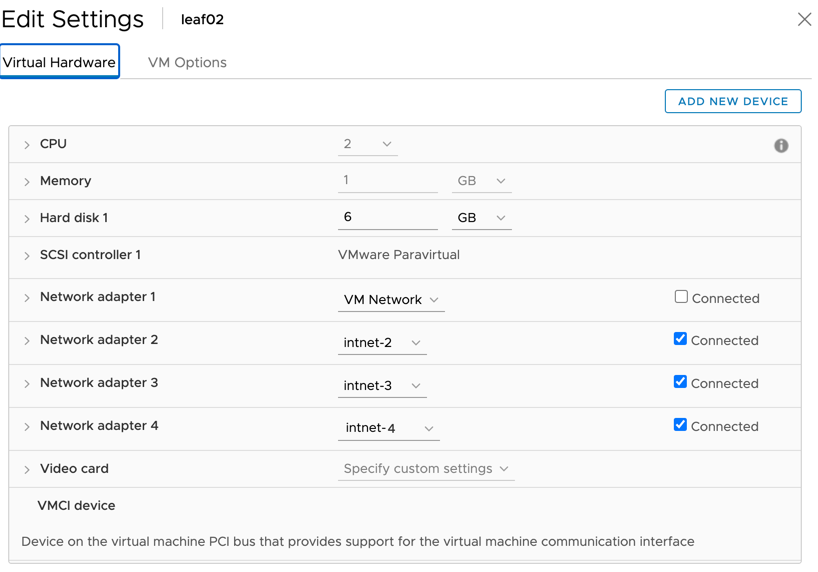
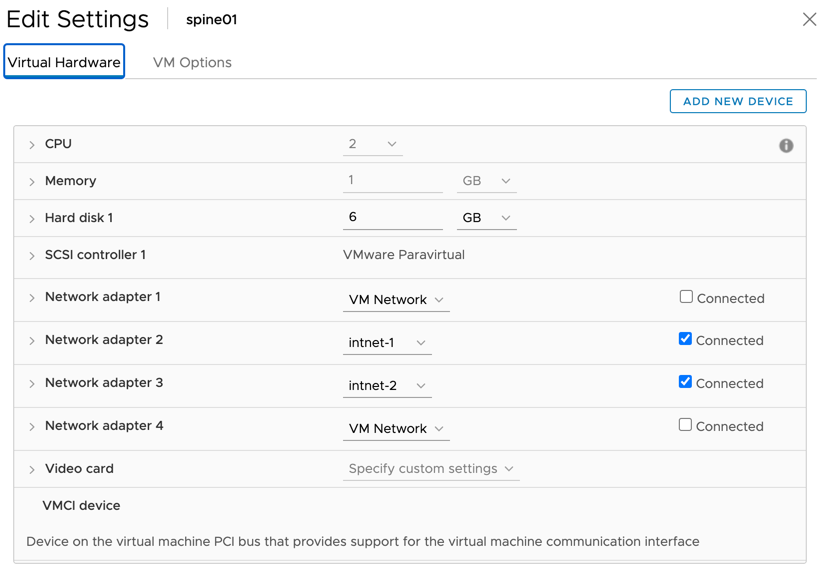
Adapter 1 is a shared management interface. The examples above show it as disabled for simplicity.
Start the VMs and launch the Console for each VM.
Log in to the Switches
Log in to each switch with the cumulus account and default password cumulus. When you log in for the first time, you are prompted to change the default password.
If you are using Cumulus VX 4.1.1 or earlier, the default password is CumulusLinux!. You are not prompted to change the default password.
For more information on the required password change, see the Cumulus Linux documentation.
Basic Switch Configuration
Run these commands on each switch to change the hostname and bring up the interfaces. Exit the switch, then log back in to see the new hostname at the prompt.
cumulus@cumulus:mgmt:~$ net add hostname leaf01
cumulus@cumulus:mgmt:~$ net add interface swp1,swp2,swp3
cumulus@cumulus:mgmt:~$ net commit
cumulus@cumulus:mgmt:~$ exit
cumulus@cumulus:mgmt:~$ net add hostname leaf02
cumulus@cumulus:mgmt:~$ net add interface swp1,swp2,swp3
cumulus@cumulus:mgmt:~$ net commit
cumulus@cumulus:mgmt:~$ exit
cumulus@cumulus:mgmt:~$ net add hostname spine01
cumulus@cumulus:mgmt:~$ net add interface swp1,swp2
cumulus@cumulus:mgmt:~$ net commit
cumulus@cumulus:mgmt:~$ exit
Verify Configuration
Run the following commands on each switch to verify the configuration:
It might take a few minutes for the LLDP information to update. If your command output is different from the output shown below, wait a few minutes, then run the command again.
cumulus@leaf01:mgmt:~$ net show lldp
LocalPort    Speed    Mode          RemoteHost     RemotePort
-----------  -------  ------------  ------------   ------------
swp1         1G       Default       spine01        swp1
swp2         1G       Default       leaf02         swp2
swp3         1G       Default       leaf02         swp3
cumulus@leaf02:mgmt:~$ net show lldp
LocalPort    Speed    Mode          RemoteHost     RemotePort
-----------  -------  ------------  ------------   ------------
swp1         1G       Default       spine01        swp2
swp2         1G       Default       leaf01         swp2
swp3         1G       Default       leaf01         swp3
cumulus@spine01:mgmt:~$ net show lldp
LocalPort    Speed    Mode          RemoteHost     RemotePort
-----------  -------  ------------  ------------   ------------
swp1         1G       Default       leaf01         swp1
swp2         1G       Default       leaf02         swp1
Run the following commands on each switch to show system information:
cumulus@leaf01:mgmt:~$ net show system
Hostname..............leaf01
Build.................Cumulus Linux 4.2.0
Uptime................0.00.23.740000
Model.................Cumulus VX
Memory................768MB
Disk..................6GB
Vendor Name...........Cumulus Networks
Part Number...........4.2.0
Base MAC Address......4:00:27:39:B1:12
Serial Number.........4:00:27:39:B1:12
Product Name..........VX
Next Steps
- Try out advanced configurations. You can update your virtual environment to be able to use the Cumulus Linux on-demand self-paced labs (a quick and easy way to learn the fundamentals). You can also run the topology converter to simulate a custom network topology with VirtualBox and Vagrant, or KVM-QEMU and Vagrant.
- Try NVIDIA Air, which is a free, personal, virtual data center network that provides a low-effort way to see Cumulus Networks technology in action. This is a good way to try out Cumulus Linux if you have platform or disk limitations.