Run Production Ready Automation
This section discusses how you can run the Cumulus Production Ready Automation unmodified on your own system in your enterprise. You can test, learn, and experience Cumulus Linux driven by best practice Ansible automation, and test drive the officially supported golden standard configurations and architecture.
For more details about how to customize, reuse, and adapt these examples of simulation, automation, or CI/CD for your own purposes, refer to Customize Production Ready Automation.
System Requirements
For a robust simulation environment and CI/CD with GitLab, NVIDIA recommends a dedicated, always-on, enterprise class server.
Typically, you do not use the NetQ server in individual development environments; you only need it for CI testing where you installed the GitLab Runner and registered it to your CI/CD-enabled project.
Hardware Requirements
- A minimum of 16GB RAM (without NetQ) - 32GB RAM recommended
- A minimum 256GB disk - more than 1TB disk recommended
- SSD recommended (NetQ requirement)
- Internet connectivity for package installs during simulation start up
- A minimum of eight CPU Cores
- 15104MB of memory without NetQ or 23296MB of memory with NetQ
Software Requirements
- Operating systems:
- Cumulus Linux 3.7.11 or later
- Cumulus NetQ 2.4 or later (optional)
- Ubuntu 16.04 or 18.04 (NVIDIA has not tested other Linux distributions)
- Software packages:
- Vagrant 2.2.4 or later
- Libvirt
- Qemu
- Git
- Vagrant plugins:
- Vagrant-libvirt
- Vagrant-scp
Refer to the Example Install Scripts for an example bash script that installs these package dependencies to support Cumulus VX simulation with Vagrant and libvirt.
Manually Start a Golden Standard Topology
The Quick Start section provides the easiest way to start a Production Ready Automation demo using a bash script. However, if you want more control over which nodes start and in which order, you can launch the simulation manually. This method saves CPU and memory resources.
To manually start a golden standard demo topology, such as EVPN Symmetric Mode, make sure you also fetch and pull down the included Cumulus Linux base reference topology. You can do this in one of two ways:
- Use the
--recurse-submoduleoption with the initialgit cloneto fetch the submodule files in the same step as the clone. You use this option in the procedure below. - Perform a normal
git clone, then fetch the submodule files separately with thegit submodule initandgit submodule updateoptions. For more information about Git submodules, see this guide.
When the submodule files download correctly, the cldemo2 folder contains a subfolder called simulation. This simulation folder contains the Vagrantfile. Using vagrant commands like vagrant ssh oob-mgmt-server are only valid when you run them from the same directory as the simulation’s Vagrantfile.
To start a golden standard topology manually:
Download a golden standard automation demo, such as EVPN Symmetric Mode. Use the
--recurse-submoduleoption to make sure Git also fetches the base NVIDIA reference topology simulation files.user@host:~# git clone --recurse-submodules https://gitlab.com/cumulus-consulting/goldenturtle/dc_configs_vxlan_evpnsym.git Cloning into 'dc_configs_vxlan_evpnsym'... remote: Enumerating objects: 535, done. remote: Counting objects: 100% (535/535), done. remote: Compressing objects: 100% (300/300), done. remote: Total 535 (delta 198), reused 465 (delta 133), pack-reused 0 Receiving objects: 100% (535/535), 66.78 KiB | 1.45 MiB/s, done. Resolving deltas: 100% (198/198), done. Submodule 'cldemo2' (https://gitlab.com/cumulus-consulting/goldenturtle/cldemo2.git) registered for path 'cldemo2' Cloning into '/root/dc_configs_vxlan_evpnsym/cldemo2'... remote: Enumerating objects: 215, done. remote: Counting objects: 100% (215/215), done. remote: Compressing objects: 100% (119/119), done. remote: Total 852 (delta 139), reused 156 (delta 96), pack-reused 637 Receiving objects: 100% (852/852), 7.64 MiB | 8.21 MiB/s, done. Resolving deltas: 100% (549/549), done. Submodule path 'cldemo2': checked out '214c8a66e3fef8f6d5d2b1e13ca3942e4cfd120f'Change to the folder created by the previous step, then into the
cldemo2/simulationsubfolder. This is the directory where theVagrantfileis present and wherevagrantcommands are valid for this simulation.user@host:~# cd dc_configs_vxlan_evpnsym/cldemo2/simulation/ user@host:~/dc_configs_vxlan_evpnsym/cldemo2/simulation#Run the
vagrant upcommand for the out-of-band management devices.If you do not intend to use NetQ, omit
netq-tsto save CPU and memory resource consumption.You must start the oob-mgmt-server and oob-mgmt-switch first. The oob-mgmt-server acts as the management network DHCP server. If the oob-mgmt-server and switch are not online first, the management interfaces of the other network devices are unreachable temporarily.
user@host:~/dc_configs_vxlan_evpnsym/cldemo2/simulation# vagrant up oob-mgmt-server oob-mgmt-switch netq-ts
Bringing machine 'oob-mgmt-server' up with 'libvirt' provider...
Bringing machine 'oob-mgmt-switch' up with 'libvirt' provider...
Bringing machine 'netq-ts' up with 'libvirt' provider...
==> oob-mgmt-server: Checking if box 'generic/ubuntu1804' version '2.0.6' is up to date...
==> oob-mgmt-switch: Checking if box 'CumulusCommunity/cumulus-vx' version '3.7.11' is up to date...
==> netq-ts: Checking if box 'generic/ubuntu1804' version '2.0.6' is up to date...
<output omitted for brevity>
Run the
vagrant upcommand to start up the other network devices. You can start up all the remaining nodes in the simulation with thevagrant upcommand (with no specific devices specified).Vagrant for libvirt tries to start devices in parallel. Starting an entire reference topology simulation in parallel can sometimes cause errors that result in a partial or incomplete startup process. NVIDIA recommends you start the simulation in smaller, more manageable groups. The example below starts the simulation in four separate stages. Each stage separated by
&&executes alone. The example combines those serialized stages in one line.The
&&operator in Linux only executes the next command if the previous command is successful. If an error occurs, the simulation start up process stops.user@host:~/dc_configs_vxlan_evpnsym/cldemo2/simulation# vagrant up /leaf/ /spine/ && vagrant up server01 server02 server03 server04 && vagrant up server05 server06 server07 server08 && vagrant up border01 border02 fw1 fw2Enter the simulation from the oob-mgmt-server with the
vagrant ssh oob-mgmt-servercommand:user@host:~/dc_configs_vxlan_evpnsym/cldemo2/simulation# vagrant ssh oob-mgmt-server _ _______ x x x | | ._ <_______~ x X x ___ _ _ _ __ ___ _ _| |_ _ ___ (' \ ,' || `, / __| | | | '_ ` _ \| | | | | | | / __| ` ._:^ || :> | (__| |_| | | | | | | |_| | | |_| \__ \ ^T~~~~~~T' \___|\__,_|_| |_| |_|\__,_|_|\__,_|___/ ~" ~" ############################################################################ # # Out Of Band Management Server (oob-mgmt-server) # ############################################################################ vagrant@oob-mgmt-server:~$Run another
git clonefrom your target golden standard demo project (refer to step 1) from inside the simulation to fetch the automation files. Or you can runvagrant scpto copy the automation files into the simulation.vagrant@oob-mgmt-server:~$ git clone https://gitlab.com/cumulus-consulting/goldenturtle/dc_configs_vxlan_evpnsym Cloning into 'dc_configs_vxlan_evpnsym'... warning: redirecting to https://gitlab.com/cumulus-consulting/goldenturtle/dc_configs_vxlan_evpnsym.git/ remote: Enumerating objects: 560, done. remote: Counting objects: 100% (560/560), done. remote: Compressing objects: 100% (310/310), done. remote: Total 560 (delta 214), reused 490 (delta 148), pack-reused 0 Receiving objects: 100% (560/560), 70.27 KiB | 3.90 MiB/s, done. Resolving deltas: 100% (214/214), done. vagrant@oob-mgmt-server:~$Change to the project folder, then to the
automationsubfolder:vagrant@oob-mgmt-server:~$ cd dc_configs_vxlan_evpnsym/automation/ vagrant@oob-mgmt-server:~/dc_configs_vxlan_evpnsym/automation$Run the
deploy.ymlplaybook and specify the inventory path with the-ioption:vagrant@oob-mgmt-server:~/dc_configs_vxlan_evpnsym/automation$ ansible-playbook playbooks/deploy.yml -i inventories/pod1 --diff PLAY [spine leaf border] **************************************************************** TASK [Gathering Facts] **************************************************************** Sunday 12 April 2020 23:35:25 +0000 (0:00:00.073) 0:00:00.073 ********** ok: [spine03] ok: [spine04] ok: [spine02] ok: [spine01] ok: [leaf01] ok: [leaf02] ok: [leaf03] ok: [leaf04] ok: [border02] ok: [border01] <output omitted for brevity>
You now have a deployed and operational golden standard Cumulus Linux architecture. For more details about the specific network topology, IP addressing, and how to interact with the features in demonstration, refer to the README.md file on the demo project page.
Automatically Run Production Ready Automation in Cumulus in the Cloud
This method is the easiest way to experience the final product of the Cumulus golden standard EVPN VXLAN demo configurations. This method is best suited to fast track all the simulation setup and provisioning, and start testing any of the official golden standard EVPN-VXLAN demo configurations.
If you want to take a closer look at the automation and deployment processes and see the actual examples of the infrastructure as code, you need to clone the demo project and manually run the automation playbook to render the configuration as code into the network devices. This automated process clones your selected demo repository and runs the Ansible deployment playbook for you with a few easy and convenient clicks from NVIDIA Air UI.
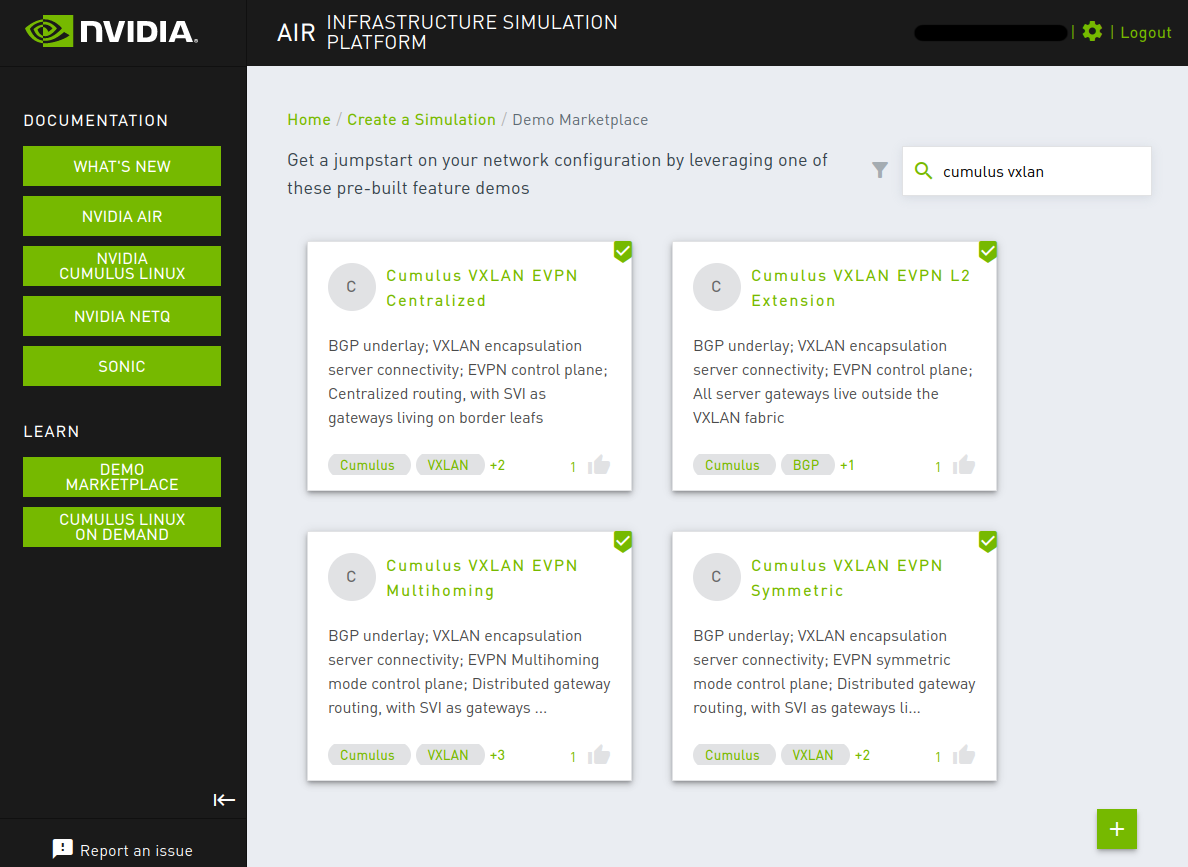
- Go to NVIDIA Air demo marketplace .
- Request one of the supported NVIDIA production ready automation demos by clicking on the card:
After you reach your simulation console, choose a demo from the dropdown menu on the left panel.
- Click Launch.
- Follow the instructions on the
Guided Tourpanel to test and experience the unique aspects of your selected demo.
Manually Run the Automation Demo from Nvidia DSX Air Platform
Nvidia DSX Air provides the fastest way to enjoy the experience of provisioning a full data center using best practice Ansible automation and see a working example of infrastructure as code. By removing the complexity of the simulation hardware and software dependencies, you can be in the driver’s seat of a fully provisioned data center to test the automation experience and any of the demo solution architectures in minutes. Cumulus in the Cloud also includes a free temporary NetQ Cloud account to showcase the NetQ features with live data from your simulation.
Start from the
oob-mgmt-serverin your DSX Air simulation. For the best experience, use an SSH client to connect. Find the SSH client connection information from the Services window in the UI.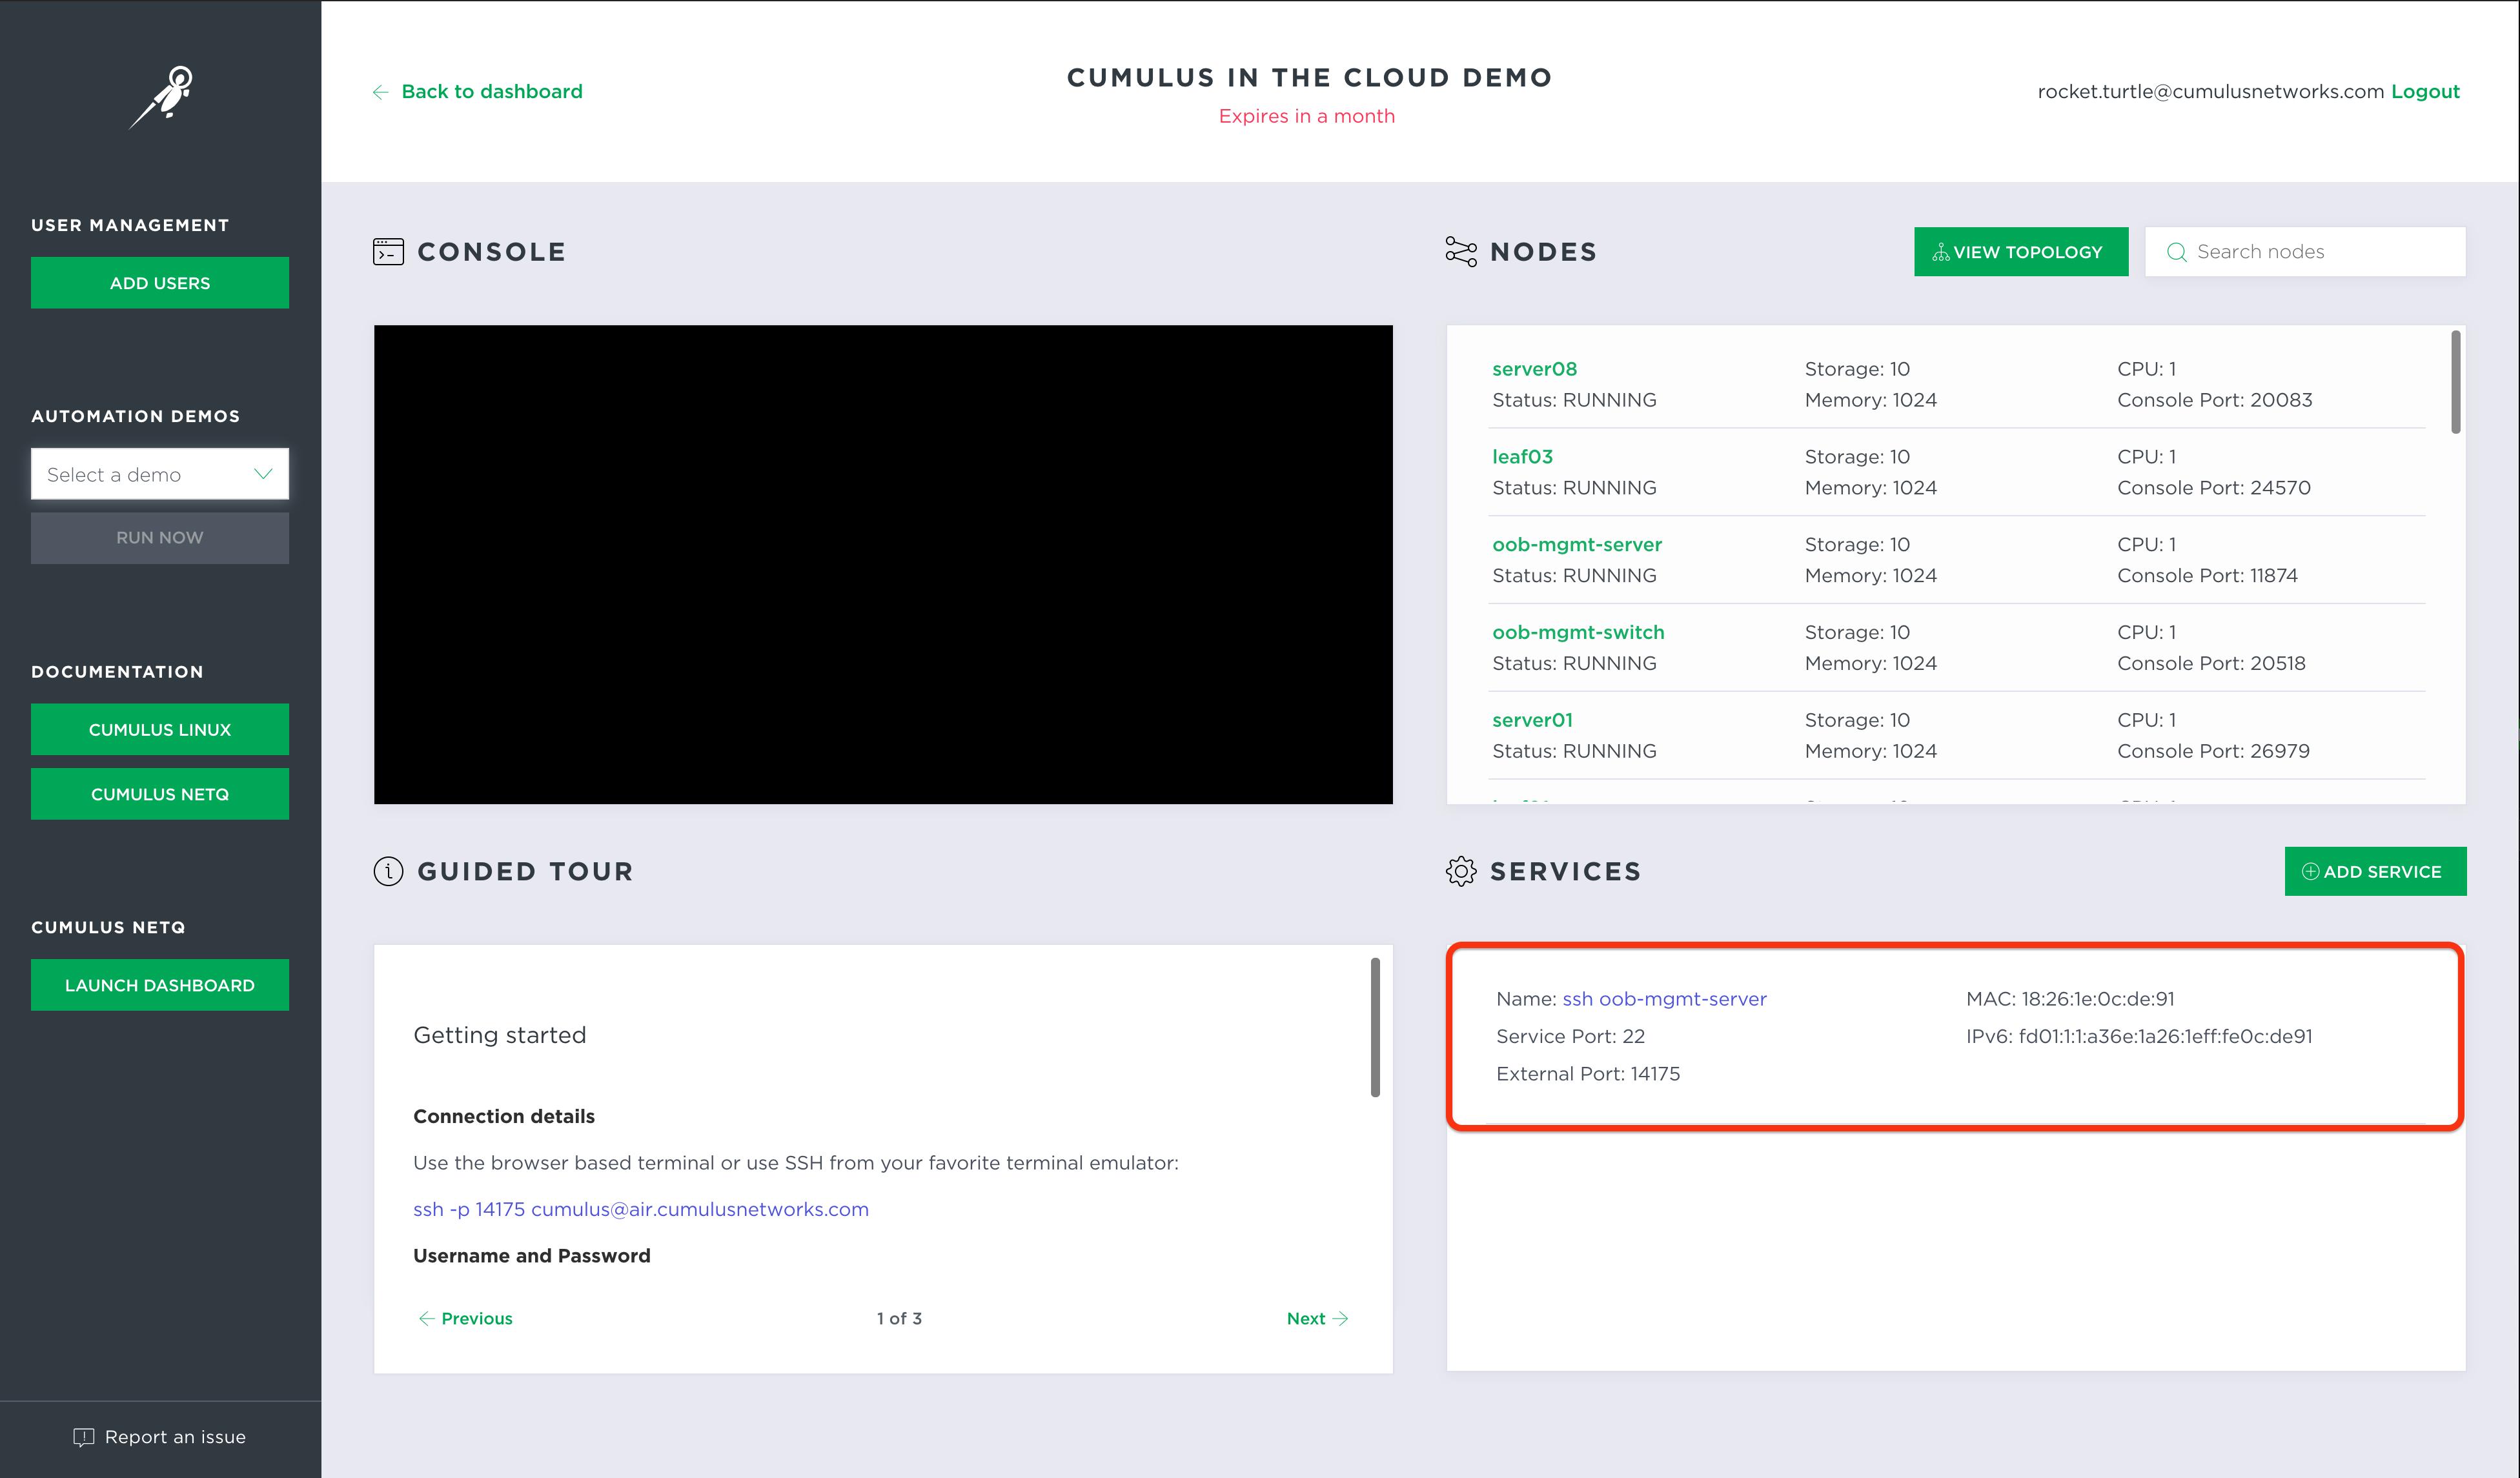
From your target golden standard demo project, run the
git clonecommand:vagrant@oob-mgmt-server:~$ git clone https://gitlab.com/cumulus-consulting/goldenturtle/dc_configs_vxlan_evpnsym Cloning into 'dc_configs_vxlan_evpnsym'... warning: redirecting to https://gitlab.com/cumulus-consulting/goldenturtle/dc_configs_vxlan_evpnsym.git/ remote: Enumerating objects: 560, done. remote: Counting objects: 100% (560/560), done. remote: Compressing objects: 100% (310/310), done. remote: Total 560 (delta 214), reused 490 (delta 148), pack-reused 0 Receiving objects: 100% (560/560), 70.27 KiB | 3.90 MiB/s, done. Resolving deltas: 100% (214/214), done. vagrant@oob-mgmt-server:~$Change to the project folder, then into the
automationsubfolder:vagrant@oob-mgmt-server:~$ cd dc_configs_vxlan_evpnsym/automation/Run the
deploy.ymlplaybook with the-ioption:vagrant@oob-mgmt-server:~/dc_configs_vxlan_evpnsym/automation$ ansible-playbook playbooks/deploy.yml -i inventories/pod1 --diff PLAY [spine leaf border] **************************************************************** TASK [Gathering Facts] **************************************************************** Sunday 12 April 2020 23:35:25 +0000 (0:00:00.073) 0:00:00.073 ********** ok: [spine03] ok: [spine04] ok: [spine02] ok: [spine01] ok: [leaf01] ok: [leaf02] ok: [leaf03] ok: [leaf04] ok: [border02] ok: [border01] ...
You now have a deployed and operational golden standard Cumulus Linux architecture. For more details about the specific network topology, IP addressing, and how to interact with the features in demonstration, refer to the README.md file on the demo project page.
Install and Configure the NetQ Cloud Server
The NVIDIA reference topology includes an Ubuntu 18.04 server with additional CPU, memory, and disk resources to support a NetQ Cloud Server installation. Vagrant provisions this system with all the required software package dependencies so you can immediately bootstrap and install the NetQ server. Read more about this setup in the NetQ documentation.
To use the included NetQ Cloud server, you must have the following:
- An active NetQ Cloud account with netq.nvidia.com.
- An additional site set up, provisioned, and dedicated for virtualization use (a unique NetQ configuration key for your simulation environment). Do not mix a simulation topology with an existing site or use an existing and in-use NetQ premises configuration key.
- The NetQ bootstrap tarball downloaded from NVIDIA.
- The NetQ OPTA install tarball downloaded from NVIDIA.
The NetQ bootstrap and NetQ OPTA install tarballs are two unique files.
Stage the NetQ Installation Tarballs
The version of the bootstrap and install files used to install the NetQ application on the provided Ubuntu server determines which NetQ application and version to install. The installation procedure uses the NetQ agent preinstalled on the Cumulus NetQ Cloud virtual appliance (netq-ts). You must stage the NetQ bootstrap and install the tarball files that you downloaded from NVIDIA for the NetQ installation procedure.
You can stage the installation tarballs in either one of two locations:
On the local filesystem of netq-ts.
After you start the simulation with
vagrant up, copy the bootstrap and installation tarballs onto netq-ts (withscporvagrant scp).On a remote HTTP server reachable by netq-ts.
Place the bootstrap and installation tarballs onto an HTTP server. You get the HTTP URL during the bootstrap and installation procedures.
You must decide whether to stage the installation tarball files directly onto the server for installation, or host them on a remote HTTP server that netq-ts can reach.
When downloaded from NVIDIA, the installation tarball files have these names:
netq-bootstrap-X.Y.Z.tgz(bootstrap tarball)NetQ-X.Y.Z-opta.tgz(install tarball)
The
netq-bootstrapandnetq-optaimage version numbers must match.
Stage from the Local Filesystem
For specific steps on how to log into the NVIDIA support site and download the NetQ files, refer to the NetQ documentation. Use SCP to copy the files onto the Linux-based simulation host securely.
The following procedure shows you how to copy the installation tarball files to the /mnt/installables directory (any directory that has sufficient read permissions is suitable for staging these files). Repeat the following steps for each file:
Download these two required installation files from NVIDIA:
- Bootstrap
- Appliance (Cloud)
Move or copy the files onto the simulation host. SCP is most commonly used to push files onto the Linux-based simulation host.
To copy the file from the simulation host to the simulation on netq-ts, run the
vagrant scpcommand. Thevagrant scpplugin usesvagrant sshand is subject to the permissions of thevagrantuser account. Copy files to a path where thevagrantuser has permissions, such as/home/cumulus/.Make sure you run the
vagrant scpcommand from inside thesimulationfolder (where theVagrantfilefor the simulation exists).user@simulation-host:~/dc_configs_vxlan_evpnsym/cldemo2/simulation# vagrant scp /path/to/local/file/netq-boostrap-X.Y.Z.tgz netq-ts:/home/cumulus user@simulation-host:~/dc_configs_vxlan_evpnsym/cldemo2/simulation# vagrant scp /path/to/local/file/NetQ-X.Y.Z-opta.tgz netq-ts:/home/cumulusRun
vagrant sshinto netq-ts, then move the files to the/mnt/installablesdirectory:user@host:~/dc_configs_vxlan_evpnsym/cldemo2/simulation# vagrant ssh netq-ts vagrant@netq-ts:~$ vagrant@netq-ts:~$ sudo mv /home/cumulus/netq-boostrap-X.Y.Z.tgz /mnt/installables/ vagrant@netq-ts:~$ sudo mv /home/cumulus/NetQ-X.Y.Z.tgz /mnt/installables/
Stage from a Remote HTTP Server
For specific steps on how to log into the NVIDIA support site and download the NetQ files, refer to the NetQ documentation. Specific steps on how to copy the tarballs onto a remote HTTP server vary depending on the specific HTTP server software. This following example shows you how to set up an HTTP server with Apache on a Debian- or Ubuntu-based Linux system.
- Download these two required installation files from NVIDIA:
- Bootstrap
- Appliance (Cloud)
- Install Apache2.
- Confirm the services are running.
- Copy the tarball files to the
/var/www/htmldirectory (with permissions). - Derive HTTP staging URLs for the next steps.
Install the NetQ Application
This process installs the NetQ Cloud server application to be able to receive and aggregate agent data, and transport the data securely to the cloud associated with your account.
- You must stage the bootstrap and install tarball files in either the local filesystem on netq-ts or on a remote HTTP server accessible from netq-ts. See the previous section for instructions.
- You need the NetQ configuration key associated with the NetQ site/premises that this simulation is to reside. You receive the key from NVIDIA by email as part of NetQ Cloud onboarding.
For more complete information about installing NetQ, refer to the NetQ documentation. To complete the NetQ Cloud Server installation in the Cumulus demo topology, follow these steps:
Perform the NetQ server bootstrap with the bootstrap tarball.
- Use
eth0as the interface identifier. <URL-path>is either a local filesystem absolute path or an HTTP server URL starting withhttp://.
vagrant@netq-ts:~$  netq bootstrap master interface eth0 tarball <URL-path>/netq-bootstrap-X.Y.Z.tgz
2020-12-20 01:13:27.207201: master-node-installer: Extracting tarball <URL-path>/netq-bootstrap-X.Y.Z.tgz
2019-12-20 01:14:44.157670: master-node-installer: Checking package requirements
2019-12-20 01:15:10.402228: master-node-installer: Using eth0 IP X.X.X.X
2019-12-20 01:15:10.812041: master-node-installer: Initializing kubernetes cluster
-----------------------------------------
Successfully bootstrapped the master node
This step takes a few minutes.
- Use
After the bootstrap step completes, perform the NetQ application install with the
-opta.tgzbundle.- Use the configuration key for your NetQ Cloud premises.
<URL-path>is either a local filesystem absolute path or an HTTP server URL starting withhttp://.
vagrant@netq-ts:~$ netq install opta standalone full interface eth0 bundle <URL-path>/NetQ-X.Y.Z-opta.tgz config-key <your-config-key>
2019-12-20  06:28:35.368116: master-node-installer: Installing in standalone mode
2019-12-20  06:32:57.106586: master-node-installer: Installing infra components
2019-12-20  06:34:06.365374: master-node-installer: Installing NetQ apps
2019-12-20  06:40:31.810887: master-node-installer: Activating
--------------------------------------
Successfully installed the master node
(Optional) Configure the NetQ CLI Agents
The NetQ CLI is a separate daemon that you configure independently from the NetQ agent data collection and telemetry streaming daemon. To fully complete the NetQ installation in your demo environment, you must also configure and install the CLI on all devices where you want to run the netq CLI commands. In most deployments, this is also configured with every agent so that you can obtain all NetQ data from any device in the network.
You must have a set of authorization keys generated for a NetQ user (access-key and secret-key). Refer to the NetQ documentation to create the keys.
To install the CLI:
From devices in simulation that do not use the management VRF (Ubuntu hosts and the NetQ server itself), run the following command:
vagrant@netq-ts:~$ netq config add cli server api.netq.cumulusnetworks.com access-key <access-key> secret-key <secret-key> premise <netq-premise-name> port 443From devices in simulation that do use the management VRF (Cumulus Linux nodes, such as leaf, spine, border, and fw), run the following command:
cumulus@netq-ts:~$ netq config add cli server api.netq.cumulusnetworks.com access-key <access-key> secret-key <secret-key> premise <netq-premise-name> vrf mgmt port 443Restart the NetQ CLI daemon:
vagrant@netq-ts:~$ netq config restart cliTest a NetQ CLI command:
vagrant@netq-ts:~$ netq show agents
To deploy the NetQ CLI configuration commands to several devices at the same time, use Ansible ad-hoc commands from the oob-mgmt-server.
The following example shows you how to configure the NetQ CLI on all the Cumulus Linux nodes that use the management VRF:
vagrant@oob-mgmt-server:~$ ansible spine:leaf:exit -a 'netq config add cli server api.netq.cumulusnetworks.com access-key <access-key> secret-key <secret-key> premise <netq-premise-name> vrf mgmt port 443'
vagrant@oob-mgmt-server:~$ ansible spine:leaf:exit -a 'netq config restart cli'
The following example shows you how to configure the NetQ CLI on Ubuntu hosts:
vagrant@oob-mgmt-server:~$ ansible host -a 'netq config add cli server api.netq.cumulusnetworks.com access-key <access-key> secret-key <secret-key> premise <netq-premise-name> vrf mgmt port 443'
vagrant@oob-mgmt-server:~$ ansible host -a 'netq config restart cli'
Clean Up Orphaned Simulations
Errors sometimes occur when you use Vagrant or when you delete files from a project that is in use.
To clean up stuck or orphaned libvirt simultations:
Use the
virsh list --allcommand to inspect the system and see all running libvirt simulations. Find the libvirt domains that you want to clean up. Simulations often have a common prefix from the same simulation that is normally the parent folder.Run these commands on each virtual machine (libvirt domain) that you want to clean up:
virsh destroy <name>virsh undefine <name>virsh vol-delete --pool default <name>.img
To clean up all simulations that match a common pattern, run this script:
#for vm in $(virsh list --all | grep <match-pattern> | awk -F ' ' '{print$2}'); do virsh destroy $vm; virsh undefine $vm; virsh vol-delete --pool default $vm.img; done
Use this script with caution on servers with other simulations and in shared environments as it does not prompt for confirmation and might delete systems you match accidentally.