Getting Started#
Prerequisites#
Install Docker
Install the NVIDIA Container Toolkit
Verify your container runtime supports NVIDIA GPUs by running
docker run --rm --runtime=nvidia --gpus=all ubuntu nvidia-smi
Example output:
+-----------------------------------------------------------------------------+
| NVIDIA-SMI 525.78.01    Driver Version: 525.78.01    CUDA Version: 12.0     |
|-------------------------------+----------------------+----------------------+
| GPU  Name        Persistence-M| Bus-Id        Disp.A | Volatile Uncorr. ECC |
| Fan  Temp  Perf  Pwr:Usage/Cap|         Memory-Usage | GPU-Util  Compute M. |
|                               |                      |               MIG M. |
|===============================+======================+======================|
|   0  NVIDIA GeForce ...  Off  | 00000000:01:00.0 Off |                  N/A |
| 41%   30C    P8     1W / 260W |   2244MiB / 11264MiB |      0%      Default |
|                               |                      |                  N/A |
+-------------------------------+----------------------+----------------------+

+-----------------------------------------------------------------------------+
| Processes:                                                                  |
|  GPU   GI   CI        PID   Type   Process name                  GPU Memory |
|        ID   ID                                                   Usage      |
|=============================================================================|
+-----------------------------------------------------------------------------+
Note
For more information on enumerating multi-GPU systems, refer to the NVIDIA Container Toolkit’s GPU Enumeration Docs
NGC (NVIDIA GPU Cloud) Account#
Docker log in with your NGC API key using
docker login nvcr.io --username='$oauthtoken' --password=${NGC_CLI_API_KEY}
NGC CLI Tool#
Download the NGC CLI tool for your OS.
Important
Use NGC CLI version
3.41.1or newer. Here is the command to install this on AMD64 Linux in your home directory:
wget --content-disposition https://api.ngc.nvidia.com/v2/resources/nvidia/ngc-apps/ngc_cli/versions/3.41.3/files/ngccli_linux.zip -O ~/ngccli_linux.zip && \
unzip ~/ngccli_linux.zip -d ~/ngc && \
chmod u+x ~/ngc/ngc-cli/ngc && \
echo "export PATH=\"\$PATH:~/ngc/ngc-cli\"" >> ~/.bash_profile && source ~/.bash_profile
Set up your NGC CLI Tool locally (You’ll need your API key for this!):
ngc config set
Note
After you enter your API key, you may see multiple options for the org and team. Select as desired or hit enter to accept the default.
Model-Specific Requirements#
Check the Support Matrix to make sure you have the supported hardware and software stack.
Launch GenMol NIM#
Pull the NIM container.
docker pull nvcr.io/nim/nvidia/genmol:1.0.0
Run container.
Note
The environment variable
NGC_API_KEYmust be defined and valid in your local environment to ensure the following command will proceed. For information regarding personal API key setup, refer to this website.
docker run --rm -it --name genmol-nim \
  --runtime=nvidia --gpus=all -e NVIDIA_VISIBLE_DEVICES=0 \
  --shm-size=2G \
  --ulimit memlock=-1 \
  --ulimit stack=67108864 \
  -e NGC_API_KEY=$NGC_API_KEY \
  -p 8000:8000 \
  nvcr.io/nim/nvidia/genmol:1.0.0
Open a new terminal and use the following command to check the status of API until it returns
true. This can take a couple of minutes.
curl localhost:8000/v1/health/ready
...
true
Run Inference in Linux Shell#
Open a new terminal, leaving the current terminal open with the launched service.
Note
Open a new terminal, leaving the current terminal open with the launched service.
Run Inference and save to output.json.
curl --silent --request POST \
  --url 'http://127.0.0.1:8000/generate' \
  --header 'Content-Type: application/json' \
  --output output.json \
  --data '{
    "smiles": "CCS2(=O)(=O).C134CN2C1.C3C#N.[*{15-15}]",
    "num_molecules": "10",
    "temperature": "2.0",
    "noise": "1.0",
    "step_size": "1",
    "scoring": "QED"
  }'
The output file
output.jsonis a JSON formatted content with generated molecule SMILES sequences and corresponding scores:
{
  "status": "success",
  "molecules":
  [
    {
      "smiles": "CCS(=O)(=O)N1CC(CC#N)(c2ccc(Cl)c(F)c2)C1",
      "score": 0.856
    },
    {
      "smiles": "CCS(=O)(=O)N1CC(CC#N)(c2ccc(Cl)c(Cl)c2)C1",
      "score": 0.851
    },
    {
      "smiles": "CCS(=O)(=O)N1CC(CC#N)(c2ccc(OC)cc2F)C1",
      "score": 0.829
    },
    {
      "smiles": "CCS(=O)(=O)N1CC(CC#N)(c2ccc(Br)c(F)c2)C1",
      "score": 0.828
    },
    {
      "smiles": "CCS(=O)(=O)N1CC(CC#N)(Cc2ccn(C)c2)C1",
      "score": 0.812
    },
    {
      "smiles": "CCS(=O)(=O)N1CC(CC#N)(Cc2ccc(Br)s2)C1",
      "score": 0.808
    },
    {
      "smiles": "CCS(=O)(=O)N1CC(CC#N)(C2CCCC(F)(F)C2)C1",
      "score": 0.801
    },
    {
      "smiles": "CCS(=O)(=O)N1CC(CC#N)(NCCC(F)(F)F)C1",
      "score": 0.789
    },
    ...
  ]
}
Run Inference with Python#
Create a new blank file, name it
genmol-generate.py, and copy the content below into it:
import requests
import json

session = requests.Session()
response = session.post("http://127.0.0.1:8000/generate", headers = {"Accept": "application/json"}, json = {
    "smiles": "CCS2(=O)(=O).C134CN2C1.C3C#N.[*{15-15}]",
    "num_molecules": 5,
    "temperature": 2.0,
    "noise": 1.2,
    "step_size":1,
    "scoring": "QED"
})

response.raise_for_status()
response_body = response.json()
print(json.dumps(response_body, indent=2))
Run the command below to launch the Python inference script:
python3 genmol-generate.py
An example output is shown below:
{
  "status": "success",
  "molecules": [
    {
      "smiles": "CCS(=O)(=O)N1CC(CC#N)(NC(=O)C(F)F)C1",
      "score": 0.748
    },
    {
      "smiles": "CCS(=O)(=O)N1CC(CC#N)(C(F)F)C1",
      "score": 0.728
    },
    {
      "smiles": "CCS(=O)(=O)N1CC(CC#N)(SC)C1",
      "score": 0.717
    },
    {
      "smiles": "CCS(=O)(=O)N1CC(CC#N)C1",
      "score": 0.634
    },
    {
      "smiles": "CCS(=O)(=O)N1CC(CC#N)(C(=O)CC(=N)O)C1",
      "score": 0.522
    }
  ]
}
Molecular Sequence as Input/Output#
The input is a SAFE text sequence with masked fragments as a template for molecular generation. SAFE is an extension to SMILES by enhancing the representation of molecular fragmentations. The masked fragment is a special placeholder with the format of “[*{min_len-max_len}]”, where “min_len” and “max_len” are the minimal and maximum number of tokens to be generated for this fragment. If an empty template is provided (masks only), the model will generate molecules de novo. If a partial SMILES/SAFE with masks is provided, the model will perform fragment completion (for example, for linker design, motif extension, and so on).
As shown the following figure, the input molecular sequence in previous examples starts from the canonical form of SMILES CCS(=O)(=O)N1CC(CC#N)C1, which is the motif part of Baricitinib - an immunomodulatory medication approved by FDA. Using the safe Python package (link), the SMILES text is converted into the SAFE format, in which three fragments (red, green, and blue blocks) are presented with the inter-fragment attachment points are indicated by paired digits (1, 2, and 3) after the corresponding atoms. Then, an unpaired attachment point 4 is added to specify the position of decoration, and a new fragment as a mask, .[*], is added at the end (the purple block) that will be supplied to the GenMol model as the sequence for generation.
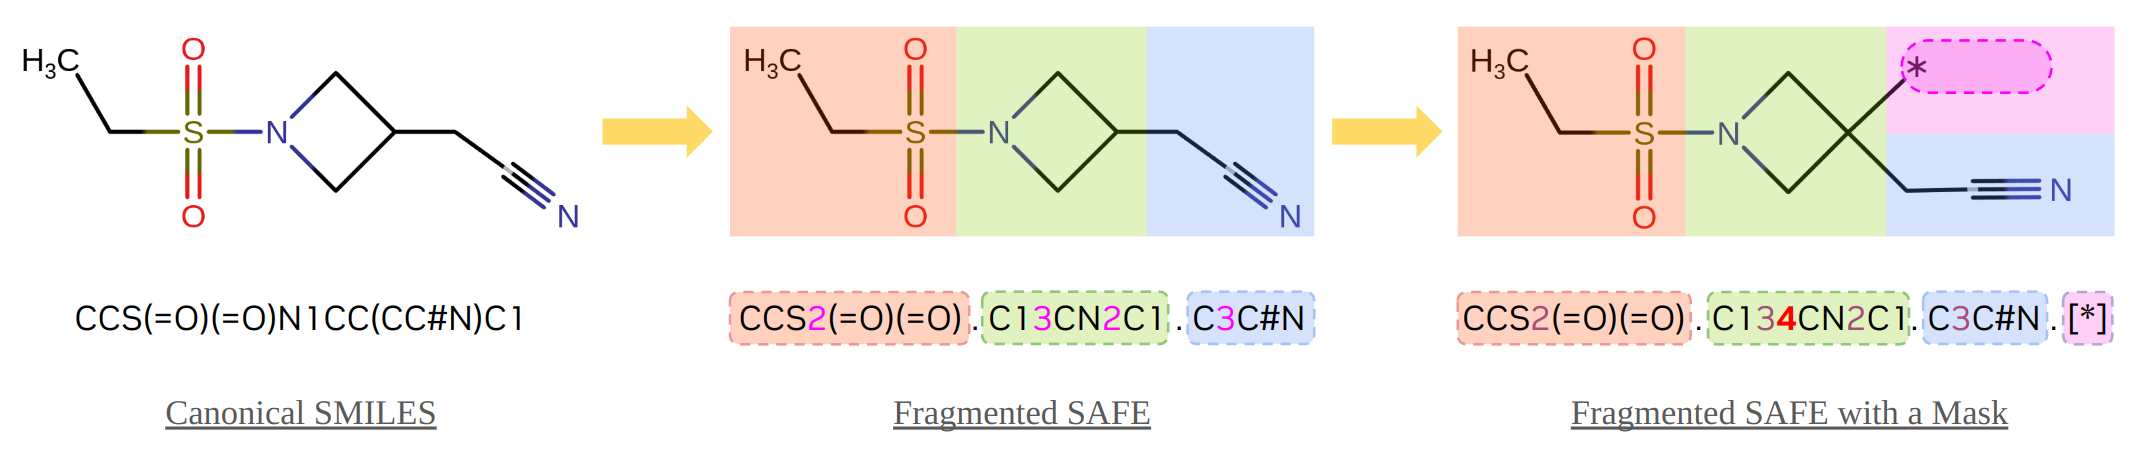
Although the direct outcomes from the model are also in SAFE format, they will be validated and converted back to standard SMILES format before being returned to users to ease the use of the results for other downstream workloads.
Stopping the Container#
When you’re done testing the endpoint, you can bring down the container by running docker stop genmol-nim in a new terminal.
Serving Models from Local Assets#
GenMol NIM provides utilities that enable downloading models to a local directory either as a model repository or to a NIM cache. Refer to the Utilities section for details.
Use the previous commands to launch a NIM container. From there, you can view and download models locally.
Use the list-model-profiles command to list the available profiles.
docker run -it --rm --runtime=nvidia --gpus=all -e NIM_LOG_LEVEL=WARNING \
  --entrypoint list-model-profiles \
  nvcr.io/nim/nvidia/genmol:1.0.0
You can download any of the profiles to the NIM cache using the download-to-cache command. For example:
docker run -it --rm --runtime=nvidia --gpus=all -e NGC_API_KEY \
  -v $LOCAL_NIM_CACHE:/opt/nim/.cache \
  --entrypoint download-to-cache \
  nvcr.io/nim/nvidia/genmol:1.0.0 \
  -p a525212dd4373ace3be568a38b5d189a6fb866e007adf56e750ccd11e896b036
Air Gap Deployment (offline cache route)#
NIM supports serving models in an Air Gap system, which is also known as an air wall, air-gapping, or disconnected network. If NIM detects a previously loaded profile in the cache, it serves that profile from the cache. After downloading the profiles to the cache using download-to-cache, the cache can be transferred to an air-gapped system to run a NIM without any internet connection and with no connection to the NGC registry.
Step 1. Download the model from a host with internet connectivity and save it to a shared folder. This step requires NGC_API_KEY in the environment.
export SHARED_NIM_CACHE=/shared/cache/folder
sudo mkdir -p $SHARED_NIM_CACHE
sudo chmod 777 $SHARED_NIM_CACHE

docker run -it --rm --runtime=nvidia --gpus=all -e NGC_API_KEY \
  -v $SHARED_NIM_CACHE:/opt/nim/.cache \
  --entrypoint download-to-cache \
  nvcr.io/nim/nvidia/genmol:1.0.0 \
  -p a525212dd4373ace3be568a38b5d189a6fb866e007adf56e750ccd11e896b036
Step 2. Launch NIM from a host without internet connectivity but accessible to the shared folder. Do NOT provide NGC_API_KEY, as shown in the following example.
export SHARED_NIM_CACHE=/shared/cache/folder

docker run -it --rm --runtime=nvidia --gpus=all -p 8000:8000 \
  -v $SHARED_NIM_CACHE:/opt/nim/.cache nvcr.io/nim/nvidia/genmol:1.0.0
Air Gap Deployment (local model directory route)#
Another option for the air gap route is to deploy the created model repository using the create-model-store command within the NIM Container to create a repository for a single model, as shown in the following example.
Step 1. Download and build the model store in a shared folder on a host with Internet. This step requires NGC_API_KEY in environment.
export SHARED_MODEL_STORE=/shared/store/folder
sudo mkdir -p $SHARED_MODEL_STORE
sudo chmod 777 $SHARED_MODEL_STORE

docker run -it --rm --runtime=nvidia --gpus=all -e NGC_API_KEY \
  -v $SHARED_MODEL_STORE:/model-store \
  --entrypoint create-model-store \
  nvcr.io/nim/nvidia/genmol:1.0.0 \
  -p a525212dd4373ace3be568a38b5d189a6fb866e007adf56e750ccd11e896b036 -m /model-store
Step 2. Launch NIM from a host without Internet but accessible to the shared store folder. Do NOT provide NGC_API_KEY, as shown in the following example.
export SHARED_MODEL_STORE=/shared/store/folder

docker run -it --rm --runtime=nvidia --gpus=all -p 8000:8000 \
  -v $SHARED_MODEL_STORE:/model-store \
  -e NIM_CACHE_PATH=/model-store \
  -e MODEL_FOLDER=/model-store/genmol \
  -e NIM_DISABLE_MODEL_DOWNLOAD=True \
  nvcr.io/nim/nvidia/genmol:1.0.0