Quickstart Guide#
This page will guide you through the process of downloading NVIDIA NIM for Cosmos WFM (World Foundation Models) and verifying the setup on your machine.
Note
Before following this guide, ensure you have installed and configured all components outlined on the Prerequisites page.
Launch NVIDIA NIM for Cosmos WFM#
You can download and run the Cosmos WFM NIM of your choice using either NGC or the API catalog.
From NGC#
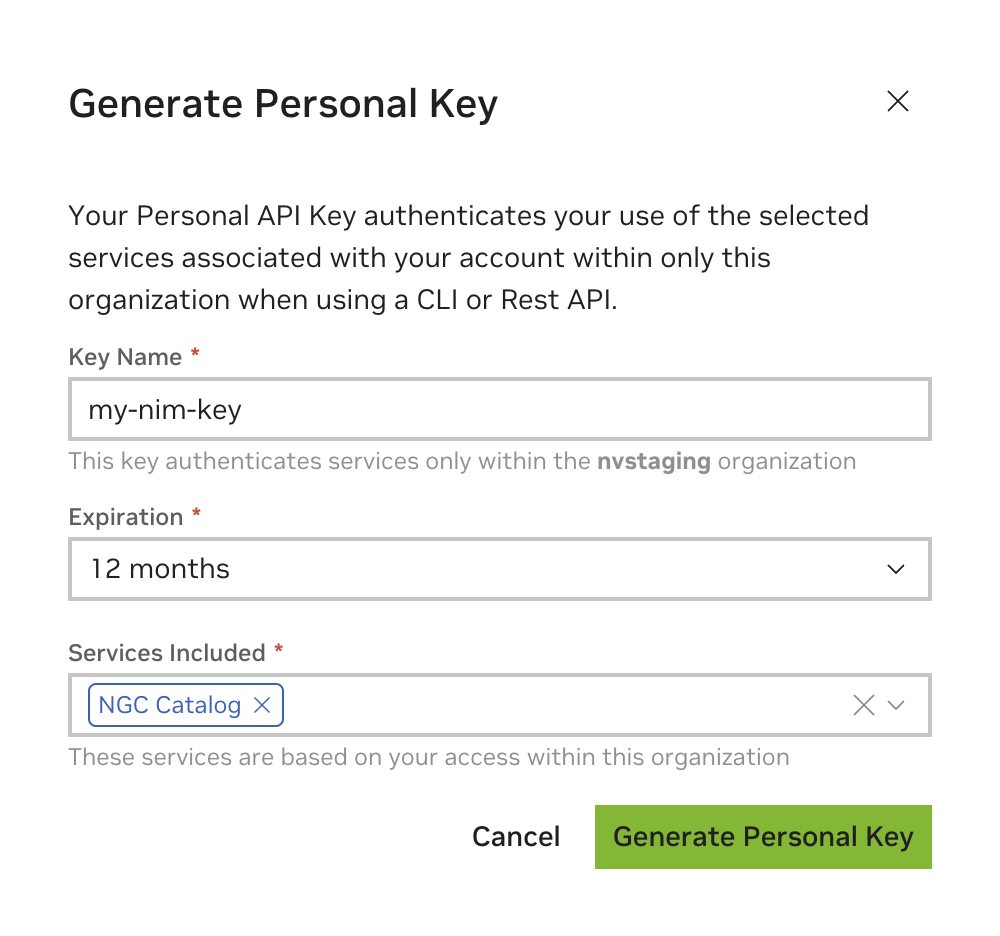
Generate an API Key#
An NGC API key is required to access NGC resources. The key can be generated here.
When creating an NGC API key, ensure that at least NGC Catalog is selected from the Services Included dropdown.
If this key will be reused for other purposes, more services can be included.
Export the API Key#
Pass the value of the API key to the docker run command in the next section as the
NGC_API_KEY environment variable to download the appropriate models and resources when
starting the NIM.
If you are not familiar with how to create the NGC_API_KEY environment variable, the
simplest way is to export it in your terminal:
export NGC_API_KEY=<value>
Run one of the following commands to make the key available at startup:
# If using bash
echo "export NGC_API_KEY=<value>" >> ~/.bashrc

# If using zsh
echo "export NGC_API_KEY=<value>" >> ~/.zshrc
Other more secure options include saving the value in a file, which you can retrieve with cat $NGC_API_KEY_FILE, or using a password manager.
Docker Login to NGC#
To pull the NIM container image from NGC, first authenticate with the NVIDIA Container Registry using the following command:
echo "$NGC_API_KEY" | docker login nvcr.io --username '$oauthtoken' --password-stdin
Use $oauthtoken as the username and NGC_API_KEY as the password. The $oauthtoken username
is a special name indicating that you will authenticate with an API key, not a username/password.
List Available NIMs#
This documentation uses the NGC CLI tool in several examples. To download and configure the tool, refer to the NGC CLI documentation.
Use the following command to list the available NIMs in CSV format.
ngc registry image list --format_type csv 'nvcr.io/nim/nvidia/cosmos**'
This command should produce output in the following format:
Name,Repository,Latest Tag,Image Size,Updated Date,Permission,Signed Tag?,Access Type,Associated Products
<name1>,<repository1>,<latest tag1>,<image size1>,<updated date1>,<permission1>,<signed tag?1>,<access type1>,<associated products1>
...
<nameN>,<repositoryN>,<latest tagN>,<image sizeN>,<updated dateN>,<permissionN>,<signed tag?N>,<access typeN>,<associated productsN>
Use the Repository and Latest Tag fields when you call the docker run command, as shown in the following section.
Launch the NIM#
Use the following command to launch a Docker container for either the cosmos-predict1-7b-text2world or cosmos-predict1-7b-video2world
model. Refer to the Supported Models page for information on supported NIM for Cosmos WFM models.
Tip
To launch a container for a different NIM, modify the Repository and Latest_Tag
values: Refer to output from the image list command above for available values. We
also recommend changing the value of CONTAINER_NAME to something appropriate.
# Choose a container name for bookkeeping
export CONTAINER_NAME=cosmos-predict1-7b-text2world

# The container name from the previous ngc registry image list command
Repository=cosmos-predict1-7b-text2world
Latest_Tag=1.0.0

# Choose a Cosmos-Predict1 NIM Image from NGC
export IMG_NAME="nvcr.io/nim/nvidia/${Repository}:${Latest_Tag}"

# Choose a path on your system to cache the downloaded models
export LOCAL_NIM_CACHE=~/.cache/nim
mkdir -p "$LOCAL_NIM_CACHE"

# Start the Cosmos-Predict1 NIM
docker run -it --rm --name=$CONTAINER_NAME \
    --runtime=nvidia \
    --gpus all \
    --shm-size=16GB \
    -e NGC_API_KEY=$NGC_API_KEY \
    -v "$LOCAL_NIM_CACHE:/opt/nim/.cache" \
    -u $(id -u) \
    -p 8000:8000 \
    $IMG_NAME
# Choose a container name for bookkeeping
export CONTAINER_NAME=cosmos-predict1-7b-video2world

# The container name from the previous ngc registry image list command
Repository=cosmos-predict1-7b-video2world
Latest_Tag=1.0.0

# Choose a Cosmos-Predict1 NIM Image from NGC
export IMG_NAME="nvcr.io/nim/nvidia/${Repository}:${Latest_Tag}"

# Choose a path on your system to cache the downloaded models
export LOCAL_NIM_CACHE=~/.cache/nim
mkdir -p "$LOCAL_NIM_CACHE"

# Start the Cosmos-Predict1 NIM
docker run -it --rm --name=$CONTAINER_NAME \
    --runtime=nvidia \
    --gpus all \
    --shm-size=16GB \
    -e NGC_API_KEY=$NGC_API_KEY \
    -v "$LOCAL_NIM_CACHE:/opt/nim/.cache" \
    -u $(id -u) \
    -p 8000:8000 \
    $IMG_NAME
Docker Run Parameters#
The following table describes the Docker run parameters used in the command above:
Flags |
Description |
|---|---|
|
|
|
Delete the container after it stops (refer to Docker docs for more information) |
|
Give a name to the NIM container for bookkeeping (here |
|
Ensure NVIDIA drivers are accessible in the container. |
|
Expose all NVIDIA GPUs inside the container. Refer to the configuration page for mounting specific GPUs. |
|
Allocate host memory for multi-GPU communication. Not required for single-GPU models or GPUs with NVLink enabled. |
|
Provide the container with the token necessary to download adequate models and resources from NGC. Refer to the Export the API Key. step for more details |
|
Mount a cache directory from your system ( |
|
Use the same user as your system user inside the NIM container to avoid permission mismatches when downloading models in your local cache directory. |
|
Forward the port where the NIM server is published inside the container to access from the host system. The left-hand side of the colon ( |
|
Provide the name and version of the NIM for Cosmos WFM container from NGC. The NIM for Cosmos WFM server automatically starts if no argument is provided after this. |
Note
Refer to the Configuring a NIM page for information about additional configuration settings.
Note
If you have an issue with permission mismatches when downloading models in your local cache directory,
add the -u $(id -u) option to the docker run call.
Verify NIM Startup#
During startup, the NIM container downloads the required resources and serves the model behind an API endpoint. The following message indicates a successful startup. The startup can take several minutes to complete.
INFO 2025-03-26 09:28:31.460] Serving endpoints:
0.0.0.0:8000/v1/health/live (GET)
0.0.0.0:8000/v1/health/ready (GET)
0.0.0.0:8000/v1/metrics (GET)
0.0.0.0:8000/v1/license (GET)
0.0.0.0:8000/v1/metadata (GET)
0.0.0.0:8000/v1/manifest (GET)
0.0.0.0:8000/v1/infer (POST)
INFO 2025-03-26 09:28:31.460] {'message': 'Starting HTTP Inference server', 'port': 8000, 'workers_count': 1, 'host': '0.0.0.0', 'log_level': 'info', 'SSL': 'disabled'}
Once you see this message, you can validate the NIM deployment by executing an inference request. In a new terminal, run the following command to check the liveness of the service:
curl -i -X GET 'http://0.0.0.0:8000/v1/health/live'
The service will respond with a 200 HTTP code if the server is live:
HTTP/1.1 200 OK
date: Wed, 26 Mar 2025 09:29:26 GMT
server: uvicorn
content-length: 55
content-type: application/json

{"description":"Triton liveness check","status":"live"}
Use the following command to check if the server is ready to accept requests:
curl -i -X GET 'http://0.0.0.0:8000/v1/health/ready'
The service will respond with a 200 HTTP code if the server is ready to accept requests:
HTTP/1.1 200 OK
date: Wed, 26 Mar 2025 09:29:26 GMT
server: uvicorn
content-length: 55
content-type: application/json

{"description":"Triton liveness check","status":"ready"}
Tip
Pipe the results of curl commands into a tool like jq
or python -m json.tool to make the output of the API easier to read (for example, curl -s http://0.0.0.0:8000/v1/health/ready | jq).
To install jq on Debian, use the following command: apt update && apt install -y jq
Run Inference#
To generate a video from a text prompt and save it to disk, use the following command:
curl -X 'POST' \
'http://0.0.0.0:8000/v1/infer' \
    -H 'Accept: application/json' \
    -H 'Content-Type: application/json' \
    -d '{
            "prompt": "first person view from a camera in a car driving down a two lane neighborhood street, viewed from the dashcam as we drive down the street. The camera faces forward. There are nice houses and sidewalks in this suburban area with green grass front yards and flower gardens and large oak trees. It is a rainy day and there are grey clouds overhead. The road has puddles on it, reflecting the sky overhead. The windshield wipers flash by.",
            "seed": 4
        }' | jq -r '.b64_video' | base64 -d > video.mp4
Generation will take a few minutes to complete depending on the utilized hardware. The server then returns a JSON object with the following fields:
{
    "b64_video": "<base64EncodedVideoString>",
    "upsampled_prompt": "first person view from a camera in a car driving down a two lane neighborhood street, viewed from the dashcam as we drive down the street. The camera faces forward. There are nice houses and sidewalks in this suburban area with green grass front yards and flower gardens and large oak trees. It is a rainy day and there are grey clouds overhead. The road has puddles on it, reflecting the sky overhead. The windshield wipers flash by.",
    "seed": 4
}
The server response, which is the curl result, is then piped to a decoder: | jq -r '.b64_video' | base64 -d > video.mp4.
This command decodes the base64-encoded video and saves the video as a local MP4 file.
Here is the above commands as a Python script:
import requests
import base64

prompt = "first person view from a camera in a car driving down a two lane neighborhood street, viewed from the dashcam as we drive down the street. The camera faces forward. There are nice houses and sidewalks in this suburban area with green grass front yards and flower gardens and large oak trees. It is a rainy day and there are grey clouds overhead. The road has puddles on it, reflecting the sky overhead. The windshield wipers flash by."

response = requests.post(
    "http://0.0.0.0:8000/v1/infer",
    json=dict(prompt=prompt),
    headers={
        "Accept": "application/json",
        "Content-Type": "application/json",
    }
)
response.raise_for_status()

data = response.json().get("b64_video")
video_bytes = base64.b64decode(data)

with open("video.mp4", "wb") as video_file:
    video_file.write(video_bytes)
To generate a video from an image with optional text prompt and save it to disk, use the following command:
curl -X 'POST' \
'http://0.0.0.0:8000/v1/infer' \
    -H 'Accept: application/json' \
    -H 'Content-Type: application/json' \
    -d '{
        "prompt": "The video is a wide shot of a large industrial facility, likely a chemical plant or factory, situated in a rural or semi-industrial area. The scene is set during a partly cloudy day, with the sky showing patches of blue and white clouds. The facility is surrounded by a vast expanse of green fields, indicating its location in a countryside or suburban area. The factory itself is a large, rectangular building with a flat roof, constructed from concrete and metal. It features several large cylindrical tanks and pipes, suggesting the processing of chemicals or liquids. The tanks are arranged in a linear fashion along the side of the building, and there are several smaller structures and equipment scattered around the premises. The camera remains static throughout the video, capturing the entire facility from a distance, allowing viewers to observe the layout and scale of the operations. The lighting is natural, with sunlight casting shadows on the ground, enhancing the details of the industrial setup. There are no visible human activities or movements, indicating that the video might be a documentary or an informational piece about industrial processes.", "negative_prompt": "blurry, low quality, artifacts, people",
        "image": "https://assets.ngc.nvidia.com/products/api-catalog/cosmos/industry_01_prompt.jpg",
        "seed": 42
        }' | jq -r '.b64_video' | base64 -d > video.mp4
Generation will take a few minutes to complete depending on the utilized hardware. The server then returns a JSON object with the following fields:
{
    "b64_video": "<base64EncodedVideoString>",
    "seed": 42
}
The server response, which is the curl result, is then piped to a decoder: | jq -r '.b64_video' | base64 -d > video.mp4.
This command decodes the base64-encoded video and saves the video as a local MP4 file.
Here is the above commands as a Python script:
import requests
import base64

prompt = "The video is a wide shot of a large industrial facility, likely a chemical plant or factory, situated in a rural or semi-industrial area. The scene is set during a partly cloudy day, with the sky showing patches of blue and white clouds. The facility is surrounded by a vast expanse of green fields, indicating its location in a countryside or suburban area. The factory itself is a large, rectangular building with a flat roof, constructed from concrete and metal. It features several large cylindrical tanks and pipes, suggesting the processing of chemicals or liquids. The tanks are arranged in a linear fashion along the side of the building, and there are several smaller structures and equipment scattered around the premises. The camera remains static throughout the video, capturing the entire facility from a distance, allowing viewers to observe the layout and scale of the operations. The lighting is natural, with sunlight casting shadows on the ground, enhancing the details of the industrial setup. There are no visible human activities or movements, indicating that the video might be a documentary or an informational piece about industrial processes."
image_url = "https://assets.ngc.nvidia.com/products/api-catalog/cosmos/industry_01_prompt.jpg"
seed = 42

response = requests.post(
    "http://0.0.0.0:8000/v1/infer",
    json=dict(prompt=prompt, image=image_url, seed=seed),
    headers={
        "Accept": "application/json",
        "Content-Type": "application/json",
    }
)
response.raise_for_status()

data = response.json().get("b64_video")
video_bytes = base64.b64decode(data)

with open("video.mp4", "wb") as video_file:
    video_file.write(video_bytes)
To generate a video from a video input instead of an image input, video field should be provided instead of image field:
curl -X 'POST' \
'http://0.0.0.0:8000/v1/infer' \
    -H 'Accept: application/json' \
    -H 'Content-Type: application/json' \
    -d '{
        "prompt": "A first person view from the perspective from a human sized robot as it works in a chemical plant. The robot has many boxes and supplies nearby on the industrial shelves. The camera on moving forward, at a height of 1m above the floor. Photorealistic",
        "video": "https://assets.ngc.nvidia.com/products/api-catalog/cosmos/ar_result_default_robot.mp4",
        "seed": 42
        }' | jq -r '.b64_video' | base64 -d > video.mp4
Generation will take a few minutes to complete depending on the utilized hardware. The server then returns a JSON object with the following fields:
{
    "b64_video": "<base64EncodedVideoString>",
    "seed": 42
}
The server response, which is the curl result, is then piped to a decoder: | jq -r '.b64_video' | base64 -d > video.mp4.
This command decodes the base64-encoded video and saves the video as a local MP4 file.
Here is the above commands as a Python script:
import requests
import base64

prompt = "A first person view from the perspective from a human sized robot as it works in a chemical plant. The robot has many boxes and supplies nearby on the industrial shelves. The camera on moving forward, at a height of 1m above the floor. Photorealistic"
video_url = "https://assets.ngc.nvidia.com/products/api-catalog/cosmos/ar_result_default_robot.mp4"
seed = 42

response = requests.post(
    "http://0.0.0.0:8000/v1/infer",
    json=dict(prompt=prompt, video=video_url, seed=seed),
    headers={
        "Accept": "application/json",
        "Content-Type": "application/json",
    }
)
response.raise_for_status()

data = response.json().get("b64_video")
video_bytes = base64.b64decode(data)

with open("video.mp4", "wb") as video_file:
    video_file.write(video_bytes)
Refer to the API Reference and Sampling Control pages for more detailed examples and full API documentation.
Stopping the Container#
If a Docker container is launched with the --name command line option, you can stop
the running container using the following command.
# In the previous sections, the environment variable CONTAINER_NAME was
# defined using `export CONTAINER_NAME=cosmos-predict1-7b-text2world`
docker stop $CONTAINER_NAME
Use docker kill if stop is not responsive. Then, follow it with
docker rm $CONTAINER_NAME if you do not intend to restart this container
as-is (using docker start $CONTAINER_NAME) in which case you will need to
follow the Launch NIM steps again to start a new container
for your NIM.
If you did not start a container with --name, look at the output of docker ps
to get a container ID for the image you used.