Reconstruct Scenes from Stereo Camera Data#
Overview#
The stereo camera reference workflow provides an end-to-end pipeline for converting real-world sensor data from stereo RGB cameras into physically realistic digital assets usable in NVIDIA Isaac Sim. This professional reference workflow is designed for production robotics applications and automates pose estimation, depth estimation, scene reconstruction, and physically based rendering asset generation.
This workflow was used to generate the assets available in the NVIDIA PhysicalAI Robotics NuRec Dataset.
The pipeline integrates several NVIDIA technologies:
Isaac ROS for data processing and conversion
cuSFM (PyCuSFM) for pose estimation
FoundationStereo for depth estimation
nvblox for mesh generation and occupancy mapping
3DGRUT for neural reconstruction
USD/USDZ export for Isaac Sim integration
Prerequisites#
Hardware Requirements#
Stereo RGB camera system
Linux workstation with:
CUDA 13
GCC ≤ 11
NVIDIA GPU (RTX recommended)
Docker support
Software Requirements#
Isaac ROS 4.0 development environment
Docker
Isaac Sim 5.0 or later
Raw Data Requirements#
The stereo camera pipeline supports two types of input data:
ROS Bag Format#
Recorded by the user, which can be converted to cuSFM format.
Requirements:
Stereo RGB camera required
camera_infotopic needed for camera intrinsics/tfand/tf_staticneeded for camera extrinsicsOnly CompressedImage and Image message type are supported.
Example ROS bags:
https://catalog.ngc.nvidia.com/orgs/nvidia/teams/isaac/resources/r2bdataset2024
cuSFM Format#
Pre-processed data in cuSFM format. See the PyCuSFM Tutorial on Raw Data Requirements for detailed format specifications.
Components:
Image files: Camera images in supported formats (JPEG, PNG, etc.)
frames_meta.json: Metadata file following the KeyframesMetadataCollection protobuf format
Example cuSFM data:
Expected Output Structure#
After running all modules in the stereo camera pipeline, the expected output directory structure is:
/workspace/
├── images/                     # Raw data extracted from ROS bag (cuSFM format)
│   ├── <camera_name>/          # e.g., front_stereo_camera_left
│   │   └── xxxx.jpeg
│   ├── frames_meta.json        # Information describing synchronized image frames captured by a stereo camera setup
│   └── stereo.edex             # (Optional) Stereo calibration / extrinsics data
│
├── cusfm/                      # cuSFM reconstruction outputs
│   ├── cuvgl_map/
│   ├── cuvslam_output/
│   ├── keyframes/
│   ├── kpmap/
│   ├── matches/
│   ├── output_poses/
│   ├── pose_graph/
│   └── sparse/                 # Sparse reconstruction
│       ├── cameras.txt
│       ├── images.txt
│       └── points3D.txt
│
├── nvblox_mesh/                # Mesh and occupancy map outputs
│   ├── nvblox_mesh.ply         # Reconstructed mesh
│   ├── occupancy_map.png       # 2D occupancy map visualization
│   └── occupancy_map.yaml      # Occupancy map metadata
│
├── depth/                      # Depth maps from FoundationStereo
│   └── <camera_name>/          # Depth maps at original resolution
│       └── xxxx.png
│
└── 3dgrut/                     # 3DGRUT training outputs and final assets
    ├── ckpt_last.pt            # Final checkpoint
    ├── export_last.inpg        # Intermediate representation
    ├── parsed.yaml             # Training configuration
    ├── ours_xxxxx/             # e.g., ours_30000 (iteration count)
    └── export_last.usdz        # Final USDZ asset for Isaac Sim
Note
Folder names such as cusfm, nvblox_mesh, depth, or 3dgrut may vary depending on your configuration.
Workflow Steps#
Step 1: ROS Bag Converter#
Note
This step is optional if your input is already in cuSFM format.
This step converts ROS bags to cuSFM format using the Isaac Mapping application rosbag_to_mapping_data.
For testing, you can use one of the example ROS bags provided in https://catalog.ngc.nvidia.com/orgs/nvidia/teams/isaac/resources/r2bdataset2024
Initialize Compute#
x86 Platforms:
Install the latest NVIDIA GPU Driver using the official GPU driver installation instructions.
Verify the NVIDIA GPU Driver is installed correctly:
$ nvidia-smi
Confirm that all relevant fields satisfy the requirements:
Driver Version
CUDA Version
GPU Memory
Create a Workspace#
x86 Platforms:
Create a workspace for experimenting with Isaac ROS:
$ mkdir -p ~/workspaces/isaac_ros-dev/src
$ echo 'export ISAAC_ROS_WS="${ISAAC_ROS_WS:-${HOME}/workspaces/isaac_ros-dev/}"' >> ~/.bashrc
$ source ~/.bashrc
Configure Isaac ROS Apt Repository#
The NVIDIA Isaac ROS Apt Repository hosts the following categories of packages for all users:
Isaac ROS CLI package for managing Isaac ROS development environments
Pre-built Isaac ROS packages for currently-supported platforms
Auxiliary packages to improve developer experience or to support a legacy OS
To configure the Isaac ROS Apt Repository, follow the steps below:
Set the locale on your host system to UTF-8:
$ locale  # check for UTF-8
$ sudo apt update && sudo apt install locales
$ sudo locale-gen en_US en_US.UTF-8
$ sudo update-locale LC_ALL=en_US.UTF-8 LANG=en_US.UTF-8
$ export LANG=en_US.UTF-8
$ locale  # verify settings
Install the dependencies:
$ sudo apt update && sudo apt install curl gnupg
$ sudo apt install software-properties-common
$ sudo add-apt-repository universe
Source the Isaac ROS Apt Repository:
NVIDIA hosts the Isaac ROS Apt Repository on two CDNs (Content Distribution Networks), one in the United States (.com) and one in China (.cn). Select the appropriate CDN based on your location and other considerations.
$ sudo apt-get update
US CDN - Option 1: Specific Version (release-4.0)
Use this option to pin to a specific minor version:
$ k="/usr/share/keyrings/nvidia-isaac-ros.gpg"
$ curl -fsSL https://isaac.download.nvidia.com/isaac-ros/repos.key | sudo gpg --dearmor \
    | sudo tee -a $k > /dev/null
$ f="/etc/apt/sources.list.d/nvidia-isaac-ros.list"
$ sudo touch $f
$ s="deb [signed-by=$k] https://isaac.download.nvidia.com/isaac-ros/release-4.0 "
$ s="${s}noble main"
$ grep -qxF "$s" $f || echo "$s" | sudo tee -a $f
$ sudo apt-get update
US CDN - Option 2: Latest Minor Version (release-4)
Use this option to automatically receive updates for the latest release-4 minor version:
$ k="/usr/share/keyrings/nvidia-isaac-ros.gpg"
$ curl -fsSL https://isaac.download.nvidia.com/isaac-ros/repos.key | sudo gpg --dearmor \
    | sudo tee -a $k > /dev/null
$ f="/etc/apt/sources.list.d/nvidia-isaac-ros.list"
$ sudo touch $f
$ s="deb [signed-by=$k] https://isaac.download.nvidia.com/isaac-ros/release-4 "
$ s="${s}noble main"
$ grep -qxF "$s" $f || echo "$s" | sudo tee -a $f
$ sudo apt-get update
Initialize Isaac ROS CLI#
Install dependencies:
$ pip install termcolor --break-system-packages
Install the Isaac ROS CLI:
$ sudo apt-get install isaac-ros-cli
Configure the environment isolation mode:
Install Docker following the official Docker installation instructions.
Install the NVIDIA Container Toolkit following the official NVIDIA Container Toolkit installation guide.
Configure nvidia-container-toolkit for Docker using the official nvidia-container-toolkit configuration guide.
Restart Docker:
$ sudo systemctl daemon-reload && sudo systemctl restart docker
Initialize the Isaac ROS CLI:
$ sudo isaac-ros init docker
Setup Development Environment#
Add your data volume to the Isaac ROS environment by adding the following line to the ~/.isaac_ros_dev-dockerargs file. For example, to mount the host directory /workspace:
$ echo -e '-v /workspace:/workspace' > ~/.isaac_ros_dev-dockerargs
Activate the Isaac ROS environment:
$ isaac-ros activate --build-local
Note
The --build-local flag rebuilds the Docker image to include the new image layer. Rebuilding can take several minutes.
After the image has been built once, you can use isaac-ros activate to launch the container without rebuilding the image.
Install Isaac Mapping ROS Package#
Inside the container, update packages and install Isaac Mapping ROS:
$ sudo apt-get update
$ sudo apt-get install -y ros-jazzy-isaac-mapping-ros
Extract Images from ROS Bag#
Note
This step is optional. Skip this step if your input is already in cuSFM format (images with frames_meta.json). Proceed directly to Step 2.
Run the ROS bag to mapping data converter:
$ ros2 run isaac_mapping_ros rosbag_to_mapping_data \
    --sensor_data_bag_file /workspace/rosbag/xxx.mcap \
    --output_folder_path /workspace/images/ \
    --pose_topic_name /visual_slam/vis/slam_odometry
Command Parameters#
sensor_data_bag_file(required): Path to the ROS bag fileoutput_folder_path(required): Directory where the converted data will be savedpose_topic_name(optional): Name of the pose topic to use. Default:/visual_slam/vis/slam_odometrybase_link_name(optional): Name of the base link or vehicle coordinate frame. Default:base_linkgenerate_edex(optional): Controls whether EDEX files (Enhanced Data Exchange files) are generated. These files speed up downstream processing such as feature extraction, matching, and reconstruction in cuSFM
Note
If you are using a ROS bag with a different base link name,
you can specify the base link name using the base_link_name parameter.
Or if you only have one camera, you can specify the base_link_name as left camera link name.
Expected Output#
images/
├── <camera_name>/          # e.g., front_stereo_camera_left
│   └── xxxx.jpeg
├── frames_meta.json        # Frame metadata (timestamps, poses, etc.)
└── stereo.edex             # Stereo calibration / extrinsics data
Step 2: Pose Estimation with cuSFM#
PyCuSFM is a Python implementation of cuSFM, a CUDA-accelerated structure-from-motion framework for reconstructing accurate 3D environmental structure and estimating precise camera pose.
Clone Repository#
$ cd ${HOME}/workspaces
$ git clone https://github.com/nvidia-isaac/pyCuSFM
$ cd pyCuSFM
Important
Before proceeding with installation, you must configure the repo based on your CUDA version on system:
For CUDA 13 systems:
$ ./setup.bash cuda13
This script creates symbolic links to the appropriate CUDA-specific binaries and libraries in the pycusfm/ directory. The setup is required before any installation or usage.
Run Installation Script#
Use the provided installation script to automatically install system dependencies and PyCuSFM.
For host installation:
$ ./install_in_host.sh
For Docker installation:
$ ./run_in_docker.sh --build_docker --install
Run cuSFM CLI#
$ cusfm_cli --input_dir /workspace/images/ \
    --cusfm_base_dir /workspace/cusfm \
    --min_inter_frame_distance 0.06 \
    --min_inter_frame_rotation_degrees=1.5
Command Parameters#
input_dir(required): Path to the converted dataset (e.g., output of ROS bag conversion)cusfm_base_dir(required): Output directory where cuSFM results will be saved (e.g., keyframes/, sparse/, matches/, pose_graph/)min_inter_frame_distance(optional): Minimum distance (in meters) between consecutive keyframes for reconstructionmin_inter_frame_rotation_degrees(optional): Minimum rotation (in degrees) between consecutive keyframes for reconstruction
Expected Output#
cusfm/
├── cuvgl_map/
├── cuvslam_output/
├── keyframes/
├── kpmap/
├── matches/
├── output_poses/
├── pose_graph/
└── sparse/                 # Contains cameras.txt, images.txt, points3D.txt
For complete installation and usage documentation, see the PyCuSFM Repository and PyCuSFM Tutorial.
Step 3: Depth Estimation with FoundationStereo#
In the stereo camera pipeline, a depth map with metric scale is essential. Without additional sensors like LiDAR, depth maps serve as the primary source for generating point clouds used in Gaussian initialization and geometry regularization.
FoundationStereo is a large-scale foundation model for stereo depth estimation that demonstrates strong zero-shot generalization. It processes sequences of stereo RGB image pairs and generates corresponding depth maps at matching resolution.
Activate Isaac ROS Environment#
Open a terminal and attach to the container:
$ isaac-ros activate
Note
If you didn’t run isaac-ros activate --build-local in Step 1, you need to use the --build-local flag now. This flag rebuilds the Docker image to include the new image layer. Rebuilding can take several minutes.
After the image has been built once, you can use isaac-ros activate to launch the container without rebuilding the image.
Install FoundationStereo ROS Package#
Inside the container, install the required FoundationStereo assets:
$ sudo apt-get update
$ sudo apt-get install -y ros-jazzy-isaac-ros-foundationstereo-models-install
Download Pre-trained Model#
Download and install the pre-trained FoundationStereo model files by accepting the EULA:
$ source /opt/ros/jazzy/setup.bash
$ ros2 run isaac_ros_foundationstereo_models_install install_foundationstereo_models.sh --eula
Troubleshooting: TensorRT Compilation Error#
If you encounter a TensorRT optimizer error during model compilation:
[E] Error[2]: [optimizer.cpp::reduce::1258] Error Code 2: Internal Error
(Assertion !n13->cost.empty() failed. Node: In reduce at optimizer/common/tactic/optimizer.cpp:1258)
This error occurs when the TensorRT optimizer fails to find a valid execution strategy for certain operations, typically during FP16 optimization. To resolve this, first remove any existing corrupted engine file, then manually compile the model using FP32 instead:
$ rm /workspaces/isaac_ros-dev/isaac_ros_assets/models/foundationstereo/deployable_foundation_stereo_small_v1.0/foundationstereo_576x960.engine
$ /usr/src/tensorrt/bin/trtexec \
    --onnx=/workspaces/isaac_ros-dev/isaac_ros_assets/models/foundationstereo/deployable_foundation_stereo_small_v1.0/foundationstereo_576x960.onnx \
    --saveEngine=/workspaces/isaac_ros-dev/isaac_ros_assets/models/foundationstereo/deployable_foundation_stereo_small_v1.0/foundationstereo_576x960.engine \
    --noDataTransfers
The --noDataTransfers parameter forces TensorRT to use FP32 precision, avoiding the FP16 optimization that causes the compilation failure.
Run Depth Estimation#
After installing the models, run the offline depth estimation:
$ ros2 run isaac_mapping_ros run_foundationstereo_trt_offline.py \
    --image_dir /workspace/images \
    --output_dir /workspace/depth \
    --frames_meta_file /workspace/cusfm/kpmap/keyframes/frames_meta.json \
    --verbose
Command Parameters#
image_dir(required): Path to the folder containing stereo image pairs extracted from the ROS bag (e.g.,/workspace/images/)frames_meta_file(required): Path to the cuSFM-formattedframes_meta.jsonfileoutput_dir(required): Directory where the generated depth maps will be savedverbose(optional): Enable verbose logging output
Expected Output#
depth/
└── <camera_name>/          # Depth maps at original resolution
    └── xxxx.png
Note
For more information, see FoundationStereo.
Step 4: Mesh Generation with nvblox#
A mesh is crucial for enabling collision detection, navigation, and assigning physical properties—all essential for realistic simulation. nvblox reconstructs a voxel-based map from dense depth and RGB images, generating both a triangle mesh and an occupancy map. It supports 2D and 3D mapping and is optimized for NVIDIA GPUs and Jetson devices.
Clone Repository#
First clone the repository:
$ cd ${HOME}/workspaces
$ git clone https://github.com/nvidia-isaac/nvblox.git
$ cd nvblox
$ git checkout public
$ sudo chown -R $(id -u):$(id -g) ~/.ccache
Configure Docker Volume Mounts#
Before running the Docker container, modify docker/run_docker.sh to add your workspace mount path so the container can access your data:
# Edit docker/run_docker.sh and add your workspace mount
# For example, add: -v /workspace:/workspace
Build and Run Docker Container#
Then build and run the docker container:
$ cd nvblox
$ ./docker/run_docker.sh
Build C++ Library#
To build the C++ library run:
$ mkdir -p /workspaces/nvblox/build
$ cd /workspaces/nvblox/build
$ cmake ..
$ make -j$(nproc)
Generate Mesh with nvblox#
Navigate to the executables directory and run the fusion command:
$ cd nvblox/executables
$ mkdir -p /workspace/nvblox_mesh
$ ./fuse_cusfm \
    --color_image_dir /workspace/images/ \
    --depth_image_dir /workspace/depth/ \
    --frames_meta_file /workspace/cusfm/kpmap/keyframes/frames_meta.json \
    --save_2d_occupancy_map_path /workspace/nvblox_mesh/occupancy_map \
    --mapping_type_dynamic \
    --projective_integrator_max_integration_distance_m=2.5 \
    --esdf_slice_min_height=0.09 \
    --esdf_slice_max_height=0.65 \
    --esdf_slice_height=0.3 \
    --mesh_output_path /workspace/nvblox_mesh/nvblox_mesh.ply \
    --nouse_2d_esdf_mode \
    --fit_to_z0
Command Parameters#
color_image_dir(required): Path to the folder containing color (RGB) images extracted from the ROS bag (e.g.,/workspace/images/)depth_image_dir(required): Path to the folder containing corresponding depth maps generated by FoundationStereoframes_meta_file(required): Path to theframes_meta.jsonfile in cuSFM format that provides timestamps, poses, and camera parameterssave_2d_occupancy_map_path(required): Output directory where the generated 2D occupancy map will be savedmesh_output_path(required): File path for saving the reconstructed 3D mesh (e.g.,/workspace/nvblox_mesh/nvblox_mesh.ply)mapping_type_dynamic(optional): Enables dynamic mapping modeprojective_integrator_max_integration_distance_m(optional): Maximum integration distance in meters for depth fusion. Default: 2.5esdf_slice_min_height(optional): Minimum height (in meters) for ESDF slice extraction. Default: 0.09esdf_slice_max_height(optional): Maximum height (in meters) for ESDF slice extraction. Default: 0.65esdf_slice_height(optional): Height (in meters) at which to extract the 2D ESDF/occupancy map from the 3D reconstruction. Default: 0.3nouse_2d_esdf_mode(optional): Disables 2D ESDF modefit_to_z0(optional): Fits the mesh to z=0 ground plane
Expected Output#
nvblox_mesh/
├── nvblox_mesh.ply         # Reconstructed mesh
├── occupancy_map.png       # 2D occupancy / cost map visualization
└── occupancy_map.yaml      # Metadata/config for occupancy map
Step 5: Neural Reconstruction with 3DGRUT#
Once the mesh, point cloud, depth maps, poses, and RGB images are ready, we use 3DGRUT to train a dense 3D reconstruction and export it to USD for Isaac Sim.
3DGRUT implements 3D Gaussian Ray Tracing (3DGRT) and 3D Gaussian Unscented Transform (3DGUT), enabling native support for distorted camera models with time-dependent effects (e.g., fisheye and rolling shutter). It also supports secondary ray tracing, allowing the representation of phenomena such as reflections and refractions within a unified 3D Gaussian framework—resulting in highly realistic scene rendering and reconstruction.
Installation#
The official 3DGRUT code is available on GitHub. Follow the installation instructions to set up all required dependencies.
$ cd ${HOME}/workspaces
$ git clone --recursive https://github.com/nv-tlabs/3dgrut.git
$ cd 3dgrut
$ chmod +x install_env.sh
$ ./install_env.sh 3dgrut
$ conda activate 3dgrut
For GCC 11 inside Conda environment:
If your system uses GCC 12 or newer (e.g., on Ubuntu 24.04):
$ conda install -c conda-forge gcc=11 gxx=11
Tip
Verify successful installation by running a test reconstruction on one of the sample datasets included in the repository before proceeding with your own data.
Prepare cuSFM Outputs#
Before running 3DGRUT training, we need to prepare the cuSFM outputs by copying the sparse folder from the cuSFM output directory (generated in Step 2) to the same level as the images folder, and reorganizing the files into the expected COLMAP structure.
Run the following commands to set up the dataset structure:
$ cd /workspace/cusfm
$ cp -r sparse /workspace/
$ cd /workspace/sparse
$ mkdir 0
$ mv cameras.txt images.txt kpmap_to_colmap.txt points3D.txt 0/
Note
We use the apps/cusfm_3dgut.yaml configuration in this tutorial, but you can also use apps/cusfm_3dgut_mcmc.yaml, which pairs 3DGRUT with an MCMC (Markov Chain Monte Carlo) densification strategy. In practice, this approach samples and densifies Gaussians in regions where the reconstruction is uncertain, sharpening thin structures and edges while improving overall fidelity, with only a modest increase in training time compared to the baseline configuration.
Your workspace directory should now look like this:
/workspace/
├── images/
│   ├── <camera_name>/
│   │   └── xxxx.jpeg
│   ├── frames_meta.json
│   └── stereo.edex
│
├── sparse/
│   └── 0/
│       ├── cameras.txt
│       ├── images.txt
│       ├── kpmap_to_colmap.txt
│       └── points3D.txt
│
├── cusfm/
├── depth/
└── nvblox_mesh/
Run 3DGRUT Training and Export USDZ#
With the environment active, start training by running the provided train.py script with the cuSFM config:
$ conda activate 3dgrut
$ python train.py \
   --config-name apps/cusfm_3dgut.yaml \
   path=/workspace \
   out_dir=/workspace/3dgrut \
   initialization.fused_point_cloud_path=/workspace/nvblox_mesh/nvblox_mesh.ply \
   experiment_name=3dgut_gs \
   export_usdz.enabled=true \
   export_usdz.apply_normalizing_transform=true
Command Parameters#
config-name(required): Specifies which configuration YAML file to use.apps/cusfm_3dgut_mcmc.yamlenables the MCMC densification strategypath(required): Path to the cuSFM output directory containing sparse reconstruction data in thesparse/folder (e.g.,cameras.txt,images.txt, andpoints3D.txt)out_dir(required): Directory where the 3DGRUT training outputs, checkpoints, and exported assets will be savedexperiment_name(required): Custom name for the training run. Used to organize logs, checkpoints, and output foldersinitialization.accumulated_point_cloud_path(required): Path to the point cloud or mesh used for Gaussian initializationexport_usdz.enabled(optional): If set totrue, exports the reconstructed 3D scene as a USDZ file, which can be directly imported into NVIDIA Isaac Simexport_usdz.apply_normalizing_transform(optional): Iftrue, applies a simple normalization (centers and scales the scene near the origin). Note: This does not ensure the floor aligns exactly with z = 0; minor translation or rotation in Isaac Sim may still be required for alignment
Training Process#
Once you run the command, 3DGRUT will begin training:
Reads your images and cuSFM data
Optimizes a 3D representation of the scene
Training duration depends on scene complexity and GPU performance
Typically ranges from a few minutes for small scenes to several hours for highly detailed ones
Training Output#
When the process completes, you will obtain:
3dgrut/
├── ckpt_last.pt            # Final checkpoint
├── export_last.inpg        # Exported intermediate representation
├── parsed.yaml             # Training configuration
├── ours_xxxxx/             # e.g., ours_30000 (iteration count)
└── export_last.usdz        # Final USDZ asset for Isaac Sim
The flag export_usdz.enabled=true writes out a USDZ file of your reconstructed scene, allowing it to be directly loaded into Isaac Sim.
The flag export_usdz.apply_normalizing_transform=true applies a primitive normalization (centering and scaling the scene near the origin). However, it does not guarantee that the floor aligns exactly at z = 0. In Isaac Sim, you can add a Ground Plane and/or slightly adjust the scene root (translate or rotate) to achieve proper alignment.
Novel View Synthesis Results#
Below are example results showing novel view synthesis from scenes reconstructed using this pipeline. These demonstrations showcase the quality and realism achievable with 3DGRUT for robotics environments:
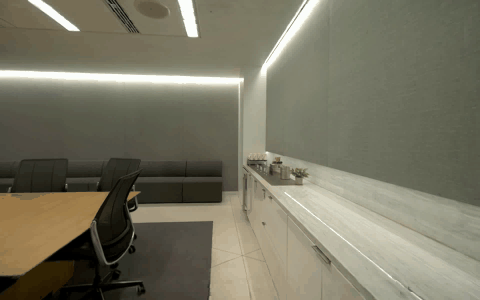
Endeavor Andoria |
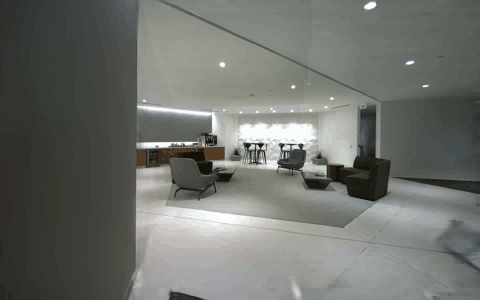
Endeavor Living Room |
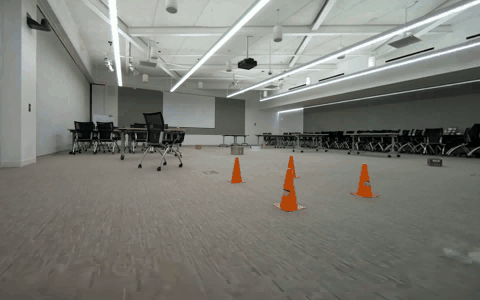
Endeavor Wormhole |
Step 6: Using Generated Assets and Sim-Ready Assets in Isaac Sim#
You can import the generated .usdz scene assets into
NVIDIA Isaac Sim for robotics simulation.
To set up physical interactions by adding assets from the OpenUSD Sim-Ready asset libraries, search for and insert these assets directly into your generated scenes in Isaac Sim.
There are several Sim-Ready asset libraries available for you to choose from:
NVIDIA’s physical AI dataset: Available on Hugging Face
Lightwheel’s extensive library: Available at simready.com
Extwin’s Synthesis Sim-Ready Assets: Available on Hugging Face (non-commercial use only)
Choose any of these Sim-Ready libraries, download the assets you need, and then load them into Isaac Sim for physical interaction with your reconstructed scenes.
Download Sim-Ready Assets:
For example: Open Lightwheel’s library in your browser, search for the asset you want, then download the zip file and extract the USD file.
Load the Generated Scene and Sim-Ready Assets:
To load the generated scene asset along with additional Sim-Ready assets into Isaac Sim, follow the steps below:
Drag and drop the
.usdzfile into Isaac Sim.Select File → Open → (Select File) → Open File from the menu.
To make the assets ready for simulation, you might want to also follow these steps:
Search for an asset in the search bar (right-hand side asset tree) and drag it into the scene.
To set mesh collision properties so that your robot can interact with the scene, navigate to and right-click on World → Volume → Mesh → Mesh, then select Add → Physics → Collider / Collider Preset.
For a complete walkthrough, watch the video tutorial by expanding the following section.
Video Tutorial: Adding Sim Objects and Setting Physics Properties
For a detailed video tutorial, play the following video: Adding Sim Objects and Setting Physics Properties.
Tips and Best Practices#
Hardware Recommendations#
Stereo RGB camera: A stereo RGB camera is required for this workflow. Recommended camera options include:
ZED 2i - AI-powered stereo camera with neural depth sensing and IP66 protection
Leopard Imaging Hawk Stereo Cameras - High-performance stereo camera systems
Data capture platform: We recommend an NVIDIA Jetson Orin Developer Kit for data capture along with an Isaac ROS Nova recorder for streamlined data collection and processing.
Camera stabilization: We recommend adding a gimbal with a handheld camera setup to reduce motion blur and improve image quality during data capture.
Data Capture#
Viewpoint diversity: Capture data from various different viewpoints with different pitch angles. This multi-angle coverage significantly improves reconstruction quality and completeness.
Data coverage: More data results in better reconstruction quality. Ensure thorough coverage of the area of interest—the more comprehensive your data collection, the higher the fidelity of the final reconstructed scene.
Stereo camera calibration: Ensure proper calibration of stereo cameras for accurate depth estimation
ROS bag recording: Record all necessary topics (images, camera_info, tf, tf_static)
Lighting conditions: Maintain consistent lighting during capture
Pipeline Optimization#
cuSFM settings: Adjust cuSFM parameters based on scene complexity and size
Depth quality: Monitor FoundationStereo output quality; regenerate if needed
Mesh resolution: Balance voxel size between detail and computational cost
Training iterations: More iterations generally improve quality but increase training time
Isaac Sim Integration#
Collision setup: Always set up collision properties for robot interaction
Ground alignment: Verify and adjust ground plane alignment
Physics properties: Configure material properties for realistic interactions
Lighting: Add supplementary lighting if the reconstructed scene is too dark
Troubleshooting#
ROS Bag Conversion Issues#
Problem: Missing topics in ROS bag
Solutions:
Verify required topics exist:
camera_info,/tf,/tf_staticUse
ros2 bag infoto inspect bag contentsRe-record ROS bag with all necessary topics
cuSFM Reconstruction Issues#
Problem: Poor sparse reconstruction quality
Solutions:
Check input image quality and camera calibration
Ensure stereo baseline is appropriate for scene scale
Verify EDEX files are generated correctly
Adjust cuSFM parameters for better feature matching
FoundationStereo Issues#
Problem: Depth maps have artifacts or missing regions
Solutions:
Verify stereo image pair alignment
Check that
frames_meta.jsoncontains correct camera parametersEnsure sufficient texture in the scene for stereo matching
Try adjusting FoundationStereo inference parameters
nvblox Mesh Generation Issues#
Problem: Mesh has holes or artifacts
Solutions:
Verify depth map quality from FoundationStereo
Adjust
voxel_sizeparameter (smaller for finer detail)Increase
projective_integrator_max_weightfor smoother surfacesCheck that RGB and depth images are properly aligned
3DGRUT Training Issues#
Problem: Out of GPU memory
Solutions:
Reduce training batch size in configuration
Use a GPU with more memory
Reduce image resolution in earlier pipeline stages
Problem: Training convergence issues
Solutions:
Verify input data quality (images, poses, depth, mesh)
Check that cuSFM sparse reconstruction is accurate
Adjust learning rate or other training parameters
Use MCMC configuration for better quality
Isaac Sim Integration Issues#
Problem: Scene appears at wrong scale or position
Solutions:
Verify normalizing transform was applied during export
Manually adjust scene transform in Isaac Sim
Check coordinate system conventions between pipeline and Isaac Sim
Problem: Robot falls through surfaces
Solutions:
Ensure collision properties are enabled on geometry
Verify ground plane is positioned correctly
Check physics settings in Isaac Sim
Additional Resources#
Documentation
Datasets
Community
Next Steps#
Explore the Mono Camera Reference Workflow for simpler capture scenarios
Learn about 4 Steps to Generate Synthetic Data for Robot Development