> This page is for Self-Hosted, version v3.0 (default).
> For other versions, use one of these documentation indexes:
> - v3.0 (default): https://docs.nvidia.com/run-ai/self-hosted/v3.0/llms.txt
> - v2.26: https://docs.nvidia.com/run-ai/self-hosted/v2.26/llms.txt
> - v2.25: https://docs.nvidia.com/run-ai/self-hosted/v2.25/llms.txt
> - v2.24: https://docs.nvidia.com/run-ai/self-hosted/v2.24/llms.txt
> For clean Markdown of any page, append .md to the page URL.
> For a complete documentation index, see https://docs.nvidia.com/run-ai/llms.txt.
> For AI client integration (Claude Code, Cursor, etc.), connect to the MCP server at https://docs.nvidia.com/run-ai/_mcp/server.
# Running AI Agents with NVIDIA OpenShell on NVIDIA Run:ai
This tutorial demonstrates how to run autonomous AI agents in NVIDIA OpenShell sandboxes on an NVIDIA Run:ai-managed Kubernetes cluster, with an OpenShell workspace for an [NVIDIA Run:ai project](/run-ai/self-hosted/documentation/platform-management/manage-ai-initiatives/organization/projects). Agents are scheduled under their NVIDIA Run:ai project's [quota](/run-ai/self-hosted/documentation/platform-management/runai-scheduler/scheduling/concepts-and-principles#quota). You can adapt this workflow for other teams, NVIDIA Run:ai projects, model endpoints, and agent harnesses.
In this tutorial, you will learn how to:
* Install the OpenShell gateway on an NVIDIA Run:ai cluster in `operator` mode
* Connect the gateway to your identity provider and sign users in
* Create an OpenShell workspace for an NVIDIA Run:ai project and add users to it
* Give agents model access through providers that keep the credential in the gateway, including a model served on NVIDIA Run:ai behind OIDC authentication
* Run an agent with Claude Code that pushes to GitHub
* Monitor agents as NVIDIA Run:ai workloads
## How OpenShell and NVIDIA Run:ai Work Together
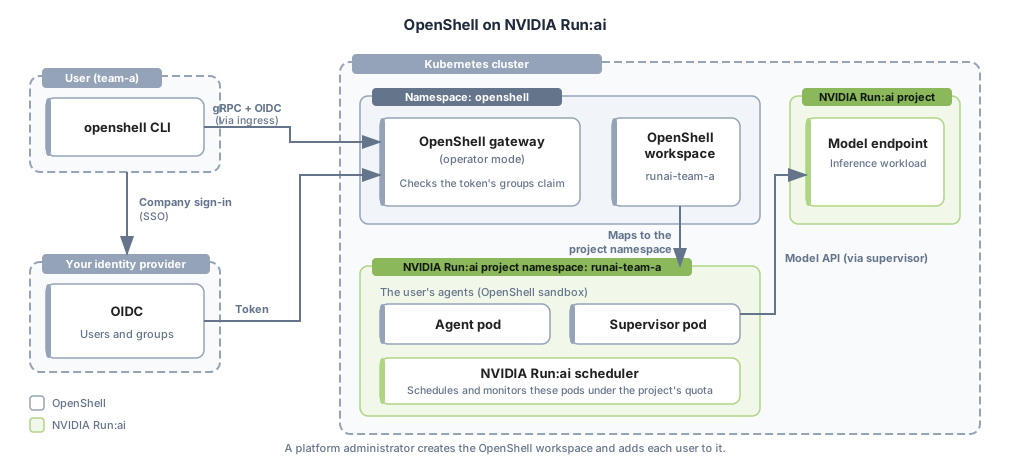
OpenShell and NVIDIA Run:ai each handle a different part of running AI agents. OpenShell is the agent platform. Users sign in to it, and it runs each agent in a sandbox, a protected environment that limits what the agent can reach. NVIDIA Run:ai is the orchestration and workload monitoring layer. It decides where the agents' pods run on the cluster, and it shows them as workloads that administrators can monitor. Each OpenShell workspace maps to an NVIDIA Run:ai project namespace, which lets NVIDIA Run:ai schedule and monitor the sandbox workloads under the quota of that project.
Each part of the setup is responsible for the following:
- **OpenShell** is the platform where users manage agents. It includes:
- **The OpenShell gateway** is the platform infrastructure that users connect to. It runs outside the NVIDIA Run:ai projects, so NVIDIA Run:ai project quota covers the agents.
- **Sign-in with your identity provider.** Users sign in through any OIDC identity provider (IdP) and do not need NVIDIA Run:ai accounts. For how sign-in works, refer to [Gateway Authentication](https://docs.nvidia.com/openshell/latest/how-it-works/gateways/authentication).
- **OpenShell workspaces and permissions.** A Platform Admin decides who can use which OpenShell workspace, and workspace membership is the access control. For more details, refer to [Workspaces](https://docs.nvidia.com/openshell/latest/how-it-works/workspaces).
- **Sandboxes.** Each agent runs in a sandbox in the NVIDIA Run:ai project namespace, where the OpenShell supervisor enforces the sandbox policy and keeps real credentials away from the agent. For more details, refer to [Manage Sandboxes](https://docs.nvidia.com/openshell/latest/how-it-works/sandboxes/overview).
- **NVIDIA Run:ai** schedules the agents' workloads and monitors them. It is responsible for:
- **Scheduling.** NVIDIA Run:ai schedules every pod in a project namespace under the NVIDIA Run:ai project's [quota](/run-ai/self-hosted/documentation/platform-management/runai-scheduler/scheduling/concepts-and-principles#quota), [fairness](/run-ai/self-hosted/documentation/platform-management/runai-scheduler/scheduling/concepts-and-principles#fairness-fair-resource-distribution), and [node pools](/run-ai/self-hosted/documentation/platform-management/manage-ai-initiatives/resources/node-pools).
- **Workload monitoring.** The agents' pods appear as workloads in NVIDIA Run:ai, where administrators can monitor them.
 ## Who Does What
The Platform Admin, Workspace Admin, and Workspace User roles are OpenShell roles. For more details, refer to [Understand the Role Model](https://docs.nvidia.com/openshell/latest/how-it-works/workspaces#understand-the-role-model) in the OpenShell documentation. The IdP group names `openshell-admin` and `openshell-user` are the values that you set as `admin_role` and `user_role` on the gateway in [Step 1](#step-1-installing-openshell).
| Role | Who they are | Steps |
|---|---|---|
| **Cluster administrator** | Cluster and infrastructure administrator. The identity provider (IdP) administrator joins for the IdP steps. | [Step 1](#step-1-installing-openshell) and [Step 2](#step-2-signing-in-to-openshell) (registers the OIDC client) |
| **Platform Admin** | A member of the IdP group `openshell-admin` | [Step 2](#step-2-signing-in-to-openshell) to [Step 5](#step-5-giving-agents-model-access), and [Step 7](#step-7-monitoring-agents) |
| **Workspace Admin** | A user that a Platform Admin gave the `admin` role in an OpenShell workspace | [Step 4](#step-4-adding-users-to-the-openshell-workspace), for their own OpenShell workspace |
| **Workspace User** | A member of the IdP group `openshell-user` and of the team's OpenShell workspace | [Step 2](#step-2-signing-in-to-openshell) and [Step 6](#step-6-running-an-agent-that-pushes-to-github) |
## Prerequisites
Before you start, make sure the following requirements are met:
### OpenShell Prerequisites
Before you install OpenShell in [Step 1](#step-1-installing-openshell), make sure the following requirements are met. Each one is described in the OpenShell documentation:
- **Cluster and tools:** Kubernetes 1.29 or later, Helm 3.x, `kubectl`, the CNI, and the Agent Sandbox controller. Refer to the [prerequisites](https://docs.nvidia.com/openshell/kubernetes/setup#prerequisites) in the Kubernetes setup guide and the [Support Matrix](https://docs.nvidia.com/openshell/latest/about/support-matrix#software-prerequisites).
- **Installer permissions:** The cluster administrator needs cluster-scoped permissions. Refer to the [RBAC](https://docs.nvidia.com/openshell/kubernetes/setup#rbac) section of the setup guide.
- **Identity provider:** OpenShell needs an OIDC identity provider for sign-in. Refer to [Access Control](https://docs.nvidia.com/openshell/latest/kubernetes/access-control) for the gateway OIDC settings and [Gateway Authentication](https://docs.nvidia.com/openshell/latest/how-it-works/gateways/authentication) for the CLI options.
### NVIDIA Run:ai Prerequisites
Make sure the following are set up in NVIDIA Run:ai:
- **A project.** An NVIDIA Run:ai [project](/run-ai/self-hosted/documentation/platform-management/manage-ai-initiatives/organization/projects) for the team that runs agents, with the quota you want to limit its agents to. This tutorial uses the NVIDIA Run:ai project `team-a`. In [Step 3](#step-3-creating-an-openshell-workspace-for-the-nvidia-runai-project), the Platform Admin creates an OpenShell workspace that matches the NVIDIA Run:ai project, and in [Step 4](#step-4-adding-users-to-the-openshell-workspace) adds the team's users to it.
- **A service account.** A [service account](/run-ai/self-hosted/documentation/platform-management/authentication/service-accounts) has a client ID and a client secret. In [Step 5](#step-5-giving-agents-model-access), the OpenShell gateway uses them to get access tokens for the model endpoint.
- **The sandbox workload type.** An administrator registers the OpenShell sandbox as a workload type, so that NVIDIA Run:ai can schedule and monitor the sandbox workloads. Use the [sandbox workload type](https://github.com/dsx-ai-factory/workload-map/blob/main/docs/catalog/agents-x-k8s-io-sandbox-v1beta1.yaml) from the workload-map repository, and follow [Registering New Workload Types](/run-ai/self-hosted/documentation/workloads-in-nvidia-run-ai/workload-types/extending-workload-support#registering-new-workload-types).
The Workload Types API takes a JSON request body, not the YAML file. To register the type and grant the permissions that it needs, follow these steps:
1. **Get the IDs.** Get the category ID with `GET /api/v1/workload-categories` and the priority ID with `GET /api/v1/workload-priorities`. For the sandbox, use the category `Build` and the priority `high`.
2. **Build the request body.** Use the following body. Replace `` and `` with the IDs from the previous step. The `spec` is the `spec` section of the [sandbox workload type](https://github.com/dsx-ai-factory/workload-map/blob/main/docs/catalog/agents-x-k8s-io-sandbox-v1beta1.yaml) file, converted to JSON:
```json
{
"categoryId": "",
"priorityId": "",
"preemptibility": "non-preemptible",
"name": "Sandbox",
"group": "agents.x-k8s.io",
"kartas": [
{
"spec": {
"structureDefinition": {
"rootComponent": {
"name": "sandbox",
"kind": {
"group": "agents.x-k8s.io",
"version": "v1beta1",
"kind": "Sandbox"
},
"statusDefinition": {
"conditionsDefinition": {
"path": ".status.conditions",
"typeFieldName": "type",
"statusFieldName": "status",
"messageFieldName": "message",
"reasonFieldName": "reason"
},
"statusMappings": {
"initializing": [
{
"byConditions": [
{
"type": "Ready",
"status": "False"
},
{
"type": "Suspended",
"status": "False"
}
],
"byExpression": {
"expression": "(.spec.operatingMode // \"Running\") != \"Suspended\"",
"expectedResult": "true"
}
}
],
"running": [
{
"byConditions": [
{
"type": "Ready",
"status": "True"
}
],
"byExpression": {
"expression": "(.spec.operatingMode // \"Running\") != \"Suspended\" and ([(.status.conditions // [])[] | select(.type == \"Suspended\" and .status == \"True\")] | length) == 0",
"expectedResult": "true"
}
}
],
"suspended": [
{
"byConditions": [
{
"type": "Suspended",
"status": "True"
}
],
"byExpression": {
"expression": ".spec.operatingMode == \"Suspended\"",
"expectedResult": "true"
}
}
],
"suspending": [
{
"byExpression": {
"expression": ".spec.operatingMode == \"Suspended\" and ([(.status.conditions // [])[] | select(.type == \"Suspended\" and .status == \"True\")] | length) == 0",
"expectedResult": "true"
}
}
],
"resuming": [
{
"byConditions": [
{
"type": "Suspended",
"status": "True"
}
],
"byExpression": {
"expression": "(.spec.operatingMode // \"Running\") != \"Suspended\"",
"expectedResult": "true"
}
}
]
}
},
"suspendDefinition": {
"suspendActions": [
{
"path": ".spec.operatingMode",
"value": "\"Suspended\""
}
],
"resumeActions": [
{
"path": ".spec.operatingMode",
"value": "\"Running\""
}
]
}
},
"childComponents": [
{
"name": "agent",
"kind": {
"group": "",
"version": "v1",
"kind": "Pod"
},
"ownerRef": "sandbox",
"specDefinition": {
"podTemplateSpecPath": ".spec.podTemplate"
},
"podSelector": {
"componentTypeSelector": {
"keyPath": ".metadata.labels[\"agents.x-k8s.io/sandbox-name-hash\"]"
}
}
},
{
"name": "companion",
"kind": {
"group": "",
"version": "v1",
"kind": "Pod"
},
"ownerRef": "sandbox",
"podSelector": {
"componentTypeSelector": {
"keyPath": "select(.metadata.labels[\"agents.x-k8s.io/sandbox-name-hash\"] == null) | [.metadata.ownerReferences[]? | select(.kind == \"Sandbox\" and (.apiVersion | startswith(\"agents.x-k8s.io/\"))) | .uid][0]"
}
}
}
]
},
"optimizationInstructions": {
"gangScheduling": {
"podGroups": [
{
"name": "sandbox",
"members": [
{
"componentName": "agent",
"groupByKeyPaths": [
"[.metadata.ownerReferences[]? | select(.kind == \"Sandbox\" and (.apiVersion | startswith(\"agents.x-k8s.io/\"))) | .uid][0]"
]
},
{
"componentName": "companion",
"groupByKeyPaths": [
"[.metadata.ownerReferences[]? | select(.kind == \"Sandbox\" and (.apiVersion | startswith(\"agents.x-k8s.io/\"))) | .uid][0]"
]
}
]
}
]
}
}
}
}
]
}
```
3. **Register the type.** Send the body with `POST /api/v1/workload-types`.
4. **Check the result.** `GET /api/v1/workload-types` lists the type as `Sandbox` with the group `agents.x-k8s.io`.
5. **Grant permissions for Sandbox resources (temporary workaround).** This step is a temporary workaround for [issue 3130](https://github.com/dsx-ai-factory/run-ai/issues/3130). Add the Sandbox resource to the two cluster roles that NVIDIA Run:ai created for registered workload types. Run these commands once per cluster. The existing project roles pick up the new rules, so no project-specific step is needed:
```bash
kubectl patch clusterrole runai-additional-workload-gvks-read --type=json \
-p='[{"op":"add","path":"/rules/-","value":{"apiGroups":["agents.x-k8s.io"],"resources":["sandboxes"],"verbs":["get","list","watch"]}}]'
kubectl patch clusterrole runai-additional-workload-gvks-crud --type=json \
-p='[{"op":"add","path":"/rules/-","value":{"apiGroups":["agents.x-k8s.io"],"resources":["sandboxes"],"verbs":["get","list","watch","create","update","delete","patch"]}}]'
```
NVIDIA Run:ai manages these cluster roles, so check them again after you register other workload types. You do not need this step in a release that includes the fix for the issue.
- **A language model for the agents to call.** In [Step 5](#step-5-giving-agents-model-access), the Platform Admin connects the agents to the model, and the agents use it in [Step 6](#step-6-running-an-agent-that-pushes-to-github). Deploy the model on NVIDIA Run:ai as an inference workload, as described in [Deploy Inference Workloads with vLLM](/run-ai/self-hosted/documentation/workloads-in-nvidia-run-ai/using-inference/hugging-face-inference) or [Deploy Inference Workloads with NVIDIA NIM](/run-ai/self-hosted/documentation/workloads-in-nvidia-run-ai/using-inference/nim-inference). When you set who can access the inference serving endpoint, select **Specific user(s) and service account(s)** and enter the service account that you created above, so that only this service account can call the model. For how to get a token, refer to [Accessing the inference workload](/run-ai/self-hosted/documentation/workloads-in-nvidia-run-ai/using-inference/hugging-face-inference#accessing-the-inference-workload).
Claude Code needs three things from the model server:
- **The Anthropic API format.** Claude Code sends requests in Anthropic's Messages API format (`/v1/messages`). The model server must support this format.
- **Tool calling.** The model must be able to ask Claude Code to run commands and edit files, for example to run the tests. The server must have this switched on.
- **Enough context.** The context window is how much text the model can hold at once. Claude Code sends large prompts, so the window needs to be about 32,000 tokens. The model must also be strong enough to use tools correctly.
For example, you can serve `Qwen/Qwen3-8B-AWQ`, a 4-bit model, on one NVIDIA A10 (24 GB), with these vLLM arguments:
```text
--model Qwen/Qwen3-8B-AWQ --max-model-len 32768 --gpu-memory-utilization 0.92 --enable-auto-tool-choice --tool-call-parser hermes --default-chat-template-kwargs '{"enable_thinking": false}'
```
- `--max-model-len 32768` - Sets the context window to about 32,000 tokens.
- `--enable-auto-tool-choice --tool-call-parser hermes` - Enables tool calling for a Qwen model.
- `--gpu-memory-utilization 0.92` - Lets vLLM use 92% of the GPU memory.
- `--default-chat-template-kwargs '{"enable_thinking": false}'` - Turns off the model's thinking mode.
### Values to Replace
Throughout this tutorial, replace:
| Placeholder | Meaning | Example |
|---|---|---|
| `` | NVIDIA Run:ai control-plane hostname | `runai.example.com` |
| `` | Hostname users connect to for the OpenShell gateway, under NVIDIA Run:ai's wildcard domain | `openshell.runai.example.com` |
| `` | The NVIDIA Run:ai project that runs agents | `team-a` |
| `runai-` | An NVIDIA Run:ai project's Kubernetes namespace, and its OpenShell workspace | `runai-team-a` |
| `` | Client ID of the NVIDIA Run:ai service account | - |
| `` | Client secret of the NVIDIA Run:ai service account | - |
| `` | Hostname of the endpoint of your model served on NVIDIA Run:ai, from the **Connections** column of the workload in the NVIDIA Run:ai UI | `model.runai-inference.example.com` |
| `` | Model the agent uses, as named by your endpoint | `my-model` |
| `` | Issuer URL of your identity provider, which must use HTTPS | `https://idp.example.com/realms/openshell` |
| `` | Audience that your IdP puts in the tokens. It must match the gateway setting | `openshell-cli` |
| `` | Claim in the IdP tokens that carries the user's roles or groups | `groups` |
| `` | Client ID of the OIDC client that you registered for the OpenShell CLI | `openshell-cli` |
## Step 1: Installing OpenShell
**Note**
**Role:** cluster administrator.
Install OpenShell on the cluster and expose the gateway to users:
1. **Install OpenShell.** Follow the OpenShell [Kubernetes setup](https://docs.nvidia.com/openshell/kubernetes/setup) guide. This tutorial uses OpenShell **0.1.5** and Agent Sandbox **1.0.7**. When you configure the gateway values, make sure to set the following:
* `workspaceMode: operator` - Runs each sandbox in an existing namespace. For NVIDIA Run:ai, the OpenShell workspace `runai-` runs in the namespace of the NVIDIA Run:ai project with that name.
* `workspaceResources.enabled: false` - Splits the gateway from the per-namespace resources, as described in [Split gateway and workspace releases](https://docs.nvidia.com/openshell/kubernetes/setup#split-gateway-and-workspace-releases). The `openshell-workspace` chart creates those resources instead, as described in the next step.
* `operatorNamespaceLabel: runai/queue` - Tells the gateway which namespaces it may use. In operator mode, OpenShell requires exactly one of `operatorNamespaceLabel` or `operatorNamespaceFile`. NVIDIA Run:ai labels the namespace of each project with `runai/queue=`, so this label selects the namespaces of your NVIDIA Run:ai projects.
* `issuer`, `audience`, `roles_claim`, `admin_role`, and `user_role` - Tell the gateway which IdP to trust and how to map its roles to OpenShell roles. Set `admin_role` to `openshell-admin` and `user_role` to `openshell-user`, the names used in this tutorial. For the settings and the claim for each IdP, refer to [Access Control](https://docs.nvidia.com/openshell/latest/kubernetes/access-control).
```yaml
workspaceResources:
enabled: false
server:
drivers:
kubernetes:
workspaceMode: operator
operatorNamespaceLabel: runai/queue
gatewayConfig:
openshell.gateway.oidc:
issuer:
audience:
roles_claim:
admin_role: openshell-admin
user_role: openshell-user
```
2. **Install the workspace chart in each NVIDIA Run:ai project namespace.** In operator mode, install the `openshell-workspace` chart in the namespace of every NVIDIA Run:ai project that runs agents. Any other NVIDIA Run:ai project that runs agents needs the same install when you onboard it. For example, to install the chart in the namespace of NVIDIA Run:ai project `team-a`:
```bash
helm upgrade --install openshell-workspace oci://ghcr.io/nvidia/openshell/openshell-workspace \
--version 0.1.5 --namespace runai-team-a
```
3. **Verify the gateway.** Check the gateway logs to confirm that it accepts tokens from your IdP and has found the NVIDIA Run:ai project namespaces:
```bash
kubectl -n openshell logs openshell-0 | grep -E "OIDC|operator namespace"
```
4. **Create the ingress.** Expose the gateway through your cluster's ingress controller, so that users connect to a hostname with a certificate from their own machines. This uses the ingress controller, the wildcard DNS record, and the wildcard certificate that your NVIDIA Run:ai installation already has, plus a hostname for the gateway, ``, which you choose under the same wildcard domain, for example `openshell.`.
NVIDIA Run:ai recommends the HAProxy Kubernetes Ingress Controller. Clusters that were upgraded from an earlier version can still run NGINX. In both cases, the gateway speaks gRPC, so the ingress must use HTTP/2 to reach the gateway pod, and long timeouts keep streaming commands (exec, upload, and download) open. Create the ingress for your controller:
```yaml
# openshell-gateway-ingress-haproxy.yaml
apiVersion: networking.k8s.io/v1
kind: Ingress
metadata:
name: openshell-gateway
namespace: openshell
annotations:
haproxy.org/server-ssl: "true" # encrypt the hop to the gateway pod
haproxy.org/server-proto: "h2" # gRPC needs HTTP/2 to the gateway pod
haproxy.org/timeout-server: "1h" # keep streaming commands open
haproxy.org/timeout-client: "1h"
haproxy.org/timeout-tunnel: "1h"
spec:
ingressClassName: haproxy
rules:
- host:
http:
paths:
- path: /
pathType: Prefix
backend:
service:
name: openshell
port:
number: 8080
```
```yaml
# openshell-gateway-ingress-nginx.yaml
apiVersion: networking.k8s.io/v1
kind: Ingress
metadata:
name: openshell-gateway
namespace: openshell
annotations:
nginx.ingress.kubernetes.io/backend-protocol: "GRPCS" # gRPC over TLS to the gateway pod
nginx.ingress.kubernetes.io/proxy-read-timeout: "3600" # keep streaming commands open
nginx.ingress.kubernetes.io/proxy-send-timeout: "3600"
nginx.ingress.kubernetes.io/proxy-body-size: "0" # file uploads and downloads
spec:
ingressClassName: nginx
rules:
- host:
http:
paths:
- path: /
pathType: Prefix
backend:
service:
name: openshell
port:
number: 8080
```
**Note**
OpenShell also documents exposing the gateway with the Gateway API. Refer to [Ingress](https://docs.nvidia.com/openshell/latest/kubernetes/ingress) in the OpenShell documentation.
5. **Apply the ingress.** Apply the file for your controller:
```bash
kubectl apply -f openshell-gateway-ingress-haproxy.yaml # or openshell-gateway-ingress-nginx.yaml
```
6. **Share the gateway address.** Give the Platform Admins and Workspace Users the gateway address, ``. They use it to sign in in [Step 2](#step-2-signing-in-to-openshell).
## Step 2: Signing In to OpenShell
**Note**
**Role:** the cluster administrator registers the OIDC client. Then every Platform Admin and Workspace User installs the CLI and signs in.
Platform Admins and Workspace Users sign in to OpenShell through your identity provider (IdP). Workspace Users are the people who run the agents. Follow these steps:
1. **Register an OIDC client in your IdP.** As the cluster administrator, register a client for the OpenShell CLI, once. For the settings, refer to [Gateway Authentication](https://docs.nvidia.com/openshell/latest/how-it-works/gateways/authentication). For how IdP roles map to OpenShell roles, refer to [Access Control](https://docs.nvidia.com/openshell/latest/kubernetes/access-control).
2. **Install the OpenShell CLI.** Each Platform Admin and Workspace User installs the CLI, as described in [Installation](https://docs.nvidia.com/openshell/latest/about/installation).
3. **Register the gateway and sign in.** Each Platform Admin and Workspace User runs `openshell gateway add` with the gateway address from [Step 1](#step-1-installing-openshell), `https://`, and the OIDC options. The command opens a browser, where you sign in through your IdP:
```bash
openshell gateway add https:// --name runai \
--oidc-issuer --oidc-client-id --oidc-audience
```
`` must match the audience configured on the gateway. For the values and the other options of the command, refer to [Gateway Authentication](https://docs.nvidia.com/openshell/latest/how-it-works/gateways/authentication).
4. **Check your identity.** Run `openshell whoami` to see the identity and roles that OpenShell sees for you.
## Step 3: Creating an OpenShell Workspace for the NVIDIA Run:ai Project
**Note**
**Role:** Platform Admin.
This tutorial creates one OpenShell workspace, for the [NVIDIA Run:ai project](/run-ai/self-hosted/documentation/platform-management/manage-ai-initiatives/organization/projects) `team-a`. To give another NVIDIA Run:ai project agents, repeat this step, and the chart install in [Step 1](#step-1-installing-openshell), for that NVIDIA Run:ai project.
As a **Platform Admin** (a user in the `openshell-admin` group), create the [OpenShell workspace](https://docs.nvidia.com/openshell/latest/how-it-works/workspaces) for the NVIDIA Run:ai project. In operator mode, the OpenShell workspace name must equal the NVIDIA Run:ai project namespace name.
Before you create the OpenShell workspace, make sure that the NVIDIA Run:ai project exists and that the cluster administrator has installed the `openshell-workspace` chart in its namespace ([Step 1](#step-1-installing-openshell)). Then create the OpenShell workspace:
```bash
openshell workspace create --name runai-team-a
openshell workspace list
```
```text
NAME STATUS CREATED
default Active 2026-10-05 12:55:36
runai-team-a Active 2026-10-07 10:17:23
```
**Note**
**Name limit.** OpenShell workspace names are at most 19 characters, so NVIDIA Run:ai project names used for agents can have at most 13 characters (`runai-` + name).
## Step 4: Adding Users to the OpenShell Workspace
**Note**
**Role:** Platform Admin. A Workspace Admin can also add users to their own OpenShell workspace.
An OpenShell workspace admits only its members. A **Platform Admin** adds each user to the OpenShell workspace of the NVIDIA Run:ai project they work in. For the roles and for managing members, refer to the OpenShell [Workspaces](https://docs.nvidia.com/openshell/latest/how-it-works/workspaces) documentation.
A member is identified by the `subject` of their token, the value the user sees in `openshell whoami` ([Step 2](#step-2-signing-in-to-openshell)). In this tutorial, `` stands for that value for the user:
```bash
openshell workspace member add --workspace runai-team-a --subject --role user
openshell workspace member list --workspace runai-team-a
```
The user now sees only their team's OpenShell workspace. Set it as the default so that commands use it by default:
```bash
export OPENSHELL_WORKSPACE=runai-team-a
```
## Step 5: Giving Agents Model Access
**Note**
**Role:** Platform Admin.
A model served on NVIDIA Run:ai accepts only requests with a valid NVIDIA Run:ai token. A token lasts about 30 minutes, so the gateway uses the client ID and client secret of an NVIDIA Run:ai [service account](/run-ai/self-hosted/documentation/platform-management/authentication/service-accounts) to fetch and renew it, and never gives them to the agent. For how providers work, refer to the OpenShell [Providers](https://docs.nvidia.com/openshell/latest/how-it-works/providers/overview) documentation.
The model and the service account are already set up, as described in [Prerequisites](#nvidia-runai-prerequisites). In this step, you create the provider profile and the provider in OpenShell.
1. **In OpenShell, create the provider profile** in the OpenShell workspace that uses the model. Take `` from the endpoint URL in the workload's **Connections** column in the NVIDIA Run:ai UI under [**Workload manager → Workloads**](/run-ai/self-hosted/documentation/workloads-in-nvidia-run-ai/workloads#connections-associated-with-the-workload).
```yaml
id: runai-model
display_name: Model served on Run:ai
description: A Run:ai inference endpoint protected by OIDC authentication
category: inference
inference_capable: true
credentials:
- name: access_token
description: Run:ai access token, fetched and refreshed by the gateway
env_vars: [RUNAI_MODEL_TOKEN]
required: true
auth_style: bearer
header_name: authorization
refresh:
strategy: oauth2_client_credentials
token_url: https:///auth/realms/runai/protocol/openid-connect/token
refresh_before_seconds: 300
discovery:
credentials: [access_token]
endpoints:
- host:
port: 443
protocol: rest
access: read-write
enforcement: enforce
binaries: # the supervisor matches the resolved binary, so list both paths
- /sandbox/tools/bin/claude
- /sandbox/tools/lib/node_modules/@anthropic-ai/**
```
The `binaries` list must contain the path of `claude` in your sandbox image. To find the path, run `command -v claude` in a sandbox. Keep the `node_modules` entry only if you install Claude Code with npm.
Set `refresh_before_seconds` larger than the longest outage of the token endpoint you want to survive.
2. **In OpenShell, create the provider and give it the service account.** Use the client ID and client secret of the NVIDIA Run:ai service account. Use one per team. The secret stays in the gateway.
```bash
openshell provider profile import --workspace runai-team-a --file runai-model.yaml
openshell provider create --workspace runai-team-a --name runai-model --type runai-model \
--credential RUNAI_MODEL_TOKEN=placeholder
export MODEL_CLIENT_ID= MODEL_CLIENT_SECRET=
openshell provider refresh configure --workspace runai-team-a runai-model \
--credential-key RUNAI_MODEL_TOKEN --strategy oauth2-client-credentials \
--secret-material-env client_id=MODEL_CLIENT_ID --secret-material-env client_secret=MODEL_CLIENT_SECRET
openshell provider refresh status --workspace runai-team-a runai-model
```
If the status shows `oauth_token_endpoint_unavailable`, check that the gateway can reach the token endpoint and trusts its certificate.
**Note**
To use another agent harness, add its binary paths to the `binaries` list of the provider profile, so that the supervisor adds the token for that harness's requests. For provider profiles, refer to the OpenShell [Profiles](https://docs.nvidia.com/openshell/latest/how-it-works/providers/profiles) documentation.
## Step 6: Running an Agent That Pushes to GitHub
**Note**
**Role:** Workspace User.
This step runs a Claude Code agent in an OpenShell sandbox that pushes code to a GitHub repository, using the model from [Step 5](#step-5-giving-agents-model-access). Follow the OpenShell [GitHub push access](https://docs.nvidia.com/openshell/latest/tutorials/github-push-access) tutorial, with these changes for NVIDIA Run:ai:
1. **Target the OpenShell workspace.** Run every command in the OpenShell workspace that is mapped to the NVIDIA Run:ai project, `runai-team-a`. Use the `OPENSHELL_WORKSPACE` setting from [Step 4](#step-4-adding-users-to-the-openshell-workspace), or add `--workspace runai-team-a` to each command. For how this works, refer to [Target a Workspace](https://docs.nvidia.com/openshell/latest/how-it-works/workspaces#target-a-workspace). The sandbox then runs in the NVIDIA Run:ai project namespace, under the project's quota.
2. **Use an image that has Claude Code.** The OpenShell tutorial requires an image with Claude Code, `git`, and the GitHub CLI installed, which the default sandbox image does not have. Build your own image, or use one that ships Claude Code, and pass it with `--from ` when you create the sandbox. If the sandbox stays in `Provisioning`, pass a valid policy with `--policy `. For details, refer to [A New Sandbox Stays in Provisioning](https://docs.nvidia.com/openshell/latest/how-it-works/policies/manage-policies#a-new-sandbox-stays-in-provisioning) in the OpenShell documentation.
3. **Use the model from Step 5.** Do not create the Anthropic provider from the OpenShell tutorial. Attach the `runai-model` provider to the sandbox instead, together with the GitHub provider:
```bash
--provider runai-model --provider my-github
```
4. **Point Claude Code at the model.** Start Claude Code with these environment variables. Claude Code reads the Anthropic-compatible endpoint from `ANTHROPIC_BASE_URL` and sends the provider's placeholder (`RUNAI_MODEL_TOKEN`) as a bearer token. The supervisor swaps in the real token:
```bash
ANTHROPIC_BASE_URL=https://
ANTHROPIC_AUTH_TOKEN="$RUNAI_MODEL_TOKEN"
ANTHROPIC_MODEL=
CLAUDE_CODE_MAX_OUTPUT_TOKENS=4096
CLAUDE_CODE_MAX_CONTEXT_TOKENS=32768
CLAUDE_CODE_DISABLE_NONESSENTIAL_TRAFFIC=1
```
`CLAUDE_CODE_MAX_OUTPUT_TOKENS` and `CLAUDE_CODE_MAX_CONTEXT_TOKENS` fit the request to the model. For a model it has not seen, Claude Code assumes a 32,000-token output and a 200,000-token context, which a model with a 32,768-token window rejects with a `400` error. Set the context value to your model's window.
5. **Check the sandbox in NVIDIA Run:ai.** The sandbox appears as a workload in NVIDIA Run:ai, as described in [Step 7](#step-7-monitoring-agents).
## Step 7: Monitoring Agents
**Note**
**Role:** Platform Admin, and NVIDIA Run:ai administrators in the NVIDIA Run:ai UI.
### Viewing Agents in OpenShell
A Platform Admin can list the agents in every OpenShell workspace. For how, refer to the OpenShell [Workspaces](https://docs.nvidia.com/openshell/latest/how-it-works/workspaces#target-a-workspace) documentation.
### Viewing Agents in NVIDIA Run:ai
In the NVIDIA Run:ai UI, [**Workload manager → Workloads**](/run-ai/self-hosted/documentation/workloads-in-nvidia-run-ai/workloads) lists the agents' pods as workloads in their NVIDIA Run:ai project. From there you can:
- **See consumption:** CPU, memory, and (when requested with `openshell sandbox create --gpu`) GPU allocation per agent, rolled up to the NVIDIA Run:ai project and department.
- **Manage capacity:** agents are scheduled under the NVIDIA Run:ai project's [quota](/run-ai/self-hosted/documentation/platform-management/runai-scheduler/scheduling/concepts-and-principles#quota), [fairness](/run-ai/self-hosted/documentation/platform-management/runai-scheduler/scheduling/concepts-and-principles#fairness-fair-resource-distribution) and [over-quota](/run-ai/self-hosted/documentation/platform-management/runai-scheduler/scheduling/concepts-and-principles#over-quota) rules.
### Watching Enforcement in OpenShell
OpenShell, not NVIDIA Run:ai, enforces the sandbox policy. To watch the sandbox's own enforcement, refer to the OpenShell [Manage Sandboxes](https://docs.nvidia.com/openshell/latest/how-it-works/sandboxes/overview) documentation.
## Scope and Limitations
### Access and Identity
* **Two permission systems.**
* OpenShell creates the Sandbox with the gateway's own Kubernetes identity, so NVIDIA Run:ai's project permissions are not checked at submission.
* Access is enforced by OpenShell workspace membership, which a Platform Admin manages ([Step 4](#step-4-adding-users-to-the-openshell-workspace)).
* NVIDIA Run:ai access rules and OpenShell workspace membership are two separate lists, so keep them consistent when a person changes teams.
* **NVIDIA Run:ai shows no submitter for agents.** NVIDIA Run:ai records the gateway, not the user, as the creator. Use the NVIDIA Run:ai project (and OpenShell workspace membership and audit) to attribute agents.
### Setup and Operations
* **OpenShell workspace setup for the NVIDIA Run:ai project.**
* Each NVIDIA Run:ai project that runs agents needs the `openshell-workspace` chart in its namespace ([Step 1](#step-1-installing-openshell)), an OpenShell workspace ([Step 3](#step-3-creating-an-openshell-workspace-for-the-nvidia-runai-project)), and a provider ([Step 5](#step-5-giving-agents-model-access)). Include these in your process for onboarding a new NVIDIA Run:ai project, or automate them.
* The `openshell-workspace` chart is marked experimental upstream.
* **The supervisor pod has no resource requests.** OpenShell creates the supervisor with no CPU or memory requests (Kubernetes `BestEffort`), so only the agent pod's requests count toward NVIDIA Run:ai project quota, and the supervisor is the first pod evicted under node memory pressure.
## Troubleshooting
| Symptom | Cause | Fix |
|---|---|---|
| `not a member of workspace 'runai-'` | The user is not a member of that OpenShell workspace | A Platform Admin or a Workspace Admin of that OpenShell workspace adds the user ([Step 4](#step-4-adding-users-to-the-openshell-workspace)) |
| Provider refresh shows `oauth_token_endpoint_unavailable` | The gateway cannot connect to the model's token endpoint, typically a TLS certificate it does not trust | Check network access; make the gateway trust the endpoint's CA ([Step 5](#step-5-giving-agents-model-access)) |
| `workspace '...' is not in the operator namespace allowlist` | The OpenShell workspace name differs from the namespace name | Name the OpenShell workspace exactly `runai-` |
| The sandbox does not appear as a workload in NVIDIA Run:ai, or each pod appears on its own | The permissions for Sandbox resources are missing | Apply the temporary workaround in the last step of the sandbox workload type prerequisite ([Prerequisites](#nvidia-runai-prerequisites)) |
| `API Error: 403` from the model endpoint | The endpoint allows only the service account that you set in the access settings of the inference serving endpoint, and the provider uses a different one | Use the client ID and client secret of the allowed service account in the provider ([Step 5](#step-5-giving-agents-model-access)) |
| Sandbox stuck before starting; the gateway logs a Secret or Role error in the NVIDIA Run:ai project namespace | The `openshell-workspace` chart is missing in that namespace | Install it ([Step 1](#step-1-installing-openshell)) |
| `claude: not found`, or the agent cannot reach the model, in a pod terminal | The terminal was opened with `kubectl exec` or the NVIDIA Run:ai UI, which bypasses OpenShell | Use `openshell sandbox exec -n --tty -- bash` |
| Agent pod shows no logs in NVIDIA Run:ai | The agent ran through `openshell sandbox exec`, so its output went to the caller's terminal | Check the agent's output in your terminal, and `openshell logs ` for its network activity |
| `API Error: Connection refused`, and the supervisor log shows `DENIED ... claude.exe ... transparent_tcp_policy_denied` | The provider profile's `binaries` does not list the path of `claude` in your sandbox image | Export the profile with `openshell provider profile export --workspace runai-team-a runai-model > runai-model.yaml`, add the path of `claude` to `binaries` ([Step 5](#step-5-giving-agents-model-access)), and update the profile with `openshell provider profile update --workspace runai-team-a --file runai-model.yaml runai-model` |
| `API Error: 400 ... maximum context length is N tokens ... you requested 32000 output tokens` | Claude Code does not know the model's limits | Set `CLAUDE_CODE_MAX_OUTPUT_TOKENS` and `CLAUDE_CODE_MAX_CONTEXT_TOKENS` ([Step 6](#step-6-running-an-agent-that-pushes-to-github)) |
| `Autocompact is thrashing: the context refilled to the limit` and the agent never finishes | The model's context window is too small for Claude Code's prompt plus the conversation | Serve the model with a window of about 32,000 tokens ([Step 5](#step-5-giving-agents-model-access)) and set `CLAUDE_CODE_MAX_CONTEXT_TOKENS` to it ([Step 6](#step-6-running-an-agent-that-pushes-to-github)) |
| `API Error: 400 "auto" tool choice requires --enable-auto-tool-choice and --tool-call-parser` | The vLLM server was started without tool calling | Add `--enable-auto-tool-choice` and a `--tool-call-parser` for your model (for example `hermes` for Qwen), and redeploy the model ([Step 5](#step-5-giving-agents-model-access)) |
| `workspace member add` succeeds, but the user sees no OpenShell workspaces | The member was added by email, but the token's subject is an opaque ID | Add the `Subject` shown by `openshell whoami` ([Step 2](#step-2-signing-in-to-openshell)) |