> For clean Markdown of any page, append .md to the page URL.
> For a complete documentation index, see https://docs.nvidia.com/switch-infrastructure/config-manager/llms.txt.
> For full documentation content, see https://docs.nvidia.com/switch-infrastructure/config-manager/llms-full.txt.
> For AI client integration (Claude Code, Cursor, etc.), connect to the MCP server at https://docs.nvidia.com/switch-infrastructure/config-manager/_mcp/server.
# DSX Air Simulation User Guide
The Config Manager DSX Air simulation guide brings up a live NVIDIA DSX Air simulation, installs Config Manager inside the simulation, loads a demo Nautobot topology, and provisions virtual Cumulus Linux switches through DHCP and ZTP. Use it when you want to validate real device-facing workflows without touching a physical lab.
This is different from the [Local Development Quick Start](/switch-infrastructure/config-manager/getting-started/local-development-quick-start). The local quick start is render-only. The DSX Air simulation runs Cumulus Linux switch nodes and exercises Config Manager against those nodes over the simulated management network.
Most Config Manager workflows that operate on the demo Ethernet Cumulus switches can be exercised in DSX Air. InfiniBand and NVLink workflows are not included because DSX Air does not currently simulate those fabrics for this demo. Switch OS Upgrade is also excluded because the ONIE install path does not work in DSX Air.
## Prerequisites
Before running the Config Manager DSX Air simulation, review the public NVIDIA DSX Air documentation:
* [NVIDIA DSX Air Account Setup](https://docs.nvidia.com/networking-ethernet-software/nvidia-air-v2/Account-Setup/) - NGC account, organization selection, free trial, and DSX Air roles.
* [NVIDIA DSX Air Quick Start](https://docs.nvidia.com/networking-ethernet-software/guides/nvidia-air/Quick-Start/) - simulation navigation, services, node consoles, SSH keys, and API authentication.
You also need:
* A local clone of the [Config Manager repository](https://github.com/NVIDIA/nv-config-manager)
* Python 3.11+ and `uv`.
* `sshpass` installed on the workstation where you run the TUI. The TUI-generated DSX Air SSH and SOCKS proxy commands use it.
* An NGC API key for DSX Air API authentication. You can paste it into the TUI or set `NGC_API_KEY` in your shell.
* Enough DSX Air capacity for the selected demo. The DSX Air free trial preset is resource-capped for public trial accounts.
* A workstation browser that can run through a SOCKS proxy. Chromium-family browsers are easiest because the TUI prints ready-to-run commands.
## Start the TUI
From your Config Manager fork checkout:
```bash
cd installer
uv sync
uv run nvcm-installer air-sim init
```
The TUI writes `~/.nvcm-air-sim.yaml` by default so API keys and generated DSX Air SSH credentials are not saved inside the Git checkout. Treat the file as sensitive if it contains your NGC API key. To use a different location outside the repository, pass `--config /path/to/config.yaml` or set `NVCM_AIR_CONFIG`.
You can also run a saved simulation config headlessly:
```bash
cd installer
uv run nvcm-installer air-sim deploy --config ~/.nvcm-air-sim.yaml
```
## TUI Walkthrough
The DSX Air simulation TUI has three sections: Topology, Options, and Launch.
### Topology
Use the **Pre-built Config** selector for the built-in demos. For most users, start with **DSX Air free trial demo**. It creates one OOB management leaf and five `TAN-HLEAF` Cumulus switches, which is enough to exercise ZTP, backup, deploy, multi-deploy, reprovision, and validation workflows.
The preset enables **Mock Topology**, points the loader at `development/mock_topology`, and configures the template plugin paired with the demo topology. Keep the paired template plugin in place; the prebuilt demos require those templates to render valid device configuration.

Important fields:
| Field | Description |
| :----------------------------- | :--------------------------------------------------------------------------------------------------------------------------- |
| **Pre-built Config** | Loads the DSX Air trial or SuperPOD demo values into the TUI. |
| **Mock Topology** | Builds DSX Air topology and Nautobot data from `development/mock_topology` instead of a hand-authored DSX Air topology YAML. |
| **Blueprint** | Mock topology blueprint, such as `air_trial`. |
| **Deployment Name** | Suffix used by the mock topology job. For the DSX Air trial preset, this is `demo`. |
| **Template Plugins** | Template plugin directories or archives paired with the selected topology. |
| **Simulation Name** | Name shown in DSX Air. Leave blank to auto-generate. |
| **OOB Management Server Name** | Existing DSX Air server node that receives Config Manager, usually `oob-mgmt-server`. |
### DSX Air trial topology
```mermaid
flowchart TB
DSXAIR["DSX Air SSH service"]
OOBSRV["oob-mgmt-server
eth0: DSX Air exit
eth1: 10.120.0.0/31"]
subgraph OOB["OOB management"]
OOBML01["oob-mleaf-01
OOB-MLEAF"]
end
subgraph TAN["TAN leaf multi-deploy target"]
TANL01["tan-leaf-01
TAN-HLEAF"]
TANL02["tan-leaf-02
TAN-HLEAF"]
TANL03["tan-leaf-03
TAN-HLEAF"]
TANL04["tan-leaf-04
TAN-HLEAF"]
TANL05["tan-leaf-05
TAN-HLEAF"]
end
DSXAIR -. "SSH to eth0" .-> OOBSRV
OOBSRV -- "eth1 <-> swp1
10.120.0.0/31" --> OOBML01
OOBML01 -- "swp2 <-> eth0
VLAN 100" --> TANL01
OOBML01 -- "swp3 <-> eth0
VLAN 100" --> TANL02
OOBML01 -- "swp4 <-> eth0
VLAN 100" --> TANL03
OOBML01 -- "swp5 <-> eth0
VLAN 100" --> TANL04
OOBML01 -- "swp6 <-> eth0
VLAN 100" --> TANL05
classDef oob fill:#eaf4ff,stroke:#2b6cb0,color:#111;
classDef tan fill:#edf7ed,stroke:#2f855a,color:#111;
classDef host fill:#f7f7f7,stroke:#666,color:#111;
class OOBSRV,OOBML01 oob;
class TANL01,TANL02,TANL03,TANL04,TANL05 tan;
class DSXAIR host;
```
### SuperPOD demo topology
```mermaid
flowchart TB
DSXAIR["DSX Air SSH service"]
OOBSRV["oob-mgmt-server
eth0: DSX Air exit
eth1: 10.100.0.0/31"]
subgraph OOB["OOB management fabric"]
OOBML["OOB management leaves"]
OOBSP["OOB spines"]
OOBHL["OOB host leaves"]
end
subgraph TAN["TAN north/south fabric"]
TANSP["TAN spines"]
TANBL["Border leaves"]
TANHL["Host leaves"]
TANSL["Storage leaves"]
end
subgraph CIN["CIN Spectrum-X fabric"]
CINSP["CIN spines"]
CINL["CIN leaves"]
end
subgraph HOSTS["Demo servers and rack mocks"]
TRAYS["Compute tray mocks"]
CONTROL["Control nodes"]
STORAGE["Storage node"]
end
DSXAIR -. "SSH to eth0" .-> OOBSRV
OOBSRV -- "eth1 <-> swp1
10.100.0.0/31" --> OOBML
OOBML --- OOBSP
OOBHL --- OOBSP
OOBML --> TAN
OOBML --> CIN
OOBHL --> TRAYS
OOBHL --> CONTROL
TANSP --- TANBL
TANSP --- TANHL
TANSP --- TANSL
CINSP --- CINL
TANBL --> CONTROL
TANHL --> TRAYS
TANSL --> STORAGE
CINL --> TRAYS
classDef oob fill:#eaf4ff,stroke:#2b6cb0,color:#111;
classDef tan fill:#edf7ed,stroke:#2f855a,color:#111;
classDef cin fill:#fff3e8,stroke:#c05621,color:#111;
classDef host fill:#f7f7f7,stroke:#666,color:#111;
class OOBSRV,OOBML,OOBSP,OOBHL oob;
class TANSP,TANBL,TANHL,TANSL tan;
class CINSP,CINL cin;
class DSXAIR,TRAYS,CONTROL,STORAGE host;
```
### Options
Use **Options** to set DSX Air authentication, source settings, and advanced timing values.

Recommended public DSX Air values:
| Field | Recommended value |
| :---------------------------- | :--------------------------------------------------------------------------------------------------- |
| **NGC API Key** | Your DSX Air-capable NGC API key, or leave blank if `NGC_API_KEY` is set. |
| **Use Public DSX Air** | On. |
| **OOB SSH Password** | Generated by the TUI for `nvcm` SSH access to `oob-mgmt-server`. Change it before launch if desired. |
| **Git Token** | Blank for the public `NVIDIA/nv-config-manager` repository. |
| **nv-config-manager Git Ref** | `main`, unless you are testing a branch that contains unreleased DSX Air sim code. |
| **Deployment Size** | Under **Advanced**. Use `small` for the public DSX Air trial demo. |
### Launch
The **Launch** screen creates the simulation, starts it, waits for SSH, deploys Config Manager, runs post-deploy Nautobot jobs, monitors pods, and follows DHCP/ZTP logs.

Click **Launch Simulation** and leave the TUI open. The launch can take a while because it boots the DSX Air nodes, builds and loads local images, installs Config Manager, and lets the switches provision.
During launch, the Activity stream can receive a high volume of log output. Mouse clicks may feel delayed while the TUI is processing those logs. If a click does not respond immediately, wait a moment and try again. This is a known limitation and will be addressed in future enhancements.
During launch:
* **Steps** shows high-level orchestration progress.
* **Progress** highlights the Nautobot pod first, then the remaining Kubernetes pods, and labels the ZTP count as **Switches Provisioned**.
* **Activity** has separate **Deploy**, **DHCP**, **ZTP**, and **Access** tabs. Deploy output appears first. DHCP and ZTP events populate while the switches request leases, pull ZTP data, and report provisioned state.
* **DSX Air**, **SSH**, and **Access** panels appear as soon as the TUI has enough information to show them. The deploy log path remains visible after completion or failure.

Use the **DHCP** tab to follow lease activity as the switches boot and request management addresses.

Use the **ZTP** tab to follow switch callbacks into the ZTP service and confirm each device reports progress.

When bringup completes, the **Access** panel shows commands for reaching the simulation.

## Access the Simulation
Config Manager runs inside the `oob-mgmt-server` node in DSX Air. The TUI creates a DSX Air SSH service to that server and prints copyable commands. The Access panel also shows the generated `nvcm` SSH password under **OOB SSH credentials**.
For Linux and macOS:
1. Copy the **Linux / macOS - SOCKS tunnel** command from the Access panel and run it in a terminal.
2. If `8080` is already in use on your workstation, change **SOCKS Port** in the Access panel before copying commands or launching a browser.
3. Copy the **Linux / macOS - browser** command, or manually launch a browser with `socks5://localhost:`.
4. Open the Config Manager and Nautobot URLs through that browser session.
Common service URLs inside the SOCKS-proxied browser are:
| Service | URL |
| :---------------- | :------------------------------ |
| Config Manager UI | `https://nvcm.air` |
| Nautobot | `https://nautobot.nvcm.air` |
| Workflow API | `https://workflow.nvcm.air` |
| Config Store API | `https://config-store.nvcm.air` |
| Render API | `https://render.nvcm.air` |
| DHCP API | `https://dhcp.nvcm.air` |
| ZTP API | `https://ztp.nvcm.air` |
The demo disables SSO. Nautobot credentials are `demo` / `demo`. Config Manager workflow RBAC is opened for the demo so the workflow forms can be exercised without identity-provider setup.
DNS resolution for `*.nvcm.air` must go through the SOCKS tunnel. If a browser resolves names locally before using the proxy, the URLs will fail even though the services are healthy.
You can also SSH directly to the DSX Air server with the SSH command shown at the top of the Launch screen. This is useful for `kubectl` checks, pod logs, and low-level troubleshooting.
## What to Check After Bringup
After launch completes:
1. Open Nautobot and confirm the demo site, devices, interfaces, IP addresses, cables, roles, platforms, and config contexts exist.
2. Open Config Manager and confirm workflow forms are available.
3. Open Config Store and confirm intended configs exist for `tan-leaf-01` through `tan-leaf-05`.
4. In Nautobot, confirm the TAN leaf devices have status **Provisioned** after ZTP completes.
5. In the TUI, use the **Activity** panel to inspect DHCP and ZTP service activity if a device is still provisioning.
## Workflow Support
The DSX Air demo is intended for Ethernet and Cumulus Linux workflows. Useful workflows to try include:
* Configuration Backup
* Configuration Deploy
* Batch Deploy
* Multi-Device Deploy
* Tenant Deploy, if you scope it to demo devices with tenant data
* Cable Validation
* Hardware Validation
* Device Reprovision
* Workflow lifecycle actions such as approve, reject, retry, and terminate
Do not use the DSX Air demo for:
| Workflow family | Why it is excluded |
| :---------------------- | :----------------------------------------------------------------------------- |
| InfiniBand workflows | DSX Air does not simulate the InfiniBand fabric for this demo. |
| NVLink switch workflows | DSX Air does not simulate NVLink switches for this demo. |
| Switch OS Upgrade | DSX Air cannot complete the ONIE install path used by the OS upgrade workflow. |
## Try Multi-Deploy
Multi-Deploy is a good first Day-2 workflow because the DSX Air trial demo has five `TAN-HLEAF` switches that should receive the same diff.
The standard demo context already includes `8.8.8.8` as a DNS server. The example below appends `8.8.4.4` to the site config context. The render service picks up the Nautobot change, produces new intended configs for the TAN leaf devices, and Multi-Deploy groups the identical diffs for approval.
### Edit the DNS config context
1. Open `https://nautobot.nvcm.air`.
2. Log in as `demo` / `demo`.
3. Navigate to **Extensibility > Config Contexts**.
4. Open `air-trial-network-management-services - demo`.
5. Edit the **Data** field.
6. Add `8.8.4.4` to the existing `dns.ipv4` list.
Example data with a demo DNS server:
```json
{
"ztp": {
"ipv4": [
"172.18.255.201"
]
},
"dhcp": {
"nvcm": {
"ipv4": [
"172.18.255.202"
]
}
},
"management_prefixes": {
"ipv4": [
"172.18.0.0/16"
]
},
"provisioning_servers": {
"ipv4": [
"10.120.0.0"
]
},
"dns": {
"ipv4": [
"8.8.8.8",
"8.8.4.4"
]
}
}
```
7. Save the config context.
8. Wait for render to regenerate intended configs. If no intended config changes appear after a short wait, make a no-op edit to the context or call `POST /v1/render/all` from the Render API at `https://render.nvcm.air/docs`.
### Run Multi-Deploy
1. Open `https://nvcm.air`.
2. Click the **+** button and select **MultiDeployWorkflow**.
3. Set **Role** to `TAN-HLEAF`.
4. Set **Max Batch Size** to `5` so all demo TAN leaf devices can be approved together when they share one diff.
The populated DSX Air trial form should look similar to this:
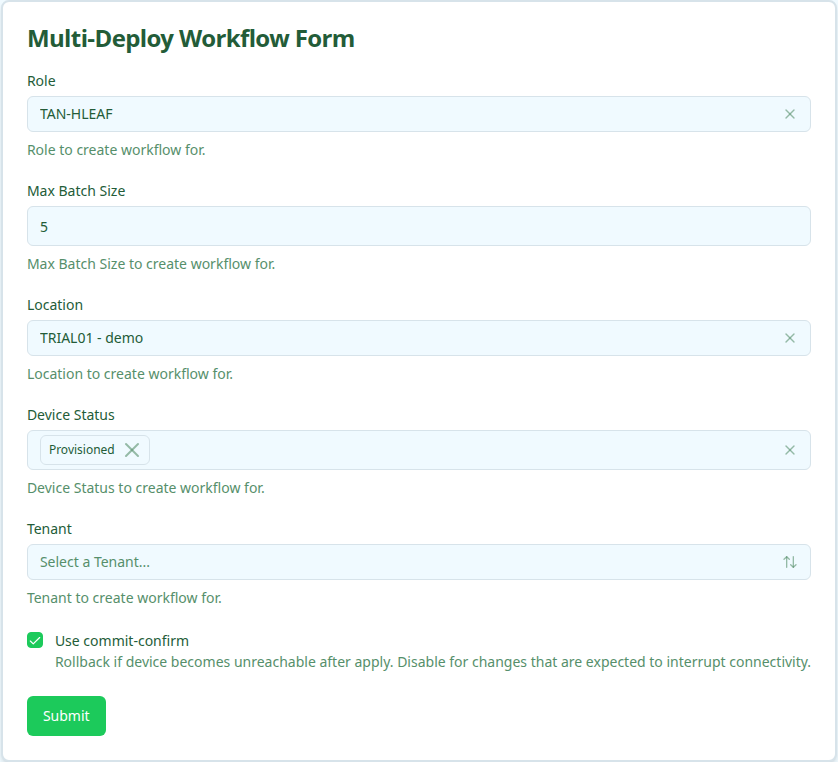
5. Submit the workflow.
6. When the parent reaches the batch execution stage, open the child Batch Deploy link.
7. Review the shared diff. It should show the DNS server addition on each `tan-leaf-*` device.
8. Approve the batch.
9. Confirm the parent workflow completes and the child batch reports successful applies and backups.
For the full workflow behavior, see [Multi-Device Deploy](/switch-infrastructure/config-manager/user-guides/configuration-deploy/multi-device-deploy) and [Batch Deploy](/switch-infrastructure/config-manager/user-guides/configuration-deploy/batch-deploy).
## Try Reprovision
Reprovision shows the re-ZTP path for an already-running switch. It factory-resets the target Cumulus switch, waits for DHCP/ZTP to run again, and then triggers a fresh backup.
Reprovision intentionally takes the selected switch offline and wipes its running configuration. In the DSX Air demo this is safe, but the same workflow is disruptive in a real environment.
1. Open `https://nvcm.air`.
2. Click the **+** button and select **ReprovisionWorkflow**.
3. Select the DSX Air trial site, such as `TRIAL01 - demo`.
4. Select a TAN leaf device, such as `tan-leaf-01`.
The populated DSX Air trial form should look similar to this:
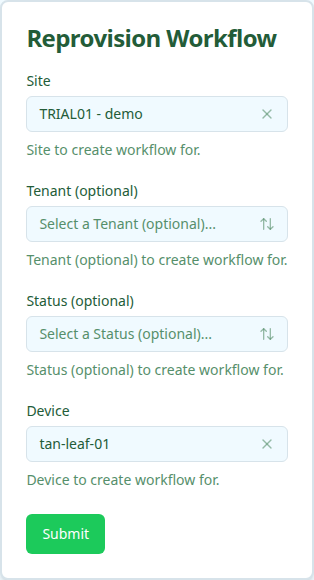
5. Submit the workflow.
6. In the DSX Air UI, open the simulation topology.
7. Double-click the same switch node to open its console.
8. On the switch console, tail the Cumulus autoprovision log:
```bash
sudo tail -f /var/log/autoprovision
```
This lets you watch the switch-side ZTP process while Config Manager waits for the device to report provisioned.
9. In the Config Manager UI, watch the Reprovision workflow stages. The workflow completes after ZTP succeeds and the backup child workflow finishes.
10. In Nautobot, confirm the device status returns to **Provisioned**.
You can also watch the TUI **Activity** panel or the ZTP service logs if the switch stalls. For the full production workflow details, see [Device Reprovision](/switch-infrastructure/config-manager/user-guides/lifecycle/device-reprovision).
## Other Useful Exercises
After Multi-Deploy and Reprovision, try these workflows:
* **Configuration Backup** against one TAN leaf. Confirm the backup appears in Config Store.
* **Configuration Deploy** against one TAN leaf after a small Nautobot config context change. Use this before Multi-Deploy if you want to inspect the single-device approval path.
* **Cable Validation** for the DSX Air trial site. This checks LLDP-reported neighbors against the mock topology's Nautobot cabling.
## Cleanup
DSX Air simulations consume account resources while running. When you are done, stop or delete the simulation in the DSX Air UI. If you expect to resume later, use DSX Air checkpoints according to your account limits. If you only needed a short demo, delete the simulation to free capacity.
The TUI-created Config Manager deployment lives inside the DSX Air simulation. Deleting the simulation removes the demo Kubernetes cluster, Nautobot data, Config Store data, and generated switch state.