Quickstart Guide#
This Quickstart Guide provides a comprehensive step-by-step walkthrough to help you quickly set up and start using the Public Safety Blueprint based on the VSS 3.0 framework.
Components Overview#
The Public Safety Blueprint features a layered architecture based on VSS that comprises:
Foundational Microservices - Based on vision language models (VLMs) and computer vision (CV) models
Real-time Video Processing Pipelines - For processing live camera feeds
AI Agents - For intelligent analysis and natural language interaction
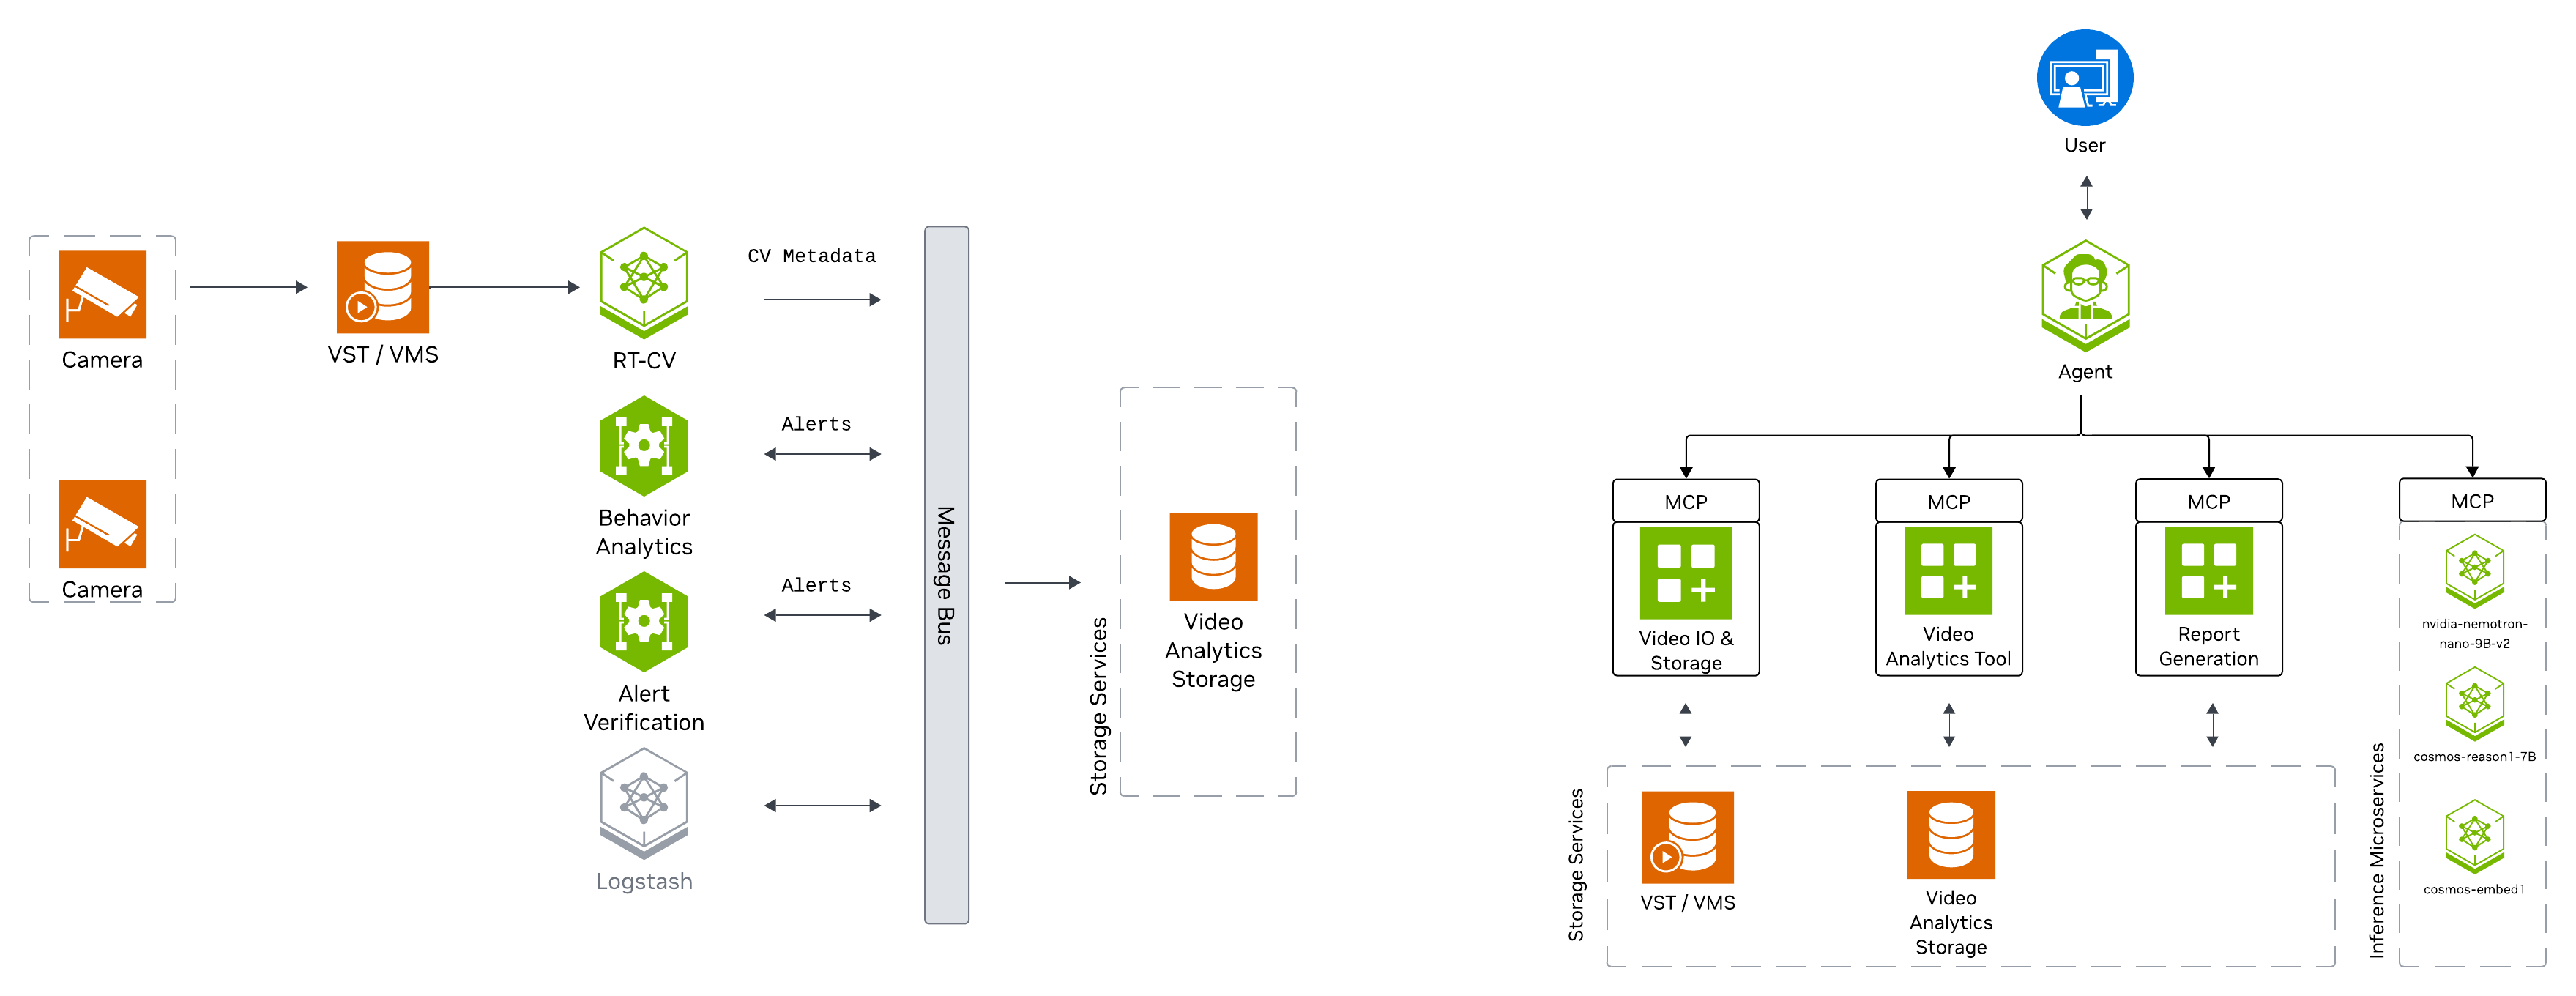
What’s Included#
The deployment includes:
CV perception pipeline for tailgating detection
Cosmos Reason2 8B for VLM-based verification of alerts
Nemotron Nano 9B v2 for Agent natural language interaction
API access
Kibana dashboard
Kafka event streams
Dashboard for visualization of alerts and incident metadata
Agent UI for natural language interaction with the system
Prerequisites#
Before you begin, ensure all of the prerequisites are met. See Prerequisites for more details.
Hardware Profiles#
Supported Hardware:
NVIDIA H100 (recommended for local NIMs)
NVIDIA L40S
NVIDIA RTX PRO 6000 Blackwell
GPU Type |
Number of Streams |
Number of GPUs |
Number of GPUs |
Number of GPUs |
|---|---|---|---|---|
Local VLM+LLM (dedicated GPU each) (default) |
Local VLM+LLM (shared GPU) |
Remote VLM+LLM |
||
H100 |
30 |
3 |
2 |
1 |
L40S |
30 |
3 |
2 |
1 |
RTX PRO 6000 Blackwell |
TODO |
3 |
2 |
1 |
Note
The default LLM and VLM have only been validated on H100 and RTX PRO 6000 Blackwell
Install Public Safety Blueprint#
The following section will guide you through the steps to install the Public Safety Blueprint.
Setup NGC Access#
# Setup NGC access
export NGC_CLI_API_KEY={your NGC_CLI_API_KEY}
export NGC_CLI_ORG='nvidia'
Create Data Directory#
# Create directory for mdx-data
export MDX_DATA_DIR={some path to a directory where data, videos etc will be placed}
mkdir -p ${MDX_DATA_DIR}
Download Sample Data#
# Download sample data
ngc \
    registry \
    resource \
    download-version \
    nvidia/vss-public-safety/public-safety-metropolis-app-data-tailgate:3.0.0

tar \
    -xvf \
    public-safety-metropolis-app-data-tailgate_v3.0.0/metropolis-apps-data.tar.gz \
    --strip-components=1 \
    -C ${MDX_DATA_DIR}

sudo chmod -R 777 ${MDX_DATA_DIR}

rm -rf public-safety-metropolis-app-data-tailgate_v3.0.0
Setup Compose Files#
# Setup compose
mkdir -p ~/vss-blueprints
cd ~/vss-blueprints

ngc \
    registry \
    resource \
    download-version \
    nvidia/vss-public-safety/vss-public-safety-compose:3.0.0

tar \
    -zxvf \
    vss-public-safety-compose_v3.0.0/deploy-public-safety-compose.tar.gz

rm -rf vss-public-safety-compose_v3.0.0
Configure Environment Variables#
# Update public-safety/.env file
cd deployments
export MDX_SAMPLE_APPS_DIR="$(realpath .)"
export HOST_IP="$(ip route get 1.1.1.1 | awk '/src/ {for (i=1;i<=NF;i++) if ($i=="src") print $(i+1)}')"

sed -i \
    -e "s|^MDX_SAMPLE_APPS_DIR=.*|MDX_SAMPLE_APPS_DIR=\"${MDX_SAMPLE_APPS_DIR}\"|" \
    -e "s|^MDX_DATA_DIR=.*|MDX_DATA_DIR=\"${MDX_DATA_DIR}\"|" \
    -e "s|^HOST_IP=.*|HOST_IP=\"${HOST_IP}\"|" \
    -e "s|^NGC_CLI_API_KEY=.*|NGC_CLI_API_KEY=\"${NGC_CLI_API_KEY}\"|" \
    public-safety/.env
Milestone Adaptor Configuration (Optional)#
The Public Safety Blueprint can be deployed with or without Milestone adaptor integration.
Default Configuration (Without Milestone Adaptor)
By default, the blueprint uses standard RTSP streams without Milestone integration. In the public-safety/.env file, ensure the following variables are commented out:
# VST Adaptor (commented out for default deployment)
#VST_ADAPTOR=milestone_onvif
#NGINX_MODE=mms
#ADAPTOR_IP=""
#ADAPTOR_USER=""
#ADAPTOR_PASSWORD=""
#AI_BRIDGE_ENDPOINT=""
With Milestone Adaptor
To enable Milestone integration for camera management and video streaming, update the public-safety/.env file to uncomment and configure the following variables:
# VST Adaptor (uncomment for Milestone integration)
VST_ADAPTOR=milestone_onvif
NGINX_MODE=mms
ADAPTOR_IP="<milestone-ip>"
ADAPTOR_USER="<username>"
ADAPTOR_PASSWORD="<password>"
AI_BRIDGE_ENDPOINT="http://<bridge-host>:4001/api/bridge/graphql"
Custom VLM Weights (Optional)#
The Public Safety Blueprint supports using custom Vision Language Model (VLM) weights for specialized use cases. This section is optional.
Note
Skip this section if you are using the default VLM without custom weights.
If you need to use custom VLM weights, first download them from NGC or Hugging Face. See the Appendix: Downloading Custom VLM Weights for detailed download instructions.
After downloading custom weights, update the .env file to use them:
# Set the path to custom weights
export VLM_CUSTOM_WEIGHTS="</path/to/custom/weights>"

# Update the .env file
sed -i \
    -e "s|^# VLM_CUSTOM_WEIGHTS.*|VLM_CUSTOM_WEIGHTS=\"${VLM_CUSTOM_WEIGHTS}\"|" \
    public-safety/.env
Deploy the Blueprint#
Select Deployment Profile#
The default deployment profile bp_ps includes all Public Safety Blueprint features (CV perception, VLM verification, and Agents).
The deployment supports different modes for LLM and VLM through LLM_MODE and VLM_MODE environment variables:
local- Deploy NIMs locally on dedicated GPUs (requires NGC_CLI_API_KEY)local_shared- Deploy LLM and VLM on a single shared GPU (requires NGC_CLI_API_KEY)remote- Use remote NIM endpoints (requires LLM_BASE_URL and VLM_BASE_URL)
To use remote NIM endpoints, modify the public-safety/.env file:
# Update to use remote NIM endpoints
# Set LLM_MODE=remote
# Set VLM_MODE=remote
# Set LLM_BASE_URL=http://<remote-host>:<llm-port>
# Set VLM_BASE_URL=http://<remote-host>:<vlm-port>
#
# Set LLM_NAME based on the provided remote LLM endpoint to any of
# - LLM_NAME=nvidia/nvidia-nemotron-nano-9b-v2
# - LLM_NAME=nvidia/nemotron-3-nano
# - LLM_NAME=nvidia/llama-3.3-nemotron-super-49b-v1.5
# - LLM_NAME=openai/gpt-oss-20b
#
# Set VLM_NAME based on the provided remote VLM endpoint to any of
# - VLM_NAME=nvidia/cosmos-reason2-8b
# - VLM_NAME=nvidia/cosmos-reason1-7b
# - VLM_NAME=Qwen/Qwen3-VL-8B-Instruct
Start the Blueprint#
# Docker login to the NGC docker registry
docker login \
    --username '$oauthtoken' \
    --password "${NGC_CLI_API_KEY}" \
    nvcr.io

# Start the blueprint
docker compose \
    --env-file public-safety/.env \
    up \
    --detach \
    --force-recreate \
    --build
Note
Initialization of some components might take a while, especially the first time as large containers will be pulled.
Verify Deployment#
Verify if containers are in running state:
docker ps
docker compose ls
Check to make sure streams were properly added to VST. To do so, navigate to the VST UI (see endpoint below) and check the Dashboard to confirm your streams are in a healthy state. If you do not see them there, check NVStreamer or your source to make sure they are active.
Check Perception FPS to make sure DeepStream is running properly. View the Perception logs by running the below command and looking for FPS lines in the logs. Ensure it is running at the desired FPS (10fps with the sample streams). If this is lower than expected, make sure your GPU is not oversaturated.
docker logs -f perception-2d
Check Kibana for tailgating alerts. Go to the endpoint listed below and navigate to the dashboard.
Check the VSS UI (see endpoint below) and test a few prompts after the system is up for a few minutes and a few alerts are present.
Endpoints#
Once deployed, the following endpoints are available:
Service |
Endpoint |
|---|---|
Public Safety Agent (VSS-UI) |
|
Kibana-UI |
|
VST-UI |
|
NvStreamer-UI |
|
Phoenix-UI (Telemetry) |
|
Grafana-UI |
|
Service |
Endpoint |
|---|---|
LLM-NIM |
|
VLM-NIM |
|
VST-MCP |
|
VA-MCP |
|
Teardown the Deployment#
To stop and remove the Public Safety Blueprint deployment:
# Stop the running deployment
docker compose -p mdx down

# Tear down all dangling volumes
docker volume ls -q -f "dangling=true" | xargs docker volume rm

# Cleanup all data (from deployments directory)
bash cleanup_all_datalog.sh -b public-safety
Known Issues and Limitations#
Only the default NIMs (LLM and VLM) have been tested to run on shared GPU. Use Dedicated GPUs or Remote NIMs for other models.
Next Steps#
Agents - Learn how to interact with the Public Safety Agent
Blueprint Deep Dive - Explore the architecture in detail
Appendix: Downloading Custom VLM Weights#
This appendix provides detailed instructions for downloading custom Vision Language Model (VLM) weights from NGC or Hugging Face.
Download Custom Weights from NGC#
If custom VLM weights are available on NGC, you can download them using the NGC CLI:
# Set your NGC API key if not already set
export NGC_CLI_API_KEY='your_ngc_api_key'

# Download custom weights from NGC
ngc registry model download-version <org>/<team>/<model>:<version>

# Move downloaded custom weights to desired path/folder
mv </downloaded/path/in/ngc/output> </path/to/custom/weights>
The weights will be downloaded to a local directory. Note the path to this directory, as you’ll need to specify it in the .env file.
Download Custom Weights from Hugging Face#
To download custom VLM weights from Hugging Face, you can use the huggingface-cli tool or Git LFS:
Using huggingface-cli:
# Install Hugging Face CLI if not already installed
pip install -U "huggingface_hub[cli]"

# Login to Hugging Face (required for gated models)
hf auth login

# Create a base directory where the custom weights can be downloaded
mkdir -p </path/to/custom/weights>

# Download a model
hf download <model-id> --local-dir </path/to/custom/weights>
Using Git LFS:
# Install Git LFS if not already installed
sudo apt install git-lfs
git lfs install

# Clone the model repository
git clone https://huggingface.co/<model-id> </path/to/custom/weights>
Note
Some Hugging Face models may be gated and require access approval. Visit the model page on Hugging Face and request access if needed. You must also authenticate using huggingface-cli login before downloading gated models.
Verify Downloaded Weights#
After downloading custom weights, verify the directory structure and contents:
# List the contents of the weights directory
ls -lrh </path/to/custom/weights>
Typical VLM weight directories contain:
Model configuration files (e.g.,
config.json)Model weights (e.g.,
pytorch_model.bin,model.safetensors, or sharded weights)Tokenizer files (e.g.,
tokenizer.json,tokenizer_config.json)Other metadata files